
Cold weather is not a reason to leave your porch or entryway empty. Even in freezing temperatures, outdoor planter boxes can brighten the space, set the mood, and completely transform an ordinary front entrance.
In this collection — 10 different winter arrangement ideas. Some can be assembled in an hour from whatever you have on hand, others require a bit more prep. But each one truly works, has been tested in practice, and suits cold climates.
We’ll talk about which containers work best in winter, what to use as the base, which plants and décor tolerate frost, and how to quickly refresh a porch with just one arrangement.
Decorating a winter outdoor space is easy when you know where to start.
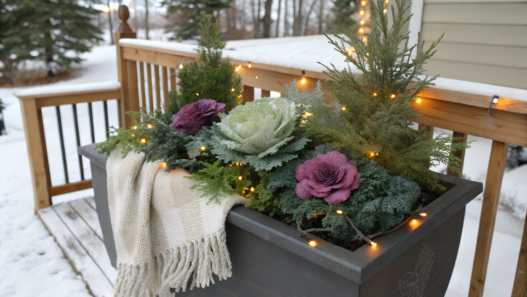
1. Sturdy Cedar Planter Box with Evergreens
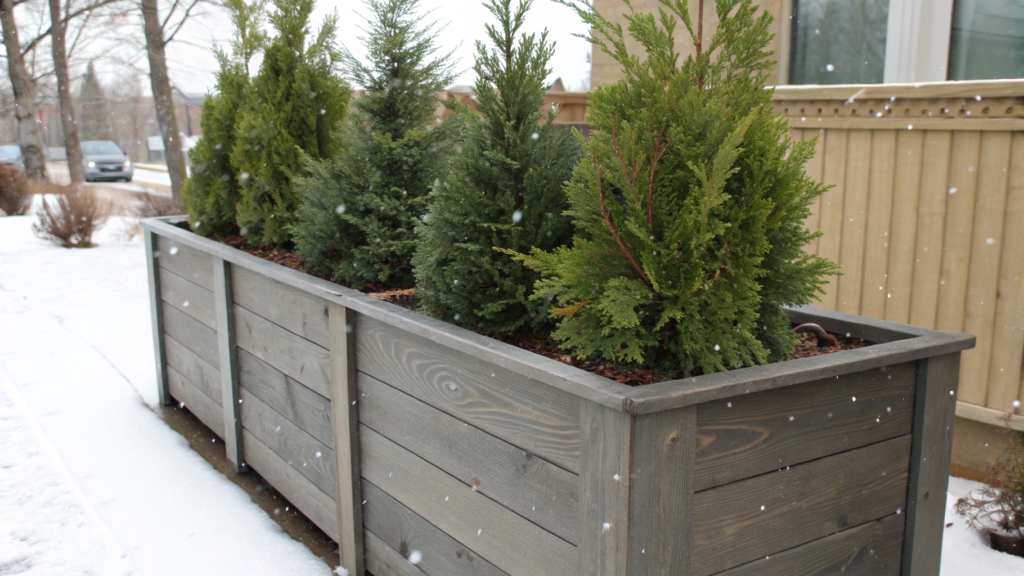
You can absolutely decorate with plants in winter — you just need to choose hardy ones. Evergreens in outdoor boxes are perfect. Especially if you plant them in a durable cedar box — long-lasting, sturdy, and fragrant.
What You Need for This Idea
- A cedar wooden planter box resistant to moisture and frost. Ideally 36 x 12 x 12 inches (91 х 30 х 30 cm). We use this one: CedarCraft Elevated Planter Box — totally worth it, it’s held its shape for the third winter.
- 1–2 compact evergreen plants in containers: Dwarf Alberta spruce, Thuja Smaragd, or juniper
- Fresh-cut branches of pine, fir, or cypress
- Natural elements: pinecones, moss, dried berries, eucalyptus
- Potting soil
- Drainage — stones, broken brick, or just a piece of styrofoam
How to Assemble
- Prepare the box. Add drainage on the bottom — styrofoam or gravel protects roots from overcooling. We usually use a layer about 2 inches (5 cm).
- Add soil. Don’t fill it to the top — leave space so the top layer isn’t blown away by the wind.
- Place the evergreen. One in the center for symmetry, or two on the sides for a slightly “off-balanced” composition.
- Fill the space with branches. Insert them at an angle to create a “green cushion.” Pine adds volume, fir adds fragrance, cypress brings a color accent.
- Decorate with pinecones and moss. Just lay them on top, gently pressing them into the soil. If the moss is dry, lightly mist it — it will “wake up.”
- Check stability. If the box will stand in a windy spot, add weight — a stone or a brick at the bottom. We once skipped that, and our box flew off the porch during a December storm.
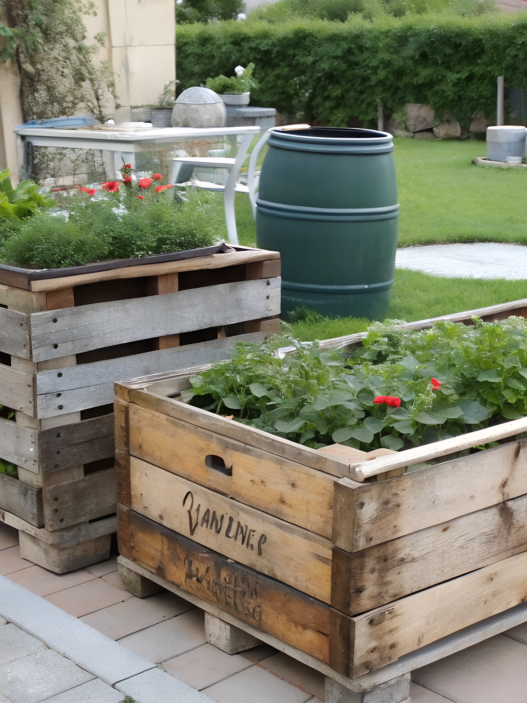
Last winter we used a planter left over from summer — a tomato box. It was cedar, slightly gray but sturdy. We planted one Smaragd thuja, wrapped pine branches around it, and added some berry juniper. On the front edge we placed moss (gathered from the forest earlier), and in the center we inserted several pinecones.
We placed it on the left side of the porch, next to a wooden bench. Right before New Year’s we added a tiny battery-powered garland — and it looked perfect.
Where and How to Place It
- On both sides of the front door — a classic choice.
- In a porch corner — especially if you want a greenery accent in one spot.
- On a stand or stool — to lift the arrangement to eye level. This visually “stretches” the entryway.
- It looks great against the house wall, especially if the wall is light and the evergreens are rich green.
You can add a lantern, a throw blanket, a wreath, or a sign next to it — and you’ll have a complete winter corner. And if you don’t want to fuss with decor, just leave it natural. Even undecorated, this box looks truly elegant.
2. Outdoor Winter Planter Box with Hydrangea Heads
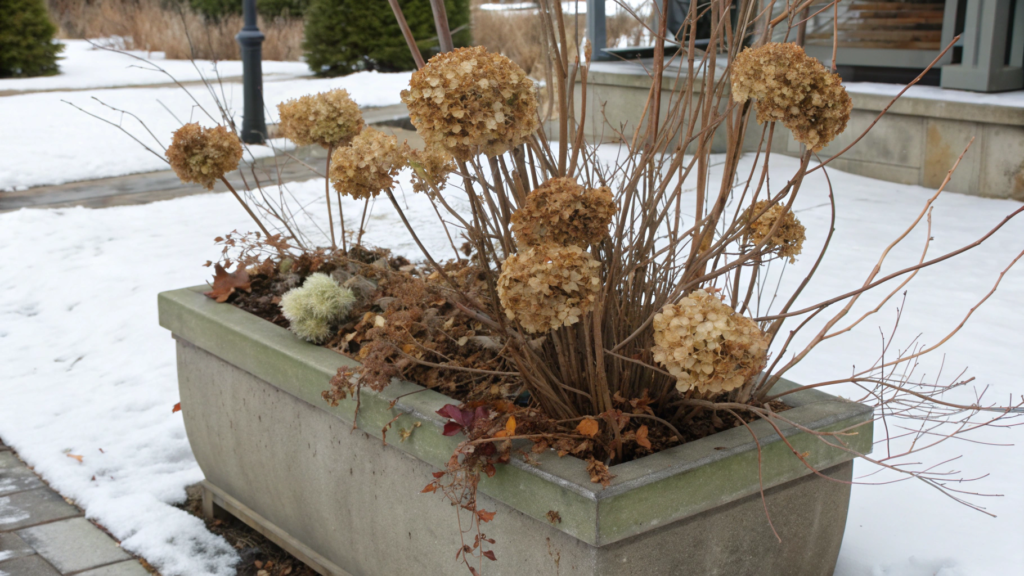
Not all winter arrangements have to be lush and green. Sometimes it’s better to choose something structural, dry, but expressive. Dried hydrangea heads are perfect for this. They handle frost well, keep their shape, and look neat even without any extra care. And the best part — they combine easily with other natural materials.
What You’ll Need
- A rectangular planter box (preferably wooden, about 30–36 inches long / 76–91 cm). Cedar works, and so does a box painted in gray-white tones — depends on the mood.
- Dried hydrangea heads — you can collect them in fall or buy ready-made bundles. Annabelle and Limelight varieties look best.
- Several thin branches — birch, hazel, dogwood.
- A bit of evergreen greenery: a couple of pine sprigs or cypress.
- Wire, floral foam, or sponge — to secure the stems.
- Décor of your choice: holly berries, rowan, battery-powered candles, a garland.
How to Assemble
- Prepare the base. Place firm floral foam or sponge into the box — it makes inserting stems easy.
- Start with the frame. Insert 2–3 vertical branches to create the “skeleton” of the arrangement. We often use thin hazel shoots — they curve beautifully.
- Fill the volume with hydrangea. Place the heads at different heights. Avoid creating a “wall” — let them breathe. Their pale beige color looks especially beautiful in soft winter light.
- Add greenery. A few pine or thuja branches at the base will visually stabilize the arrangement and add texture. But don’t overdo it — the focus is the hydrangea.
- Decorate. Total freedom here: we often use rowan berries, dried viburnum, or just deep red ribbons. Insert a battery-powered candle — and the evening magic is guaranteed.
What to Plant (If You Want a Long-Term Display)
If you want the box not just as a temporary decoration but as a living arrangement, you can plant in advance:
- Moss phlox or ivy as a ground cover
- Dwarf boxwood or heather for year-round greenery
- And hydrangea — in a pot, so you can remove it in spring and transplant it into the garden
A couple of years ago we gathered Annabelle heads in October and left them to dry in the shed. Later we took an old wooden box (it used to be an apple crate), painted it in gray-white, lightly sanded it — and got a “vintage patina” effect.
We placed foam inside, added the hydrangea stems, some dried fern, and a bit of eucalyptus along the sides. On one side we hung a tiny garland. The box sat near the railing, on the porch corner, and looked very charming.
Where and How to Place It
- If the porch is bright and spacious — place the box on a low bench, slightly to the side of the entrance.
- For a narrow entryway — the windowsill or the stair corner is perfect.
- It pairs beautifully with metal lanterns, light furniture and… simply silence. This arrangement isn’t about loud décor but about the warm quietness of winter.
3. Frost-Proof Resin Planters Filled with Seasonal Greens

If you live in a region with a fairly harsh winter, regular clay pots might simply not survive until spring. Frost-proof resin planters are a great solution for those who don’t want to replace containers every season.
They’re lightweight, don’t crack in freezing temperatures, look stylish (often stone-, concrete-, or wood-like), and work perfectly for winter arrangements with seasonal greenery.
What You’ll Need
- A frost-resistant resin planter, 12 to 20 inches in diameter (30–50 cm), with drainage holes
- Fresh-cut evergreen branches: spruce, fir, juniper, pine
- Several accent elements: red dogwood branches, pinecones, artificial berries, eucalyptus
- Sand or dense soil — to anchor the branches
- A battery-powered garland (optional)
How to Assemble
- Prepare the base. You need to add weight — winter is windy, and lightweight planters can get blown away. We fill them almost to the top with moist sand or soil mixed with sand. Old potting mix works too, if you have leftovers from fall. The key is that the mass holds its shape.
- Set the “height.” For the center, choose several large branches — fir or spruce. Insert them vertically into the sand, slightly angled upward — so they “look” upward but don’t stick out stiffly. This defines the shape of the whole arrangement.
- Fill the sides. Add pine or juniper branches — they’re softer and create volume. Place them along the edges and near the front of the planter to cover the surface. You can angle them slightly downward — it looks more natural.
- Add structure. Insert 2–3 dogwood or hazel branches. They’re thin but bright, pull the shape upward, and add a focal accent. Red bark branches look especially good against evergreens and snow.
- Details and décor. Spread pinecones on the top layer, weave in a bit of eucalyptus or rowan. If you plan to use a garland, wrap it around the central branches before you press everything down — it gets tricky afterward.
- Final step — firming. Gently press the soil around all the branches so they don’t wobble. We sometimes secure the center additionally with a long skewer or bamboo stick, especially when placing the planter in an open area.
Where to Place It
- These planters are perfect on both sides of the front door, especially if the porch is large.
- On stair steps — one on each side — to visually “stretch” the entry area.
- Near the base of columns or even along the walkway if you want to add greenery to the yard.
These arrangements pair beautifully with other textures: wooden boxes, metal lanterns, knitted throws on a bench — together they create a cohesive, clean winter look.
4. Classic Wooden Box with Red Dogwood Branches
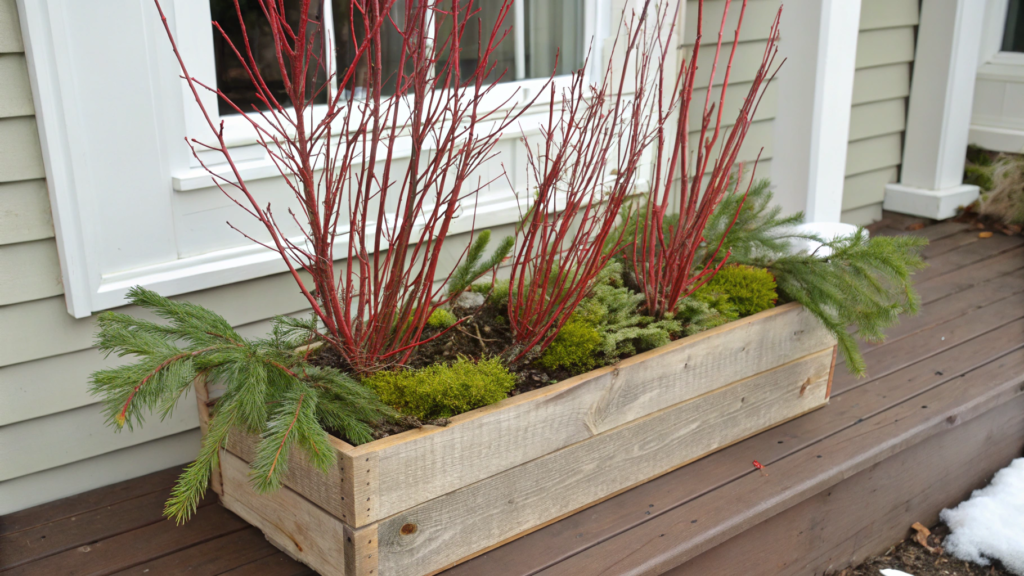
Winter arrangements with red accents can literally bring a porch to life. One of the most striking natural elements is red dogwood (Cornus sericea) — with its straight, deep-red branches. It’s not only frost-resistant but also very expressive and doesn’t overload the composition.
These branches look especially good in a low wooden box, for example a classic rectangular shape, with added evergreens, moss, and a few simple accents.
What You’ll Need
- A wooden box, 30–36 inches long (76–91 cm), about 10–12 inches wide (25–30 cm). If possible, choose one that’s slightly weathered, with natural texture.
- 5–7 red dogwood branches (Cornus alba or sericea) — you can buy them or cut them from a shrub if you have one on your property
- Evergreen branches: pine, fir, spruce
- Pinecones, moss, berries (artificial or natural)
- Sand, soil, or floral foam — to support the structure
- Optional: a battery-powered garland or ribbons
How to Assemble
- Fill the base. Place a layer of sand, soil, or floral foam at the bottom of the box. This adds weight and provides stable support for the branches.
- Place the dogwood. Start with vertical branches — insert them closer to the center at different heights. The key is avoiding strict symmetry. A slight “chaos” looks more lively. Let some branches lean gently to the sides.
- Add the evergreen foundation. Along the edges, place pine or fir sprigs. Angle them outward to create a visual “green cushion” around the red branches.
- Decorate. Insert pinecones between the greenery — we usually just press them into the soil. Add a bit of moss, dried rowan, or a couple of eucalyptus pieces. It’s all up to your taste — this composition works even with minimalism.
- Press and check stability. Firm the base with your hands or a wooden stick. Dogwood branches shouldn’t wobble in the wind — if needed, secure them with wire or add reinforcing elements (we sometimes place skewers crosswise).
One time we made such an arrangement with friends right before the holidays. It was December, lots of snow, everything just right. We used an old box that once stood in the chicken coop — cleaned it, sanded it, but didn’t paint it.
We inserted 6 dogwood branches in the center (cut behind our property), added fir and a bit of juniper on the sides. On top — pinecones, an old linen bow, and a garland with soft yellow light.
It turned out great, and the arrangement became the main accent of the whole entrance.
Where to Place It
- This box looks great near the entrance, on one side, especially if the other side is decorated more subtly (for example, just evergreens).
- You can use it along the house wall, next to a bench, or in a porch corner.
- If you have steps, the box fits well on the first or second one — it adds the height needed for visual balance.
And remember — dogwood compositions tolerate frost well, but in strong winds the box should be secured or placed in a sheltered spot.
5. Metal Bucket Planter With Eucalyptus and Pine

The simplest yet very striking way to decorate a porch in winter is a metal bucket filled with seasonal greenery. You can assemble this décor in about 20 minutes using minimal materials. At the same time, it looks clean, fresh, and natural.
The combination of pine branches and fresh eucalyptus works especially well. They have different textures, shapes, and even scents — and together they create a sense of lightness and comfort.
What You’ll Need
- A metal bucket or pail, 3 to 5 gallons (11–19 L). Handles, scuffs, or even rust add character. For example, something like this works great — Creative Co-Op Decorative Metal Bucket, 12″.
- Fresh pine branches — 6–8 pieces, medium length
- Eucalyptus — preferably Silver Dollar or Seeded, 5–7 stems
- Floral foam, sand, or old soil
- Pinecones, berries, dried grasses, or a ribbon — your choice
- Optional: garland, candle, wooden sign
How to Assemble
- Prepare the base. Fill the bucket with sand or soil almost to the top. If you want everything to hold firmly, insert floral foam and slightly moisten it.
- Start with the pine. Place pine branches at the base and along the edges. Try directing some of them forward and downward — this lets the arrangement “spill” over the bucket and prevents it from looking stiff.
- Add the eucalyptus. Insert it closer to the center and along the sides. These stems are softer, so you can curve them slightly or pull them upward — creating a light, breathable center. Their matte, silvery texture complements the pine beautifully.
- Details. Insert 2–3 pinecones between the branches (we often just press them against the stems). Add a bit of red berries or dried grass. If the arrangement will sit closer to the New Year, you can tie a ribbon onto the bucket’s handle.
- Final check. Make sure everything is securely fixed and nothing wobbles. If the bucket is light, place a flat stone or brick at the bottom — especially if it will stand outdoors.
We got this idea from friends in Oregon. They had an old metal pail they once used for collecting rainwater. They cleaned it, placed it by the entrance, and filled it with pine branches from their property and store-bought eucalyptus. The pail stood on a wooden stand near the porch, and even without lighting, it looked very beautiful. We loved it!
Where and How to Place It
- By the front door — especially if there’s already a wreath or a second planter on the other side.
- Near the stairs — the bucket looks great on the bottom step or slightly to the side.
- On a bench or wooden box — raise it to eye level if you want the accents to stand out.
- You can pair it with another metal element: an old lantern, a wrought sign, or a bucket of a different size.
An arrangement with eucalyptus and pine tolerates cold well and requires no maintenance. The only thing — if it stands in an open spot, check whether the wind is shifting it.
6. Outdoor Rectangle Planter Box with Mixed Winter Foliage
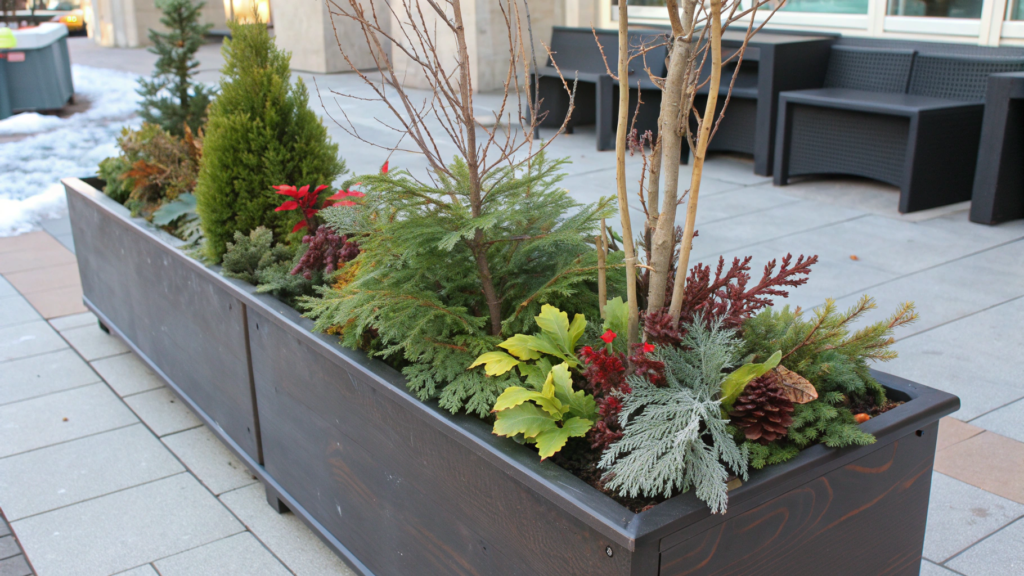
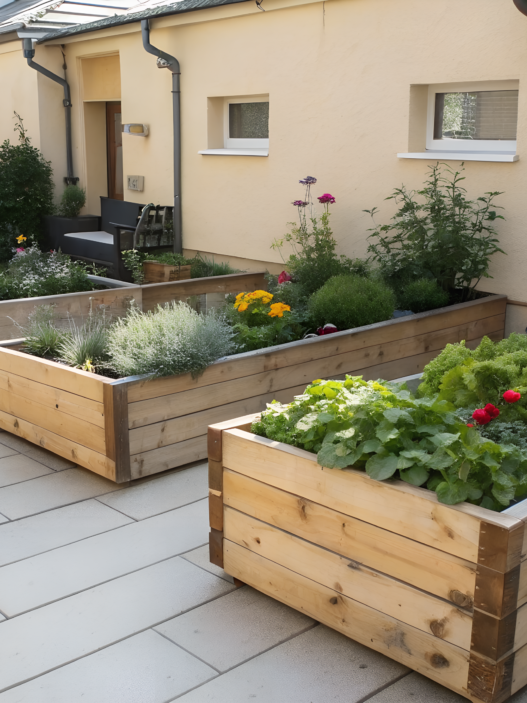
A mixed winter arrangement looks lively, natural, and — most importantly — it’s easy to adjust to any style: from minimalism to rustic country. Such a box can sit by the entrance or on an open patio — it will definitely brighten the space and give the eye something to catch on.
The base is a rectangular planter box, deep enough to hold branches securely and not freeze instantly during the first frosts. Inside — greenery of different shades, textures, and shapes.
What You’ll Need
- A rectangular planter box — 36 x 12 x 12 inches (91 х 30 х 30 cm) or slightly smaller, depending on the space. Wooden, plastic, or metal — anything works as long as it handles moisture.
- Evergreen branches: spruce, pine, fir
- Laurel cherry or magnolia foliage — adds density and color
- Juniper with berries
- Decorative cabbage (artificial works too)
- Pinecones, eucalyptus, dried flowers, berries, dogwood branches
- Sand or floral foam for support
How to Assemble
- Fill the box with sand or place floral foam. This keeps the branches stable through the winter. Sand also adds weight — helpful if the porch is exposed.
- Start with the evergreens. Arrange pine or fir branches along the edges — framing the box. Angle some branches slightly downward to create volume.
- Add leafy accents. Place a couple of large laurel cherry or magnolia branches in the center. They add color contrast and visually soften the sharp evergreen texture.
- Fill the center. Insert decorative cabbage or dried grasses — you can alternate them with juniper and eucalyptus. Juniper is great because it adds both berries and softness.
- Decorate. Place pinecones between the foliage, add red dogwood stems or artificial berries. If you want, hang a garland along the box or tie a fabric ribbon.
Where to Place It
- Ideally — on a wide porch railing or along the house wall.
- You can place it between two chairs or a bench as a cozy seating-area element.
- If the porch is large — set it near the door under a low garland or wreath to tie everything together visually.
These planter boxes are also great because you can easily “reassemble” them mid-season: remove some branches, add new ones, or switch accents from autumn to holiday themes.
7. Tall Winter Planter Box for Porch Corners
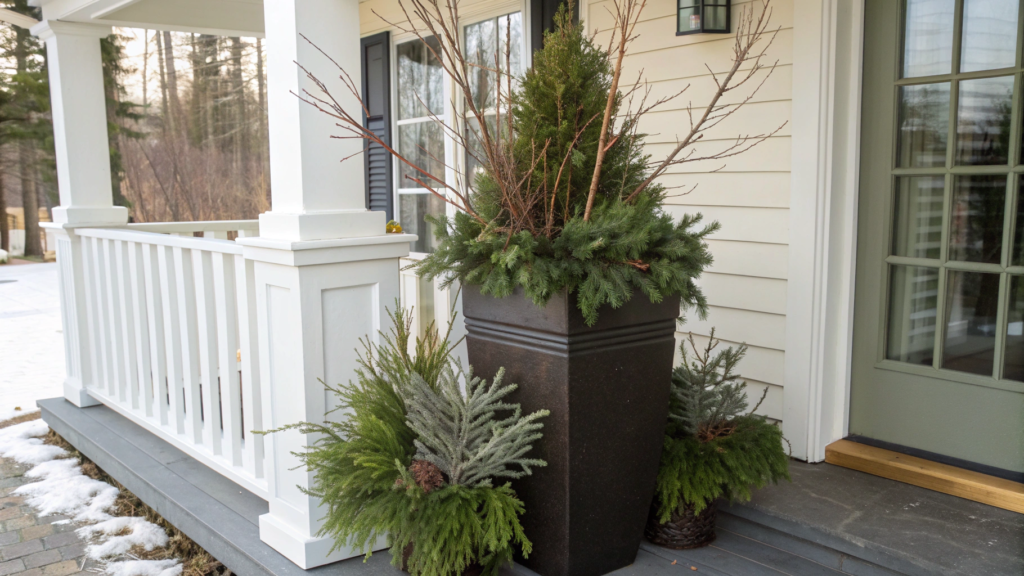
Sometimes one or two low arrangements aren’t enough. A tall winter planter box works great in a porch corner or next to a column. It adds verticality, visually fills empty space, and helps balance the proportions between windows, doors, and furniture.
The main thing is choosing the right proportions and plants that can hold height.
What You’ll Need
- A tall planter, at least 24–30 inches high (60–75 cm). Wooden, wrought iron, or plastic with a concrete look all work.
- One large vertical plant or branch — juniper, slender spruce, dogwood
- Evergreen branches for volume: pine, thuja, fir
- Juniper with berries, eucalyptus, boxwood
- Floral foam or soil mixed with sand
- Pinecones, dried flowers, decorative berries, ribbons (optional)
How to Assemble
- Stability. A tall planter must be stable, especially if placed in an open area. Put bricks or stones at the bottom, then add soil or sand on top so you can anchor the branches.
- Define the center. Place a tall “axis” branch in the middle. We often use dogwood or a slender juniper shrub — it’s not too dense but holds shape and vertical height perfectly.
- Create the shape. Arrange pine or fir branches around the central stem. Angle some forward and downward, others slightly upward diagonally. This keeps the composition from looking heavy.
- Add texture. Insert eucalyptus or boxwood at the base. You can alternate them with juniper branches with berries. This adds depth and a lively structure.
- Decorate. Place pinecones at the base, wrap the central branch with a garland, or hang light wooden ornaments. Keep it simple — this arrangement relies on shape and proportion.
This year we decided to set up such an arrangement in the far corner of our porch:
The right corner of our porch looked completely empty. We took a tall plastic planter, filled it with sand, and placed a vertical bundle of red dogwood. Around it — pine, a bit of fir, and boxwood branches.
No extra décor — just natural texture and height. After a couple of weeks, we added a garland, and everything instantly transformed.
Where to Place It
- In a porch corner — especially if there’s a column or tall façade
- Next to the door, on one side — if the other side already has a low arrangement
- On the edge of steps, if the stairs lead to the porch at an angle
- Looks great against a wooden wall or brickwork, adding contrast and a distinct accent
8. Window Box Arrangements with Winter Berries
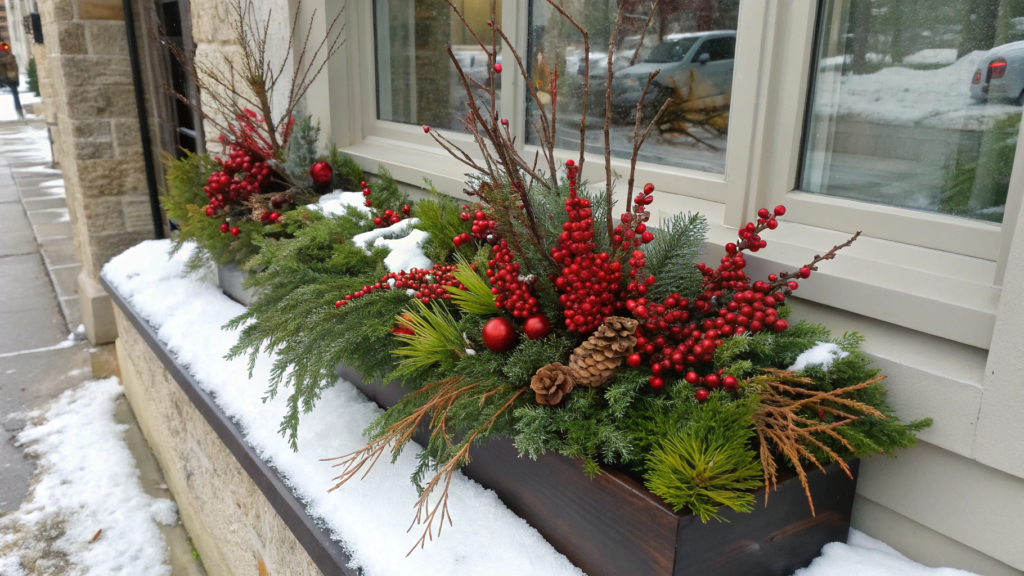
An eye-catching way to prepare a home for winter is decorating the window boxes. Especially if the windows face the street or overlook the entry area. Such boxes instantly work “for the facade”: they set the mood, add color, and visually stretch the house — especially when everything around is white and emp
Winter berries become the main element. They pair beautifully with evergreens, moss, and even dried flowers. And the arrangement doesn’t require any maintenance — especially if the berries are artificial.
What You’ll Need
- A window planter box — sized to the width of the window, preferably with drainage and secure mounting. Frost-resistant metal or plastic models with wooden accents work best.
- Evergreens: spruce, fir, pine — the base of the entire composition
- Berries: artificial rowan, holly, snowberry (natural berries work too, but hold up worse)
- Eucalyptus or juniper with berries
- Pinecones, dried grasses, moss, thin branches for structure
- Soil, sand, or floral foam
How to Assemble
- Fill the box to the top. Use dense soil, packed sand, or floral foam — the main thing is that the branches can be inserted securely. If the box is deep, you can place styrofoam at the bottom for insulation.
- Create the evergreen base. Arrange fir and pine branches evenly along the entire length, slightly hanging over the edge. Don’t make a “bouquet” — the composition should stay elongated and horizontal.
- Add the berries. Place clusters of artificial rowan or holly along the whole arrangement. You can group them into 2–3 accents or distribute them evenly. If you want more depth, add a bit of eucalyptus or juniper.
- Texture and details. Insert a couple of vertical branches (dogwood or hazel), add moss at the base, and — if you want — pinecones or dried grasses. Just a little bit of everything.
- Stabilize. Make sure all elements are securely anchored: winter is not the season for delicate compositions. If needed, secure pieces with wire or add extra supports.
Our neighbors have a wooden house with dark trim, and simple metal window boxes mounted under each window. In late November, they fill them with fir branches, add bright red berries (artificial but very realistic), a few pinecones, and lightly mist everything with water. In the frost it forms a delicate glaze — and it looks incredibly alive.
No garlands, no ribbons. Just beauty through texture and color.
Where and How to Place Them
- On facade windows, especially those facing the street
- They look great on the kitchen window, especially if the view works from inside too
- For symmetry — place matching arrangements on “blind” windows as well
- You can mount them on porch railings if you don’t have window ledges
9. DIY Winter Planter Box Filled with Juniper and Pinecones

For a natural winter arrangement, you need only two basic components: juniper and pinecones. You can gather everything on your property or buy it at a nearby garden center. This arrangement works even for people who have never made outdoor décor. The main thing is choosing the right box and not fearing slight “imperfections” in the shape — that’s where the charm comes from.
What You’ll Need
- A low wooden or metal box — 24–30 inches long (60–76 cm)
- Fresh juniper branches — ideally with berries if you can find them
- Pinecones of different sizes — collect them outside or buy Natural Pine Cones, 30 pcs on Amazon
- A bit of moss or dried grass for the base
- Soil or sand — to hold everything in place
- Optional: eucalyptus, dried flowers, old vine branches
How to Assemble
- Prepare the box. Place a layer of moist soil or sand at the bottom — about 3/4 of the height. This anchors the branches and adds weight to the structure.
- Arrange the juniper. Insert the branches at an angle, directing some forward and some upward. If there are berries, try not to hide them. They add color and natural texture.
- Add the pinecones. Simply place them on top of the greenery or between the branches. The more varied the sizes, the more lively the result. We sometimes put them on skewers to lift them slightly above the rest.
- Small details. Add a bit of moss at the base or dried grasses if you like. Eucalyptus also works well — especially if you want a little more greenery.
- Tamp everything down. Once arranged, press everything firmly into the soil so nothing gets blown away. You can add small stones at the base for extra stability.
Where to Place It
- On a low bench or box by the entrance
- On a stair step, if there are several
- Against the house wall paired with a lantern or wooden sign
- Under a roof or awning so snow doesn’t pile on top — especially if you want the pinecones to stay light
This is the kind of arrangement that works not because of brightness but because of natural simplicity. Juniper stays green for a long time, pinecones need no care, and the whole structure can stand until late February without changes.
10. Minimalist Outdoor Box with Single Evergreen Focus
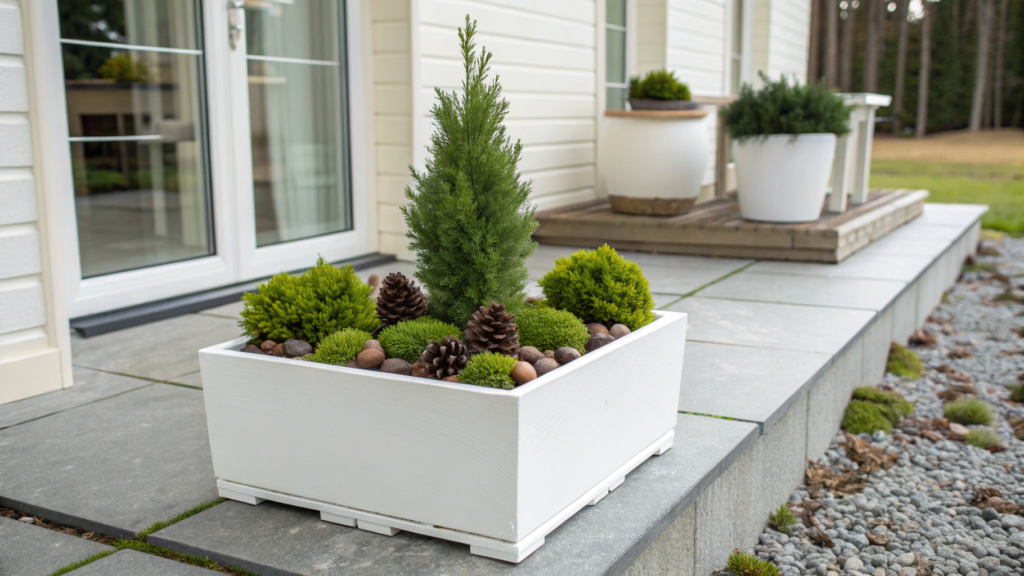
Minimalism works beautifully, especially on modern porches, entryways with clean lines, and monochrome finishes.
At the center — a single evergreen, such as a dwarf spruce or cone-shaped thuja. Around it — nothing extra, at most a bit of moss, pinecones, or simple stone gravel. This option is also great because you can easily move from winter to spring just by removing the décor.
What You’ll Need
- A low, monochrome planter box — 16–20 inches wide (40–50 cm), clean in shape. Concrete, metal, or matte plastic works best.
- One compact evergreen plant — Dwarf Alberta spruce, Thuja Smaragd, Juniper Mint Julep
- Optional: white moss, small pinecones, gravel, 1–2 vertical branches
- Soil, drainage
How to Assemble
- Prepare the box. Place a drainage layer (stones or expanded clay) at the bottom, then soil up to just below the rim.
- Plant the evergreen in the center. It must be the main and only plant in the composition. Firm the soil around it and check stability.
- Minimal accents. If you want, place moss along the edge or sprinkle gravel evenly. Sometimes we simply place 3–5 large pinecones around the perimeter, and that’s enough.
- No overload. Don’t add garlands, berries, or ribbons — the appeal here is in purity. The main focus is the plant’s clean shape and the quality of the container.
We often place such a composition near the back door that opens to the yard. A black planter, one drop-shaped thuja, and at the base — only flat white moss. That’s it.
No unnecessary elements. In winter, against snow and gray sky, it looks strict and almost Scandinavian. In spring, we simply remove the moss, and the thuja continues growing without repotting.
Where to Place It
- A single accent near the door — especially if the facade is monochrome
- Along the sides of the stairs — you can place them as a pair
- Along the house or garage wall, where you want clean geometry
- On concrete tiles or wooden decking — to make the planter visually “readable”
If everything is done neatly, the composition becomes an art object on its own. This is about attention to detail, not abundance.
Winter Porch
I hope you found at least one idea here that instantly “clicked” — or maybe you want to try a few in different areas of your home. We’ve noticed many times: one well-designed planter by the entrance can change the feel of the whole property.
And even if it’s made of simple evergreens, pinecones, and a couple of branches — it still carries warmth and the feeling of something made by hand.
What materials do you usually use in winter décor? Share in the comments.
Maybe you have a favorite combination or a tried-and-true way to keep greenery fresh longer? And if you still have questions — write, we’ll talk it through together.