In winter, the front porch becomes a separate conversation. You look at the gray sky, the wet steps… and you realize that something needs to be changed, some adjustments made, a small accent added so the season doesn’t feel so dull and endless.
And yes, winter planters completely shift the mood at the entrance and create atmosphere. In this article, I gathered 10 winter solutions that truly work in real life, not just in ideal conditions.
We tested each one in Idaho and the PNW — in snow, rain, wind, and constant winter moisture. I’ll also show how we assembled them, which materials survived the season best, and why sometimes the simplest composition becomes the most expressive.
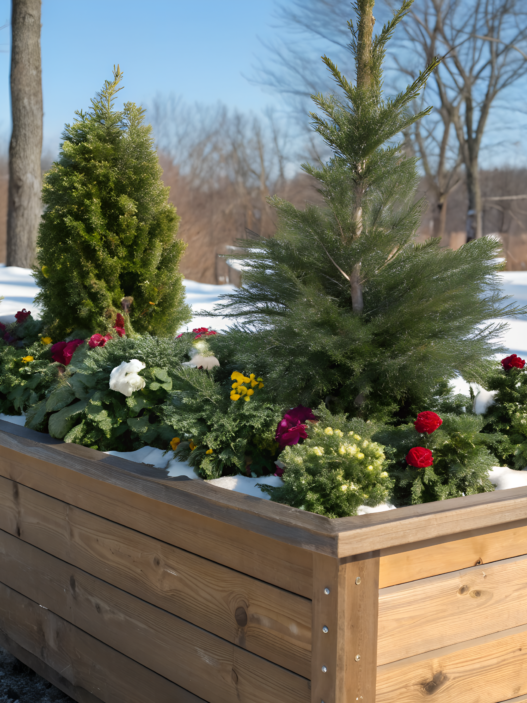
1. Neutral Concrete Winter Boxes
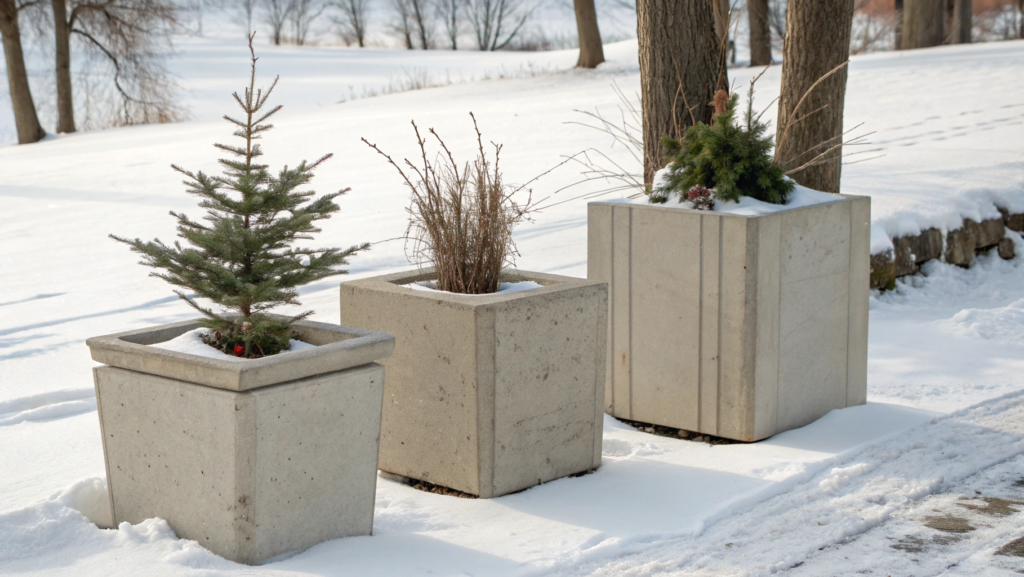
Neutral concrete winter boxes are stable, they don’t fade, they don’t crack from temperature changes, and they handle the season surprisingly well.
Once we shoved a cypress, two orange heathers, and a handful of red branches into a concrete box. We loved it… and a week later it looked miserable. Now I understand you need to approach these boxes calmer, more restrained, more neutral. And that’s exactly what works.
Why concrete boxes?
There are a few reasons, and they aren’t just about aesthetics.
- Concrete boxes are exceptionally durable in winter. Even when the wind on our porch gets strong enough to make the shutters slam, concrete stands like a rock.
- Temperature stability matters too. Concrete holds warmth around the root zone better.
- And the neutral palette helps. The gray background highlights shapes, lines, greenery — especially important in winter when colors are rare.
If you want something reliable and stylish, the Veradek Concrete Rectangular Planter is perfect for both durability and style.
What you’ll need
- 1 large concrete box — 18″ to 24″ long (45–60 cm)
- 2–3 bundles of cedar branches
- 1 bundle of spruce branches
- 1 bundle of arborvitae
- 8–10 stems of red or natural dogwood
- 3–5 large pinecones
- 1 dwarf juniper in a 1-gallon container (3.7 L)
- Outdoor potting mix
- Bark mulch (1–2 cups, 250–500 ml)
How to assemble a winter composition in a concrete box
- Fill the box with fresh potting mix almost to the top and lightly tamp it with your hand. The key here is not to overdo it — the soil should hold the branches, but not turn into a brick. We over-packed it a couple of times and ended up unable to insert anything, digging the whole thing out again.
The mix should stay workable, especially in winter when humidity changes almost daily. - Insert 6–10 dogwood stems along the back edge of the box at a slight angle. This tilt creates depth, and the red stems become a visual anchor that holds the entire composition. Dogwood keeps its color because of anthocyanins. We once tried replacing dogwood with regular branches — and the composition immediately lost structure.
- Create a green “frame” using a mix of cedar, spruce, and arborvitae. Cedar gives soft lines, spruce gives density, arborvitae gives a deep green shade. When everything blends together, the composition looks like you cut the branches right in the forest, not at a garden center.
A small tip: start with the longest branches to set direction, then fill empty spaces with shorter ones — this helps the box keep its shape even under snow. - Plant the small dwarf juniper in the center (1-gallon container / 3.7 L). This little shrub is the heart of the composition. It overwinters directly in the box, doesn’t collapse, keeps its form, and stays surprisingly stable even in wet snow. We picked up this trick from a designer in Seattle, and it really works: when at least one plant is alive and winter-hardy, the whole box looks intentional.
- Place 3–5 large pinecones near the front and add a bit of mulch on top — around 1–2 cups (250–500 ml). Pinecones add volume and a bit of visual warmth (yes, even with concrete!), and mulch helps retain moisture and slightly protects the topsoil from freezing.
Funny enough, the pinecones are what guests compliment most often.
The final composition is calm, neutral, structured — and it lasts until the end of February without any effort. Sometimes I just shake snow off the branches so they don’t break. And in March we use part of the greenery as mulch around young trees: nothing goes to waste.
2. Farmhouse Galvanized Bucket Planters
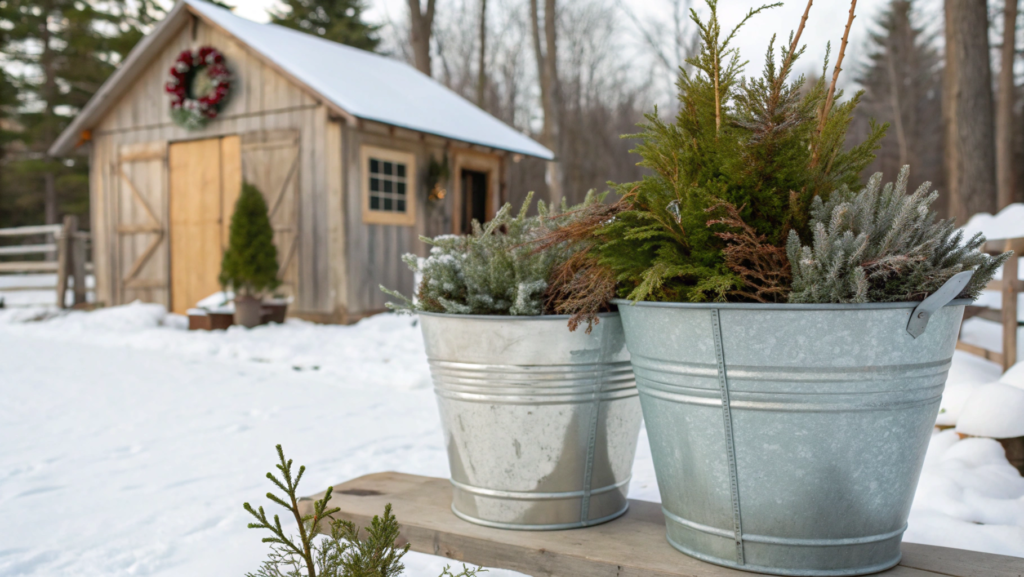
When we moved to Idaho, we found two slightly crooked galvanized buckets in the previous owners’ shed, washed them — and unexpectedly got the perfect winter planters. Since then, it has become a whole tradition: every winter I assemble at least one composition specifically in a farmhouse metal bucket.
Why farmhouse galvanized buckets?
Here everything is simple and honest, without extra romanticism:
- Metal is strong, it doesn’t crumble or crack.
- Yes, it ages over time, but that’s actually a style advantage.
- Galvanized steel handles moisture well.
In the PNW our winter is almost constantly wet, and the buckets survive it without problems. - They are lightweight.
Unlike concrete, you can move the composition with one hand — more important than it seems. - The style is universal.
It works for a farmhouse porch and a modern home — an unexpected effect, but true.
How we assemble a winter composition in a galvanized bucket
- Prepare the bucket and create drainage. Some buckets don’t have holes, so we always drill 3–4 small ones (¼”). If the bucket sits under snow, drainage is essential. We throw a layer of gravel on the bottom — just a couple of handfuls so the soil doesn’t sour.
- Create a dense evergreen base. A galvanized bucket is smaller in diameter than a concrete box, and if the branches sit too loosely, the composition looks “collapsed.” We first form a tight ring of greenery along the edge: spruce, arborvitae, a bit of pine. This gives instant volume.
- Add an accent — red or brown branches. We use dogwood stems or simply trimmed apple branches — they add height.
Unlike in a concrete box, height matters here: the bucket itself is compact, so a vertical element makes it look visually “taller.” - Insert one bold element — something textural. Last year it was dried artemisia (silvery branches, very beautiful). The year before — a small juniper twig with berries.
The main thing: one element that stands out in texture. Without it, the bucket looks too flat. - Fill gaps with small evergreens or eucalyptus. Yes, eucalyptus isn’t winter-hardy, but fresh it dries beautifully and holds for several weeks. We buy one bouquet and separate it into sprigs.
- Add small decorative accents. These can be:
– mini pinecones
– willow twigs
– pieces of bark
– decorative berries
It’s important not to overdo it — galvanized buckets love simplicity.
A small episode that taught us something
A couple of winters ago, I assembled a bucket too perfectly. Everything was symmetrical, neat, strict. And Lindy looked at it and said: “It’s beautiful, but it’s not us.”
So we ruffled a few branches, added one crooked pinecone, one eucalyptus twig at a strange angle… and then the composition finally looked alive.
Yes, not everything needs perfection.
3. Moody Purple Pansy Collection

Violas and pansies tolerate cold extremely well. That’s why these compositions are one of the most reliable winter décor options.
Why dark pansies work well for winter compositions
- They are cold-hardy. This is known from university recommendations (for example, Oregon State University Extension): pansies are among the most resilient annuals for the shoulder seasons.
- The color lasts a long time. Cold slows flower development, so pansies keep their shape and richness longer.
- Dark shades look luxurious against a winter backdrop. Metal, concrete, wood, snow — anything at all — highlights the deep purple.
- They are easy to pair with other materials. Pansies can be planted in ceramic, galvanized metal, wooden boxes — the style works everywhere.
How to assemble a Moody Purple Pansy Collection
- Choose a neutral-colored container. Dark purple looks especially beautiful against gray, graphite, white, or galvanized metal.
Concrete planters are perfect, but we often use simple ceramic pots that have survived many winters. - Add quality potting mix. Pansies prefer moderately nutritious but well-draining soil.
If the mix is too dense, it compacts after rain and the roots “suffocate.”
We always add a bit of perlite — a habit from Idaho we’ll never drop. - Plant pansies in groups, not individually. Dark varieties reveal their depth in clusters: several blooms together create a richer shade.
We usually plant 3–5 together, shifting the group slightly to make it look more natural. - Add silvery or burgundy foliage for contrast.
– hebe with a silvery coating
– dichondra (in mild winters)
– senecio
– small heuchera shrubs (burgundy varieties work beautifully)
Visual contrast always works. - Fill the space between plants with evergreen elements. This can be a single spruce branch, a couple of arborvitae twigs, or just a small piece of pine greenery.
Pansies become even more expressive — purple surrounded by green looks much deeper. - A small decorative detail — berries or mini pinecones. Sometimes we add a barberry twig (if we trimmed the shrub), sometimes a couple of pinecones.
They don’t play a major role, but they make the composition more alive.
The first “moody pansies” that survived winter for us grew… in a plastic construction bucket we forgot to throw away.
And then we decided: “If they survived this winter here, they’ll survive anywhere.”
And honestly, it turned out to be true. When everything around is gray and wet, these small dark flowers become a point of focus — like a quiet sign that winter will soon come to an end.
What makes this collection special
When other winter plants rely mostly on texture, pansies give real color that stays stable even in cool weather. It doesn’t fade, doesn’t turn gray, and remains visible against metal, wood, or concrete.
These shades also tolerate weather shifts well: after rain the blooms appear even deeper, and on cloudy days they provide necessary contrast. As a result, you get a composition that not only decorates the porch but stays neat throughout the season — without daily care and without the risk of losing its beauty after another wet night.
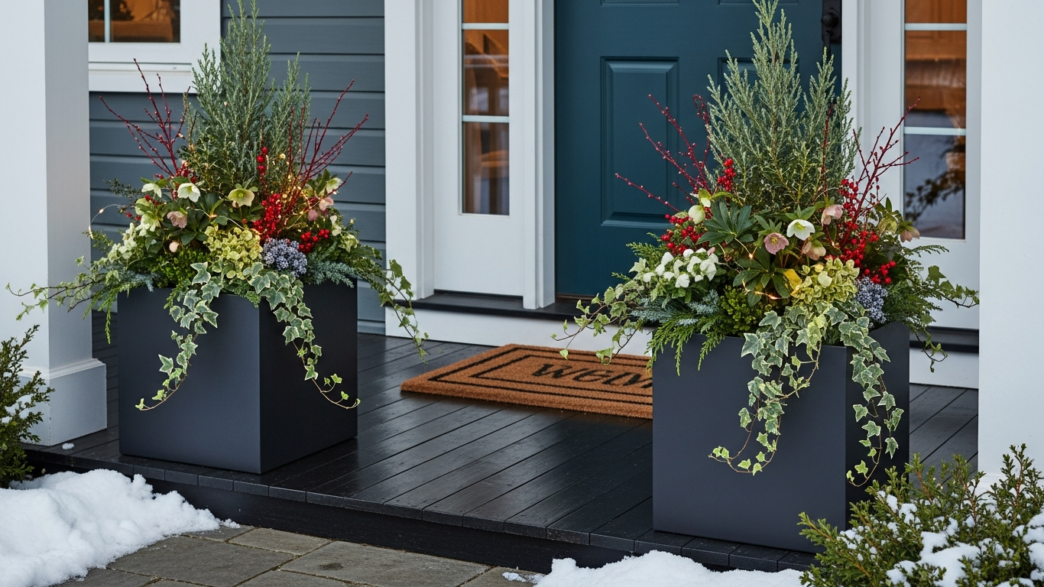
4. LED-Lit Porch Urns
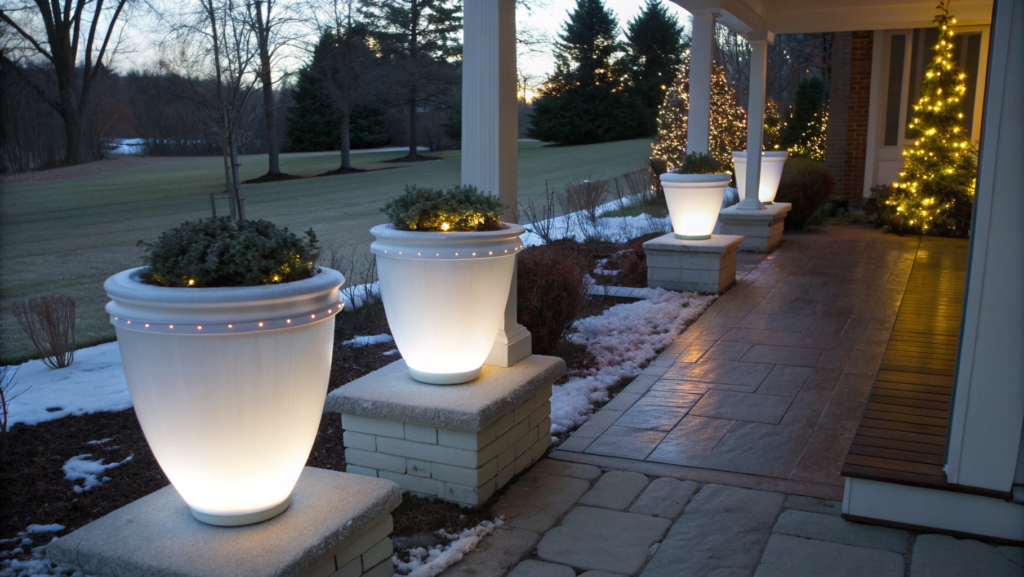
LED-lit outdoor urns became a real discovery for us. Light changes everything.
It doesn’t make the composition “festive,” it makes it visible. And that’s a completely different feeling.
That’s why LED urns are one of our winter must-haves.
Why LED urns work so well in winter
- Light adds depth to the composition.
Branches, evergreens, and decorative elements become more structured, especially in the dark. - They increase porch visibility.
On wet or icy surfaces this is even slightly safer — you can see where you step. - LED requires almost no maintenance.
We use only battery-powered or timer-based lights — so we don’t think about turning them on or off. - You can change the mood without replanting.
Cool light feels more modern, warm light feels cozier. It all depends on the house and the season.
How to assemble an LED-Lit Porch Urn (step by step)
- Choose a stable tall urn. Tall shapes work better because the light spreads vertically, illuminating branches and structure.
Neutral colors — black, gray, graphite — fit any style. - Create a base of evergreens. We almost always use cedar, spruce, and a bit of arborvitae.
The combination of dense greenery and thin branches creates a good framework that the light highlights beautifully. - Add branches of different thicknesses. No need for anything exotic: birch, willow, or pruned apple branches work perfectly.
A vertical element is important — LED outlines the shape, making the urn look taller and more elegant. - Place the LED string inside the composition. We never wrap it “spiral-style.” Instead, we loosely weave the lights between branches so it looks like natural diffusion.
A small trick: secure the battery pack to the inside of the urn using simple wire. - Add decorative elements (optional). Dense pinecones, small eucalyptus sprigs, dried grasses — anything that adds texture.
But balance matters here. The light already adds expression, so the décor should stay modest. - Set a timer or adjust light placement. We always use the 6 hours on / 18 hours off mode — enough to light the evening without wasting batteries.
A quick note on safety
If you’re using lighting in outdoor urns, the most important thing is making sure it’s outdoor-rated.
Outdoor LED strings and strips are made specifically for wet conditions and withstand rain, snow, and temperature swings much better than indoor options.
We always choose models marked UL Listed for Outdoor Use — a small detail that ensures the cable and controller are protected.
And one more tip: keep the power block slightly elevated instead of letting it sit directly on the ground. Even a small lift helps protect it from excess moisture.
A small story
Our first LED urn didn’t appear for beauty at all — it started with a simple problem: in winter, we don’t have overhead lighting near the house, and the porch turned into a dark spot every evening. Lindy suggested trying a small LED string light — just to see the steps.
And you know what surprised us the most? Not how it looked, but how much more convenient everything became. It became easier to see where to step, easier to find keys in a bag, easier to navigate when carrying groceries.
Only later we noticed that the lit evergreens looked neater, and the urn itself appeared deeper and more refined.
Since then, LED lighting for us is not a decorative experiment but a practical solution that improves both the look and the functionality of the entrance.
5. Winter Fern and Grass Arrangement

Compositions that combine winter ferns and ornamental grasses look much calmer than evergreens and work even when the porch feels too flat, too gray, or simply empty.
Why ferns and grasses work well in winter
Everything here is practical:
- They keep their texture.
Even when the foliage dries a little, the silhouette stays — and in winter that’s already half the job done. - Grasses maintain height with minimal care.
Even if snow pushes them down, they spring back quickly. - Ferns add softness, grasses add structure.
Because of this, the composition looks natural, like a small edge of a woodland clearing. - You can use plants you already have on-site.
We often just move one small clump of sedge or a fern into a winter container and return it to the ground in spring.
How to assemble a Winter Fern and Grass Arrangement
- Prepare a tall or medium container. It doesn’t have to be complicated: concrete, metal, or ceramic all work.
The main thing is good drainage, because grasses don’t like standing water in winter. - Create a base with dried or semi-evergreen grasses. Sedge, pennisetum, molinia — anything that gives height.
We usually place them toward the back edge of the container so the composition feels like it’s leaning “forward.” - Add a fern closer to the center. For winter, varieties that hold their shape longer work best — like shield ferns or common woodland ferns.
If your fern has partially shed foliage, use newer fronds — they look tidier. - Fill the side areas with something textural. Possible options:
– small arborvitae sprigs,
– a few dried grasses,
– thin birch branches.
This gives the arrangement a finished look without overloading it. - Add an accent — one expressive detail. Sometimes we use a small cluster of mini pinecones or a single cattail stem.
You don’t need much — grasses and ferns already create movement. - Add light mulching for stability. A thin layer of bark or wood shavings helps retain moisture and keeps the planting looking tidy.
Not too thick — grasses don’t like being “buried.”
We simply didn’t know where to put the sedge we needed to dig up before laying a new grader near the house. We placed it into an old ceramic container, added a couple of fern fronds so they wouldn’t be lying around the yard… and suddenly realized it looked better than half the winter arrangements we had bought before.
And the most convenient part — in spring we just lift the plants out and return them to the ground. No losses, no fuss.
Why this arrangement is practical
Winter grasses don’t need lighting, décor, or rare varieties. They withstand wind, moisture, snow — and still give that structure that makes the porch look cared for even when there’s nothing else nearby.
This is one of those winter container ideas that works on a farmhouse porch, a modern home, or even a small balcony. It’s a quiet, reliable arrangement that’s easy to assemble and even easier to maintain.
6. Cedar and Magnolia Mix
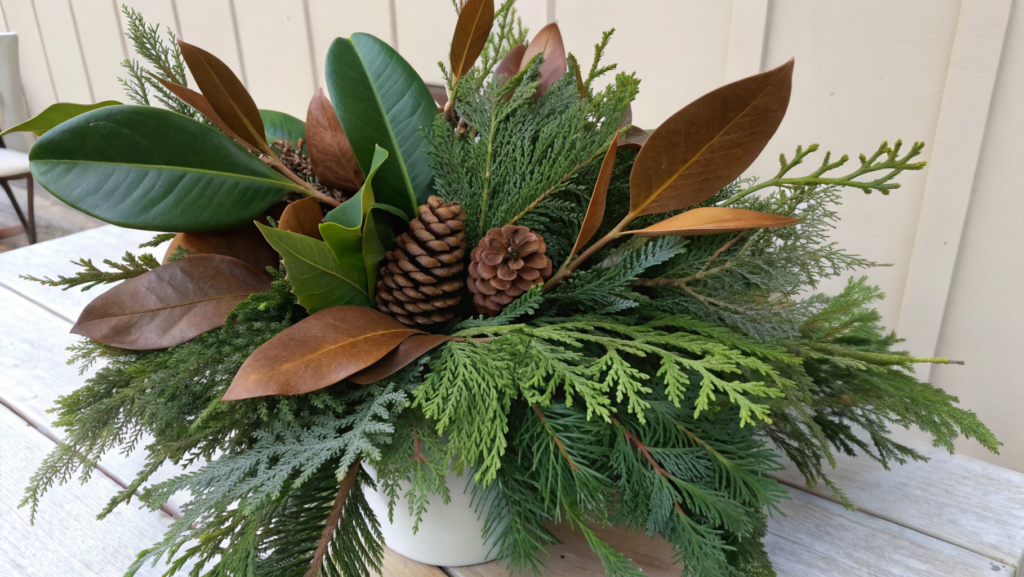
In this winter arrangement, cedar gives softness and volume, while magnolia brings those dense, leathery leaves that hold their shape much longer than most decorative materials. For us, this combination became one of the most reliable winter solutions: it looks rich and requires almost nothing from you.
Why cedar and magnolia work so well together
- The longevity of magnolia leaves. They don’t soften or lose their shape quickly, even in long stretches of winter moisture.
- Different textures create visual depth. Cedar is soft and fluffy.
Magnolia is dense, large, structured.
Together they create contrast without any effort. - Minimal care. We assemble this arrangement in literally 5–7 minutes. And honestly: it lasts until February if you don’t bother it.
- It looks refined even without extra décor. Magnolia is an accent on its own. And if you add a bit of light or a couple of dogwood branches — it suddenly becomes an “entrance installation.”
If you need artificial (but very natural-looking) leaves as backup, Admired By Nature Artificial Magnolia Leaves have worked perfectly for us.
How to assemble a Cedar and Magnolia Mix
- Choose a wide container. Ceramic or concrete works best. Magnolia leaves are large, so tall narrow shapes look bulky.
- Create a base of cedar. We place the branches so they slightly drape over the rim — it gives volume and makes the arrangement feel more alive.
- Add magnolia leaves in groups. We never spread them evenly in a circle.
Two or three dense clusters look much better: they create a focal point and direct the eye. - Insert lighter elements for contrast. Birch twigs, a few dried grass stems — anything that adds a small “break” between the green cedar and the dark magnolia leaves.
- Stabilize the structure with small evergreens. Sometimes we add a couple of arborvitae or spruce branches — they strengthen the shape and fill possible gaps.
- A light decorative detail — optional. One large pinecone or a single dogwood branch is enough. Magnolia doesn’t like competition.
The first time we tried this arrangement was when we pruned an old magnolia near the house. It was December — everything around was wet and gray — and the magnolia leaves were lying there glossy, heavy, as if someone had just polished them. And Lindy said, “Let’s just stick this somewhere.” That’s how one of our favorite winter combinations was born.
We simply placed those pruned magnolia leaves into a container with cedar — more out of practicality than the desire to “decorate.” And then we noticed something surprising: the arrangement held up incredibly well. The cedar dried a little, but the magnolia stayed perfect, as if it had just been cut.
That’s how we learned that pruned magnolia leaves are an ideal winter material that outperforms most décor throughout the season.
7. Simple DIY Outdoor Planter Recipe

There are winter arrangements that look like a decorator spent hours on them. And then there are the ones you can assemble in ten minutes — and they still don’t look “cheap.”
This simple DIY recipe belongs exactly to the second category.
What you’ll need (and why this, specifically)
- 1 medium-height container — ceramic, galvanized, or concrete.
- Evergreens: cedar + spruce or arborvitae.
- A couple of structural branches (birch, willow, or even apple tree prunings).
- 1 accent element — pinecones, berries, dried grasses.
- A bit of mulch — just to stabilize the arrangement.
This isn’t an “official list” — it’s basically the set of things we most often have lying around the property in winter.
Simple DIY Outdoor Planter Recipe — how to assemble it
- Fill the container with soil and make light compaction. No need to press too hard — just enough so the branches don’t fall out from a random nudge. We always leave 1–1.5 inches (2–3 cm) below the rim so the greenery can “drape.”
- Create a base layer of evergreens. This is the most important layer. Cedar gives volume, spruce gives structure, arborvitae gives density.
Tip: if the greenery looks too “even,” turn a couple of branches at a slight angle — the arrangement instantly looks more alive. - Add 2–3 vertical branches. They set the direction. Birch or willow adds a light contrast and structure.
Tip: if a branch is too long, don’t cut it right away — try changing the angle. Sometimes the angle solves everything. - Insert the accent element. This can be
– a large pinecone,
– a branch with berries,
– a dried grass stem.
Tip: one expressive element is better than five tiny ones. The container looks cleaner that way. - Fill gaps with leftover greenery. The goal isn’t to pack it tightly — this isn’t a bouquet. We lightly correct the shape but don’t stuff it until it becomes a “mini Christmas tree.”
- Add a little mulch or bark on top. It stabilizes the structure, hides the soil, and helps retain moisture.
Tip. If the mulch is too light, use darker chips — they blend better into winter arrangements.
A few tips that are especially useful in winter
- Don’t make the arrangement too dense. In winter, greenery settles faster than in summer, and dense setups lose their shape after two weeks.
- Use branches of different lengths. This creates a natural silhouette — especially important if the container is visible from the side.
- Check stability before leaving. Windy nights do their thing. We always give the arrangement a slight shake to make sure the structural branches sit tight.
- Keep a bit of extra greenery nearby. Sometimes one small branch is all it takes to “refresh” the container after strong wind.
Why this recipe works so well in winter
Because it’s flexible. If you don’t have the evergreen you need — birch or willow easily gives you height.
No birch? Apple tree branches from fall pruning work just as well. No bright accent? One big pinecone or a small dried grass stem solves the problem completely.
It’s one of those rare winter arrangements that can be adapted to any climate, any porch, and any materials you already have on hand in winter. You don’t need to look for anything “special” — even simple branch trimmings quickly turn into a tidy winter container.
8. Modern Metal Cylinder Display
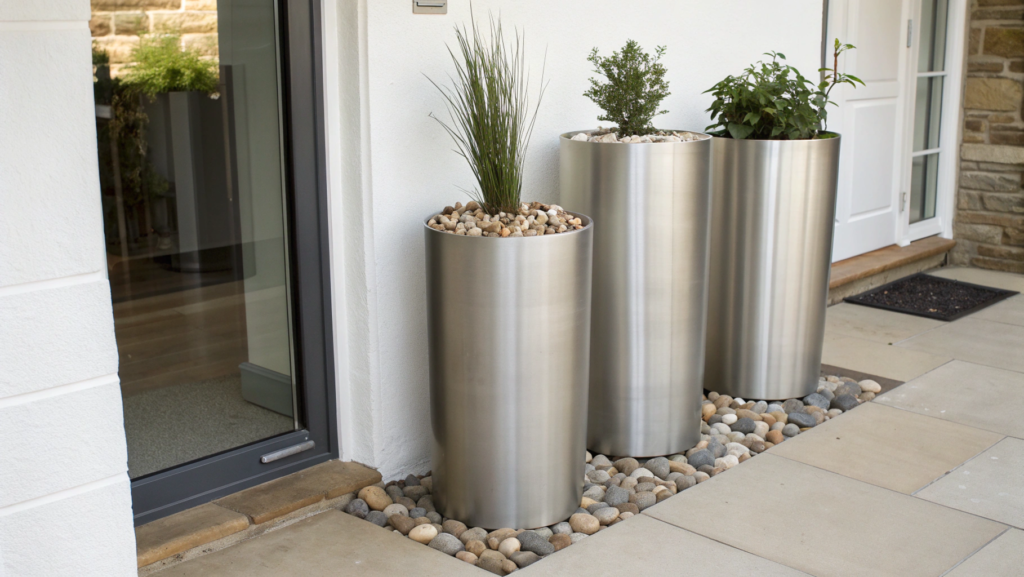
Metal cylinder planters — tall, clean, minimalist — instantly give a modern look to the entryway, even if you fill them with the simplest materials.
Why metal cylinders work well in winter
- They’re durable and don’t absorb moisture. In the PNW, that’s our lifesaver: everything is wet in winter, and materials that soften or crack aren’t an option.
- They look tidy even when empty. The shape alone makes the porch look more put together.
- They’re perfect for vertical arrangements. The height of the cylinder makes even simple branches more expressive.
- They work as a pair. Two different sizes instantly create that modern effect without extra effort.
If you need high-quality cylinders, Veradek Metallic Series Cylinder Planters have worked very well for us.
How to assemble a Modern Metal Cylinder Display
- Prepare the cylinder and weigh down the base. Metal is naturally light, but winter wind can be unpredictable. We always add 1–1.5 inches (2–3 cm) of gravel at the bottom before adding soil. This makes the cylinder more stable.
- Create a vertical center. In tall planters, this is the most important part. We use:
– birch branches,
– straight stems of ornamental grasses,
– sometimes even bamboo sticks (if we have them).
The container immediately gets structure and height. - Add an evergreen base. A bit of cedar or arborvitae softens the strict metal lines.
Tip. Don’t cover the entire top with greenery. Leave some space — the cylinder needs to “breathe.” - Insert a dark accent. Dogwood branches or even dried barberry stems work beautifully.
The contrast between metal and deep tones always looks professional. - Add side elements. These can be:
– a couple of eucalyptus twigs,
– dried fern,
– thin willow branches.
The key is lightness — metal doesn’t like visual overload. - Cover the soil with decorative chips or gravel. It makes the arrangement cleaner and more finished.
We often use fine gray gravel — it matches the metal surface perfectly.
Tip. If the arrangement looks like it’s “sinking” inside the cylinder, increase the height of the central element rather than adding more material.
Metal planters rarely suffer from “not enough décor,” but very often — from the wrong scale. Once the center is taller, everything else falls into place.
Why this display is practical in winter
Metal is a material that doesn’t fuss. It doesn’t soften, doesn’t absorb moisture, and doesn’t lose its shape. And most importantly: it gives structure even when the content inside is minimal.
You can update the arrangement seasonally, changing only the accent branches or evergreen tones — and the container still remains the stylistic anchor.
It’s an ideal solution for anyone who likes clean, modern winter décor without the hassle.
9. Minimal Black and White Pot Pairing

In winter, you naturally want simpler lines. Calmer shapes. And if there’s one arrangement that always looks restrained, tidy, and modern, it’s a pairing of black and white planters.
Why the black-and-white combination works so well in winter
- The contrast is visible even at dusk. White reflects light, black emphasizes shape — together they stand out against snow, concrete, or a wooden porch.
- Minimalist style simplifies plant selection. Even modest evergreens look expressive in such containers.
- Perfect for small spaces. The contrast makes the arrangement feel “cohesive,” not washed out.
- Easy to update seasonally. In spring you can place tulips inside, in summer — grasses, but in winter — branches and evergreen bundles work best.
How to assemble a Minimal Black and White Pot Pairing
- Place the containers next to each other, not symmetrically. We usually give them a slight offset: the white planter a little forward, the black one slightly behind. It gives the arrangement depth.
- Give each planter a different role. – The white container feels lighter and more airy: birch branches, light grasses, or arborvitae work well there.
– The black container feels visually heavier: we place richer evergreens there, such as cedar or spruce. - Use a limited palette. This is where “less is better” truly works. Three materials are enough: evergreens, branches, and one small accent.
- Add textural contrast.
In the white pot — softer lines (arborvitae, dried grasses).
In the black pot — denser elements (spruce, large pinecones). - Cover the surface with mulch or gravel.
Light mulch looks better in the black container, and dark mulch works best in the white one.
It reinforces the contrast and makes the arrangement look finished.
Tip. Place the white container closer to the edge of the porch. It reflects more light and makes the whole arrangement feel more “open.”
If you place the white one in the back — it disappears. But when it stands in front — the black pot becomes the backdrop, and the whole composition gets deeper without adding extra materials.
Why this pairing is especially practical in winter
- The containers are easy to combine.
- Minimal filling still looks expressive.
- The color pairing suits any façade.
- The visual clarity doesn’t get lost under snow or after rain.
This is a solution that doesn’t require a big budget but creates a very modern look. And most importantly — it doesn’t fall apart after a week, which sometimes happens with more elaborate winter arrangements.
We once used this approach when we were trying to brighten a porch that almost never got direct light. Bright colors looked random, and large planters felt overwhelming.
That was the first time we placed a pair of black-and-white pots — simple, matte, different shapes. Inside them was almost nothing: birch branches, a handful of greenery, a couple of cones.
But it was the contrast between the containers that “pulled” the arrangement together. It looked clean, tidy, and — importantly — didn’t need any updates for the rest of the season.
That’s when we realized that sometimes contrast works better than complex décor.
10. Small Space Winter Planter Trio

In winter, small spaces sometimes win, because every detail becomes instantly visible. That’s exactly why a winter planter trio for compact areas became one of our favorite projects: a minimal set of containers, minimal materials — and a clean, tidy winter look.
Why a trio works better than a single container
- Groups always look intentional. Even if the arrangement is simple, grouping makes it feel more thoughtful.
- You can play with height. In a small space, vertical elements matter — they visually stretch the area.
- Easy to refresh. If one planter “collapses,” you can replace it without rebuilding the whole group.
- Flexible plant choices. One planter with evergreens, one with grasses, one with an accent — even a tiny set feels like a mini-composition.
For small trios, Classic Home and Garden Small Planter Set works beautifully.
How to assemble a Small Space Winter Planter Trio
- Choose three containers of different heights. They don’t have to match — metal + ceramic + concrete looks great too.
What matters is that they stand in a tight group, not scattered. - Assign a role to each container. A simple structure:
– Tall — structure (branches, grasses)
– Medium — evergreens
– Small — accent
This creates visual rhythm. - Create vertical height in the main container. Insert long branches (birch, willow) or decorative stems.
This planter sets the tone for the entire group. - Fill the medium container with evergreens. Cedar, arborvitae, spruce — anything with directional lines makes the arrangement look tidy.
- Add an accent in the small container. This can be:
– a tiny juniper shrub,
– dried berries,
– mini pinecones,
– decorative grass.
The idea is that the smallest planter “supports” the other two rather than competing with them. - Place the containers close together. In small spaces, gaps between planters work against the arrangement — the trio should act as one unit.
Tip. Place the lowest planter in front and the tallest on the opposite side of the entry direction.
This way the trio doesn’t block the walkway, but still creates depth — almost as if there’s a full composition rather than just three containers.
Why a Small Space Trio is practical in winter
Because it’s infinitely scalable. You can have a tiny porch, a narrow entry, or just a single step — the trio still works.
It’s tidy, doesn’t overwhelm the space, needs very few materials, and is easy to refresh as the season goes on.
This is the kind of winter décor that helps small spaces look stylish without the extra fuss.
Winter Porch
When I look back at all these winter containers, I see that each one shines in its own way. Some come together in minutes and still look like you planned them carefully. Others need a little more attention but then stay intact all winter without a single adjustment.
Lindy and I still experiment every year. Sometimes we use whatever shows up after pruning the trees. Sometimes we come up with a small trick just to add structure to a gray backdrop. And every time the result is different — but that’s exactly what makes it exciting.
Winter porch décor never has to be “correct.” It should reflect your style, your climate, your winter.What winter arrangements have you made before? Leave a comment — let’s continue the conversation there.