Potatoes usually require sunlight and warmth to grow. That’s why it’s ideal to grow them during the spring.
However, I’ve often been asked, can I plant sprouted potatoes in winter? The short answer is yes, you can, but the process requires several steps, and a fair bit of know-how.
I’ve been planting potatoes for more than a decade, and I use the following five-step process which is:
- Step 1 – Choose your ideal potato for planting (see full details below)
- Step 2 – Prepare your soil (which includes soil type, drainage, and sunlight)
- Step 3 – Plant them with the right separation between each
- Step 4 – Water and care for the potatoes
- Step 5 – Harvest them!
In this guide, I’ll take you through each of these five steps, so you can successfully plant potatoes in winter. There are lots of top tips that you need to understand to have a good chance!

How to Plant Potato Sprouts in the Winter
Though planting potato sprouts in winter is possible, you can’t do it in extreme weather conditions.
If you live in an extremely cold place, where the soil’s temperature gets below freezing point, you can plant your potato sprouts indoors or during the fall before it gets too cold.
Another option is to use a raised bed or cover the soil with plastic sheets to provide it with some heat.
If you have adequate temperatures during winter, then you should be able to plant your potato sprouts with no issues. Let’s go over the planting steps.
Step 1: Choose Your Potato
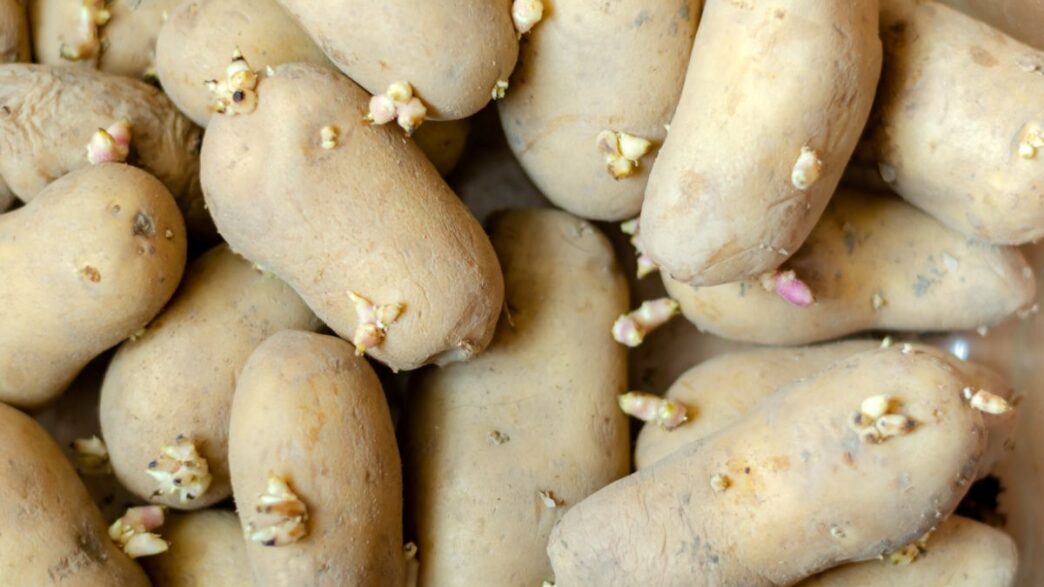
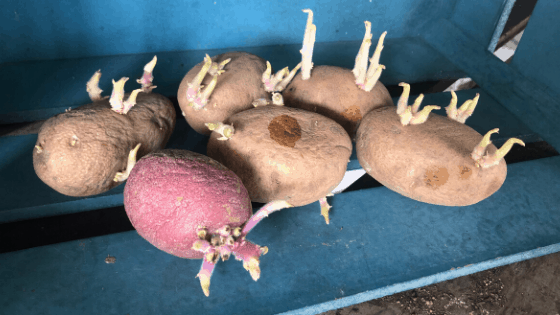
When choosing your sprouted potatoes, pay attention to the quality. Choose healthy and firm-looking potatoes with green and small sprouts.
The potatoes are good for planting as soon as they sprout.
If a potato is too soft and wrinkled, or has white and long sprouts, it’s a sign that the potato is decaying. So, avoid planting potatoes that look like this.
Now, cut the potatoes into pieces, ensuring every piece has sprouted parts. Leave the cut pieces two to three days before planting so the skin can dry and seal back. Sealing the skin prevents the potatoes from rotting.
Step 2: Prepare Your Soil
To grow your potatoes, you need soil with good drainage and adequate sunlight.
I also recommend adding a well-balanced, organic fertilizer to the soil to help with the potatoes’ growth.
Now, dig the soil where you’ll place the potatoes. You should dig the soil in rows or trenches next to each other.
Get your shovel or mattock and dig parallel trenches, each three to four inches deep and 12 inches apart.
These spaces are required because potatoes develop underground and need room to grow.
Step 3: Plant the Potato Pieces
Insert your potatoes in the trenches, leaving 12 inches between them.
When placing the potatoes in the soil, the sprouted parts should face up.
Then, cover them well with soil. To protect and maintain the soil’s temperature during the winter, you can cover it with mulch such as leaves or straw too.
Step 4: Water and Care for the Potatoes
Now that you’ve planted the potatoes, you’ll need to take care of them until they’re ready to harvest. This will usually take around three months.
You should water the potatoes regularly to keep the soil moist.
During the winter, watering every four to five days should be sufficient. However, check the soil every couple of days for signs of dryness. If the soil looks or feels dry, water it.
Though you should keep the soil moist, avoid excessively watering the potatoes.
Soggy soil can cause the potatoes to rot, or if it’s too cold, they could freeze.
As your potatoes grow, and the plant grows out of the soil, keep adding more soil around its base. Adding soil protects the plant from excessive sunlight. It’s also good to add fertilizer to the soil.
Step 5: Harvest the Potatoes
When the potatoes have finished growing, it’s time to harvest them. The way to know that the growth is complete is when the tops of the plants’ vines are dead.
Another way to check is to dig out one plant and see if the potatoes have grown. If it looks good, dig up the rest of the potatoes. Use a spade fork and dig gently to avoid damaging the potatoes.
Don’t wash the potatoes after you harvest them as this can lead to rotting. To clean them, use a soft vegetable brush, and brush off the dirt and soil.
There you have it, your fresh and hopefully delicious, sprouted potatoes grown in the winter.
FAQs
What soil temperature do potatoes need to grow?
The ideal soil temperature should be between 45℉ and 65℉. To check the temperature, you can use a compost thermometer. If the soil drops below 45℉, add mulch to warm it up or cover it with a plastic sheet.
How do you sprout the seed potatoes?
Sprouting (also called chitting) means allowing the seed potato to grow sprouts to plant them.
Here’s how to do that:
- Purchase organic potatoes (chemically treated ones may not sprout)
- Put each organic potato in an egg carton
- Place the egg carton in a warm spot with light until they develop sprouts
Those sprouts form tubers that eventually grow into new potatoes. The sprouting process usually takes around three weeks.
How long can I leave the potatoes in the ground?
When the potatoes have grown (when the vines have died) you don’t have to harvest them immediately.
You can leave them in the ground for up to two weeks after the harvest due date.
However, only do this if the soil conditions are right for the potatoes. So, make sure the soil’s temperature is right, and it’s moist.
Summary
The table below summarizes the factors needed for the growth of potatoes and the ideal conditions for them.
| Potato Growth Factors | Ideal Conditions |
| Potato sprouts | Small and green |
| Soil condition | Good drainage, moist, warm, and fertile |
| Soil temperature | Between 45℉ and 65℉ |
| Sunlight | Adequate sunlight |
| Watering | Regular but not excessive |
| Fertilizer | Well-balanced and organic |
Conclusion
It’s possible to plant potatoes in the winter with proper care and by following the right steps.
Remember, if your soil’s temperature is too low or freezing, direct planting won’t be possible, but you can still do it through other means.
Make sure you also choose healthy potatoes with small and green sprouts so the ones you grow can be healthy.
Additionally, prepare your soil well and choose a good fertilizer to encourage the potatoes’ growth. Care well for your potatoes while they’re growing, and water them regularly.