

In the previous article on whimsical room decor, I shared how ordinary things like simple frames or tulle can completely change the atmosphere at home — if you haven’t read it yet, check out Part 1 it’s full of inspiration. But there were so many ideas that I decided to put together another selection: ten new projects that will make your room even cozier and more cheerful.
Today we’ll look at how a simple shelf can turn into a rainbow, why an old mirror deserves a second chance, and more. All the ideas are simple, clear, and accessible, but the result feels like you had a designer at home — without the extra cost.
Well, here are 10 ideas worth trying!
1. DIY Rainbow Wall Shelf
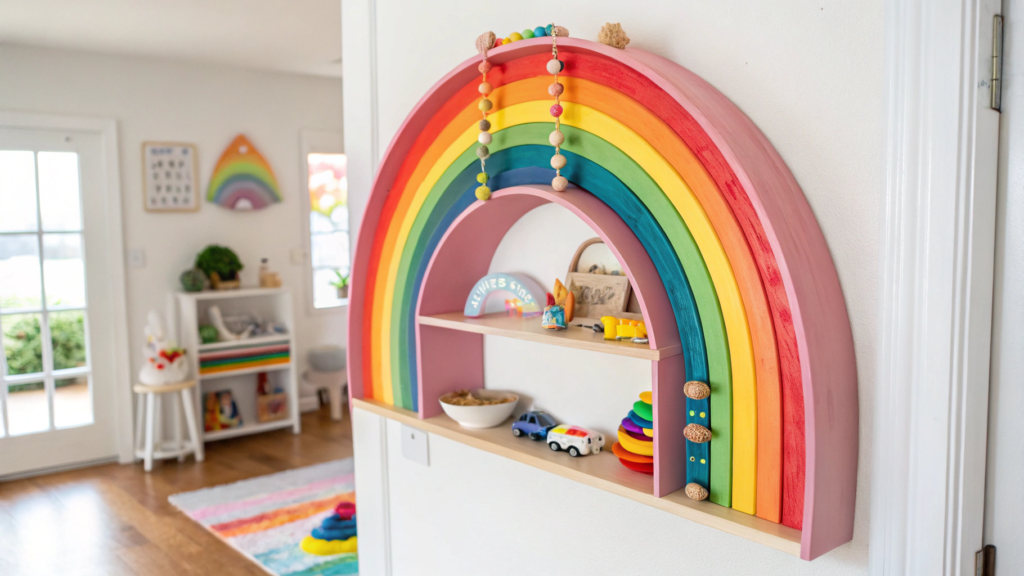
A DIY Rainbow Wall Shelf is that little “special detail” that not only stores small items but also instantly brightens the mood. A simple shelf becomes an art object, made by hand.
I once made such a shelf for my niece’s room. I thought it would just be handy for her toys. But when we hung it on the wall, the whole room immediately felt brighter and more joyful.
What You’ll Need
- Wooden shelf (a simple straight one, about 24 in / 60 cm long).
- Acrylic paints in bright shades (red, orange, yellow, green, blue, indigo, violet).
- Painter’s tape.
- A set of brushes of different thicknesses.
- Spray lacquer for protection.
Step-by-Step Instructions for this whimsical room decor
- Surface prep. If the shelf is new, lightly sand it with fine sandpaper so the paint applies smoothly. If it’s old, remove dust and any old coating.
- Marking. Use painter’s tape to divide the surface into 7 equal sections. These will be your “color stripes.”
- Painting. Start with red and move through the rainbow. Each section is a separate color. I recommend applying two coats for rich, saturated tones.
- Drying. Allow the paint to dry completely (at least 4–6 hours).
- Finish. Seal the result with spray lacquer. This will protect it from scratches and moisture.
And that’s it — your Rainbow Wall Shelf is ready!
This shelf works perfectly as an accent piece in a minimalist room. You can display books, figurines, or small potted plants on it. It looks especially beautiful against white or pastel walls. And if it’s in a child’s room, they’ll love it — because the shelf becomes a little rainbow right at home.
Tip. If you don’t want strict geometry, lightly blur the edges between colors with a sponge. It creates a soft watercolor effect, like the rainbow gently melted.
2. Upcycled Mirror Frame with Whimsical Paint Accents
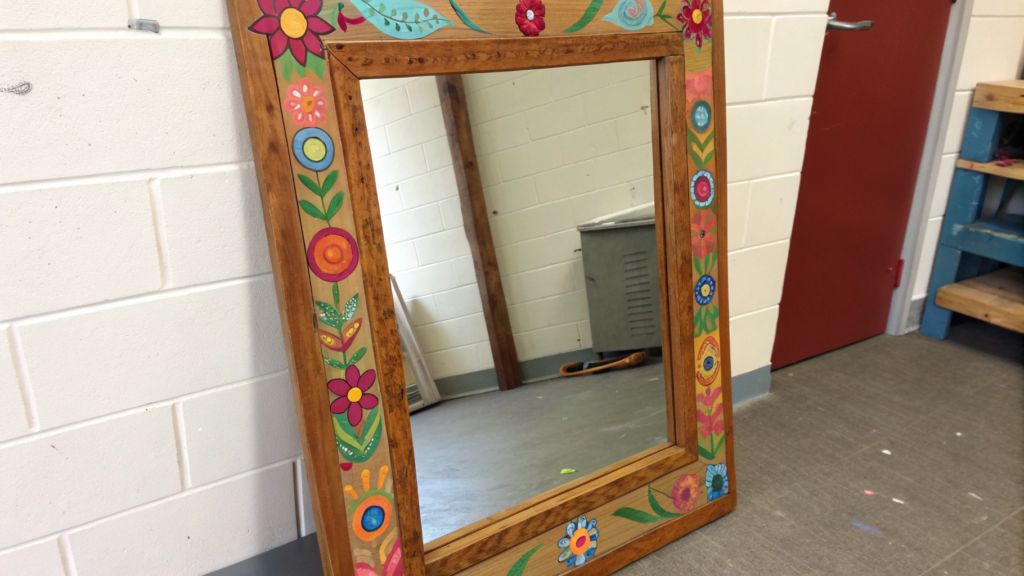
I especially love this idea because these projects give a second life to old things. A vintage frame found at a flea market or a boring mirror from a store suddenly turns into something unique, as if an artist made it.
I once did this with a mirror that had been gathering dust in the garage for years. It was heavy, with a massive wooden frame, but it looked empty and bland. After painting, it turned into a true wow element, and now everyone asks me where I bought it.
What You’ll Need
- Old mirror with a wooden or metal frame (any size, but it’s easier to work with something around 18×24 in / 45×60 cm).
- Acrylic paints in bright or pastel shades.
- Primer for wood/metal.
- Painter’s tape.
- Several brushes (a wide one for the background and thin ones for details).
- Sandpaper.
- Protective lacquer.
Step-by-Step Instructions for this whimsical room decor
- Frame prep. First, clean the mirror of dust and dirt. If there’s old lacquer or peeling paint, gently sand it down. This removes imperfections and gives the surface texture so the paint adheres better.
Tip. Cover the glass with painter’s tape and paper so you don’t stain it. - Priming. Apply a thin coat of primer over the entire frame. For wood, one coat is enough; for metal, it’s better to do two. Let the primer dry for 1–2 hours before painting.
- Background. Choose a base color (white, cream, or light blue work well) and paint the entire frame with a wide brush. Apply 2 coats, letting it dry between each. This creates a “clean canvas” where accents will really pop.
- Add whimsical accents. Now for the fun part! Use bright colors to create a whimsical effect:
- add random strokes in different shades,
- paint spirals, drops, or splashes,
- draw flowing lines, like paint is dripping.
There are no rules here — the spontaneity is what sets the mood. I love mixing pastel and neon tones; it feels playful without being too loud.
- add random strokes in different shades,
- Finish. Once the paint is fully dry (about 3–4 hours), remove the tape from the glass. Seal the frame with clear protective lacquer. One coat gives it shine and protects the paint from scratches.
Such a mirror will instantly attract attention. In the entryway, it creates a cheerful vibe from the moment you walk in. In the bedroom, it pairs beautifully with soft textiles, adding coziness and character.
Hack. You can also glue on small decorative elements — beads, pieces of colored glass, or even faux flowers — for extra whimsy.
3. DIY Canopy Tent with String Lights
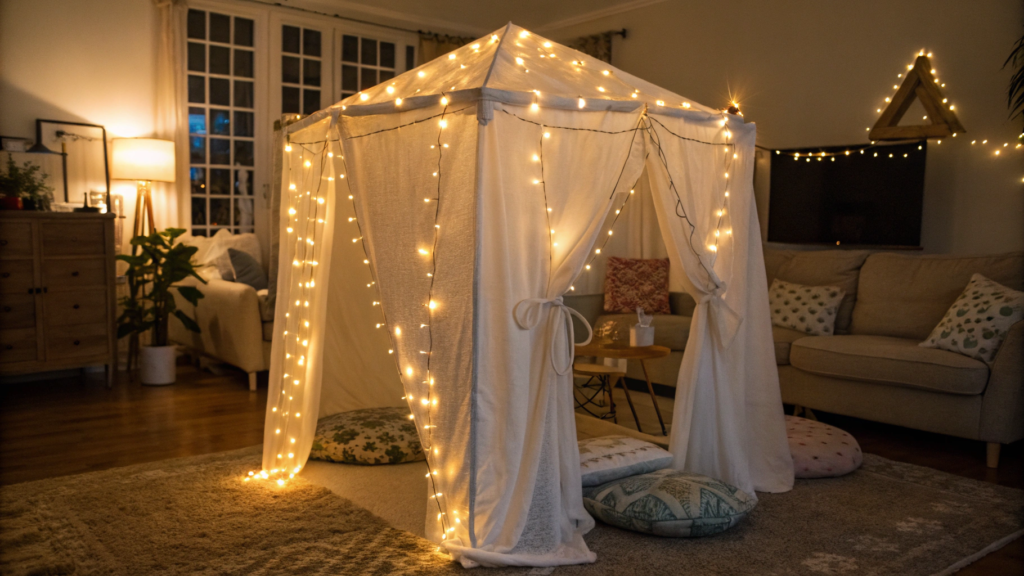
A little fabric, string lights, and some imagination — and suddenly you have a DIY Canopy Tent with String Lights, a cozy nook where you want to read, sip tea, or dream about new plans.
I once made this kind of canopy in our living room, and it instantly became everyone’s favorite spot. The vibe turned out to be warm and homey, and the whole project took just one evening.
What You’ll Need
- Lightweight fabric (about 5–6 yards / 4.5–5.5 m). Tulle, muslin, or cotton voile work perfectly.
- LED string lights, battery-powered or USB (20–30 ft / 6–9 m long).
- Ceiling hooks (at least 3 pieces).
- Strong rope or cord.
- Cushions and a throw blanket for comfort.
Step-by-Step Instructions for this whimsical room decor
- Pick the spot. Corners of the room or by the window work best. The canopy takes up about 5×5 ft (1.5×1.5 m), so plan the size in advance to keep proportions balanced.
- Install the hooks. Fix them into the ceiling in a triangular layout. You can add a central hook to hold most of the fabric’s weight.
- Hang the fabric. Attach one edge to the central hook and let it drape down. Pull the other ends to the side hooks, forming a tent shape. If the fabric is long, let it flow onto the floor for a soft, relaxed effect.
You can leave the fabric ends pooling on the floor or lightly secure them if you prefer a neater look. - Add the lights. Wrap the string lights around the fabric or let them cascade down in waves. I like to fix them with small clear clips to prevent slipping.
- Make it cozy inside. Add a throw blanket and soft pillows. Want even more comfort? Place a fluffy rug underneath.
How to Style It in Your Room
This canopy looks amazing in a bedroom, creating a sense of safety and intimacy.
In a child’s room, it becomes a “secret hideout” for play and reading (in that case, it’s best to secure the fabric ends with small hooks or Velcro so they don’t get in the way).
In the living room, it makes a perfect chill-out zone for inviting friends over for tea under the glow of the lights.
Tip. Choose warm white string lights — they make the atmosphere much more relaxing than cool tones.
4. Pastel Clay Sculptures for Shelf Styling
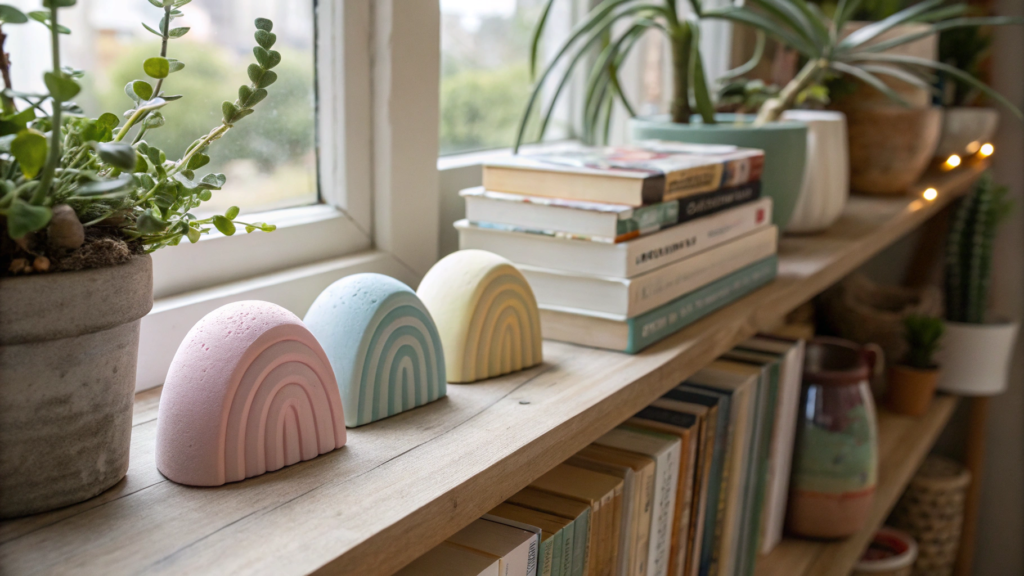
Pastel Clay Sculptures are a great way to add small accents to your interior that look modern yet slightly playful. These little sculptures don’t require any artistic training — just some polymer clay, imagination, and a free evening.
When you place these sculptures on a shelf next to books or plants, the eye immediately catches on their shape and color, making the whole space look more put-together, even if the shelf has a bit of creative mess.
What You’ll Need
- Pastel-colored polymer clay, for example, Sculpey III Pastel Colors Polymer Oven-Bake Clay, 10 Piece Set (pink, mint, lavender, peach).
- Clay knife or craft knife.
- Small rolling pin or a glass bottle for rolling.
- Shaping molds (even regular cookie cutters work).
- Oven for baking the clay.
- Matte varnish for sealing the surface.
Step-by-Step Instructions for this whimsical room decor
- Prepare the clay. Take small pieces and knead them in your hands until soft and pliable. This step prevents cracking during shaping.
- Create the forms. Roll out the clay to about 1/4 in (0.5–0.6 cm) thick. Cut out shapes: circles, hearts, abstract waves, or even small “pebbles.” If you want more dynamics, mix a few colors slightly and roll them together to create a marbled effect.
- Assemble a composition. Think about how the pieces will look together. Some can be taller (2–3 in / 5–7 cm), others flatter and wider. This contrast in size makes them feel more sculptural.
- Bake. Preheat the oven to 265°F (130°C) and bake for 15–20 minutes (follow the clay package instructions). Important: place the pieces on parchment paper so they don’t stick.
- Finish. Once cooled, coat them with matte varnish. This protects the surface from dust and gives a clean look.
Pastel sculptures pair beautifully with plants — they highlight the greenery and make the shelf feel airy. On a desk, they bring a sense of playfulness and give your eyes a break from the screen. In a kid’s room, they serve as safe and stylish décor that adds coziness without being over-the-top.
Tip. Make a series of 5–6 pieces in different shapes and sizes. Groupings always look stronger than a single item.
5. Fairy Garden Terrarium Lanterns
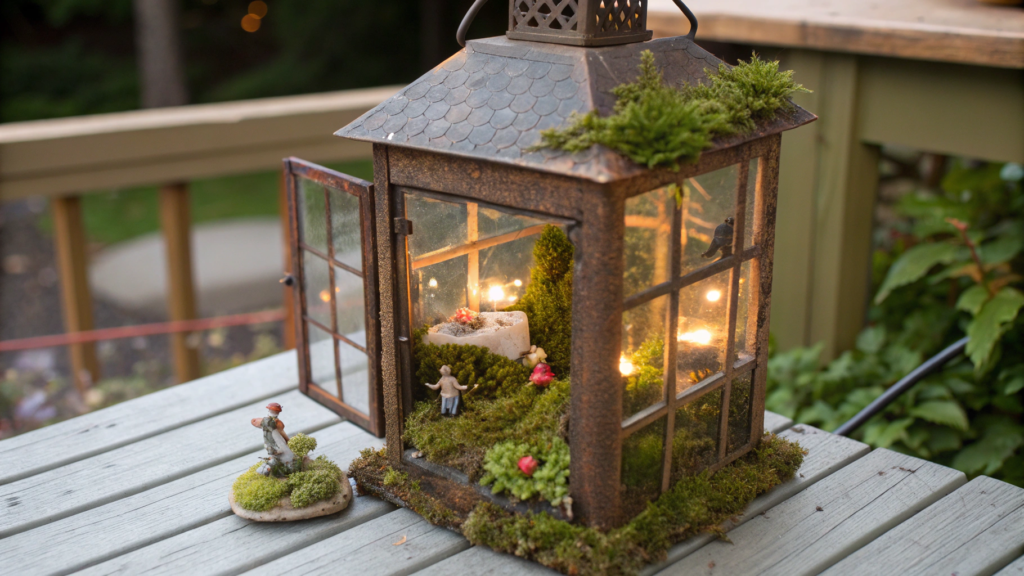
Imagine an old outdoor lantern where, instead of a candle, there’s a whole miniature garden with moss, tiny figurines, and soft lights. These little terrarium lanterns add a gentle, cozy glow to any room or veranda.
What You’ll Need
- Metal or glass lantern (candle models about 10–12 in / 25–30 cm tall work well), for example, Vela Lanterns Decorative Candle Lanterns available on Amazon.
- Moss (real or artificial).
- Miniature figurines of fairies, animals, or houses.
- Small stones and sand for the base.
- Battery-powered LED string lights.
Step-by-Step Instructions for this whimsical room decor
- Prepare the lantern. Remove the candle (if included). It’s important that there’s enough space inside for your arrangement.
- Make the base. Add a thin layer of small pebbles or sand to the bottom. This creates a “landscape” and provides stability for the other elements.
- Add greenery. Place moss to cover part of the surface. If using artificial moss, press it down slightly to make it look more natural.
- Place the figurines. Mini fairies, tiny houses, or even little toadstools will create a magical garden vibe. Try to arrange them so the composition looks balanced from all angles.
- Lighting. Carefully position the LED string lights around the inside edges. The warm glow will make the terrarium come alive, especially in the evening.
These lanterns work beautifully as night lights in the bedroom or as decorative accents in the living room. On a porch or in the garden, they create an incredibly cozy vibe for evening gatherings. And if you make several and line them up, you’ll have your very own “fairy-tale alley.”
Tip. Change the filler with the seasons! Add flowers in spring, tiny pumpkins in fall, and pinecones with faux snow in winter.
6. DIY Painted Window with Dreamy Haze Effect
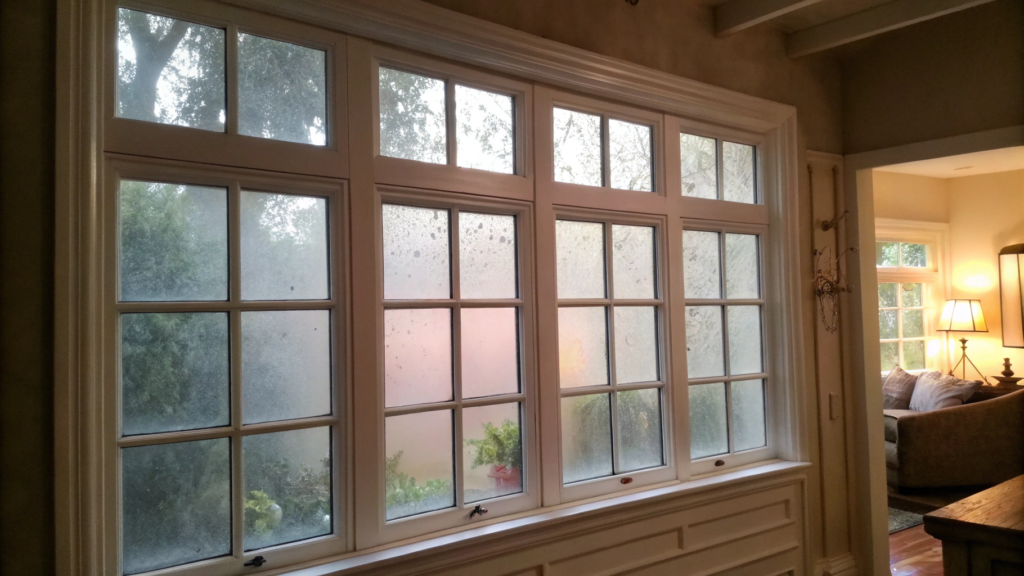
Ordinary glass can be transformed with just a light haze of spray paint, making a room feel more intimate and cozy while still letting the light stay soft and diffused.
What You’ll Need
- Old window glass or a ready-made frame with clear glass (18×24 in / 45×60 cm is a great starter size).
- Translucent spray paint (frosted glass effect), for example, Rust-Oleum Frosted Glass Spray Paint available on Amazon.
- Painter’s tape.
- Stencils for patterns (optional).
- Soft cloth for cleaning.
Step-by-Step Instructions for this whimsical room decor
- Prep the glass. Clean off all dust and grease. Even small spots will show under the paint, so it’s best to use glass cleaner and polish thoroughly.
- Cover unwanted areas. Use painter’s tape to mark off the frame or any sections you want to keep clear. You can also add stencils to create light patterns.
- Apply the first coat. Hold the can about 10–12 in (25–30 cm) away and spray with smooth, sweeping motions. Keep the layer thin and airy. Let it dry for 10–15 minutes.
- Build the effect. Repeat the process 2–3 times until you get the soft haze you like. The more coats, the less transparent the glass will be. Important: let each coat dry separately to avoid streaks.
- Finish. Carefully remove the tape and stencils. Wipe the glass edges with a soft cloth to clean off any remaining dust.
This kind of painted glass works beautifully as a decorative partition between rooms, giving the sense of a gentle veil. In a bathroom, it adds privacy without feeling closed in. In a bedroom, it turns sunlight into a soft glow, as if it’s always morning outside.
Tip. Try applying the haze only to the lower part of the glass, leaving the top clear. It gives depth and makes the window feel less standard.
7. Dreamcatcher-Inspired Mobile with Beads & Lace
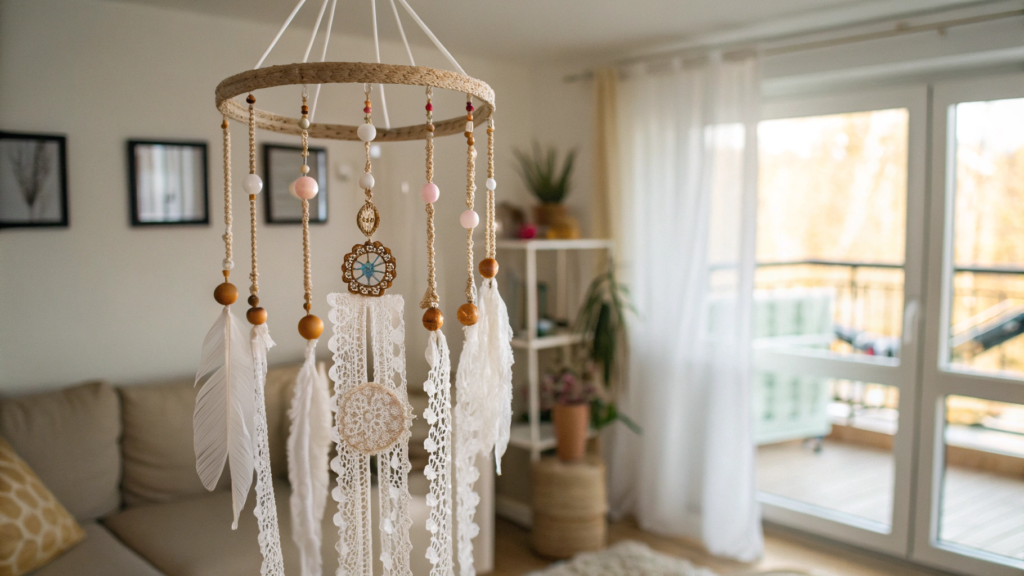
This idea combines the boho-style vibe with the softness of lace, and it also creates a gentle visual flow when the light elements sway in the breeze. You can hang such a mobile in the living room near a window or even in a nursery to add lightness to the space.
What You’ll Need
- Metal or wooden hoop (10–12 in / 25–30 cm in diameter).
- Lace ribbons and thin fabric strips.
- Beads in different sizes and colors (pastel or clear work best).
- Feathers (natural or artificial).
- Strong thread or thin fishing line.
- Hot glue gun (optional).
Step-by-Step Instructions for this whimsical room decor
- Base. Wrap the hoop with lace ribbon or fabric strips. This makes the frame softer and more decorative.
- Add the hangings. Cut several strips of lace and fabric about 18–24 in (45–60 cm) long. Attach them to the lower part of the hoop. Let them hang freely to form the base of the mobile.
- Beads and feathers. Thread beads onto the string or fishing line, securing them with knots at different heights. Attach feathers at the ends for a dreamcatcher-style accent.
- Assembly. Arrange the beads and fabric strips so they cascade downward. The key is to keep the lengths varied — this makes the design look more dynamic.
- Hanging loop. Secure three threads at the top of the hoop, tie them together in a knot, and leave a loop for hanging.
This mobile looks wonderful in a relaxation area, like over a reading chair or by a bedroom window. A light breeze will gently move the lace and beads, creating a peaceful atmosphere. In a nursery, it works beautifully above a bed or play area.
Tip. Choose beads with different textures — matte and clear. The light passing through them will reflect and dance on the walls.
8. Hand-Painted Whimsical Wall Clock
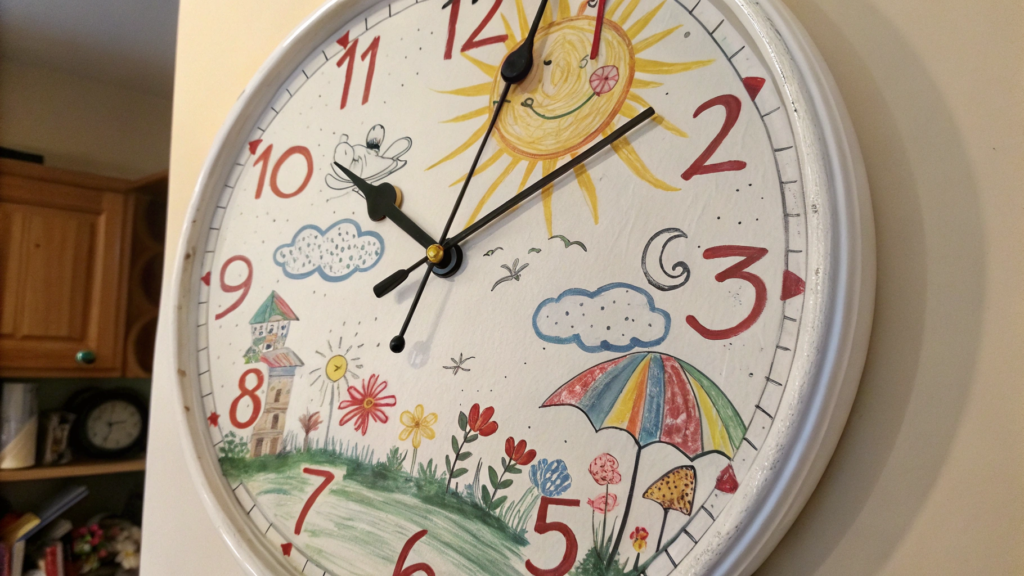
This is your chance to add a bright accent to your home — something that will lift your mood every single day. Imagine: ordinary clock hands ticking along, but the dial itself is decorated with playful brushstrokes, drawings, and unexpected details. That’s how a clock turns from a simple functional item into a true art piece.
What You’ll Need
- Plain wall clock with a smooth dial (10–12 in / 25–30 cm diameter works best).
- Acrylic paints and brushes of different sizes.
- Painter’s tape (for geometric patterns).
- Spray lacquer for sealing.
- Palette or simple plate for mixing paints.
A great base option is FirsTime & Co. Shiplap Wall Clock, 12-Inch available on Amazon.
Step-by-Step Instructions for this whimsical room decor
- Prepare the base. Remove the glass and hands from the clock (they usually come off easily if gently lifted). Make sure the surface is clean and dry.
- Background. Pick a main color and paint the entire dial. It can be a soft pastel tone or, on the contrary, a bold background — it depends on your room’s mood. Let the paint dry (about 1–2 hours).
- Add designs. Paint whimsical patterns: clouds, drops, spirals, waves, or even tiny flowers. Mix techniques — use painter’s tape for geometric lines and freehand strokes for abstract elements. The more variety, the more interesting the effect.
- Details. Highlight some numbers or dial markers with bright dots or small figures. This gives the clock individuality and a sense of playfulness.
- Finish. Once the paint is completely dry, seal the surface with clear spray lacquer. Reattach the hands and glass. Your clock is ready!
Such an accessory instantly becomes a focal point on the wall. In the living room, it enlivens the space above the sofa. Kitchen — it brings a playful touch to everyday life. In a child’s room, it doubles as décor and a learning tool — kids will love following the time on a “fun” clock.
Tip. Swap the standard clock hands for colorful ones — red or yellow will make the design pop even more.
9. DIY Toadstool Cushions for Cozy Corners
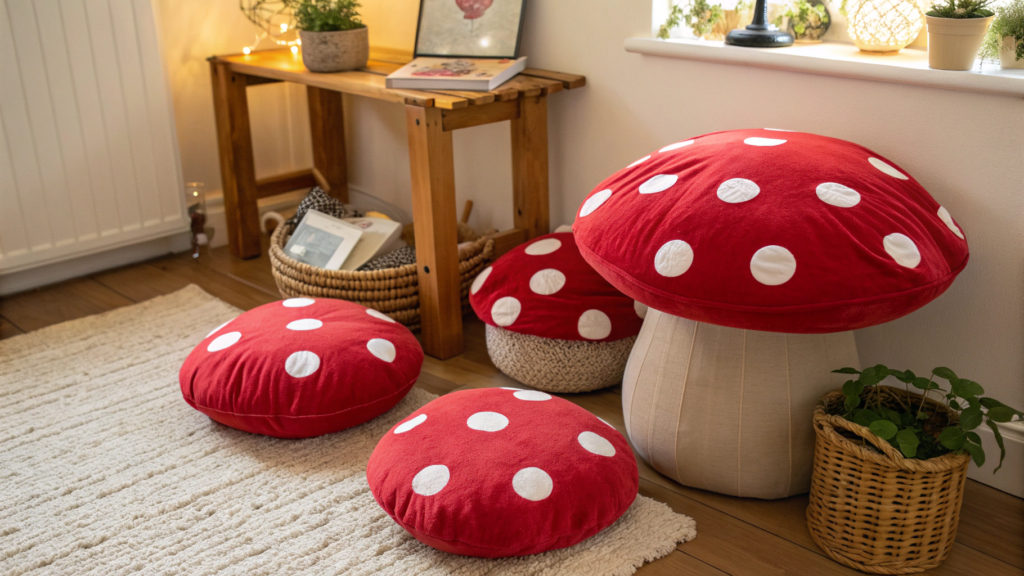
Sometimes ideas come unexpectedly. I went to visit friends just for tea, and came home with a brand-new inspiration for my own place. In their kids’ room, I noticed huge cushions shaped like toadstool mushrooms. Bright red with white spots, soft and playful.
These Toadstool Cushions bring a fairy-tale vibe into the space. You can toss them in a corner, place them by a low table, or stack them up.
What You’ll Need
- Red fabric (cotton or velour works best) for the top part of the cushion.
- White fabric for the “stem.”
- White felt for the spots.
- Stuffing (polyfill or foam, about 2–3 lbs / 1–1.5 kg), for example Fairfield Poly-Fil Premium Fiber Fill, 5 lbs available on Amazon.
- Thread, needle, or sewing machine.
- Scissors, pins.
Step-by-Step Instructions for this whimsical room decor
- Cap. Cut a circle out of the red fabric about 24 in (60 cm) in diameter. The larger the circle, the bigger and chunkier the cushion will be.
- White spots. Cut felt circles in different sizes (1–3 in / 2.5–7 cm). Sew them randomly onto the red fabric. This gives the cushion its mushroom look.
- Stem. From the white fabric, make a cylinder about 10–12 in (25–30 cm) tall and the same diameter as the red top. This will be the “stem” of the mushroom.
- Join the pieces. Pin the red cap to the white cylinder and stitch around. Leave a small opening for stuffing. Once sewn, carefully remove the pins and keep the opening accessible.
- Stuffing. Fill the cushion tightly with polyfill or foam. The denser the fill, the more stable the cushion will be.
- Finish. Sew the opening closed by hand or machine. Smooth the fabric and shape it.
These cushions are perfect for lazy corners. In a kids’ room, they’ll become a favorite play spot. Living room — they add humor and a relaxed vibe. Bedroom — they can work as fun poufs near a bedside table.
Tip. Make several cushions in different sizes. Together they create the feeling of a real mushroom meadow right inside your home.
10. Repurposed Frame as a Mini Whimsical Art Gallery
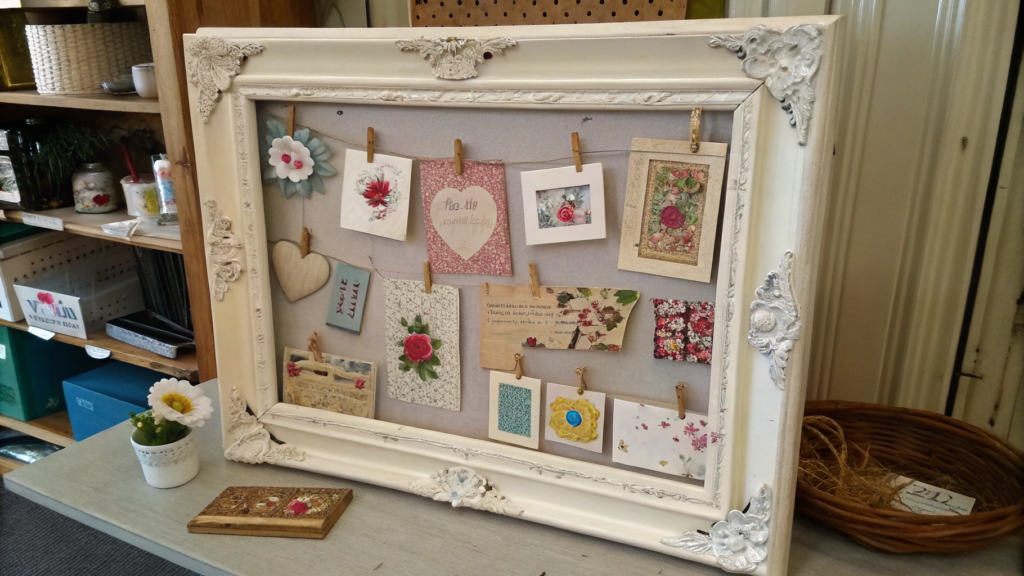
An old picture or photo frame that’s been gathering dust in the closet suddenly comes alive and becomes the base for a mini whimsical-style gallery. Inside, you can display mini illustrations, postcards, dried flowers, or even small fabric appliqués. The result is something decorative yet deeply personal.
What You’ll Need
- Old frame (a larger one works best — about 16×20 in / 40×50 cm).
- Paint or wood stain to refresh the frame.
- Sturdy cardboard or plywood for the back panel.
- Small clothespins, twine, or decorative ribbon.
- Lightweight display items: photos, mini drawings, dried plants.
Step-by-Step Instructions for this whimsical room decor
- Prep the frame. Clean off dust. If the wood has darkened or lost its look, sand it lightly and cover it with paint or stain. This refreshes it and creates the base for your future display.
- Back panel. Insert cardboard or thin plywood. You can paint it in a solid color or cover it with fabric for a softer background.
- Create the hanging base. Stretch twine or ribbon across the frame in 2–3 rows, securing it at the back. This will hold the gallery’s exhibits.
- Add clothespins. Small wooden clothespins hold lightweight items perfectly. You can even paint them in bright colors to make them part of the design.
- Arrange the exhibits. Photos, postcards, sketches, pressed leaves, or flowers — anything you’d like to showcase. It’s easy to change the display with the seasons or your mood.
This mini gallery looks beautiful in an entryway, setting the tone right when you walk in. In a bedroom, it can be a vision board for your favorite images and quotes. In the living room, the frame becomes a unique wall accent, especially near a bookshelf or sofa.
Your Home, Your Rules
That’s the end of this second set of ideas. Now you’ve got 10 more fresh projects that you can bring to life even on a weekend. Each one adds not just beauty but also personality — that sense that your space truly belongs to you.
If you haven’t seen Part 1 of this article yet, definitely check it out — it’s full of inspiring DIY décor ideas, and together the two posts form a whole collection of solutions for anyone who wants to live surrounded by eye-catching details.Tell me, which idea speaks to you most? The rainbow shelf? The mushroom cushions? Share in the comments — I always love hearing how these projects come alive in your homes!


