When a group gets together, it’s always the same story: some people arrive early, others show up later. Someone eats standing up, someone says they’ll “just have a bite” — and then comes back for more. In moments like that, complicated dishes only get in the way.
That’s exactly why I make sliders so often. They scale easily for any size crowd. In this roundup, I’ve put together 10 crowd-friendly slider recipes that actually work in real life. All of them come together fast, cook on a sheet pan or in a slow cooker, and handle pauses between servings without a problem.
Here’s only what’s truly convenient, clear, and good when you’re feeding a lot of people.
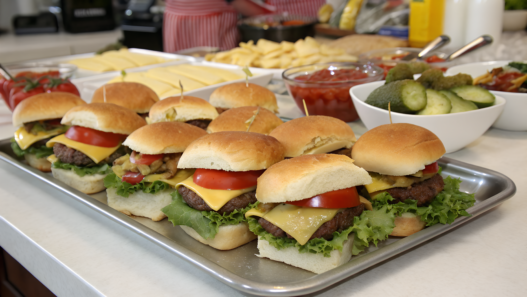
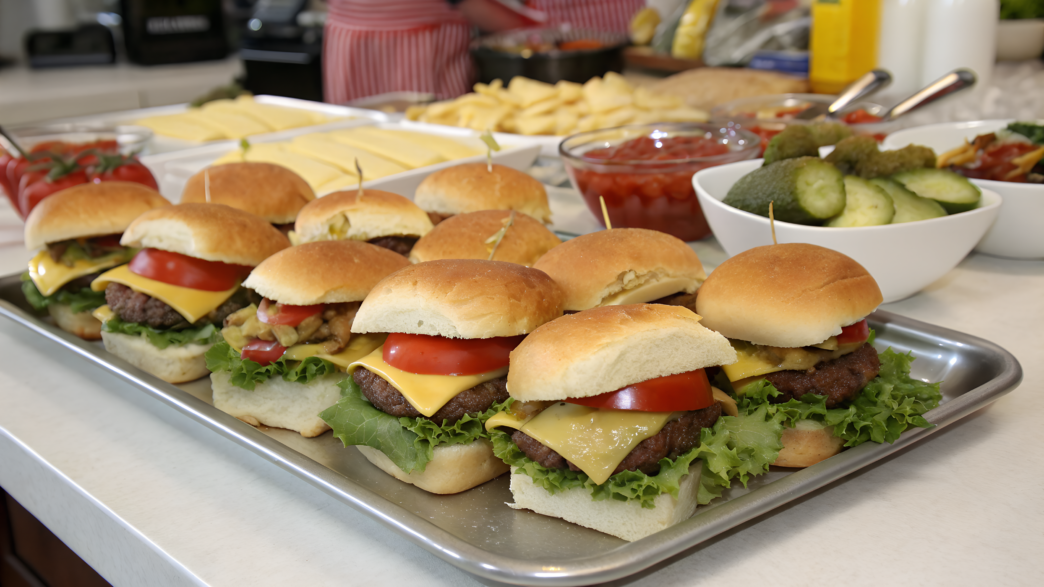
1. Party-Size Cheeseburger Sliders with Pickle Relish Butter

I make these sliders when I know there will be a lot of people, even more talking, and I really don’t want to stand at the stove all evening. And yes — they pretty much cook themselves.
Why these sliders work
- cooked on one sheet pan
- can be assembled ahead of time
- easy to scale up
- literally everyone likes them
And one small tweak — pickle relish butter.
Ingredients (for a large crowd, 12 sliders)
For the sliders:
- 80/20 ground beef — 1½ lb (about 680 g)
- Salt — 1½ tsp
- Black pepper — 1 tsp
- Garlic powder — 1 tsp
- Onion powder — 1 tsp
- Cheddar or American cheese — 6–8 slices
- Slider buns (Hawaiian rolls work great) — 12
For the Pickle Relish Butter:
- Softened butter — ½ cup (about 115 g)
- Pickle relish — ¼ cup (about 60 g)
- Dijon mustard — 1 tbsp
- A pinch of sugar
- A little black pepper
How I make them
- I start with the meat. Not because that’s what the textbook says, but because it’s the most practical.
- I preheat the oven to 375°F (190°C). I let it heat up calmly, no rushing. It matters to me that the meat goes straight into a hot oven — that way it sets faster on the outside and stays juicy inside.
- I mix the ground beef with salt, pepper, and spices. With my hands. Always. A spoon just doesn’t do it. I don’t overmix — just until everything is combined. The less handling, the softer the meat after baking.
- I spread the meat in one even layer on a parchment-lined sheet pan. No patties, no shaping. I just spread it out, like focaccia dough. This saves time and gives even thickness, which means no dry edges.
- I gently press the meat with my palm. Just a little. I don’t want a dense “brick,” I want a juicy layer that’s easy to cut to bun size later.
- I bake the meat for 15–18 minutes. I don’t rely on the timer alone — I go by smell too. When the kitchen starts smelling like burgers, it’s time to check.
- While the meat is in the oven, I make the butter. I mix softened butter with relish, Dijon mustard, sugar, and pepper. No blenders. Just a bowl and a fork. The butter stays slightly textured, with little pickle bits — the flavor feels brighter that way, not flat.
I taste the butter. Sometimes straight from the spoon. Yes, really. And every time I think it would be great on potatoes or vegetables too.
Assembly (the best part)
I slice all the buns at once, without separating them. I place the bottom half into the baking dish.
Then:
- a layer of meat
- cheese (it melts just enough — exactly what we want)
- top buns
And now the most important part — I generously brush the tops with the pickle butter.
Don’t hold back. This is one of those times when “a little more” is the right choice.
I send everything back into the oven for 10–12 minutes, until the tops turn golden.
A few tips from my experience
- If you’re cooking for a very large group, make a double batch of the butter. People will put it on everything.
- These sliders stay warm really well for 30–40 minutes under foil.
- Leftovers (if there are any) the next day…
2. Hawaiian Roll Ham and Swiss Sliders with Onion Soup Mix Glaze

These sliders are my go-to option when I need to feed a lot of people fast. Slightly sweet rolls, salty ham, melty Swiss cheese, and that glossy top with onion soup mix glaze. The smell in the oven is so good that people start accidentally wandering into the kitchen before the timer even goes off.
Ingredients (12 sliders)
Base:
- Hawaiian rolls — 12
- Ham (thinly sliced) — 12–16 slices (about 300–350 g)
- Swiss cheese — 6–8 slices
Onion soup mix glaze:
- Butter, melted — ½ cup (about 115 g)
- Dry onion soup mix — 1 packet (about 40 g)
- Dijon mustard — 1 tbsp
- Worcestershire sauce — 1 tsp
- Poppy seeds — 1 tbsp (optional, but I almost always add them)
Little real-life observations
- These sliders hold heat really well, so you can make them ahead of time.
- They’re great both warm and at room temperature.
- If there are leftovers, they reheat in the oven much better than in the microwave the next day.
How I make them (no extra fuss)
- I slice all the rolls at once. I don’t separate them — that way they hold their shape and don’t slide around during assembly. It also speeds things up, especially when you’re cooking for a crowd and doing other things in the kitchen at the same time.
- I layer the ham and cheese. Ham goes on first, slightly overlapping, no perfect order. Swiss cheese slices on top. I don’t try to line everything up with each roll — once it bakes, everything melts and settles on its own.
- I place the top half of the rolls on without pressing. This part matters. I don’t push them down with my hands. They should sit loosely — in the oven they’ll settle exactly as much as they need to.
- I make the glaze right before brushing it on. I melt the butter and immediately stir in the dry onion soup mix. It doesn’t look pretty at first, and that’s fine. I add Dijon mustard and Worcestershire sauce so the flavor is deeper, not just salty and buttery. If I’m using poppy seeds, they go in at the very end.
- I generously brush the tops with the glaze. I don’t aim for perfection. Some spots get more glaze, some less — that’s what gives the top more texture and aroma. Some of the glaze always runs down the sides, and that’s only a good thing.
- I cover with foil and bake. First, 10 minutes at 350°F (180°C) — covered, so everything heats through and the cheese starts melting. Then I remove the foil and bake for another 8–10 minutes, until the tops are golden and lightly crisp.
- I let them rest for 5 minutes before cutting. It sounds small, but it makes a difference. The rolls set, the cheese stays put, and slicing is cleaner and easier.
I usually assemble these sliders in Nordic Ware Naturals Aluminum Commercial Baker’s Half Sheet, because it doesn’t warp with heat and the glaze doesn’t burn around the edges.
Tip. These sliders are especially good when served with something fresh and tangy — pickles, a light salad, or even simple apple slices balance the rich glaze really well.
3. Cold Italian Sub Sliders with Marinated Olive Salad Topping

When there’s already enough hot food on the table and you need something cold, bright, salty, and full of character, these sliders come in right on time. If the table is big, cold Italian sliders balance hot dishes really well.
And yes — there’s no baking involved. At all. Which, on party days, feels like a small win.
This is real food with an Italian vibe. A little loud, with olives, vinegar, and that unmistakable oregano aroma.
Ingredients (12 sliders)
Base:
- Soft slider buns — 12
- Salami — 6–8 slices
- Pepperoni — 6–8 slices
- Ham or mortadella — 6 slices
- Provolone — 6 slices
Marinated olive salad:
- Green olives, pitted — ½ cup (about 120 g)
- Black olives — ½ cup (about 120 g)
- Red onion, very finely chopped — ¼ cup (about 40 g)
- Roasted red peppers (jarred or homemade) — ¼ cup (about 60 g)
- Capers — 1½ tbsp
- Extra virgin olive oil — ¼ cup (about 60 ml)
- Red wine vinegar — 1½ tbsp
- Dried oregano — 1 tsp
- Black pepper — to taste
How I make them
- I start with the olive salad. I finely chop the olives, onion, and peppers, but I don’t turn everything into a paste. Texture matters here — I want to feel it in every bite. I add the capers, oil, vinegar, and oregano, mix everything together, and let it sit on the counter for 10–15 minutes. During that time, the flavor pulls itself together and gets deeper.
- I slice the buns in one whole slab. Like with all sliders — not one by one. This keeps them from falling apart and makes them look neater when serving. I place the bottom half straight into the dish.
- I build the meat layer. Salami goes first, then pepperoni, then ham. Slight overlap, no perfect order. This isn’t about symmetry — it’s about flavor density.
- I add the cheese. Provolone goes on top of the meat. It’s mild, doesn’t overpower anything, and holds everything together. It works better here than mozzarella or cheddar.
- I evenly spread the olive salad. With a spoon, no rushing. Some of the marinade soaks into the bread, and that’s exactly what we want. The buns turn juicy, but not soggy.
- I place the top buns on and gently press. Not hard. Just enough to bring everything together. I usually cover the dish with foil and refrigerate it for at least 30 minutes. During that time, the sliders “set,” and slicing becomes much easier.
- I slice with a sharp knife right before serving. This part matters. If the knife isn’t sharp, the layers will slide. I usually use my Victorinox Fibrox Pro 8-Inch Chef’s Knife, because it cuts cleanly through bread, meat, and olives without pressure.
Serving tip. These sliders are best served slightly chilled, not ice-cold. Take them out of the fridge about 10 minutes before serving — the flavor softens, and the olive oil aroma opens up more fully.
If the table is large, cold Italian sliders balance hot dishes beautifully.
4. Buffalo Chicken Sliders with Ranch Slaw for Game Day Crowds
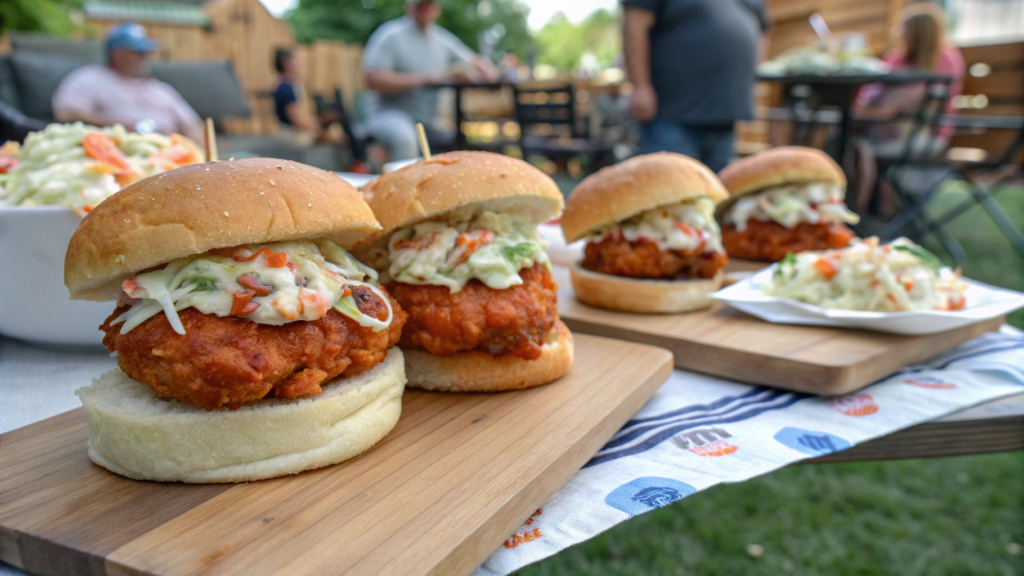
Spicy, juicy, a little messy — exactly how food should be for game day, loud crowds, and people eating while standing around arguing about the score.
I love this version for the contrast. Hot, spicy chicken and cold, crunchy ranch slaw. Together they work better than on their own. And yes, napkins are required. That’s normal.
We made these sliders a couple of years ago while watching a game at friends’ place.
We ate them straight off the table in the backyard, standing, talking, and arguing about the score. Lindy said that cold slaw with spicy chicken is exactly what snacks like this are usually missing. I was skeptical at first, and then I realized she was absolutely right. Since then, this version stuck, and we almost never make Buffalo chicken without a crunchy cold layer on top.
Ingredients (12 sliders)
Buffalo chicken:
- Chicken breast or boneless thighs — 2 lb (about 900 g)
- Buffalo sauce — ¾ cup (about 180 ml)
- Melted butter — ¼ cup (about 60 g)
- Garlic powder — 1 tsp
- Paprika — 1 tsp
- Salt — to taste
Ranch slaw:
- Green cabbage, finely shredded — 3 cups (about 200 g)
- Carrots — 1 cup (about 80 g)
- Ranch dressing — ½ cup (about 120 ml)
- Apple cider vinegar — 1 tsp
- A pinch of salt
Assembly:
- Slider buns — 12
- Butter for brushing — 2 tbsp
How I make them
- I cook the chicken ahead of time. I usually use a slow cooker, because it takes half the pressure off on game day. I add the chicken, pour over the Buffalo sauce, add the butter and spices, and cook on low for 4–5 hours, until the meat starts falling apart on its own. If I need it faster, I bake it in the oven at 375°F (190°C) for about 30 minutes, covered with foil.
- I shred the chicken. I do this with two forks right in the dish or bowl. I want the meat fully coated in sauce, but not swimming in it. If there’s too much sauce, I remove a couple of spoonfuls.
- I make the ranch slaw. I mix the cabbage, carrots, ranch dressing, vinegar, and salt. No extra add-ins. The slaw should be fresh and crunchy, not drowned in dressing. I put it in the fridge for at least 20 minutes — the cold matters here.
- I slice the buns in one slab. I place the bottom half into the dish and brush it lightly with melted butter. This helps keep the bread from getting soggy from the sauce.
- I spread the chicken in an even layer. I distribute it evenly without pressing it down. I want to keep the fibers light so the sliders don’t feel heavy.
- I add the top buns and warm everything through. I cover with foil and put them in the oven for 10 minutes at 350°F (180°C) — just enough to heat everything through and lightly dry the bread on top.
- I add the ranch slaw right before serving. I lift the top buns, add the cold slaw onto the hot chicken, and put the tops back on. That temperature contrast is part of the experience.
Serving tip. I always put extra ranch on the table and a few celery sticks on the side. Some people add more sauce inside, others eat it on the side. These sliders like a little freedom.
5. Kid-Friendly Cheeseburger Pizza Sliders on Garlic Butter Rolls

When there are kids at the table, they don’t need complex flavors, unexpected textures, or “interesting accents.” They need food that’s familiar, clear, and good. Preferably — with cheese. And more cheese.
And when cheeseburger pizza sliders show up, there are no extra questions at the table.
Ingredients (12 sliders)
Base:
- Slider buns — 12
- Ground beef — 1½ lb (about 680 g)
- Salt — 1 tsp
- Black pepper — ½ tsp
Pizza layer:
- Tomato sauce (pizza or marinara) — ¾ cup (about 180 ml)
- Mozzarella, shredded — 2 cups (about 200 g)
- Cheddar, shredded — 1 cup (about 100 g)
Garlic butter:
- Butter, melted — ⅓ cup (about 75 g)
- Garlic, finely chopped — 2 cloves
- Italian seasoning — 1 tsp
- A pinch of salt
How I make them (no extra fuss)
- I cook the meat simply and “clean.” I brown the ground beef in a skillet with nothing but salt and pepper. I want the flavor to stay as neutral as possible so it doesn’t compete with the sauce and cheese. I cook it until fully done, then remove it from the heat.
- I slice the buns in one slab and place the bottom in the pan.This saves time and nerves. The bottom layer is immediately ready for assembly, nothing falls apart or slides around.
- I spread a thin layer of tomato sauce.Not like restaurant pizza — carefully. Too much sauce will make the buns soggy, and that’s not what we want here.
- I add the meat in an even layer.I spread the beef so it covers the whole surface, but without packing it down. It should stay loose.
- I add the cheese — and this is not the place to hold back.Mozzarella first, then cheddar. One gives stretch, the other gives flavor. Kids notice this even if they can’t explain why.
- I place the top buns on. I press gently with my hands, just enough to bring everything together.
- I mix the garlic butter and brush the tops.Butter, garlic, herbs, salt — I mix quickly and generously brush the buns. Some of it runs down the sides, and that’s perfect.
- I bake covered, then uncovered.
First 10 minutes at 350°F (180°C) under foil so everything heats through. Then I remove the foil and bake for another 8–10 minutes, until the tops are golden and fragrant.
We often make these sliders when kids are playing in the yard and everyone needs something fast and familiar. They eat them quietly — and honestly, that’s the best compliment a kid-friendly dish can get. Lindy usually laughs and says this is the only kind of “pizza” you can eat without a plate and without arguments.
Serving tip. Slice the sliders right away, but serve them warm, not piping hot. If there’s ketchup or a simple tomato sauce on the table for dipping, they’ll disappear faster than you expect.
6. Vegetarian Caprese Pesto Sliders with Balsamic Drizzle
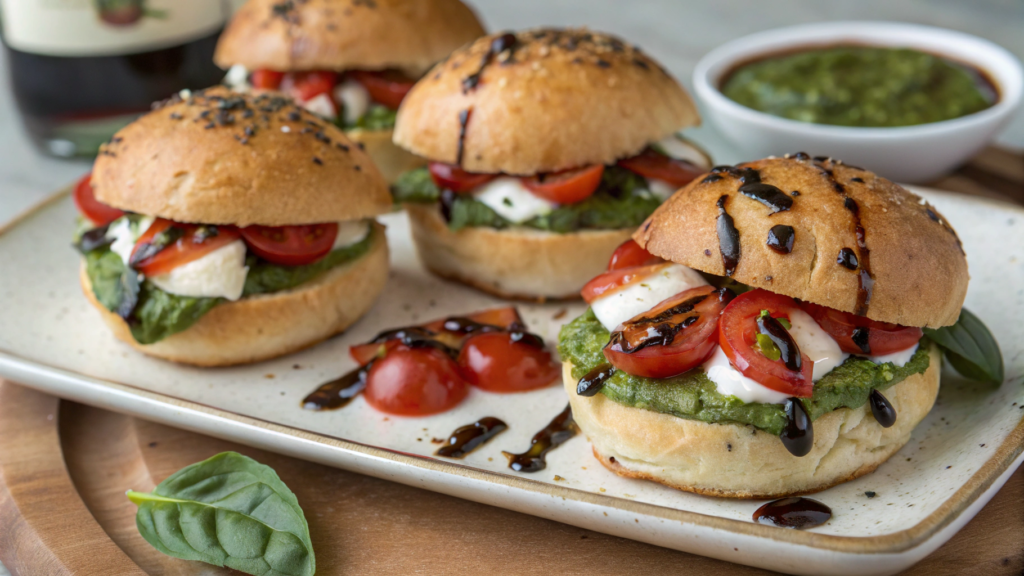
Caprese is one of those things that always surprises me. Tomatoes, mozzarella, basil — nothing complicated, but together it just works. And when you add pesto, warm buns, and a little sweet-tangy balsamic drizzle… that’s it. Conversation over.
Ingredients (12 sliders)
Base:
- Slider buns — 12
- Fresh mozzarella — 12 slices (about 225–250 g)
- Ripe tomatoes — 2–3, sliced into rounds
Pesto layer:
- Pesto sauce — ½ cup (about 120 g)
Balsamic glaze:
- Balsamic vinegar — ½ cup (about 120 ml)
- Honey or maple syrup — 1½ tbsp
For the tops:
- Butter, melted — ¼ cup (about 60 g)
- Italian herbs — ½ tsp
- A pinch of salt
How I make them
- I start with the balsamic glaze. I pour the vinegar into a small saucepan, add the honey, and place it over medium heat. I let it simmer gently until the volume reduces by about half. The texture should be thick but still pourable. I take it off the heat and let it cool — it thickens more as it cools.
- I slice the buns in one slab. I place the bottom half straight into the pan. This recipe doesn’t like rushing or individual halves — a single layer works cleaner and looks better on the table.
- I spread the pesto in a thin but confident layer. I don’t spread it until it disappears. The flavor should be noticeable. Pesto is what sets the tone for the whole dish here.
- I layer the mozzarella and tomatoes. Cheese goes first, then tomatoes. I try to choose tomatoes that are firm and not watery. If they release a lot of juice, I blot the slices with a paper towel.
- I place the top buns on and press lightly. No pressure. Just enough to bring everything together.
- I brush the tops with the flavored butter. I mix the melted butter with Italian herbs and salt and brush it over the buns. Not perfectly — a little unevenness keeps it looking alive.
- I bake until soft and lightly golden. I put them in the oven at 350°F (180°C) for 12–15 minutes. I’m not looking for crunch here — I want a warm, soft texture and melted mozzarella.
- I drizzle with balsamic glaze right before serving. Thin lines. Not flooded. This is the final touch, not the main flavor.
Serving tip. These sliders are best served warm, not hot. When the mozzarella is soft and the tomatoes aren’t burning your mouth, the flavors feel much more balanced.
7. Turkey Club Sliders with Bacon and Honey Mustard Mayo
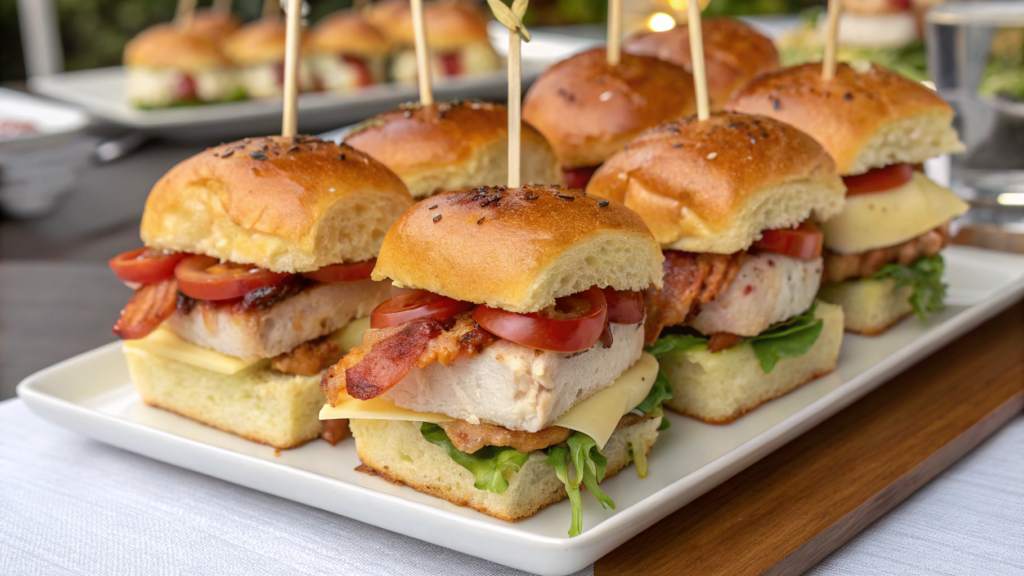
These are warm sliders that hold their shape, don’t fall apart, and work well on a big table. They’re easy to eat by hand, don’t drip, and don’t require a plate — which is exactly why a turkey club shows up so often when a group with different tastes gets together. Roasted turkey, crispy bacon, mild cheese, and honey mustard sauce — everything is familiar, everything works, and there’s no need to complicate it.
Ingredients (12 sliders)
Base:
- Slider buns — 12
- Roasted turkey, thinly sliced — 1 lb (about 450 g)
- Bacon — 8–10 slices
- Cheese (provolone or Swiss) — 6 slices
- Lettuce leaves — 6–8
Honey Mustard Mayo:
- Mayonnaise — ½ cup (about 120 g)
- Dijon mustard — 1½ tbsp
- Honey — 1½ tbsp
- Black pepper — to taste
For the tops:
- Butter, melted — ¼ cup (about 60 g)
- Garlic powder — ½ tsp
- A pinch of salt
How I make them (no extra fuss)
- I start with the bacon. I cook it until fully crispy and transfer it to a paper towel. It needs to be crisp — soft bacon gets lost here and adds extra grease.
- I mix the sauce. I stir together mayonnaise, honey, and Dijon until smooth. The sauce should be balanced — not too sweet, not too sharp. I always taste it with my finger. No spoon needed.
- I slice the buns in one slab. I place the bottom half into the baking dish. This saves time and keeps everything looking neat when serving.
- I spread the honey mustard mayo. Not too thin. This sauce isn’t a background note — it’s a full part of the flavor.
- I layer the turkey and cheese. I distribute the turkey evenly without pressing it down. The cheese goes on top — it melts slightly and ties everything together.
- I add the bacon and lettuce. I break the bacon with my hands and scatter it casually. The lettuce goes on last so it keeps its texture and doesn’t wilt from the heat.
- I add the top buns and brush with butter. I mix the melted butter with garlic powder and salt and brush the buns lightly. No need to overdo it — just enough for aroma.
- I warm them briefly in the oven. I bake at 350°F (180°C) for about 10–12 minutes, until the cheese starts to melt and the tops dry slightly. Longer isn’t necessary — these lean more toward the cold side.
We often make these sliders when people of different ages and preferences gather around the table. Some reach for spicy, some for vegetarian, but turkey club usually works for everyone.
Serving tip. Slice with a sharp knife and serve right away while the lettuce is still crisp. If they sit too long in the warmth, the texture softens — not a disaster, but not the same.
8. Sheet-Pan Breakfast Sausage and Egg Sliders for Brunch Buffets

Sausage and egg sliders are warm, filling, and sturdy, and they can calmly wait their turn on the sheet pan.
What I like most is that this is a full breakfast, not just something to snack on with breakfast. Eggs, meat, bread — everything is there. And no running back and forth between skillets.
Ingredients (12 sliders)
Base:
- Slider buns — 12
- Breakfast sausages (pork or turkey) — 12
- Eggs — 8
- Milk or cream — ¼ cup (about 60 ml)
- Salt — ½ tsp
- Black pepper — ½ tsp
Cheese layer:
- Cheddar, shredded — 1½ cups (about 150 g)
For the tops:
- Butter, melted — ¼ cup (about 60 g)
- Maple syrup — 1½ tbsp
- A pinch of salt
How I make them
- I cook the sausages ahead of time. I brown them in a skillet until golden and set them aside. It matters that they’re fully cooked — in the oven they’ll only be reheated.
- I bake the eggs in one even layer. In a bowl, I whisk the eggs with milk, salt, and pepper. I pour the mixture into a parchment-lined pan and bake at 350°F (180°C) for about 12–15 minutes, until the eggs are set but still soft. This gives me a clean, even layer that’s easy to cut to bun size.
- I slice the buns in one slab. I place the bottom half into a dish or onto a sheet pan. This recipe works best when everything is compact and there are no gaps.
- I build the layers. First the baked eggs, then the sausages, then the cheese. I’m generous with the cheese — it’s not just for flavor, it helps hold all the layers together.
- I add the top buns. I press gently with my hands, just enough to keep everything from shifting during baking.
- I brush the tops with maple butter. I mix the butter, maple syrup, and salt and brush the buns. The sweetness is very subtle — it highlights the sausage without turning the sliders into dessert.
- I warm everything together in the oven. I cover with foil and bake at 350°F (180°C) for 10 minutes, then remove the foil and bake another 5–7 minutes, until the tops are lightly golden.
We often put these sliders out when brunch stretches into half the day. Someone grabs one with coffee, someone else comes back later for a second. They handle that calmly, without losing flavor or structure — which is rare for a breakfast table.
Serving tip. Slice the sliders before serving and keep them under foil on low heat. They’ll stay warm without drying out, even if guests don’t sit down at the same time.
9. Slow-Cooker BBQ Chicken Sliders with Tangy Apple Slaw

In this recipe, the chicken slowly cooks on its own, the kitchen smells like smoke and apples, and you’re free to do anything else — garden, talk to guests, have conversations, live your life.
BBQ chicken and apple slaw is a simple but very precise pairing. Sweet, tangy, salty, with a little smoky depth. That balance is exactly what keeps BBQ dishes from feeling heavy.
Ingredients (12 sliders)
BBQ chicken:
- Boneless chicken thighs or breasts — 2 lb (about 900 g)
- BBQ sauce — 1½ cups (about 360 ml)
- Apple cider vinegar — 2 tbsp
- Smoked paprika — 1½ tsp
- Garlic powder — 1 tsp
- Salt — to taste
Apple slaw:
- Green cabbage, finely shredded — 3 cups (about 200 g)
- Apple (sweet-tart), julienned — 1 large
- Mayonnaise — ½ cup (about 120 g)
- Apple cider vinegar — 1½ tbsp
- Honey — 1 tsp
- A pinch of salt
Assembly:
- Slider buns — 12
- Butter — 2 tbsp (optional, for the tops)
How I make them (no extra fuss)
- I add the chicken to the slow cooker. I place the chicken in whole pieces — that way it loses less moisture. I add the BBQ sauce, vinegar, spices, and salt right away. I mix everything by hand so every piece is coated.
- I cook on the low setting. I set it to low for 5–6 hours. By then, the chicken is soft enough to fall apart on its own. I like this setting for its consistency — the result is always predictable.
- I shred the chicken. I do this right in the slow cooker bowl with two forks. If there’s too much sauce, I remove a couple of spoonfuls — the meat should be juicy, not swimming.
- I make the apple slaw. I mix the cabbage and apple. In a separate bowl, I combine the mayo, vinegar, honey, and salt. I dress the slaw and refrigerate it for at least 20 minutes. It needs to be cold and crunchy — that’s essential.
- I slice the buns in one slab. I place the bottom half into a dish or onto a sheet pan. This recipe isn’t about individual assembly — everything should be fast and compact.
- I spread the hot chicken in an even layer. I distribute it evenly without packing it down. The fibers should stay “alive,” not compressed.
- I add the top buns and warm if needed. If guests are already nearby, I serve right away. If everything needs to be hot at once, I cover with foil and place it in the oven for 8–10 minutes at 350°F (180°C).
- I add the apple slaw right before serving. I lift the top buns, add the cold slaw onto the hot chicken, and put the tops back on. The contrast in temperature and texture is half the flavor here.
Serving tip. If the table is large, keep the slaw separate and add it as you serve. That way it stays crunchy until the very last slider.
10. Roasted Veggie and Mozzarella Sliders for Meat-Free Gatherings

Roasted vegetables, warm mozzarella, and bread that soaks up all the juices — there’s no feeling of “meat replacement” here. This is just good food, full stop.
These sliders are especially helpful when there are people with different eating habits at the table. Someone doesn’t eat meat, someone is tired of heavy dishes, and someone just wants something more vegetable-forward and satisfying.
Ingredients (12 sliders)
Vegetables for roasting:
- Zucchini — 1 medium
- Red bell pepper — 1 large
- Red onion — 1 medium
- Mushrooms — 8–10
- Olive oil — 3 tbsp
- Balsamic vinegar — 1 tbsp
- Salt — ¾ tsp
- Black pepper — ½ tsp
- Dried oregano or thyme — 1 tsp
Assembly:
- Slider buns — 12
- Fresh mozzarella — 8–10 slices (about 225–250 g)
For the tops:
- Butter, melted — ¼ cup (about 60 g)
- Garlic, finely chopped — 1 clove
- A pinch of salt
How I make them (no extra fuss)
- I cut the vegetables into large pieces. It’s important to me that they don’t turn into a stew. Larger cuts keep texture and prevent the vegetables from drying out during roasting.
- I season the vegetables right on the sheet pan. I add olive oil, balsamic vinegar, salt, pepper, and herbs. I mix everything with my hands so it’s evenly coated. It’s faster and more honest than bowls and spoons.
- I roast until caramelized. I put the vegetables in the oven at 400°F (200°C) for 25–30 minutes, stirring once. I’m looking for browning and softness, but not collapse.
- I slice the buns in one slab. I place the bottom half into the pan. This step always saves time and keeps assembly calm.
- I add a layer of roasted vegetables. I spread them evenly, making sure each portion gets a mix of different vegetables. It affects the flavor more than you’d think.
- I add the mozzarella. I place the slices on top of the vegetables, not too tightly. The cheese shouldn’t bury everything — it just needs to hold the layers together.
- I add the top buns and brush with garlic butter. I mix the melted butter with garlic and salt and brush the buns. The aroma shows up immediately, even before the oven.
- I bake until soft and the cheese melts. I bake at 350°F (180°C) for 12–15 minutes. I’m not aiming for crunch here — a warm, juicy texture is what matters.
We often serve these sliders at summer gatherings, when the table is already full of food and you want to add something lighter and more vegetable-focused. I’ve noticed that this is the version people finish last — not because it’s “diet food,” but because it’s the one they like coming back to.
Serving tip. These sliders are best warm, not hot. Let them rest for 5 minutes after baking — the flavor softens, and the vegetables stop sliding when you cut them.
Favorite Sliders
When you put everything together, it becomes clear that sliders are a way to feed people without stress, without rushing, and without feeling like you’re working in the kitchen instead of being part of the gathering.
Kids, vegetarians, spice lovers, brunch guests, and people who stop by later in the day can all sit at the same table — and everyone finds something that works for them.If you made it this far, tell me in the comments: which one would you put on the table first?
Or maybe you have your own go-to slider that always works for a crowd? I’d genuinely love to read what works for you in real life.