
When you look for front yard flower bed ideas, it’s easy to get stuck scrolling through pretty photos… and then step outside and not really understand where to even start. Sometimes there are too many plants, sometimes the shapes are too complex, and it all feels like something you shouldn’t even try without experience.
In reality, it’s much simpler. Clean-looking beds almost always have a defined edge, repeating plantings, contrast, or a clear sense of height. When that’s there, even basic plants start to look good. When it’s not — no “beautiful flowers” will save it.
Here you’ll find ideas you can actually repeat in your own yard. No overload, no complicated layouts, just a clear result. You can take one idea, try it on a small area, and you’ll already see the difference.
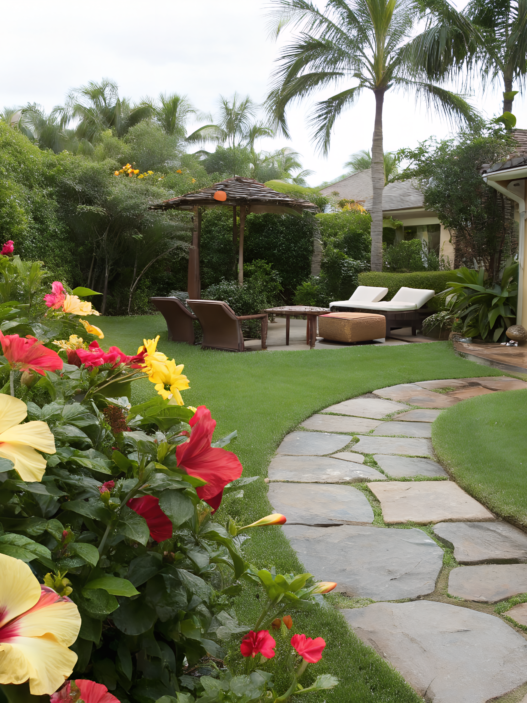
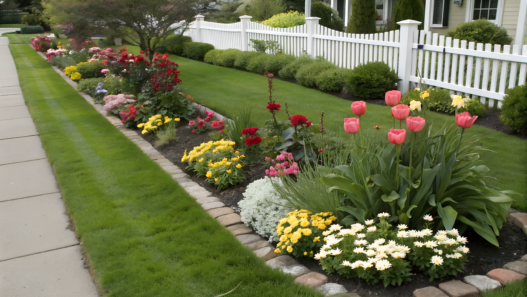
1. Texas Heat Proof Bed With Salvia, Lantana And Angelonia
This mix of salvia, lantana, and angelonia we noticed from farmers in the southern states… and honestly, at first we didn’t believe it would look this alive in +95°F (≈35°C).
Salvia, lantana, and angelonia are not a random combination.
- Salvia gives vertical structure and attracts pollinators
- Lantana fills the space and holds its shape even in heat
- Angelonia adds soft floral accents without being demanding
And all of them are drought tolerant.
Plants adapted to drought (including species with deep or efficient root systems) require significantly less watering once established.
What You’ll Need
Before you start digging, it’s better to have everything ready.
- Seedlings: salvia, lantana, angelonia (3–5 of each for a small area)
- Good quality compost
- Mulch (wood or bark)
- Shovel and garden trowel
- Drip hose or a basic watering system
- Gloves
- Fiskars Steel Garden Spade — a solid heavy shovel if your soil is dense
If the soil is very dry and worn out, add some sand for drainage.
How To Build This Flower Bed
- Mark the shape
A straight or slightly curved strip about 3–4 feet wide (≈90–120 cm) already looks clean. We usually use a hose to “draw” the line. It immediately shows where you want to adjust things a bit. - Prepare the soil
Remove the top layer of grass. Loosen the soil to about 8–10 inches (20–25 cm) deep. Add compost — about 2–3 inches on top (5–7 cm) — and mix it into the soil.
Yes, this is the least exciting part… but without it, everything else will be weaker. - Place the plants before planting
Don’t plant right away. Place the pots on the ground and look at the layout. The simple rule:
- Salvia — back (height)
- Lantana — center
- Angelonia — closer to the edge
Leave 12–18 inches (30–45 cm) between plants. They need space.
- Planting
Dig holes slightly wider than the root ball. Plant at the same depth as in the container. Don’t bury deeper. Water well after planting. - Mulch
Mulch layer — about 2–3 inches (5–7 cm).
This reduces moisture loss and helps keep soil temperature more stable. - Watering and the first weeks
For the first 2–3 weeks — regular watering. After that, you can reduce it. These plants start handling things on their own and tolerate heat well.
Tip. Lantana can grow faster than the others, and that’s normal. Just trim it slightly so it doesn’t take over the space. Also, you’ll notice more butterflies. Especially around salvia. And… it’s nice.
Where This Works Best
This option works especially well where other flower beds just don’t hold up. If you have a spot you’ve already mentally given up on — this is exactly where you should try it.
- South side of the house
- Along fences
- Open areas with no shade
- Places where “nothing grows”
I’ve noticed that these difficult spots often end up becoming the most expressive parts of the yard. When plants stop struggling to survive, they start growing properly and look completely different.
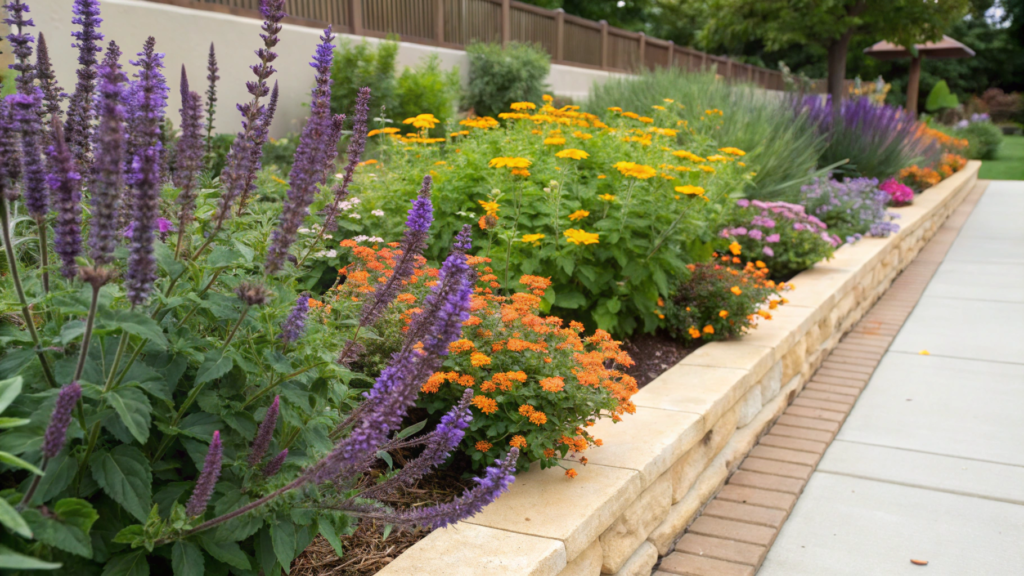
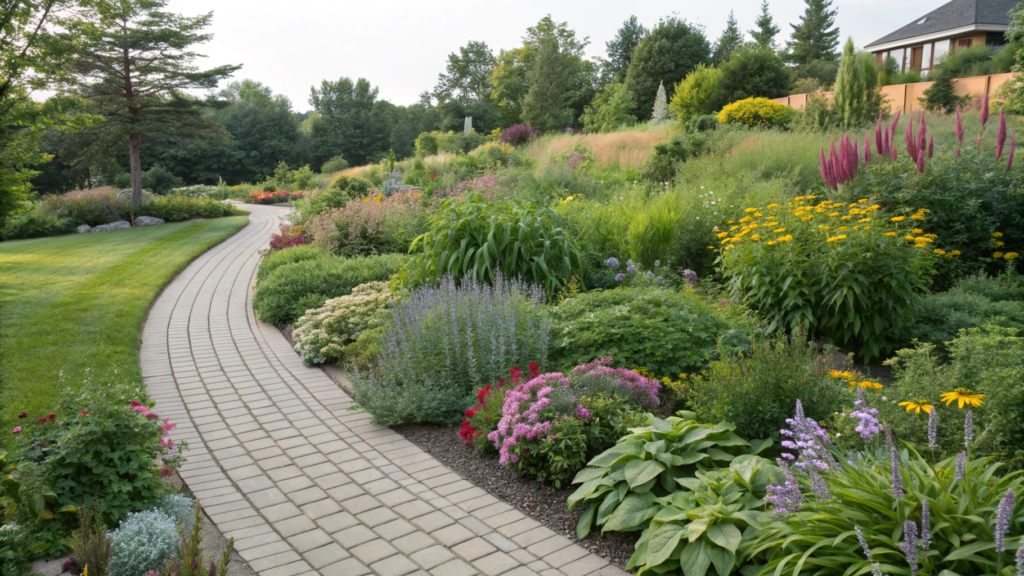
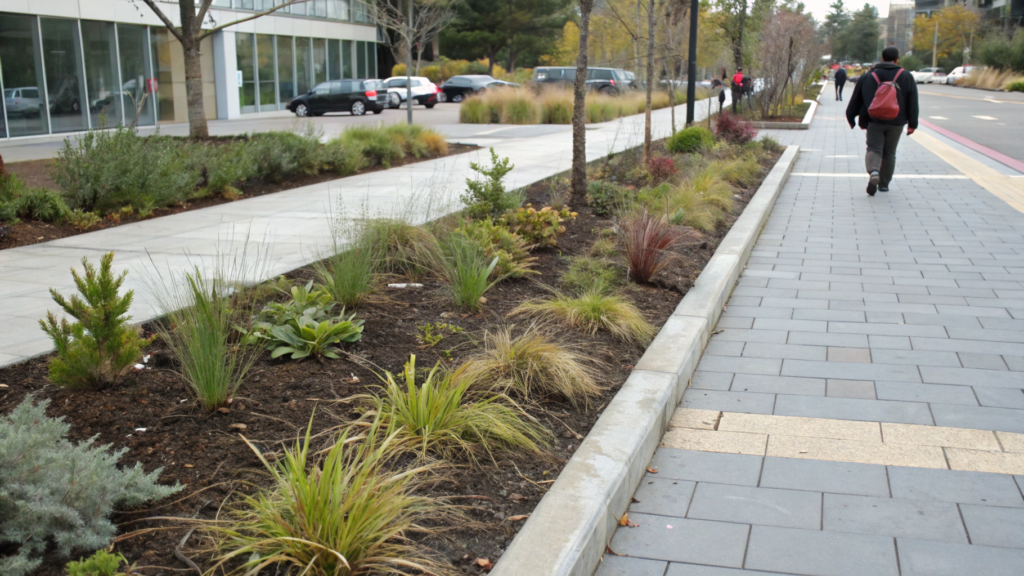
2. Full Sun Perennial Bed Using Repeating Drifts
Repeating drifts means the same plants repeat in waves across the entire bed.
Lindy and I did this along a path on our property. And nothing needed fixing later. It just looked right from the start. Because when you use repeating plant groups, you remove visual noise. The bed starts reading as one whole, not a mix of separate plantings.
- you get a visual rhythm that guides the eye
- plantings look more intentional
- maintenance gets easier because there are fewer plant types
In landscape perception research (for example, Joan Nassauer’s work), it’s noted that people see repeating and ordered plantings as more maintained — even when the plants themselves are quite simple.
What You’ll Need
- Perennial plants for sunny areas (echinacea, rudbeckia, salvia, ornamental grasses)
- Compost or soil improver
- Mulch
- Shovel and garden trowel
- Hose or marking line
The main rule — don’t overload the mix. 3–5 plant types already give a strong result.
How To Build This Flower Bed
- Mark the shape of the bed
Elongated shapes work best, about 3–5 feet wide (90–150 cm). Slight curves feel softer and more natural than straight lines. We usually just lay a hose on the ground and move it until the line starts to feel right — faster than sketching it out. - Prepare the soil
Remove the sod and loosen the soil to about 8–10 inches (20–25 cm) deep. Add compost in a 2–3 inch layer (5–7 cm) and mix it in. If you skip this step, plants will still survive, but they’ll grow noticeably weaker. - Place plants using the drift pattern
Don’t plant one by one — make groups of 3–5 plants and repeat them along the bed. For example: group of echinacea → then salvia → then echinacea again → then grasses. It’s important that the same plants “come back” at intervals — that’s what creates order. - Keep proper spacing
Leave 12–24 inches (30–60 cm) between plants depending on their mature size. It’s tempting to plant densely for an instant full look, but after a season it turns into competition for space. - Planting
Dig holes slightly wider than the root ball and plant at the same depth as in the container. Don’t bury deeper — it slows growth. Water well after planting so the soil settles around the roots. - Mulching
Cover the surface with a 2–3 inch layer (5–7 cm) of mulch. This reduces moisture loss and helps keep soil temperature more stable, especially in heat.
What We Noticed After Planting
At first, there’s a temptation to add one more color or one more plant. We thought the same. But once you start adding “just a bit more,” the structure falls apart.
When you stick to a limited palette and simply repeat it — the bed looks cleaner and more expensive. Over time, plants start blending slightly between groups, and that doesn’t ruin the look. It actually makes it feel more natural.
Where This Works Best
This approach works best where the bed is visible as a whole, not in fragments. That’s when the repetition really reads and creates that “designed” look.
- Along garden paths
- In front of the house
- Along property lines
- Along fences
And the nice part — over time, this type of bed needs less attention. When the structure is set correctly, it holds its shape without constant adjustments.
This approach gives a strong result. Try it once, and it’s hard to go back to random planting.
3. Shade Bed With Hostas, Ferns And Heuchera Layers

If you have a shaded area, you don’t need to fight the sun, dry soil, or burnt leaves. It’s the opposite — soft light, stable moisture, and steady growth.
In shade beds, you don’t get bright blooms like in full sun. Here, something else works — form, texture, and layers.
- large hosta leaves create the base
- ferns add lightness and movement
- heuchera brings color closer to the ground
And this is important — these plants are naturally adapted to low light conditions. They have a lower rate of moisture loss through their leaves, so they keep their structure longer and don’t look wilted even in heat. That’s one of the reasons why shade beds stay “fresh” longer during the day.
What You’ll Need
- Plants: hostas, ferns, heuchera
- Compost or leaf mold
- Mulch (bark works best)
- Shovel and trowel
- Gloves
If the soil is heavy and clay-based, add some organic matter — it makes a big difference in structure.
How To Build This Flower Bed
- Define the shape and boundaries
In shade, softer and slightly blurred shapes work better. The bed should be about 3–5 feet wide (90–150 cm). Avoid sharp corners — they feel too harsh in shaded areas. - Prepare the soil with focus on organic matter
Loosen the soil to about 8–10 inches (20–25 cm) deep and add 2–3 inches (5–7 cm) of compost or leaf mold. Shaded soil is often dense and moist, so it’s important to make it more airy. - Place plants in layers
Start by arranging everything in pots and looking at the composition.
- hostas — back and middle layer (volume)
- ferns — between them to add lightness
- heuchera — closer to the edge as the lower layer
Let plants slightly overlap — that’s what creates depth.
- Keep proper spacing
Leave 12–24 inches (30–60 cm) between plants. Hostas especially will spread over time, and if planted too close, the space will feel crowded after one season. - Planting
Plant at the same depth as in the container. In shade, it’s especially important not to bury too deep — excess moisture can lead to rot. Water gently after planting, but avoid turning it into mud. - Mulch
Apply a 2–3 inch layer (5–7 cm). In shade, this is not only about moisture — it also keeps things clean, so leaves don’t sit in dirt.
What We Noticed After Planting
In shade, everything grows slower, and at first the bed can feel a bit empty. So it’s important to wait. After one season, plants start filling the space, and the whole picture becomes much more interesting.
And color behaves differently here. Heuchera with burgundy or lime leaves stands out more than flowers do in full sun. It’s unexpected, but it works really well.
Where To Place This Type Of Bed
These plantings work best in areas where the sun shows up rarely or only for a short time. Where regular flower beds look weak, this one actually becomes the better option.
- North side of the house
- Under trees
- Along shaded fences
- Near buildings
And the nice part — these beds don’t require constant attention. When plants are chosen correctly, they hold their shape and don’t fall apart over time.
In this case, shade is not a limitation. It’s just a different setup. And when you work with it, the result feels clean, layered, and complete.
4. Under Window Bed With Hydrangea Anchor And Low Edgers
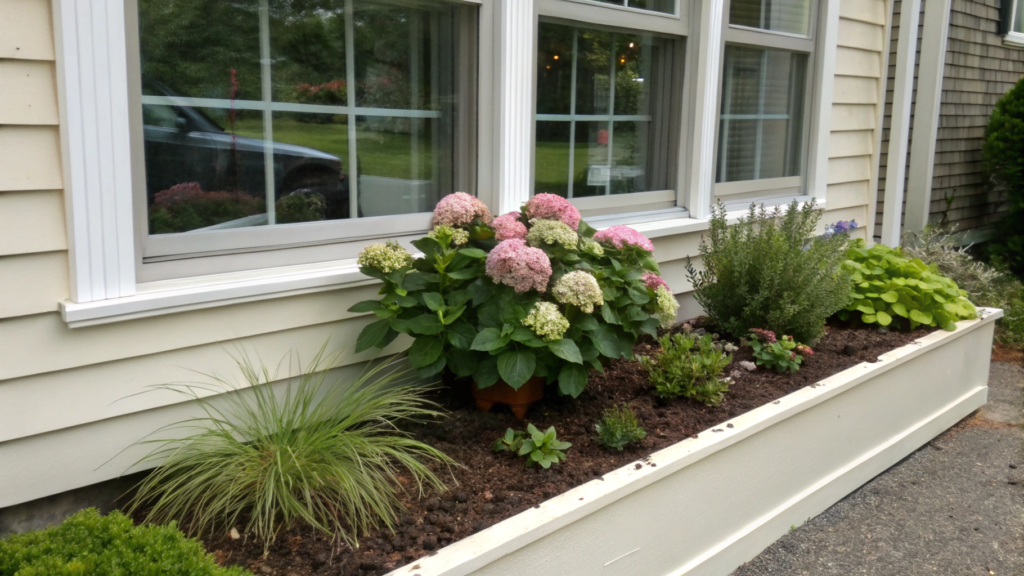
For a long time, the area under our windows looked unclear. Sometimes empty, sometimes random flowers. You look at it — not bad, but not satisfying either. And only when we placed one hydrangea in the center, and made a clean line of low plants along the edge, everything fell into place. And the house immediately started to look different, without renovation and without extra costs.
Why the “anchor” matters here
A hydrangea is not just a shrub. It’s a visual point that everything else builds around.
- it sets the height and center of the composition
- draws attention to the window
- creates a sense of volume
And low plants along the edge (often called edgers) make the boundary clean. Without them, the bed looks blurred, like it’s “spreading” into the yard.
What You’ll Need
- Hydrangea plant (better 3–5 gallons / 11–19 L to get instant volume)
- Low-growing edge plants (boxwood, dwarf spirea, creeping jenny or similar)
- Compost
- Mulch
- Shovel and trowel
- Gloves
If the area under the window is dry (which often happens because of roof overhang), think about watering in advance.
How To Build This Flower Bed
- Define the size and distance from the house
Don’t press the bed right against the wall. Leave at least 12–18 inches (30–45 cm) so air can circulate and moisture doesn’t build up near the foundation. The bed is usually about 3–4 feet wide (90–120 cm) — enough to fit both the shrub and the low plants. - Prepare the soil
Soil under windows is often dry and compact. Loosen it to about 8–10 inches (20–25 cm) deep and add compost in a 2–3 inch layer (5–7 cm). Hydrangeas are sensitive to soil quality, so it’s better not to skip this step. - Place the hydrangea as the center
Set it roughly in the middle of the window or slightly off-center if the window is large. Leave at least 18–24 inches (45–60 cm) from the wall, because the shrub will grow. Step back and look — sometimes shifting it just a couple of inches changes the whole look. - Place low plants along the edge
Now add low edgers. Their job is to create a clean line along the front edge of the bed. Plant them 8–12 inches apart (20–30 cm), so over time they connect into a single line. Don’t make a zigzag — keep it straight or softly curved. - Planting
Dig holes wider than the root ball and plant at the same depth as in the container. Don’t bury the hydrangea — it can slow growth. Water well after planting, especially if the soil is dry. - Mulch
Cover the entire surface with a 2–3 inch layer (5–7 cm). This helps retain moisture and makes the bed look clean. Also fewer weeds — and under windows, they are very noticeable.
What We Learned From This
The most common mistake is planting a small hydrangea and expecting a strong visual effect. It won’t happen right away. It’s better to take a larger plant so the volume is there from the start.
If the edge is not defined, even a beautiful hydrangea looks like a single bush, not part of a design. A clean edge matters more than it seems.
Maintenance
This type of bed is quite predictable, and that’s a plus. The main care is watering and light shaping, especially in the first months after planting.
Hydrangea needs moisture, so in hot periods it will need more water than the rest. Low edge plants are usually less demanding and just hold the line without constant attention.
Sometimes you’ll trim the edge to keep it clean, and remove faded blooms from the hydrangea — not required, but it improves the look.
Overall, this is not a bed that needs weekly work. When the structure is set right, maintenance becomes about keeping it in shape, not constantly fixing it.
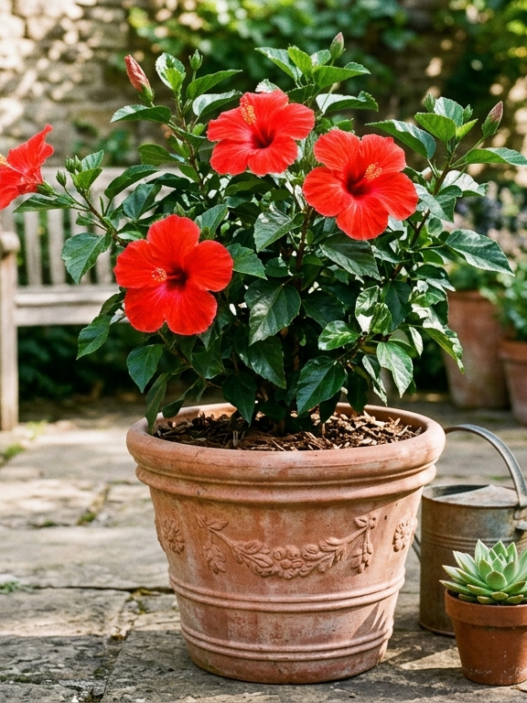
5. Simple Rock Mulch Bed That Cuts Weeding In Half
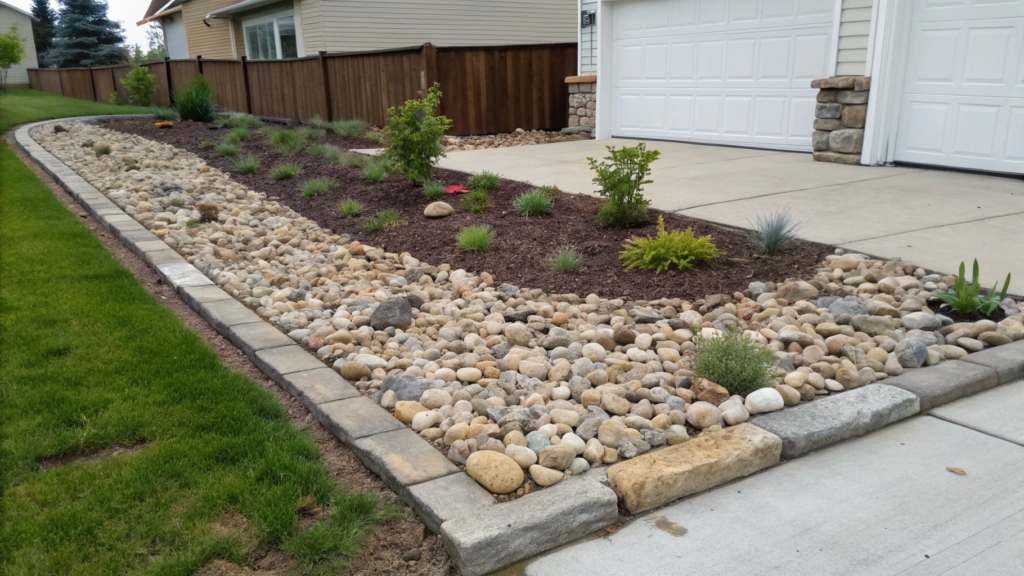
If you want to reduce maintenance time and still keep a clean look, these front yard flower bed ideas quickly become a favorite. When you cover the soil with a layer of stone, you simply block light for weeds. And this is not theory — it’s a very practical thing.
- less light → less germination
- dense layer → harder for weeds to push through
- stable structure → doesn’t wash away after rain
Properly installed mulch (including rock) noticeably reduces weeds — mainly because it blocks their access to light.
What You’ll Need
- Decorative stone (gravel or crushed rock 1–2 inches / 2.5–5 cm)
- Landscape fabric, for example Scotts Premium Landscape Fabric
- Fabric staples
- Compost (for planting areas)
- Plants (drought-tolerant: lavender, ornamental grasses, salvia)
- Shovel and rake
How To Build This Flower Bed
- Define the shape and edges
First, mark the outline. Simple shapes work best — straight lines or soft curves. Complex shapes in stone look overloaded. We usually lay out a hose or rope and move it until the line starts to look clean. - Prepare the base
Remove the grass layer and level the surface. No need to dig deep, but it’s important to remove weed roots. If you leave them, they will find a way through. - Lay the landscape fabric
Spread the landscape fabric across the entire area and secure it with staples. Overlap seams by 4–6 inches (10–15 cm) so there are no gaps. This is your main weed barrier, and half the result depends on it. - Make planting openings
Where plants will go, cut small cross-shaped openings in the fabric. Keep them neat, not oversized. Dig small holes, add some compost, and plant. - Add the stone layer
Spread the stone evenly in a 2–3 inch layer (5–7 cm). Don’t go thinner — the fabric will show, and weeds will break through faster. Level it with a rake so the surface looks clean. - Water and check
After finishing, water the plants and observe how water moves. Stone can slightly change drainage, so it’s better to see it right away.
What To Consider In Advance
Rock mulch behaves differently from organic mulch. It doesn’t break down and doesn’t feed the soil.
In summer, stone heats up. So it’s better to choose plants that handle heat well. Lavender, salvia, grasses do fine in these conditions.
Of course, it won’t remove weeds completely. But there will be noticeably fewer of them. And they’re easier to deal with.
Maintenance
At first, it feels like you can forget about the bed completely. And partly that’s true — weed pressure drops a lot, and you notice it right away. But they don’t disappear fully. Wind brings seeds, and some find their way through small gaps. The difference is that instead of constant weeding, you just remove occasional sprouts — quickly and without effort.
And there’s no avoiding leaves and debris. In fall, the stone collects everything, and sometimes it’s easier to go over it with a rake or a blower. In the end, it’s not zero maintenance, but much easier than a regular bed. And most importantly — it doesn’t require constant attention.
6. Black Mulch Bed With Lime Green Foliage Pop
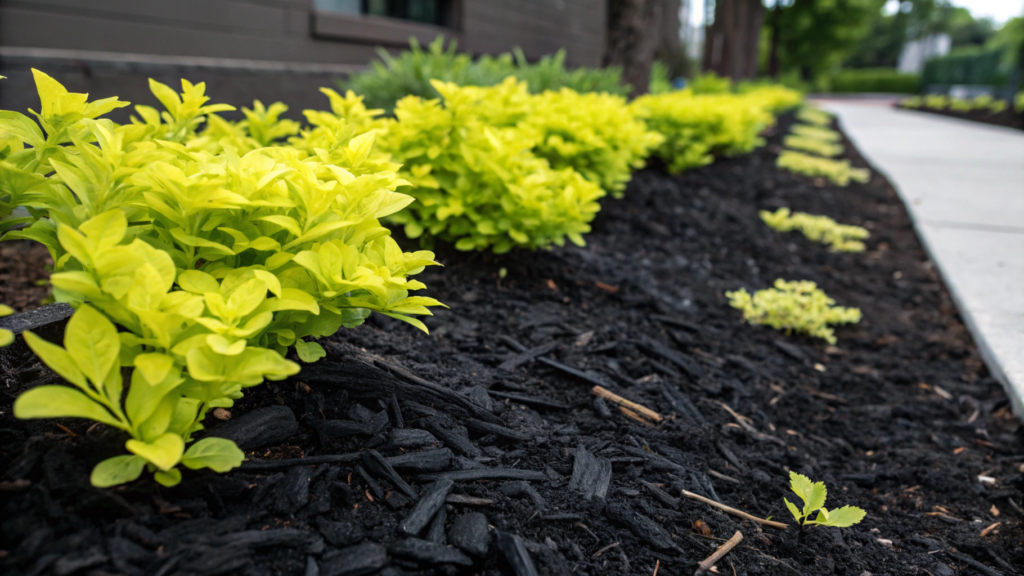
Black mulch + lime green foliage is a strong combination. A dark background and bright leaves. We made a section like this along a path, and after switching to black mulch and adding plants with lime green leaves, the bed literally came to life.
Dark mulch works as a background that enhances plant color. This is especially noticeable with lime tones — they become brighter and cleaner.
- you get depth and contrast
- plants look more “graphic”
- the bed stays visible even from a distance
Dark surfaces enhance how we perceive color next to them. This is used in design and photography. In the garden, it works the same way.
What You’ll Need
- Black mulch (dyed bark or wood chips)
- Plants with lime green foliage (for example: hosta ‘Lime Rickey’, ornamental grasses, coleus, lime-toned heuchera)
- Compost
- Shovel and trowel
- Gloves
If the soil is dry, it’s better to prepare a good organic layer under the mulch in advance.
How To Build This Flower Bed
- Define the shape of the bed
Simple shapes work best — straight lines or soft curves. Width around 3–4 feet (90–120 cm). In this setup, clean lines matter, so don’t overcomplicate. - Prepare the soil
Remove grass and loosen the soil to about 8–10 inches (20–25 cm). Add compost in a 2–3 inch layer (5–7 cm). Even if mulch is the main visual element, plants still need a solid base. - Place plants with contrast in mind
Start by arranging everything in pots. Try not to cluster lime-colored plants too tightly — leave small gaps between them. This way each accent stands out instead of blending together. - Keep proper spacing
Leave 12–18 inches (30–45 cm) between plants. As they grow, the space will fill in, and the contrast will soften but won’t disappear. - Planting
Plant at the same depth as in the container. Water well after planting. If the soil is dry, you can water again the next day. - Mulch
Spread the black mulch evenly in a 2–3 inch layer (5–7 cm). Make sure it doesn’t touch the stems — leave a small gap.
What Changes Over Time
At first, the contrast looks very sharp. Even a bit unusual. After a couple of weeks, your eye adjusts, and the bed starts to feel more balanced. As plants grow, the lime color softens but still stays noticeable.
Over time, the mulch color may fade slightly. That’s normal. You just refresh the layer once a season or every couple of seasons.
Black mulch heats up more in the sun. It’s not critical, but it’s better to choose plants that handle heat well.Also, on a dark surface, any fallen leaves or debris are more visible. Sometimes a quick pass by hand or with a rake is enough to bring back a clean look.
7. Brick Edging Straight Line Bed For Clean Curb Appeal
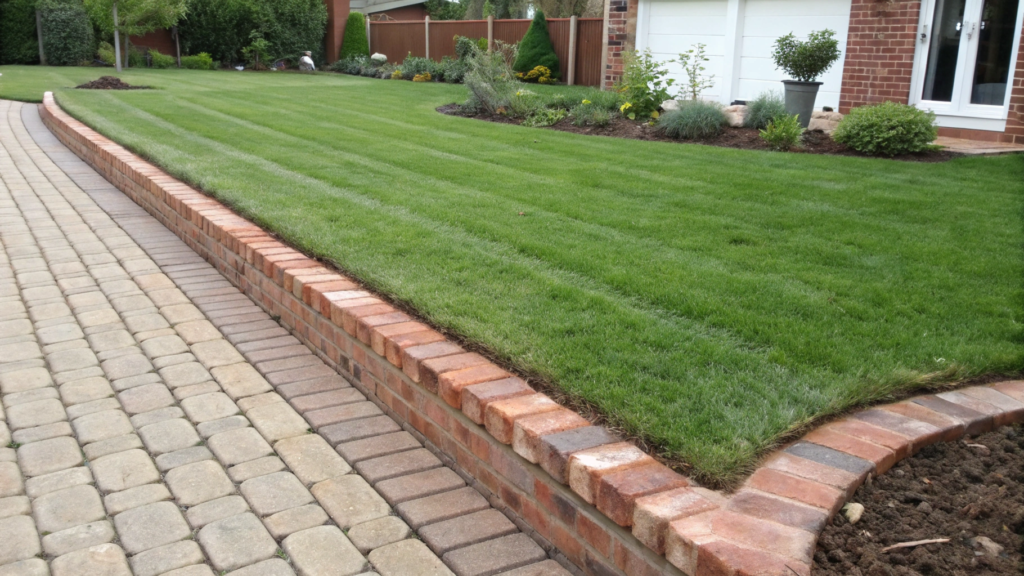
If you want your yard to look clean even without expensive plants, use a straight-line bed with brick edging. A clean edge immediately gives that “planned project” look, not something planted randomly. In this setup, the main focus is not the plants, but the edge itself.
- creates a clear separation between lawn and bed
- the yard looks more maintained
- mowing becomes easier — the edge doesn’t “shift”
Straight lines are perceived as order. It’s a basic principle in design, and it works the same way in the garden.
What You’ll Need
- Bricks (standard size about 8 × 4 × 2.25 inches / 20 × 10 × 5.7 cm)
- Sand or fine gravel for the base
- Level
- Rubber mallet
- Shovel and marking string
- Plants of your choice
How To Build This Flower Bed
- Mark a straight line
Stretch a string between two points — this will be your guide. Don’t do it “by eye.” Even small deviations become visible later. A straight line is half the result. - Prepare a trench for the bricks
Dig a shallow trench slightly wider than the brick and about 3–4 inches deep (7–10 cm). The base should be even, without bumps, otherwise the bricks will shift. - Create a sand base
Add a layer of sand or fine gravel about 1–2 inches (2.5–5 cm) and level it. This helps set the bricks evenly and prevents sinking over time. - Lay the bricks
Place the bricks tightly next to each other along the string. Tap them with a rubber mallet and check with a level. This step takes time, but it’s what gives the clean result. - Fill gaps and secure the edge
After placing the bricks, lightly fill gaps with sand and brush it in. From the inside of the bed, add soil against the bricks — this helps lock them in place. - Finish the planting area
Now you can plant inside the bed however you like — perennials, shrubs, or simple annuals. The clean edge makes everything look more intentional.
Tip From Experience. Bricks heat up in the sun, so it’s better not to plant very sensitive plants right next to them. And if your area has a slope, you either need to create steps or account for the elevation change from the start. Otherwise, the line will shift.
What Turned Out To Be Important
The most common mistake is rushing the leveling step. It’s tempting to finish quickly, but uneven bricks are noticeable right away.
Over time, the soil may settle a bit. We just check the edge once a season and adjust if needed. It takes about 10–15 minutes, but it makes a big difference in how everything looks.
8. Mailbox Mini Bed With Perennials And Seasonal Color
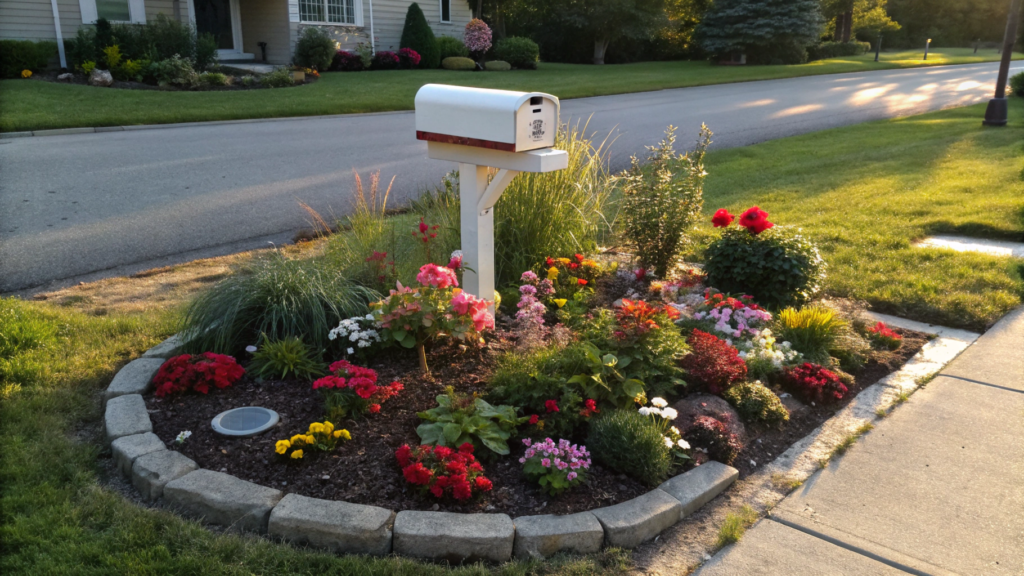
A small flower bed around a mailbox may seem like a minor detail… but these are exactly the things that create the first impression. For a long time, we just had a post with a mailbox and a patch of grass around it. Then we added a small circle with perennials and seasonal flowers — and the space immediately felt alive.
Why the perennial + seasonal mix works best
If you plant only perennials, the bed stays stable but not always bright. If you use only seasonal flowers — it looks good, but requires constant replacement.
The combination creates balance:
- perennials hold structure and shape
- seasonal plants add color and change through the seasons
- the bed feels dynamic, not static
In the end, you get a base that doesn’t need to be redone every year, and a small area where you can play with color.
What You’ll Need
- Perennials (lavender, salvia, dwarf grasses, coreopsis)
- Seasonal flowers (petunias, marigolds, pansies — depending on the season)
- Compost
- Mulch
- Small shovel or trowel
- Gloves
If the soil around the mailbox is compacted (which often happens), it’s better to prepare it properly from the start.
How To Build This Flower Bed
- Define the shape around the mailbox
The simplest option is a circle or oval about 2–3 feet (60–90 cm) in diameter. You can slightly stretch the shape toward the road or the house if you want more movement. The key is a clean line without broken edges. - Prepare the soil
Remove the grass and loosen the soil to about 6–8 inches (15–20 cm) deep. Add compost in a 2–3 inch layer (5–7 cm). In these spots, soil is often compacted and dry, so this step has a strong impact on the result. - Place perennials as the base
Start with the perennials. Usually 2–3 plants are enough: one slightly taller (like salvia), one more compact (lavender or grasses). They create the structure and stay in place for years. - Add seasonal plants between them
Now add seasonal color into the empty spaces. These can be small clusters of 2–3 plants. Their role is to add brightness without overloading the layout. - Keep proper spacing
Don’t plant too densely. Leave 8–12 inches (20–30 cm) between plants. Within a couple of months, they will grow and fill the space. - Planting and watering
Plant at the same depth as in the container. Water well after planting. In small beds, soil dries out faster, so watch moisture during the first weeks. - Mulch
Cover the surface with about 2 inches (≈5 cm). This helps retain moisture and keeps the bed looking clean. Also fewer weeds — and in a small space, they stand out immediately.
What Turned Out To Be Important
The size of the bed. At first, it’s tempting to make it very small, “so it doesn’t get in the way.” But then plants start crowding and the whole thing looks messy. When you give just a bit more space (even 6–8 inches / 15–20 cm wider), it immediately looks cleaner and more intentional.
In spring, you can plant something light and bright, in summer switch to more heat-tolerant plants, and in fall add cold-resistant options. Meanwhile, perennials stay in place and look better each season. Over time, they start defining the structure, and seasonal plants simply support it.
9. Corner Foundation Bed With Tall Shrubs And Front Fillers
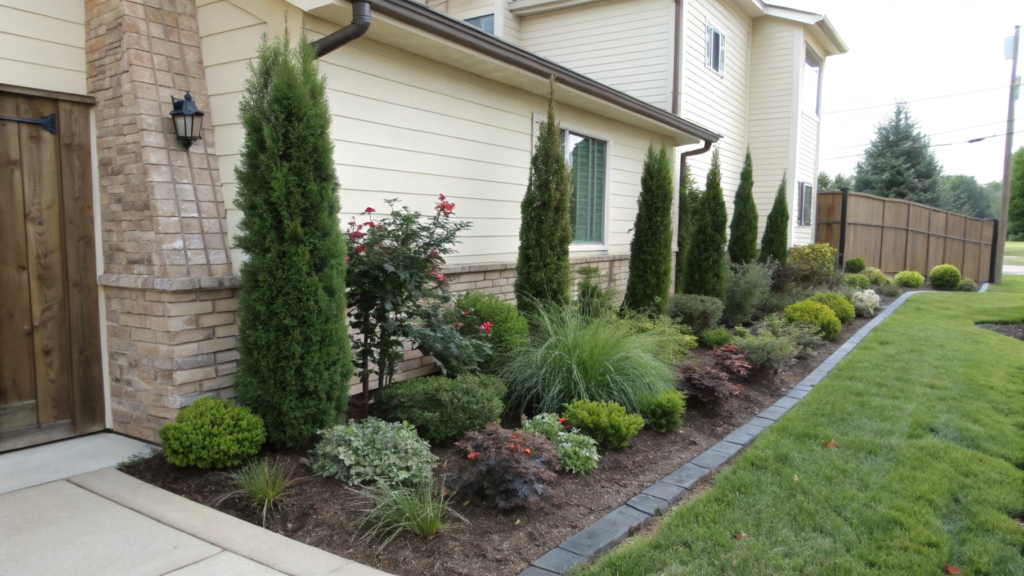
A corner bed with tall shrubs in the back and low plants in the front immediately adds volume and covers empty walls. In a corner, you always have two planes — the walls of the house. And if you plant everything at the same level, the bed looks flat. When you add layers by height, you get depth:
- tall shrubs create the background
- medium plants fill the space
- low plants form a clean front edge
It’s a simple principle, but it changes how everything looks.
What You’ll Need
- Tall shrubs (hydrangea, boxwood, viburnum or similar)
- Medium and low plants (spirea, hosta, ornamental grasses, heuchera)
- Compost
- Mulch
- Shovel and trowel
- Gloves
Don’t use too many types. 3–4 plant types are enough to keep the bed clean and structured.
How To Build This Flower Bed
- Define the shape of the corner bed
Usually it’s a triangle or a soft curve that “wraps” around the corner of the house. The width from the wall should be about 3–5 feet (90–150 cm). Don’t make it too narrow — you won’t get proper layering. - Prepare the soil
Loosen the soil to about 8–10 inches (20–25 cm) deep and add compost in a 2–3 inch layer (5–7 cm). Corners are often dry because of roof overhangs, so it’s better to improve the soil right away. - Place tall shrubs as the base
Set 1–2 shrubs closer to the corner, leaving 18–24 inches (45–60 cm) from the wall. Step back and look — they should cover the corner but not block windows or walkways. - Add a middle layer of plants
Place medium-sized plants in front of the shrubs. They fill the space and create a smoother transition from height to low plants. Arrange them in groups, not one by one. - Finish the front edge with low plants
Closer to the lawn or path, add front fillers — low plants that create a clean edge. They work like a frame for the whole bed. - Keep proper spacing
Leave 12–24 inches (30–60 cm) between plants. Shrubs will grow over time, and if planted too close, everything starts competing for space. - Planting and watering
Plant at the same depth as in the container. Water well after planting. In the first weeks, keep an eye on moisture — soil near walls dries out faster. - Mulch
Cover the surface with a 2–3 inch layer (5–7 cm). This helps retain moisture and keeps the bed looking clean.
Tip. The most common mistake is placing everything in a straight line. Then the bed looks flat, like plants were just lined up along the wall. It’s better to slightly shift plant groups, creating a subtle step forward and back. That’s what adds depth and makes the corner feel more alive.
In the first season, it may look a bit empty, especially if shrubs are still small. But after a year, the structure becomes visible, and after two, the corner looks like a real part of the design, not just a filled space. When corners look intentional, everything around them feels more put together.
10. Narrow Sidewalk Strip Bed Using Low Growers Only
A narrow strip along a walkway — this is exactly where using only low-growing plants makes sense. Along sidewalks, there’s always movement — people, kids, sometimes equipment. And if plants are too tall, they start getting in the way and look messy. So with low plants:
- the walkway line stays clean
- the bed doesn’t spill onto the path
- maintenance becomes easier
And one more thing — low plants hold their shape better in limited space and don’t need constant trimming.
What You’ll Need
- Low-growing plants (creeping thyme, dwarf mondo grass, alyssum, sedum)
- Compost
- Mulch (fine texture)
- Shovel and trowel
- Gloves
The main rule — don’t choose plants that grow upward quickly, even if you like them.
How To Build This Flower Bed
- Check the width of the strip
Most often it’s about 1–2 feet (30–60 cm). And here it’s important to accept the limitation — don’t try to turn it into a full-size bed. It’s a narrow line along the walkway. - Prepare the soil
Remove the top layer, loosen the soil to about 6–8 inches (15–20 cm) deep, and add 2–3 inches (5–7 cm) of compost. Soil in these areas is often compacted, and without this step plants will grow weak. - Place plants with growth in mind
Arrange plants so they won’t cross into the walkway even at full size. It’s better to leave a bit more space than to keep trimming all the time. - Keep proper spacing
Leave 6–10 inches (15–25 cm) between plants. They will quickly grow together and form a dense line. - Planting
Plant at the same depth as in the container. In narrow strips, it’s important not to plant too deep — otherwise plants may struggle to establish. - Mulch
Use fine mulch in about a 2 inch layer (≈5 cm). Larger mulch looks too rough and visually takes up space. - Watering and the first weeks
Water regularly for the first 2–3 weeks. After that, most low-growing plants hold up on their own.
Tip. As you probably noticed, the most common mistake is trying to add “just a bit more height.” One plant, then another… and the clean line is gone. When you stick to low plants only, the bed looks cleaner and calmer. And it’s much more comfortable to walk next to it.
After a couple of months, plants start closing in and form a dense strip. It looks neat and almost doesn’t require attention. In this case, limitations work better than freedom. The narrow strip keeps things simple — and that’s why the result looks clean and intentional.
Where To Start
When you look at all these ideas together, one thing becomes clear — the result doesn’t depend on the number of plants, but on clear decisions at the base. Sometimes it’s a clean line, sometimes repetition, sometimes the right height.
You feel more calm and confident when you don’t try to do everything at once. You take one idea, try it on a small area… and watch how it behaves over time. That’s how you understand what actually works for you, not just what looks good in photos.Which option stood out to you the most? Share in the comments — it’s always interesting to see how different people approach the same space.