In small spaces, you quickly understand what actually works and what just looks good in pictures. In this article, we’ll try to break down 10 herb garden ideas that transform small spaces into aromatic retreats — from balconies and windowsills to vertical systems and recycled containers. All of these solutions come without complications, without extra purchases, and everything can easily be repeated and done at home.
Lindy and I have tried different formats: some turned out неудобным already after a week, some still work without changes. And now it’s clearly visible where details matter: light, container depth, spacing between plants, drainage. And where you don’t need to overthink and can just do it.
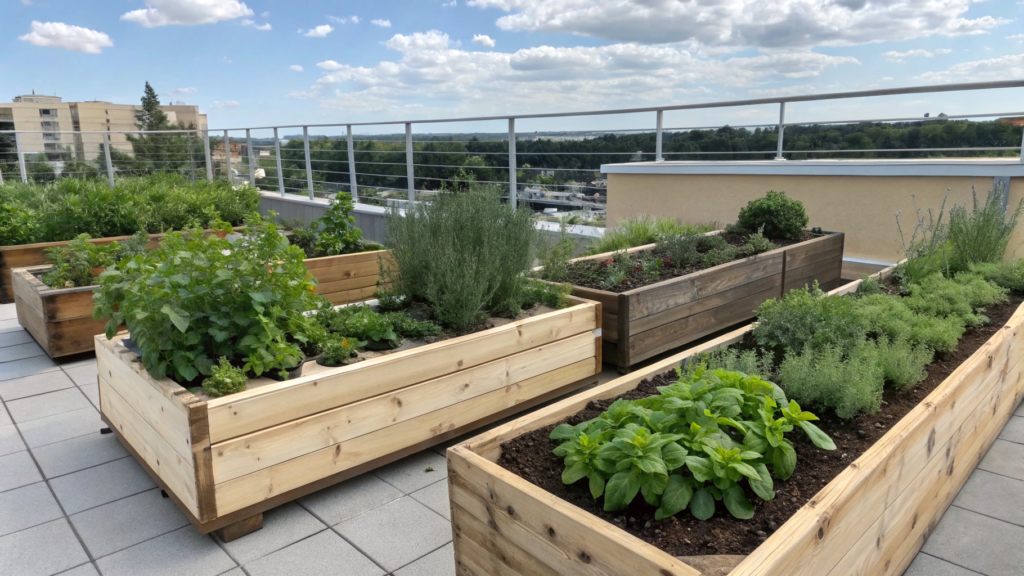
1. Compact Balcony Herb Gardens That Maximize Sunshine

Compact balcony herb gardens — a small space where it smells like fresh basil, mint, and rosemary already in the morning.
When we first moved and had a tiny temporary balcony (about 4 × 6 ft — around 1.2 × 1.8 m), I honestly didn’t understand how you could fit anything there besides a couple of chairs. But I wanted greenery, preferably right at hand.
A balcony is a controlled environment. And that’s a big advantage.
- sunlight comes from one side → you can clearly plan plant placement
- less wind (in most cases) → less stress for herbs
- easier to control watering → you literally see everything every day
In an open garden, you sometimes work blindly. On a balcony — everything is under control. And if you use light correctly — the harvest can be very decent.
How to maximize sunlight on a small balcony
You need to “catch” the light, not just hope for it. Here’s what actually works:
1. Use vertical space, not just the floor
If you place pots only on the floor — you lose up to 70% of potential space.
Better options:
- narrow shelves along the wall (depth 8–12 inches / 20–30 cm)
- hanging planters
- railing mounts
A very convenient option is 5-Tier Vertical Garden Planter Indoor Outdoor Stackable Planter on Amazon. It takes about 1.5 ft (45 cm) in diameter, but gives 5 planting levels. You can grow 10–15 herb plants on one like this.
2. Group herbs by sunlight needs
Not all herbs need the same amount of sun.
- Full sun (6–8 hours): basil, thyme, rosemary, oregano
- Partial shade (3–5 hours): mint, cilantro, parsley
If you put mint in the brightest spot — it will struggle. And basil in the shade… it will just exist, not really thrive.
We mixed this up once and the result didn’t make us happy.
3. Use reflective surfaces
It seems like a small thing, but it makes a difference. Light walls, metal surfaces, even white trays — all of this reflects light back to the plants.
In one experiment (yes, I like these things), we just placed a white panel behind the containers — and growth became noticeably faster within a couple of weeks.
Research in controlled environment agriculture shows that the more evenly light is distributed across the plant, the more efficiently leaf surface is used. That’s why even reflected light can help — it reaches parts that normally stay in shade.
4. Containers are not just “something to plant in”
The container size directly affects growth.
Minimum:
- 6–8 inches (15–20 cm) deep for greens
- 10–12 inches (25–30 cm) for larger herbs (rosemary, sage)
If the container is too small — roots overheat and dry out quickly.
At first, we used whatever we had on hand. That was a mistake. Too-small pots mean constant stress for plants.
What to plant in a compact balcony garden (working combination)
Here’s a combination that works consistently for us:
- basil (Genovese) — for cooking
- mint — grows fast, adds volume
- thyme — compact and aromatic
- parsley — versatile
- oregano — very resilient
Regular garden soil from outside won’t work. It’s too dense, doesn’t let air and water pass well. In a container, it quickly turns into a heavy mass… and roots start to suffocate.
Better to use a light potting mix with perlite — roots will breathe and water won’t get stuck. And then — simple logic:
- upper levels → basil and thyme
- lower levels → mint and parsley
This way you use light and space efficiently.
An important detail people often miss
A balcony is a microclimate. Sometimes it’s 10–15°F (5–8°C) hotter than outside.
And that means:
- watering more often
- soil dries faster
- plants grow faster… but also get tired faster
According to container gardening research (for example, University of California Agriculture and Natural Resources), container plants dry out much faster than in-ground plants and need more frequent watering, especially in hot weather.
And yes… on hot days I water twice, sometimes even three times. And that’s normal.
2. Indoor Herb Setups Perfect for Kitchens
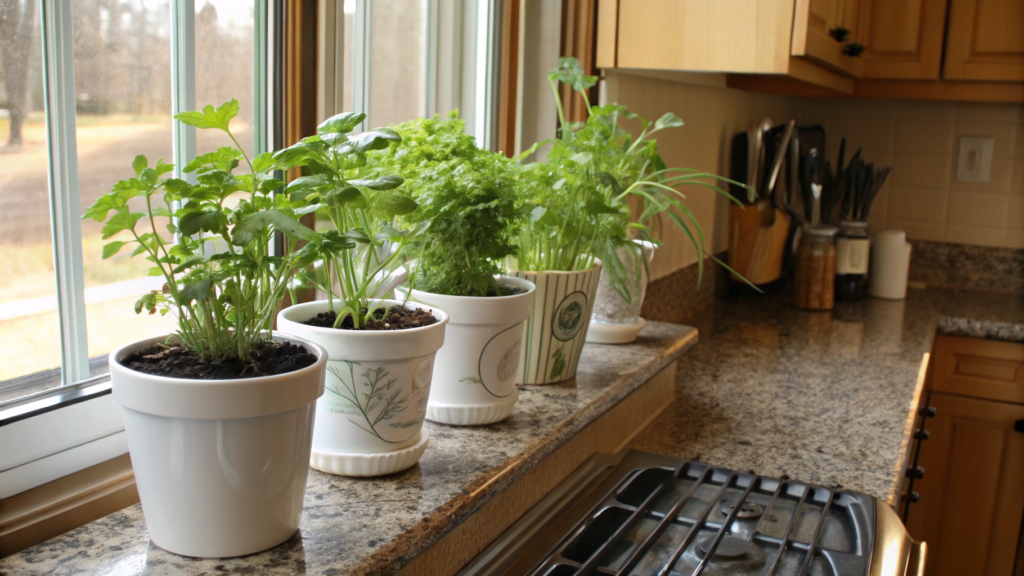
I spend a lot of time in the kitchen and realized I got tired of running outside for parsley while cooking. We placed a couple of pots on the windowsill… and everything became easier. This is exactly where indoor herb setups perfect for kitchens make sense.
But the kitchen is not a greenhouse. Light is unstable, temperatures change, sometimes there’s heat from the stove. That’s why it’s important to set up a system that doesn’t require constant control.
What you need
No overload, only what actually affects the result:
- containers 6–8 inches (15–20 cm) deep with drainage holes
- trays
- light potting mix for containers
- basic herb set: basil, parsley, green onions, thyme
- light source (if the window is weak)
How to set it up
- Choose the right spot
A south or west-facing window is the best option. You need at least 4–6 hours of light per day.
If there’s less light, herbs will start stretching: stems get longer, leaves smaller. In that case, it’s easier to add a light than try to fix weak growth. - Space out the containers
Leave 2–3 inches (5–8 cm) between them. This reduces moisture buildup and allows proper airflow around the leaves.
If everything is packed tightly, moisture stays longer and spots can appear on the leaves over time. - Prepare the soil
Use a light container soil mix. It doesn’t compact and keeps a balance between moisture and air.
If you have perlite, add about 10–20% by volume. The soil becomes more airy and roots develop faster. - Water based on condition, not schedule
Check the top layer with your finger. If it’s dry at about 1 inch (2–3 cm) — water.
Water until a bit drains into the tray — that means the whole soil volume is hydrated. It’s better to pour out excess water from the tray. - Harvest regularly
Basil, for example, is best trimmed every 7–10 days, cutting the tops above a node (where leaves grow).
This encourages side growth, so the plant becomes fuller instead of stretching into a single stem. - Rotate the plants
Every 2–3 days, turn the pots to the other side of the light.
If you don’t, plants will lean in one direction, and it becomes hard to correct their shape later.
Practical tip. Don’t place herbs right next to the stove.
Heat and temperature swings quickly affect the leaves. It’s better to keep them on a windowsill or nearby, but not in the cooking zone.
What actually grows well in the kitchen
If you keep it simple — choose herbs you actually use. Then they won’t just sit there “for looks,” they’ll be part of your routine.
- basil — grows fast and gets used often
- green onions — one of the easiest options
- parsley — stable and low-maintenance
- cilantro — needs more light but performs well
- thyme — slower growth, almost no effort
With soil, it’s simple: a light container mix works best. Heavy soils slow growth and create extra watering problems.
And then it becomes part of everyday life. You cook — you cut a few stems. The next day, the same. If you keep it simple and don’t overcomplicate things, this setup can run for months without needing changes.
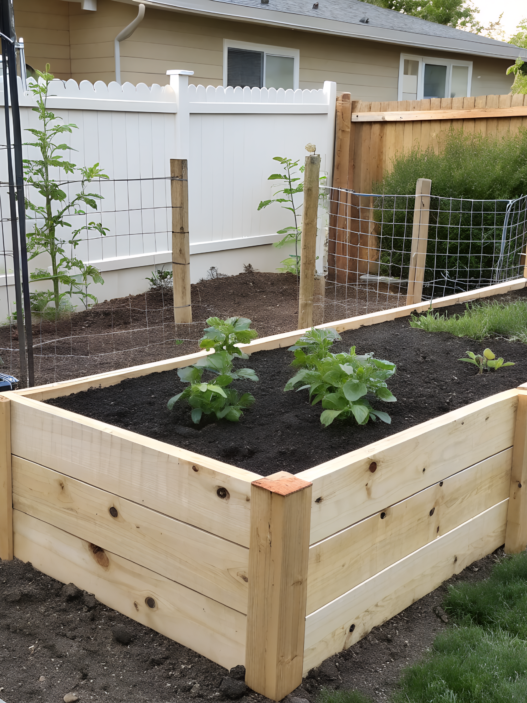
3. Outdoor Raised Bed Designs for Fresh Herbs
Outdoor raised bed designs for fresh herbs — this is more control, more yield, and, importantly, less constant struggle with soil.
In a raised bed, you define the conditions yourself: what soil to use, how drainage works, how the ground warms up.
You can control almost everything here.
- soil is not compacted like in regular ground
- water doesn’t stagnate
- roots warm up faster in spring
- fewer weeds
According to recommendations from sources like University of Illinois Extension, raised beds provide more stable results due to better soil structure and drainage.
And you feel it in daily work — you simply spend less time “fighting” the conditions.
What you need
- boards (usually 2×6 or 2×8 inches — 5×15 cm or 5×20 cm)
- screws or fasteners
- cardboard or landscape fabric for the base
- soil mix (garden soil + compost + aeration material)
- mulch (optional)
You can use a ready option like Best Choice Products Raised Garden Bed 48x24x30 inch Wooden Planter Box — it already has the right height and size.
How to build it
- Choose the location
Herbs need at least 6 hours of sun, ideally closer to 8. Pay attention to how sunlight moves during the day. Morning can look perfect, but in the afternoon there might be shade from the house.
If unsure, just observe for 1–2 days — it significantly reduces the chance of mistakes. - Define the bed size
The classic size is 4×8 ft (120×240 cm). Keep the width under 4 ft (120 cm) — otherwise it becomes hard to reach the center, and you’ll end up stepping on the soil, which compacts it.
Height of 10–12 inches (25–30 cm) works well for herbs: enough for roots without drying out too fast. - Prepare the base
Remove the top grass layer or simply press it down. Lay thick cardboard overlapping — it blocks weeds. Lightly wet it so it starts breaking down faster. In a couple of months, it will be gone. - Assemble the frame
Use boards sized 2×6 or 2×8 inches (5×15 or 5×20 cm). Build a rectangle using wood screws (2.5–3 inches / 6–7 cm long).
Important! Сorners should be firmly secured, otherwise the structure will start shifting after a season. - Fill the bed in layers
Don’t just dump everything in — layering works better:
- bottom layer: branches or rough organic material (saves soil and improves drainage)
- main soil layer
Mix composition:
- 50–60% garden soil
- 30–40% compost
- 10–20% aeration material (perlite or coarse sand)
After filling, water lightly — the soil will settle, and you’ll see the actual level.
- Plan planting before placing anything
Before planting, arrange the plants in their pots on the surface. Check spacing visually.
Basil — 10–12 inches (25–30 cm), thyme and oregano — 8–10 inches (20–25 cm).
This prevents the situation where everything turns into one dense mass after a month. - Plant and water immediately
After planting, water deeply so moisture reaches the full depth. The first watering is critical — it removes air pockets around the roots. - Add mulch
Layer of 1–2 inches (2–5 cm) — straw, wood chips, or even dry grass.It reduces evaporation and keeps soil more stable.
In summer, the difference is noticeable right away — watering becomes less frequent.
Practical tip. Don’t make the bed too tall “just in case.” 30 inches (75 cm) looks nice but requires much more soil and dries out faster on top. For herbs, it’s better to stay in the 10–12 inches (25–30 cm) range — it’s enough for roots and easier to manage.
What herbs work best in a raised bed
In a raised bed, you can grow more and plant more densely than in containers. But it’s still important to consider plant behavior.
- basil — grows actively, loves warm soil
- oregano — quickly fills space
- thyme — compact, keeps shape well
- sage — slightly larger, needs more room
- parsley — stable, produces for a long time
There’s also a soil nuance here. In a raised bed, it shouldn’t be too rich. If you overdo compost, herbs produce a lot of greenery, but the aroma becomes weaker.
With a raised bed, you stop thinking “will it grow or not.” The question changes to “what do I do with all of this.” At some point, we had so much thyme that we started drying it in batches. And that’s already a completely different level of working with your garden.
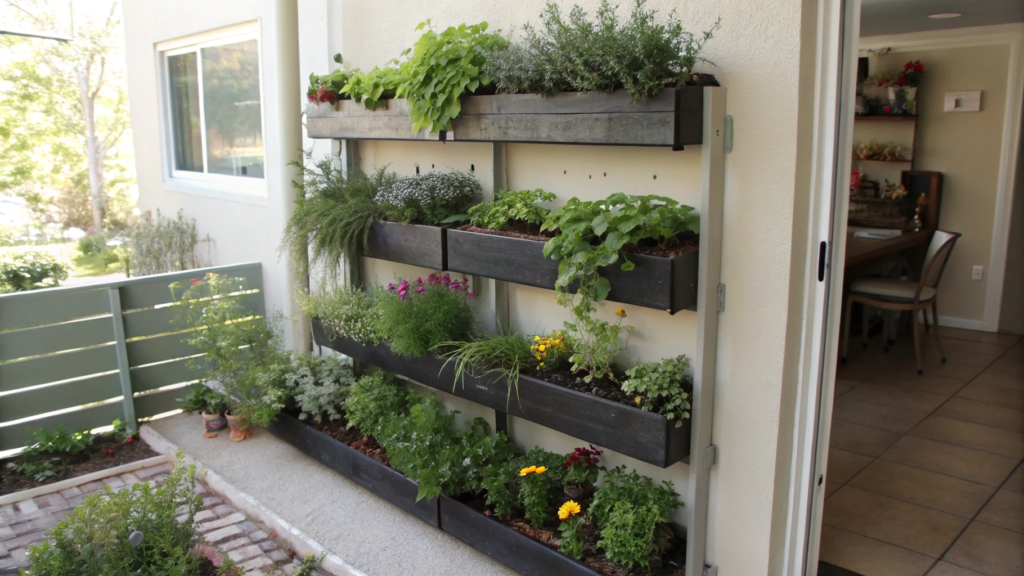
4. Creative Wall-Mounted Herb Displays
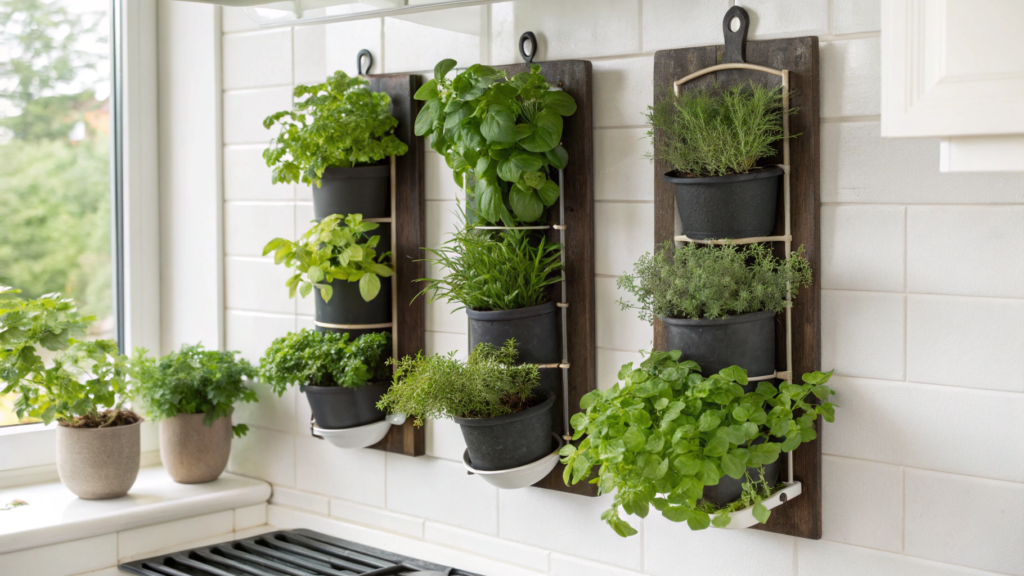
Creative wall-mounted herb displays save you when there’s not much space on the ground or countertops.
There are three main reasons why this works well:
- you use vertical space, not just the floor
- plants get more light (if placed correctly)
- it’s easier to monitor watering and leaf condition
When herbs are at eye level, you naturally use them more often. It’s a small detail, but a very practical one.
What you need
- wall-mounted planters or modules
- крепления (hooks, anchors, screws)
- light potting mix for containers
- herbs (compact varieties work best)
- tray or system that catches excess water
How to set it up
- Choose the right wall
Ideally, a south- or west-facing wall. What matters is not just light, but how consistent it is throughout the day. If the wall is in shade for half the day, upper levels may grow fine, while lower ones lag behind. - Check the load capacity
The wall needs to support the weight. One filled container can weigh 5–10 lb (2–4.5 kg). With 6–8 pots, that adds up quickly.
Use anchors instead of just screws in drywall. - Plan the layout in advance
Before installing, lay everything out on the floor and see how the composition looks.
Leave at least 10–12 inches (25–30 cm) between levels so plants don’t block light from each other. - Think about watering from the start
This is one of the most common mistakes. Water flows downward. If not planned, lower plants will stay constantly overwatered.
Solutions:
- use trays
- or choose planters with built-in reservoirs
- Prepare the soil
Use only a light container mix. If it’s too dense, water will stay inside, and on a wall setup this quickly becomes a problem. - Place plants based on growth and light
Upper levels — sun-loving herbs (basil, thyme).
Lower levels — those that tolerate less light (parsley, mint). - Check access for maintenance
You should be able to easily reach every level. If you need to stretch or grab a stool every time, the system will stop being convenient very quickly.
Practical tip. Don’t install containers that are too deep on the wall. 6–8 inches (15–20 cm) depth is enough for most herbs. Anything deeper adds unnecessary weight and makes watering harder.
What herbs work best for wall systems
Here it’s important to choose compact, manageable plants — the ones that don’t start spreading in all directions.
- thyme — holds shape, doesn’t need much space
- oregano — easy to trim and control
- basil (dwarf varieties) — grows well with enough light
- parsley — stable and easy to maintain
- chives — compact and neat-looking
Soil is simple: light mix with good drainage. In wall systems this is critical, because excess water doesn’t drain into the ground like it does outdoors.
With wall-mounted setups, at first it feels like just a way to save space. Then you notice something else — the kitchen or yard starts to look different. More alive. But the main thing is practicality. You’re not searching for space — you’re using what’s already there.
5. DIY Vertical Garden Projects for Limited Space
I think everyone has faced that moment when space runs out, but the желание что-то вырастить still stays. That’s where DIY vertical garden projects for limited space really help.
You use wall space or narrow areas that are usually empty. At the same time, plants get enough light if everything is arranged correctly, and maintenance even becomes easier because everything is right in front of you. These structures are flexible — you can add levels or remove them whenever you want.
What you need
A lot depends on the type of project you choose, but the basic setup is almost always the same:
- base (wooden frame, pallet, metal grid, or stand)
- containers or planting pockets
- fasteners (screws, hooks, zip ties)
- light potting mix for containers
- herbs
How to set it up
- Choose the structure format
The most practical options are a vertical stand, a hanging system, or a pallet-based structure.If space is very limited, it’s better to go with a narrow vertical setup rather than a wide wall. - Prepare the base
If you’re using a wooden pallet, make sure it’s clean and not treated with chemicals.
If needed, sand it and secure the back so the structure stays solid. For a metal grid, it’s enough to fix it firmly to a wall or frame. - Attach the containers
Containers can be screwed in, hung, or secured with ties. The key is stability — they shouldn’t move and must hold the weight of wet soil.
Keep about 10–12 inches (25–30 cm) between levels so plants don’t block light. - Prepare the soil
Use a light container mix. It dries faster and doesn’t overload the structure.
If you add a bit of perlite, water will move more evenly, and upper levels won’t dry out too fast. - Plan watering in advance
In vertical systems, water always flows from top to bottom. Water slowly, letting it absorb, otherwise the top dries out and the bottom stays too wet.
Sometimes it’s more effective to water level by level instead of the whole structure at once. - Place herbs based on position
Upper levels — basil, thyme, oregano.
Lower levels — parsley, mint.
This helps balance light and moisture conditions across the setup. - Check stability after setup
After planting and watering, the structure becomes heavier. Make sure everything holds firmly, without shifting. This is an important step people often skip.
Practical tip. Don’t overload the structure from the start. It’s better to begin with 3–4 levels, see how the system behaves, and then expand, instead of building everything at once and redoing it later.
What herbs work best for vertical projects
Here it’s better to choose plants that don’t take up too much space and can handle limited soil volume. At the same time, keep in mind that conditions differ slightly on each level.
- basil — grows well on top with good light
- thyme — compact and stable
- oregano — fills space quickly
- parsley — works well in middle levels
- mint — needs to be controlled so it doesn’t spread
A light container soil works best here, because in vertical systems excess moisture doesn’t drain deep like it does in ground beds.
These projects are one of the most flexible systems. You can start small and just build upward over time. And at some point, you begin to notice how much unused space you actually have around you.
6. Container Garden Combinations That Thrive Together
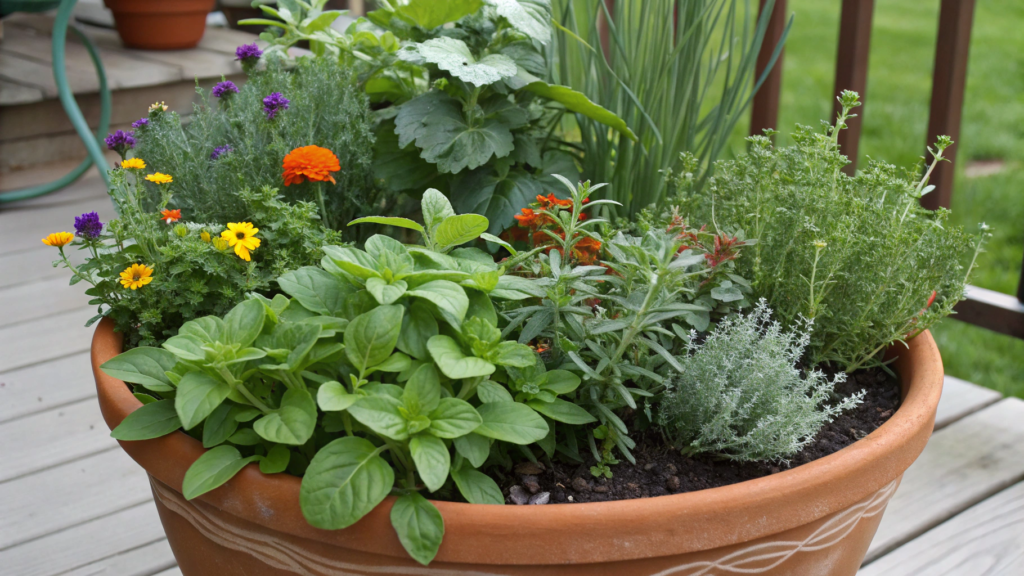
Container garden combinations that thrive together — this is no longer just “plant some herbs.” When plants start working together instead of competing, maintenance becomes easier, and results more stable.
In a container, plants share the same resources: soil, water, space. If their needs differ, conflict starts. If they match, everything grows evenly and predictably.
What matters:
- water needs
- growth speed
- root system size
- sun preference
When these align, the container works as one system.
What you need
- container at least 8–12 inches (20–30 cm) deep
- drainage holes
- tray
- light potting mix
- herbs with similar growing conditions
How to set it up
- Choose compatible plants
Start with the conditions your container will have — more влажные or more dry.
If you plan to water often (for example, the container is in full sun), go with basil, parsley, green onions.
If you prefer less watering — thyme, oregano, rosemary.
Mixing these groups usually doesn’t work: for some it will always be “too wet,” for others “too dry.” - Pick the right container
Depth should be at least 8–12 inches (20–30 cm), otherwise roots will quickly fill all the space. Drainage holes are обязательны. Without them, water will stagnate and roots may start rotting.
Width matters too: for 2–3 plants, you need at least 12–16 inches (30–40 cm) in diameter. - Prepare the soil
Use a light container mix. If you have perlite, add about 10–20% by volume.
Before planting, slightly moisten the mix — not wet, just evenly damp. This helps roots adapt faster. - Plan the layout in advance
Place plants in their pots inside the container and see how they fit. Taller ones — closer to the center or back, lower ones — along the edges.
Leave space for growth, not just what looks good right now. - Plant correctly
Make holes slightly larger than the root ball. Carefully remove the plant without damaging roots and place it at the same depth it was growing before.
Don’t bury the stem — this is a common mistake. - Firm the soil and water deeply
After planting, gently press the soil around the plant to remove air pockets. Water until it starts draining through the holes. This ensures the entire volume is hydrated. - Adjust watering routine
In the first days, check soil daily. In containers, it dries faster than expected. Then follow the top layer: dry at about 1 inch (2–3 cm) — time to water. - Control growth over time
If one plant starts growing aggressively (often basil or mint), trim it back so others don’t lose light and space. This keeps balance inside the container.
Practical tip. If you’re unsure — it’s better to separate than combine. Two smaller containers usually work more reliably than one overloaded.
Working herb combinations
Here are combinations that consistently perform well:
- basil + parsley + green onions — same moisture needs, fast growth
- thyme + oregano + rosemary — prefer drier soil and lots of sun
- cilantro + parsley — similar conditions and growth speed
- mint (separately) — better not to combine, it quickly takes over
Choose a light container soil without excess moisture. If the soil is too dense, plants start competing even more.
When everything is matched правильно, you interfere less. One watering routine, even growth, and no need to constantly “save” one plant at the expense of another.
7. Rustic Pot Arrangements for Outdoor Charm
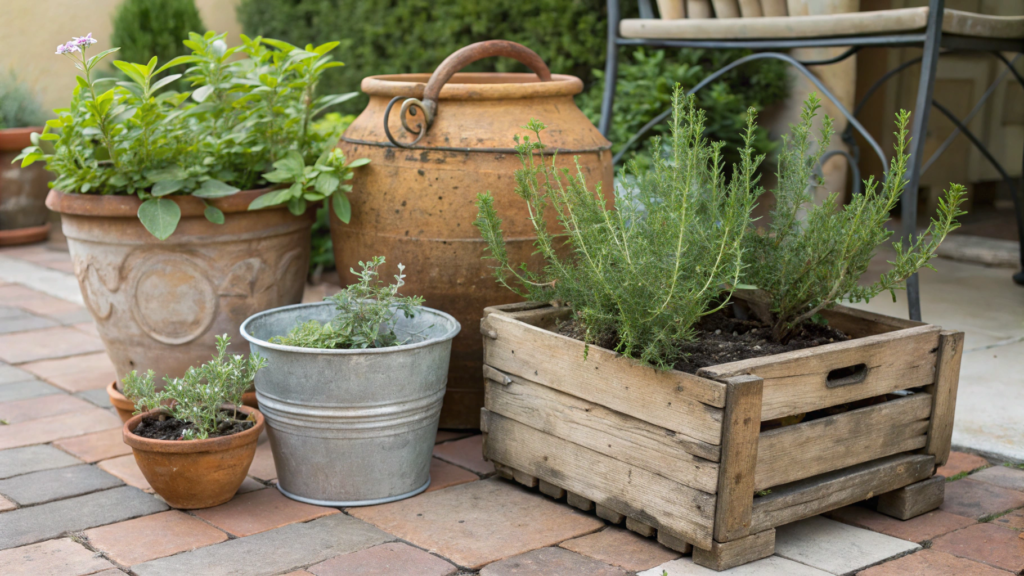
We didn’t come to this style right away. At first, the idea was to keep everything neat: same pots, clean lines. But outdoors it looked… too polished. Like it didn’t quite belong. Then one day we placed an old clay pot next to a metal bucket and a wooden crate — and suddenly it looked completely different. Here it wasn’t about perfection, but about combination.
Herbs naturally grow a bit irregular — they lean, spread, change shape. And when the containers aren’t perfectly identical, it stops looking like a mistake.
Plus, different materials behave differently:
- clay dries out faster
- metal heats up
- wood keeps a more stable temperature
And you can use that instead of trying to avoid it.
What you need
The base here isn’t a matching set, but a mix of different pieces:
- clay pots (different sizes)
- metal buckets or containers
- wooden boxes or planters
- light potting mix
- drainage (gravel or holes at the bottom)
If you want to add something ready-made, you can use La Jolíe Muse Ceramic Plant Pots Set of 2 with Drainage Holes — they have a slightly imperfect texture that fits this style well.
How to set it up
- Choose containers of different sizes
Try not to use identical pots. When you have one large, a few medium, and a couple of small ones, the arrangement immediately looks more natural. Usually, we just place them next to each other and move things around until it feels “right.” - Check drainage
If you’re using buckets or wooden boxes, you’ll almost always need to add holes yourself. Without this, water collects at the bottom and starts affecting the roots over time.
A couple of holes solves the problem completely. - Prepare the soil
Keep it simple: a light container mix that doesn’t compact. If you add some perlite, the soil dries faster after watering or rain, which makes maintenance easier. - Arrange everything before planting
Don’t rush to plant right away. Place empty containers and look at them from a distance. It often helps to choose one larger piece as a center, and build the rest around it.
You might need to rearrange a few times — that’s normal. - Plant with growth in mind
This is where it’s easy to rush and try to fill everything at once. While plants are small, it feels like there’s plenty of space. But basil or parsley quickly take it over.
So it’s better to place larger herbs into more spacious pots from the start, where they don’t compete for every inch.
Thyme or oregano, on the other hand, grow comfortably in smaller containers and don’t need as much room.
And if there’s a bit of empty space left somewhere — that’s actually a good thing, plants develop more easily that way. - Add a bit of irregularity
Don’t try to align everything perfectly. Turn a pot slightly, shift something off-center — and the composition already feels less staged. Outdoors, small imperfections work better than perfect symmetry. - Check stability
After watering, containers become heavier, and if something is uneven, you’ll notice it right away. It’s better to make sure everything stands firmly now than deal with shifting later.
Practical tip. Don’t be afraid to use old items. Sometimes a container that’s “not perfect anymore” actually looks better than a new one. And plants grow just fine in it, as long as there’s proper drainage.
What herbs work best for this style
Here it’s not just about how plants grow, but how they look together. Rustic arrangements work best when there’s variation in texture and shape.
- basil — adds volume and rich color
- parsley — brings density
- thyme — neatly fills gaps
- oregano — can gently spill over the edge
- sage — adds larger leaves and contrast
A mix of fuller plants and those that slightly trail makes the arrangement feel alive, not like a set of separate pots.
These setups only get better over time. You add a new container here, remove something there. It’s not a fixed structure. And that’s probably the main point. You’re not building a “perfect set.” You’re gradually finding a combination that feels right and works in everyday use.
8. Modern Minimalist Indoor Herb Displays
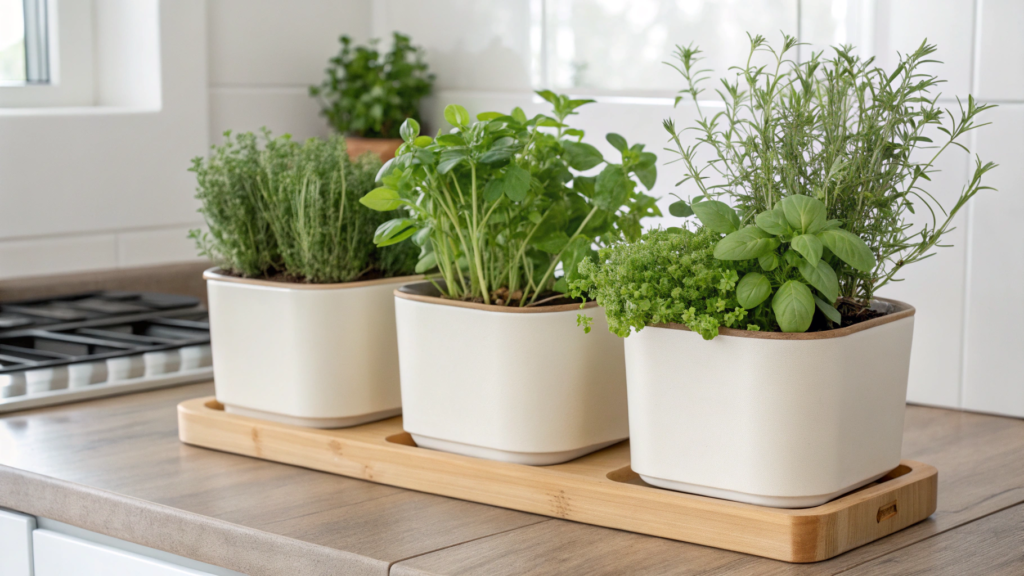
Modern minimalist indoor herb displays — no extra details, only what actually works: light, clean containers, and a simple care system.
Herbs already bring texture and color on their own. When there’s nothing distracting around them, they look neat and don’t get lost.
There’s also a practical side:
- same containers → easier watering
- same volume → same care routine
- less visual noise → easier to notice if something goes wrong
What you need
- identical containers (6–8 inches / 15–20 cm deep)
- trays or built-in drainage
- light potting mix
- 2–4 types of herbs (better not more)
- light source (if the window is weak)
How to set it up
- Choose a spot with stable light
A windowsill or a narrow shelf near a window works best. What matters is not just “some light,” but at least 4–6 hours of consistent light daily. If light is weak, plants start stretching, and in a minimalist setup this becomes noticeable very quickly — the shape gets lost fast. - Limit the number of plants
Here the rule is simple: less is better. Start with 2–4 herb types and see how it looks. When there are more, the setup starts feeling overloaded, and the clean look disappears. - Use matching containers
Pick pots of the same size and color — this immediately pulls everything together visually. Depth of 6–8 inches (15–20 cm) is usually enough for herbs.
If containers differ, attention shifts from plants to the pots themselves. - Prepare the soil
Use a light container mix, without heavy components. If you have perlite, add about 10–20% — it helps the soil dry faster and prevents water buildup, which is especially important indoors. - Arrange before planting
Place empty containers first and look from a distance. Sometimes moving one pot just a couple of inches makes the whole setup feel more balanced.
Leave about 2–3 inches (5–8 cm) between them so it doesn’t feel cramped. - Plant carefully
Don’t bury the stems and don’t compact the soil too much. After planting, gently press the soil and water right away to remove air pockets around the roots. - Set a simple watering routine
Indoors, soil dries slower than outside. Check the top layer: dry at about 1 inch (2–3 cm) — time to water. It’s better to slightly underwater than overwater — that’s the most common mistake. - Maintain shape over time
Once a week, check how herbs are growing. If something starts stretching or losing shape — trim it. In this kind of setup, even small changes are noticeable, so it’s easier to keep things under control early.
Practical tip. Don’t add decorative elements just to “fill space.” If it feels a bit empty — leave it that way. That’s the whole point of this approach.
What herbs work best
In a minimalist setup, plants with a clean shape and steady growth work best. They don’t collapse or require constant adjustment.
- basil (compact varieties)
- thyme
- parsley
- green onions
It’s important that all plants have similar needs. And of course, choose herbs you actually use. Then it’s not just a “green corner,” but part of your daily routine.
This format works well because it doesn’t need constant changes. You set it up once — and then just maintain it.
9. Hanging Herb Gardens That Free Up Counter Space
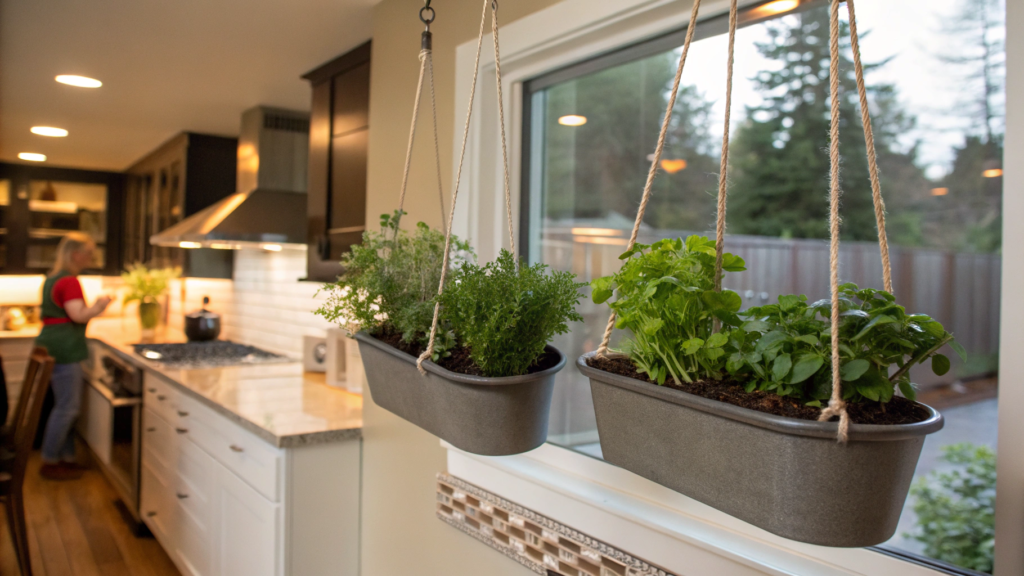
Hanging herb gardens that free up counter space — here it’s not just about “hanging pots,” but making it удобным for everyday use: watering, harvesting, access to light.
The main benefit is clear — you free up working surfaces. But there are also additional ones:
- plants get more light when placed near a window
- less contact with cold surfaces (especially in winter)
- easier to control shape — everything is at eye level
And one more thing — hanging herbs are harder to ignore. You see them all the time.
What you need
- hanging planters or pots
- hooks or ceiling mounts
- strong cords or chains
- light potting mix
- 2–4 types of herbs
How to set it up
- Choose the right spot
The best option is near a window with consistent light. Think not only about height, but also how you’ll reach the plants. If you have to stretch every time, it quickly becomes inconvenient. - Check the mounts
One pot with moist soil can weigh around 5–8 lb (2–3.5 kg). If you hang several, the load adds up. Use reliable hooks or anchors, especially for ceilings or drywall. - Set the right height
The ideal position is around chest level or slightly higher. Too high — difficult to water and harvest. Too low — gets in the way during daily use. - Prepare the soil
Use a light container mix — weight matters here too. Adding some perlite helps distribute water more evenly. - Plant with a margin
Don’t fill containers all the way to the top. Leave some space so water doesn’t spill over the edges during watering. - Water carefully
Avoid pouring too much at once. Water slowly, allowing the soil to absorb moisture.
If possible, take planters down to water them or use trays. - Place plants based on light
More exposed positions — basil and thyme. Less light — parsley or mint.
Practical tip. Don’t hang too many planters in one area. Once they start blocking light from each other, lower plants quickly lose their shape.
What herbs work best
For hanging systems, it’s better to choose compact and not too heavy plants — the ones that don’t need a large volume of soil and don’t spread aggressively.
- basil (compact varieties work better)
- thyme
- parsley
- chives
Before choosing, think about how often you’ll actually use them. Hanging setups work best when you regularly harvest herbs.
This kind of system is flexible. You can move it, add another level, or remove something. And at the same time, your kitchen or balcony stays clear and usable.
10. Recycled and Sustainable Herb Planter Concepts
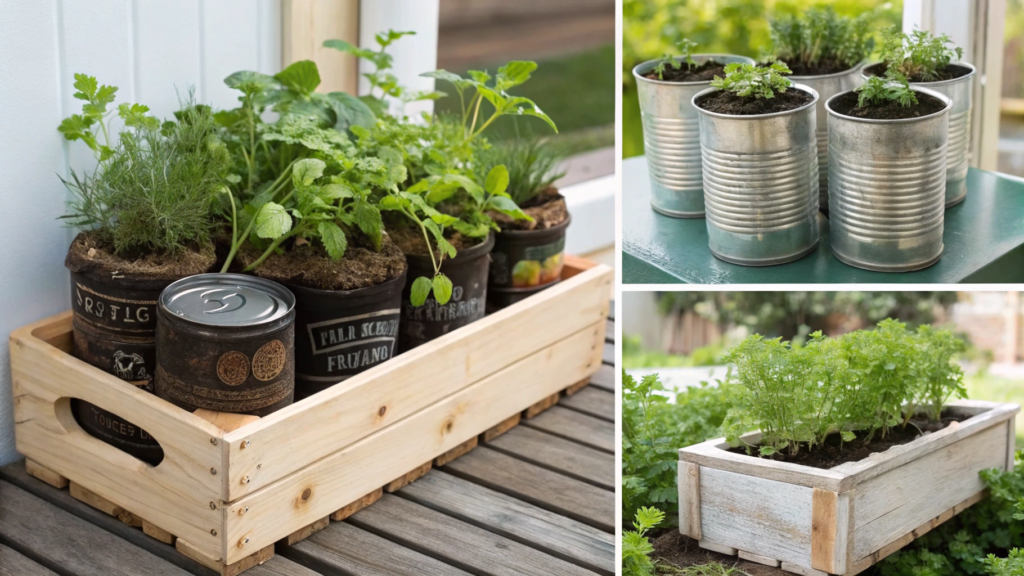
Recycled and sustainable herb planter concepts — this is a way to use what you already have and avoid buying extra things. And surprisingly, these setups often turn out to be more practical than store-bought ones.
First, you save money. Second, you’re not tied to “perfect” solutions from a store.But there’s one important point — these containers usually need a bit of adjustment.
What you need
The list depends on what you’re using, but the base is примерно такая:
- any suitable containers (jars, buckets, boxes, bottles)
- a drill or sharp tool for holes
- light potting mix
- some gravel or expanded clay (optional)
- herbs
How to set it up
- Choose the right container
Look not only at appearance. The volume matters — at least 6–8 inches (15–20 cm) deep for herbs. Containers that are too small dry out quickly, and you’ll have to constantly monitor them. - Check the material
Not everything works. It’s better to avoid containers that previously held chemicals or anything aggressive. Food containers, wooden boxes, metal buckets — these are good options. - Add drainage
This is the key step. Without holes, water will stagnate. Make 2–4 holes at the bottom (about 0.25–0.5 inches / 0.5–1 cm).
If the material is thin, that’s already enough. - Prepare the base
If the container is metal or wood, you can add a thin layer of gravel at the bottom.
It’s not required, but it helps distribute water more evenly. - Fill with soil
Use a light container mix, without heavy components. Don’t compact it too much — roots need air. - Plant the herbs
Try not to bury the stems. Leave about 1–2 inches (2–5 cm) at the top so water doesn’t overflow when watering. - Check watering behavior
First watering — until water drains out. After that, adjust based on how the soil behaves: in recycled containers it can dry faster or slower depending on the material.
Practical tip. If a container looks a bit rough, don’t rush to paint it. Over time, the surface naturally changes and often ends up looking better than right after modification.
What works well in these containers
There are no strict rules, but it’s better to choose herbs that tolerate small variations in conditions.
- basil — reacts quickly to changes, easy to manage
- parsley — stable and low-maintenance
- mint — grows in almost any conditions
- thyme — handles drier soil well
Soil should be a light mix with good drainage. In recycled containers this is especially important, because they don’t have the same buffer as standard pots.
These setups often start as temporary — until you get “proper containers.” But then you realize they work just as well… and sometimes even better.
Useful small spaces
It’s interesting how everyone ends up with different results. Even if you use the same idea, the outcome depends on light, habits, how often you cook, and how much time you’re willing to spend on care. And that’s normal. There isn’t one perfect setup.If you’ve already tried something — write in the comments what worked for you and what didn’t.
Especially if you’re working with a small space and found something that actually made life easier.