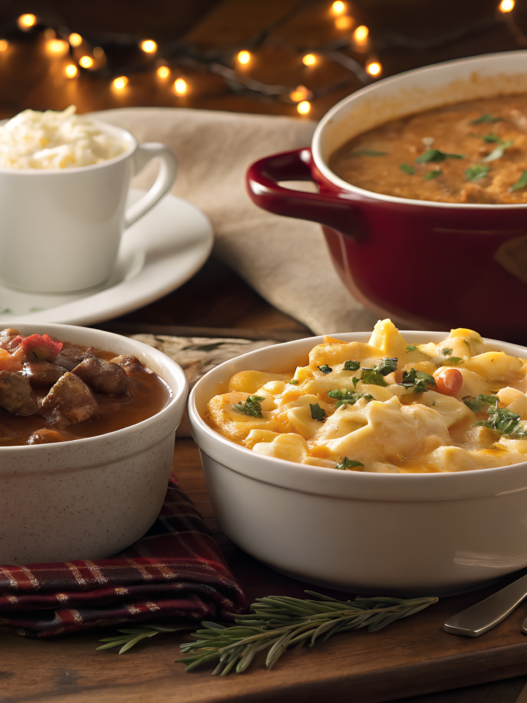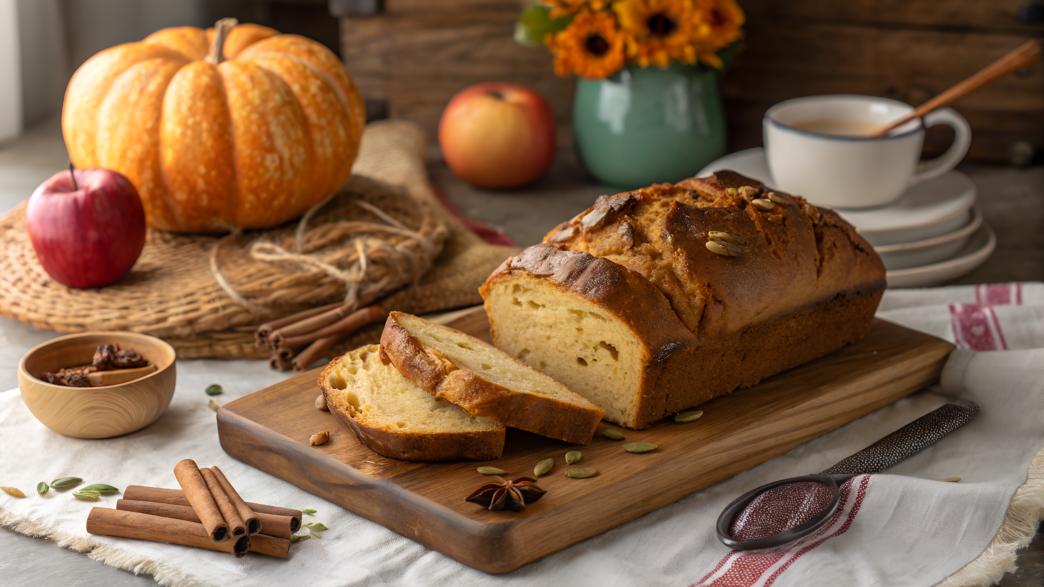
Bread can be very different. Sometimes it’s a soft sweet loaf with fruit and spices. Sometimes it’s a dense rustic bread that works perfectly with soup or a hot dinner. In this collection, we gathered 10 homemade fall bread recipes where old traditions meet the fresh flavors of recent years.
Here you’ll find classics like Old-Fashioned Molasses Bread or Classic Oatmeal Raisin Bread, which were baked decades ago. There are also more modern combinations. All recipes are simple, clear, and work well in a regular home kitchen.
Each of these breads creates its own special aroma in the kitchen. And it’s exactly these little details that build real homemade baking.
1. Old-Fashioned Molasses Bread
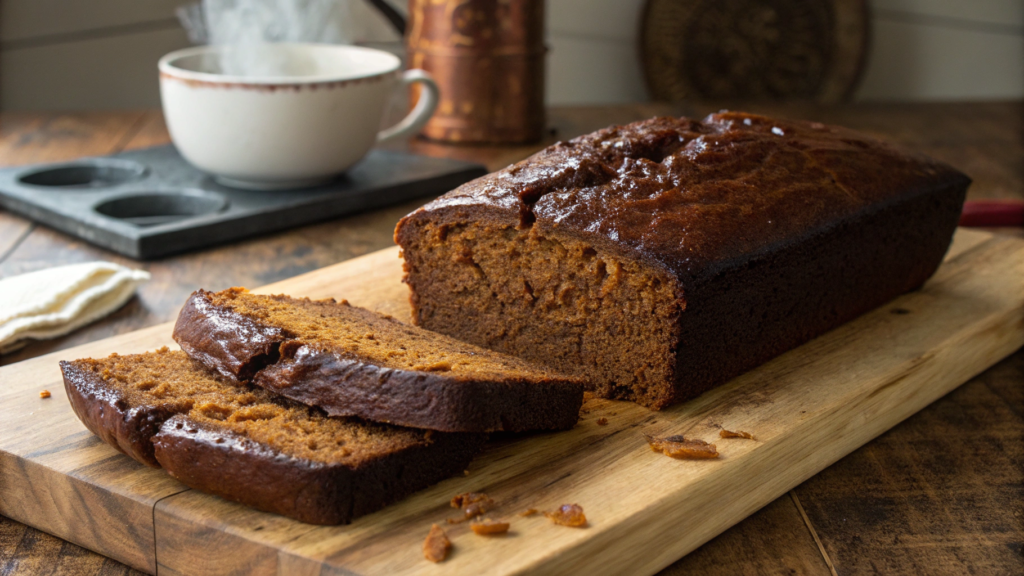
Old-fashioned molasses bread is an old loaf made with molasses, baked long before modern food trends appeared. It’s dense, dark, and has a deep caramel flavor.
And the smell of molasses in the oven always makes you want to bake another loaf.
Why Molasses Bread Is Coming Back to Kitchens
Molasses bread is a recipe that has survived several generations. Molasses gives bread not only flavor but also a dense texture that helps the loaf stay soft longer. That’s why recipes like this often appeared in old farmhouse cookbooks.
In addition, blackstrap molasses really contains noticeable amounts of minerals — iron, potassium, calcium, and magnesium.
According to USDA FoodData Central, blackstrap molasses contains meaningful amounts of iron, calcium, magnesium, and potassium, while refined white sugar contains almost no micronutrients.
That’s why older recipes used it not only for flavor.
From Our Experience
I found this recipe in an old notebook with farm cooking notes. Lindy looked at the list and said: — We don’t even have half of this. But we had molasses. The dough turned out very dark and heavy. But when the bread started baking… the kitchen filled with the smell of caramel, spices, and warm flour.
And this recipe found its place in our kitchen.
Ingredients
For one large loaf you’ll need:
- 2 cups warm water (480 ml)
- ⅓ cup molasses (80 ml)
- 2 tbsp melted butter (30 g)
- 1 tsp salt
- 1 packet active dry yeast (7 g)
- 3½–4 cups all-purpose flour (420–480 g)
- 1 tsp cinnamon (optional)
- ½ tsp ground ginger
If you bake bread regularly, it’s easier to use a heavy loaf pan. It keeps the temperature stable and helps create an even crust. For example, Lodge Cast Iron Loaf Pan heats evenly and can handle years of regular baking.
How to Make Old-Fashioned Molasses Bread
- Activate the yeast
In a large bowl mix warm water and molasses. The liquid should be warm but not hot — about 100–105°F (38–40°C). Add the yeast and let it sit for 5–10 minutes until a light foam appears on the surface. This means the yeast has started working. - Add the base ingredients
Stir melted butter, salt, and spices into the yeast mixture. Cinnamon and ginger add a light fall aroma but can be skipped if you prefer a simpler flavor. Start adding flour gradually, about ½ cup at a time, mixing gently with a spoon. - Knead the dough
When the dough becomes thick, move it to a lightly floured surface. Knead for about 8–10 minutes until it becomes smoother and more elastic. At first it may feel sticky and heavy, but it will tighten up as you work it. - Let the dough rise
Place the dough in a lightly oiled bowl and cover it with a towel. Leave it in a warm place for 60–90 minutes until the dough roughly doubles in size. If the kitchen is cool, it may take a bit longer. - Shape the loaf
Gently press the dough to release excess air. Shape it into a loaf and place it into the bread pan. Cover again and leave it to rise for another 30–40 minutes. - Bake the bread
Preheat the oven to 375°F (190°C). Bake the loaf for 35–40 minutes until the crust becomes deep golden brown. When you tap the bottom of the loaf lightly, it should sound hollow — that’s a good sign the bread is done.
What Makes This Bread Special
Old-fashioned molasses bread turns out slightly sweet, aromatic, and dense, but soft inside.
It works perfectly with:
- butter
- homemade apple jam
- hearty fall soups
There’s also one interesting detail. When dough ferments, phytic acid in the grain partly breaks down — this compound normally binds minerals. Because of that, the body can absorb minerals like iron and magnesium from fermented bread a little more easily.
So this bread isn’t only a tasty tradition. It’s also a practical choice for the kitchen.
A Small Experiment
Sometimes this bread changes a little. Not dramatically — just small details. Sometimes we add a handful of oats directly into the dough. The bread becomes slightly denser and develops a light nutty flavor.
Another time we replace part of the regular flour with whole wheat flour. The crust becomes a bit darker and the aroma gets deeper.
Sometimes we replace part of the molasses with a spoon of thick honey. The flavor becomes softer and the color a little lighter.
These small changes don’t create a completely new recipe. But every loaf turns out a little different. And that’s exactly what makes homemade bread so interesting in the kitchen.
2. Maple Pecan Streusel Loaf
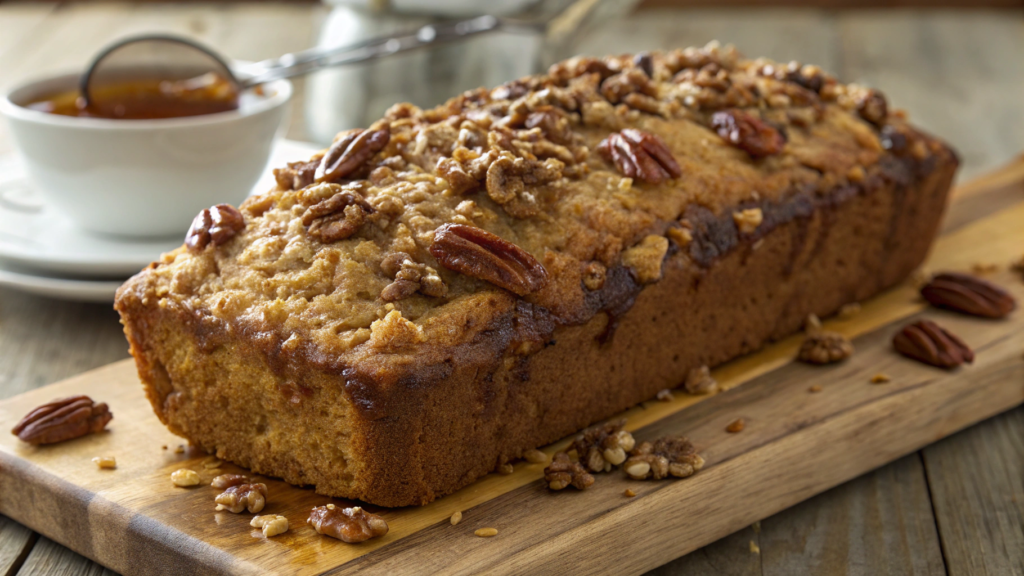
A favorite loaf in our kitchen is Maple Pecan Streusel Loaf. Maple syrup, toasted pecans, and a crumbly streusel topping on top. The smell is like you’re standing inside a small bakery.
It works perfectly for breakfast, and also as a dessert with tea.
Why Maple Syrup Works So Well
Maple syrup is not just a sweetener. It gives baked goods a depth of flavor that is hard to get from regular sugar. It contains minerals, antioxidants, and organic acids.
In one study published in the Journal of Agricultural and Food Chemistry, scientists identified more than 60 phenolic compounds in natural maple syrup. These compounds help shape its characteristic flavor and aroma.
And when the syrup goes into the dough and bakes… its caramel notes become even deeper. Add pecans to that, and you get a classic North American flavor combination.
Ingredients
For one loaf you’ll need:
The batter
- 1 ¾ cups all-purpose flour (220 g)
- ½ cup maple syrup (120 ml)
- ⅓ cup brown sugar (65 g)
- ½ cup milk (120 ml)
- 1 large egg
- ⅓ cup melted butter (75 g)
- 1 tsp vanilla extract
- 1 tsp baking powder
- ½ tsp baking soda
- ½ tsp salt
The pecan layer
- ¾ cup pecans, roughly chopped (90 g)
For the streusel topping
- ½ cup flour (60 g)
- ⅓ cup brown sugar (65 g)
- ¼ cup cold butter (60 g)
- ½ tsp cinnamon
How to Make Maple Pecan Streusel Loaf
- Prepare the pecans
Pecans taste better when lightly toasted first. Heat a dry skillet over medium heat and toast the nuts for about 3–4 minutes until a light nutty aroma appears. Let them cool slightly, then chop them roughly. - Mix the wet ingredients
In a large bowl combine maple syrup, melted butter, milk, egg, and vanilla. Stir until the mixture becomes smooth. The color should turn warm and caramel-like — a good sign. - Add the dry ingredients
In a separate bowl mix flour, baking powder, baking soda, and salt. Gradually add this mixture to the wet ingredients, gently folding it in with a spatula. The batter should become thick but still soft. - Add the pecans
Fold most of the pecans into the batter, leaving a small handful for the top. The nuts won’t distribute perfectly evenly, and that’s fine. In the finished bread you’ll get occasional pockets of pecans. - Make the streusel topping
In a small bowl combine flour, brown sugar, and cinnamon. Add the cold butter and rub it into the mixture with your fingers until it forms coarse crumbs. This topping creates the crisp crumb layer on top of the loaf. - Bake the loaf
Pour the batter into a loaf pan. Sprinkle the streusel topping and the remaining pecans over the top. Bake at 350°F (175°C) for 45–50 minutes, until a wooden toothpick inserted in the center comes out clean.
Different Variations of the Recipe
Sometimes this bread changes slightly — not dramatically, just small adjustments. For example, part of the pecans can be replaced with walnuts, which gives the loaf a deeper flavor.
Sometimes 2–3 tbsp of whole wheat flour are added to the batter. The loaf becomes slightly denser and the aroma a bit richer.
Occasionally a pinch of nutmeg goes into the mixture, which makes the maple flavor feel warmer. And once we added thin apple slices right in the middle of the loaf between layers of batter. It turned out almost like a dessert.
Each time the loaf comes out a little different. And that’s one of the nice things about home baking.
What Makes This Bread Special
This bread combines several textures at once.
- Inside there is soft maple crumb.
- On top there is a crisp streusel layer.
- And between them are toasted pecan pieces.
Every slice comes out a little different. Sometimes there are more nuts. Sometimes more caramelized crust. And that’s exactly what makes it one of those recipes that stays in the kitchen for years.
3. Rosemary Garlic Harvest Bread
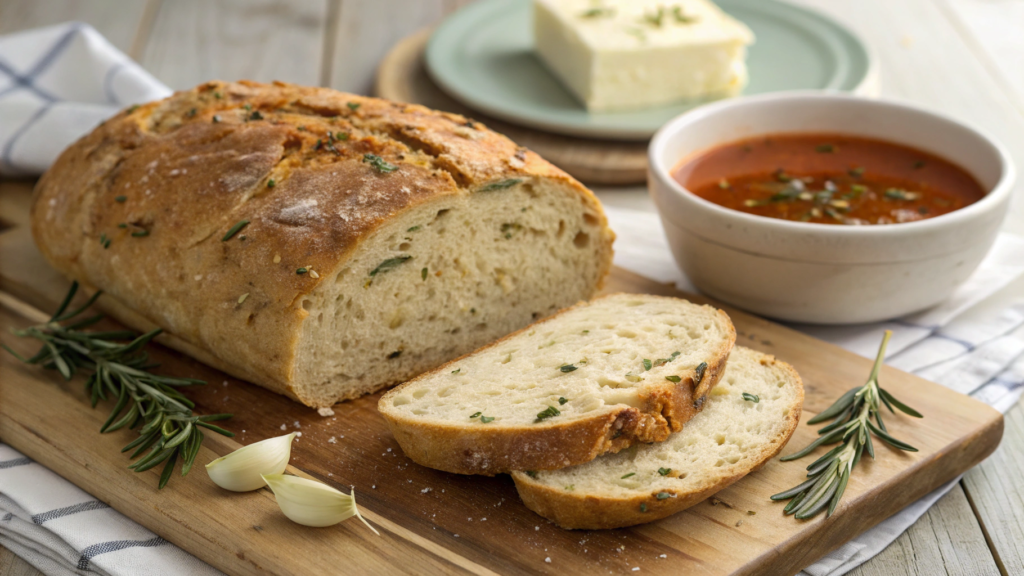
In our kitchen, Rosemary Garlic Harvest Bread appears regularly. No sweetness here. Instead, it’s packed with garlic, rosemary, and a warm crispy crust.
This bread works perfectly with thick soups, stewed vegetables, and simple farmhouse dinners. Sometimes all you need is a slice of bread, a bit of butter, and a bowl of soup — and the whole meal suddenly feels complete.
Why Rosemary and Garlic Are a Classic Bread Pair
The combination of garlic and rosemary has been used in Mediterranean cooking for centuries. These ingredients deepen the aroma of bread and make the flavor more complex.
Rosemary contains compounds such as rosmarinic acid and carnosic acid, which are known for their antioxidant properties. These compounds are often discussed in research on rosemary’s biologically active components, including studies published in the Journal of Medicinal Food.
The characteristic aroma of garlic is linked to a compound called allicin, along with other sulfur-containing substances. Reviews published in the Journal of Nutrition note that these compounds can show antioxidant and anti-inflammatory activity.
But in the kitchen things feel much simpler. When garlic bakes inside the bread, it becomes soft and slightly sweet. And rosemary adds that unmistakable herbal aroma.
Ingredients
For one loaf you’ll need:
- 3 cups all-purpose flour (360 g)
- 1 cup warm water (240 ml)
- 2 tbsp olive oil (30 ml)
- 1 packet active dry yeast (7 g)
- 1 tsp salt
- 3 cloves garlic, finely chopped
- 1 tbsp fresh rosemary, finely chopped
- ½ tsp black pepper
How to Make Rosemary Garlic Harvest Bread
- Activate the yeast
In a bowl mix warm water and yeast. The water should be around 100–105°F (38–40°C). Let the mixture sit for 5–10 minutes until a light foam appears on the surface. That means the yeast has started working. - Add the aromatic base
Stir in olive oil, salt, black pepper, chopped garlic, and rosemary. Mix everything with a spoon. Even at this stage the dough begins to smell strongly of herbs. - Add the flour
Gradually add the flour, mixing the dough as you go. When the dough becomes thick, transfer it to a work surface. It should feel soft and slightly sticky. - Knead the dough
Knead for about 8–10 minutes until the dough becomes smooth and elastic. The garlic and rosemary pieces will spread through the dough evenly. - First rise
Place the dough in a lightly oiled bowl, cover with a towel, and leave it in a warm place for 60–90 minutes. It should grow to about double its size. - Bake the bread
Shape the dough into a round loaf and place it on a baking sheet or inside a preheated Dutch oven. Bake at 375°F (190°C) for 35–40 minutes until the crust turns golden and crisp.
Why This Bread Stands Out
This bread feels different from many fall recipes because it has no sweetness at all.
Instead, the flavor comes from aroma:
- garlic, which becomes soft and slightly sweet while baking
- rosemary, which adds a fresh herbal note
- olive oil, which keeps the crumb tender
The crust becomes crispy, while the inside stays warm and aromatic.
It pairs especially well with a bowl of thick soup or vegetable stew — the kind of bread that people instinctively break apart with their hands at the table.
Simple Ways to Change the Recipe
Sometimes we add a few tablespoons of grated Parmesan cheese to the dough. The crust becomes even more aromatic, and the bread develops subtle cheesy notes inside.
Occasionally a handful of whole wheat flour goes into the mix — about ¼ cup. The loaf becomes slightly denser and the flavor takes on a more rustic character.
And sometimes, right before baking, we sprinkle the loaf with coarse sea salt. The crust turns a little crispier, and the bread looks like it just came from a small neighborhood bakery.
4. Pumpkin Chocolate Marble Loaf
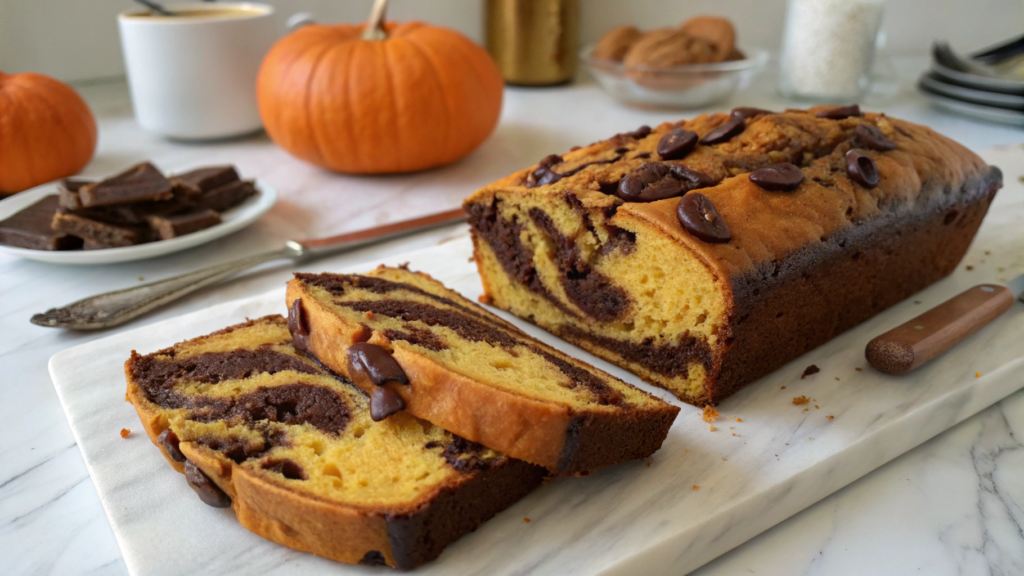
A regular pumpkin loaf can sometimes feel a little predictable. That’s exactly why Pumpkin Chocolate Marble Loaf has become more popular in recent years — it combines the warm flavor of pumpkin with swirls of chocolate batter running through the crumb.
When you slice the bread, dark chocolate ribbons appear across the loaf. The flavor turns out rich but not overly sweet. Pumpkin keeps the texture soft and slightly moist, while chocolate adds depth.
Pumpkin also works well in baking because of its natural composition. It contains pectin, natural sugars, and beta-carotene, all of which help keep baked goods tender. That’s why pumpkin purée is often used in baking to improve texture and retain moisture.
Ingredients
This bread belongs to the quick bread category, so the batter is made without yeast. Most of the batter will be pumpkin-based, and a smaller part becomes the chocolate swirl that creates the marble pattern.
For one loaf you’ll need:
- 1 ¾ cups all-purpose flour (210 g)
- ¾ cup brown sugar (150 g)
- 1 tsp baking powder
- ½ tsp baking soda
- ½ tsp salt
- 1 tsp cinnamon
- ½ tsp ground ginger
- ¼ tsp nutmeg
- 1 cup pumpkin purée (240 g)
- ⅓ cup melted butter (75 g)
- 2 large eggs
- 1 tsp vanilla extract
- ¼ cup milk (60 ml)
For the chocolate batter
- 2 tbsp cocoa powder
- 2 tbsp sugar
- 2 tbsp milk
Once the ingredients are ready, all that remains is preparing two batters and combining them in the pan.
How to Make Pumpkin Chocolate Marble Loaf
- Prepare the oven and pan
Preheat the oven to 350°F (175°C). Lightly grease a loaf pan with butter or oil, or line it with parchment paper so the bread can be removed easily after baking. - Mix the dry ingredients
In a large bowl combine flour, brown sugar, baking powder, baking soda, salt, cinnamon, ginger, and nutmeg. Stir everything well with a whisk so the spices distribute evenly through the flour. - Mix the wet ingredients
In another bowl combine pumpkin purée, melted butter, eggs, vanilla extract, and milk. Stir until the mixture becomes smooth and evenly blended. - Make the pumpkin batter
Pour the wet mixture into the bowl with the dry ingredients. Gently mix with a spatula until a thick, smooth pumpkin batter forms. Avoid overmixing so the loaf stays tender. - Prepare the chocolate portion
Transfer about ⅓ of the batter into a separate bowl. Add cocoa powder, sugar, and milk, then mix until the batter becomes smooth and chocolate-colored. - Create the marble pattern and bake
Spread half of the pumpkin batter in the loaf pan. Add the chocolate batter on top, then cover with the remaining pumpkin batter. Use a knife to swirl the batters together a few times to create a marble pattern. Bake for 50–55 minutes, until a toothpick inserted into the center comes out almost clean.
After baking, allow the loaf to cool for 15–20 minutes. During this time the crumb structure settles and the chocolate swirls become more visible.
What Makes This Bread Different
This loaf stands out from a typical pumpkin bread recipe because of its contrast in both flavor and texture.
The pumpkin batter is soft and lightly spiced thanks to cinnamon and ginger. The chocolate swirls add deeper flavor and make every slice slightly different.
When the loaf is cut, a marble pattern appears inside. That’s why this bread often looks like a dessert, even though it remains a simple homemade recipe. It works well for a fall breakfast or with a cup of evening tea.
Small Variations People Sometimes Try
Sometimes this bread can be adjusted slightly to add another layer of flavor. The base recipe stays the same, but small additions can make the loaf feel new.
- Chocolate chips. Adding about ¼ cup chocolate chips to the chocolate batter makes the flavor richer.
- Pecans. A handful of chopped pecans adds a light nutty crunch that pairs well with pumpkin.
- Maple syrup. Replacing part of the sugar with 2 tbsp maple syrup makes the flavor softer and deeper.
- Orange zest. A small amount of orange zest brightens the aroma and adds freshness.
These small adjustments don’t change the core idea of the recipe. But sometimes it’s exactly these details that make a familiar loaf feel slightly new in the kitchen.
5. Cranberry Orange Quick Bread
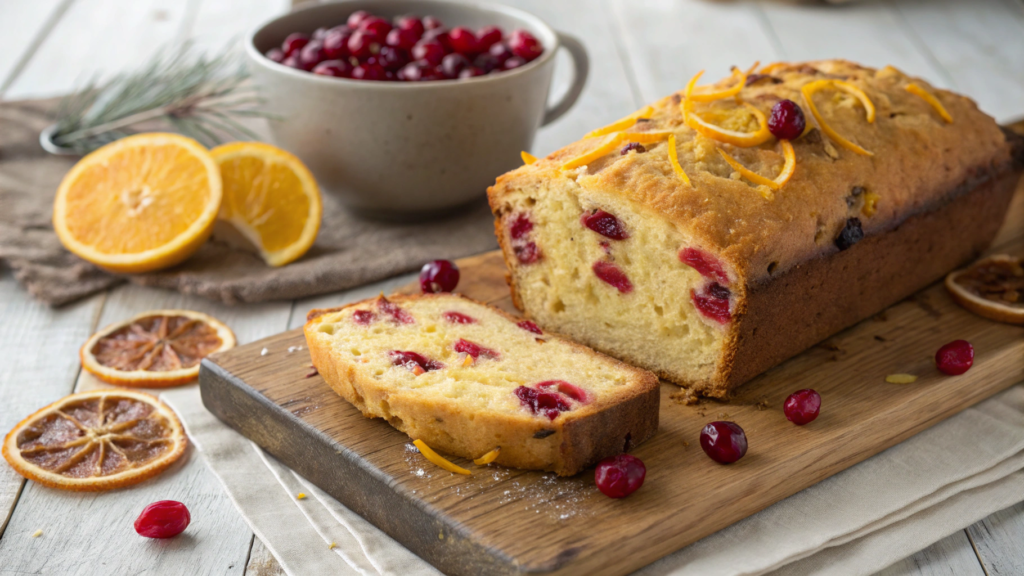
Cranberry Orange Quick Bread turns out bright, fragrant, and slightly tart. And that gentle tartness is exactly what makes it so pleasant with a cup of coffee or tea.
Once Lindy mentioned that if you add cranberries to bread and pair them with orange, the combination could become surprisingly good. Soon the kitchen started to smell like fresh orange zest.
Cranberries work especially well in baking because they keep their natural tartness. Because of that, the bread never becomes overly sweet. In every slice there are small berries that burst slightly during baking, giving the loaf a lively and juicy texture.
Ingredients
This loaf belongs to the quick bread category, which means it’s made without yeast. The batter doesn’t need long kneading or rising time, so the recipe fits perfectly into a regular weekday kitchen.
For one loaf you’ll need:
- 2 cups all-purpose flour (240 g)
- ¾ cup sugar (150 g)
- 1 tsp baking powder
- ½ tsp baking soda
- ½ tsp salt
- ¾ cup fresh or frozen cranberries (100–120 g)
- 1 tbsp orange zest
- ½ cup fresh orange juice (120 ml)
- ⅓ cup melted butter (75 g)
- 1 large egg
- 1 tsp vanilla extract
For baking quick breads, a classic loaf pan works best. A simple model like Wilton Perfect Results Premium Non-Stick Loaf Pan works well for recipes like this — the batter bakes evenly and the loaf releases easily from the pan.
How to Make Cranberry Orange Quick Bread
This bread comes together quickly. Most of the work takes about ten minutes, and the oven handles the rest.
- Preheat the oven and prepare the pan
Preheat the oven to 350°F (175°C). Grease the loaf pan with butter or line it with parchment paper so the finished loaf can be removed easily. - Mix the dry ingredients
In a large bowl combine flour, sugar, baking powder, baking soda, and salt. Stir with a whisk until the ingredients are evenly mixed. - Add cranberries and zest
Fold the cranberries and orange zest into the dry mixture. This simple step helps distribute the berries through the batter and prevents them from sinking to the bottom. - Mix the wet ingredients
In another bowl combine orange juice, melted butter, egg, and vanilla. Stir until the mixture becomes smooth. - Combine the batter
Pour the wet ingredients into the dry mixture and gently mix with a spatula. Stir only until the batter becomes even and combined. - Bake the loaf
Transfer the batter into the loaf pan and bake for about 45–50 minutes. You can check doneness with a wooden toothpick — it should come out almost clean.
After baking, allow the bread to cool slightly. After 10–15 minutes it can already be sliced, and the orange aroma becomes especially noticeable.
What Makes This Bread Special
This bread stands apart from many fall recipes because it feels lighter and less sweet. There are no heavy syrups or large amounts of spice. The main flavor comes from cranberries and orange zest.
During baking the berries open slightly and leave small ruby-colored spots inside the crumb. The orange zest keeps the aroma fresh and bright.
The result is a loaf that works just as well for breakfast as it does for a light dessert.
Small Changes That Sometimes Work Well
The base recipe stays the same, but small additions can slightly change the flavor and texture of the loaf.
- Walnuts. Sometimes we add a handful of chopped walnuts to the batter. They make the crumb a little denser and add a mild nutty flavor that pairs well with cranberries.
- Maple syrup. Occasionally part of the orange juice is replaced with 2–3 tbsp maple syrup. The loaf becomes slightly softer and gains a gentle caramel note.
- Coarse sugar on top. Try sprinkling coarse sugar over the batter before baking. In the oven it forms a thin crisp crust that contrasts nicely with the soft crumb.
With small adjustments like these, every loaf turns out a little different. And that’s one of the reasons this bread ends up in the oven again and again.
6. 2026 Trend: Sweet Corn and Honey Loaf
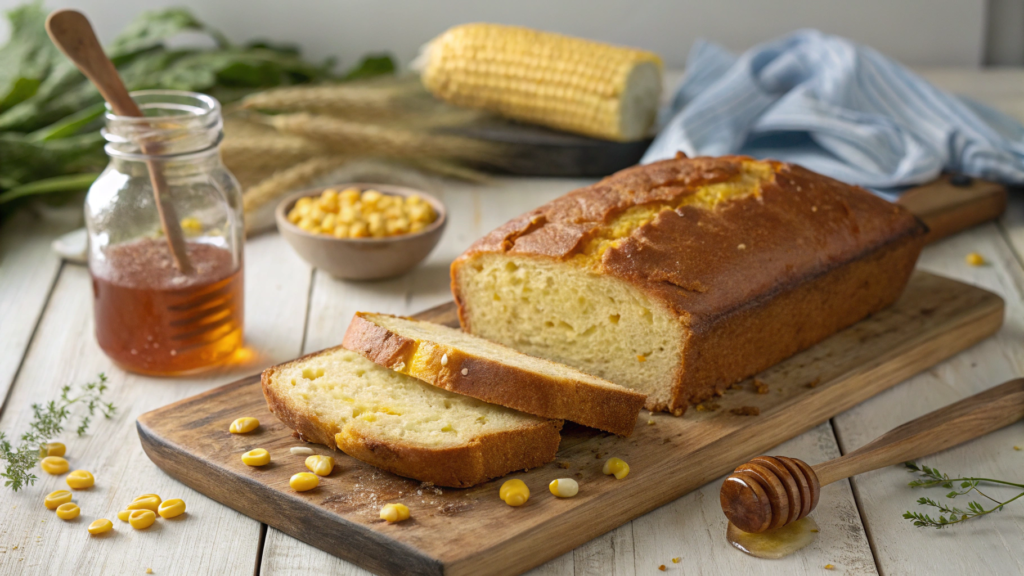
Bread made with sweet corn and honey doesn’t really behave like classic cornbread. But it also doesn’t feel like a typical sweet loaf. The texture turns out soft, slightly grainy, and the flavor becomes warm with a gentle caramel note.
We first tried this bread at a small farmers market at the end of September. One baker was selling warm loaves of corn bread with honey. At first it looked like just another version of cornbread. But when the loaf was cut open, there were whole corn kernels inside. The bread turned out soft, slightly sweet, and surprisingly juicy.
Sweet corn works in baking better than many people expect. It adds a little moisture and texture inside the loaf. Honey brings a soft sweetness that feels warm rather than sharp.
Ingredients
This bread is simple to make. There are no complicated techniques here, which makes the recipe perfect even for a regular weekday evening.
For one loaf you’ll need:
- 1 cup cornmeal (150 g)
- 1 cup all-purpose flour (120 g)
- ½ cup sweet corn kernels (80–100 g)
- ⅓ cup honey (80 ml)
- ¾ cup milk (180 ml)
- 2 tbsp melted butter (30 g)
- 1 large egg
- 1 tsp baking powder
- ½ tsp baking soda
- ½ tsp salt
Once the ingredients are ready, all that remains is mixing the batter and placing it in the oven.
How to Make Sweet Corn and Honey Loaf
This bread comes together quickly because it belongs to the quick bread category. There’s no need to wait for dough to rise.
- Prepare the oven
Preheat the oven to 350°F (175°C). Lightly grease a loaf pan with butter or line it with parchment paper. - Mix the dry ingredients
In a large bowl combine cornmeal, flour, baking powder, baking soda, and salt. Stir everything together with a whisk. - Add the corn
Fold the sweet corn kernels into the dry mixture. They should distribute evenly through the batter. - Mix the wet ingredients
In another bowl combine honey, milk, egg, and melted butter. Stir until the mixture becomes smooth. - Combine the batter
Pour the wet ingredients into the dry mixture and gently mix with a spatula. The batter should become thick but soft. - Bake the bread
Transfer the batter into the loaf pan and bake for 40–45 minutes, until the top becomes golden. You can check doneness with a wooden toothpick.
After baking, let the bread cool slightly. After 10–15 minutes it can already be sliced, and the honey aroma becomes more noticeable.
Why Corn and Honey Work So Well
Cornmeal and whole corn kernels create a pleasant texture and natural sweetness. In traditional cornbread this is already noticeable — the crumb feels slightly grainy but still soft.
Corn also contains complex carbohydrates, fiber, and B vitamins, which makes corn bread fairly filling and able to provide a good amount of daily energy.
Honey adds another dimension to the flavor. It contains natural sugars, small amounts of minerals, and antioxidant compounds, while also helping baked goods stay softer and more aromatic.
The result is a loaf that works equally well as breakfast or as a side for dinner.
Small Variations That Sometimes Work
Sometimes this bread changes a little. The base recipe stays the same, but small additions can adjust the flavor and texture.
- Cheddar cheese. Adding about ½ cup grated cheddar (60–70 g) makes the bread richer and perfect next to soups or autumn vegetable dishes.
- Jalapeño. A couple of finely chopped jalapeños add gentle heat and make the flavor brighter. This version works well with hearty stews.
- Whole wheat flour. Occasionally part of the flour is replaced with ¼ cup whole wheat flour. The loaf becomes slightly denser and develops a more rustic flavor.
- Extra honey on top. Before baking, drizzle a thin line of honey over the batter. During baking it caramelizes slightly and forms a soft aromatic crust.
You’ll notice that the overall character of the bread doesn’t change. But each loaf turns out a little different, and details like these make homemade baking more interesting and varied.
7. Classic Oatmeal Raisin Bread
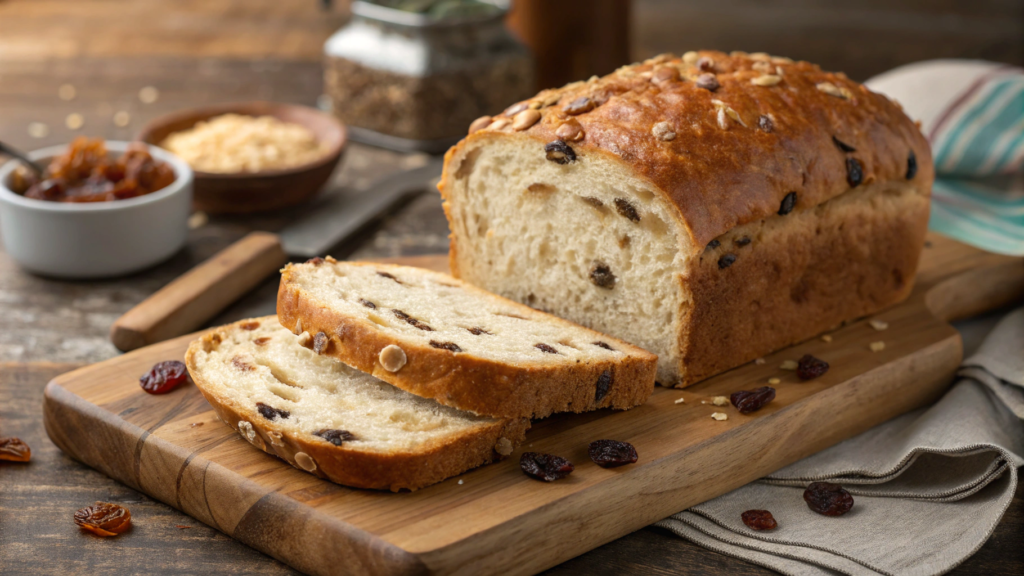
As soon as you slice a fresh loaf of Classic Oatmeal Raisin Bread, it becomes clear why this bread has survived for generations. Oats give the crumb a soft, dense texture, while raisins create small sweet pockets inside the loaf.
This bread often appeared in older American kitchens because the ingredients were simple and easy to store. Oats keep well, raisins don’t need refrigeration, and the dough produces a loaf that feels filling and nourishing. As the bread bakes, the kitchen begins to smell like warm grain, caramel sugar, and baked raisins. It’s one of those aromas that immediately creates the feeling of a home kitchen.
Oats are used in bread not only for texture. They contain soluble fiber called beta-glucan, which has been widely studied in nutrition science. Publications in the Journal of Nutrition note that oat beta-glucan may help support healthy cholesterol levels and contribute to a longer feeling of fullness. That’s one reason oatmeal bread often turns out both flavorful and satisfying.
Ingredients
This bread is a little different from quick loaf recipes. It uses yeast dough, which gives the crumb a soft and slightly springy structure. The oats absorb moisture and create a deeper, more textured crumb.
For one large loaf you’ll need:
- 1 cup rolled oats (90 g)
- 1 cup hot water (240 ml)
- 2 ¼ tsp active dry yeast (1 packet — 7 g)
- 2 tbsp honey or brown sugar (30 g)
- 2 tbsp melted butter (30 g)
- 1 tsp salt
- ½ tsp cinnamon
- 3 cups all-purpose flour (360 g)
- ¾ cup raisins (110 g)
It’s best to rinse the raisins and soak them in warm water for a few minutes before using them. This helps them soften so they don’t pull moisture out of the dough while baking.
How to Make Classic Oatmeal Raisin Bread
- Prepare the oat base
Place the rolled oats in a bowl and pour 1 cup hot water (240 ml) over them. Let the mixture sit for about 10–15 minutes so the oats soften and absorb some of the liquid. - Activate the yeast
When the oat mixture becomes warm rather than hot, add the yeast and honey. Stir gently and leave it for about 5–7 minutes until a light foam appears on the surface. - Add the main ingredients
Mix in the melted butter, salt, and cinnamon. Then begin gradually adding the flour, stirring the dough with a spoon or spatula. The dough will become thick and slightly sticky. - Knead the dough
Transfer the dough to a work surface and knead it for about 8–10 minutes. The dough will become smooth and elastic. After that, fold in the raisins so they spread evenly through the dough. - First rise
Place the dough in a lightly oiled bowl, cover it with a towel, and leave it in a warm place for 60–90 minutes. The dough should roughly double in size. - Shape and bake the loaf
Shape the dough into a long loaf and place it in a bread pan. Let it rise again for 30–40 minutes, then bake at 375°F (190°C) for 35–40 minutes until the crust becomes golden.
After baking, allow the bread to cool slightly. After about 15 minutes it can already be sliced, and the aroma of oats and raisins becomes especially noticeable.
The result is a loaf that works well for morning toast, sandwiches, or a simple slice with butter. It feels filling but not heavy. That’s why recipes like this continue to appear in kitchens decade after decade.
Small Variations That Work Well
The base recipe stays the same, but a few additions can slightly change the flavor and texture of the loaf.
- Walnuts. Sometimes about ½ cup chopped walnuts (60 g) are added to the dough. They give the bread a more interesting texture and a mild nutty flavor.
- Maple syrup. Occasionally part of the honey is replaced with 2 tbsp maple syrup, which adds a light caramel aroma.
- Orange zest. A small amount of orange zest brightens the flavor and pairs nicely with raisins.
- Whole wheat flour. Sometimes about ¼ cup of the flour is replaced with whole wheat flour, which makes the flavor deeper and more grain-forward.
Small changes like these keep the familiar recipe feeling a little new each time it comes out of the oven.
8. Caramel Apple Cream Cheese Bread
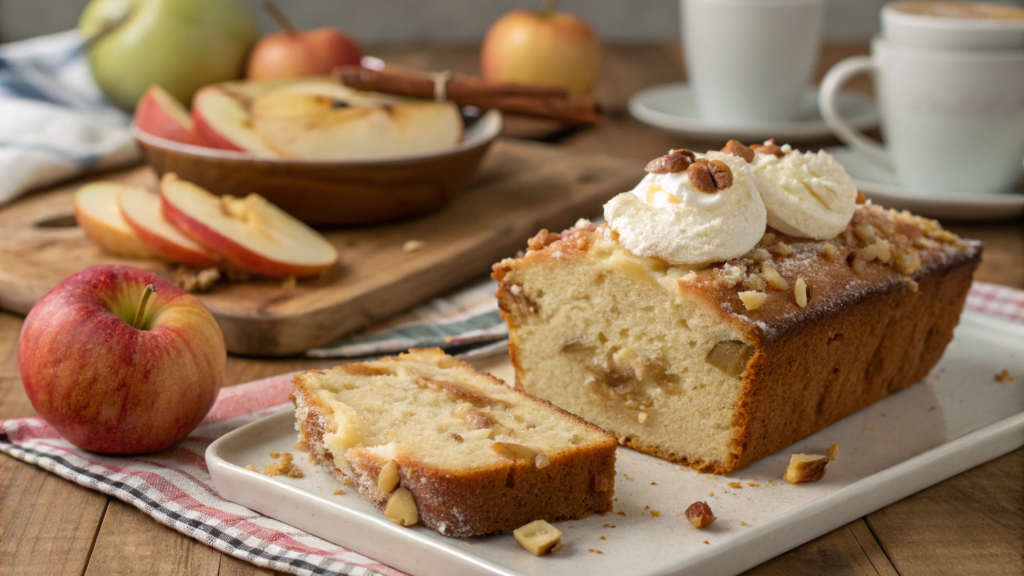
This bread stands apart from a typical apple loaf because it includes a layer of cream cheese and a light caramel flavor that makes the texture more interesting. The crumb stays soft and slightly moist, while pieces of apple add juiciness to every slice.
This kind of bread often appears in small bakeries around the middle of autumn. As apples bake, the kitchen fills with the smell of caramel and fruit. That’s one reason this recipe is often served not only for breakfast but also as a dessert with tea. Sometimes a warm slice of this bread replaces an entire pie.
Apples work especially well in baking for a simple reason. They contain pectin and natural sugars, which soften and become aromatic during baking. When heated, the sugars begin to caramelize, which is why baked goods with apples usually develop a deeper flavor.
Ingredients
This loaf belongs to the quick bread category. The batter is made without yeast, and the cream cheese layer is added separately, creating a soft creamy center inside the bread.
For one loaf you’ll need:
- 2 cups all-purpose flour (240 g)
- ¾ cup sugar (150 g)
- 1 tsp baking powder
- ½ tsp baking soda
- ½ tsp salt
- 1 tsp cinnamon
- ½ tsp nutmeg
- 1 cup chopped apples (about 150 g)
- ½ cup milk (120 ml)
- ⅓ cup melted butter (75 g)
- 1 large egg
- 1 tsp vanilla extract
The cream cheese filling
- 8 oz cream cheese (225 g)
- 3 tbsp sugar
- 1 tsp vanilla extract
The caramel accent
- 3 tbsp thick caramel sauce
For baking this type of bread it helps to use a non-stick loaf pan so the batter cooks evenly and the loaf releases easily after baking.
How to Make Caramel Apple Cream Cheese Bread
- Prepare the oven and pan
Preheat the oven to 350°F (175°C). Grease the loaf pan with butter or line it with parchment paper. - Mix the dry ingredients
In a large bowl combine flour, sugar, baking powder, baking soda, salt, cinnamon, and nutmeg. Whisk the mixture so the ingredients distribute evenly. - Add the apples
Fold the chopped apples into the dry mixture. Firm apple varieties such as Honeycrisp or Granny Smith work best because they hold their texture during baking. - Mix the wet ingredients
In another bowl combine milk, melted butter, egg, and vanilla extract. Stir until the mixture becomes smooth. - Combine the batter
Pour the wet mixture into the bowl with the dry ingredients and gently stir with a spatula until a thick, fragrant batter forms. - Create the layers and bake
Spread half of the batter in the loaf pan. Add the cream cheese mixture on top, then cover with the remaining batter. Drizzle caramel sauce over the surface and bake for 50–55 minutes, until a toothpick inserted into the bread comes out almost clean.
After baking, allow the bread to cool for about 15 minutes. The cream cheese center will settle slightly, making the loaf easier to slice.
The final result feels like a combination of apple pie and soft dessert bread. It works equally well for an autumn breakfast or a simple dessert after dinner.
Small Variations to Try
The base recipe stays the same, but a few additions can slightly shift the flavor.
- Pecans. Sometimes about ½ cup chopped pecans are added to the batter. They create a light nutty crunch.
- Maple syrup. Occasionally part of the sugar is replaced with 2 tbsp maple syrup, which adds a deeper caramel tone.
- Extra spices. On colder days, adding ½ tsp ground cloves or allspice brings a stronger fall aroma.
- Caramel drizzle. After baking, the loaf can be lightly drizzled with extra caramel sauce for a richer finish.
The main idea of the recipe stays the same. But small adjustments like these can make a familiar loaf feel a little different each time it appears on the table.
9. Rustic Rye Harvest Bread
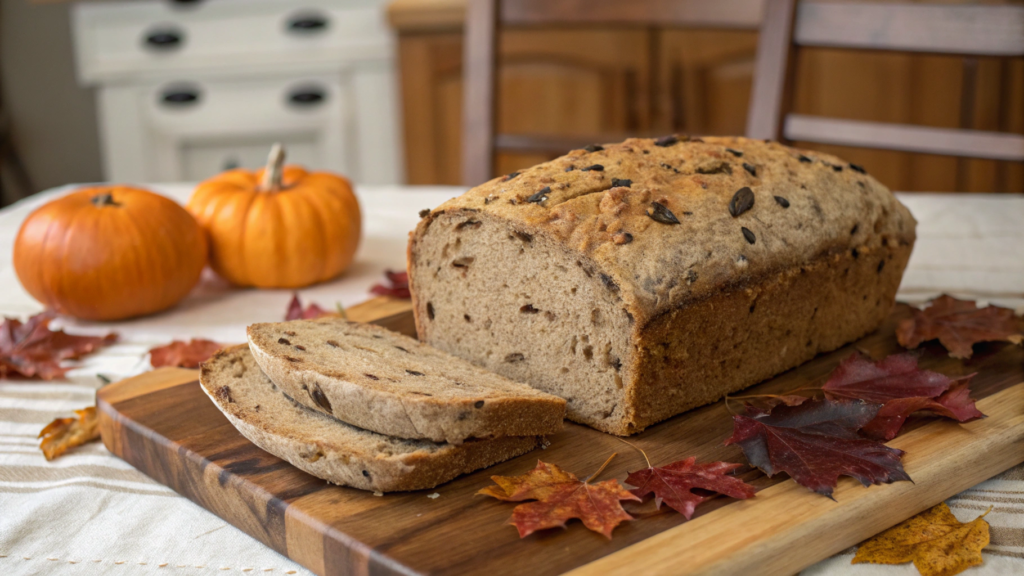
Rustic Rye Harvest Bread belongs to those loaves that naturally find their place on an autumn table. It pairs beautifully with soups, stewed vegetables, and hearty hot stews.
Rye bread has a flavor that’s hard to confuse with wheat bread. It’s slightly nutty, mildly spicy, and very aromatic. As the loaf begins to bake, the kitchen fills with the smell of warm grain and toasted crust. A loaf like this often becomes the centerpiece of a simple farmhouse dinner.
Rye also differs from regular wheat in its composition. It contains higher amounts of dietary fiber and phenolic compounds, which are often studied in the context of grain nutrition. Research published in the Journal of Cereal Science notes that rye flour contains both soluble and insoluble fibers, which is why rye bread often feels more filling.
Ingredients
This bread uses yeast dough, but the process remains fairly simple. Rye flour makes the dough slightly denser, so the recipe uses a mix of rye and wheat flour.
For one loaf you’ll need:
- 1 ½ cups rye flour (180 g)
- 1 ½ cups all-purpose flour (180 g)
- 1 ¼ cup warm water (300 ml)
- 2 ¼ tsp active dry yeast (1 packet — 7 g)
- 1 tbsp honey (15 ml)
- 1 tbsp olive oil (15 ml)
- 1 tsp salt
- 1 tsp ground coriander (optional)
Rye dough often bakes best in heavy cookware that retains heat and helps form a good crust. In our kitchen, a Lodge Pre-Seasoned Cast Iron Dutch Oven is often used for recipes like this because it produces a particularly nice rustic crust.
How to Make Rustic Rye Harvest Bread
- Activate the yeast
In a bowl mix warm water, honey, and yeast. Let the mixture sit for about 5–10 minutes until a light foam forms on the surface. - Add the liquid base
Stir in the olive oil and salt. Mix briefly so everything dissolves evenly. - Add the flour
First mix in the rye flour, then gradually add the wheat flour. The dough will become thick and slightly sticky. - Knead the dough
Transfer the dough to a work surface and knead for about 8 minutes. The dough will not become as smooth as wheat dough — this is normal for rye. - First rise
Place the dough in a bowl, cover it with a towel, and leave it in a warm place for 60–90 minutes. The dough should roughly double in size. - Bake the bread
Shape the dough into a round loaf and place it in a preheated Dutch oven or on a baking sheet. Bake at 375°F (190°C) for about 40–45 minutes until the crust becomes deep golden brown.
After baking, allow the bread to cool slightly. Rye bread slices more easily once it has cooled a bit.
Why This Bread Works So Well in Autumn Cooking
Rye bread stands apart from wheat bread mainly because of its dense texture and deep flavor. The crumb feels richer and more substantial, which works well during colder months when meals tend to be more filling.
Coriander adds a mild spice note often found in traditional rye bread recipes. The combination of rye and wheat flour helps balance the loaf — it stays soft inside while still carrying the characteristic flavor of rye.
Small Changes That Add Variety
Sometimes small adjustments can make the bread feel slightly different without changing the core recipe.
- Caraway seeds. Occasionally ½ tsp caraway seeds replace coriander. Caraway is a classic spice often used in rye bread.
- Molasses. Sometimes part of the honey is replaced with 1 tbsp molasses, which gives the loaf a deeper color and flavor.
- Whole rye grains. About 2 tbsp soaked rye berries can be added to the dough for a more textured crumb.
- Seeds on top. Before baking, the loaf can be sprinkled with sesame or flax seeds.
The result is a loaf that works well for sandwiches, thick soups, and autumn stews, bringing a hearty grain flavor to the table.
10. Spiced Pear Gingerbread Loaf
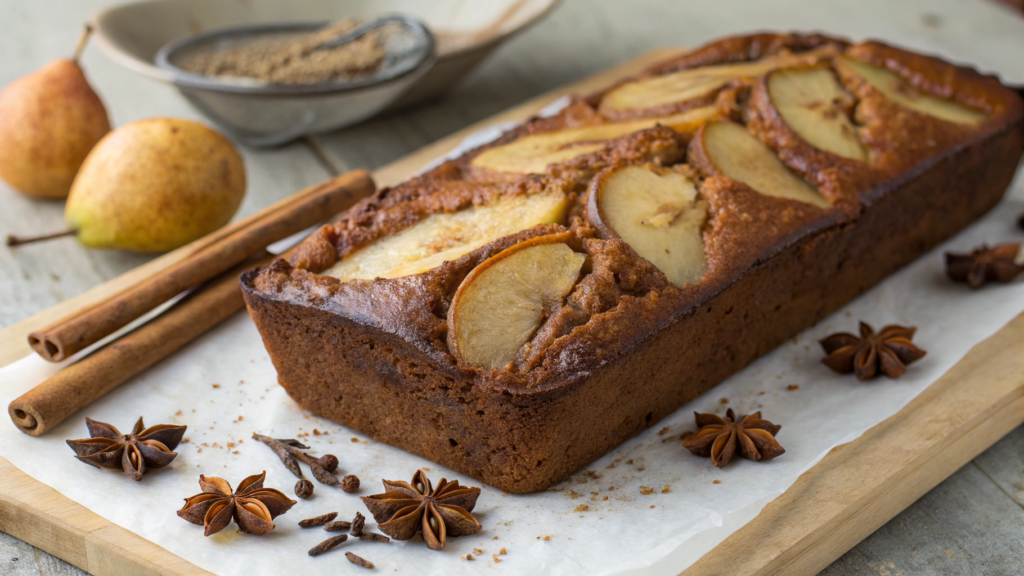
In Spiced Pear Gingerbread Loaf, pears meet dark spices and a soft texture that makes the loaf feel almost like a dessert — but it still remains a bread.
Pears behave a little differently from apples in baking. They become softer and almost creamy inside the crumb. As the bread bakes, the pieces of pear begin to lightly caramelize, while spices like ginger, cinnamon, and nutmeg fill the kitchen with a warm aroma.
Pears also work well in baking because of their natural composition. They contain pectin and natural sugars, which help keep the crumb soft when heated. In addition, pears are a source of soluble fiber and antioxidant compounds, which are often studied in research on fruit composition.
Ingredients
This loaf belongs to the quick bread category, which means it is made without yeast. The main structure of the loaf comes from the fruit, spices, and dense batter.
For one loaf you’ll need:
- 2 cups all-purpose flour (240 g)
- ¾ cup brown sugar (150 g)
- 1 tsp baking powder
- ½ tsp baking soda
- ½ tsp salt
- 1 tsp ground ginger
- 1 tsp cinnamon
- ¼ tsp nutmeg
- 1 cup finely chopped pears (about 150 g)
- ½ cup milk (120 ml)
- ⅓ cup melted butter (75 g)
- 1 large egg
- 1 tsp vanilla extract
- 2 tbsp molasses (optional for deeper flavor)
How to Make Spiced Pear Gingerbread Loaf
- Prepare the oven and pan
Preheat the oven to 350°F (175°C). Grease a loaf pan with butter or line it with parchment paper. Parchment helps remove the loaf easily once baked. - Prepare the pears
Peel the pears and cut them into small cubes. Firm varieties work best so the pieces keep their shape during baking. If the pears are very juicy, lightly pat them dry with a paper towel so the batter doesn’t become too wet. - Mix the dry ingredients
In a large bowl combine flour, brown sugar, baking powder, baking soda, salt, ginger, cinnamon, and nutmeg. Whisk the mixture so the spices spread evenly. At this stage the aroma already becomes noticeable. - Mix the wet ingredients
In another bowl combine milk, melted butter, egg, vanilla, and molasses. Stir until the mixture becomes smooth. The molasses deepens the color of the bread and adds a light caramel note. - Combine the batter and add pears
Pour the wet mixture into the dry ingredients and gently mix with a spatula. Stir only until the batter becomes even. Then fold in the chopped pears, spreading them through the mixture. - Bake the bread
Transfer the batter into the loaf pan and smooth the top. Bake for 50–55 minutes, until the surface turns deep golden brown. Test with a wooden toothpick — it should come out almost clean.
After baking, allow the loaf to cool for 15–20 minutes. During this time the crumb settles and the spice aroma becomes stronger.
What Makes This Bread Different
This loaf stands out because it combines soft fruit texture with warm spice flavor. The pears create a moist and slightly creamy crumb, while the spices bring the familiar aroma of gingerbread-style baking.
Molasses deepens both the color and flavor of the bread. The result is a loaf that works well for evening tea, autumn breakfasts, or a simple dessert after dinner.
Small Changes That Add Variety
Sometimes the bread can be adjusted slightly without changing the core idea of the recipe.
- Walnuts. About ½ cup chopped walnuts can be added to the batter for a firmer texture and nutty flavor.
- Orange zest. A little orange zest brightens the aroma and works well with the spices.
- Maple syrup. Occasionally part of the sugar is replaced with 2 tbsp maple syrup, making the flavor softer and more caramel-like.
- Coarse sugar topping. Sprinkling a small amount of coarse sugar on top before baking creates a thin crisp crust.
The result is a loaf that looks almost like a dessert but still remains a simple homemade bread.
The Flavors of Homemade Bread
Bread tends to appear more often in the kitchen during cooler months, and there is a practical reason for that. Many of these recipes are fairly simple to prepare, and a single loaf can easily serve several purposes at once — a quick breakfast, an afternoon snack, or a side for dinner.
Another advantage of homemade bread is how easily it adapts to what you already have in the kitchen. Apples, pears, a handful of nuts, or a jar of honey can often become part of the dough without changing the process too much.
If you try one of the recipes from this collection, write in the comments which bread turned out the best.
These notes often help reveal which combinations truly work in a home kitchen and which recipes deserve to be baked again.