
I think that most yards, just like our first property in Idaho, always dealt with the same problem: you need privacy, but you don’t want to build a tall fence or you simply can’t. That’s exactly when trellises step in. Over the past few years, Lindy and I have tried dozens of options: wooden, metal, modular, mobile.
In this article, I’ve gathered 10 practical trellis ideas that actually work: they create shade, block views, add structure, and easily integrate into both small and large spaces. For each idea, I described the key materials, where it performs best, and how to build the structure yourself — with no complicated tools or construction adventures.
1. Cedar Slatted Trellis with Vertical Planters
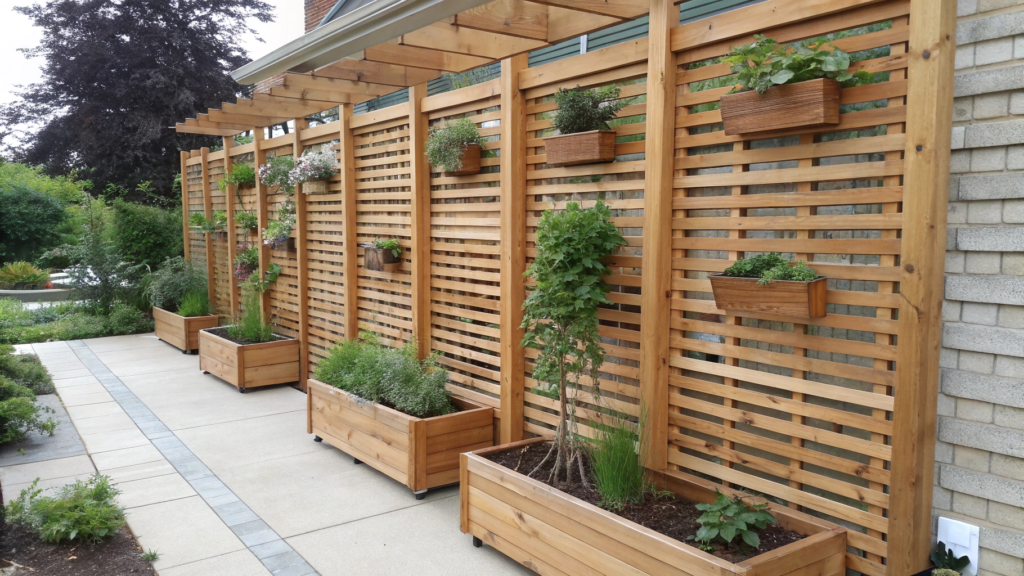
This is a vertical grid made of cedar slats with narrow vertical planters attached to it. This combination works in three directions at once: it creates privacy, adds height and movement, and becomes a perfect backdrop for plants. And cedar brings a sense of warmth, smells pleasant, looks high-end, yet stays completely subtle.
Why people choose cedar
You don’t even need a permaculture background to understand the advantages of cedar. It’s naturally resistant to moisture and insects — this is confirmed by wood research, including studies from the Forest Products Laboratory (USDA). No toxic treatment, yet it still lasts for years.
By the way, if you use slats about 1×2 inches (2.5×5 cm) thick, they look great and hold their shape, even if your winds are as strong as ours here in the PNW.
How the structure looks
It’s not enough to simply line up the slats. They should be spaced about ½–1 inch (1.2–2.5 cm) apart.
Why:
- if the gaps are wider — you lose privacy;
- if they’re narrower — the airflow for plants suffers.
We built ours at about 6–7 ft (1.8–2.1 m) tall. This is more than enough to feel shielded from unwanted views without blocking sunlight completely.
Vertical planters — the main secret
I once thought vertical planters were just a pretty add-on. No. They act like a small life-support system.
What you can plant there:
• thyme, oregano, mint — herbs you can reach for while grilling;
• strawberries — yes, they grow beautifully in vertical planters if you remember to water them;
• marigolds — to keep insects away;
• trailing nasturtiums — hanging down in bright “threads.”
How to build this structure (and not lose your whole weekend)
- Define the area and width of the trellis. It’s important to understand what exactly you want to block. For us, it was a side corridor about 6 ft (1.8 m) wide. Measure the length where the structure will stand and immediately consider how much sun the area gets — vertical planters feel this strongly.
- Choose the posts — usually 4×4 (10×10 cm). I always use treated posts even if the slats are cedar. They stand in the ground, which means they must handle moisture. A height of 8 ft (2.4 m) is ideal because part of it will go into concrete or soil.
- Set the posts 4–6 ft (1.2–1.8 m) apart. This spacing keeps the structure stable without making it look “sunken.” We set ours 5 ft (1.5 m) apart, and not a single gust of wind has complained yet.
- Secure the posts in the ground. You can use concrete or metal anchors. But if your soil is loose — choose concrete. The depth should be at least 2 ft (60 cm). Once I decided to “just stick it in,” and then chased the trellis across the yard three times after storms.
- Cut the cedar slats 1×2 (2.5×5 cm). The height matches the posts. If you need more privacy — place slats closer together. If you want more airflow — leave wider gaps. I like the ½–1 inch (1.2–2.5 cm) range. It’s both attractive and functional.
- Attach the slats horizontally. This is the most meditative step. Use exterior screws — indoor hardware doesn’t survive outside. And don’t tighten the slats “all the way” — wood needs to breathe, especially cedar.
- Add the vertical planters. You can buy ready-made planters or build your own from thin boards. The key is secure hardware. Planters need to hang confidently because their weight increases after watering.
- Treat the trellis with oil or a clear protective finish. Cedar looks gorgeous on its own. But if you apply a light exterior oil, it keeps its color longer. Skip a year — and it turns silver. Some people actually like that.
- Set up a watering system for the planters. Vertical systems love either drip irrigation or a simple “walk with a watering can.” Soil dries out faster there. I usually add a bit of coconut coir to help retain moisture.
- Check the stability of the entire structure. Walk along and shake the trellis with your hands. If it sways more than you’re comfortable with — add diagonal braces or install one more post.
Where this trellis works best
You don’t need a huge property. In fact, this design looks most impressive:
- in narrow side yards between the house and fence,
- along a patio or deck,
- along a neighbor border if you don’t want a solid fence,
- next to a seating area to create a feeling of a separate little “corner.”
For us, this trellis became a natural extension of the small coffee spot — the one we restored back on our one-acre property in Idaho (you can see the photos in the layout article on Rooted Revival).
Tip. We mounted the trellis on metal 4×4 bases — this keeps the wood from touching soil directly and adds at least a couple more years of life. Cedar is durable on its own, but extra protection never hurts.
2. Steel Frame Trellis Fence with Climbing Roses
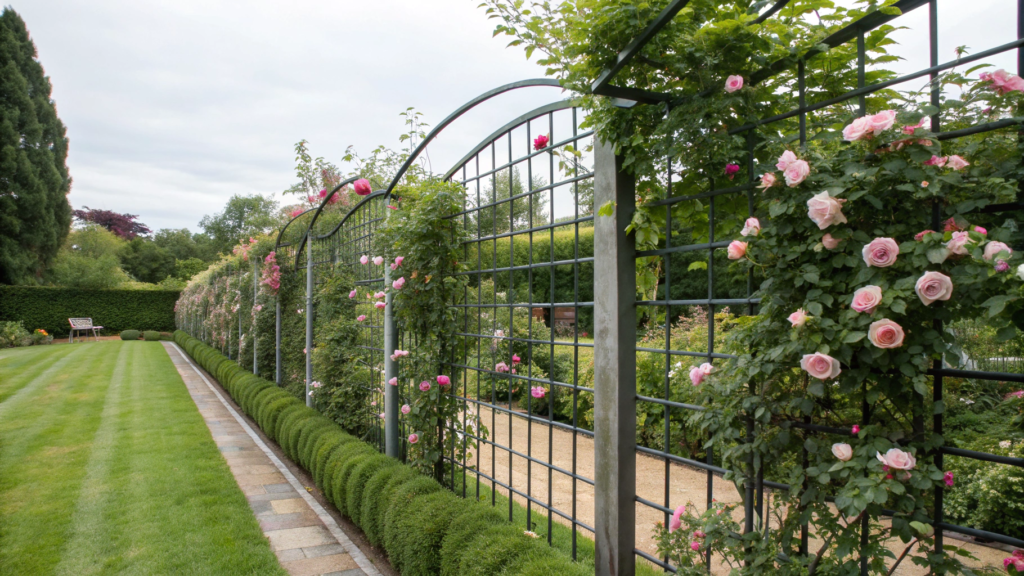
The steel frame holds its shape, doesn’t bend, and doesn’t behave unpredictably during transitional seasons. And roses — if you give them structure, support, and good soil — can turn the most ordinary fence into a small wall of color and fragrance.
There are three reasons why we once chose steel — and never went back to other options:
• wind resistance — roses get heavier as they grow, especially after rain
• longevity — even galvanized steel lasts for years with no maintenance
• minimal visual weight — the metal frame becomes almost invisible when roses gain mass
By the way, one study from the University of California Agriculture & Natural Resources (UC ANR) showed that climbing varieties develop better on strong vertical structures where the load is distributed evenly. This is exactly the case with steel trellises — they’re simply made for this purpose.
Which roses work best
These performed beautifully for us:
• New Dawn — grows fast and is incredibly hardy
• Don Juan — if you want deep red, this one is perfect
• Eeden Climber — grows slower, but the flowers… they’re soft, heavy, and look almost like old-fashioned garden postcards
One spring I tied a couple of Eeden Climber canes slightly higher than needed, and a season later I got a cascade of blooms that fell from top to bottom like a soft wave. I highly recommend not being afraid to experiment with the direction of the canes — roses love “architecture.”
How to build this structure
- Define the spot and installation line. I always start by walking around the yard with stakes in my hands. Roses need light, but not scorching sun all day long. And if the trellis will serve as a “fence,” think through which side you want to enjoy the blooming view from. Sometimes we position it so that we see the roses from the patio — and it creates a completely different feeling.
- Choose the material — steel or aluminum. Galvanized steel is heavy, but it gives a sense of reliability. We had aluminum structures — they’re good, but in strong wind they “sing” a little. If your area is open, steel is better, although it requires more effort during installation.
- Set the height — 6–8 ft (1.8–2.4 m). This is the working height for most climbing varieties. If you build it taller, roses will appreciate it, but maintaining them becomes… let’s say, a gymnastic exercise. And I am long past the shape needed to balance on the top step of a ladder.
- Install the posts, burying them at least 2 ft (60 cm). No creativity here: depth means stability. Once I thought 18 inches (45 cm) would be enough. It wasn’t.
Posts should be placed 4–6 ft (1.2–1.8 m) apart — if the distance is wider, the frame will “flex,” especially under the weight of wet canes. - Level the structure. This is the step you want to skip when you’re tired. But if the trellis leans even slightly, you’ll notice it even more a year later when roses fill in. I usually ask Lindy to look from different angles to catch the perfect vertical line.
- Add horizontal supports every 12–18 inches (30–45 cm). This isn’t “decor” — it’s the key to load distribution. Roses get heavier than many people expect. Especially after rain, when each bloom becomes a little water pouch.
- Coat the metal with a protective finish (if it’s not galvanized). A light layer of anti-corrosion spray doubles the lifespan of the structure. Once, we got lazy and didn’t treat the side panels — two seasons later, we had to replace them.
- Plant the roses 1.5–2 ft (45–60 cm) from the trellis. For airflow. Roses should not “stick” to the structure. If planted too close, the risk of black spot and other fungal issues increases.
- Tie the first canes with soft ties. In the beginning, roses are still flexible, like teenagers — they grow where you direct them. But if you tie too tightly, you can damage the bark. I use elastic garden tape — it stretches as the cane grows.
- Check the strength of the entire structure. Just grab it and pull toward yourself, then away from yourself. It’s better to find weak spots now than next season when the plant has already climbed all over the trellis. I once did this “test” after planting — not a great experience.
Where steel trellises truly shine
Steel frames work best where:
• you need a strong wind-resistant element
• you want a vertical accent without the feeling of a “wall”
• you need to separate the garden area from the seating zone
We have a steel structure on the border between the garden and the patio, and I love how it draws the perspective of the yard. From spring to fall it changes every couple of weeks — new buds, new canes, new colors. A living calendar.
Tip. Let the roses grow in a fan shape. This increases the number of blooms. When the canes are directed horizontal or at an angle, side shoots activate and flowering becomes noticeably more abundant.
It took me a whole season to get used to “laying out” the roses instead of just pulling them upward. But the effect is worth the effort.
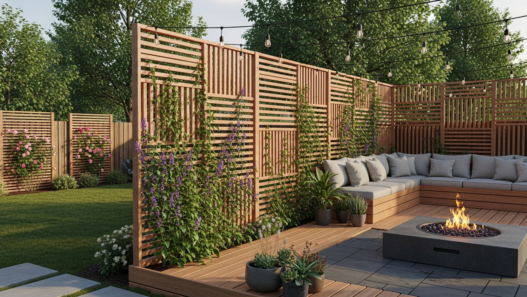
3. Bamboo Folding Trellis Divider
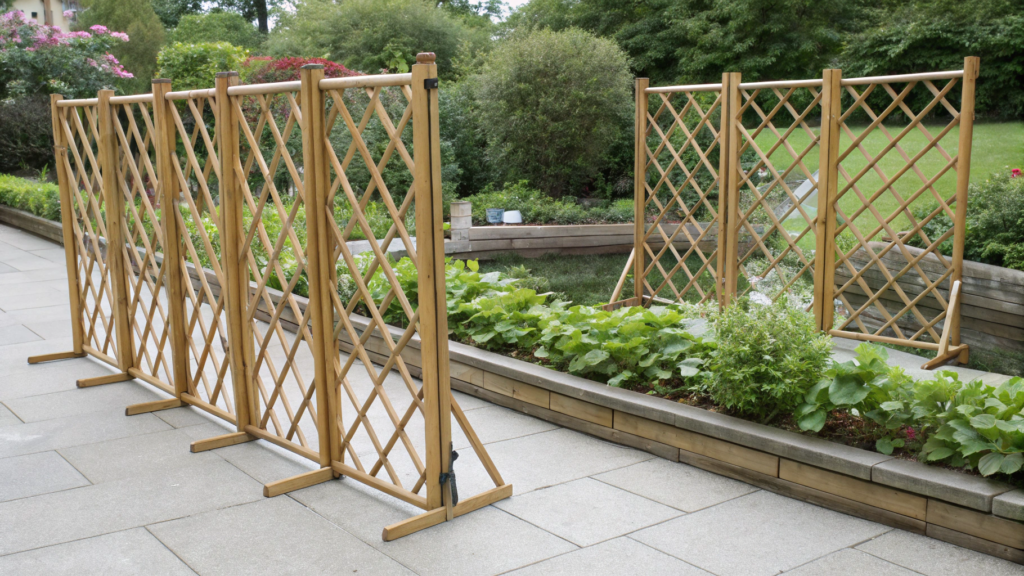
Bamboo folding trellises make it easy to block a view from neighbors, separate a seating area from garden beds, and add a vertical line to the yard — all without concrete drilling or long weekends spent with tools.
Why a bamboo folding trellis is a great solution
Bamboo has a special quality: it looks natural in absolutely any garden style — modern, cottage-like, naturalistic, permaculture-inspired… And it’s very lightweight. You can pick it up alone and move the entire width of the structure in just a couple of minutes.
What else matters:
• bamboo is flexible — it handles wind gusts without cracking
• eco-friendly — a fast-growing material that needs very little processing
• doesn’t overwhelm the space, stays visually “soft”
• folds like an accordion — you can control width and shape
And the nicest part — it doesn’t try to be a “perfectly straight wall.” It’s natural, slightly uneven, alive. It creates a feeling of protection and warmth.
Where this trellis works best
We used it in several places — and each time the result felt different:
• on the edge of the deck to separate the seating area from the garden
• next to compost bins — to hide them without blocking airflow
• as a temporary divider when the chickens decided the beds were their personal spa
• around a bench area — to create a gentle sense of privacy
The secret is that it’s not a “fence,” but a divider. It doesn’t block the space — it adjusts it.
How to use a folding bamboo trellis
- Choose the spot and shape. The folding design allows you to set it not only in a straight line, but also curved, angled, or in a zigzag. Once, I placed the trellis in a “wave,” and it perfectly hid the old composter.
- Reinforce the bottom support points. Bamboo is lightweight, and sometimes the wind tries to “take it away.” Small garden stakes or metal U-pins are enough to anchor the trellis to the ground.
- Adjust the width. It expands like an accordion: you can open it to 6–8 ft (1.8–2.4 m) or narrow it to 3–4 ft (0.9–1.2 m). Super handy when you need to fit a specific spot.
- Add plants if you want more privacy. Bamboo is semi-transparent. For more coverage: sunflowers, hops, ornamental beans, or mini cucumbers climb it easily.
- Use it as a seasonal solution. You can bring it in, put it away, change its location every year. It doesn’t require permanent installation or winter protection.
One day — mid-April — we needed to hide an area where mulch bags were stored. I spent 6 minutes unfolding the trellis and lightly anchoring it into the ground. Six minutes — and the view was saved.
Since then, I always keep one nearby, like the Master Garden Products Bamboo Expandable Trellis. It’s like a folding room divider — useful whenever you need quick order.
4. Lattice Trellis Wall Painted in Coastal Blue

This shade of coastal blue works surprisingly softly. It doesn’t shout, doesn’t clash with greenery, and instead highlights it. And honestly, here in the PNW with its foggy mornings, this color feels especially fitting — it reminds you of the ocean even if you’re a couple of hours away from it.
Why a lattice wall in coastal blue is one of the most versatile options
This solution has several advantages, and they show up in the very first season:
• the lattice provides structure without creating a heavy wall
• the coastal blue color visually cools the space (especially important on south-facing areas)
• the tone enhances foliage shades, from bright greens to deep saturated tones
• decorative elements — planters, lights, hanging baskets — read better against this backdrop
And there’s more — this is one of the rare cases where paint serves two functions at once: decorative and protective.
Where a coastal blue lattice wall works especially well
This structure fits perfectly:
• along a patio to create a backdrop
• on the boundary with a neighbor’s yard (without the heavy effect of a solid fence)
• in narrow pathways where light matters more than privacy
• behind a seating area — to frame it as a separate “garden room”
If you plant ornamental grasses, hostas, or hydrangeas nearby, the wall’s color makes them appear deeper and more expressive.
How to make a Coastal Blue lattice wall
- Choose the base — wooden lattice or PVC lattice. Wood looks warmer but needs coating. PVC lasts longer but costs more.
We usually choose wood because paint adheres better to it. - Choose the coastal blue shade. It’s best to view the color outdoors. In the PNW, many paints look lighter in sunlight than they do in the can.
You want a shade with a soft green or gray undertone, without bright blueness. - Prepare the surface. A light sanding is enough. Even a new lattice benefits from removing the factory sheen.
- Apply primer and 1–2 coats of paint. Primer is important if you want the color to last longer than one season.
Coastal blue goes on wood smoothly, and two thin coats are ideal. - Install the lattice onto a frame or directly on a wall. The key is to make sure the back side can ventilate. Lattices pressed tightly against a surface trap moisture faster.
- Add accents — planters, lanterns, hanging baskets. Coastal blue makes a perfect backdrop for white, terracotta, or copper hardware.
Once, I hung a simple copper watering can as decor — and it became the main feature of the whole area.
Which plants pair 100% perfectly with coastal blue
• hydrangeas — both blue and pink shades appear richer
• veronica, sage, lavender varieties — they echo the cool tones beautifully
• clematis — especially purple and deep violet flowers
• ornamental grasses — they create a soft contrast with the even color of the wall
This color has a way of making the garden feel visually deeper — as if the space extends just a little farther than it actually does.
5. Planter Box Trellis for Compact Deck Spaces
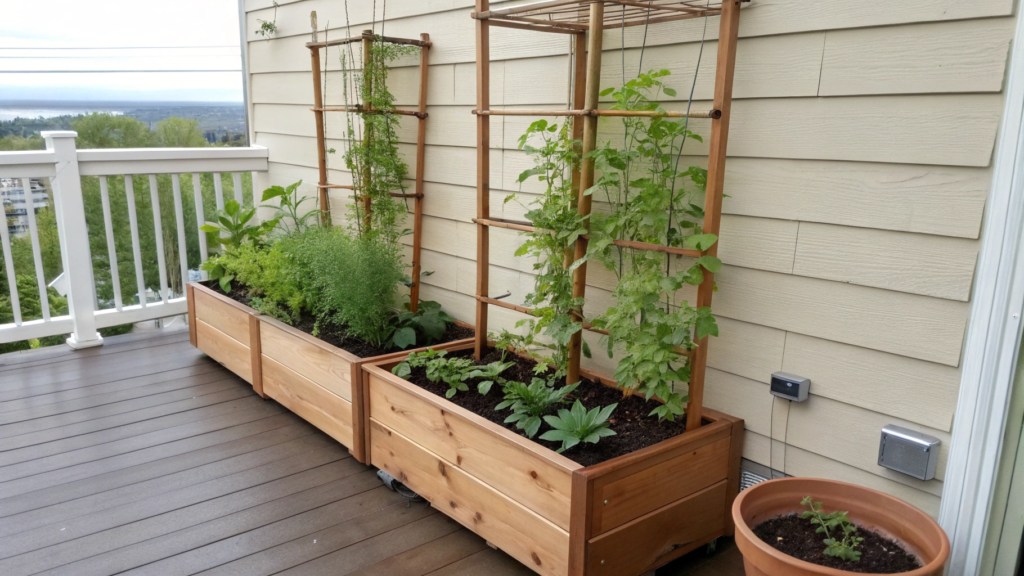
The planter-and-trellis system works surprisingly flexibly: you can place it against a wall, tuck it into a corner, or create a paired setup — all without major construction. It’s incredibly convenient for compact spaces and for anyone who wants vertical greenery without digging posts into the ground. And the plants grow confidently because the root zone sits in a generous volume of soil, while the vines immediately get support.
Why a trellis planter is so good for small spaces
• creates a vertical garden without taking floor space
• gives privacy, perfect for decks, balconies, and small patios
• easy to move — you can change the setup every season
• works like a container garden where you can swap soil, fill, and plants
• ideal for climbing crops: clematis, beans, morning glories, ornamental vines
One season, this trellis literally saved our late summer: it covered an awkward corner by the railing, and within two weeks everything bloomed as if it had been planned from the start.
Which plants work best
On compact decks, plants that cover the trellis quickly — but don’t overload it — look the best:
• peas and beans — lightweight, fast growers
• clematis — blooms heavily if you keep the roots cool
• nasturtium — spills softly downward
• evergreen honeysuckle — fragrant and hardy
• mini cucumber varieties — nothing beats picking a couple of fruits in the morning before breakfast
How to make a Planter Box Trellis for a small deck
- Choose the planter size and shape. For a trellis, you need a base at least 24–30 inches long (60–75 cm) so the structure stays stable. Depth matters more than width: 12–14 inches (30–35 cm) is enough for most roots.
- Install the trellis posts inside the planter. I use 1×2 or 2×2 posts (2.5×5 cm or 5×5 cm).
They’re placed along the back edge and secured with metal brackets.
The posts should reach the bottom of the planter — that keeps them from wobbling. - Add the trellis panels. You can use a ready-made wooden or PVC lattice or make a simple one from slats.
Spacing of 1–2 inches (2.5–5 cm) is ideal: plants grip easily while the structure stays light. - Reinforce the connections. This is the step that’s easy to forget. On decks, the wind is stronger at elevation.
I always add a couple of small diagonal slats on the back — it stabilizes the trellis and extends its lifespan. - Fill the planter with soil. Go for lightweight container mixes that don’t turn into concrete when dry.
I add a bit of compost and a couple handfuls of perlite, especially when growing clematis. - Plant at the base of the trellis. Give them 2–3 starting points — the vertical surface fills in faster.
Young vines need guiding by hand during the first weeks. - Check the stability of the whole structure. I always give the trellis a gentle shake after watering — wet soil is heavier, and if the structure holds then, it will definitely last the season.
Where this trellis works perfectly
• on small decks where you need to block part of the view
• near the entry area — it feels like a “green welcome wall”
• in corners that look empty
• beside an outdoor table when you want the space to feel like its own “room”
On our new property, we placed two of these trellises on each side of a bench — and it created a small quiet nook where it’s lovely to drink tea in the morning.
6. Freestanding Wooden Trellis with Built-in Lights

Freestanding wooden trellises, in my opinion, are underrated. I also spent years thinking they were “for looks, not for function.”
You need one in places where you can’t mount anything to a wall — or when you simply want to create a small “island” of space.
• complements the evening atmosphere with soft ambient light
• creates privacy without “closing off” the yard
• can stand anywhere without digging, concrete, or power tools
• ideal for a moon garden if, like me, you’re addicted to nighttime walks between the beds
• looks beautiful even without plants — the lighting does half the work
This is the kind of project where light becomes part of the design, not just a function.
Where it works especially well
We placed these trellises:
• along the deck edge to create a gentle boundary
• near a bench — to form a small seating zone
• in the center of the garden as a decorative panel where we clipped sunflowers and grasses
• near the grill area — it lights the corner without blinding anyone
On our previous property, we kept one between the vegetable beds and the seating area, and in the evenings that spot became the most inviting corner of the whole yard.
How to make this trellis yourself
- Choose the wood. The best options are cedar or larch — they tolerate moisture and hold their shape for years.
The structure is usually 6–7 ft (1.8–2.1 m) tall so it feels proportional and noticeable. - Build a rectangular frame. Use 2×2 or 2×3 boards (5×5 cm or 5×7.5 cm).
Connect them with exterior screws or bolts — since the trellis will be moved around, it needs extra rigidity. - Add inner slats. Position them horizontally or vertically, whatever you prefer, but keep 1–2 inches (2.5–5 cm) of spacing so the structure looks neat and can support climbing plants if you ever want to add them.
- Create a stable base. Freestanding models require support. We used two versions:
• a wooden platform 12–16 inches (30–40 cm) wide
• weighted side feet with metal plates
The key is to keep the center of gravity low. - Install the lights. The best option is warm-toned LED string lights attached along the frame or as vertical strands.
You can add tiny built-in spotlights too, but they require more prep. - Protect the wood. Use a clear exterior oil. It preserves the natural wood color and significantly extends the lifespan.
- Check stability and cable access. Especially if the trellis will stand on an open deck.
We once forgot about the cable route — and had to stretch an extension cord across half the yard.
Which plants look especially beautiful next to a lit trellis
• clematis — their flowers look almost velvety under warm light
• sweet pea — the delicate vines create a lovely silhouette
• jasmine — brings fragrance in the evening, especially on warm days
• or simply ornamental grasses at the base — and it’s already beautiful
Sometimes the trellis doesn’t need any greenery at all — the lighting creates its own graphic effect.
7. Concrete Base Trellis Panels for Windy Gardens

Trellis panels with a concrete base look neat, stand firmly, and make it possible to grow even heavy climbing plants without worrying about the next storm.
The key advantage is stability — and that’s not an exaggeration:
• the concrete creates a low center of gravity, the trellis is practically “nailed” to the ground
• the structure doesn’t require in-ground posts
• works perfectly on patios, decks, and gravel areas where digging isn’t an option
• supports medium- and heavy-weight climbing plants
• functions both as a decorative panel and a plant support
And most importantly — these trellises require almost no maintenance beyond protecting the wood or metal on top.
Where concrete-base panels work best
We used them in three situations — and each played out differently:
• open areas where the wind comes from every direction
• along a fence to add a vertical element without installing anything permanently
• on a patio where we wanted more privacy without major construction
On our previous property, the concrete base literally saved our Don Juan rose, which had repeatedly tried to pull the trellis over with its weight after rain.
How to build this structure yourself
- Choose the type of base. The best options are concrete blocks weighing 40–60 lbs (18–27 kg) or small square slabs you can anchor posts to.
Blocks with built-in post slots are the ideal choice. - Install the posts into the base. People usually use 4×4 posts (10×10 cm) or metal posts.
Secure them with bolts or anchor brackets — this prevents wobbling in strong winds. - Assemble the trellis panel. Arrange slats or metal mesh with 1–2 inches (2.5–5 cm) of spacing.
Wooden panels give a softer look, while metal provides maximum stability. - Attach the panel to the posts. Use exterior bolts or galvanized screws.
If the panel is large, add diagonal braces so the trellis doesn’t lean back under plant weight. - Add extra weight if your site is very windy. Sometimes we place two concrete blocks on one post or add an extra slab when making a trellis taller than 7 ft (2.1 m).
- Protect the material from moisture. Treat wooden parts with oil, and if needed, add an anti-corrosion coating to steel components.
- Check stability after watering. Wet plants are always heavier. I usually give the structure a gentle shake — if it stands firm after watering and wind, everything is done right.
Which plants pair best with these trellises
• climbing roses — Don Juan, New Dawn
• ornamental grape
• medium-weight clematis
• honeysuckle
The concrete doesn’t just hold the trellis — it allows the plants to fully develop without risk.
8. Vinyl Lattice Fence Extension for Extra Height
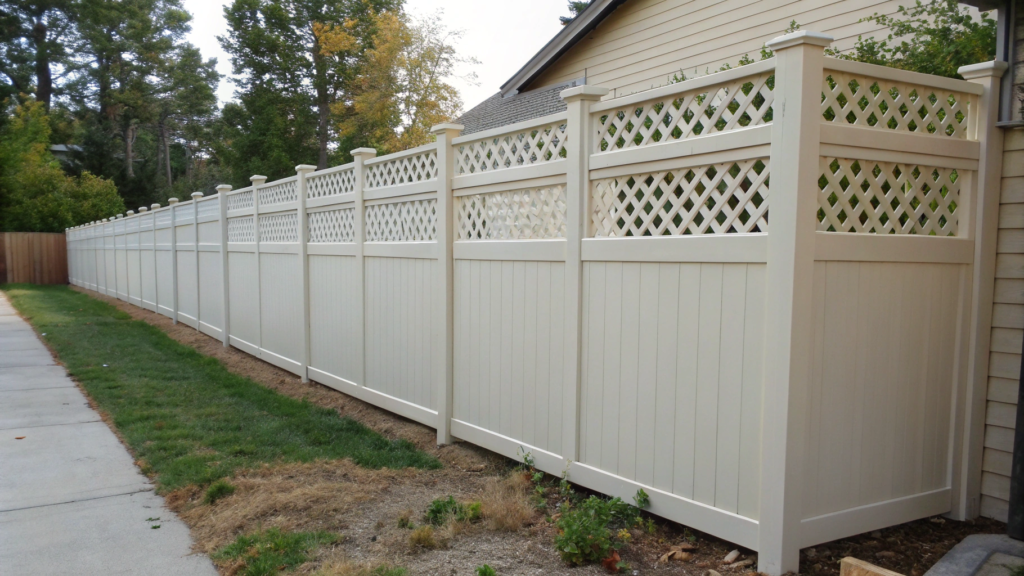
Vinyl lattice extensions add height without the heavy feel of a solid wall.
The lattice stays light, lets air and light through, and still gives you the level of privacy you need.
Vinyl panels quickly became our favorites because:
• no painting required — the color stays bright
• lightweight yet strong enough for seasonal winds
• resistant to rain, warping, and cracking
• mount directly onto an existing fence without replacing anything
• keep a clean, tidy look even after several seasons
And vinyl is simply easier to clean. A quick pass with a soft brush in spring — and it looks freshly installed.
Where these extensions work especially well
We installed them in several places:
• along the back yard to add height without extra shade
• near the patio where we wanted more privacy
• around the garden beds — neighbors (and their dogs) peeked in sometimes
• on both sides of the deck to create a “frame” around the seating area
Each time, the effect was immediate: the space became calmer and more cohesive.
How to install a vinyl lattice extension
- Measure the existing fence. Decide how much height you want to add. Usually 1–2 ft (30–60 cm) is enough to noticeably change privacy.
- Choose the right lattice style. Squares 2×2 inches (5×5 cm) strike the perfect balance of light and privacy.
Larger openings let in too much visibility; smaller ones feel overly dense. - Pick your mounting method. Most vinyl extensions attach using:
• special clamps that grip the top rail, or
• L-shaped brackets mounted to the vertical posts.
Both methods are simple — 10–15 minutes per section. - Install and level the panel. Use a level. Even a slight tilt becomes very noticeable.
Lindy always checks from a distance — that’s where small shifts show up best. - Check the attachment strength. I give the panel a light shake as if wind hit it.
If there’s any movement, I add another attachment point. - Round the corners for a softer look (optional). Vinyl cuts easily with a handsaw or plastic shears.
Rounded upper corners can make the fence feel more “garden-friendly.” - Pair it with plants. Clematis, sweet pea, ornamental grape — all of them climb well and add depth and texture to the lattice.
What effect you can achieve
Placing panels in a staggered pattern or adding them only where privacy is needed creates a multi-level look.
We did this near our seating area: raised just three sections — and it formed a clean “frame” without the boxed-in feeling.
9. Vine-Draped Metal Arched Trellis Design

When we installed a metal garden arch and planted honeysuckle and clematis on both sides, I honestly expected results only after a couple of years. But the vines climbed so fast that by the end of the first season the arch already looked impressive.
That’s because an arch changes the perception of space, even in a small garden.
• adds vertical movement, which flat gardens often lack
• creates a sense of a thoughtful transition between zones
• works like a frame for the view — especially beautiful on the approach to the vegetable garden
• supports even heavy vines because the metal handles the weight
• provides shade when the foliage becomes dense
Where this kind of arch works best
We tested several placements, and each one created a different effect:
• at the entrance to the garden — everything immediately feels more cohesive
• between the seating area and the beds — a soft natural boundary
• along a path — as a series of repeating arches (if there’s space)
• near a bench — forms a small secluded nook
• in the center of the garden — as a standalone art piece
At our old place, the arch stood right before the berry patch. Every time we walked under it, it felt like we were entering the garden, not just “going to the plants.”
How to Build a Vine-Covered Arched Trellis
1. Choose a proper arch — not just a pretty one. The most common mistake is choosing a structure that’s too light.
• steel thickness 0.8–1 mm
• height 7–8 ft (2.1–2.4 m)
• width 3.5–4 ft (1–1.2 m)
A narrow arch will drop vines onto your head, and a low one will sag under weight.
2. Prepare proper holes — real holes, not shallow slots. Depth 16–20 inches (40–50 cm), diameter 8 inches (20 cm) minimum. Windy sites may require even deeper footing.
• add gravel to the bottom for drainage
• insert the post
• backfill in layers, tamping lightly
• water thoroughly so the soil settles and locks the post in
3. Level the arch before securing it. Arches can be perfectly level and still look crooked due to perspective.
• check straight on
• check from the side
• check from the angle where the path is usually approached
4. Add side support if your soil is loose. In sandy or lightweight soil, arches tend to wobble. Two angled metal stakes on each side give huge extra stability
They disappear under foliage but make all the difference.
5. Plant vines at the correct distance. Not right at the base — metal heats up and water drains away.
Best spacing: 6–8 inches (15–20 cm) from the post. Аlways plant on the sunny side if the vine prefers sun
6. Identify 2–3 main shoots and guide them immediately. The first month defines the whole shape.
• choose two strong shoots on each side
• guide them along the arch and secure gently
• pinch or redirect the rest for even coverage
7. Use soft ties and replace them once per season. Vines thicken over time; hard ties damage stems.
• soft elastic garden tape works best
• once a season: check, loosen, replace
We once bought the Tooca Garden Metal Arch Trellis because we wanted not just a decorative curve but a strong metal frame with real height. Our honeysuckle climbed it so fast that I still regret not filming it as a time-lapse.
Plants That Work Perfectly on Garden Arches
• honeysuckle — fragrant and fast
• large-flowered clematis — dramatic yet light
• Virginia creeper — creates a lush, dense wall
• climbing roses — Eden, New Dawn, Don Juan
• actinidia — flexible and beautifully draping
My favorite combo is honeysuckle plus clematis: one gives fragrance, the other — color.
10. Recycled Wood Trellis with Privacy Screens

When we first moved to the PNW, we ended up with a pile of old boards: some from an old shed, some from previous raised beds, and some with an unknown history. The boards were mismatched in color and age, some with cracks. But once we sanded them down and started assembling them vertically, I realized this could become the one element that makes the garden feel… alive.
We ended up with a trellis that had a slight industrial vibe but still felt warm — entirely made from recycled wood. And the best part: it created privacy without turning the yard into a box.
Experience showed that recycled wood is far more than a “budget material.” It has its own character:
• the wood is already stable — it won’t warp or twist
• the texture of aged lumber is richer and deeper
• it’s an eco-friendly solution — you’re genuinely reducing waste
• creates soft privacy without forming a solid wall
• perfect for a subtle “modern homestead” look
And I love that this kind of trellis is handmade, not factory-perfect — that’s what gives the garden individuality.
Where These Trellises Work Best
We tested several placements:
• along a deck — to block part of the view
• near a seating area — especially if a neighbor enjoys looking your way
• behind the grill zone — works as a windbreak and a clean backdrop
• around an outdoor shower (if you have one) — a natural privacy screen
• in the vegetable garden — to separate the compost area
The best effect happens when boards of different tones are arranged in a rhythmic vertical pattern, with small gaps in between. Light passes through, yet the privacy remains.
How to Build a Recycled Wood Trellis with Privacy Screens
- Sort the boards by thickness and condition. We separate them into three groups:
• structural boards
• decorative boards with strong texture
• “problem” boards that can be cut into narrow slats
The supporting frame should use the densest, strongest pieces.
- Determine the height and width. A height of 6–7 ft (1.8–2.1 m) is usually enough to block the line of sight.
Width depends on the location: from 3 ft (90 cm) up to 6 ft (1.8 m) for a full panel. - Build the main frame. Best done with 2×4 lumber (5×10 cm).
If you’re also using recycled lumber for the frame, choose the straightest pieces.
Assemble with bolts or reinforced exterior screws. - Prepare the decorative boards. Sanding is essential. Old lumber splinters easily, and sanding “opens up” the texture beautifully.
- Install the boards vertically or mix widths
Once we made a vertical trellis with alternating widths:
• 3-inch boards (7.5 cm)
• 1-inch slats (2.5 cm)
We left a ½-inch (1.2 cm) gap between them — this keeps privacy but avoids a “solid wall” look.
- Add a hidden lower support. If the structure stands on the ground — set posts 12–16 inches (30–40 cm) deep.
If it sits on a deck — use L-brackets at the base.
Windy areas benefit from a diagonal brace on the back. - Treat the wood with oil or clear sealant. Old wood absorbs oil beautifully, making the grain look deeper. Just choose a finish designed for outdoor use.
Plants That Pair Well with This Style of Trellis
• Virginia creeper — creates dappled shade and wraps the structure softly
• clematis — flowers look almost graphic against aged wood
• honeysuckle — flexible, fragrant
• ornamental grasses at the base — add movement
Aged wood plus climbing plants always looks like it belongs there — as if the trellis has been part of the landscape for years.
Handy Wrap-Up
These 10 solutions make it easy to add privacy, structure, and plant support without major expense or complicated construction. Some ideas are perfect for small decks, others for open windy spots, and a few can be integrated right into an existing fence.
Have you tried installing trellises before? Which style would you choose first? Or maybe you already have a structure that performed better than expected?
Share in the comments — practical stories help other readers choose the right design and avoid mistakes.
And if you want, we can look at your exact garden layout and choose the best option for your space.