If your front yard requires more maintenance than you’d like, and at the same time doesn’t give that feeling that everything is “in its place” — front yard garden design layouts that save water and time help fix that without big effort.
Here I tried to put together 10 working layouts that we’ve actually tested in practice: from drainage and slopes to beds and herbs along the walkway.
And over time it became clear to us that the problem isn’t in the plants themselves, but in how everything is arranged. When you start changing not individual elements, but the structure itself — the yard starts behaving differently.
These layouts don’t require perfect conditions and aren’t tied to specific plants, but they create the feeling that the yard finally works as one system.
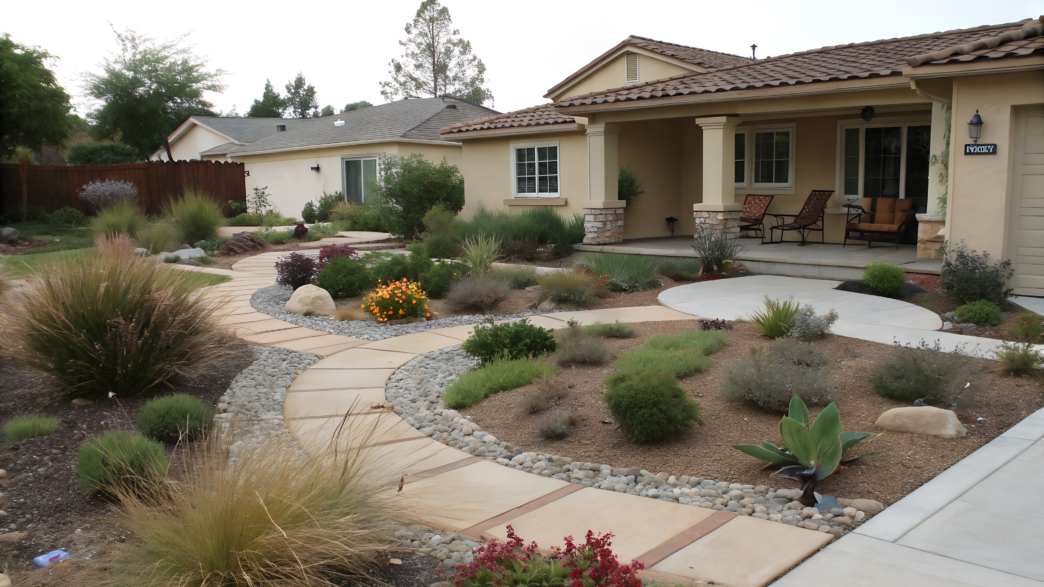
1. Dry Creek Rock Path Layout That Solves Drainage
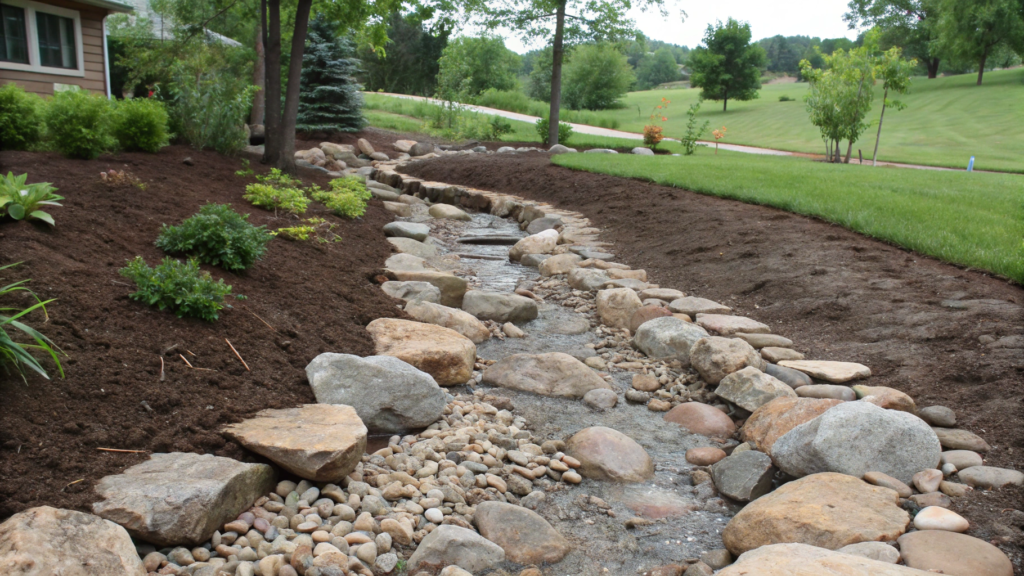
If after rain you get mud, puddles, or water just “sits” in one place — dry creek rock path layout can solve several problems at once. A dry creek is basically a controlled water channel. It directs the flow where it doesn’t get in the way, and at the same time works as a path or decorative element.
Recommendations from USDA Natural Resources Conservation Service show that controlled drainage channels and directed water flow help reduce soil erosion and prevent water stagnation. So this is not just nicely placed rocks — it’s a real working system.
How we approached the layout
At first, we didn’t dig. We just walked around the yard after rain and watched where the water naturally wanted to go. That part really matters.
If you build the creek against the natural slope — it won’t work properly.
- Find the point where water collects
- Identify the natural flow direction
- Create a path with a slight slope (at least 1–2%)
- Finish the creek in an area where water can safely absorb
For us it was about 20 ft long (around 6 m) and 3 ft wide (90 cm). Not huge, but enough to solve the problem.
What you’ll need
- Landscape fabric — to block weeds and keep gravel from sinking into the soil
- Gravel for the base layer (2–3 inches / 5–7 cm)
- Stones in different sizes: large (8–12 inches / 20–30 cm), medium, and small
- Shovel and rake
- Hose or rope to mark the shape
- Tamper or just a solid board for compacting
How to build it
- Mark the creek shape
Lay out a hose or rope directly on the ground and play with the curves. Straight lines look too artificial, while gentle bends help the creek blend into the yard. - Remove the top layer of soil
Take out about 4–6 inches (10–15 cm) of soil along the full length. If the soil is loose, go a bit deeper where water used to collect — this helps avoid standing water. - Prepare the base
Compact the bottom so it becomes firm, and lay down the fabric. Let it go slightly up the edges — this keeps the structure stable over time. - Add the gravel layer
Start with a base layer of gravel (2–3 inches / 5–7 cm). It works as a drainage cushion, letting water move down without washing everything away. - Place the stones
Start with large stones along the edges, then add medium ones inside and fill gaps with small gravel. Don’t try to make it perfectly even — a bit of asymmetry makes it look more natural.
After the first rain, the water followed this path exactly. No erosion, no mud on the sides. It just went where we directed it. I was sure leaves and debris would get stuck. They do, a little, but it takes 5 minutes — quick rake, and it’s clean.
How to make it look not like “drainage”
To keep the dry creek from looking like a construction element:
- add plants along the edges (like ornamental grasses or groundcovers)
- use stones in different shades
- avoid perfectly straight edges
- break the line with plantings in some spots
A bit of imperfection makes everything feel alive. We have thyme and creeping phlox along the edges — over time they start creeping onto the stones, and it no longer looks like an engineered solution, but part of the landscape.
When it makes sense to do this
On a sloped area, a dry creek helps control water flow, so it doesn’t wash soil away or run randomly.
It also works well on clay soil, where water drains slowly — the creek acts as an additional drainage channel and relieves problem areas.
Near walkways and entry zones it’s almost a lifesaver — no mud gets tracked around, and everything stays clean even after rain.
And in spots that regularly erode, it defines boundaries and stabilizes the surface, keeping the soil from moving.
If none of these issues apply, you can skip it. But if you recognized your yard in at least one of these… the difference after installing it will be very noticeable.
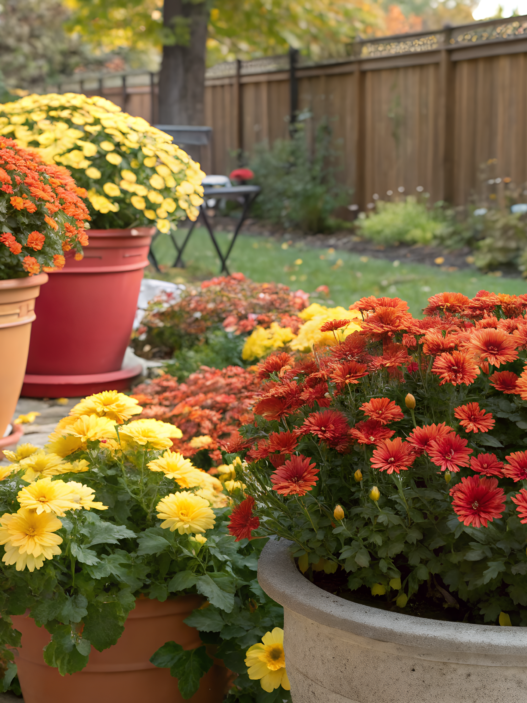
2. Full Sun Perennial Bed With Three Plant Formula
Full sun perennial bed with three plant formula reduces water needs and makes the bed work without constant intervention. Especially if the area gets sun all day.
The idea is simple: each plant handles its own job. Together they create a stable system where soil is protected, moisture lasts longer, and the bed holds its shape visually. And that means less watering, less weeding.
How the formula works
Everything is split into three levels:
- Tall accent plants (3–5 ft / 90–150 cm) — create structure
- Mid-layer plants (1–2 ft / 30–60 cm) — add volume
- Low groundcovers (up to 1 ft / 30 cm) — cover the soil
It’s not just about picking three plants. They all need to handle full sun and not require constant watering.
What you’ll need
- 1–2 accent plants (for example, echinacea or ornamental grasses)
- 3–5 mid-layer plants (lavender, sage, coreopsis)
- 5–9 groundcovers (thyme, sedum, creeping phlox)
- Mulch (2–3 inches / 5–7 cm)
- Shovel and rake
- Compost to improve soil
For convenience, you can use something like Miracle-Gro Performance Organics All Purpose In-Ground Soil — a solid option if the soil is weak and you want a faster start.
How to build it
- Mark the planting area
Define the bed edges and think about scale right away. If the space is small, don’t overload it with too many types — fewer plants, but repeated, works better. - Prepare the soil
Remove the top layer, add compost, and loosen the soil slightly. If the soil is heavy, don’t leave it compacted — roots develop worse in dense ground. - Place the accent plants
Start with the tallest ones — they set the rhythm of the whole layout. Usually they go in the back or center if the bed is visible from all sides. - Add the mid layer
Place plants around the accents, filling the space. Don’t line them up — a slight offset makes everything feel more natural. - Cover the soil with low plants and mulch
Plant groundcovers closer to the edges and between main plants. Then add mulch — it keeps moisture in and reduces weed growth.
Watering dropped almost in half. Before, we watered every other day in heat. Now it’s every 3–4 days, and the plants still look fine.
When the soil is covered, it doesn’t overheat as much. You can even feel it — under the leaves, the ground stays cooler.
How to keep the bed visually clean
A simple trick helps — repetition.
- repeat the same plants in different spots
- don’t use more than 5–6 types
- keep spacing between plants consistent
- leave some “air” between groups
In our case, lavender repeats across the whole bed. And because of that, even different plants read as one system.
When it makes sense to use this
On open, sunny areas this setup reduces soil overheating and holds moisture longer.
When there’s no time for constant care, a layered planting naturally cuts down on watering and weeding.
So if you want a stable result without reworking things every season — perennials come back every year and don’t need replanting.
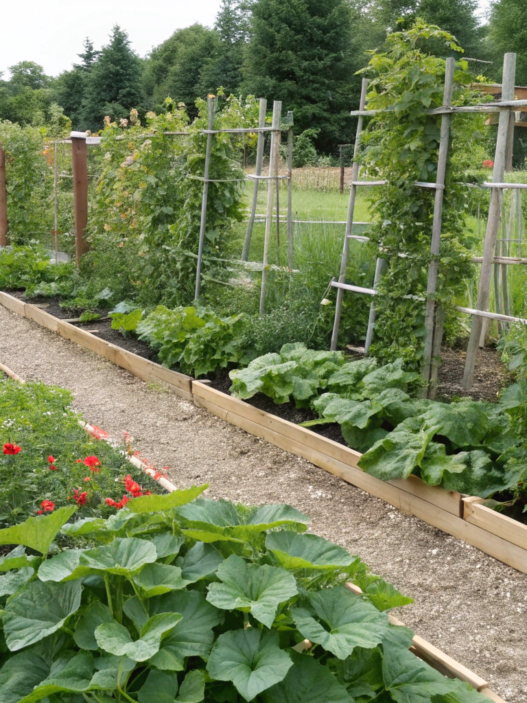
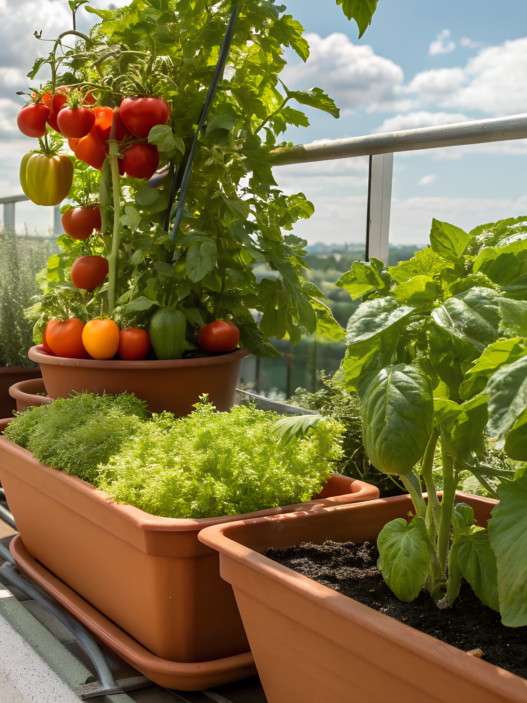
3. Front Yard Vegetable Layout With Hidden Trellis Wall
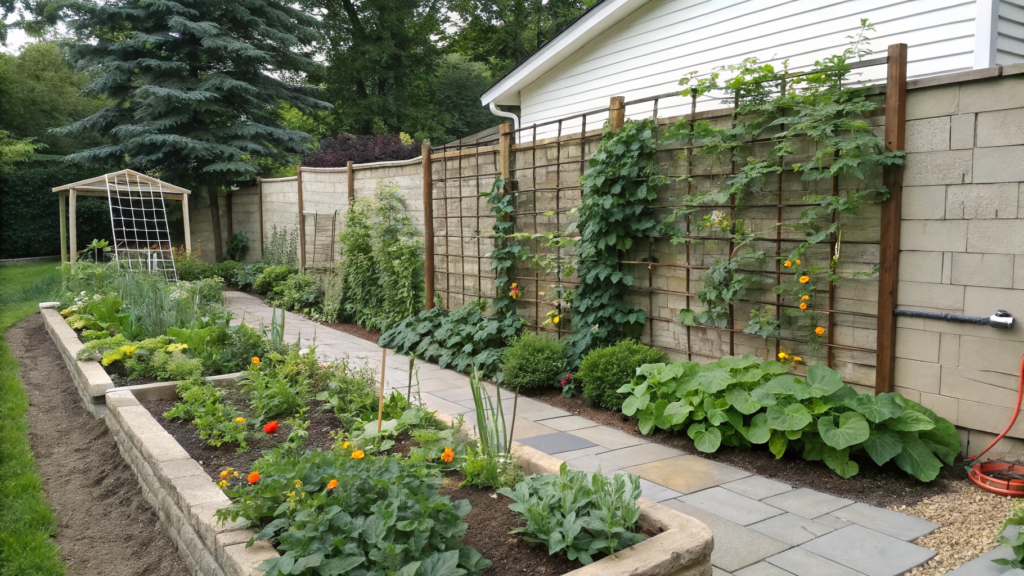
Here we’ll try to break down how to hide a front yard vegetable layout with hidden trellis wall so everything looks like part of the landscape, not like a temporary setup.
Our first attempt didn’t go well. We put up a basic trellis — and it looked like storage. Then we redid it. And that’s when it finally started to feel like a system.
Why a hidden trellis works
Vertical structures save space on their own. But when they stand out in the open, they often break the overall look.
A hidden trellis solves several things at once:
- creates a vertical zone for growing vegetables
- hides plantings behind ornamental plants
- adds extra shade and wind protection
- visually pulls the space together
Vertical systems can increase yield per square foot and improve light access for plants. This is especially noticeable in smaller yards.
How the layout works
Everything is built in three layers, but a bit differently than in flower beds:
- back layer — trellis with climbing crops (cucumbers, beans, tomatoes)
- middle layer — compact vegetables (peppers, greens, cabbage)
- front layer — decorative or low edible plants (basil, thyme, strawberries)
And the key point — the trellis should not be the first thing you notice.
What you’ll need
- Trellis or grid 5–7 ft tall (150–210 cm)
- Climbing plants (cucumbers, beans, indeterminate tomatoes)
- Compact vegetables for the middle layer
- Low plants or herbs for the front edge
- Soil mix or compost
- Drip irrigation (optional, but makes things much easier)
How to build it
- Define the trellis line
Place it along a fence, wall, or as a standalone element. It shouldn’t fully block the view — leave a bit of openness so it doesn’t feel heavy. - Secure the structure
The trellis needs to be stable, especially for tomatoes or beans. Set it at least 8–12 inches (20–30 cm) into the ground or attach it to a fixed surface. - Plant the climbing crops
Place them at the base of the trellis, about 12–18 inches (30–45 cm) apart. Guide the shoots upward right away — it helps form the vertical structure faster. - Add the middle layer
Plant lower crops in front of the trellis. They get filtered light and don’t overheat as much as in full exposure. - Finish the front edge
Use herbs or compact plants to soften the edge of the bed. This makes the transition smoother and the whole layout feel more complete.
The most important part wasn’t the trellis itself — it was what’s in front of it. When the front layer is filled properly, no one reads the back structure as a “vegetable setup.” It just looks like a layered planting.
As plants grow, they start covering the structure naturally. After a month, you barely see the trellis — just greenery.
How to keep it natural
- don’t place the trellis right in the center
- mix plants with different leaf textures
- avoid identical spacing
- leave a bit of open space
A bit of asymmetry makes it feel less artificial. In our case, basil and strawberries slightly spill onto the path. It doesn’t look like a mistake — it feels like an extension of the planting.
When it makes sense to do this
When the space is limited, you start seeing it differently — not just horizontally, but vertically too. And this is where vertical planting really helps: the space doesn’t grow, but it feels different. If you want to grow vegetables in front without the “front yard garden” look, a hidden trellis keeps things calm — the greenery is there, but it doesn’t stand out as something purely functional. And one more thing you notice pretty quickly: plants on a support get better airflow and tend to stay healthier.
4. Rock Mulch Zones That Cut Weeding Drastically
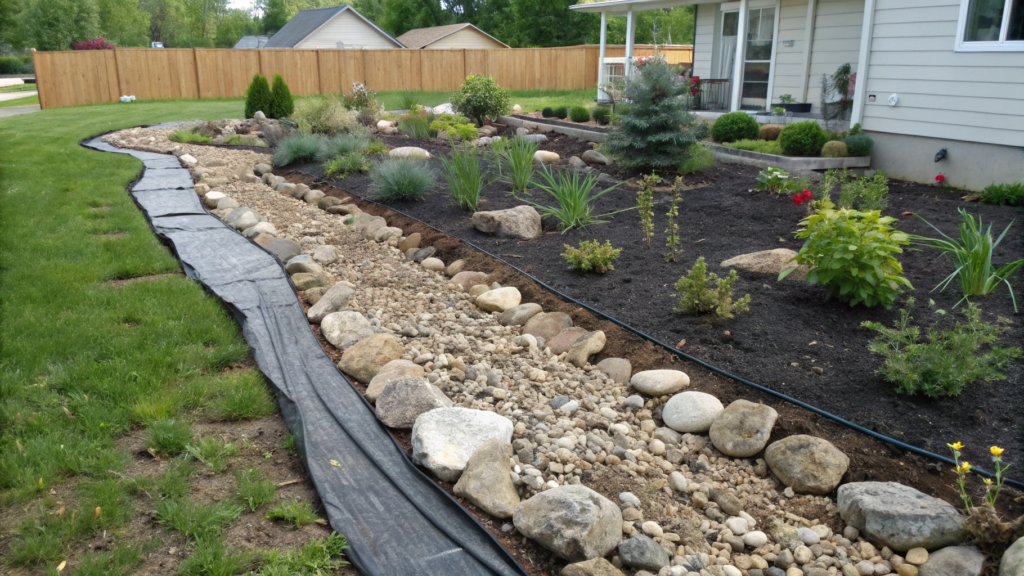
Rock mulch zones reduce the number of weeds, and yard maintenance stops taking up half your time.
This happens because stone works as a barrier. It blocks light and makes it harder for seeds to settle in the soil. If there’s landscape fabric underneath, the system becomes even more stable.
According to University of Minnesota Extension, mulching, including rock mulch, can significantly reduce weed growth, especially when the layer is thick enough and properly installed.
Stone doesn’t work everywhere. But there are areas where it’s almost ideal:
- along walkways and sidewalks
- around the house (foundation zone)
- in narrow paths between plantings
- in spots that are hard to maintain regularly
Where you don’t want to keep working with your hands all the time — stone works instead of you.
What you’ll need
- Landscape fabric (dense, not the thinnest)
- Rock mulch (gravel or decorative stone)
- Edging or border
- Shovel and rake
- Level or a board for smoothing
How to build it
- Clear and level the area
Remove all weeds with roots and lightly level the surface. If you leave uneven spots, the stone will shift over time and spread unevenly. - Set the borders
Add edging along the perimeter. It keeps the stone in place and prevents it from spreading onto the lawn or walkway. - Lay the fabric
Spread the fabric across the entire area with a slight overlap (2–4 inches / 5–10 cm). This is the base that stops weeds from growing through from below. - Add the stone layer
Pour in 2–3 inches (5–7 cm) of rock mulch. If the layer is too thin, light will get through and weeds will still appear. - Level and secure
Spread the stone with a rake and lightly compact it. After that, the area looks clean and doesn’t need adjustments.
Weeding almost disappeared. Not completely, of course. Sometimes something still grows from above — seeds get blown in by the wind. But it’s rare, not a full layer anymore. After rain, there’s no mud. The stone holds its shape, water drains through, and the walkway stays clean.
How to avoid a “hard” look
Stone can feel too cold if left on its own. To soften it:
- add plants along the edges
- use different stone tones
- avoid large continuous areas
- break the space into sections
Add just a bit of living elements — and the stone stops dominating. For example, we have ornamental grasses along one of these zones. They slightly spill onto the stone, and everything looks softer and more natural.
When it makes sense to do this
When weeds grow faster than you can keep up with them, rock mulch makes a noticeable difference — fewer weeds, less time spent going back to the same spot.
Near walkways and the house, the change is obvious too: no mud gets tracked around after rain, everything stays clean and easy to manage.
And in terms of convenience, stone stays in place for years, doesn’t settle, and doesn’t need constant refreshing like organic mulch.
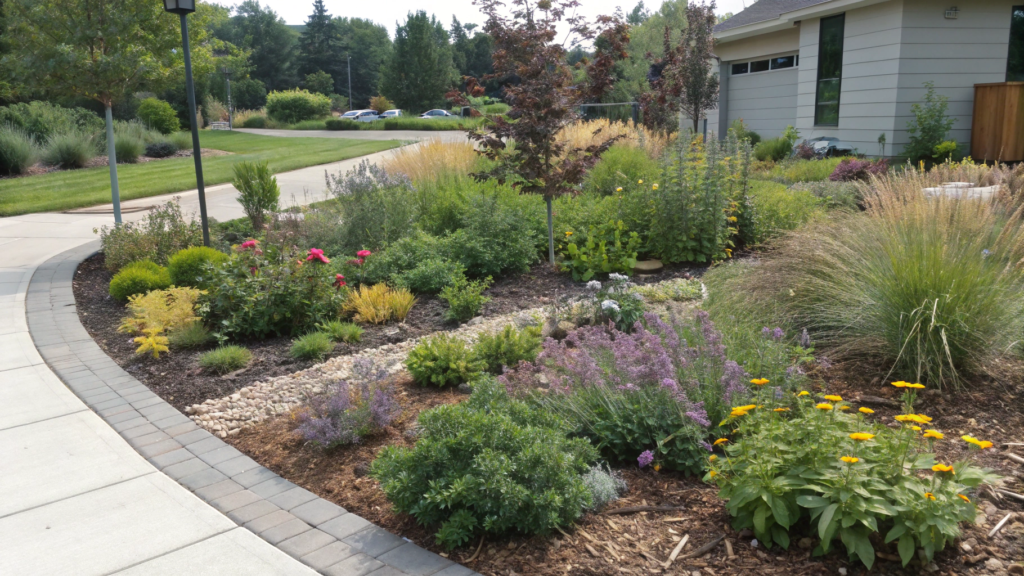
5. Curved Bed Edges That Make A Small Yard Look Bigger
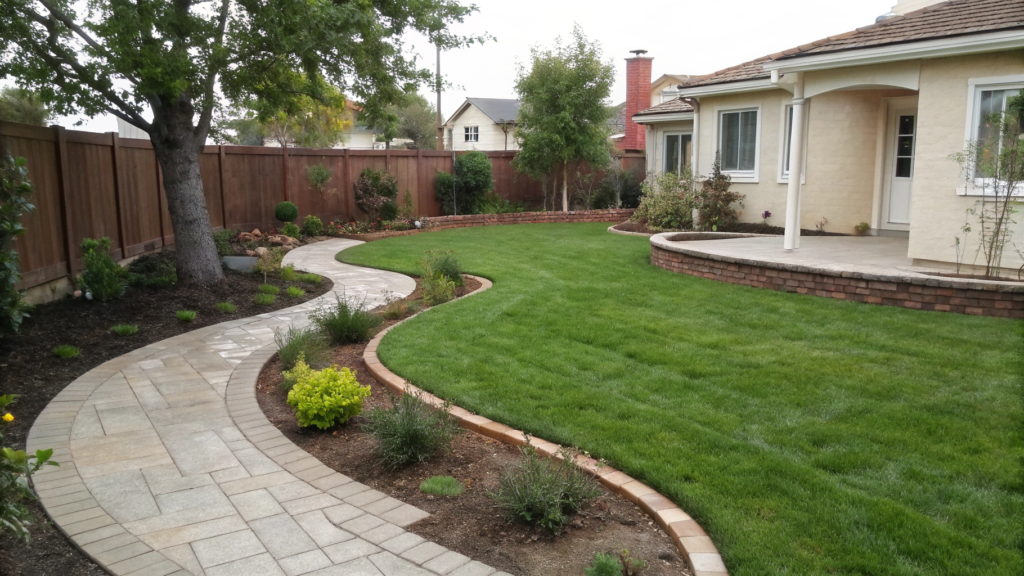
Curved bed edges can change how a yard feels without increasing its size. The eye doesn’t like stopping at sharp corners. It follows a smooth line and keeps moving. Curved lines create a sense of depth and make small spaces feel more open.
These lines work best along walkways, along the edge of a lawn, around the entry area, and in narrow yards. Where space is limited — shape matters more than square footage.
What you’ll need
- Hose or rope for marking
- Shovel or garden knife
- Edging (optional)
- Mulch or stone for filling
- Measuring tape
If you want to fix the shape, you can use something like Dimex EasyFlex Plastic Landscape Edging Kit — it works well for smooth curves.
How to build it
- Mark the curve line
Lay a hose on the ground and adjust it until the shape starts to feel natural. Avoid sharp turns — smooth curves work better. - Check the spacing
Step back and look at the shape from a distance. The curves shouldn’t feel random — the distance between the lawn edge and the bed should change gradually. - Cut along the line
Use a shovel or knife to follow the marked edge. Keep the cut clean — it directly affects how the whole area looks. - Shape and level the edge
Remove a small strip of soil along the line (2–3 inches / 5–7 cm) to create a clear boundary. This helps hold the shape and keeps materials in place. - Fill and secure the area
Add mulch or stone, and install edging if needed. It holds the line, especially if the soil is loose or prone to washing out.
The yard stops reading as a rectangle. The eye moves slower, and that creates a feeling of depth. Even simple plants start to look more interesting. Not because they changed, but because the shape around them did.
How to avoid overdoing it
Curves can easily turn into chaos.
- don’t add too many bends
- avoid repeating identical arcs
- leave sections with calmer lines
- keep an overall rhythm
One clean curve works better than five random ones.
When it makes sense to do this
When a yard feels small, shape starts to matter more — curved lines visually expand the space, even if the area stays the same. Around walkways, fences, or the house, the effect is stronger: soft edges reduce the harshness of straight lines, and the yard feels more intentional.
And the best part — you don’t need to redo everything. Changing the shape of the beds is often enough to shift the whole look.
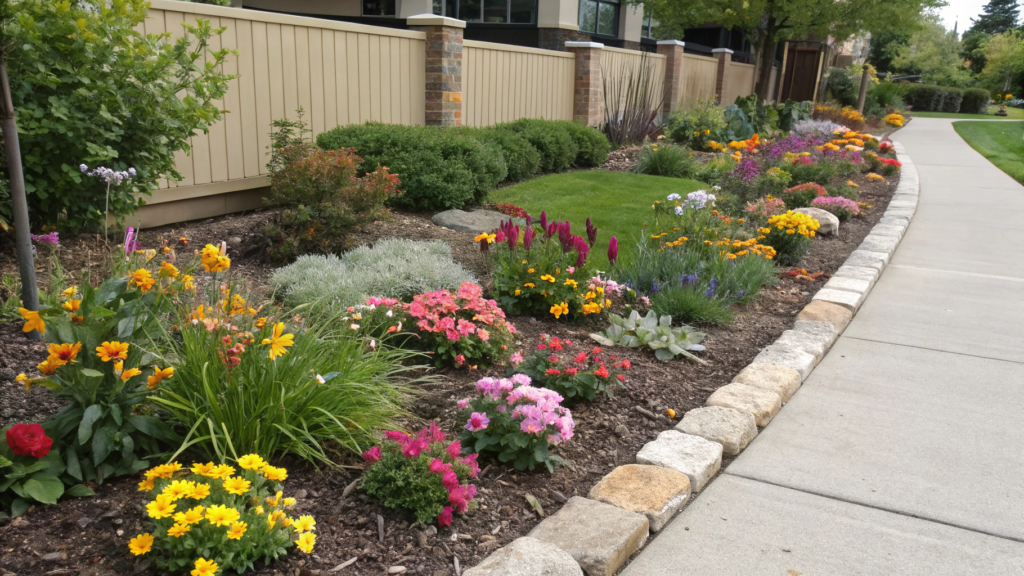
6. Entry Walk Border Bed With Repeat Planting Rhythm
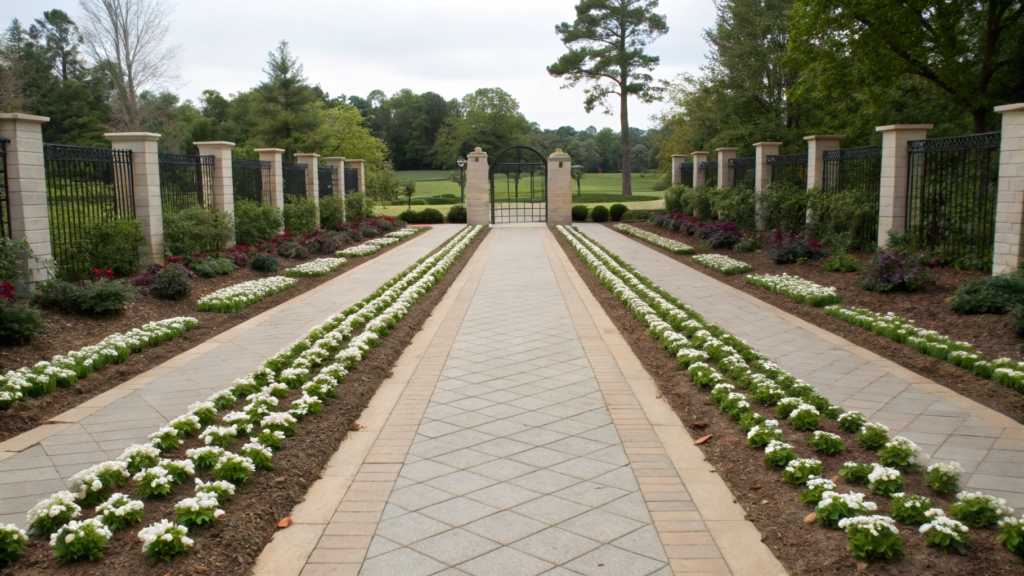
When the same element appears several times, the brain starts reading it as a system. There’s predictability, and with it comes a sense of order. That’s why entry walk border bed with repeat planting rhythm helps bring structure without making things complicated.
How to arrange planting along the walkway
The idea isn’t in how many plants you use, but in how you place them. A working setup looks like this:
- one key plant that repeats
- a second one for support (background or contrast)
- a third for filling and softness
And then you simply repeat this combination along the entire length of the walkway.
What you’ll need
- 1 main plant type (for example, lavender or boxwood)
- 1 secondary plant (heuchera or sage)
- Low plants (up to 1 ft / 30 cm) or groundcovers like creeping thyme, sedum, or alyssum — they cover the soil and shape the edge
- Mulch (2–3 inches / 5–7 cm)
- Shovel and rake
- Measuring tape for consistent spacing
How to build it
- Set the spacing
Decide how often the main plant repeats. Usually it’s every 2–3 ft (60–90 cm). Keeping this spacing consistent along the whole line matters. - Mark plant positions
Use stakes or just place pots on the ground. This lets you see the layout before planting. - Plant the main element
Start with the repeating plant. It sets the rhythm, so spacing between each one should stay even. - Add the secondary layer
Place the additional plants between the main ones, slightly offset. This removes the “row” effect and makes it feel more natural. - Fill the lower layer and mulch
Add groundcovers or low plants and cover the soil with mulch. This reduces evaporation and keeps everything looking clean.
The walkway starts to feel like one continuous line. Not a mix of elements, but a line that leads to the house. Even when plants are still small, repetition already creates a sense of completion. You don’t have to wait for everything to grow in.
How to avoid making it too “perfect”
Repetition works, but if everything is too symmetrical, it starts to feel artificial.
- slightly shift secondary plants
- add small variations in height
- don’t align everything in one straight line
- leave some freedom in placement
In our case, lavender repeats with a clear rhythm, but the plants between it are placed more loosely. It feels much more natural.
When it makes sense to do this
When the entry area feels disconnected, repetition starts tying everything together — you get visual order, and the walkway reads as one line. When there’s too much going on, simplifying helps — fewer plant types, repeated, and the yard starts to feel calmer, without that scattered look.
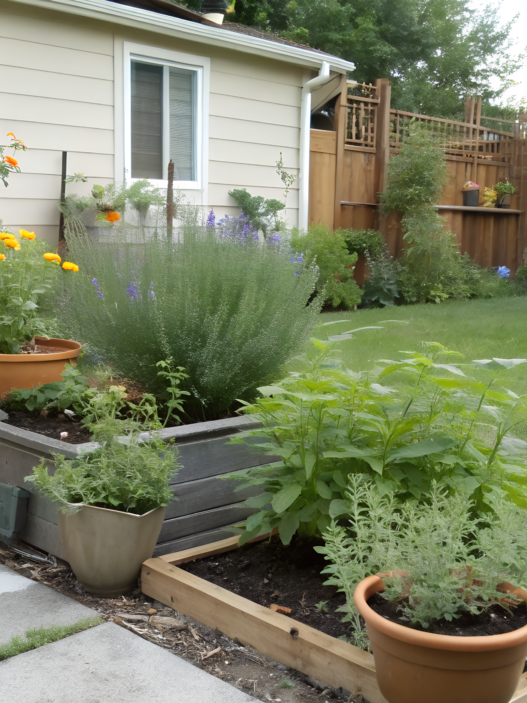
7. Foundation Planting Layout With Four Season Structure
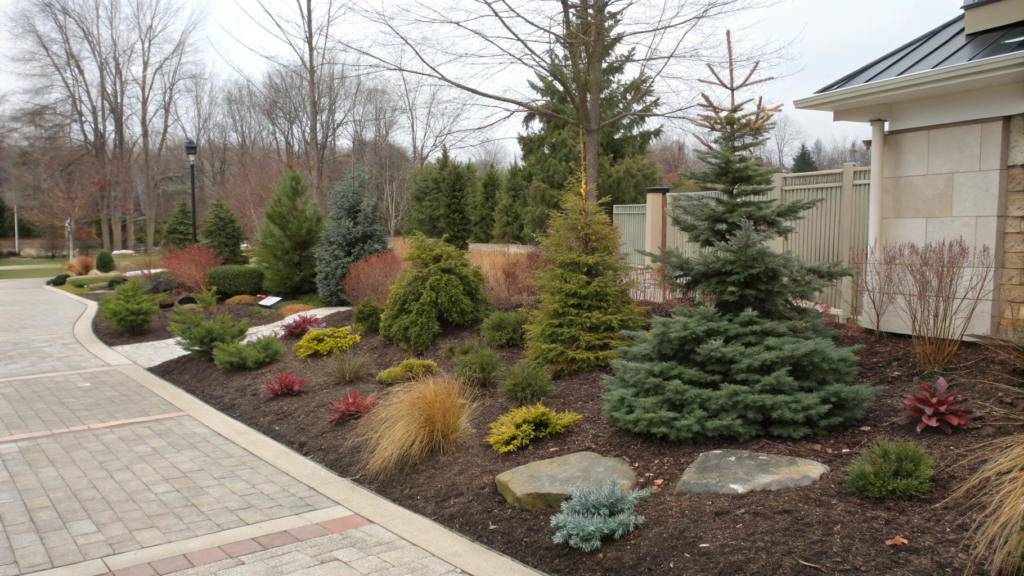
Foundation planting layout with four season structure helps build a planting that works all year. When there is a clear structure, it holds even without blooms. Visually, the area stays “alive” not because of flowers, but because of form, height, and texture.
A mix of evergreen and seasonal plants keeps the landscape visually stable throughout the year. That’s the base of a four-season layout.
How to build planting around the house
Here it’s not just about plant height, but also understanding how the planting changes from season to season.
- evergreens — give structure in winter
- deciduous shrubs — add volume in summer
- perennials — bring seasonal accents
- groundcovers — cover the soil and tie everything together
And all of this should work not only in peak season, but across the whole year.
What you’ll need
- 2–3 evergreen shrubs (for example, boxwood or dwarf spruce)
- 2–4 deciduous shrubs (hydrangea, spirea)
- 4–8 perennials (echinacea, sage, hosta)
- Groundcovers like creeping juniper, pachysandra, or vinca minor — they cover the soil and connect the planting into one space
- Mulch (2–3 inches / 5–7 cm)
- Compost or soil amendment
- Shovel and rake
How to build it
- Set the planting depth
Step back at least 2–4 ft (60–120 cm) from the wall so plants don’t “stick” to the house. This creates space for growth and improves air circulation. - Place the evergreen plants
Position them at key points — near corners or spaced along the wall. They form the base that stays visible even in winter, so placement matters. - Add deciduous shrubs
Place them between the evergreens to create volume. They change through the seasons, so it’s better to spread them evenly. - Plant the perennials
Fill the space in front of the shrubs. They bring color and movement, but shouldn’t hide the main structure. - Cover the soil and mulch
Add groundcovers and mulch. This reduces moisture loss and keeps the area looking clean in any season.
The area stops depending on the season. Even in winter, there’s shape, lines, and volume — not just empty space. In spring, everything doesn’t start from zero. There’s already a base, and new elements build on top of it.
How to avoid making it too busy
When working with different plant types, it’s easy to overdo it.
- limit the number of plant types
- repeat the same plants
- leave space between groups
- don’t fill everything at once
Empty space also works.
When it makes sense to do this
When the area around the house looks empty in colder months, structure starts holding everything together — evergreens keep the form even in winter, so the space doesn’t “drop out.”
Different plant levels keep balance through the year, without the feeling that everything has to be rebuilt each season. And in terms of care, it shows too — perennials and shrubs need less attention than constantly replanting annuals.
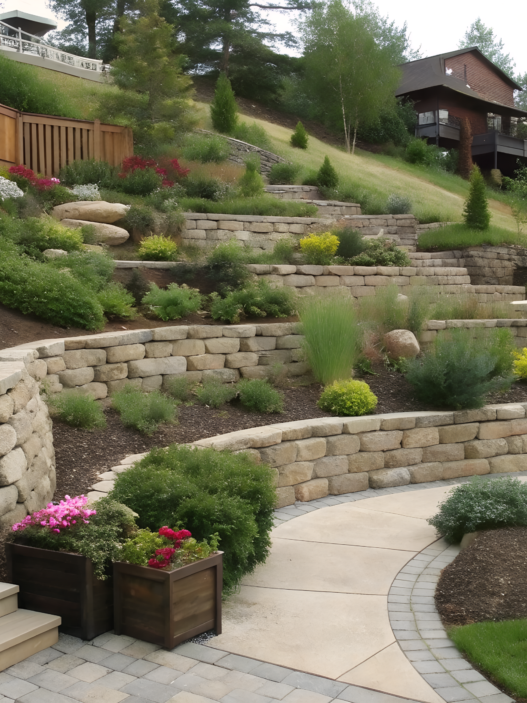
8. Sunny Slope Layout Using Groundcovers And Boulders
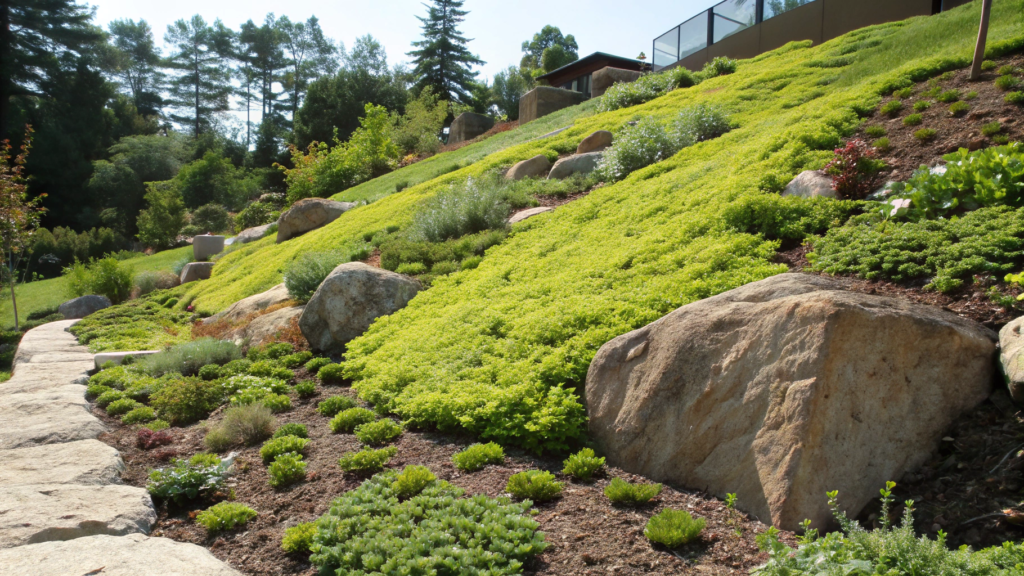
On a slope, the main problem is instability. Water moves, soil moves, and plants don’t have time to establish. Groundcovers create a dense root layer that holds the soil, and stones provide physical support.
If a sloped area keeps drying out, washing away after rain, and still looks empty — sunny slope layout using groundcovers and boulders helps stabilize the soil and reduce maintenance.
How the layout works
There are no typical “beds” here. Everything follows the slope line.
- large stones (boulders) fix key points
- groundcover plants fill the space between them
- the entire surface stays covered
It’s important not to leave exposed soil. That’s where erosion starts.
What you’ll need
- Large stones (boulders) 12–24 inches (30–60 cm) in diameter
- Groundcover plants (thyme, sedum, creeping juniper)
- Small gravel or rock mulch
- Landscape fabric (optional, if the slope is unstable)
- Shovel and pickaxe (if the soil is dense)
- Gloves
For filling, you can use Southwest Boulder & Stone Landscape Gravel 0.5 cu. ft. — a convenient option for smaller areas.
How to build it
- Check the slope and water flow
Walk the slope after rain or watering and see where the water goes. This helps avoid placing stones where they could be undermined. The steeper the slope, the more anchor points you need. - Place the large stones
Set boulders not just on top, but slightly embed them into the soil — about one-third of their height (4–8 inches / 10–20 cm). This keeps them stable over time. Don’t line them up — slight offset distributes weight better. - Prepare the areas between stones
Loosen the soil around and between stones. Add a bit of compost if the soil is poor. This helps plants root faster and cover the surface. - Plant the groundcovers
Place them about 8–12 inches (20–30 cm) apart so they eventually grow together. Density matters — if gaps stay open, the soil will start washing out. - Add gravel and secure the surface
Spread small gravel between plants in a 1–2 inch layer (2–5 cm). It reduces evaporation and protects the soil from direct rain impact. Lightly compact everything so it settles in place.
After rain, water moves slower, doesn’t wash soil away, and doesn’t form channels. Even before plants fully grow in, the stones already create a finished look and don’t feel temporary.
Small tips
When working with a slope, it’s easy to make things feel random. To avoid that:
- use stones in similar tones
- keep spacing between large elements consistent
- don’t mix too many plant types
- repeat the same groundcovers
The slope should feel natural, not random.
The combination of stones and groundcovers really stabilizes the surface and removes that constant washing after rain. Over time, you notice that covered soil holds moisture longer, so watering becomes less frequent, even in full sun. And once everything is established, this setup barely needs attention.
You don’t need to fight the slope. You just guide it — and it starts working with you, not against you.
9. Low Maintenance Flower Bed With Long Bloom Sequence
Low maintenance flower bed with long bloom sequence helps stretch blooming across the whole season without constant replanting. The idea is that different plants take turns through the season. Some finish — others start.
According to Missouri Botanical Garden, choosing plants with different bloom times helps keep the garden decorative from early spring to fall without additional planting.
How to build a long-bloom bed
Here it’s important to divide plants by timing:
- early bloom (spring)
- mid-season (early to mid-summer)
- late bloom (late summer to fall)
And at the same time, consider height so the bed reads clearly.
What you’ll need
- 2–3 early bloom plants (tulips, irises)
- 3–5 mid-season plants (echinacea, sage, lavender)
- 2–4 late bloom plants (asters, rudbeckia)
- Groundcovers or compact ornamental grasses (up to 1–1.5 ft / 30–45 cm), like sedum, creeping thyme, or blue fescue
- Mulch (2–3 inches / 5–7 cm)
- Compost or soil amendment
- Shovel and rake
How to build it
- Group plants by season
Before planting, lay them out by timing: spring, summer, fall. This helps you see if there are gaps when nothing blooms. - Set height zones
Place taller plants toward the back or center if the bed is visible from all sides. Mid-height plants go in front, and low ones along the edge. This creates a clear structure. - Plant in groups, not individually
Plant 3–5 of the same type together. This creates visible color blocks that feel intentional. - Leave space for growth
Don’t fill everything at once. Perennials spread over time. If planted too tight, you’ll have to redo it next season. - Mulch and cover the soil
Add mulch to keep moisture in and reduce weeds. This matters even more in long-bloom beds — less maintenance through the season.
The bed stops “fading out.” When some plants finish, others take over. There’s no rush to fix empty spots or quickly add something to fill gaps.
A few practical notes
With many bloom times, it’s easy to lose control. To keep things clear:
- limit the number of plant types
- repeat plants in different areas
- keep spacing consistent
- don’t add everything at once
When you don’t want to rebuild the bed every season, sequential blooming takes that pressure off — plants simply replace each other, and nothing needs replanting. It simplifies care: tasks spread across the season, so you don’t feel like everything needs attention at the same time.
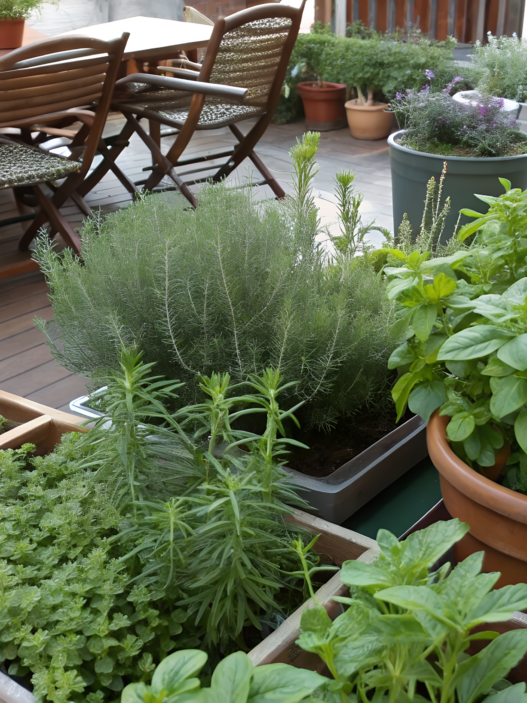
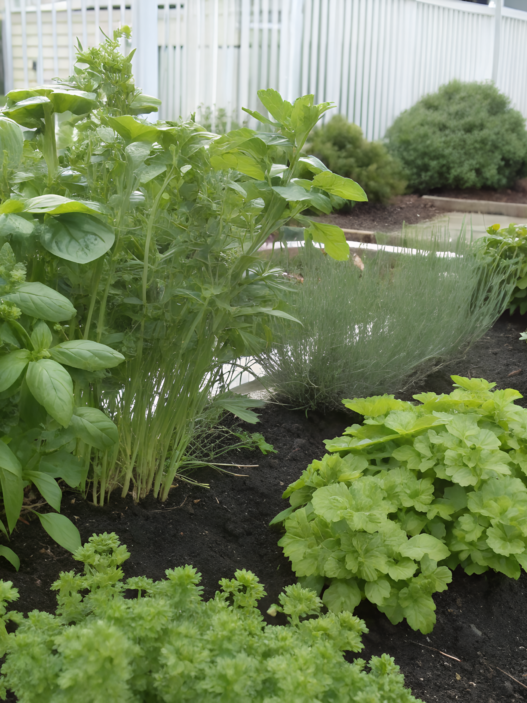
10. Front Yard Herb Strip That Smells Amazing By The Sidewalk
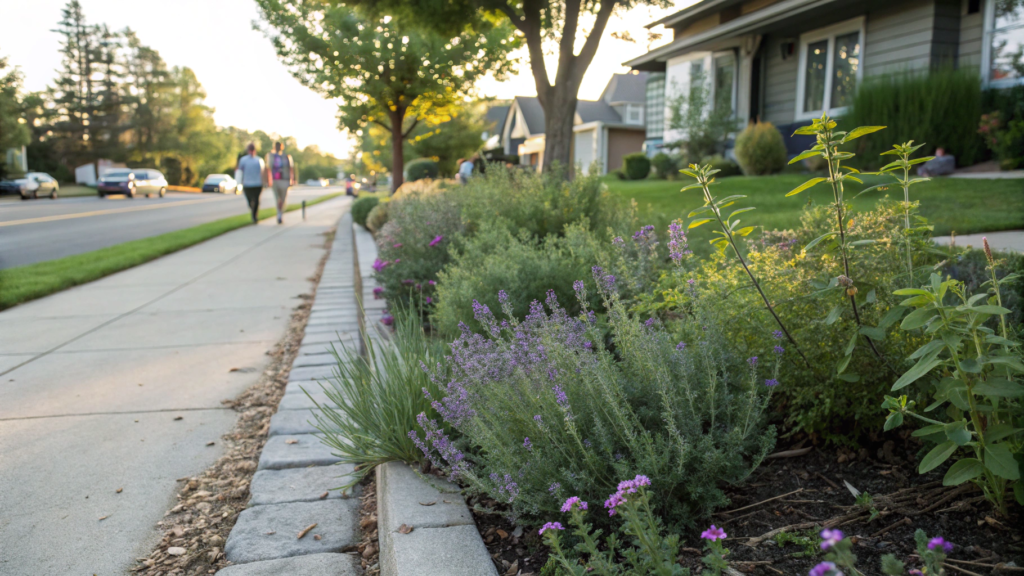
Essential oils in the leaves of many herbs (like thyme and lavender) are released more actively with mechanical contact, so placing them along walkways enhances the scent.
This is where a front yard herb strip by the sidewalk makes a lot of sense.
So you’re not just looking at plants — you’re interacting with them.
How to set up an herb strip
Here it’s not about complexity, but about density and repetition.
- main aromatic herbs (thyme, oregano, lavender)
- second layer — slightly taller (sage, rosemary)
- edge — as low as possible and tolerant to foot traffic
Everything should grow dense enough so there’s no exposed soil.
What you’ll need
- Low herbs (creeping thyme, oregano)
- Medium herbs (lavender, sage, rosemary)
- Soil mix with good drainage
- Mulch or small gravel (1–2 inches / 2–5 cm)
- Shovel and rake
- Measuring tape
How to build it
- Set the strip width
Around 1.5–3 ft (45–90 cm) works best. Narrower — plants won’t fully develop, wider — harder to maintain. Walk along the path and picture where the planting edge should go. - Prepare the soil
Remove the top layer (about 4–6 inches / 10–15 cm) and add a well-draining mix. Herbs don’t like standing water, especially near walkways where soil gets compacted. - Plant the low edge
Start with creeping thyme or oregano along the very edge. Keep spacing at 6–8 inches (15–20 cm) so they close gaps quickly. - Add the second layer
Behind the low edge, plant lavender, sage, or rosemary. Space them 12–18 inches (30–45 cm) apart. This adds volume and a stronger scent. - Mulch and define the line
Add a thin layer of gravel or mulch. It reduces evaporation and protects soil from washing out. It also keeps the edge looking clean.
Now you don’t just see the yard — you experience it. Every time you walk by and brush against the plants, the scent comes through. Sometimes light, sometimes stronger in heat. It’s not the same feeling every day.
Herbs are actually tough. They don’t need constant attention if everything is set up right from the start.
Practical notes
It’s easy to go into “everything at once” mode with herbs. To avoid that:
- stick to 3–4 types
- repeat the same plants
- keep spacing consistent
- don’t mix too many heights
When it makes sense to do this
When the walkway is used often, herbs along the edge start doing their job — they get brushed, and the scent releases on its own.
On sunny and dry areas, this becomes even more noticeable: most herbs handle these conditions well and don’t need constant watering. And overall, the space starts to feel different — not just visually, but more alive, because scent adds another layer of perception that is usually missing.
When Everything Falls Into Place
You didn’t really do anything dramatic… just changed the shape of a bed, added stone, rearranged plants with a bit more logic. And suddenly the yard stops pulling your attention with constant tasks.
Not because it became perfect. But because it became clear.
You step outside, and there’s no feeling that something urgently needs fixing. Where water used to sit — it drains. Where weeds used to grow — there’s simply no space for them. Where it felt empty — now there’s structure, even without flowers.Do you have a spot like that — the one that annoys you every time you look at it? Or maybe the opposite — something that turned out well and now just works?
Drop it in the comments, curious to see what’s working for you and what’s not.