I’ll say right away, I don’t like summer dinners that turn into long cooking at the stove. When it’s hot, you want to cook faster: throw something on the grill, put something together in a bowl, take something out of the oven — and in 20–30 minutes the table is set with proper meals.
These 10 easy summer dinners are used very often in our house, because they don’t require perfect conditions, but consistently give the feeling of real, satisfying meal at the end of the day.
Each of these recipes is built around the idea of “less actions — more flavor”, but at the same time you don’t spend a lot of time. And all of them are not like theory, but like a real necessity to feed family, guests, or just yourself after a long working day.
1. Chef Style Smash Burger Tacos With Secret Onion Sauce

Chef Style Smash Burger Tacos With Secret Onion Sauce — there is everything: crunch, juiciness, fat, acidity, a bit of sweetness. And this onion sauce… it decides half of the success.
When you press the ground meat hard (that same “smash”), on the hot surface the Maillard reaction starts — this is a reaction between amino acids from proteins and sugars, which gives that rich taste and aroma of fried meat.
What you’ll need
- 1 lb (450 g) ground beef 80/20
- 6 small tortillas (corn or wheat)
- 1 medium onion
- 2 tbsp (30 ml) mayonnaise
- 1 tbsp (15 ml) ketchup
- 1 tsp (5 ml) mustard
- 1 tsp (5 ml) apple vinegar
- 1 tsp sugar
- salt, pepper
- 4–6 slices of cheese (cheddar or american)
- a bit of oil for frying
From tools — if you have something like Cuisinart Cast Iron Smashed Burger Press, you will feel the difference right away. But if not — a regular spatula and a strong hand also work. Proven.
How to make Chef Style Smash Burger Tacos
Step 1. Prepare the onion sauce
Start with it — it should sit a bit. Finely chop the onion. Really very finely.
Mix it with mayonnaise, ketchup, mustard, vinegar and sugar. Add a pinch of salt. Mix and leave for 10–15 minutes.
The onion will become softer. Already at this stage you want to try it with a spoon. And yes… I try.
Step 2. Prepare the meat
Divide the ground meat into small balls — about 2–2.5 oz (60–70 g) each. Do not press them in advance. This is important. We need a loose ball that will later flatten on the pan.
Step 3. Heat the pan
The pan should be very hot. If you have cast iron — perfect. It holds temperature the way we need. Add a bit of oil. And immediately go to the next step.
Step 4. Smash moment
You put the meat ball on the pan. Right on top — the tortilla. And here — you press. Hard. Right to a thin layer. Do not touch for 60–90 seconds. Let the crust form. This is the flavor we need.
Step 5. Flip and cheese
Flip — now the meat is on top. Put a slice of cheese. It starts melting right away, while the tortilla fries below.
Another 1–2 minutes — and you remove.
Step 6. Assembly
Remove the taco from the pan. Add onion sauce on top. You can add a bit of fresh lettuce or cucumber if you want freshness.
And everything is ready. And everything is very tasty.
Practical tip
If you cook for several people at once — do not stack ready tacos on top of each other. Steam softens the tortilla, and that crunch disappears.
It’s better to place them in one layer on a rack or on a tray in a warm oven (about 200°F / 90°C). This way they keep the texture until serving.
I like to serve this right from the board, without extra formality. Dishes like this fit perfectly into our philosophy of simple home food. No need for complex techniques or rare ingredients. Everything comes together fast, but the taste… feels like you did more than you actually did.
2. Grilled Pesto Shrimp Skewers With Charred Lemon Butter
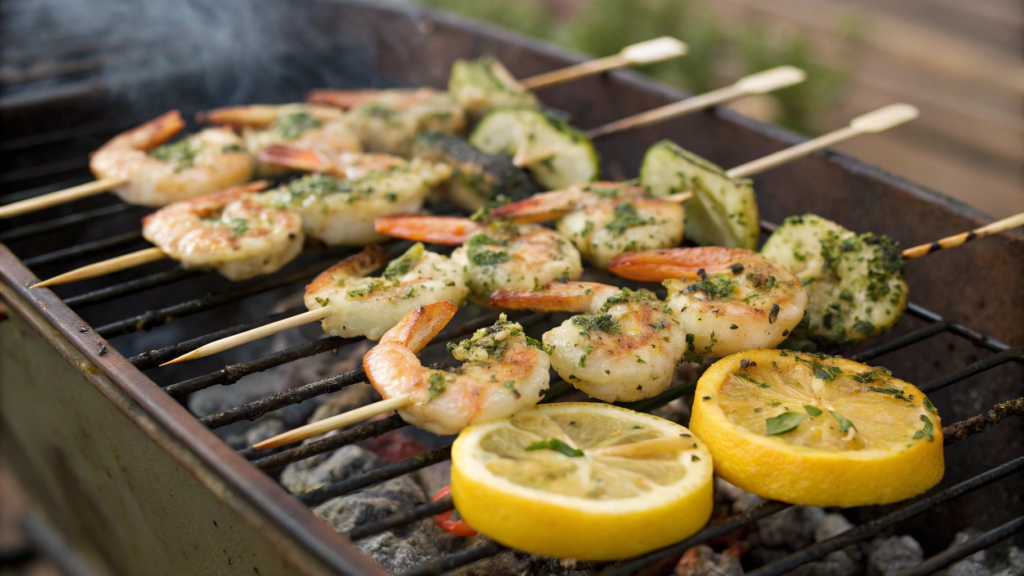
Grilled Pesto Shrimp Skewers With Charred Lemon Butter — this is outdoor food, with grill, smoke and minimal fuss in the kitchen. Everything cooks fast, especially if you prepare the marinade in advance.
Shrimp cook very quickly because of the low content of connective tissue. Seafood is better slightly undercooked than overdried — after removing from heat they continue to cook a bit from residual heat and keep a more tender texture.
What you’ll need
- 1.5 lb (680 г) large shrimp, peeled, tails on
- 1/2 cup (120 ml) basil pesto (homemade or store-bought)
- 2 tbsp (30 ml) olive oil
- 2 cloves garlic, finely
- salt, pepper
- wooden or metal skewers
For the butter:
- 3 tbsp (45 g) butter
- 1 lemon
- a pinch of salt
- a bit of chili flakes (optional)
How to make Grilled Pesto Shrimp Skewers With Charred Lemon Butter
Step 1. Prepare the shrimp
Rinse the shrimp, pat dry with paper towel — this is important, otherwise the pesto will “slide” and not stick well. Mix them with pesto, olive oil, garlic, salt and pepper. Mix with hands so each piece is coated with sauce. Leave to marinate for 20–30 minutes, no more — acids and garlic can start “cooking” the meat in advance.
Step 2. Skewers
Thread the shrimp onto skewers. Do not press them too tight — there should be a small gap between them so heat passes evenly. If you use wooden skewers, soak them in water at least 20 minutes in advance so they don’t burn on the grill.
Step 3. Grill
Preheat the grill to medium-high heat. The surface should be hot, but not smoking like crazy.
Place the skewers and cook about 2–3 minutes on each side. Shrimp quickly turn pink and slightly firm. As soon as they curl into a neat “C” shape — this is the sign to remove. Overcooked shrimp go into an “O” shape and become rubbery, and at that point it’s already too late to fix.
Step 4. Charred lemon and butter
Cut the lemon in half and place cut side down on the grill. Grill 2–3 minutes until dark caramelized marks appear.
At the same time melt the butter, add salt and a bit of chili. Squeeze in the juice from the grilled lemon — it gives a slight bitterness and depth of flavor, not just acidity.
Serving and plating
I usually remove the shrimp from the skewers and lay them out in a loose line or semicircle on a large plate or board. Not in a pile, not in a tight stack — exactly with space between them. This way the caramelization on the edges stays visible, and they look more appetizing.
On top I go over them with warm lemon butter right away — it should slightly flow over the surface, not just sit in drops.
Next to it I always place the grilled lemon halves. They are already soft, with charred skin, and easy to squeeze right during eating. This gives control over acidity — someone likes it brighter, someone softer.
You can add a simple green layer: arugula, a bit of olive oil, salt. That’s it. No complex salads, because the shrimp are already bright on their own.
Practical tip
Do not overload shrimp with time on the grill. This is the main thing that affects texture. As soon as they turn pink and start to slightly curl into a neat shape — remove. Even extra 30–40 seconds already gives rubberiness, and no sauce will fix it.
And keep the lemon butter warm until the very end. Cold butter sits like a film and does not open the aroma the way it should.
3. Ground Beef Bulgogi Rice Bowls With Quick Cucumber Pickles
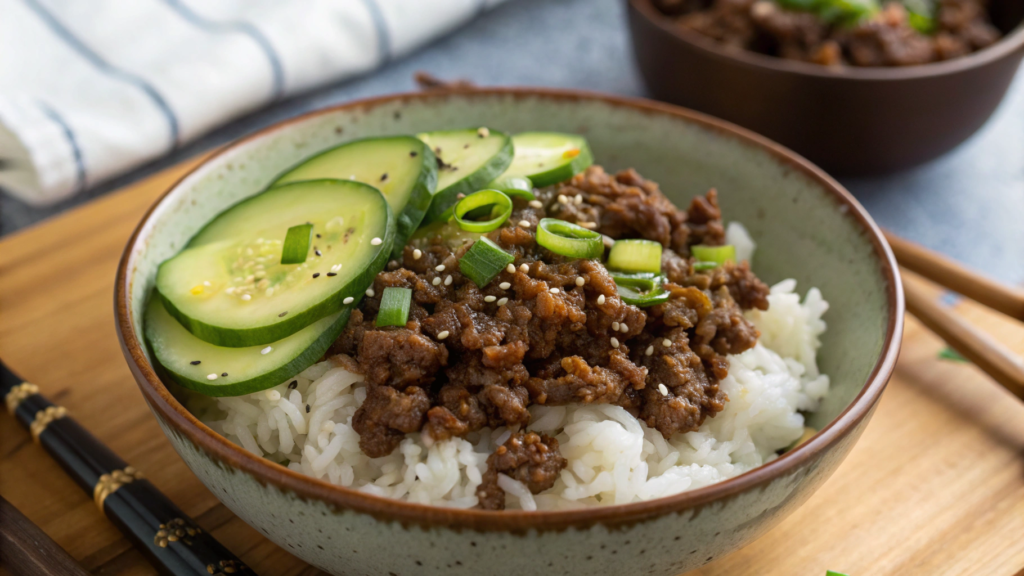
We have this dish often on weekdays: minimal dishes, everything comes together faster than the rice finishes cooking. Strange, but exactly these kinds of meals then stay in the home menu for a long time. Because they are fast and tasty.
The basic idea of bulgogi is a balance of sweet, salty and umami. In this recipe everything holds on soy sauce, garlic and a small amount of sugar — they quickly give that rich flavor without long marinating.
What you’ll need
- 1 lb (450 г) ground beef
- 2 cups (400 г) cooked rice (jasmine or short-grain)
- 3 tbsp (45 ml) soy sauce
- 1 tbsp (15 ml) sesame oil
- 1–2 tbsp (15–30 ml) brown sugar or honey
- 2 cloves garlic, finely
- 1 tsp (5 ml) grated ginger
- 1/2 tsp (2–3 ml) chili flakes (optional)
- green onion for serving
- sesame seeds
For quick cucumbers:
- 1 large cucumber
- 2 tbsp (30 ml) rice or apple vinegar
- 1 tsp (5 ml) sugar
- a pinch of salt
How to make Ground Beef Bulgogi Rice Bowls
Step 1. Quick cucumbers
Slice the cucumber into thin rounds or half-moons. The thinner — the faster they “catch” the marinade. Mix vinegar, sugar and salt, pour over cucumbers and lightly mix.
Leave for 10–15 minutes. During this time they become crispy, but already with a bright sweet-sour note. This is an important contrast to warm meat and rice.
Step 2. Flavor base — ground beef
Heat a pan to medium temperature and add the beef. Break it apart with a spatula right away so no large chunks form — we need a crumb texture, not patties.
When the meat loses its pink color, add garlic, ginger and chili. Mix and let them heat for 30–60 seconds — it’s important not to burn garlic, it quickly becomes bitter.
Step 3. Bulgogi sauce
Add soy sauce, sesame oil and sugar (or honey). Mix and let the liquid slightly reduce.
The sauce should coat the meat, becoming thick and a bit sticky. This is the character of bulgogi texture — not dry beef, but glossy and rich.
Step 4. Rice
Rice is better already cooked and slightly warm. If it’s cold — quickly reheat it in a pan or microwave with a drop of water.
It’s important not to overheat, otherwise it becomes dry. Rice here is not just a side — it’s a base layer that absorbs all the sauce.
Serving and plating
Build the bowl in layers: first rice, on top — warm bulgogi beef, then quick cucumbers. It’s better not to mix cucumbers right away — let them stay in a separate zone so everyone can take as much as they want.
On top add green onion and sesame seeds. If you have it — you can add a few drops of sesame oil at the very end, just a bit, to enhance the aroma.
Serve in deep bowls where the layers are visible. This is not only aesthetics — it makes it easier to control the flavor balance.
Practical tip
Do not make the beef too “dry”. If you reduce the sauce completely, bulgogi loses its essence. Leave a bit of glossy moisture — it should lightly coat the meat.
Important: cucumbers should not be marinated too far in advance. After an hour they lose crunch and become too soft. It’s better to make them “for now”, right before serving.
4. Vegetarian Chimichurri Portobello Steaks With Corn Salad
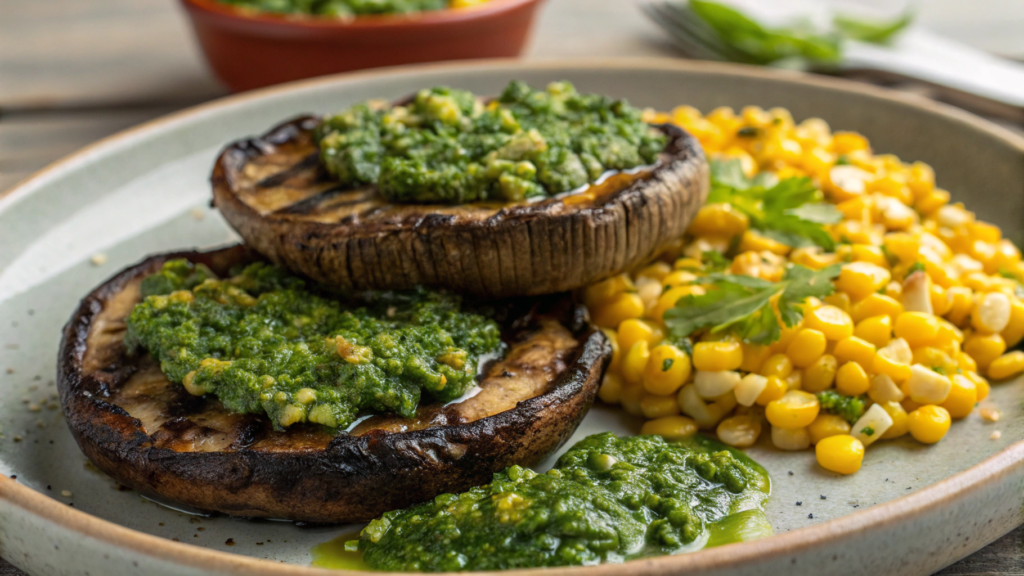
Mushrooms in this dish really play the role of meat substitute and give a dense texture, umami and a proper roasted flavor that holds the sauce very well.
Portobello give a rich “meaty” taste because of natural glutamates. That’s why they are often used as a steak alternative — when cooked, they become dense and hold texture well.
What you’ll need
For the mushrooms:
- 4 large portobello mushrooms
- 2 tbsp (30 ml) olive oil
- 1 tsp (5 ml) balsamic vinegar
- 2 cloves garlic, finely
- salt, pepper
For chimichurri:
- 1 cup (30–40 g) fresh parsley
- 2 tbsp (10–15 g) fresh oregano (or 1 tbsp dried)
- 3 tbsp (45 ml) olive oil
- 1 tbsp (15 ml) red wine vinegar
- 1 clove garlic
- a pinch of chili flakes
- salt
Corn salad:
- 2 cups (about 300 g) corn (fresh or frozen)
- 1 tbsp (15 ml) olive oil
- 1/2 red onion, finely
- juice of 1/2 lime
- salt, pepper
How to make Vegetarian Chimichurri Portobello Steaks
Step 1. Prepare the mushrooms
Gently clean the portobello with a damp cloth (do not wash under water — they absorb moisture and then cook worse). Remove stems and, if you want, lightly scrape out the dark gills inside for a cleaner taste.
Mix olive oil, garlic, balsamic, salt and pepper. Brush the mushrooms on both sides and leave for 10–15 minutes. This is enough to take in aroma but not start to “release water”.
Step 2. Chimichurri
Finely chop parsley and oregano. Do not turn into paste — the texture should stay alive. Add garlic, vinegar, olive oil, chili and salt. Mix and leave to sit at least 10 minutes.
Important: chimichurri should not be a smooth sauce. It’s more like a chopped dressing, where oil binds the herbs but does not overpower them.
Step 3. Corn salad
Cook the corn on a dry pan or grill until light char marks appear. This gives sweetness with caramelization.
Mix corn with red onion, lime juice, olive oil, salt and pepper. The onion should be sliced thin so it doesn’t overpower the corn, but just gives a light sharpness.
Step 4. Cook the portobello
Heat a pan or grill to a properly hot state — the surface should be heated. Place the mushrooms cap side down first — let them “sear”. Cook about 4–5 minutes on each side, until clear roast marks appear and softness inside.
Mushrooms should become dense, but not fall apart. If overcooked — they lose juiciness and become rubbery.
Serving
Serve portobello like “steaks” — whole caps on a large plate or board. On top generously pour chimichurri so it flows down the edges and gathers below. Place the corn salad next to it in a separate zone, without mixing — this keeps the contrast of flavor and texture.
To enhance the aroma of herbs, add a few drops of olive oil right before serving.
If serving for guests — do not pour all the sauce at once. It’s better to leave part of the chimichurri separately in a small bowl so everyone can add themselves.
Tip
Do not overdry the mushrooms. Portobello easily lose moisture if kept on heat too long. As soon as they become soft and start releasing aroma — remove.
I would recommend making chimichurri slightly in advance, but not too early. Optimal — 10–30 minutes resting. This way herbs stay bright, and the oil has time to absorb the aroma.
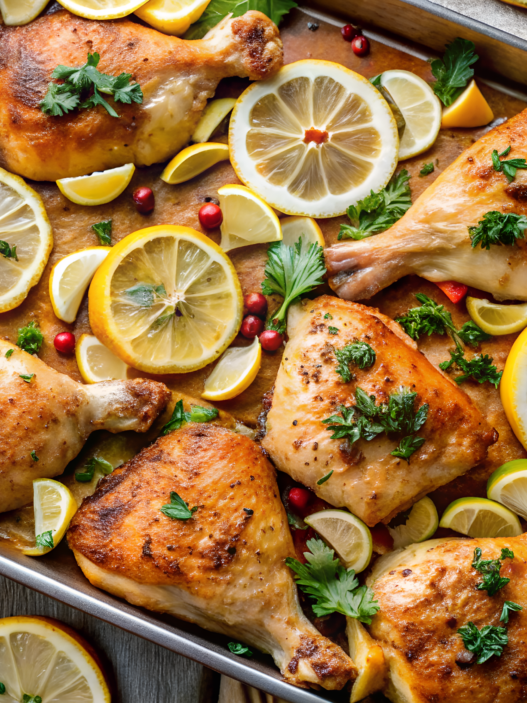
5. Crockpot Greek Chicken Gyros With Tzatziki Shortcut
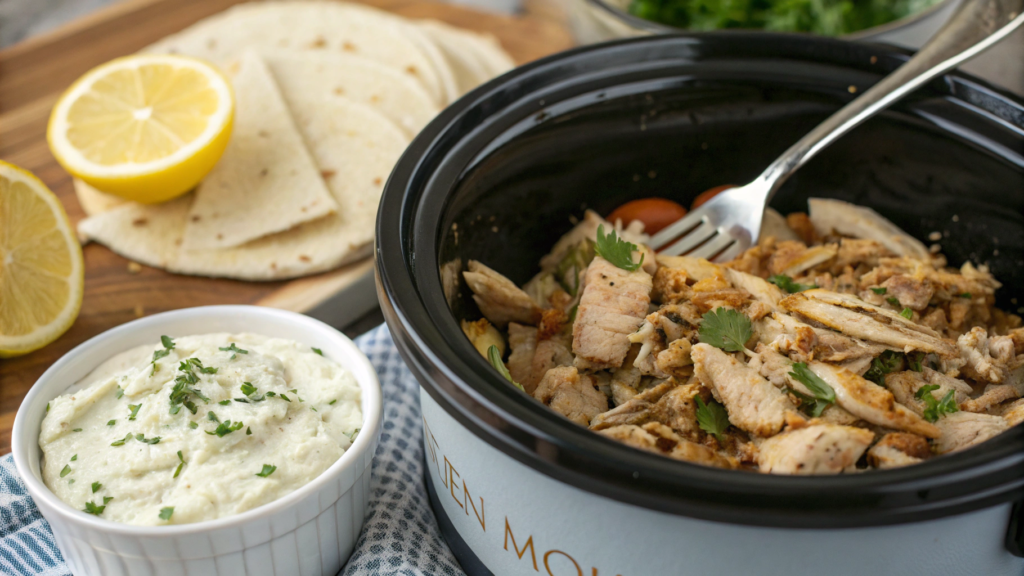
Crockpot Greek Chicken Gyros With Tzatziki Shortcut — chicken in a slow cooker turns out so tender that you can literally pull it apart with a fork, and the smell of spices slowly fills the house.
We keep this dish in rotation because it’s always reliable and tasty, and you don’t need constant control at the stove.
The Greek flavor here is built on a simple balance: lemon, garlic, olive oil and oregano. This is a classic combination that gives a bright flavor without heavy sauces or extra fat.
What you’ll need
For the chicken:
- 2 lb (900 г) boneless chicken thighs
- 3 tbsp (45 ml) olive oil
- juice of 1 lemon
- 3 cloves garlic
- 1 tbsp (15 ml) dried oregano
- 1 tsp (5 ml) paprika
- 1/2 tsp (2–3 ml) cumin
- salt, pepper
For serving:
- pita or flatbreads
- red onion, thinly sliced
- tomatoes, cucumbers
Quick tzatziki:
- 1 cup (240 g) Greek yogurt
- 1/2 cucumber, grated
- 1 clove garlic
- 1 tbsp (15 ml) olive oil
- a bit of lemon juice
- salt
It’s convenient to use something like OXO Good Grips Handheld Mandoline Slicer, especially for thin onion and cucumbers.
How to make Crockpot Greek Chicken Gyros
Step 1. Marinade in one bowl
Mix olive oil, lemon juice, garlic, oregano, paprika, cumin, salt and pepper. Add the chicken directly into this marinade and mix with hands or a spoon so each piece is coated. The key here is even coating.
Step 2. Slow cooking
Transfer everything into the crockpot and cook on low for 6–7 hours or on high for 3–4 hours.
The chicken should become so soft that it easily pulls apart into fibers with a fork. If there is still firmness — it needs more time.
Step 3. Tzatziki shortcut
Grate the cucumber and lightly squeeze out excess water — this is important, otherwise the sauce will be watery. Mix with Greek yogurt, garlic, olive oil, lemon and salt.
Leave for 10–15 minutes so the garlic opens up. This is a quick version, but it gives a very close classic taste.
Step 4. Prepare the base
Warm up the pita or flatbreads. You can lightly toast them on a dry pan — a light crust appears, and they hold the filling better.
The chicken after crockpot will already be juicy, so extra sauces inside are not needed.
Assembly and serving
I usually set it up like this: warm chicken in one bowl, tzatziki in a small one, vegetables separate, pita nearby. This way everyone builds their own gyros, and it keeps the kitchen from turning into chaos.
Inside the pita first goes chicken, then vegetables, and only on top tzatziki. If you add sauce first — it quickly soaks the bread.
It’s a good idea to lightly toast the assembled gyros on a pan for 30–40 seconds on each side — it becomes more compact and doesn’t fall apart.
Final touch
Do not overload the gyros with sauce right away. It’s better to leave part of the tzatziki separately and add during eating. This keeps the balance of flavors and doesn’t turn everything into a “yogurt mess” by the middle of dinner.
6. Kid Friendly Cheeseburger Flatbread With Pickle Relish Drizzle
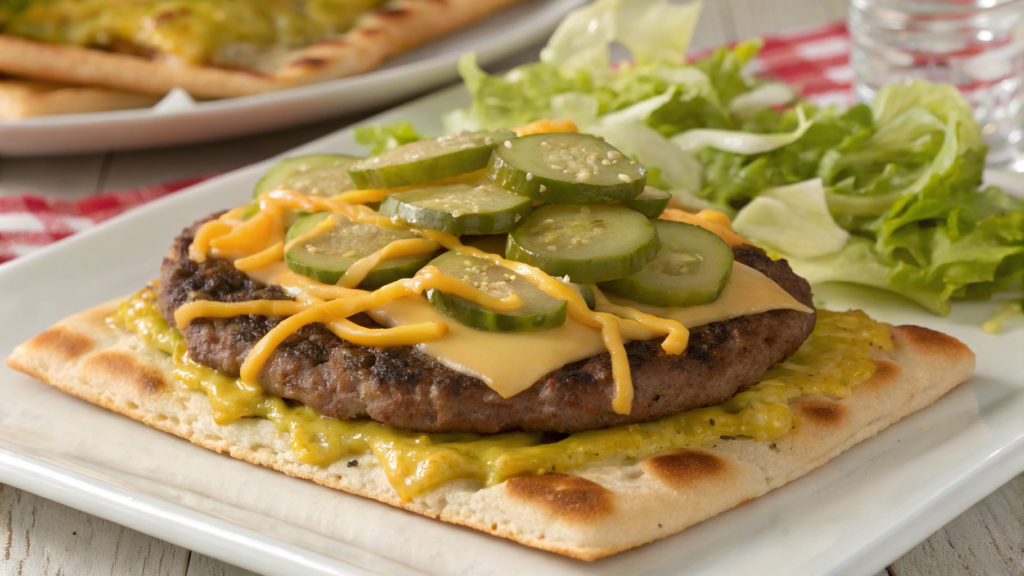
Kid Friendly Cheeseburger Flatbread With Pickle Relish Drizzle — this is definitely not an idea for a blog, but a real way to feed everyone fast and without negotiations at the table. Kids love burgers, adults want something simple, and here flatbread turns out to be the perfect compromise.
Basically, these are the same cheeseburger flavors — meat, cheese, pickles, a bit of sweetness — but in a more controlled format. No buns, no falling apart layers, and the ability to assemble everything in one go in the oven.
What you’ll need
- 1 lb (450 г) ground beef 80/20
- 2 large flatbread or naan
- 1 cup (100–120 г) shredded cheddar
- 1/2 cup (120 ml) tomato sauce or ketchup
- 1 small onion, finely chopped
- 1 tsp (5 ml) mustard
- salt, pepper
- a bit of oil for frying
For pickle relish drizzle:
- 1/3 cup (80 ml) finely chopped pickles
- 2 tbsp (30 ml) mayonnaise
- 1 tbsp (15 ml) pickle brine
- 1 tsp (5 ml) mustard
- a pinch of sugar
How to make Cheeseburger Flatbread
Step 1. Prepare the meat
Heat a pan or grill to a properly hot state. Add a bit of oil and the beef. Break it apart with a spatula right away so you get a fine, even texture — not patties, but “burger crumble”.
When the meat is no longer pink, add onion, salt, pepper and mustard. The onion should become soft, but not fully disappear — it gives sweetness and structure.
Step 2. Base for flatbread
Preheat the oven to 400°F (200°C). Place flatbread on a baking tray. Lightly spread ketchup or tomato sauce — not a thick layer, just as a base. Too much sauce will make the dough soft and rubbery.
Step 3. Assembly before baking
Spread the cooked beef evenly over the surface. Try to distribute it to the edges so every bite has meat.
On top generously add cheddar. This is where the cheeseburger effect forms — cheese binds everything into one mass.
Step 4. Baking
Put into the oven for 8–12 minutes. The cheese should fully melt, and the edges of the flatbread should slightly dry out and become crispy. If you overbake — the base becomes too hard, so watch closer at the end.
Step 5. Pickle relish drizzle
While everything bakes, mix chopped pickles, mayonnaise, brine, mustard and a pinch of sugar.
The consistency should be like a thick sauce, but with pieces — not a puree. This is important: texture gives that burger-style taste.
Serving and slicing
Take out the flatbread and let it sit for 2–3 minutes — this way the cheese stabilizes a bit, and it’s easier to cut. Slice into squares or strips, like pizza.
Pickle relish is better not added in advance. Keep it in a separate bowl and add on top of pieces before eating — this keeps the crispy base and flavor balance. For kids, you can even make part without sauce and part with it.
Practical note
Do not overload the base with sauces before baking. Flatbread does not like excess moisture. If there is too much sauce, the bottom layer becomes soft and loses structure.
If you cook for a group, it’s better to slice right after a short rest, not wait for full cooling — at this moment the cheese holds shape, but no longer stretches too aggressively.
7. Family Big Batch Cowboy Caviar With Rotisserie Chicken
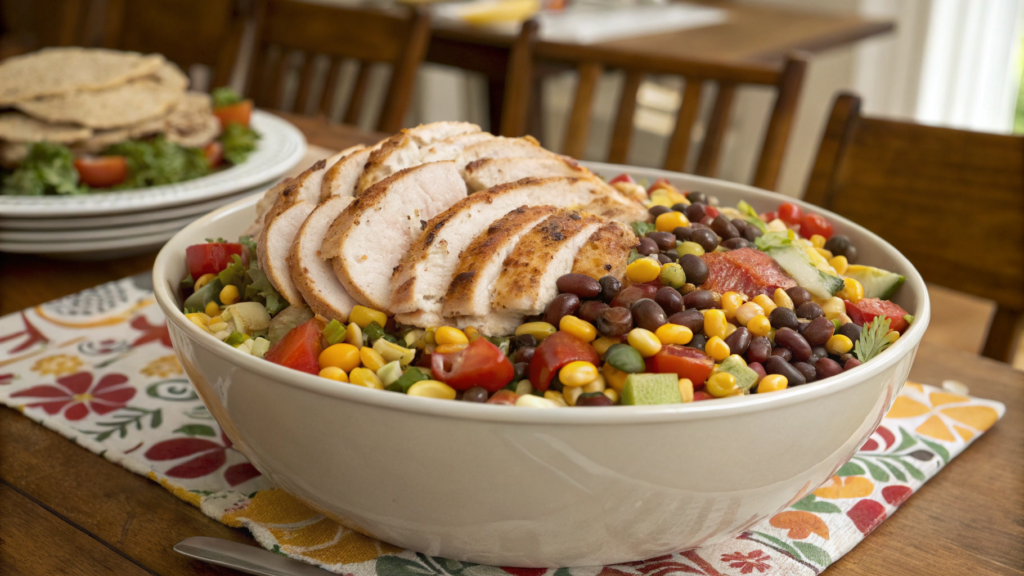
Family Big Batch Cowboy Caviar With Rotisserie Chicken — this is an American version of a hearty bean salad with beans, corn and fresh vegetables, which can sit for a couple of hours and not lose flavor. In the US, it’s often made for picnics and big groups — especially in the South, where dishes like this have long become a normal part of everyday food.
What you’ll need
- 1 rotisserie chicken (store-bought grilled chicken)
- 1 can (15 oz / ~425 г) black beans, rinsed
- 1 can (15 oz / ~425 г) pinto or red beans, rinsed
- 1 cup (150–170 г) corn (fresh or frozen)
- 1 red bell pepper, finely chopped
- 1 yellow bell pepper, finely chopped
- 1/2 red onion, finely
- 1 avocado, diced (optional, add before serving)
- 1/2 cup (120 ml) olive oil
- juice of 1–2 limes
- 1 tbsp (15 ml) apple vinegar
- 1 tsp (5 ml) cumin
- salt, pepper
- a bit of cilantro (optional)
How to make Cowboy Caviar
Step 1. Prepare the base
Drain and rinse the beans. This is important — it removes excess starch and makes the taste cleaner.
Chop all vegetables into roughly the same small dice. You don’t need perfect precision, but even size affects texture: the closer the size, the better everything mixes in a spoon.
Step 2. Chicken
Shred the rotisserie chicken into small pieces. Don’t make it too fine — let there be visible fibers, they give a feeling of fullness.
It’s better to use a mix of white and dark meat: white gives neutrality, dark gives flavor and juiciness.
Step 3. Dressing
In a separate bowl mix olive oil, lime juice, vinegar, cumin, salt and pepper.
The dressing should be bright and slightly acidic — it ties the dish together, not just adds flavor on top.
Step 4. Big bowl assembly
In a large bowl combine beans, corn, peppers, onion and chicken. Pour in the dressing and gently mix. Do not press too hard, especially the beans — it’s important to keep the ingredient texture.
Step 5. Avocado (if using)
Add avocado at the very end and very gently. It should not turn into puree, its role is softness and contrast to the crunchy vegetables.
Serving in “family table” style
This dish works best not as individual plates, but as one big shared bowl in the center of the table. You can place tortillas, chips or just spoons nearby — everyone builds their own version.
If it’s for a picnic, it’s better to serve like this: chicken separate, vegetable base separate, dressing separate. This way everything stays fresh longer and does not become soggy.
Tip
Do not add avocado in advance, especially if you plan to store leftovers. It quickly darkens and loses texture. It’s better to cut it right before serving — then both taste and look stay fresh.
Cowboy Caviar becomes better after 20–30 minutes after mixing. This is not the kind of salad you eat immediately — during this time beans and vegetables absorb the dressing and the flavor becomes more balanced. Keep this in mind.
8. Crowd Sheet Pan Sausage Peppers With Hero Bread Toast
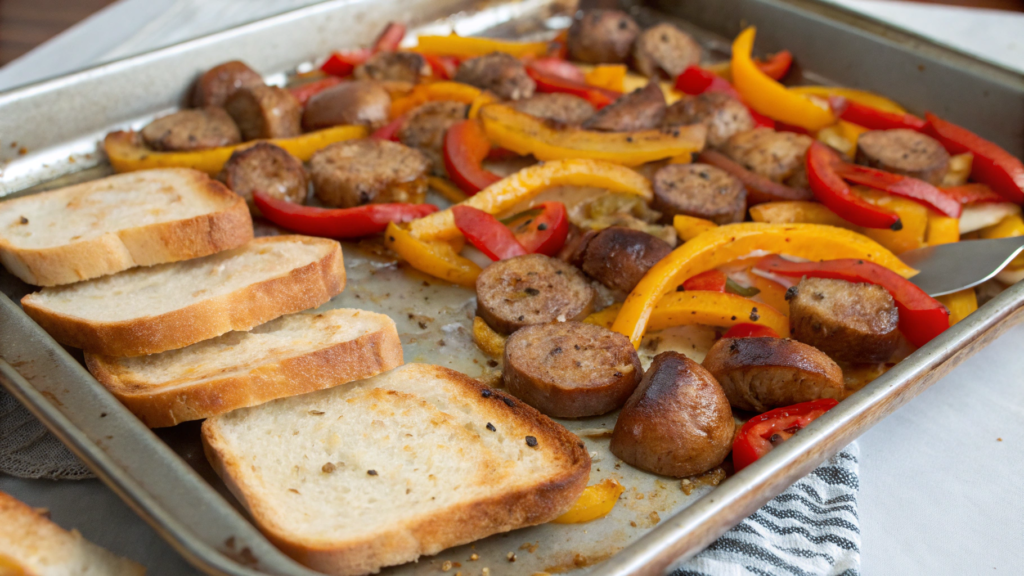
Crowd Sheet Pan Sausage Peppers With Hero Bread Toast — everything is cooked on one sheet pan, no extra pans, just slice, spread, put into the oven — and done.
What you’ll need
- 1.5–2 lb (700–900 г) Italian sausages (sweet or spicy)
- 2 red bell peppers
- 2 yellow or orange peppers
- 1 large red onion
- 2–3 tbsp (30–45 ml) olive oil
- 1 tsp (5 ml) dried oregano
- 1 tsp (5 ml) garlic powder or 2 cloves fresh garlic
- salt, pepper
- 4–6 slices Hero Bread (or similar low-carb bread)
- a bit of oil or spray for toasts
How to make Sheet Pan Sausage Peppers
Step 1. Prep
Preheat the oven to 425°F (220°C). This is important — high heat gives that caramelization, not “stewed vegetables”.
Slice peppers into large strips, onion into half rings. Sausages can be left whole or cut in half lengthwise if you want more crispy surface.
Step 2. Seasoning and layout
In a large bowl mix vegetables with olive oil, oregano, garlic, salt and pepper. Mix with hands — this way spices distribute more evenly.
Spread everything on a tray in one layer. Sausages are better slightly “nested” between vegetables so they release juices during baking.
Step 3. Roasting
Put into the oven for 25–30 minutes. In the middle you can mix vegetables once so they brown on all sides. Sausages should become golden, and peppers — soft with slightly charred edges. This is not a defect, it’s part of the flavor.
Step 4. Hero bread toast
While everything bakes, lightly brush Hero bread with olive oil or spray and toast in the oven for the last 5–7 minutes. The bread should become crispy outside, but not dry inside — it will be the base for serving.
Assembly and serving
Serve everything right from the tray or transfer to a large plate: sausages, roasted peppers and onion go on top of warm Hero bread toast. The juices from vegetables can be lightly poured over — they work as a natural sauce.
For a group, it’s convenient to make a “build station”: tray with the hot mix and toasts separately. This way everyone builds their own portion, and the bread does not get soggy.
Tip
Do not overload the tray. If ingredients are in two layers, they start steaming instead of roasting. And this completely changes the final texture — instead of caramelization you get a soft mass.
It’s better to use two trays than one overcrowded.
9. High Protein Cottage Cheese Alfredo With Summer Peas
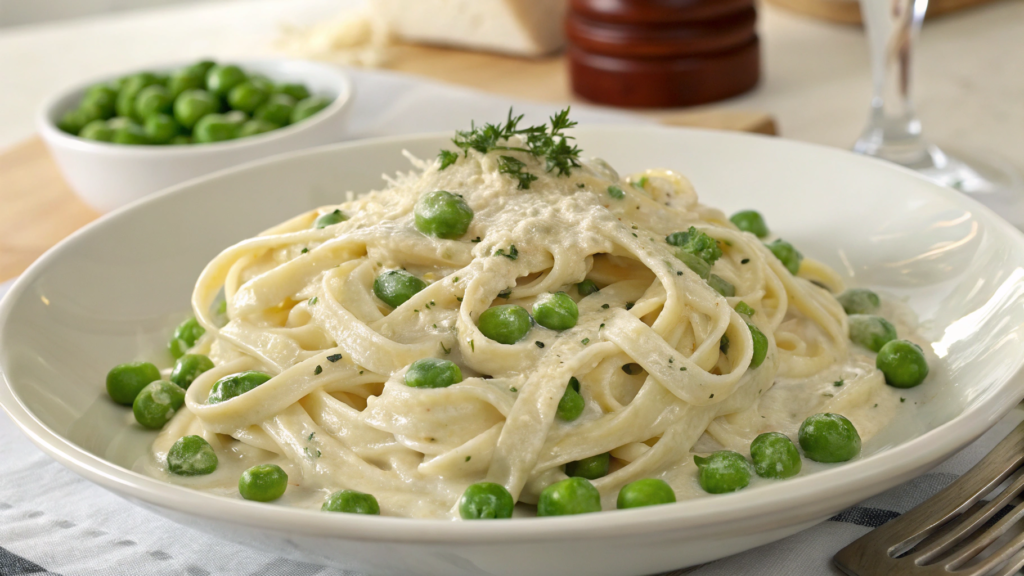
The secret of this recipe is in the cottage cheese: when blended properly, it turns into a smooth, almost velvety base that imitates Alfredo sauce. In practice, it’s just a different texture of protein and milk fats, but it feels like a full creamy sauce.
Cottage cheese is one of the most high-protein dairy products, while still being lighter in calories than cream. That’s why it’s often used in lighter versions of creamy pasta sauces.
What you’ll need
- 12 oz (340 g) pasta (fettuccine, penne or linguine)
- 1 cup (220–250 g) cottage cheese
- 1/2 cup (120 ml) milk (or a bit more for consistency)
- 1/2 cup (50–70 g) grated parmesan
- 2 tbsp (30 g) butter
- 2 cloves garlic
- 1 cup (120–150 g) green peas (fresh or frozen)
- salt, pepper
- a bit of nutmeg (optional)
For an extra smooth sauce without grains, a powerful blender like Vitamix 5200 Blender helps fully emulsify the cottage cheese into a creamy texture.
How to make High Protein Cottage Cheese Alfredo
Step 1. Pasta
Cook the pasta in well-salted water until al dente. Before draining, make sure to save about 1/2 cup (120 ml) of pasta water — you’ll need it to adjust the sauce.
Step 2. Peas
If you use frozen peas — add them straight into the pasta 2–3 minutes before it’s done. They will heat through and stay bright green and slightly sweet.
If fresh — you can lightly blanch them separately for 1–2 minutes.
Step 3. Alfredo base
In a blender combine cottage cheese, milk, parmesan, garlic, a pinch of salt and a bit of pepper. Blend until the texture is as smooth as possible.
If the sauce is too thick — add a little pasta water. The consistency should be like heavy cream, but without the heaviness.
Step 4. Build the sauce
In a large pan melt the butter over medium heat. Add the cheese sauce and warm it for 2–3 minutes, stirring constantly.
It’s important not to boil it — the sauce should become warm and smooth, but not separate.
Step 5. Combine
Add the pasta and peas into the sauce. Mix gently so everything is evenly coated with the creamy base.
If needed, add a bit more pasta water — it helps the sauce cover all the pasta better.
Serving and final assembly
Serve right away, while the sauce is still warm and silky. On top you can add a bit more parmesan and freshly ground pepper.
It’s best served in shallow bowls, where the pasta doesn’t “sink” but sits more openly, with the texture of the peas still visible. If you want a slightly cleaner look — add about 1 teaspoon of olive oil on top right before serving, it gives a light shine and boosts the aroma.
Tip
Do not overheat the sauce after adding the cottage cheese. If you bring it to a boil, it can start to break a bit in texture and become grainy.
Try to blend the cottage cheese as thoroughly as possible. Even small curds are noticeable in the sauce later, and that strongly changes the feel of the dish.
10. Hot Day Gazpacho Cups With Garlic Crouton Crunch
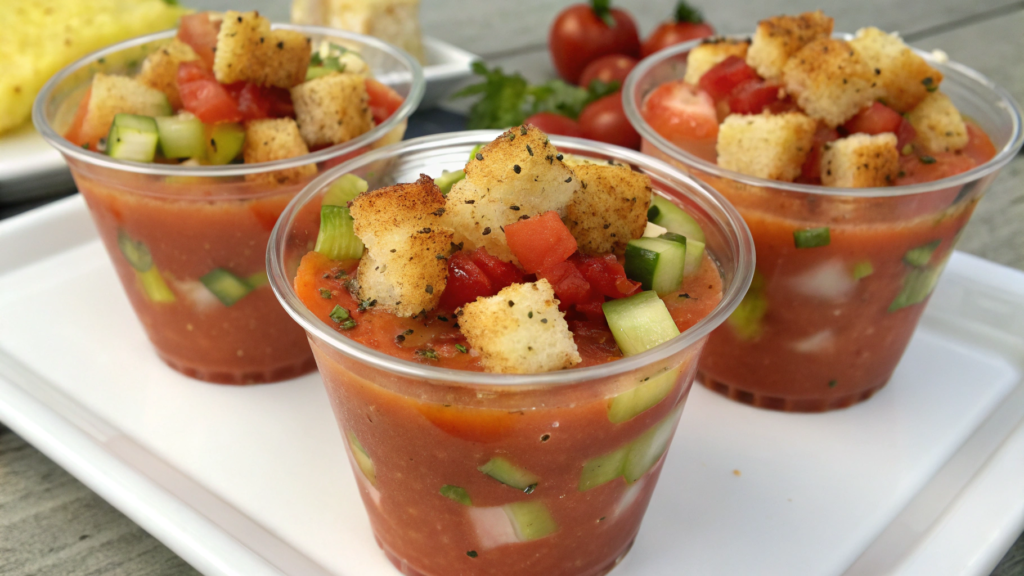
Hot Day Gazpacho Cups With Garlic Crouton Crunch — this is basically a cold vegetable soup, where everything is built on the balance of ripe tomatoes, pepper and light acidity. In traditional Spanish cuisine, it’s often seen as a way to use maximum fresh summer vegetables without heat. And it makes sense: the less cooking, the brighter the natural flavor stays.
What you’ll need
- 6–7 ripe tomatoes (about 2 lb / 900 g)
- 1 cucumber
- 1 red bell pepper
- 1/2 red onion
- 2 tbsp (30 ml) olive oil
- 1–2 tbsp (15–30 ml) red wine vinegar
- 1 small garlic clove
- salt, pepper
- 1–2 slices bread for croutons
For garlic croutons:
- 1 cup (about 50–60 g) bread cubes
- 1–2 tbsp (15–30 ml) olive oil
- 1/2 tsp garlic powder or 1 small garlic clove
- a pinch of salt
How to make Hot Day Gazpacho Cups
Step 1. Prep vegetables
Cut tomatoes, cucumber, pepper and onion into large pieces. No need for fine chopping — everything goes into the blender anyway.
Be careful with garlic: one small clove is enough, otherwise it will overpower the fresh taste.
Step 2. Blend the base
Add all vegetables into a blender, add olive oil, vinegar, salt and pepper. Blend until smooth or leave slightly textured — it’s a matter of preference. I usually don’t make it fully “liquid”, I keep a bit of body so the soup is not too thin, more like a light texture.
Step 3. Chill
Transfer into a bowl or pitcher and refrigerate for at least 1–2 hours. This is an important step: flavor comes together in the cold. The taste of tomatoes becomes deeper, acidity softer, and everything feels more balanced.
Step 4. Garlic croutons
Cut bread into cubes. Mix with olive oil, garlic and salt. Spread on a tray and bake at 375°F (190°C) for about 10–12 minutes until golden. Important not to overdry: croutons should be crispy outside, but not too hard inside.
Serving and plating
Serve gazpacho in small glasses or cups — it’s convenient, especially if it’s part of a summer table or snack. Before serving make sure to stir the soup, because it can slightly separate in the fridge.
Add a handful of garlic croutons on top right before serving so they stay crispy. If you add them earlier, they quickly get soggy and lose the whole point.
Practical note
Do not overblend the vegetables. If you make it completely smooth, gazpacho loses character and becomes just cold vegetable puree. A bit of texture here works in your favor — it makes the flavor feel more alive and fresh.
Summer kitchen
Summer cooking is very simple in its logic. It’s not about perfect ingredients. It’s about freshness and the ability to put together food so it doesn’t take more energy from you than you’re ready to give.
I like that you don’t need to constantly think “what should I cook”, you don’t need to keep long process lists in your head. Everything is pretty straightforward, but not boring, and these dishes really work in real life, not just on paper.How do your summer dinners work? What falls into your “make again and again” category, and what never stuck, even if it seemed like a good idea at the start? Write in the comments, let’s share ideas.