
The front yard is always visible. And often these yards don’t have structure. There are bushes, there are flowers, there is a lawn… but together it doesn’t come into a cohesive picture.
These 10 ideas give a quick visual result without complex projects. Without complicated reworks and without the feeling that you need to call a designer.
Let’s break down how to use stone, how to work with symmetry, and how to fit even vegetable beds into the front yard so it looks appropriate.
Each of these ideas can be implemented separately, or you can combine them. The main thing is — you’ll start seeing the space not as a set of elements, but as a system.
So, let’s start?
1. Curb Appeal Triangle Layout With One Statement Tree
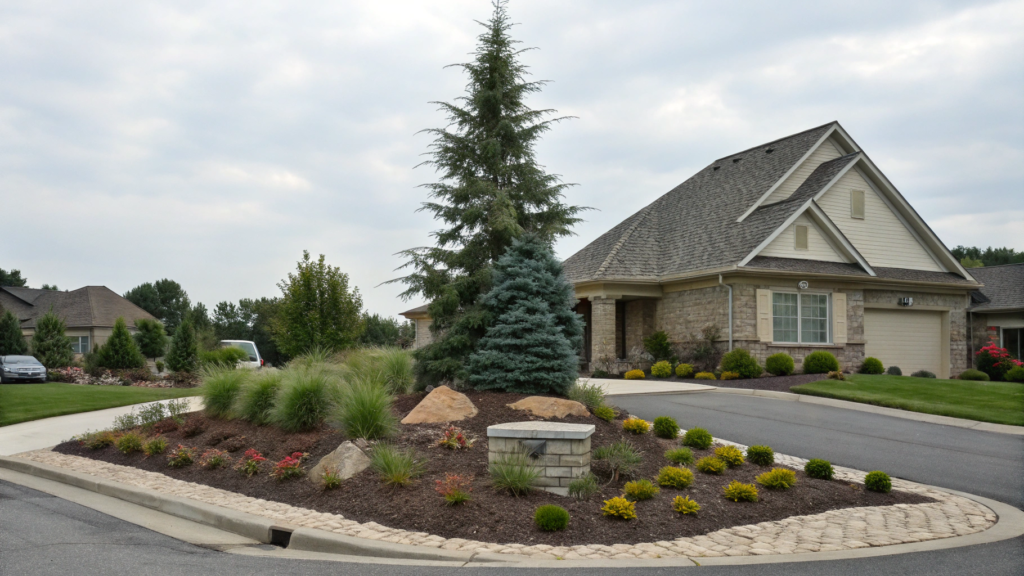
Curb appeal triangle layout with one statement tree — this is one accent and a clear shape around it.
The idea is that you build the composition in the shape of a triangle layout. The top is the tree. The base is lower plants that “open up” the composition toward the house or pathway.
The triangle creates a sense of balance, even if the plants differ in shape and color. Plus, when there is one main element (that same tree), everything else stops competing for attention.
What you’ll need
- One statement tree 6–10 ft (1.8–3 m) tall — for example, a decorative apple tree or Japanese maple
- 3–5 mid-level shrubs (2–4 ft / 60–120 cm)
- Groundcovers or low perennials (up to 1 ft / 30 cm), like creeping thyme, creeping phlox, sedum, alyssum, periwinkle
- Mulch (bark or wood chips)
- Shovel and garden hose for layout
- slow-release fertilizer, like Osmocote Smart-Release Plant Food
How to do it
- Choose the accent point
Stand by the road or where you usually look at the yard from. From that exact spot, pick the place for the tree. This matters — not from inside the yard, but from the main viewpoint. - Mark the triangle
Use a garden hose or rope to outline the shape. The base is usually wider — about 8–12 ft (2.5–3.5 m), and the top goes toward the tree. Even at this stage, it becomes clear how it will look. - Plant the tree first
Don’t delay it. Once the tree is in place, everything else “adjusts” to it. I once tried the opposite — starting with shrubs… had to replant everything. - Add the middle layer
Place shrubs along the sides of the triangle. Not in a straight line — shift them a bit so it doesn’t feel artificial. - Fill the bottom
Groundcovers close the soil and tie the composition together. Repeating groups work well here — 3–5 plants of the same type. - Mulch and level
A 2–3 inch mulch layer (5–7 cm) instantly makes everything look cleaner. And plus — fewer weeds and better moisture retention.
Possible mistakes
- Too large “future growth” tree. At the nursery everything looks compact and neat. But in a few years, the tree can grow to 20–25 ft (6–7.5 m) and start overpowering the whole composition. The triangle will simply “fall apart”. Look at the mature height, not the current size.
- Too straight, “ruler-perfect” planting. When shrubs are placed strictly symmetrical and at equal distances — it instantly looks artificial. In nature, this almost never happens. A slight shift (even 6–12 inches / 15–30 cm) makes the picture much more natural looking.
- Underestimating the width of the composition. Often the triangle is made too narrow. As a result, it doesn’t “read” from the road. The base should be wide enough — at least 8 ft (2.5 m), otherwise the effect is simply lost.
A tip that will save you time
Before digging, place all plants right in their containers. Look from a distance, walk by as if you’re just passing the house.
Sometimes one small shift — and everything clicks. And sometimes the opposite: everything seems right, but it doesn’t look good. Better to spend 10–15 minutes on this than to replant later.
One accent, a clear shape, and the space already looks like a designer worked on it.
2. Full Sun Flower Beds With Repeating Color Blocks
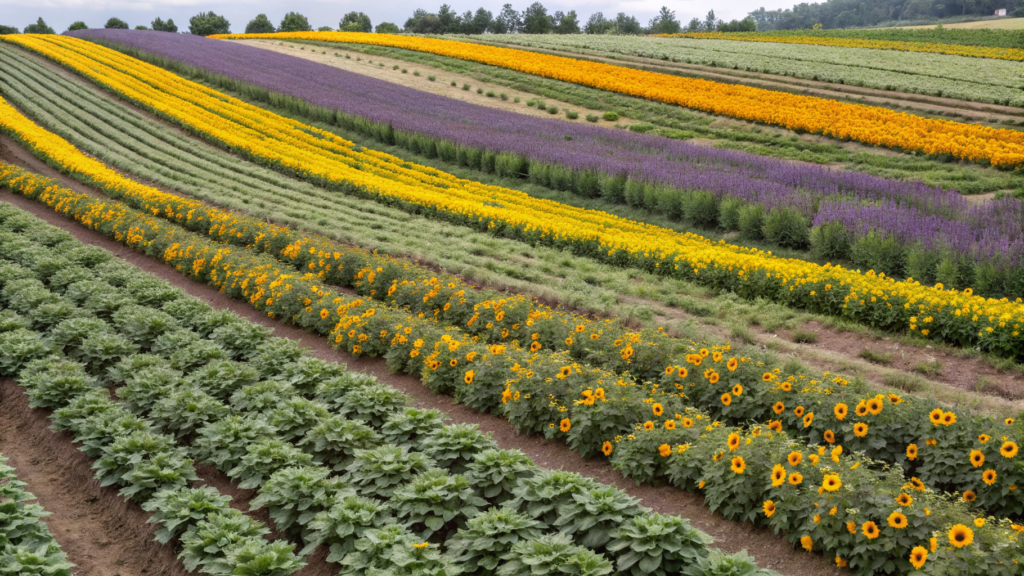
Full sun flower beds with repeating color blocks — this is a way to make it look good not through complex plants, but through repetition.
You take 2–3 colors and repeat them across the whole bed in groups. You don’t mix everything in one place, but create a rhythm. When the same color or shape repeats at intervals, the brain automatically connects it into one composition.
And for sunny beds, this is also practical. Many full sun plants (for example, coneflower or lavender) like the same conditions. That means it’s easier to care for them — no need to adjust for each plant separately.
What you’ll need
- 2–3 main colors (for example: purple, yellow, white)
- 3–5 types of plants suitable for full sun (6+ hours of sun), for example:
- coneflower — purple and pink shades
- black-eyed Susan — rich yellow
- lavender — cool purple
- salvia — blue or purple
- coreopsis — bright yellow
- verbena — purple, pink
- Repeating groups of 3–7 plants of each type
- Shovel, rake
- Mulch (2–3 inches / 5–7 cm)
- Drip irrigation or a simple hose
- slow-release fertilizer
How to do it
- Choose the palette
First decide which colors will be the main ones. Better to take 2–3, no more. For example: purple + yellow + a bit of white. Think about how they will look against the house and pathways. If the facade is warm — cool tones (purple, blue) give a nice contrast. And vice versa. - Pick plants for full sun
Look not only at color, but also at heat tolerance. Choose plants that can handle 6–8+ hours of sun: coneflower, black-eyed Susan, lavender, salvia. Pay attention to bloom time — it’s better if they overlap so the bed doesn’t look “empty” in the middle of the season. - Divide the bed into blocks
Split the area into zones about 2–4 ft (60–120 cm). You can mark them directly on the ground with a hose or a stick. Don’t make perfect geometry — small variations look more natural. The key is that the blocks are big enough, otherwise the color won’t read. - Repeat colors across the length
Arrange colors with repetition: for example, purple → yellow → white → purple again. You don’t have to make equal intervals. One block can be longer, another shorter — it adds life but keeps the structure. - Plant in groups, not individually
Each color is a group of 3–7 plants. Keep spacing within recommendations (usually 12–18 inches / 30–45 cm), so they grow into one patch but don’t choke each other over time. - Mulch and lock in the result
After planting, add a 2–3 inch mulch layer (5–7 cm). It keeps moisture and instantly makes the bed look cleaner. If the soil dries out quickly, think about simple watering — even a basic hose with a spray solves half the problem.
Possible mistakes
- Too many colors. When a fourth or fifth shade is added, repetition stops working. The bed turns back into a mix of random plants.
- Planting single plants. Single specimens don’t create a visual block. Even a beautiful color gets lost if it’s not supported by nearby plants of the same type.
- Too small blocks. If zones are 1 ft (30 cm) or smaller, they’re simply not visible from a distance. Visually, everything blends together.
- Same height across the whole bed. When all plants are at the same level, the bed looks flat. A small height difference adds depth.
If you keep these points under control, the result looks much better. Without redoing and replanting in a couple of weeks.
Tip. Before planting, lay out the plants right in their pots and take a photo on your phone. The camera removes emotion and shows where there is no balance. Sometimes in real life everything feels fine, but in the photo you immediately see that one color dominates too much.
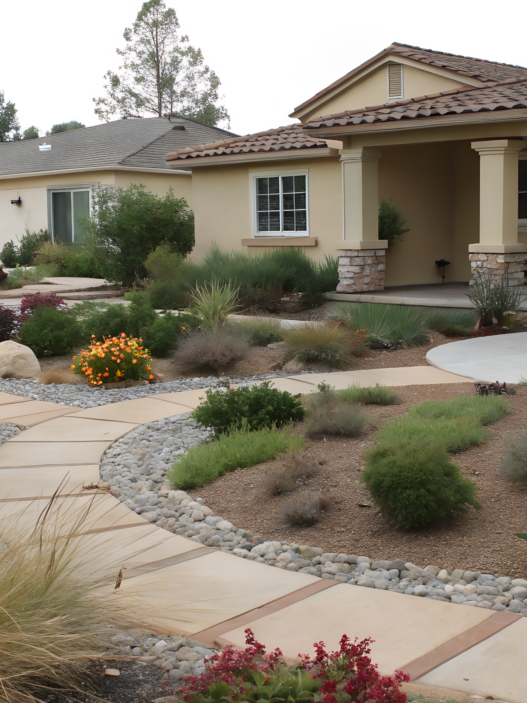
3. Rock Border Ribbon Bed Along the Walkway
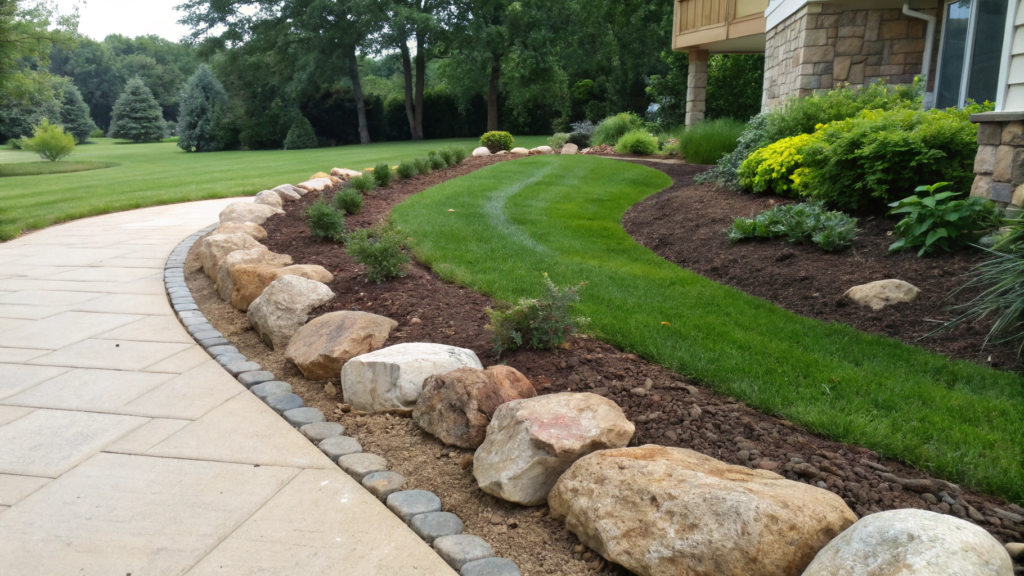
You’ve probably noticed that a clean line along the walkway makes the space feel more structured. The eye automatically “catches” the edge and moves along it.
Rock border ribbon bed along the walkway also holds the soil and reduces lawn spreading. This is not just a visual effect, but also less work with trimming the edges.
What you’ll need
- Stone for the border (natural or decorative), 4–8 inches (10–20 cm) wide
- Landscape fabric to hold back weeds
- Gravel or crushed stone for the base
- Low and mid plants (up to 2 ft / 60 cm)
- Shovel, level, rubber mallet
- Mulch (2–3 inches / 5–7 cm)
- Tamper or compactor
How to do it
- Mark the line along the walkway
Use a hose or rope to define the shape. Don’t make a perfectly straight line if the walkway itself is slightly curved — follow its contour. The distance from the walkway is usually 12–24 inches (30–60 cm), so there’s space for plants. - Prepare the base
Remove the top layer of soil to a depth of about 4–6 inches (10–15 cm). Add a gravel layer 2–3 inches (5–7 cm) and compact it well. This is important — without a solid base, stones will start shifting over time. - Install the stone border
Place the stones along the line, fitting them tightly together. Check the level every few pieces. If the stone shapes vary — that’s fine, but the top line should stay even. - Lay the landscape fabric
Spread it inside the future bed, secure it with pins or hold it down with stones. This reduces weed growth and makes maintenance easier later. - Arrange plants along the “ribbon”
Plant them not randomly, but in repeating groups. For example: low plants in front (up to 1 ft / 30 cm), slightly taller closer to the house. Keep spacing between plants 10–16 inches (25–40 cm), so they eventually fill in. - Add mulch and level the surface
A 2–3 inch mulch layer (5–7 cm) instantly makes everything look cleaner and holds moisture. Level it with your hands or a rake so there are no dips.
Possible mistakes
- Weak base under the stone. If you skip the gravel and compaction step, the border will start sinking within a season.
- Too narrow strip. If it’s less than 12 inches (30 cm), plants simply won’t have enough space. They will look cramped.
- Random plant placement. Without repetition and structure, the “ribbon” turns into a mix of unrelated patches.
- Plants too tall near the edge. They block the stone line, and the whole idea gets lost.
Keep these points in mind, and you’ll get the result you want.
Tip. Try to choose stone that already appears on the site or near the house (for example, in the foundation or steps). Then the border doesn’t look out of place, and the whole area is perceived as one unified space.
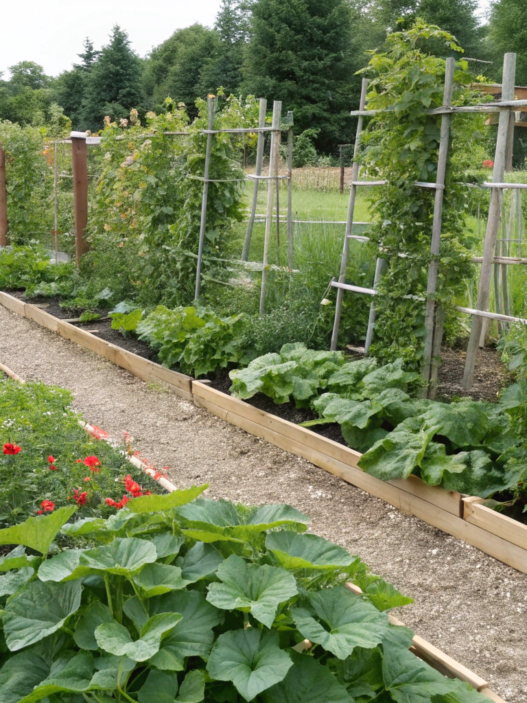
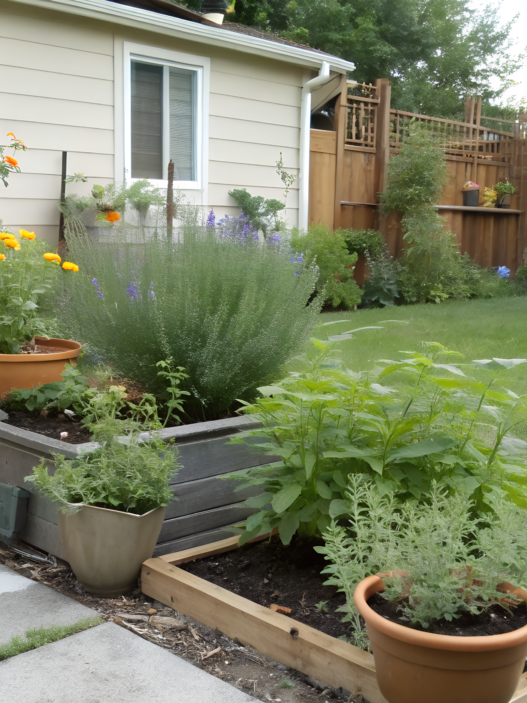
4. Edible Front Yard With Raised Vegetable Beds
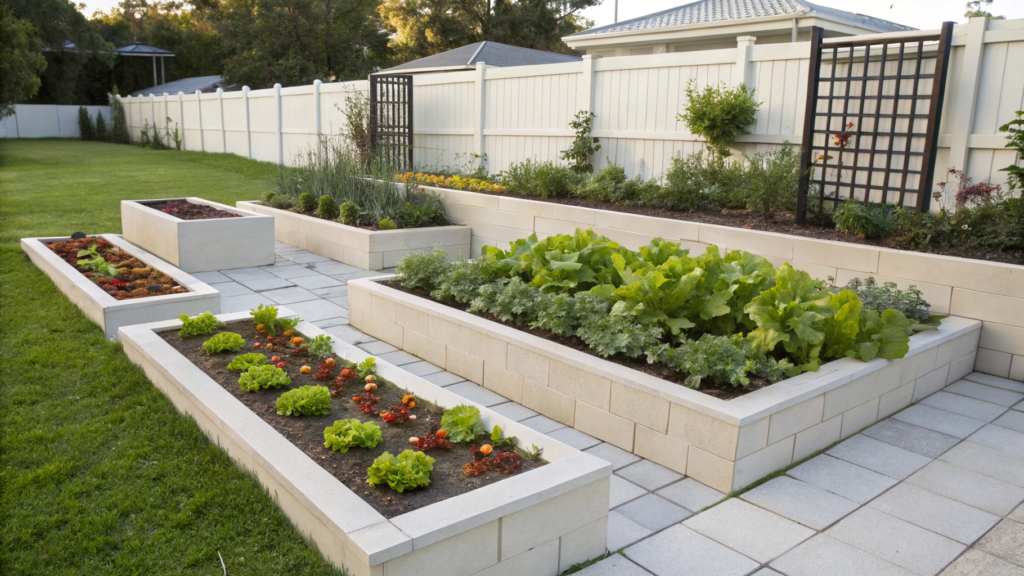
Edible front yard with raised vegetable beds — this is when the front yard not only looks good, but also gives value. At the same time, it’s still not a traditional garden. Everything is neat and clean.
The main thing here is clear geometry. Raised beds immediately create structure, and even simple crops like lettuce or tomatoes start to look like part of the design.
What you’ll need
- Ready beds 12–24 inches (30–60 cm) high or boards for building
- Soil mix (topsoil + compost)
- Compost or organic matter for filling
- Vegetable crops (lettuce, tomatoes, peppers, herbs)
- Mulch (straw, wood chips)
- Drip irrigation or hose
- Level, drill
- A convenient option — ready kits like Best Choice Products Raised Garden Bed 48x24x30in
How to do it
- Choose layout and number of beds
First, check where you get the most sun — at least 6–8 hours a day. Place beds so there is 24–36 inches (60–90 cm) between them for walking. This matters — narrow paths quickly become annoying. - Build or install the beds
If you build them yourself — use boards at least 1–1.5 inches (2.5–4 cm) thick so the structure holds shape. Check the level, especially if the area is sloped. Even a small tilt will stand out later. - Fill the beds properly
Don’t just dump soil. You can add a rough organic layer at the bottom (branches, leaves), then a mix of soil and compost on top. This improves drainage and nutrition. Fill almost to the top, but leave 1–2 inches (3–5 cm) for mulch. - Plan planting in advance
Divide the bed into zones. For example: back row — tall plants (tomatoes up to 4–6 ft / 120–180 cm), middle — medium, front — low (greens up to 12 inches / 30 cm). This makes the layout more readable and convenient. - Plant in groups with proper spacing
Don’t overcrowd. For example, tomatoes — 18–24 inches (45–60 cm) between plants, lettuce — 6–10 inches (15–25 cm). If planted tighter, it looks good at first, then plants start competing for light. - Add mulch and set up watering
A 2–3 inch mulch layer (5–7 cm) helps hold moisture and reduces weeds. It’s better to think about watering right away — even a simple drip system saves time.
Possible mistakes
- Beds too small. Beds narrower than 2 ft (60 cm) quickly lose visual impact and are inconvenient for proper planting.
- No clear pathways. If you don’t leave enough space between beds, access becomes difficult. And it starts to annoy you within a week.
- Random crop placement. When tall plants block lower ones, everything looks messy, and part of the harvest suffers from lack of light.
- Poor bed filling. Plain soil without compost gets depleted quickly. Plants grow worse, and you have to constantly fertilize.
Tip. Try to make all beds the same size and align them in one line. Even if different things grow inside, from the outside it looks clean and structured. Start with 2–3 beds, and after a season it will be clear if it makes sense to scale further.
When beds in the front yard are aligned, spacing is correct, and plants are arranged by height, the space starts to look cohesive. And at the same time, you get not only the look, but also a solid harvest from the same space.
5. Low Water Rock Garden With Drought Tough Perennials
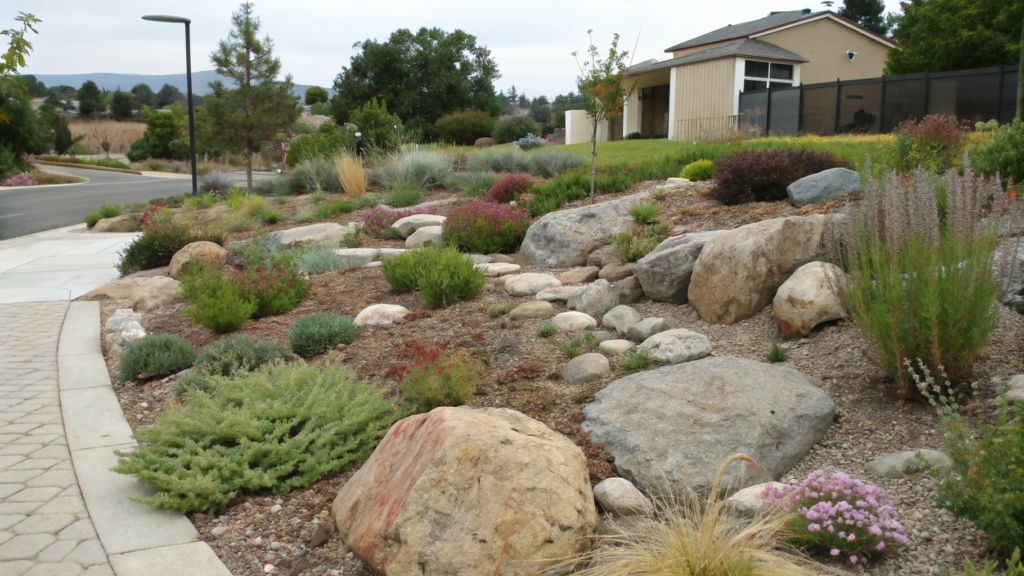
On an area where watering is either limited, or you just don’t want to spend time on it, it’s the right moment to think about a low water rock garden with drought tough perennials. The main idea is to reduce dependence on water.
Drought-tolerant perennials are adapted to low-moisture conditions: they either have deep root systems or leaves that reduce evaporation. And stone reduces the area of exposed soil, so moisture evaporates more slowly.
What you’ll need
- Stones or gravel (different sizes for a more natural look)
- Landscape fabric
- Drought-tolerant perennials (lavender, sedum, salvia, yarrow)
- Sand-gravel mix for drainage
- Shovel, rake
- Mulch (gravel or small crushed stone 1–2 inches / 2.5–5 cm)
How to do it
- Prepare the area and remove old vegetation
Remove the top layer of sod or weeds to a depth of 3–5 inches (7–12 cm). If the soil is heavy, add sand or fine gravel right away — this improves drainage. - Mark zones for stone and plants
Don’t fill everything with stone. Leave “pockets” for planting. You can mark them directly on the ground — where plant groups will be and where the stone area will be. - Lay the landscape fabric
Cover the main area with it, especially where the stone will go. Cut openings for plants. This reduces weeds and keeps the structure in place. - Add the drainage layer
Add 2–3 inches (5–7 cm) of gravel or sand-gravel mix. Level it. This is important — without it, water will stagnate, and even drought-tolerant plants will start to struggle. - Place large stones first
Start with bigger elements. Partially “sink” them into the ground (about 1/3 of their height), so they don’t look like they’re just sitting on top. - Plant in groups
Keep spacing 10–18 inches (25–45 cm), depending on the type. Plant not individually, but in small repeating groups. This makes the composition more expressive. - Fill the surface with small stone
Add a 1–2 inch layer (2.5–5 cm) of gravel or crushed stone. It locks in moisture, reduces evaporation, and makes the surface look clean.
Possible mistakes
- No proper drainage. Without a gravel layer, water stagnates and roots start to rot.
- Random stone placement. If you just scatter stones on top, it looks unnatural. Large elements should be partially buried.
- Too dense planting. Drought-tolerant plants spread. If planted too close, in a year they will start interfering with each other.
- Using water-demanding plants. Even one “thirsty” plant breaks the whole system. It will need more watering, and this affects neighboring plants.
Keep these details in mind, and you’ll avoid many problems with maintenance.
Tip. Try to combine 2–3 types of stone (by size, not by color). For example, large boulders + medium gravel + small crushed stone. This makes the composition look more natural.
6. Mailbox Mini Garden With Layered Heights
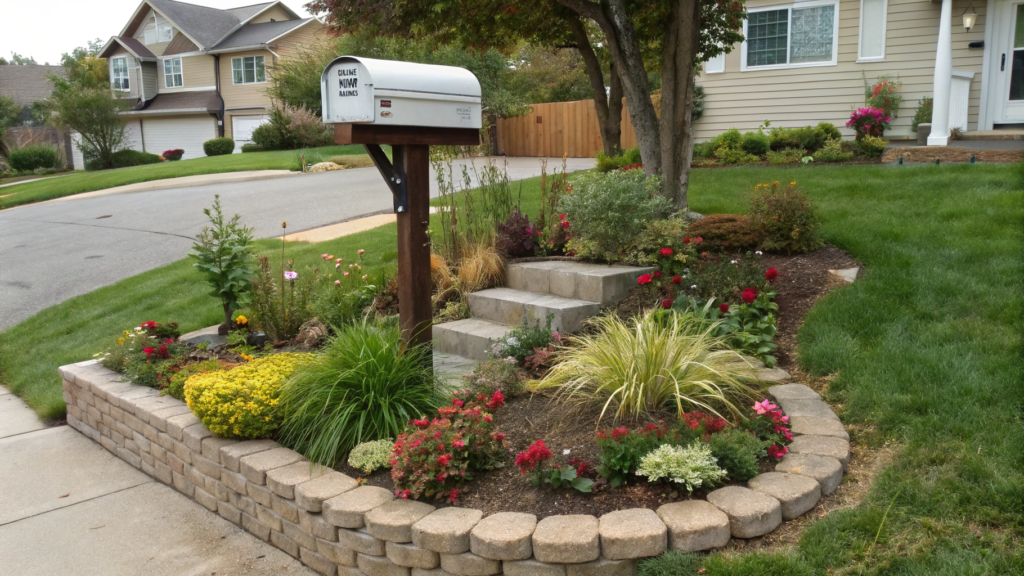
Our mailbox used to stand on its own. Grass around it, a bit of bare soil — and that was it. We added a small flower bed with different plant heights, and the spot became noticeable. Three levels — low, medium, high. They create depth even in a small 3–5 ft (90–150 cm) area around the box. When there’s a difference in height, the composition doesn’t look flat.
What you’ll need
- 1–2 tall plants (3–5 ft / 90–150 cm) — for example, ornamental grass or coneflower
- 2–4 medium plants (1–3 ft / 30–90 cm), for example, lavender, salvia
- Low plants or groundcovers (up to 1 ft / 30 cm), for example, alyssum, creeping thyme
- Mulch (2–3 inches / 5–7 cm)
- Shovel, rake
- Stone or border edging
- A compact fertilizer option — for example Espoma Organic Plant-Tone
How to do it
- Define the shape around the mailbox
Usually it’s a circle or a soft oval with a diameter of 3–5 ft (90–150 cm). You can mark it with a hose. It’s important not to make sharp corners — a soft line looks more natural near the road. - Prepare the soil
Remove the top layer of sod to a depth of 3–4 inches (7–10 cm). Loosen the soil, add some compost. This gives plants a better start and reduces rooting issues. - Place the tall element
Put the tallest plant closer to the back (toward the house, not the road). Leave 6–12 inches (15–30 cm) from the mailbox post so you still have access. - Add the middle layer
Place medium-height plants around the tall one, but not in a perfect circle. Shift them slightly so the composition feels more natural. Keep spacing 10–16 inches (25–40 cm). - Fill the front edge with low plants
Groundcovers or compact flowers go closer to the road. They cover the edge and make the transition cleaner. Spacing — 6–10 inches (15–25 cm). - Add border and mulch
Stone or edging keeps the shape in place. A 2–3 inch mulch layer (5–7 cm) reduces weeds and holds moisture.
Possible mistakes
- Too many plants. A small area quickly turns into chaos if you try to fit everything at once.
- Wrong height placement. If tall plants are placed in front, they block the view and the mailbox itself.
- Ignoring access to the mailbox. If you plant too close, it becomes inconvenient to use it.
- No clear boundary. Without edging or a visual border, the area blends into the lawn.
Tip. Try to choose plants that hold their shape most of the season, not just during bloom. Then the area will look good both in spring and at the end of summer.
7. Foundation Bed Layout With Evergreen Structure
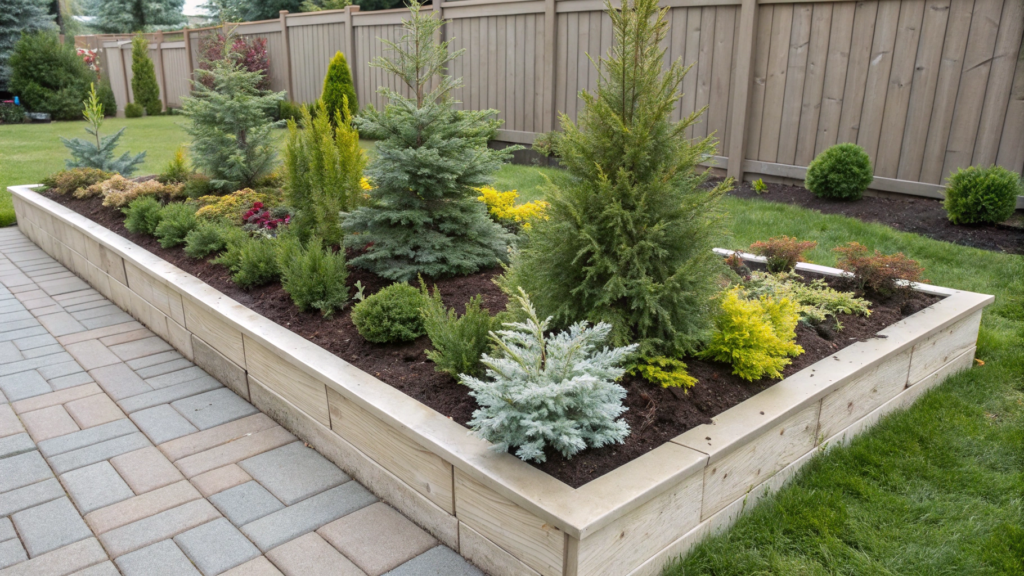
Foundation bed layout with evergreen structure — the base here is created by evergreen plants, and everything else is added later. First, a “framework” of evergreen structure is built, and then lighter, seasonal elements are added into it.
Evergreen plants keep their shape and color all year round.
What you’ll need
- Evergreen shrubs (boxwood, arborvitae, juniper) 2–5 ft (60–150 cm) tall
- Additional perennials and decorative plants, for example:
- hydrangea — for volume and seasonal blooms
- hosta — if there is partial shade near the wall
- heuchera — adds foliage color
- Mulch (2–3 inches / 5–7 cm)
- Shovel, rake, level
- Compost or soil improver
- Border or bed edging
- Shrub fertilizer, for example Jobe’s Evergreen Fertilizer Spikes
How to do it
- Define bed depth and shape
Usually a foundation bed is 3–6 ft (90–180 cm) wide along the wall. If less — plants will feel “pressed” against the house, if more — the area can look overloaded. The edge line is better soft, without sharp corners. - Prepare the soil along the foundation
Remove the top layer 4–6 inches (10–15 cm), loosen the soil and add compost. Check drainage — water should not stagnate near the foundation. If needed, add sand or gravel. - Place evergreens as the base
Space them 2–4 ft (60–120 cm) apart, depending on mature size. Alternate shapes: for example, one taller shrub, next to it a more compact one. This creates rhythm, not a solid wall. - Add the second plant layer
In front of the evergreens, place perennials 1–3 ft (30–90 cm) tall. They fill the space and soften the transition from rigid shrub shapes to lower plants. - Fill the front edge with low plants
Here groundcovers or compact plants up to 1 ft (30 cm) work well. Keep spacing 6–12 inches (15–30 cm), so they close into one layer and cover the soil. - Mulch and level the surface
A 2–3 inch mulch layer (5–7 cm) holds moisture and makes the bed look clean. Level it so there are no empty patches.
Possible mistakes
- Planting evergreens too close. After 2–3 years, shrubs start interfering with each other, and you have to prune or replant.
- No gap from the wall. If planted too close to the house (less than 12 inches / 30 cm), air circulation gets worse and maintenance becomes harder.
- Ignoring mature plant size. Small plants look neat now, but in a few years they can block windows or paths.
- Too many plant types. When every shrub is different, the structure gets lost. Better fewer types, but with repetition.
Tip. Try to leave a small gap (about 12–18 inches / 30–45 cm) between the back of the plants and the house wall. This makes maintenance easier, improves ventilation, and reduces moisture-related issues.
8. Corner Lot Layout That Frames The Porch View

Corner lot layout that frames the porch view — here the important thing is to create a “frame” of plants that softly leads the eye to the house, not blocks it.
The eye always looks for the center of the composition. If it isn’t there — the eye “wanders” around the yard. When plants are arranged in a way that frames the porch, attention automatically shifts there.
What you’ll need
- Tall accent plants (4–6 ft / 120–180 cm) for the far corners, for example, switchgrass, hydrangea
- Medium shrubs (2–4 ft / 60–120 cm), for example, spirea, dwarf barberry
- Low plants (up to 1 ft / 30 cm), for example, alyssum
- Ornamental grasses or perennials for soft transitions, for example, salvia, lavender
- Mulch (2–3 inches / 5–7 cm)
- Shovel, rake, hose for marking
How to do it
- Choose the key point — the porch
Stand at the corner of the lot (where the house is seen most often from) and look at how the entrance feels right now. The goal is to make the eye move toward the porch. Visually mark two lines that will “lead” there. - Mark planting zones along the edges of the lot
Use a hose or rope to create soft lines along the corners. Don’t make sharp angles — smooth curves are better. Planting width is usually 3–6 ft (90–180 cm), so plants have enough room to grow well. - Place tall plants in the far points
In the most distant corners (from the porch), place taller elements — shrubs or grasses 4–6 ft (120–180 cm) tall. They create the frame and define the space. - Gradually reduce height closer to the house
Move from the corner to the porch: first medium plants (2–4 ft / 60–120 cm), then low ones (up to 1 ft / 30 cm). This transition creates a guiding effect. - Keep the entrance view open
In the area right in front of the porch, avoid tall plantings. At least 2–3 ft (60–90 cm) in front of the entrance should stay visually open. - Mulch and level the zones
Add a 2–3 inch mulch layer (5–7 cm) to tie the plantings into one composition. Level the surface so the lines read clearly.
Possible mistakes
- Plants too tall near the entrance. They block the view of the porch and break the whole “frame” idea.
- No height gradient. If all plants are about the same height, there is no direction for the eye.
- Random planting shape. Without a clear line, the lot looks blurred again.
- Too many details. Too many plant types and elements pull attention away from the house.
Think everything through in advance, then the composition will look the way you planned it.
Tip. Try to check the result from different points — from the road, from the sidewalk, from the car. A corner lot is always seen from different angles, and it’s important that the composition looks good not just from one position.
9. Narrow Strips Turned Into Pollinator Pathways
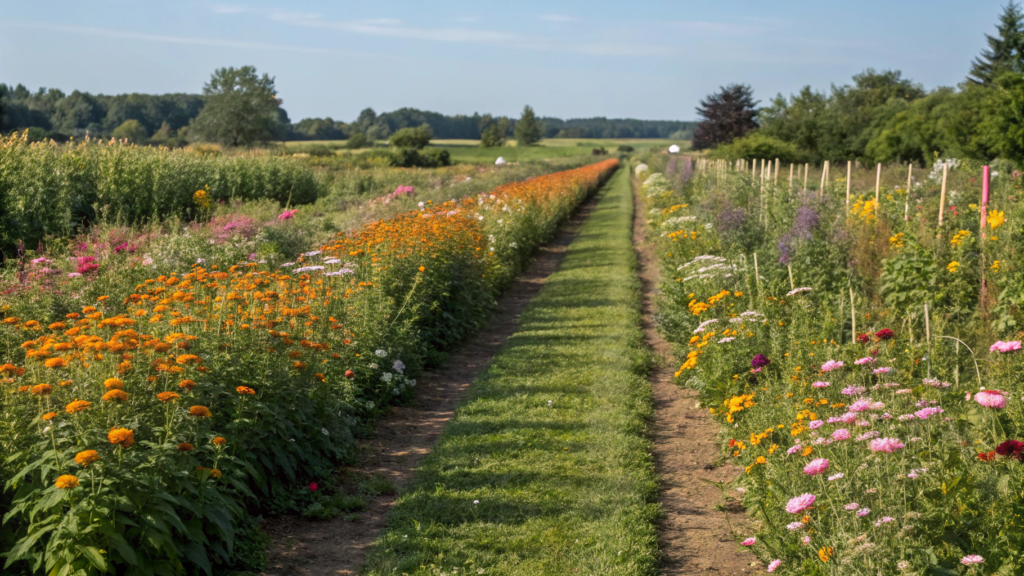
Narrow strips turned into pollinator pathways — the idea here is not just to plant flowers, but to create a “path” of repeating plants that pollinators can move along.
Pollinators respond better to groups of plants, not single flowers. When the same species repeats along a line, it’s perceived as a stable source of nectar.
What you’ll need
- A narrow strip of land 12–36 inches (30–90 cm) wide
- Pollinator-friendly plants (lavender, salvia, coneflower, thyme)
- Landscape fabric (optional)
- Mulch (wood chips or gravel 2–3 inches / 5–7 cm)
- Shovel, rake
- Compost for improving soil
How to do it
- Clear and level the strip
Remove grass and weeds to a depth of 3–4 inches (7–10 cm). If roots are dense, go over it twice. Level the surface with a rake so there are no dips — in a narrow area, this is immediately noticeable. - Prepare the soil
Add a 1–2 inch (3–5 cm) layer of compost and lightly mix it with the topsoil. This improves nutrition and moisture retention. If the soil is heavy, add some sand for drainage. - Mark repeating groups
Divide the strip into sections 1.5–3 ft (45–90 cm). Each section is one plant type. For example: lavender → salvia → coneflower → lavender again. Plant a bit denser than usual, but leave room for growth. - Space plants correctly
In a narrow strip, plants can be placed 8–14 inches (20–35 cm) apart. They will close faster and cover the soil. But don’t plant too tight — leave space for growth. - Add mulch
A 2–3 inch mulch layer (5–7 cm) reduces weeds and holds moisture. In narrow zones this is especially important — they dry out faster. - Plan minimal watering
Even drought-tolerant plants need water at the start. For the first 2–3 weeks, water regularly, then you can reduce frequency.
Possible mistakes
- Random mix of plants. Without repetition, the strip looks like a mix of random bushes, not a single line.
- Planting too sparsely. If gaps are too big, soil stays exposed and weeds appear.
- Ignoring height differences. If everything is the same height, the strip looks flat. Better to alternate plants 8–24 inches (20–60 cm) in height.
- No care at the start. The first weeks matter. Without watering and weed control, some plants simply won’t establish.
Tip. Try to choose plants with different bloom times. Then the strip will work longer — one type finishes, the next starts, and so on in a chain.
10. Symmetrical Entry Beds With Matching Containers
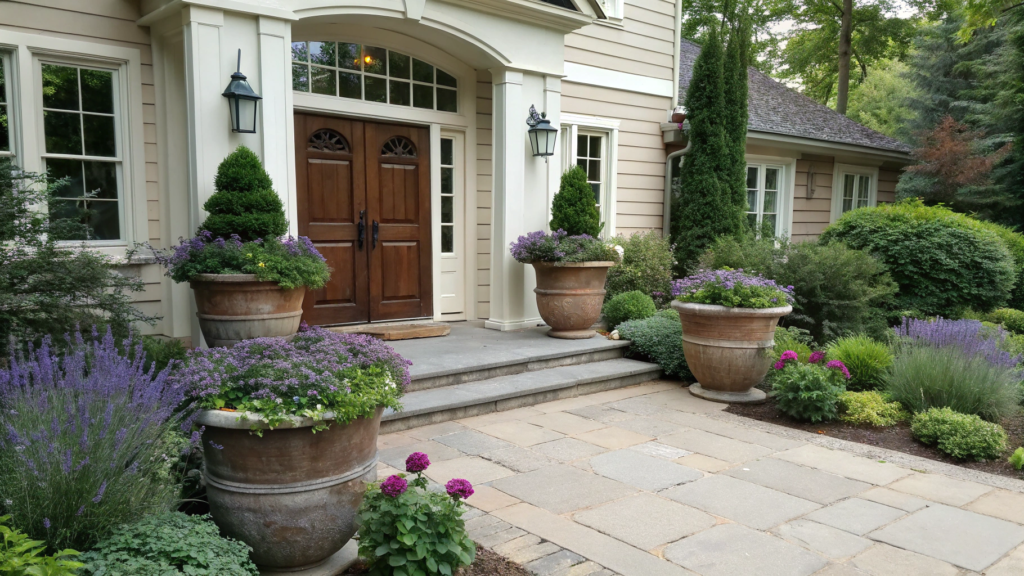
Symmetrical entry beds with matching containers — repetition and balance. The left and right sides work as one whole.
Symmetry is perceived as order. The entry is the area seen most often. When there is a clear structure there, the whole space automatically looks more thought-out.
What you’ll need
- Two identical planting zones on both sides of the entry (usually 2–4 ft / 60–120 cm wide)
- 2 identical containers (planters) 16–24 inches (40–60 cm) high
- 1–2 identical accent plants (for example, boxwood or arborvitae)
- Medium plants for filling (1–2 ft / 30–60 cm), for example, lavender and heuchera
- Low plants (up to 1 ft / 30 cm), for example, alyssum, periwinkle
- Potting soil for containers
- Mulch (2–3 inches / 5–7 cm)
- Shovel, level
How to do it
- Define the axis of symmetry
Find the center of the entry — usually the door. Measure equal distance left and right. These will be the boundaries of the two zones. Better to check with a tape measure, not by eye. - Mark and level the beds
Create two identical shapes — rectangle or soft oval 2–4 ft (60–120 cm) wide. If one side is larger even by 4–6 inches (10–15 cm), it will be noticeable. - Place accent plants
In each zone, place one key element — for example, an evergreen shrub 2–3 ft (60–90 cm) tall. Keep the same distance from the entry so they hold the composition. - Add the middle layer
Around the accent plant, place 2–3 medium plants (1–2 ft / 30–60 cm). Spacing — 10–16 inches (25–40 cm). They fill the volume without overloading it. - Fill the front edge with low plants
Closer to the walkway, add low plants up to 1 ft (30 cm). Spacing — 6–10 inches (15–25 cm), so they close into a line. - Place containers at the entry
Put two identical planters on both sides of the door. Fill them the same way: either one plant in each, or the same combination. It’s important not to mix different options. - Add mulch and level everything
A 2–3 inch mulch layer (5–7 cm) ties the zones together and makes them look clean. Check lines and spacing again — symmetry should be precise.
Possible mistakes
- Different bed sizes. Even a small difference breaks the whole effect.
- Mismatched plants. If one side has a different plant, symmetry disappears.
- Different containers or fill. Planters should match both in shape and content.
- Too many details. When too many plant types are added, the composition becomes overloaded and loses clarity.
If you follow the rules and avoid mistakes, the result doesn’t require constant fixing.
Tip. If you’re unsure about plant selection, start with an evergreen base and one flowering accent. It’s easier to control and maintain in the same condition on both sides.
How It All Comes Together
If you made it to the end, you’ve probably noticed that almost all solutions in this list are built on three things — repetition, clear shape, and proper proportions.
When there is a clear line, one accent, or the same elements repeat across the space, the area starts to look designed even with basic materials. Then the result depends not on budget, but on how everything is selected and put together into one whole.If you’ve already tried something from this list — write in the comments what worked and what didn’t. Or describe your space, and we can break it down using these principles.