Growing potatoes in buckets with a straw is an innovative option for home gardeners for a rewarding yield, and you might want to know the step-by-step instructions involved in the whole process.
With a wealth of hands-on expertise in innovative gardening techniques, I’ve grown potatoes in buckets with straw in a very easy way by:
- Choosing healthy potato seeds with sprouts or eyes
- Selecting sturdy, drainage-equipped buckets, at least 5 gallons each
- Preparing straws and filling the buckets with 6 inches of soil
- Planting 2-3 seeds atop the soil, spaced apart, and covering stems with straw
- Adding more layers of straw as the plant grows taller.
But I make sure the whole crop receives adequate water and sunlight. I also always add compost or balanced fertilizer for extra nutrients and harvest when the foliage turns yellows.
Embark on a journey with me today as I unveil a superb 9-step guide to growing potatoes in buckets with straws. This captivating technique harnesses space and promises a bountiful yield.
How do I grow potatoes in buckets with straws?

Traditional gardening requires ample garden beds. But the bucket approach enables apartment dwellers, urban gardeners, and those with small yards to partake in potato cultivation.
The method of growing potatoes in buckets with straw unveils a host of advantages that extend beyond these traditional gardening practices.
By the way, we have an excellent material on growing potatoes in bags – be sure to check it out!
This is how you can experience this exciting journey of cultivating fresh and flavorful yield right from the comfort of your home. So, let’s start with the steps:
Step 1: Opt for Healthy Potato Seeds
The first step is to start picking out the right seeds.
Always give the seeds a good look before you buy them. Aim for those that are free from diseases and have those little sprouts or “eyes” on them. These tiny bumps signal that the potatoes are all set to start their journey.
Skip the ones that look mushy, moldy, or beat up.
Step 2: Choosing Buckets
Next up, you’re going to need some buckets in which you’ll be growing your precious potatoes.
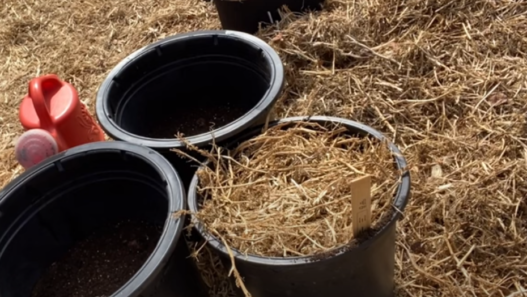
I buy the ones that are tough, food-grade, and have drainage holes at the bottom. Why? Because potatoes, like all plants, aren’t too keen on sitting in water. Those holes let excess water escape to keep your veggies cozy and happy.
Oh, and remember to buy buckets with at least 5 gallons of space. That’s the room your potatoes need to stretch their roots and grow happily!
Step 3: Preparing Straw
In this step, get straw ready for your potato project. It might sound simple, but it’s a key element in making sure those spuds thrive.
You want straw that’s clean and free from any pesky weeds. This way, it will hold onto water like a champ and act as insulation for your potatoes—no dry spells for them.
And here’s the best part: As your potato plants start growing, they’ll need a bit of assistance. The straw gives them something to lean on, like a natural support. It’s all about ensuring those potatoes stand upright and stay sturdy.
Step 4: Preparing Buckets
Now let’s get those buckets ready for your potatoes!
First things first, get a bucket and fill up about 6 inches of soil in the bottom. It should be loaded with compost and enriched with nutrients.
After that, give the bucket a little shake or tap to make sure the soil is even. You want it to be flat and smooth. It’s like giving your potatoes a comfy bed to rest in.
Step 5: Planting Potato Seeds
It’s time to put potato seeds to work. Simply take each bucket with the soil at the bottom – and let’s get going. Grab 2 to 3 seeds and plant them right on top of it.
To be on the safe side, give these seeds a bit of space – a few inches apart from each other. It will give your potatoes some room to stretch out as they grow.
Even your potatoes need some space like everyone else!
Step 6: Providing Water and Sunlight
For successful bucket-grown potatoes, a combination of adequate water and sunlight is required.
First up, watering. You want to make sure the soil in those buckets stays moist but not all waterlogged. So, water regularly, not too much and not too little.
Another important element is sunlight. It is best to opt for a spot for those buckets, where they can soak up around 6 to 8 hours of sunlight every day. It is like the fuel that helps your potatoes thrive.
Step 7: Covering with Straw
As your potato plants start getting taller, it’s time to cover them with layers of straws.
So put straw around the stems of the potato plants. Cover them gently, like you’re tucking them in.
Here’s the trick: As the plants keep getting taller, keep adding more layers of straws. This helps support them as they reach for the sky.
But hold on – don’t go overboard. Leave the top part of the plants exposed – those green leaves. This way, they can still soak up sunlight and keep growing strong.
Step 8: Fertilizing
As those potato plants start showing off their growth, it’s time to think about fertilizing. This means giving them some extra nutrients to keep the party going. In my experience, compost or a balanced fertilizer is a good choice. Here’s why:
Compost is like a buffet of goodness for your plants. Just sprinkle some of it around the base of your potato plants, and you’re good to go.
Now, if you’re going for a balanced fertilizer, follow the instructions on the package. This kind of fertilizer has all the right nutrients your plants require to stay healthy and strong.
But here’s the catch: don’t overdo it. Too much of a good thing isn’t always great! Just use an adequate amount of compost or fertilizer and be done with it. A healthy balance will bolster soil structure and nutrient content, and the final crop will reflect this thoughtful approach.
As an experienced gardener, I can honestly say that moderation is the secret to reaping nature’s bounties while nurturing the delicate symphony of the soil.
Step 9: Harvesting
Your journey of growing potatoes in buckets with straw is about to come full circle!
It’s time you’ll notice new stems and leaves popping up.
You may also observe the yellowing and drying of the foliage. This transformation signals that your potatoes are reaching their peak and are ready to be harvested.
So, make sure you approach the task gently. Start by delicately sifting through the layer of straw and soil that covers your precious spuds. This reveals the hidden treasure beneath your fully-grown potatoes.
Now, there is a choice to make! Either opt to harvest baby potatoes earlier or exercise patience and allow the larger potatoes to reach their full maturity.
Either way, extract the potatoes from the straw and soil without damaging them. A gentle wash is in order to remove any lingering dirt before you proceed to the kitchen.

Ahh, my fellow gardeners! Finally, you can relish the satisfaction of your efforts. These potatoes have flourished under your care, and now they’re ready to be transformed into delicious meals that reflect your dedication to this unique gardening endeavor.
Can you use the straw to store potatoes?
Straw can be a fantastic option for storing potatoes. It provides a naturally insulating and protective layer that helps keep your potatoes fresh and in good condition for longer periods.
Here’s how it works. After harvesting your potatoes, gently brush off excess soil and let them air-dry for a few hours. Then, create layers of potatoes in a container – a crate, box, or even a specially designed-potato sack.
As you layer the potatoes, place straws in between and around them. This acts as a cushion, which prevents bruising and protects them from direct contact with each other.
Don’t forget to store the container in a cool, dark, and dry place to extend the shelf life.
How long do potatoes take to grow?
Are you wondering what time potatoes take to go from dirt to dinner?
Well, early varieties tend to mature faster and take around 70 to 90 days. These are great for getting a quick harvest. Mid-season varieties take a bit longer, about 90 to 110 days, and they strike a balance between early and late varieties.
Late varieties take the longest, around 100 to 120 days, but they often yield larger potatoes.
Of course, Mother Nature has her say too. Sunlight, temperature, and how much you water those spuds all play a part!
Finale or…?
And there you have it, my fellow gardeners who have a little space to grow their favorite foods and fruits. This is my ultimate guide to growing potatoes in buckets with straw.
From selecting healthy seed potatoes to nurturing their growth with the proper nutrients and care, you’ve embarked on a journey and completed it with the joy of gardening right where you live.
So, roll up your sleeves, get those buckets ready, and watch as your potato dreams take root and flourish. Happy planting!
