When Lindy and I first started our first small plot, we didn’t have a dime to spend on decorating. It all went to soil, seeds, and repair materials. But we wanted beauty. We wanted the garden not just to work – but to breathe, to sing, to smile. To make it ours. That’s when our little tradition was born – to make DIY garden decor with our own hands. From everything that is at hand: old spoons, a bucket with rust, a cracked cup, a forgotten apple crate. So, step by step, our garden began to find its soul.
In this article, I’ve gathered 10 of my favorite, tried and tested, and inexpensive DIY garden decor ideas that will help you add a little magic to your plot – without spending a fortune.
1. Transform Old Teacups into Cute Hanging Garden Lights – Almost Free!
I collect tea cups. Not the exquisite gilded porcelain that’s a shame to touch. But the ones with cracks, colorful patterns, a little weird ones that you find at flea markets or second hand for 25 cents. Somewhere with roses, somewhere with mushrooms, and the one I have has a duck in a dance (and I still don’t know why, but it’s beautiful).
A few years ago I found a whole box of these cups in my shed. Then I found an idea in some old gardening magazine to make them into hanging garden lanterns.
Now these cups are the main accent in our backyard seating area. Every evening when we go out to sit outside with an iced herbal tea (or…well, yes, sometimes wine), these cups glow with a soft, warm light. The atmosphere is such that it makes you want to stay there for an hour longer.
You’ll need:
- Old tea cups (the fancier the better)
- Small solar puck light solar LED flashlights (make sure the flashlights are meant for the outdoors).
- Strong rope or wire
- Drill with a ceramic drill bit
- Hooks or an old metal basket from a cachepot.
Like I did in one day – you can do it too!
- Pick out the cups. I took a variety of them: with flowers, with birds, with mysterious patterns. The main thing is that the cup should not be too small, otherwise there will be little light.
- Drill a hole in the bottom. Through it you will put a rope and provide drainage. Use a ceramic drill bit, work slowly and carefully (yes, I cracked two cups while I was learning – it happens).
- Secure the wire or rope. Thread it through the hole and fasten it securely. I made “handles” like the lanterns. If you use rope, it’s better to fix it with glue so it doesn’t slip.
- Insert the solar lantern. Just put the flashlight inside the cup. I glued it on with a drop of hot glue to keep it from dangling. It charges during the day and shines in the evening – soft, cozy.
- Hang a beauty! I took an old basket from a hanging cachepot, turned it upside down and hung the cups around the edges. But you can also hang it from tree branches, a pergola, or even a porch. It’s not a bright spotlight, but just such a decorative warm effect. It looks very romantic in a dark garden.
A few tips from me
- If the inside of the cup is dark or matte, the light is “swallowed”. But if you paint the inside surface in white, or better – pearlescent acrylic, the light will begin to reflect and “play” inside. Tested! Becomes 2 times brighter.
- Or you can carefully drill small holes in the cup on the sides, creating a pattern. The light will start to “break through” these holes and the effect will be like old metal lanterns. Very beautiful and atmospheric.
- If you’re worried about rain getting into the cups, drill an extra side hole for the water to escape.
- By the way, this makes a great gift! I made these lanterns for my neighbor – and to this day, when we meet, she tells me, “These cups are adorable!”
Honestly, every time someone comes to our garden for the first time, the first thing they notice are these glowing cups. They’re fun, cozy, and yet look truly magical (in a good way, not pathetic!).
2. DIY Rustic Wind Chimes from Recycled Silverware – So Easy & Beautiful!

I have a whole jar of old spoons and forks that have long since lost their steam or are too soft to eat. I used to just put them in a drawer “for later”. And then….. Lindy and I made some of the most beautiful and simple garden decorations – vintage wind bells made from old cutlery.
Why this idea is a godsend
It’s almost free. Everything you need is probably already in your house (or grandma’s cottage)
Super atmospheric. Metal spoons and forks make a surprisingly melodic sound in the wind.
It looks vintage and warm. Especially when hung next to a wooden fence or pergola.
What you need:
- Old forks, spoons, knives (stainless steel or aluminum is best – they sound prettier)
- Metal ring, stick or old pot handle (as a base)
- Wire, twine or chains
- Drill with a thin metal drill bit
- pliers
- (optional) beads, buttons, keys, rings – for decoration
How to make bells from cutlery
- Prepare the tools. Arrange everything on the table. If the instruments are very dirty – wash with vinegar and baking soda, so that they shine and do not rust further.
- Drill holes. Drill small holes in the handle of each appliance – you’ll need these for hanging.
- Tip. Сlamp the appliance in a vise or wrap a cloth around it and press with pliers – the metal may slip.
- Bend the forks (optional). Forks can be bent slightly to “hug” the bead or create an interesting shape. The spoons can be bent slightly as well.
- Secure everything to the base. On the ring or stick evenly attach all the elements: spoons, forks, decorative beads.
- You can alternate: fork – bead – spoon – key.
- The distance – 1-2 cm between them, so that they ring in the wind.
- Hang and enjoy! Choose a place where the wind often walks – a pergola, a tree branch, a corner of the veranda. Hang the design and check it out – does it ring? Then it worked!
Tricks that will come in handy:
- Don’t be afraid of rust! It adds vintage charm. But if you want, you can coat everything with a clear varnish (like Protective Clear Spray).
- Want more sound? Add some key rings or metal buttons – they’re great for “singing”.
- It’s best not to use knives with sharp edges – or blunt them with a file. Safety first!
If you want to make something heartfelt, warm and with a story, try this project. It literally sings in the wind.
It’s also a great way to give a second life to things that are no longer in use, but still full of memories.
3. Turn Broken Clay Pots into Adorable Fairy Garden Decor!
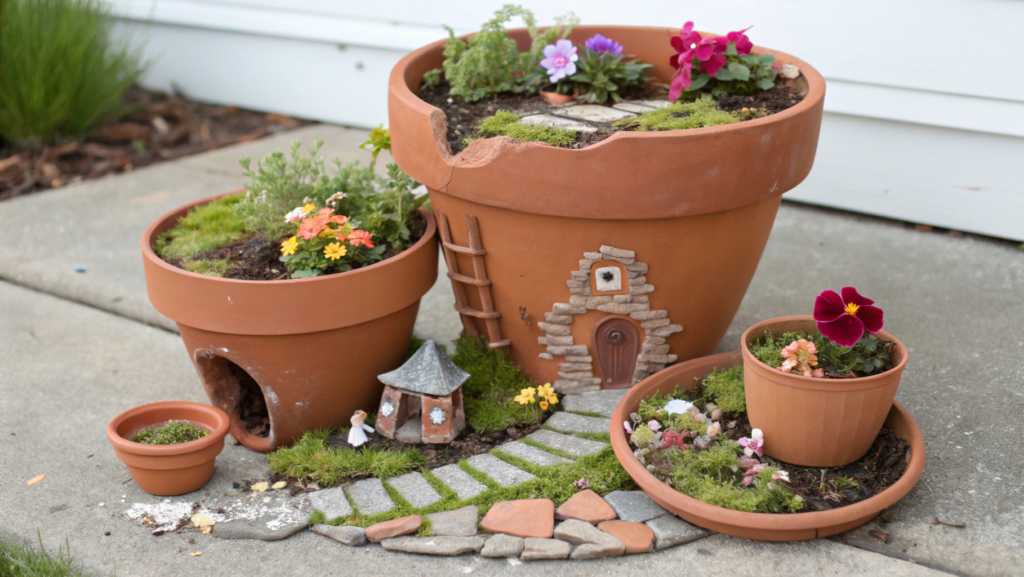
Oooh, have you ever dropped a clay pot and cursed at yourself too? I dropped three in one summer. And one was the one with the mint that I had so lovingly transplanted. It fell apart beautifully, into three large pieces and a handful of splinters. And instead of throwing it all away (my hand could not rise – the pots were old, but kind), we decided to make them into… a fabulous mini garden. You know, a little world like fairies fly in at night.
Why it’s worth a try:
You don’t have to throw away broken pots – just breathe new life into them!
Fairy gardens are magical, but without the pathos. The little details make the atmosphere.
You can get the kids involved – our neighborhood boy came one day, saw it, and ran off to get his broken trowel: “I want to build too!”
What you’ll need:
- A broken clay pot (the bigger the pieces, the better)
- Garden soil
- Small plants: clematis, thyme, milkweed, mini fuchsias and other low-growing plants (succulents will work too).
- Moss (can be live or artificial)
- Small decorative elements (ladders, benches, “houses”, figures)
- Hot glue (optional)
- Fantasy in large doses
How to make a fairy garden from a broken pot
- Prepare the base. Take the bottom of the pot and the largest side pieces. Try on how they can “stand” inside each other – we are making a sort of multi-level staircase.
- If something doesn’t fit together, just break it up some more. You’re a creator now, not a cleanup crew after a disaster
- Fill with soil. Put the bottom of the pot on a stand or directly into the garden. Fill with soil. Add pieces of the sides, forming “terraces”. Each step can be slightly deepened to hold the soil.
- Repopulate with plants. On each “terrace” plant a different mini plant. It is better to use drought-tolerant, so that you do not agonize with watering. I love cleavers and succulents – they look like micro-trees.
- Add a fairy tale. This is where the real magic begins:
- A little ladder of sticks
- A mini door to the fairy house.
- Pebbles like bridges
- Moss like a forest pillow
- Even acorn shells can be turned into “basins” for fairies.
- Plant, photograph and admire! And don’t forget to show your friends! This is when a random breakage turns into the center of attention of your garden.
Helpful Hints.
- If the pot is badly destroyed – no problem! You can simply lay out the composition in a box or other container and insert the pieces as decorative walls.
- If you want the garden to live in the rain – use waterproof glue and street miniatures.
- And if you want to do everything yourself, you can glue the stairs from twigs and draw the doors on a pebble with a marker.
One of our fairy gardens was on the back porch. And one morning, we discovered that there was a sparrow was sitting in it. Seriously. He was perched on a miniature “bench” and nibbling on the moss. I think he wanted a little magic too.
So if you have a lonely broken pot lying around, don’t throw it away. Make a little world in it. A fairy world. Your own.
4. Recycled Tire Flower Beds – A Colorful, Budget-Friendly Yard Upgrade!
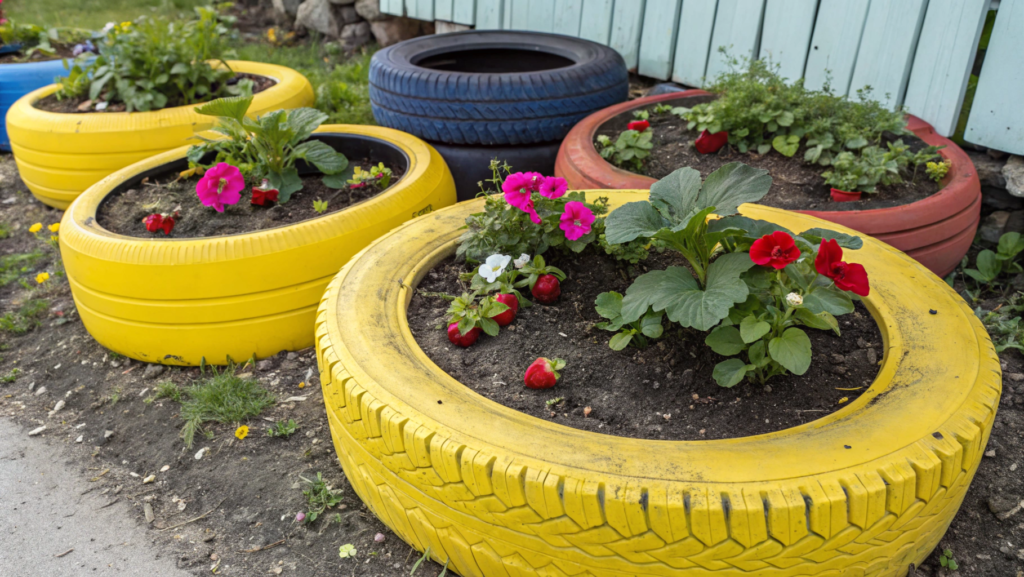
Old tires? Well… you could, of course, recycle them. Or you could take one, paint it sunny yellow, fill it with soil, and plant some velvets. Or petunias, strawberries. And voila – you have a bright, long-lasting, almost free flower bed.
Why tire beds are a cool idea:
Free (or almost free) material. Tires are given away for free at tire shops.
Strong and durable. They are not afraid of neither heat nor frost.
Lots of shapes and ideas. From a simple ring to swans and cups (but without fanaticism, please).
Eco-friendly. Reuse means no throwing away.
What you’ll need:
- An old car tire (or several)
- Gloves and soap (tires are sometimes dirty, yes)
- Primer and acrylic paint for the street
For example, here’s Rust-Oleum street paint – holds up for years!
- Garden soil
- Plants (flowers, herbs, succulents – whatever you want)
- Optional: decorative rocks, signs, mulch
How to make a flowerbed out of an old tire
- Find a suitable tire. It is best suited for passenger cars – not too big and easier to cut. You can even take a couple and make a two-tier construction.
- Wash and degrease. This is a boring but important step. Old tires are often covered in dust, oil, and dirt. Just give it a good wash with soap and a brush, and let it dry.
- Paint! This is where the creativity begins. You can:
- Make a solid-colored, brightly colored flowerbed
- Paint flowers, polka dots, stripes.
- Write lettering: “Flower Power,” “Edible Circle,” etc.
Use primer before painting – the paint holds better.
And be sure to get street paint or everything will bleed after the first rain.
- Put it in place. Put the tire where you want it to be. If necessary, dig a little into the ground for stability. You can put gravel inside the bottom to provide drainage.
- Fill with soil and plant! Choose plants to match the style of the bed:
- For colorful beds – velvets, begonias, petunias
- For edible – strawberries, basil, chives.
- For shade – hostas, ferns.
- Decorate! You can put some pebbles next to it, put up a sign, surround it with mulch – make it your corner.
Lifehacks from us:
- If you want a mobile flower bed, put the tire on a wooden stand with wheels!
- Don’t want to mess around with paint? Just wrap the tire in jute or fabric for a rustic look.
We have one tire that serves as a campfire seat – a wooden round cover on top, with a nook inside for onions.
If you have a dusty old tire in your yard, don’t be in a hurry to throw it away. Give it a second life. Make a flower bed out of it. Add a little color. A little soul.
5. Make a Stunning DIY Garden Fountain from an Old Bucket!

Have you ever sat on your porch in silence …. and suddenly realized something was missing? Sound. Not the TV or the neighbor’s chain saw, but something real. Like a stream in the woods. That feeling was the beginning of our bucket fountain.
We made it literally out of an old galvanized bucket, plastic containers and a pump for 15 bucks. No complicated construction. No concrete. Just a bucket, a little imagination – and now we have a place to rustle up summer.
Why this fountain is a godsend for any garden:
Cheap – realistically, you can assemble it from whatever’s lying around in the shed.
Atmospheric – the sound of the water changes the mood immediately.
Suitable even for small plots. We put the first one on our porch.
Doesn’t require a water connection.
What you will need:
- An old bucket (preferably metal – for atmosphere!)
- Submersible pump
Here, by the way, is a great pump for mini fountains – quiet, powerful, fits perfectly
- Flat stones or pebbles
- Decorative elements (driftwood, shards, moss – optional)
- Extension cord or solar panel (if you want autonomy)
- Option: an old flower pot or bowl if you want a two-level design
How to assemble a garden fountain from a bucket
- Prepare the bucket. Clean it, wash it, and make sure it doesn’t leak. If the bottom is rusty – you can treat the inside with sealant or put a plastic bowl of the right size inside.
- Install the pump. The submersible pump is placed on the bottom. You can put a flat stone under it – so it doesn’t vibrate.
The hose (or tubing) should rise above the water level – to where the spray will come from.
- Hide the pump under the rocks. Lay pebbles or beautiful stones on the bottom – they mask the pump and at the same time make the sound of water softer and more pleasant.
- Fill with water. Fill the water level so that the pump is completely submerged. Important: Use clean water, especially if plants or children are around.
- Turn it on – and listen! That’s it. You’ve assembled a real fountain with your own hands. Rustling water, light splashes, and the joy of having done it all yourself.
More ideas:
- Need more levels? Put a pot or bowl on top and make a cascade – water will flow from the top level into a bucket.
- Add moss or succulents around the edges to make the fountain look harmonious in the garden.
- For outdoor placement – connect the pump through a solar panel.
Lifehacks. If it’s noisy, turn down the pump’s power or change the angle of the water outlet. Put a piece of sponge under it. Add a drop of vinegar to the water once a week to prevent limescale.
Make your garden a place where everything flows, everything sounds, everything comes alive.
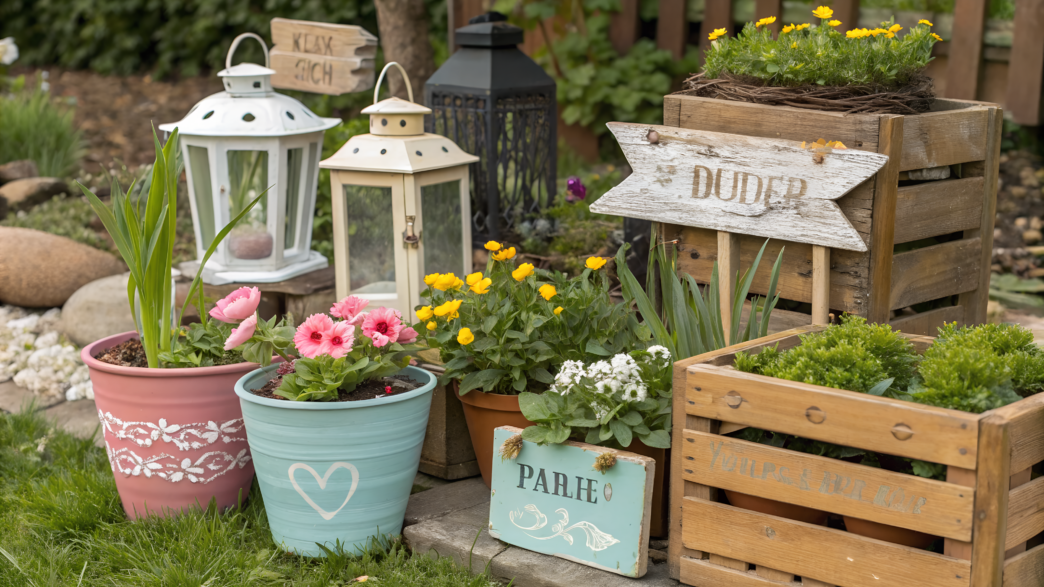
6. Wooden Crate Planters – The Cheapest & Easiest Backyard Decor Idea!

You won’t believe it, but the cutest flower beds we have on our property… are made out of regular wooden apple crates. The same ones that are sometimes given away for free at farm shops or supermarkets “to throw away”.
We didn’t have any extra money or proper beds back then. We scored crates from a farmer for a couple jars of jam and turned them into a real decoration for the porch and backyard. Ever since then, it’s been one of our favorite green thumbtacks: simple, stylish, and 100% homemade.
Wooden crates are almost always free, perfect for mobile beds, and you can always decorate them however you want.
What you’ll need:
- One or more wooden crates
(or here’s a set of pre-made crates on Amazon – if you don’t feel like running around shopping)
- Geofabric or a piece of old burlap (for the bottom)
- Hammer and nails (optional – if you want to reinforce)
- Garden soil
- Seeds or seedlings
- Paint, stain, varnish (optional)
How to make a flower bed from a wooden box
- Clean and strengthen. If the box is dirty, wash it. If it’s wobbly, reinforce with staples or nails.
- Protect the bottom. Put a geotube or dense fabric inside to keep the soil from spilling out. If you plan to place the box directly on the ground, you can make a drainage of crushed stone at the bottom.
- Add soil and plant. Fill with soil and plant whatever you want:
- For beauty: petunias, verbena, velvets
- For food: basil, lettuce, radishes, strawberries.
- For texture: cleavers, milkweed, lavender
- Decorate. You can paint the drawer a bright color, write something in chalk (like “Fresh Herbs” or “Mom’s Flowers”), add rope handles or old drawer tags.
Lifehacks.
- If you don’t want the crate to rot quickly, treat it with a natural antiseptic or tung oil.
- Suiculents and cacti don’t water too often, and make good drainage. One box can be divided into compartments – you will get a mini bed with mixes.
- One box can be divided into compartments to create a mini mix bed.
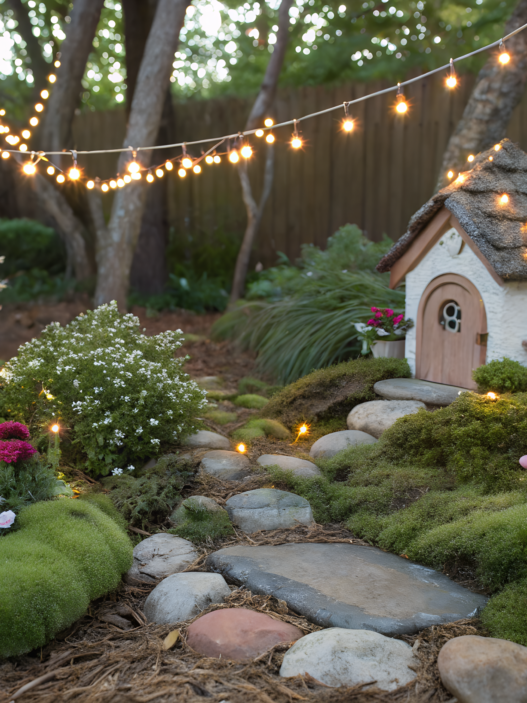
7. Create a Magical Glow with Solar-Powered Mason Jar Lanterns!

You know that feeling when you walk barefoot through a garden on a warm summer evening and the flowers smell especially strong, the grass is warm from the sun and the air is tingling with silence. It is on such evenings that solar lanterns in jars turn an ordinary plot of land into a place you don’t want to leave.
Yes, just ordinary mason jars (or just glass jars) and small solar lids with a light bulb. And the effect is like a movie.
Why it’s worth a try:
- Very simple. Even a child can do it.
- They work without electricity. Charged during the day, lights up at night.
- Beautiful. That’s the word. Not “comfortable”, not “normal” – but beautiful.
- You can put it anywhere – on the ground, on a table, hanging from a tree.
What you’ll need:
- Glass jars with lids
You can use regular jars or a set of Mason jars on Amazon
- Solar lids for jars with LED lights
- Small decorations (optional): glass balls, dried flowers, sand, figurines.
- Wire or twine – if you want to hang it up
How to make a lantern from a jar
- Prepare the jar. Wash the jar, remove the labels. The glass should be clean so the light doesn’t “swallow”.
- We love using jam jars, especially if they are patterned or textured – they refract light beautifully!
- Decorate the inside. This is optional, but very nice. Sprinkle some decorative sand inside, put small pebbles, beads, shells or dried lavender. Sometimes we put tiny figurines in there, like in a snow globe.
- Install the solar cover. Solar covers are inserted in place of the regular ones and secured by threads. Inside is a thin garland or small LED.
- They charge during the day and turn on automatically when it gets dark.
- Put up or hang. You can simply arrange them around the garden, place them along the steps, or hang them with wire or twine.
We have several lanterns hanging directly from our cherry tree – they look like fairy fruit.
Lifehacks from us:
- Add flavor. Put some dried mint or lavender inside – you get both light and scent!
- Different jars – different effect. Clear, green, brown – each lantern will shine differently.
- Put the jar in a wire lantern holder – you can make your own or buy a ready-made one.
The first lantern we made on the day of the summer solstice. We just put it in the middle of the table, not expecting anything special. But in the evening, as the sun went behind the hill, that one little jar lit up… and suddenly the whole space was different. Quiet. Alive. As if someone had placed a candle to commemorate something important.
A garden that glows by itself is not just a garden anymore. It’s a space you want to be in.
8. Upcycled Tin Can Flower Holders – The Easiest Garden DIY!

Tin cans are, no joke, one of the cheapest and most convenient ways to make garden planters. Especially when you want to add some color, verticality, or just fun chaos to the design. Lindy and I use them everywhere: along a fence, on steps, under a shed, and even hanging from a tree.
And it works great because it’s practically free. All you need is cans, paint, and some string, and you can do it in 15 minutes. The tin cans look amazing in the mass. One holder is nice. But ten multi-colored ones are a fiesta!
And you can hang anywhere: fence, pergola, wall, porch.
What you’ll need:
- Empty tin cans (different sizes)
- Paint (acrylic or spray paint for the street)
- Twine, wire or fabric ribbons
- Nail and hammer (or drill) – to make holes
- Earth and plants (your favorite!)
- Optional: decorative stones, lace, buttons, markers for inscriptions.
How to make a cachepot from a tin can – simple, fast and fun
- Prepare the cans. Wash the can. Peel off the label (most easily comes off with soap and hot water).
Check the edge! If it’s sharp, trim it with a file or tape it up with duct tape.
- Make a drain. Using a nail and hammer (or drill), make 3-4 holes in the bottom. This is important, otherwise water will accumulate and the plant will rot.
- Make sure to paint! This is where you can go wild. You can:
- Paint in one color
- Paint faces, stripes, flowers, lettering.
- Add beads, fabric, buttons.
(We had one jar painted as a cat, with cardboard ears. It still lives on the fence).
- Add a handle or mount. Make two holes in the sides of the top and thread twine or wire through – so you can hang the planter on a hook, branch, or nail.
Or just place the jar on any horizontal surface – works great too.
- Fill and plant. Sprinkle some drainage (pebbles), then soil, then the plant. Best for:
- Thyme, basil, parsley – for the kitchen
- Petunias, verbena, velvets – for beauty.
- Succulents – if you’re too lazy to care
Lifehacks from me:
Use jars of different sizes: from under corn, tomato paste, pineapples – looks especially spectacular!
You can make a mobile vertical garden – just screw 6-8 cans to a board and place it vertically against the wall.
We once arranged a “can painting” right with the neighbor kids. We gave them brushes, cans, acrylic and only one rule – no rules!
As a result, we got a jar with eyes, a jar with flowers, a superhero jar… Now they all hang on the pergola by the kitchen. And every time I go there, I smile.
9. How to Make a Whimsical Garden Path with Painted Rocks!

To be honest, our garden has never been perfect. There are no perfectly trimmed bushes, smooth paths or identical flowerbeds. But it does have a soul.
And one of the most “soulful” things we did with Lindy is a garden path of painted rocks. Each stone is like a page from a diary: somewhere a date, somewhere a word, somewhere just a flower that our nephew drew.
The path has since become something of our garden comic strip – and, yes, it brings joy every day.
Why it’s a holiday idea, not just a walkway:
You can make it out of what you already have. Stones are lying around in every yard, and paint is inexpensive.
There’s a huge field for imagination. You can paint, write, even make mini installations!
Great for engaging kids and guests. Everyone can “leave their mark”.
It’s beautiful,not flashy, just. humanly pleasing.
What you’ll need:
- Stones (preferably flat and wide)
- Acrylic paints or spray paint for the street.
- Brushes of different sizes
- Transparent water-resistant varnish (ideally with UV protection)
- Chalk (for sketching)
- Gloves, oilcloth or a board – so as not to stain everything around you.
- Imagination without brakes
How to make a magic path from painted stones
- Gather the “right” rocks. Flat, medium sized, easy to paint. We have both large cobblestones (like “main stones”) and small ones with symbols, letters, patterns.
- Clean and Prepare. Wash the stones, dust them off. Allow to dry. It’s best not to paint over damp – the paint will roll off. If you want, you can prime with white paint – the patterns will be brighter!
- Come up with a story (or don’t).
You can:
- Write inspirational words: grow, hope, trust the process
- Draw flowers, bees, houses, mushrooms.
- Make abstract patterns.
- Or make a “story” from one end of the path to the other.
- Color. Use brushes, sponges, toothpicks for small details. If you’re painting with kids, you can trust them to paint the “background” and then add details.
When the paint is dry, coat with varnish. It is obligatory. Without varnish, the first rain will wash it all off. - Lay out the walkway. Choose an area: from the porch to the garden, around the flowerbed, along the fence. Arrange the stones as you like – evenly, randomly, in a snaking pattern. You can even mix them with regular pebbles.
Ideas for inspiration:
- A path of wishes: each stone with a written intention.
- Flower Alley: everything but the flowers is b/w, the flowers are bright!
- Fantasy trail: gnomes, fairies, castles, stars, cats with wings
So if you want to add something special to your garden, don’t buy expensive tiles. Just get some rocks. And paint. And a little bit of your mood.
Let every step in the garden be a step through memory, joy, and personal stories.
10. Recycled Glass Bottle Border for Flower Beds – A Genius Hack!

One time Lindy and I started collecting glass bottles for another DIY (I think we wanted to make lanterns back then). There were more and more of them, and they were so beautiful! Green, amber, transparent, with bubbles. And suddenly, click! “What if… we make a border with them?”
This is how one of the most spectacular, simple ideas was born – a border made of inverted glass bottles.
This is a really genius trick, because it’s almost free. Especially if you or your friends sometimes buy wine, juices, lemonades in glass. And also super durable, because glass does not rot, does not crack, does not fade. You can change colors and shapes and each border will be like an art installation, it will look very impressive.
What you need:
- Glass bottles (preferably the same height, but you can play with different ones)
- Shovel or narrow garden shovel
- Gloves
- Bucket of water (for washing bottles)
- Optional: pebbles or sand for fixation
How to make a border from bottles – simple and tasteful
- Collect and wash the bottles. We needed about 25 bottles per 1 meter. Everything depends on the width and height. It is better if they:
- Without stickers (they are easily soaked in warm water with soda)
- About the same shape
- Durable (not thin glass)
- Determine the border line. Mark the place where the border of the flower bed will be. You can stretch a rope or just mark it with a shovel.
- Dig a narrow trench. The depth is about ⅓ of the bottle’s height. They should sit firmly and not wobble. If the soil is loose, you can make it a little deeper and add gravel or sand to the base.
- Insert the bottles neck down. Tightly next to each other. Press them in carefully, you can twist them slightly for stability.
If some bottles wobble, fill the sides with sand or soil and tamp. - Admire the result! It looks especially cool when the bottles are different colors. Or vice versa – all the same, and it seems as if the border is glowing from the inside.
Life hacks:
- Do you want to prevent the bottles from filling with water? Seal the necks with hot glue or corks.
- If you are afraid that the glass will break, choose thick-walled bottles, for example, from wines or liqueurs.
- Use bottles from oil, cider, mineral water – they often have unusual shapes.
Now everyone who drinks a glass of wine with us, the first thing they ask is: “Will my bottle go into the collection?”
So do not throw away the bottles. Let them become a frame for your flowerbed. After all, every garden deserves its “stained glass”.
And perhaps this very border will become the beginning of the most beautiful path leading to your beds.
The garden is not Pinterest. It’s you
You won’t find perfect rulers, designer shapes or expensive solutions here. But you will find ideas that come to life in your hands.
And you know what? Sometimes the garden doesn’t need a designer. It needs you – with a can of paint, an old spoon and a desire to make it beautiful in your own way.
So take what’s lying around in the shed, open the paints, call the kids, the neighbor, the wife, the grandmother – and let’s make the garden the way you see it, where you’ll want to spend a lot of time.
Write in the comments which idea you liked the most and share yours! I’m always glad to know how your garden is arranged.