Over the past couple of seasons, we’ve brought to life 10 DIY garden decor ideas with our own hands. Step by step, and piece by piece, we turned forgotten items into charming outdoor features — and now we’re excited to share them with you. All of them were born out of things that usually get dusty in the shed or go “out”.
No expensive materials. Just imagination, a little time and a desire to breathe soul into the garden.
From a flowerbed made from a bicycle to a border made from your grandmother’s plates, you’re sure to find a project here that you’ll fall in love with at first sight.
1. DIY Garden Stepping Stones with Handprints – Perfect for Kids!
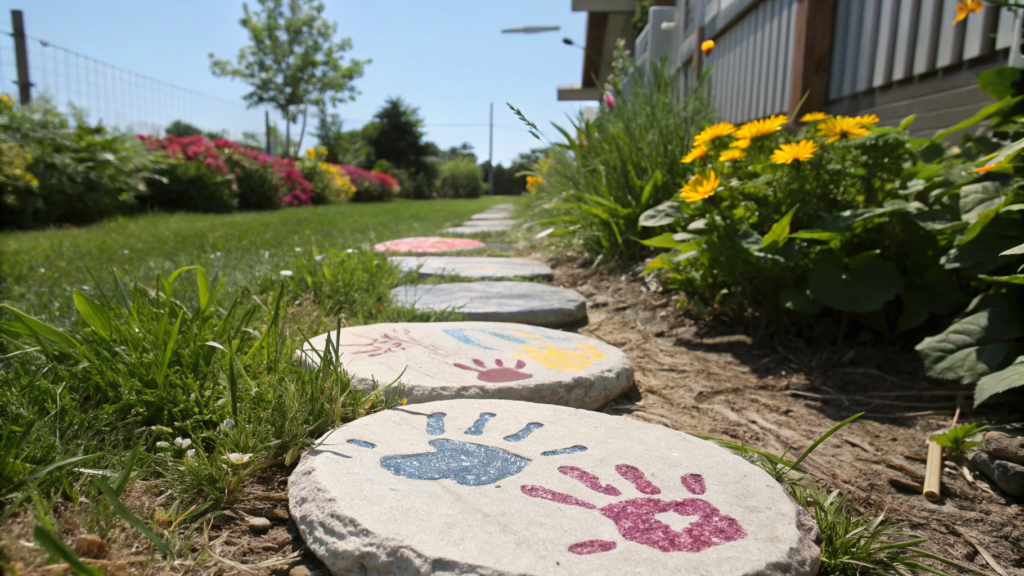
You know those cute palm prints that somehow end up on windows, the fridge and every mirror in the house? What if you save them – but for real this time – and turn them into something beautiful for the garden?
That’s exactly what we did a couple years ago when we made our first palm-print garden tiles with our own hands. It’s not just garden decor – it’s a memory. Little palms, huge smiles and the whole family in flour and glitter because the kids decided the tiles could definitely use “a little glitter”.
What you’ll need:
- Quick-setting concrete (like Quikrete Walkmaker)
- Molds (we used old pie molds, but plant trays, plastic yogurt lids, etc. will work)
- Vegetable oil or petroleum jelly (so the tiles can be easily removed from the mold)
- Pebbles, glass beads, leaves, seashells – whatever the kids want to use for decoration!
- Acrylic paints (preferably weatherproof) or mosaic
- Popsicle stick, toothpick or knife – to write name/date
- And of course…. little palms!
How we did it (and what we learned!)
- We mixed the concrete – right in an old plastic bucket. We used a quick-setting one, like Quikrete Walkmaker. The main thing is, don’t make it too liquid or you won’t get a sharp print. The consistency is like thick sour cream.
- Poured the concrete into the molds – we had disposable pie molds (they work great!).
Pre-lubricated them with vegetable oil, so that then the tiles can be easily removed.
We waited about 10-15 minutes. This moment was critical! Too early – and the hand will fall through. Too late – the concrete would set. After 10 minutes, everything was perfect.
- We made palm prints. My niece was thrilled, and my nephew at first was just poking at the concrete with his finger as if he was waiting for it to speak. But then they both got into the process.
- We added decor – glass pebbles, shells, beads. The boys even put little hearts around their prints.
- They scratched out a name and a date. They used an ordinary popsicle stick. Somewhere the letters turned out crooked, but that’s the charm – children’s hands, handwriting too!
- We left it to dry overnight. It is better somewhere in the shade, so that it does not dry out too quickly and does not crack.
- In the morning, we took it out of the molds. Just flipped the molds over on the grass – and thanks to the oil, the tiles popped out easily. Only one stuck a little bit, and I carefully poked around the edge with a knife.
- (Optional) Painted the tiles with paints. We used acrylics, and then covered with protective spray varnish from rain. It turned out bright and long-lasting!
A few tips.
- In the heat it is better to mix concrete in the shade, and work quickly – it sets quickly.
- Want color? You can add concrete pigment to the mix or let the kids color the tiles later.
- To keep the tiles from deteriorating outdoors, coat them with varnish.
Every year we make new tiles. Some with palms, some with feet, and one even has our dog Luna’s muddy paw on it – she just ran across the freshly cast tiles.
They decorate the beds, peeking out from under the lavender, and make our garden feel like a living gallery of memories.
2. Repurpose an Old Ladder into a Vertical Flower Display – So Cute!

As it turns out, an old ladder plus a little imagination makes a gorgeous vertical flower bed that not only saves space, but looks great too.
We found our ladder in a barn. Rotten, painted, and covered in cobwebs. But I saw the potential in it right away. Like, “You’re gonna be the star of my front garden”.
Here’s how we did it and what to consider before dragging any ladder into the garden.
What you’ll need:
- Old ladder (wood or metal)
- Metal brush or sandpaper
- Primer and paint (open sky)
- Hooks or self-tapping screws
- Flower pots, hanging planters or wooden boxes
- Sturdy garden ropes or clamps
- And a couple of free hours
How we did it
- Took the ladder out of the shed. It was all cobwebby and smelled damp, but the structure was sturdy. That’s the main thing: even if it looks awful, make sure it’s not wobbly or falling apart.
- Cleaned off old paint and dirt. We used a metal brush and sandpaper. Then wiped with a damp cloth and let it dry completely.
- We primed and painted. We chose a bright yellow paint to catch the eye immediately.
- Installed the ladder at an angle to the wall of the shed. We made it stable by fixing it with concrete blocks at the bottom and screws directly to the wall at the top.
- Hung the flower pots. We used threaded metal hooks and hanging cachepots with ropes.
On the bottom step we put wooden boxes with petunias. In the middle – herbs: thyme, mint, oregano. Top – ivy and ampel flowers.
- Added decor. Hung small signs with the names of plants (handwritten, on planks), garland on solar batteries and one old clay plate with the inscription “Mind the bees”.
And I like it because this vertical gardening is a real lifesaver for small plots. And it’s just beautiful. Natural, vintage, with character. Not like the plastic racks from the garden center. And much cheaper.
A few tips from us.
- Metal stairs are better treated with an anti-corrosion primer.
- Don’t load the top steps with heavy pots – let lightweight ampelic ones go there.
- Add a solar-powered garland – it looks wonderful in the evening
- In spring, put the ladder in a shelter or cover it with a protective layer – especially if the paint has started to crack.
3. How to Make a Rustic DIY Bird Bath from Recycled Materials!
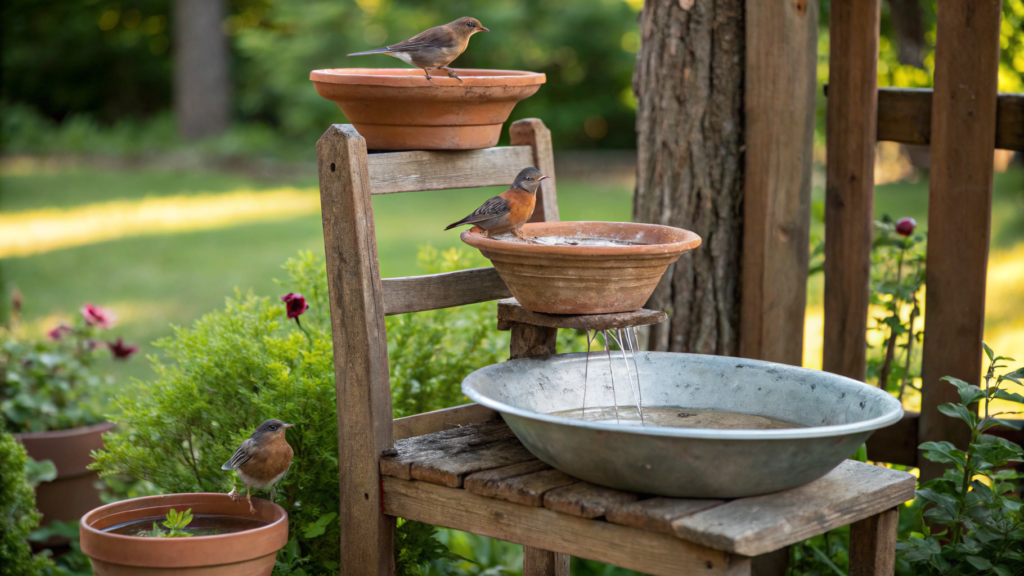
I’ve been meaning to make a bird bath for a long time. And kept putting it off…
Well, since then we’ve made three – all from old things that were lying around in the shed or on the property. And each one turned out to be unique in its own way: one – from an old wooden chair, another – from fragments of terracotta pots and a metal bowl.
It’s cheap, fun and, most importantly – environmentally friendly. And the birds? They are delighted! Especially the sparrows – putting on such a show there that you can leave Netflix off.
What you might need (but not necessarily all at once):
- Base: old stool, stump, bucket, vase, concrete block, even a broken tripod
- Bowl: deep ceramic plate, pot lid, metal bowl, bottom from an old cachepot
- Stones, marble chips or glass balls for the bottom
- Glue (if you want to fix the bowl),
- Metal or wood paint (optional)
- Lacquer or sealant for protection
How we made our favorite bird bath
- We found an old chair without a seat. No one was going to fix it anymore and the legs were quite sturdy. We just took it out into the garden, cleaned it up a bit and painted it with some leftover white paint.
- They put an old enamel bowl in the frame instead of a seat. Yeah, the same one my mom used to make jam in. It fit perfectly in size – and held even without glue! But if you want, you can tack it down with a strong glue like E6000.
- On the bottom we put a couple of pebbles and a couple of decorative glass balls – so the birds could stand up comfortably and not slip.
- We put it all in the shade under a pear tree. So the water does not overheat, and there are branches nearby, on which the birds can sit before “bathing”.
- We filled it with water and waited. It didn’t take long – in a couple of days the first tit flew in! And then the whole “bird spa” began.
How to take care of the bath
- Change the water at least once every 2-3 days. In hot weather – more often.
- Wash the bowl once a week (no chemicals!) – just a brush and warm water.
- If you use paint or varnish, make sure it is safe for animals. It’s best to use water-based ones or those labeled non-toxic.
Birds bring many benefits to the garden. They eat pests, spread seeds, and pollinate some plants. But they also need a place to drink and bathe, especially in the summer.
One Audubon Society study noted that access to clean water can increase the number of birds on a property by 2 to 3 times, especially in arid regions.
4. Painted Cinder Blocks for a Fun & Unique Garden Border!
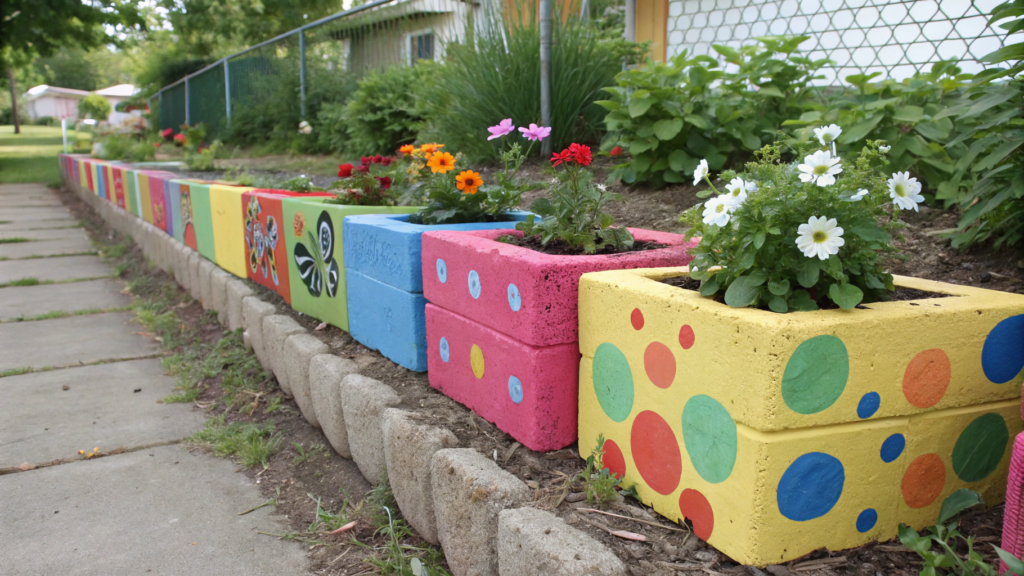
We never even thought about using cinder blocks as a border for a flower bed. But they were literally lying under our feet — left over from a renovation, heavy, unsightly… and so convenient! And most importantly — you can paint them anything. And we did!
What you’ll need:
- Old or new cinder blocks — can often be found for free on Facebook Marketplace or from neighbors
- Brushes, rollers
- Exterior paint — acrylic or latex
- Primer (optional, but if the blocks are really dusty and porous — it’s better to apply it!)
- Varnish or sealant for protection (if you want the color to last a couple of seasons)
How we did it
- Washed the blocks. Straight from the hose. The main thing is to remove dust and pieces of concrete. Let them dry in the sun for a couple of hours.
- Primed. We don’t always do this, but this time the blocks were very porous – the paint would have simply “slipped” inside. So first a layer of primer (we had white universal).
- Chosen colors. And here the fun began. We chose 3 main colors (blue, green and terracotta) and a couple of additional ones for accents. Each block was painted differently – somewhere a pattern, somewhere the block was completely in color. The children joined in – they drew the sun, flowers, even a snail with hearts.
- Let it dry and varnished. We used a moisture-resistant transparent spray – one layer so that the paint would not peel off after the first rain.
- Lay the blocks along the garden bed. Placed them horizontally, with the holes facing up. We poured some soil into these holes and planted viola, parsley and marigolds. So the border also became a mini-flowerbed!
Why I like this project?
- Practical. These blocks won’t move anywhere, even if a hurricane passes.
- Functional. You can plant flowers, strawberries, greenery in them. And also – hide garden markers or put candles in them.
- Inexpensive. We were lucky – the blocks were free. We only spent money on paint (we took a large can and later used it for the stairs).
Tips. If you want to “level” the border, dig a shallow trench and put the blocks on a sand cushion. And it is good to insert plastic flowerpots into the holes of the blocks if you do not want the roots to go into the ground. And if children or dogs are running around and you are afraid that someone will move them, you can connect the blocks together with construction glue.
5. Turn an Old Bicycle into a Vintage Garden Planter!

If you have an old bicycle rusting in the corner of your yard, it can become one of the most spectacular details of your garden.
We found our “bike project” at our neighbors: it was leaning, flat tires, rusty chain… but the frame was strong. And now it sits under our apple tree, covered in flowers and vines, as if it escaped from the cover of Pinterest.
What you will need:
- An old bicycle (it doesn’t matter if it works or not)
- Wire baskets or metal hanging planters
- Wire, garden rope or zip ties for fastening
- Paint for metal (optional)
- Coconut fiber or moss for lining the planters
- Soil and flowers (hanging plants, petunias, ivy, verbena, bacopa will do)
- A little patience and imagination
How we turned a bicycle into a floral art object
- Washed the bicycle. Just a sponge, water and a little effort. Washed away dust, cobwebs and remnants of past cycling glory.
- Painted (optional). We chose turquoise spray paint with a slight matte effect. But if you want to leave the “vintage rust” – that would be cool too.
- Attached the planter. We took two hanging metal planters with chains and attached them to the handlebars and trunk. We used black wire so that it wouldn’t be conspicuous. Be sure to tighten everything tightly — after watering, the weight of the flowers doubles!
- Added coconut fiber and planted flowers. Without fiber, the soil will just fall out. We took a roll of coconut mat, cut it to shape and put it inside. Planted the flowers tightly — so that it would be really lush! Petunias, verbena and dichondra “silver waterfall” — look especially cool when they fall over the edges.
- Put the bike in partial shade and lightly sprinkled soil around it. So that it stands steadily and looks like part of the garden, and not just “parking at the entrance”.
If the bike is really wobbly, you can dig one wheel into the ground a little. Put it next to the path or at the entrance to the garden — this is a real WOW effect.
You can add a vintage touch by hanging a sign on the steering wheel with the name of the garden, your last name, or simply “Welcome”.
6. Easy DIY Pallet Bench – Perfect for a Cozy Backyard Corner!

You may not believe it, but we put this garden pallet sofa together in half a day, with minimal expense, and it has become a favorite place for evening tea, conversations, and gatherings around the fire.
Making such a corner is easier than it seems. And most importantly, you don’t need any special skills. Just a drill, a couple of pallets, paint, and a strong desire to make it cozy.
What you need for the basic version:
- 2-3 pallets (Euro pallets or any, the main thing is that they are the same size)
- A screwdriver and screws
- Sandpaper or sander
- Paint or wood stain
- Varnish or protective spray
- Pillows, mattresses, blankets (more on that later!)
How we assembled it – step by step:
- Choose the pallets. We had them from building materials – one day they were just left over after delivery and were waiting for their time. We selected 3 pieces – 2 for the base (we stacked them on top of each other) and 1 – the back.
- Sanded. Important! We don’t want a splinter, right? We took a grinder, but regular sandpaper will do. The main thing is to go over all the corners, especially where the hands and back will be.
- Painted. We chose a deep warm brown – to fit into our terrace. We used a stain with a matte effect, then varnished. But you can experiment: white, dark green, turquoise – it all depends on your mood.
- Screwed the structure. We stacked 2 pallets one on top of the other and screwed the third one vertically – this is the back. We used long wood screws and added L-shaped metal corners from the hardware store for stability.
- Added pillows. We bought garden pillows on Amazon and put a couple of colorful throws on top. It looks like a coffee shop, only cozier and without the crowds of people with laptops.
We created a real place to relax, with our own hands, without a huge expense.
Now we drink herbal tea here in the evenings, read during the day, and sometimes even sleep there on a warm night, because it’s our little garden oasis.
A few tips along the way.
- It’s better to burn the pallets with a torch or treat them with an antiseptic, especially if they were outside
- If you want a soft seat, put a chaise lounge mattress on top – they’re just the right size
- Don’t forget to check for nails or staples before you start
Add a small side table to the side (you can also use scraps!) – very convenient for a cup or a solar lamp
7. Garden Art with Upcycled Picture Frames – An Eye-Catching Idea!

I never thought that old photo frames would become the most photogenic element of the entire garden. But here’s an example: an old wooden frame hangs right in the middle of a blooming flowerbed – no glass, no photo, just a frame turned into an art object. And through it – like a portal – you can see all the riot of greenery and color.
This is garden art from nothing. More precisely – from frames forgotten in the attic, a little paint and a couple of screws. And it looks like you ordered the installation from a local interior designer.
What you need for the project:
- Old photo frames (wooden ones are ideal, but plastic ones will do)
- Paint (spray or regular)
- Clear sealant (optional – if you want them to stay up in the rain)
- Ropes, chains, wire or garden hooks
- Decor optional: garlands, signs, artificial flowers, lace, mosaic pieces
- Screwdriver and screws – if you’re going to attach them to a wall or wooden structure
How we did it
- Collect all the unnecessary frames. We found 7 of them! Some were without glass, one even had a crack in the corner. The more crooked, the cooler it looks in the garden, by the way.
- Sanded and painted. We chose contrasting colors: one was dark blue, the other was lemon yellow, and one was left “in the wood” altogether. We used Rust-Oleum spray paint, it dries quickly and is suitable for outdoor conditions.
- We secured it.
— We hung one on the fence, right in the ivy area — like a “window to the greenery.”
— Screwed another one to the end of the shed, and hung a heart-shaped vine in the center.
— We hung a couple more on chains between two posts so that they seemed to “hang in the air” above the flower bed. It really looks magical (in a good way, not glossy).
- We added decor. We put a solar-powered garland in one frame — in the evening it lights up and illuminates the herbs. We glued artificial flowers and shells along the edge of the other — we got a “coastal” frame.
Other ways to use frames in the garden:
- Insert fine wire mesh and use it as a support for peas or flowers
- Create a vertical installation from several frames, crosswise placed on the wall
- Cover with mosaics and use as a panel on the wall of a barn or fence
An empty frame in the garden is surprising. The brain does not immediately understand what it is looking at. It is not just a “pretty thing” – it is a context, a visual focus. Especially if you place it against the background of a lush flowerbed or a moving light and shadow pattern.
And – as always – it is almost free. Everything you need is most likely already gathering dust in the pantry.
8. How to Build a Hanging Herb Garden with Just $10!

When you don’t have much space, but you really want to grow your own mint, basil, and thyme, a hanging herb garden is a really convenient solution.
And we spent no more than ten bucks. And all thanks to the fact that we used improvised and inexpensive materials, plus a couple of tricks that still help out.
What you’ll need:
- Several empty plastic bottles (preferably 1.5–2 liters)
- Strong rope or jute cord
- Scissors and an awl
- Soil and seeds or ready-made seedlings
- Hooks or a slat to hang (ideally under a canopy or on a balcony)
- A little patience and a desire to plant!
How we did it (a simple way, from scratch):
- Prepared the bottles. We took 4 pieces. We cut each one across — about ⅓ from the top. The top part with the lid was used as a “bowl” for planting. This is convenient: there is a neck for drainage, and the sides are not too high.
- Rinse and let dry. Do not skip this step – the remains of sweet water or juice can attract flies and mosquitoes.
- Made holes in the lids. Just small ones – so that excess moisture can drain. This is important so that the roots do not rot. You can screw in drip nozzles – if you want to look like an advanced gardener.
- Threaded a rope. In the side walls, made two holes with an awl. Threaded a jute cord, and made such “belts” for each bottle. Secured them one under the other – got a vertical garland with plants.
- Poured soil and planted herbs. Thyme in the lower tiers (it likes drier), basil and mint above. So the water, flowing from top to bottom, will moisturize those herbs that especially need it.
- We hung the structure on a hook on the wall. We used a self-adhesive hook with a bracket, but you can also hang it on a driven nail or even on a pergola. The main thing is that the structure has enough light.
The hanging garden takes up zero horizontal space – even on the tightest balcony there is a corner. In addition, the herbs are always at hand – no need to run outside or remember where you planted rosemary.
Yes, and it is mobile! In the spring, you can hang the structure on the south side, and in the summer – move it to partial shade.
Tricks from us:
- If you want to build a more stable option, then use tin cans from coffee or canned goods instead of bottles. They look vintage and are easy to paint.
- Label each container. You can use paint, a marker or garden signs.
- Don’t forget to feed the plants once every 2-3 weeks. Personally, I use a diluted compost infusion.
9. Cute & Creative DIY Garden Markers Using Rocks & Paint!

If you’ve ever confused basil with oregano (and then spent the summer wondering how weird your pizza tasted), you definitely need garden markers. Those plastic signs from the garden center are boring. They break, fade, and some even blow away in the wind.
We’ve found the perfect solution: painted rocks as signs. It’s easy, fun, super cheap, and gives you a lot of room for creativity.
What you’ll need:
- Rocks (flat, smooth ones — river pebbles or ones you’ve collected on a walk are best)
- Acrylic paints (like Arteza Outdoor Acrylic Set)
- Thin brushes and toothpicks (for small details)
- Black marker (permanent or acrylic)
- Clear protective varnish (like Rust-Oleum Clear Sealer)
- A little inspiration and a good mood
How we did it:
- Collect the rocks. Flat pebbles with a diameter of 5–10 cm are ideal.
- Washed and dried. The stones must be clean and dry so that the paint lays down evenly.
- Applied the base color (optional). We left some stones in their natural form, and painted others in a bright background – yellow, light green, blue. We used outdoor acrylic, it is durable and not afraid of moisture.
- Signed. The most fun part! We wrote by hand: “Tomato”, “Thyme”, “Mint”, etc. Sometimes we added funny faces or drew a plant – so that the child (and ourselves!) would have more fun.
- Varnished. After the drawing dried, we covered it with a transparent spray so that it would not wash off in the rain and did not fade.
- Laid out in the garden. We laid the stones at the base of the plants – it is beautiful, clear and no more confusion!
Why I love this project?
- Simple and quick. Even if you don’t have time for a long DIY, you can make a whole set in an hour.
- Weather-resistant. These markers have been sitting quietly in our garden beds all season and have survived winters.
- You can do this with kids. One of my niece’s favorite projects was drawing smiley faces on each rock.
- Each rock is unique. Even boring cabbage looks cuter next to a rock that says “Kale Yeah!”
10. DIY Flower Bed Edging from Old Plates – A Colorful & Fun Idea!

A border made of plates looks unexpected, original and at the same time very soulful. A little bit vintage, a little bit art, a little bit “I never throw anything away, I use everything”. And all this turns an ordinary flower bed into a cheerful flower gallery.
What you will need:
- Old plates (different, most importantly – not plastic)
- Rubber mallet
- Gloves (preferably thick)
- Sand or bayonet trowel
- Level (optional – if you want everything to be even)
- Inspiration and belief that even cracked dishes are worth a second chance
How we did it (and what we took into account along the way):
- Collected plates. 80% of the plates were found in the barn and in the attic. The rest was given to us by our neighbors when they heard that we were making a porcelain border (they probably thought we were crazy).
- Marked out the flowerbed. Just marked a line where the border would go. You can stretch a rope – it makes it easier to keep an eye on the level.
- Made a narrow groove. About 10-15 cm deep. No heavy digging – just slightly deepened the soil along the line.
- Insert the plates into the ground. We stuck them in upside down so that the top edge of the plate sticks out of the ground by about a third. It looks like a wavy, mottled fence.
- Use a rubber mallet, not a regular one – so as not to crack the porcelain.
- Tamped the soil around. Just pressed the soil with your foot or a wooden block at the base of each plate so that they do not wobble.
Advice. Don’t be afraid of chips – on the contrary, they give the project a vintage look.
This looks unusual. Especially if the plates are different: white, colored, patterned – then the flowerbed turns into a garden gallery of ceramics. There is no need to even talk about simplicity and accessibility, because almost everyone has old plates lying around that they feel sorry to throw away, but have nowhere else to use. Here is their moment of glory!
The whole structure is very stable. We left our border for the winter – in the spring everything stood as if rooted to the spot. Even after heavy rains and snow.
This border has become my favorite part of the garden. When the flowers bloom and the sunlight falls on the ceramics, it begins to shine like an old mosaic.
Coziness in the garden is not bought. It is created
And even if it is crooked somewhere, the paint has faded somewhere, and one stone with the inscription “oregano” floated away during the rain – all this is garden life. Not for gloss. For yourself.
Each of these projects is a way to express yourself, relax, have fun, and feel: “Look, I did it. My hands. My idea.” And it does not need to be perfect. It needs to be real.
If you have already tried any of this – write to me in the comments! I really want to know how our ideas live with you.