
I used to think that a beautiful fall porch was something for big outdoor spaces. But experience proved the opposite: small porches actually offer the most possibilities.
It was on a tiny porch the size of a doormat where we learned how simple things—a layer of throws, two stands for mums, or thin curtains—can completely change how a space feels. Because at some point you stop seeing it as décor and start noticing that the place becomes good for reading, for quiet moments, for a warm cup of tea in your hands when the air finally turns fall-like.
In this article, the ideas come straight from our experience. Everything is simple, tested on a real porch that has seen fog, wind, and spontaneous evenings with books. If you want to make a small space feel a bit warmer and more alive this fall, you might find something here.
1. Building a Simple Daybed for a Small Porch
One cool September morning, I was sitting on our tiny porch with a cup of coffee and realized: enough with the folding chair. I wanted to stretch out, to lie down. I wanted this space to finally become comfortable and welcoming.
That’s how the idea of building a small porch daybed was born—just a simple structure you can put together in a weekend.
And if you approach it without perfectionism, it turns out that it’s actually pretty doable.
What’s important to understand before starting
I measure the space… twice. Small porches don’t forgive mistakes. Ideally, the daybed should be around 72 in (183 cm) long—that’s the classic length for stretching out your legs—but sometimes you need to adjust. We had only 65 in (165 cm) of free wall space, so we had to shorten the frame a bit.
The height matters too: around 18–20 in (45–50 cm) is the most comfortable for sitting.
Materials that work outdoors
After years of experimenting (some attempts successful, some not so much), we learned that the best performers are:
- Pine 2×4 boards (5×10 cm): lightweight, inexpensive, easy to work with.
- Exterior-grade plywood ¾ in (18–19 mm): for the mattress base.
- Exterior screws so the structure doesn’t fall apart after a season.
- Exterior-grade oil or sealant—non-negotiable. Even under a roof, wood absorbs moisture as if it’s competing for a prize.
By the way, once we “forgot” to seal the frame. By spring, the plywood had swollen so much that we could barely unscrew it from the base. So sealing really is essential.
How to assemble the frame
This is exactly how we did it. It’s not architectural-level building—just a working method that survived two falls, one winter, and all those weather surprises that love to show up right after you spread a clean throw.
- Build a rectangular frame from 2×4s, roughly 72×28 in (183×71 cm).
When you fasten the boards, make sure the end-grain patterns “look” outward — this helps the frame twist less over time. We always pre-drill the holes; otherwise the boards may crack, especially cheap pine. - Add cross supports every 12–14 in (30–35 cm).
Important detail: don’t just attach them — align them in one straight line so the plywood doesn’t bounce under the mattress. Once we installed one support slightly off line, and it clicked every time someone lay down. If your porch is exposed, galvanized brackets are a solid upgrade. - Screw a ¾-inch plywood sheet (18–19 mm) on top.
We treat the plywood beforehand: two coats of sealant on the edges are the minimum. Edges absorb moisture the most. We fasten the sheet every 6–8 in (15–20 cm) so there are no soft spots. - Round the outer corners if the space is narrow.
You can use an orbital sander or cut a small 2–3 in (5–7 cm) radius with a jigsaw. Not for beauty — for your legs, especially on cold fall mornings in socks. - Seal the entire structure with outdoor oil and let it dry for at least a day.
We use a blend intended for decks — it absorbs well and doesn’t stay sticky. If the weather is humid, give it two days.
We use a blend meant for outdoor decks—it absorbs well and doesn’t stay sticky. If the weather is humid, give it two days.
Choosing a mattress
The most practical solution (if you don’t want to buy an expensive outdoor-specific mattress) is to use 6-inch memory foam and cover it with a protector that handles moisture well, such as SafeRest Premium Waterproof Mattress Protector.
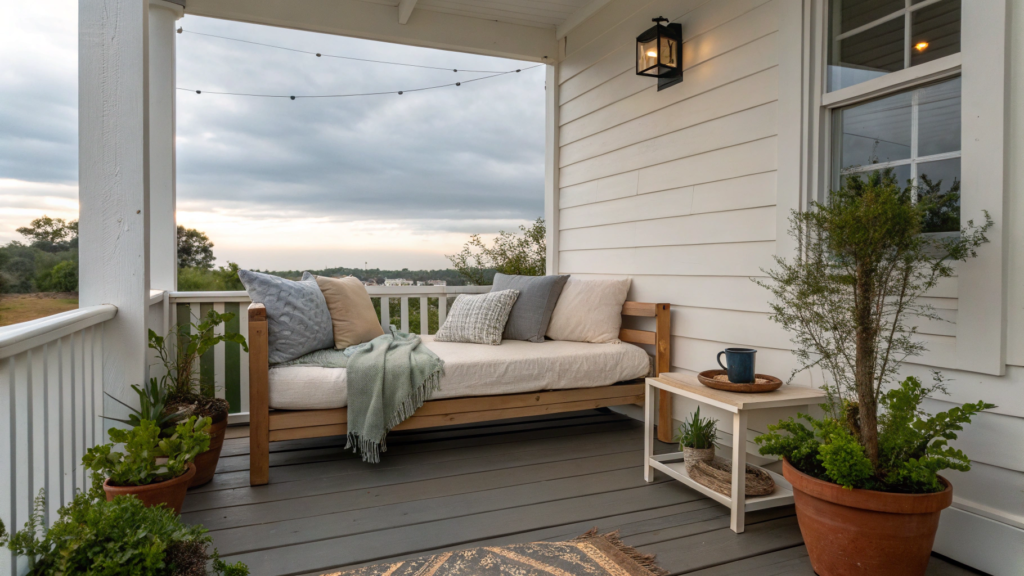
I never imagined that such a simple daybed could change the feeling of the porch so much. But when we placed the mattress, threw on the first blanket, I lay down and looked at the garden… It felt so pleasantly homey. On a tiny porch.
2. Selecting Weather-Resistant Bedding for Outdoor Use
After a few unsuccessful attempts, I now approach choosing outdoor textiles as a small science: how much moisture the material holds, how fast it dries, how quickly it fades in the sun. It’s simple, but it saves nerves, money, and those unpleasant morning surprises.
Which materials actually work
The list is fairly short.
- Acrylic
This is probably the best option. Lightweight, water-resistant, and won’t fade in a single season. We use acrylic cushions at our second property in the PNW, and they survived fall, winter, and spring without a hint of mildew. - Polyester (outdoor-grade)
A good choice if you pick outdoor polyester. Regular “decorative” cushions won’t work—they soak instantly. Outdoor polyester has a special coating that makes water roll right off. - Olefin
This one is a real workhorse. It doesn’t absorb water, dries quickly, and is easy to clean. The only downside is that cheap fabric can feel a bit stiff. But for a fall porch? Perfect. - Cotton blends — only with solid water-repellent coating.
We tried cotton cushions with coating—they looked great, yes. But after a month the coating wore off, and the cotton started absorbing moisture like a sponge. So only premium-coated options make sense.
How we choose sets for ourselves
If the fabric keeps its shape after evening moisture, doesn’t smell damp in the morning, and can be wiped clean with a cloth—then it works for us.
Over the years, I’ve made a small list of criteria:
- fabric weight around 8–10 oz/yard² (270–340 g/m²) — the optimal density
- UV-resistant coating — otherwise the colors fade by mid-October
- removable covers — easier to clean
- simple, calm colors that pair well with the fall shades of mums (more on that later)
All of this combined turns the porch into a living space rather than a display.
We tried countless options before we found the ones that didn’t disappoint us. For example, outdoor-grade cushions with olefin fabric work best—they don’t absorb moisture even after foggy nights, which happen in the PNW more often than forecasts admit.
Functionality and beauty
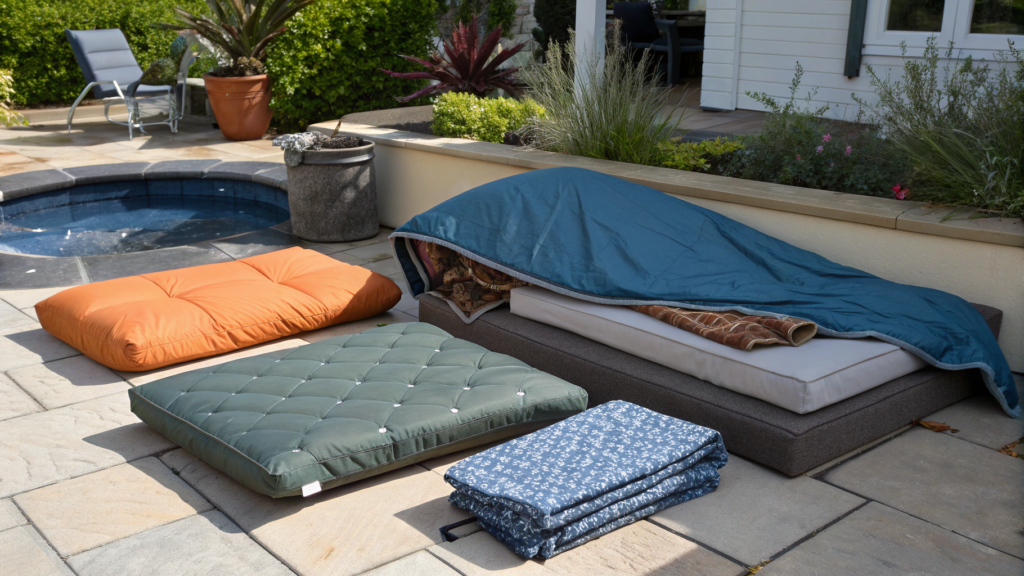
I love warm textures, but outdoor textiles still have their own logic. I always start with a protective layer: on top, a waterproof outdoor cover that easily handles dew or a sudden drizzle. And only under it—or next to it—I leave soft throws, the ones you want to pull over your shoulders in the evening.
This way, practicality pairs with that calm fall atmosphere, when you want to sit at the edge of the daybed and look at the mums by the porch.
3. How to Anchor a Bed Setup Using Porch Railings
On small porches, there’s one trick: if you don’t anchor the daybed, it can behave unpredictably. Especially in fall, when winds can get very strong.
That first fall we were literally catching the frame every week. And only after yet another attempt did I finally realize it was time to anchor everything properly.
Why railings are the best anchoring method
Railings are already a ready-made support point, and they withstand surprisingly high loads. The average wooden porch railing holds around 200 lb (90 kg) of horizontal pressure — more than enough to secure a lightweight wooden frame.
And most importantly, you can attach to them without drilling into the porch structure itself. We always try to keep the house’s construction in its original state.
Main anchoring options
Three approaches that consistently work:
- Metal L-brackets — simple, fast, ideal for hidden anchoring.
- Heavy-duty zip ties — a temporary solution, but surprisingly effective.
- Rope anchoring — works well if you want a more “garden” look, especially next to mums.
We’ve tried all three. And although brackets are the most technically “correct” option, rope ties actually look surprisingly good on a fall porch.
The method we use most often
Here’s the full process — with notes that usually help avoid small mistakes.
- Identify two anchoring points on the railings.
These are usually spots where the vertical posts are the strongest. I gently press on the railing with my palm: if the area doesn’t flex, it’s good. For safety, I look for a point that can withstand at least 20–30 lb (9–14 kg) of pressure without visible movement. - Place the daybed so it touches the railings along the entire back edge.
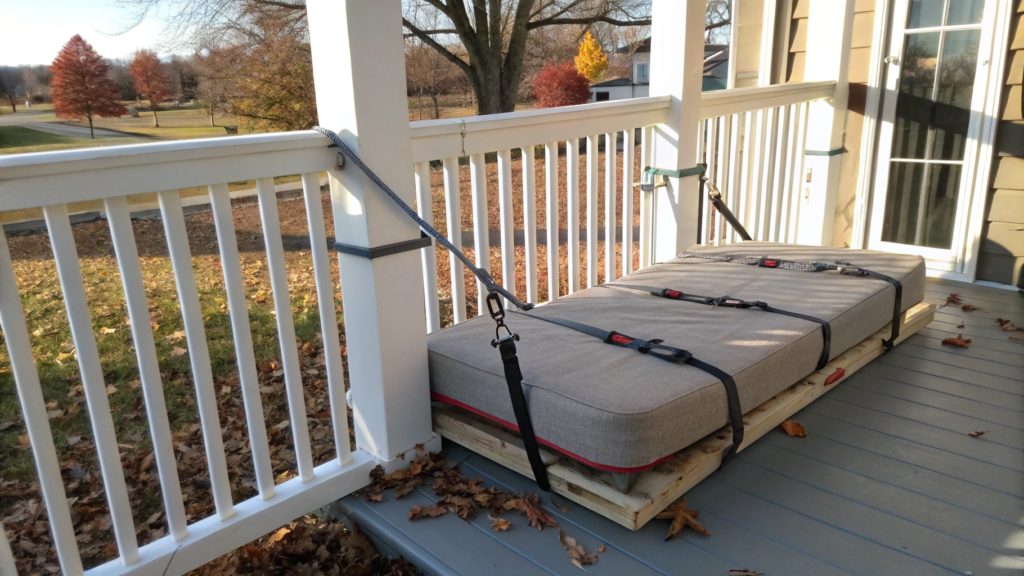
The more surface contact, the less strain on the hardware. If there’s even a ½ in (1–1.5 cm) gap between the frame and the railings, I wedge in a rubber spacer — it absorbs vibration from the wind. - Use metal L-brackets for the main anchoring.
We install one bracket on each side. We attach the bracket to the daybed frame, then to the railing post. Galvanized 4×4 in (10×10 cm) brackets work well; they’re rigid enough to hold the structure even under side pressure.
From experience: don’t attach the bracket from below — it becomes impossible to reach later for inspection. - Add extra securing with rope or zip ties.
Yes, many skip this step, but it genuinely saves the setup on windy nights. We tie a soft polypropylene rope, about ¼ in (0.6 cm) thick, around the side crossbeam and pull it to a railing baluster. It looks natural and holds well.
Zip ties work too — but choose heavy-duty 120–175 lb strength. - Check how the structure moves.
I always lean on the back of the daybed with my full weight — around 150 lb (68 kg). If the structure moves less than ¼ in (0.5 cm), that’s an excellent result.
There’s a small secret: hardware can sometimes rub against the railings. I place thin rubber washers under the brackets — they’re sold in any hardware store or online.
4. Choosing Color Schemes that Blend with Mums

The main character of fall is mums. They’re so bright that if you choose the wrong color palette for the porch or the daybed, everything starts looking a bit chaotic.
I approach porch palettes carefully — like a recipe: if you overdo one ingredient, the balance disappears.
Which mum colors show up most often
Practically speaking, mums usually appear in four dominant shades:
- bright yellow
- burgundy red
- warm orange
- deep purple
These colors naturally “shout” against neutral surfaces. That’s why I always start the palette not with textiles, but with the plants.
I won’t invent a complicated theory. Logically, if mums are bright, then the textiles should stay calm; if mums are dark, I add soft light accents.
And it works beautifully.
Working color schemes
1. Warm palette for orange and yellow mums
These are mums that love attention. To avoid getting lost next to them, I choose porch bedding in calm tones:
- light beige
- soft sand gray
- warm cream
- gentle olive
They don’t compete with the bright color — they create the sense that mums are the leading role here.
We’ve used an oatmeal-colored throw for two seasons, and it highlights yellow tones nicely without pulling attention.
2. Calm contrast palette for burgundy mums
Burgundy mums are true fall classics. They add depth.
But if you place textiles of the same dark tone next to them, everything blends together. So I choose:
- gray-blue
- smoky gray
- cool beige
- white-sand throws
The trick is to slightly brighten the mums rather than compete with their richness. I like the white-gray “mist” effect — on a small porch it makes the space look wider.
3. Elegant palette for purple mums
Purple bushes create the most unexpected palette. In fall, these tones appear less often, and they already look rich on their own. What works with them:
- muted plum
- dusty rose
- soft charcoal
- warm taupe
Once we placed two purple bushes on each side of the daybed and added a throw in a “mauve smoke” shade — it turned out soft and calm, even though the bushes themselves were bright.
How to pair palettes with textures
Sometimes it’s not about color at all — it’s about texture. I’ve noticed that next to mums, the fabrics that behave best are:
- those with light relief
- small “rice-like” knits
- matte weaves
Gloss or artificial “velvety” finishes make the composition too dressed up — and what we need is fall calmness, naturalness.
If I want a bit more depth, I simply add a second throw, slightly darker than the main one. It ties the whole composition together immediately.
Where to find colors that don’t fade?Textiles that look beautiful in the store often turn into a “last-year throw” after a month in the sun. That’s why I try to choose outdoor fabrics with UV protection. They hold color, resist moisture, and work with most mum palettes.
5. Incorporating Vertical Mum Displays

There’s a particular thing about small porches: when everything sits on one level, the eye just glides across the surface and doesn’t land anywhere. And then one day I lifted a mum pot onto an old wooden stand — simply so it wouldn’t be in the way — and instantly saw the difference.
Vertical height changes everything. The space suddenly felt taller, and the mums opened their color much brighter.
Why vertical levels work
I always start by watching the light. In fall, the sun sits low, and if the pots stay below 10–12 in (25–30 cm), they can spend the whole day in partial shade. Raise them a bit — and the tones become deeper.
Plus, the porch gains structure: there’s a focal point, a supporting element, and a gentle transition toward the daybed. No unnecessary formality, just a working fall corner.
Main types of vertical stands
Here’s what has worked best for us:
- Metal stands, 20–30 in (50–76 cm) tall
They take up little space, the narrow lines don’t clutter the porch, and mums end up close to eye level. - Wooden stools or steps
We often use old stools from the shed — they add a warm, grounded texture. - Tiered plant stands
Perfect for very small porches: three pots in the footprint of one is a real space-saver.
How to combine vertical and floor-level elements
I usually follow a simple pattern: one tall element + two low ones. It creates an easy visual flow.
If you want symmetry (especially near a daybed), place two matching stands on both sides and leave low pots closer to the center.
But there’s another approach — a pleasantly loose arrangement.
Three pots of different heights, set at a slight angle, give the whole space a lively, natural feel.
A few practical tips
- Place vertical stands closer to the wall or railing.
They’re safer from wind this way. - Add weight to the base.
A stone or small sandbag inside a metal stand stops wobbling instantly. - Don’t be afraid of “imperfect” objects.
Old crates, short stools, overturned ceramic pots — they work beautifully and often look more natural than store-bought décor.
Try it, and you’ll see that sometimes the most “imperfect” solutions become the most alive ones.
6. Adding Canopy Curtains for Privacy and Style
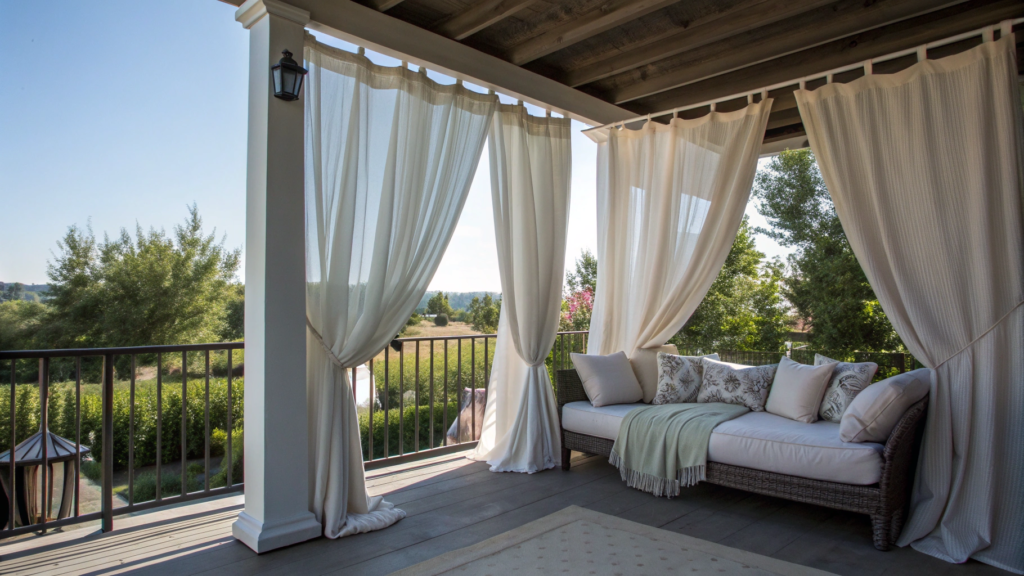
I always thought that hanging curtains on a porch felt too “resort-like.” But one day I was sitting on our daybed with a book, the wind moved the throw a little, the neighbors across the street were discussing something very energetically… and I thought: why not?
Two days later we already had our first canopy curtains. And the porch felt more tucked away, more like our own space.
Why curtains work better than you expect
A porch is an open space where fall contrasts are especially noticeable: light–wind, shade–brightness, sound–quiet evenings. Light curtains soften all of that. They create the feeling of a room without the sense of “closing” anything in.
Plus, they’re a great way to create a backdrop for mums and the daybed. White or cream panels make the composition softer, tie the colors together, and suddenly everything starts looking like a Pinterest photo.
Outdoor-friendly materials
We tried several options before we found ones that don’t turn into wet rags after two nights:
Polyester Outdoor Sheer
The most universal choice. Lightweight, dries quickly, lets light through well.
Olefin Blends
Slightly denser, wrinkle less. Ideal if your porch faces the sunny side.
Canvas-style curtains with coating
Heavier, but they create privacy even on open porches.
I like options similar to NICETOWN Outdoor Sheer Curtains — they’re lightweight, behave well in the wind, and don’t absorb moisture as aggressively as regular polyester.
How to hang the curtains
Fall winds are a story of their own. So the mounting system has to be simple but sturdy.
- Rod attached to posts or railings
The standard way: attach a thin metal rod to the porch walls. The important part is leaving a small gap so the fabric moves easily. - Magnetic weights at the bottom
They save the setup from gusts. We used small magnets hidden in the hem — and the fabric became much calmer instantly. - Elastic bands or small hooks on the sides
When I want to open the curtains, I simply hook them onto the porch posts. It looks neat and works well.
How to pair curtains with mums and the daybed
If the daybed is already bright — for example, an oatmeal throw or light gray cushions — curtains should stay neutral: white, cream, light stone.
If you want a soft accent, these shades work well:
- muted sage
- warm flax
- light sand
These tones don’t fight with the fall palette; they highlight the mums — especially yellow and burgundy ones.
Light curtains can be taken down for winter in a couple of minutes — the key is choosing hardware that opens easily and fabrics that dry fast.
In fall they offer privacy, in summer they create shade, and in the shoulder season they soften the wind a bit. One element doing work in three directions.
7. Layering Multiple Blankets for Texture and Warmth

When fall arrives, I almost automatically start carrying blankets out to the porch. It’s become a ritual. One blanket is nice, but two or three create depth on a small porch.
First layer — the base
When it comes to a practical outdoor layer, I always start with a working blanket that can stay on the porch overnight and hold up even through fog and morning dew. And no — this isn’t the one that just looks pretty in photos. It has to be:
- dense enough to keep warmth
- moisture-resistant so it doesn’t absorb dew
- easy to clean
I usually choose blankets made from water-resistant outdoor materials, like olefin or special outdoor-grade polyester. A blanket like this protects the mattress and sets the tone for the whole daybed-and-mums composition. For example, the Sunbrella Outdoor Throw Blanket.
If I have golden mums along the edges of the porch, I choose a calm-colored blanket — oatmeal or warm stone — so it works as a neutral background that doesn’t compete with the bright fall hues.
Second layer — texture
This is the moment when you want to add volume. I pick a blanket with a different texture: chunky knit, light waffle knit, soft fleece, sometimes even a thin striped throw.
The contrast of textures keeps the composition lively rather than flat.
This is the layer that creates visual warmth, even when temperatures drop toward evening.
Third layer — the accent (optional but very effective)
Here you can allow yourself a bit of color or pattern, especially if the mums on the porch are bright.
For example:
- a burgundy accent throw next to a beige daybed
- a thin orange trim that echoes the mums
- a soft smoky blue if you want to tone down the palette
One time we added a light throw in a muted rust shade on top of two neutrals — and the whole composition looked more complete, even though the piece cost less than twenty dollars.
How to arrange the blankets so they don’t steal the spotlight
There’s a simple technique I’ve repeated for several seasons:
- The base blanket is spread out fully and neatly.
- The second is placed slightly casually, with a soft diagonal fold.
- The third is just draped by the corner, as if someone was about to sit down with a book.
This kind of “natural looseness” looks far nicer than strict straight lines. People often think it’s a “stylish accident,” though in reality, I just repeat the same setup each year.
8. Styling a Reading Corner on the Porch Bed
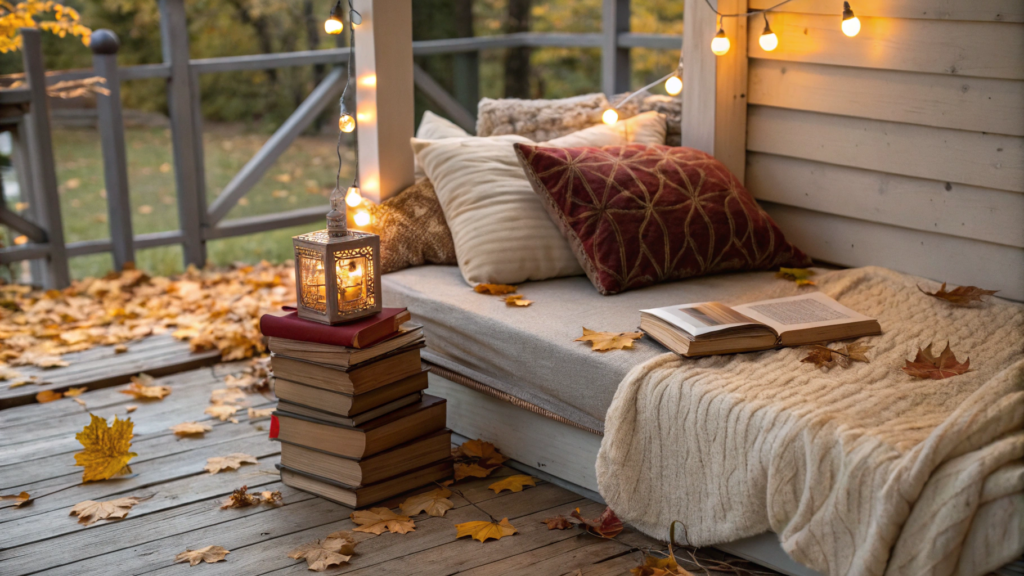
Our porch works like a small seasonal library. Every year we create our own fall reading corner — nothing luxurious, but incredibly alive.
Start with proper back support
On a daybed, everything depends on the pillows. If they’re too soft, your shoulders get tired; if they’re too firm, you won’t stay long. We found the perfect balance with:
- one firm lumbar pillow about 20–24 in (50–60 cm) long
- two oversized throw pillows 20×20 in (50×50 cm)
This creates a “corner” that doesn’t collapse with every small movement.
And one more important detail: outdoor pillows must be olefin or outdoor-polyester. Otherwise, they absorb moisture, and reading becomes… let’s just say, much less romantic.
Add blankets
I lay the base blanket along the full length of the daybed’s back — like soft upholstery.
The second blanket goes across, creating a diagonal where you can comfortably rest a book.
And here’s a small thing that matters: I always let one corner of the blanket hang slightly over the edge. That asymmetry makes it feel like a place someone just sat in, not a staged setup.
Lighting is everything
Reading on a fall porch is always a balance between natural light and evening shadows. We tried many options before finding what works best:
- a small clip-on lamp on the railing — perfect for evening reading
- a warm LED string light, looped above the curtain — gives soft, diffused glow
- a battery lamp near your feet — creates a cozy little “niche” without being harsh
And yes, brightness should be around 2700–3000K — anything cooler makes the mums look washed out. Learned that the hard way.
Where to put your book (and your tea!)
This is crucial. When you sit down to read, balancing everything on your lap is a nightmare.
We use a tiny side table — just 12–14 in (30–36 cm) in diameter. It stands next to the daybed and holds a mug, book, glasses, and sometimes a small pot with mini mums.
One time I tried replacing the table with an overturned bucket — looked cute, but the tea fell off with impressive consistency.
Small details that make a big difference
- Watch the wind direction. If fall wind hits from one side, pillows keep falling. Just shifting the whole setup by 6–8 in (15–20 cm) solves the problem instantly.
- Add one personal item. I always keep a thin leather bookmark. Lindy brings her thick wool socks.
Little details like this turn the reading corner into a place you want to be, not just décor. - Use matte, not shiny fabrics. In fall, matte textures read much warmer. Shiny polyester looks great in photos but feels cold in real life.
9. Using Old Headboards as Decorative Backdrops
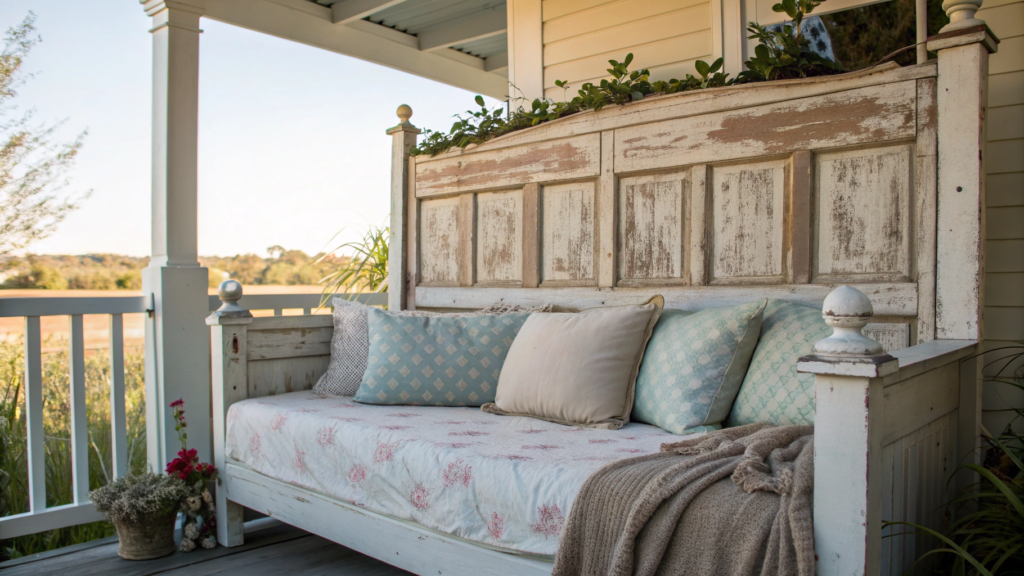
When we added an old headboard to our daybed — the one Lindy dragged out of the shed, slightly worn, wooden, marked by time — I said: “Oh no, this definitely isn’t for the porch.” She insisted. We placed it behind the daybed — and I realized it looked… right. As if it had always belonged there.
Why headboards work so well
They have a few advantages that are hard to replace with anything else:
- they add a vertical accent that pulls the whole composition together
- wood brings depth — soft, warm, calm
- they create a kind of “back wall,” but without any sense of being closed in
- and honestly, in small spaces they create a magic sense of scale: the porch suddenly looks thoughtfully designed
And the best part — they usually cost next to nothing, and sometimes come free.
What kinds of headboards work best
If we break down what actually performs well on a porch:
Wooden headboards with carvings or panels
They create a soft texture behind the mums and blankets.
Metal lattice headboards
Great for small porches because they let light and air through.
Flat wooden boards with patina
They look like an old bench or barn door — especially beautiful against fall colors.
How to prep a headboard before using it
A little bit of hands-on work makes the piece come alive:
- I always sand down sharp edges first
- apply a layer of outdoor seal (moisture protection), especially along the bottom edge
- if the headboard is too bright, I tone it down with stain so it doesn’t compete with the mums
We saved one white headboard this way — it looked too “bedroom-like,” but a light wash of stain made it softer.
How to place a headboard behind a daybed
There are two main methods, and both work well.
1. Simple support method
We place the headboard directly against the wall or railing, and wedge two rubber shims at the bottom so it doesn’t slide. Wind won’t move it because the daybed anchors it with its own weight.
2. Light railing attachment
If we want more security, we use small brackets or short zip-ties to attach the headboard to the top rail. The key is not to overtighten — it should still feel light.
How to pair a headboard with mums
The vertical panel becomes the visual center, the mums become the “frame,” and the daybed becomes the base.
I usually do this:
- on the right: a pot of yellow mums on a medium stand
- on the left: a burgundy pot placed at floor level
- and the headboard itself in a neutral wood tone that softly ties the palette together
This trio works almost every time.
Decorative elements you can add
Not necessary, but sometimes it turns the space into a tiny stage:
- a narrow LED garland along the top edge
- a small bundle of dried grasses
- pumpkins in muted tones (the gray-blue ones are especially lovely)
The important rule: don’t overload the space. A headboard is already a strong visual element.
Now every fall we go hunting for a new “old” headboard. Sometimes it’s a real treasure, sometimes just random wooden panels, but every time they change the space so much that I smile: who would’ve thought a piece of wood could become the heart of fall décor?
10. Arranging Mum Pots Symmetrically Around a Bed
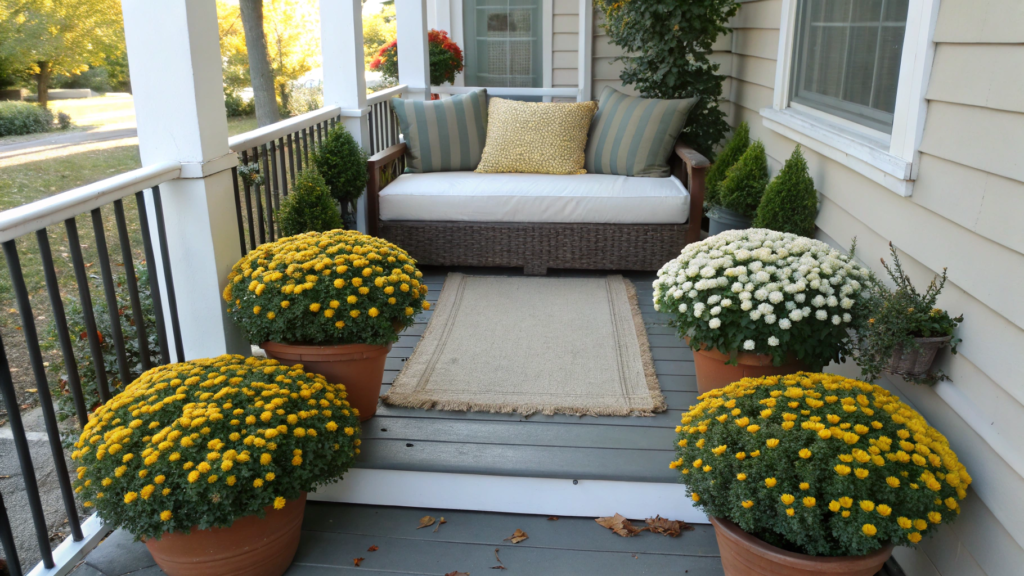
Symmetry is something you barely notice — until it’s missing.
When we first placed mums around our porch daybed in a random way, it looked cute but… restless. As soon as I tried a symmetrical layout, there was a sense of order. And the best part: the small porch instantly looked wider and tidier.
Where symmetry begins
I usually start from the center — from the daybed itself. Its width sets the logic.
For example, our daybed is 65 in (165 cm) wide. That means the outer points of the mums should visually balance each other at equal distances.
And one more nuance: mums aren’t geometric shapes. They grow differently. So symmetry isn’t math — it’s a feeling of balance.
Which symmetry works best
There are three proven approaches, each creating its own mood.
- Classic “mirror” symmetry
Two identical pots (same size and color) on both sides of the daybed.
Perfect for small porches: the eye doesn’t wander, the space feels structured. - Stepped symmetry
Left: one tall pot + one low
Right: one tall pot + one low
Different levels, but mirrored. Very striking with vertical plant stands. - Color symmetry
If the mums are different colors, you can place burgundy ones closer to the wall and yellow ones closer to the front — identically on both sides.
It creates a sort of mini fall arch.
We most often use stepped symmetry — it adds depth, especially when one pot is lifted.
Stands and height levels — this is 50% of the success
If you place all pots on the floor, symmetry will work, but stay flat.
When levels appear, the composition becomes more architectural:
- high level: 20–30 in (50–76 cm)
- medium level: 10–14 in (25–36 cm)
- low level: right on the floor
And most importantly — do it as a mirror. If a tall pot stands on a 24 in (61 cm) stand on the left, then the right side should match.
It’s not just a formality — the human eye reads it instantly.
How not to mess up the spacing
There’s a small rule that saves the day every time: leave at least 8–10 in (20–25 cm) of space between the daybed and each pot — otherwise the composition “presses in” on the seating area.
Once we placed the pots too close and it felt like sitting in a hallway.
We moved them back to 12 in (30 cm) — and it changed everything.
How to match mum colors with symmetry
This part is a little more subtle. If the daybed is styled in neutral tones (stone, oatmeal, light gray), then a symmetrical pair of bright mums works beautifully.
But if the textiles are more saturated, color symmetry is better:
- on the outer sides: bright mums (burgundy/yellow)
- closer to the center: calmer ones (white or muted orange)
That way the space doesn’t look overloaded, even if there are many mums.
Tip. If the pots are large (12–14 in / 30–36 cm in diameter), I sometimes place them on rubber pads. They don’t slide, don’t rattle, and the wind won’t move them. They’re thin, almost invisible, but stabilize plant compositions perfectly.
Your Porch’s Atmosphere
I could talk forever about how we built the daybed, chose stands for mums, or debated which blanket would be “the fall one.” But the most interesting part doesn’t happen in the articles — it happens in your stories.
What does your porch look like? Where does the light fall? What do you already have, and what’s missing for it to become a fall corner you want to return to?Share in the comments which idea you want to try first — or which small detail marked the start of fall on your porch. I always love seeing how these ideas come to life in other homes.