When we first started going camping, I honestly thought I’d be living off sandwiches and daydreaming about real food back in the kitchen.
Then came that first dinner by the campfire — smoky air, melty cheese, and foil-wrapped food in our hands instead of plates.
Since then, we haven’t just cooked outdoors. We’ve made camping dinners delicious.
This list includes 10 simple camping dinners that became our absolute favorites over the last few years. They’re easy, quick to make, don’t require much equipment, and still taste like something you’d get at a good little café — except the background music is crickets, and your waiter is your spatula and Blackstone.
1. Foil-Packed BBQ Chicken That’s All Over Pinterest in 2025

It feels like every other post on Pinterest this summer is all about foil-wrapped BBQ chicken.
At first, I gave it the usual side-eye. I mean… it’s chicken. In foil. But one night in June, by the lake, we finally gave it a shot.
And since then, it’s become one of our go-to camping meals.
Simple, filling, flavorful. And no dishes.
Ingredients (serves 4):
- 4 boneless skinless chicken breasts (6–8 oz each)
- 1 cup (240 ml) of your favorite BBQ sauce — we love Sweet Baby Ray’s Hickory & Brown Sugar
- 1 red bell pepper, sliced
- 1 green bell pepper, sliced
- 1 small red onion, sliced into half rings
- 1 cup canned corn (frozen works too)
- Salt and pepper to taste
- Smoked paprika (optional)
- Heavy-duty foil (so it doesn’t rip in the coals)
How to make it:
- Tear off 4 large sheets of foil (around 12×18 inches).
- Place a chicken breast in the center of each sheet.
- Add BBQ sauce, bell peppers, onion, and corn right on top.
- Season with salt, pepper, a bit of smoked paprika, and more BBQ sauce if you like it saucy.
- Wrap up the foil packets, leaving a bit of room inside for steam.
- Place the packets on hot coals or a grill, and cook for 25–30 minutes, flipping once.
- Carefully unwrap (watch the steam!) and enjoy while it’s hot.
Tips & tricks:
You can prep the foil packs at home and keep them chilled — just toss them on the fire when you’re ready.
Once they’re cooked, top the chicken with crispy onions or crushed croutons for texture.
If you’re doing this at home, bake them in the oven at 400°F (200°C) for the same amount of time.
What to serve with it:
The chicken’s great on its own, but we usually bring along flatbreads or tortillas — wrap the chicken and veggies up and boom, instant campfire burrito.
Baked potatoes in the coals are another win: toss them in next to the chicken, and they’re ready in 30 minutes.
Sometimes we prep a jar salad at home and keep the dressing separate — just shake and serve.
And for drinks, nothing beats a thermos of lemonade or cold water with mint and orange slices.
- This recipe is all about keeping it easy and tasty. No stress. Just the kind of meal we always come back to on camping trips.
2. Blackstone Philly Cheesesteak Sliders You Can’t Skip

If you’ve got a Blackstone griddle, this is your go-to for any weekend outdoors. These sliders turn out juicy, flavorful, and you get full control over every single ingredient.
Ingredients (for 6 sliders):
- 1 lb (450 g) beef (thinly sliced rib or steak)
- 6 slider buns (or small brioche rolls)
- 1 green bell pepper, sliced into strips
- 1 onion, sliced into half rings
- 6 slices of provolone or American cheese
- cooking oil (spray works fine too)
- salt and pepper, to taste
- garlic butter for buns (optional)
How to make it:
- Heat up your griddle over medium heat. If you’ve got dual zones, use both — one for veggies, one for meat.
- Add a bit of oil and toss on the onion and pepper. Sauté until they soften and get just a little browned, about 5–7 minutes. Stir with a spatula.
- Push the veggies aside to a cooler zone. Add the beef to the hot side. If you’re using steak, slice it super thin, almost chip-like.
- Cook the meat quickly, stirring. Season with salt and pepper. Keep it juicy — it only needs about 3–4 minutes.
- Mix the meat and veggies together, gently combining them on the griddle. Shape into 6 small piles — one for each slider.
- Top each pile with a slice of cheese. We like provolone — it melts well and has a mellow flavor. Let it sit for a minute so the cheese melts and gets gooey.
- While that’s melting, cut the buns in half and toast them cut-side down on the griddle. If you’ve got garlic butter, this is the time to use it. They toast up quick — 1–2 minutes is enough.
- Build your sliders: bottom bun → meat with melted cheese → top bun.
- If you like, press each one gently with the spatula to give it that smashed shape and help it hold together.
And that’s it — ready to serve. Hot, juicy, crispy buns, melted cheese — and they go insanely well with something crunchy. We almost always pack dill chips or throw together a quick coleslaw in a jar — just cabbage, carrot, and dressing.
And if you’re craving something warm on the side, grill up some potato slices or zucchini right next to the sliders.
3. Campfire Nachos Recipe That’s TikTok Camping Gold

These nachos are not just tasty — they look amazing too. I still remember the first time we set that cast iron skillet on the grill, layered it up with cheese and veggies, covered it… and then lifted the lid to find everything perfectly melted.
Smoky smell, stretchy cheese, crispy chips — and no one believed it was that easy.
Ingredients (serves 4–6):
- corn tortilla chips (about 12 oz / 340 g)
- shredded cheese (cheddar, Mexican blend, or mozzarella)
- canned beans (black or pinto)
- canned corn
- tomato (chopped) or cherry tomatoes
- jalapeño (optional, finely chopped)
- green or regular onion, finely chopped
- sour cream, salsa, and guacamole for serving
You can prep and pack everything in containers ahead of time — that way, it’s all ready to layer and grill at camp.
How to make it:
- Grab a cast iron skillet with a lid, or use a disposable foil pan (it doesn’t hold heat as well, but it’ll work). Set it on a grill grate over the fire or directly on coals.
- Start with a base layer of chips. Be generous, but don’t overdo it — thin layers heat better.
- Sprinkle cheese, then add beans, corn, tomatoes, peppers, and onion.
- Repeat for 2–3 layers, always ending with a solid top layer of cheese.
- Cover the skillet with a lid or foil. That helps melt the cheese evenly and keeps the heat in.
- Place the pan over medium coals, or just to the side of the fire — not directly in flames. Let it heat for about 10–15 minutes. When the cheese is bubbling, it’s ready.
Remove the lid, let it cool just a bit (2–3 minutes), then serve right away. Put the nachos in the center, with guac, salsa, and sour cream on the side — and you’ve got dinner.
And if we want to make it heartier, we take some pre-cooked mince and warm it up next to it on the griddle.
Pair it with cold Mexican-style lemonade or lime-mint water — just something refreshing to balance the richness.
And most importantly: no forks allowed. We eat with our hands, gather by the fire, laugh, and soak in the real summer feeling.
4. Easy Campfire Pizza That Tastes Like a Backyard Oven
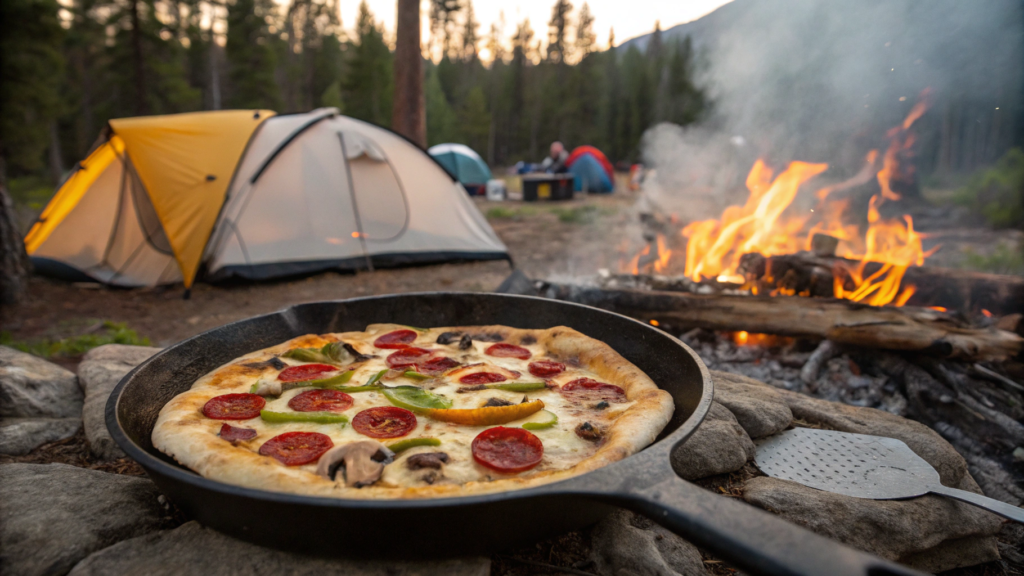
Making real pizza over a campfire is way easier than you’d think. After we moved to Idaho, we didn’t have an oven or even a grill — but we did have a fire, a skillet, and a serious craving for something other than canned food. And that’s how this pizza was born.
The crust gets crispy, the cheese melts just right, and the smell fills the whole campsite. Just the way we like it.
Ingredients (for 2 small pizzas):
- pizza dough (store-bought or homemade — we love the refrigerated one from Trader Joe’s)
- tomato sauce (or puréed tomatoes with a pinch of salt and oregano)
- shredded cheese (mozzarella, Italian blend — anything melty works)
- toppings of your choice: pepperoni, mushrooms, olives, bell pepper, basil
- olive oil
- cast iron skillet with lid (or foil)
How to make it:
- Preheat your skillet over hot coals or on a grill rack. It should be hot, but not blazing — think oven-hot.
- Drizzle a little olive oil and spread it across the bottom. This keeps the dough from sticking and helps with that crispy base.
- Stretch the dough into the pan with your hands, pressing it out toward the edges. If it tears — no big deal. Patch it up and keep going.
- Cook over open fire for about 3–5 minutes until the bottom is golden brown. Use a spatula to lift the edge and check.
- Flip the crust carefully — this is key — and start adding toppings right away: sauce first, then cheese, then everything else.
- Cover with a lid or foil and cook another 5–7 minutes, until the cheese is melted and that iconic pizza smell hits.
- Take it off the fire, let it cool slightly, slice it right in the pan — and call everyone over (by “table,” we usually mean a log).
This pizza doesn’t need much. But if you want to dress it up — a simple arugula and lemon salad, roasted garlic, or even just some olives and sliced tomatoes make great sides.
For drinks, anything cold works — cucumber water, iced tea, whatever’s refreshing.
The only real rule? Eat it hot, smoky, and straight from the skillet. Because yeah, it’s kind of magical.
5. Grilled Shrimp Skewers for Fancy Camping Vibes

Shrimp skewers take just 10 minutes to make, look absolutely amazing, and the flavor… well, let’s just say it deserves a glass of white wine — even if you’re sipping it out of a thermos by the fire.
Ingredients (serves 4):
- shrimp (peeled, preferably with tails on)
- olive oil
- lemon juice (from 1 lemon)
- garlic (2–3 cloves, minced or grated)
- paprika (regular or smoked)
- salt and black pepper
- wooden skewers (soak them in water for at least 30 minutes to keep them from burning)
How to make it:
- In a bowl, mix olive oil, lemon juice, garlic, paprika, salt, and pepper. This is your marinade.
- Add the shrimp and toss to coat. Let them marinate for at least 15 minutes — perfect timing while you’re lighting the fire.
- Thread the shrimp onto skewers — wave-style or straight, whatever works for you.
- Place your grill grate over the fire or set up your grill. You want medium heat — not open flame, just steady coals.
- Grill the skewers for 2–3 minutes per side, until the shrimp turn pink and get a little charred around the edges.
- Remove from heat, squeeze a bit more lemon juice on top, and serve immediately. Shrimp wait for no one — and they’re best hot and fresh.
These shrimp go great with rice or quinoa, especially if you’ve cooked them ahead of time. But more often, we just grab a loaf of fresh bread, toast it over the fire, rub it with garlic, and serve it on the side.
You can also bring a quick cucumber salad with vinegar and mint — super refreshing, like a cool breeze at the end of a hot day.
As for drinks? Anything chilled and citrusy. That’s the vibe.
6. Summer Veggie Stir-Fry on the Griddle (Viral + Easy)

Veggie stir-fry? At a campsite? Yep — especially if you’ve got a griddle, like a Blackstone.
This is one of those meals that’s not just convenient — it looks so good, you’ll want to post it. Everything sizzles, glistens in the sun, and fills the air with that unmistakable summer scent.
And in the end? You’ve got perfectly seared veggies with a bit of char, full of flavor, just like something from a little farmers market café.
Ingredients (serves 4):
- zucchini or summer squash, sliced into rounds or half-moons
- red bell pepper, sliced into strips
- yellow onion, roughly chopped
- mushrooms, halved or sliced
- green beans or broccoli (optional)
- soy sauce
- sesame oil (optional, but adds amazing flavor)
- vegetable oil for cooking
- ginger or garlic (fresh or dried, just a pinch)
- sesame seeds and green onion for serving
How to make it:
- Heat your griddle to medium-high. If you’re using a Blackstone, set up both zones — perfect for shifting veggies around as they cook.
- Add a bit of vegetable oil and let it heat for about 30–60 seconds.
- Start adding veggies to the hot surface, beginning with the ones that take longer: green beans, broccoli, onion. Then add pepper, zucchini, and mushrooms.
- Stir frequently, cooking until lightly browned but still a little crisp — about 6–8 minutes total.
- At the end, pour in soy sauce and sesame oil, then sprinkle with ginger or garlic. Give everything a final toss — the veggies will quickly glaze up and shine.
- That’s it! Take them off the heat and top with sesame seeds and chopped green onion. Serve them straight off the griddle or scoop into bowls — especially good if you’re eating under the stars.
You can enjoy this stir-fry as a main dish, especially with some rice or noodles. But more often, we use it as a go-to side: with grilled chicken, shrimp, even a bunless burger — it fits with just about everything.
Want to add some protein? Use the other half of your griddle to fry up some tofu or a quick egg. And to drink? We love a chilled ginger lemonade or iced green tea with mint. Refreshing and balanced — just like this dish.
7. Healthy Campfire Chicken Fajitas in 20 Minutes

I absolutely love fajitas — hot, flavorful, and full of seared chicken strips and veggies.
And the best part? You make everything in one pan, quick and easy — just what we all need after a long day on our feet.
This recipe is a real rival to your local Mexican takeout. Except here, you’re eating it by the campfire, staring at the mountains, knowing it’s fresh, healthy, and made from scratch.
Ingredients (serves 4):
- chicken breast, sliced into strips
- red bell pepper, sliced
- yellow or green bell pepper, sliced
- red onion, sliced into half rings
- olive oil
- paprika
- ground cumin
- dried garlic
- salt and black pepper
- tortillas (whole wheat preferred)
- lime, sour cream, avocado, cilantro — optional, for serving
How to make it:
- In a bowl or zip-top bag, combine chicken with olive oil, paprika, cumin, garlic, salt, and pepper. Mix it all up — using your hands is totally fine.
- Heat a skillet on a grill or grate over the coals. Once it’s hot, add the chicken and sear until golden — about 5–7 minutes.
- Add the onion and peppers, and cook everything together for another 5–7 minutes, until the veggies are soft and the chicken is cooked through. It should all be bright, juicy, and just a bit charred around the edges.
- While it’s cooking, warm the tortillas on the edge of the grill or wrap them in foil and toss into the coals for 1–2 minutes. They’ll turn soft and smell amazing.
Assemble your fajitas: load up the tortillas with filling, squeeze on some lime, add a dollop of sour cream, a few slices of avocado, some cilantro — and you’re good to go!
You can pair these with Mexican rice (made ahead), or even hummus if you want something lighter and fresh.
We always bring a bottle of hot sauce too — everyone adds their own kick.
To balance it out, we love a lime-and-basil infused water — super refreshing after the heat.
8. Blackstone Smashburgers You’ll Make Every Trip

You probably already know this, but let’s say it anyway — the Blackstone griddle was made for burgers.
And if you haven’t tried it yet, start with this recipe. Because smashburgers? They’re all about thin, crispy, juicy patties that melt in your mouth.
Ingredients (makes 4 burgers):
- ground beef (80/20 blend — trust me, the fat matters)
- salt and pepper (right before cooking)
- burger buns
- cheddar cheese slices
- oil or griddle spray
- optional: pickles, ketchup, mustard, crispy onions, lettuce
How to make it:
- Preheat your griddle to high heat. It should be fully hot — sizzling, not just warm.
- Divide the beef into 4 equal balls. Don’t smash them yet — the smash happens on the griddle.
- Add a bit of oil to the surface, place the balls down, let them sit for 30 seconds, then smash them flat using a spatula. Press hard! You want them thin and seared.
- Season with salt and pepper right on top while they’re still sizzling.
- Cook without flipping for 2–3 minutes until the edges are browned and crispy. Then flip — and immediately place a cheese slice on each patty.
- Wait 1–2 minutes for the cheese to melt. The patties are now ready.
- While the meat is cooking, toast the buns cut-side down on the griddle. For extra flavor, you can spread them with a bit of butter or mayo beforehand.
- Assemble the burgers: bottom bun → patty with cheese → toppings → top bun. Done. Classic perfection.
These burgers are a full experience on their own, but we usually add nachos, home-style potato wedges, or just some fresh cucumber and radish slices for crunch.
For drinks, go with ice-cold soda or a craft cola in a glass bottle — because aesthetics matter, even in the woods.
And if you’ve still got room? Toast some marshmallows. The griddle’s hot anyway.
9. Easy Chili Cheese Dogs for That Retro Summer Feel

This hot dog feels like a flashback to old-school American movies — wooden picnic benches, string flags overhead, lemonade in hand, and someone wiping ketchup off their shirt.
For us, chili cheese dogs are an end-of-day ritual: the fire’s burning low, everyone’s a little tired, but no one’s saying no to something greasy and delicious.
Ingredients (serves 4):
- hot dog buns
- sausages (natural, beef, or smoked work best)
- chili (homemade or something like Hormel Chili, which is great for camping)
- shredded cheddar cheese
- green onion or crispy fried onions (for crunch)
- optional: mustard, ketchup, hot sauce
How to make it:
- Heat your griddle or skillet and sear the sausages until browned all over, about 5–7 minutes. Turn them often so they heat evenly.
- While the sausages are cooking, warm up the chili — either in a small pot or right in foil over the coals. It should be hot and thick.
- Toast the buns, cut-side down on the griddle, until they get a light golden crust.
- Assemble the dogs: place a sausage in each bun, spoon over some hot chili, sprinkle with cheese, and if you like, add green onion or crispy fried onions on top.
- To melt the cheese, cover each hot dog with foil for just about a minute. That steam will do the trick.
We usually pair these with pickles, dill chips, and a cold vintage-style soda in a can.
Sometimes we throw corn on the grill too or bring along a bottle of hot sauce for anyone feeling bold.
But the real key? Eat these slow, with music in the background and stories about summer as the fire crackles nearby.
10. Loaded Campfire Potatoes That Are Blowing Up This Season

Baked potatoes in foil? Total camping classic. But when you load them up with cheese, bacon, herbs, and garlic butter, then unwrap that hot foil and dive in with a spoon — it’s clear why this recipe is blowing up everywhere.
We make these almost every camping trip. Sometimes as a side. Sometimes as a full-on dinner. And sometimes just because we want something hot and homey, with no dishes and no extra effort.
Ingredients (serves 4):
- potatoes (medium size, skin on is fine)
- shredded cheddar cheese
- cooked bacon, chopped
- sour cream
- green onion, chopped
- butter or garlic butter
- salt and pepper
- foil (heavy-duty!)
How to make it:
- Wash the potatoes well and poke each one a few times with a fork. Wrap each in foil.
- Place them directly in the coals (not flames!) and bake for about 40–50 minutes, turning once or twice.
- While they’re roasting, prep your toppings: chop the bacon, grate the cheese, slice the green onion.
- Check if the potatoes are done by poking with a knife — if they’re soft inside, carefully open the top of the foil (watch out for steam!).
- Cut a cross into the potato, gently open it up, and add butter, salt, cheese, bacon — whatever feels right.
- Fold the foil loosely back over and return to the coals for 5 more minutes, just until everything melts together inside.
- Take it out, top with sour cream and green onion, and eat it straight from the foil. Right by the fire.
What to serve with it:
Honestly? Nothing. This is a meal all by itself. But you can always go full-on “potato bar” — set out bowls of sour cream, shredded cheese, hot sauce, crispy onions, even chip crumbs.
If you’re serving it as a side, it pairs great with fajitas or shrimp skewers. And if it’s dinner under the stars — pour yourself a mug of herbal tea, wrap up in a blanket, and yes, even a baked potato can be a vibe.
Grill. Eat. Smile.
If you feel like trying even one of these recipes — just do it. No pressure, perfect coals, gourmet rules.
Just grill, eat, smile. Because camping isn’t just “getting away.”
It’s that feeling of freedom; smell of smoke in your hoodie; cheese stretching all the way to your chin.
And if you come up with your own twist — drop it in the comments. And if any of these land on your personal “make it every time” list… just know: we’re right there with you, by the same campfire.May your summer be warm, satisfying — and just a little bit crispy around the edges.