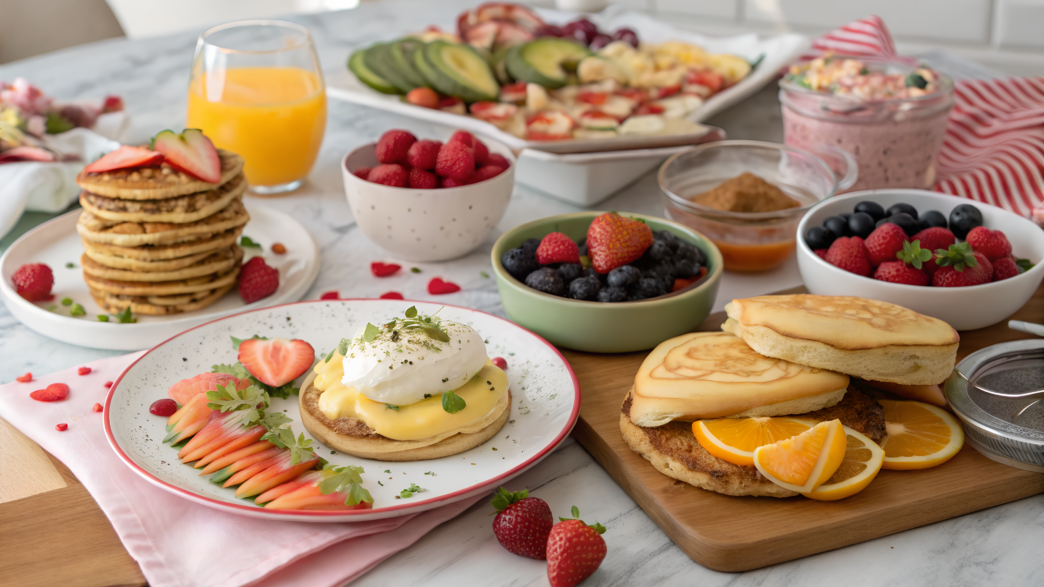
For me, a good Galentine’s brunch is a cozy get-together with girlfriends, not a formal dinner with a minute-by-minute schedule. The table should have food that is easy to eat, easy to pair together, and most importantly, it should taste good.
Lindy and I have a few brunch rules: a few beautiful dishes, different textures, and as little fuss as possible when it’s time to serve. Some things can be prepared ahead, some things can be quickly warmed up, and so on. Only then will brunch be pleasant not only for the guests, but also for the person making all the food.
You don’t need to try to make everything perfect. These are ideas that won’t turn your morning into a cooking exam, but still look beautiful. This is normal food, exactly right for Galentine’s brunch.
1. Rose Petal Croissants Filled with Vanilla Butter
Rose petal croissants filled with vanilla butter are a good way to start a festive Galentine’s brunch. Here we take ready-made croissants, make soft vanilla butter, add a little honey and edible rose petals. It turns out very pretty.
Rose petals are not here just for beauty. They give a light floral aroma. But you need to use edible rose petals, not decorative petals for baths, candles, or a “romantic atmosphere.” These are different things.
Ingredients
For 6 croissants:
- 6 large butter croissants
- 1/2 cup unsalted butter, softened (113 g)
- 2 tbsp honey
- 1 tsp vanilla paste or natural vanilla extract
- 1 tbsp powdered sugar
- 1/4 tsp fine sea salt
- 2 tbsp edible dried rose petals, lightly crushed, for example, Kate Naturals Dried Rose Petals Edible
- 1 tbsp finely chopped pistachios, optional
- 1 tbsp warm honey for brushing
How to Make
- Make the vanilla butter.
Place the softened butter in a bowl. It should be soft, not melted. Add the honey, vanilla paste, powdered sugar, and sea salt. Mix until you get a soft, creamy texture. You don’t need to whip it for long — we don’t need cake frosting, just a soft, fragrant filling. - Add the rose petals.
Lightly crush the petals with your fingers and mix them into the butter. Don’t turn them into dust. It’s enough to make the pieces smaller so they spread evenly through the filling. Larger petals are better saved for decorating the top. - Prepare the croissants.
Slice each croissant lengthwise, but not all the way through. Let it open like a book. If the croissants are very soft, cut carefully and don’t press down from the top. Puff pastry can squish easily, and we want to keep the pretty shape. - Fill the croissants.
Spread about 1–1 1/2 tbsp of the rose vanilla butter inside each croissant. Don’t put too much filling near the edges. When the croissant warms up, the butter will melt a little and spread through the layers on its own. - Warm the croissants.
Preheat the oven to 325°F (165°C). Place the croissants on a parchment-lined baking sheet and put them in the oven for 5–7 minutes. We don’t need to bake them again. We only need the vanilla butter to soften and soak slightly into the layers. - Brush the tops with honey.
While the croissants are still warm, lightly brush them with warm honey. Don’t pour it on. You just need a thin, glossy layer so the petals stick to the top and the croissants look more festive. - Decorate with rose petals and pistachios.
Sprinkle the croissants with rose petals and, if you like, finely chopped pistachios. Pistachios add a pretty green accent and a light nutty flavor. Just don’t overdo the rose. It should be a gentle note, not the feeling that you accidentally ate a bouquet.
How to Serve These Croissants for Galentine’s Brunch
Serve them nicely on a large white plate or a wooden board, but don’t crowd them too much. Croissants are pretty on their own, and they need a little space. You can add fresh strawberries, slices of blood orange, or a small bowl of extra vanilla butter nearby.
These croissants go well with coffee with milk, Earl Grey tea, or an iced vanilla latte. They look festive, delicate, and not overloaded with sugar.
Small Tips to Make Them Taste Better
- If the croissants are too large, you can cut them in half after warming and serve them as mini portions. Then guests can try several dishes instead of getting stuck with one huge croissant in the first ten minutes.
- If you are preparing ahead, make the rose vanilla butter the day before and keep it in the fridge. In the morning, take the butter out 30–40 minutes ahead so it becomes soft. But it’s better to fill and warm the croissants right before serving. That way, they keep their layers and don’t turn damp.
- It may happen that not everyone likes a floral aroma, so make half of the croissants with rose petals and half with just vanilla honey butter. Guests can choose their own version.
This is where I would start Galentine’s brunch. Pretty, fragrant, tasty!
2. Mini Frittatas with Halloumi & Spinach
Mini frittatas with halloumi & spinach are small egg bakes that are easy to serve for a Galentine’s brunch. Because after sweet croissants and berry desserts, you will always want something salty, warm, and filling.
Halloumi gives a salty flavor and a nice firm texture here. It doesn’t disappear into the eggs like many soft cheeses do, but stays in little pieces.
Ingredients
For 12 mini frittatas:
- 8 large eggs
- 1/3 cup milk or cream (80 ml)
- 1 cup fresh spinach, finely chopped
- 3/4 cup halloumi, cut into small cubes or grated (about 90 g)
- 1/4 cup green onion, thinly sliced
- 1/4 cup sweet red pepper, finely chopped
- 1 tbsp olive oil
- 1/2 tsp garlic powder
- 1/4 tsp black pepper
- 1/4 tsp salt, optional
- 1 tbsp fresh parsley or dill, finely chopped
- a little butter or oil spray for the pan
Halloumi is already salty, so you need to be careful with the salt. I usually just go by the cheese and don’t oversalt it.
For baking, use a muffin pan with a nonstick coating if you want an even shape and want the mini frittatas to come out more easily after baking.
How to Make Mini Frittatas with Halloumi and Spinach
- Prepare the pan.
Preheat the oven to 350°F (175°C). Grease the muffin pan with butter or oil spray. - Lightly cook the spinach.
Heat the olive oil in a small skillet. Add the chopped spinach and cook for 1–2 minutes, until it softens and shrinks a little. This removes extra moisture, so the frittatas don’t turn watery. - Add the pepper and green onion.
Add the sweet pepper and green onion to the skillet. Warm them for about 1 more minute. The vegetables should stay bright and not turn into a soft mush. - Mix the eggs with milk.
In a large bowl, whisk the eggs with the milk or cream. You don’t need to create foam. Just combine the whites and yolks so the mixture becomes even. Add the garlic powder, black pepper, and a little salt, if using. - Add the halloumi and herbs.
Add the halloumi, parsley or dill to the egg mixture, then add the warm spinach with vegetables. Mix with a spoon so the cheese and herbs are evenly spread out. Otherwise, one frittata will have all the cheese, and another will have almost nothing. This often happens with small portions. - Pour the mixture into the pan.
Fill each cup about 3/4 full. The frittatas will rise a little while baking, so don’t fill them all the way to the top. It’s easiest to do this with a small spoon or a measuring cup with a spout. - Bake until softly set.
Place the pan in the oven for 16–20 minutes. The finished mini frittatas should be set in the center and slightly risen. The top can become a little golden, but not dry. Overcooked eggs quickly turn rubbery, and we need a soft texture. - Cool and decorate.
Take the pan out of the oven and let the mini frittatas sit for 5 minutes. They will sink a little. Then gently run a knife around the edges and take out each frittata. Before serving, add a little fresh greenery on top, a thin strip of sweet pepper, or a small piece of halloumi.
How to Serve These Mini Frittatas for Brunch
Mini frittatas with halloumi & spinach look beautiful on a wide plate, in one layer, so they don’t get crushed or lose their shape. Fresh cherry tomatoes, thinly sliced cucumber, herbs, and a few olives will look nice next to them.
If there is a lot of sweet food on the table, these frittatas bring the right balance. After a croissant with vanilla butter, it feels really good to take something warm, salty, and protein-rich. Not heavy, but filling enough.
Small Tips
- For a softer texture, you can use cream instead of milk. The frittatas will turn out softer and a little richer in flavor, but with milk they will be lighter.
- You can also make them ahead. Bake the mini frittatas in the evening, let them cool completely, and put them in the fridge. Before serving, warm them in the oven at 300°F (150°C) for about 8–10 minutes.
These mini frittatas are convenient because they are easy to eat with your hands. That is a big plus for brunch. You take one little frittata, add a couple of berries, a piece of croissant, a little salad to the plate — everything is very pretty, tasty, and easy to eat.
3. Chili Honey Chicken Sliders on Brioche
Chili honey chicken sliders on brioche are a small soft bun, crispy chicken, sticky chili honey, and a little creamy sauce. These chili honey chicken sliders on brioche are simply necessary for a Galentine’s brunch.
I would definitely add these mini burgers to a Galentine’s brunch because they create a nice balance: honey softens the chili, the chicken stays juicy, and brioche adds a soft sweetness.
Ingredients
12 mini burgers:
- 12 small brioche buns (St Pierre Brioche Slider Rolls)
- 1 1/2 lb chicken breast or boneless, skinless chicken thighs (680 g)
- 1 cup buttermilk or kefir (240 ml)
- 1 large egg
- 1 1/2 cups flour (190 g)
- 1/2 cup cornstarch (60 g)
- 1 tsp smoked paprika
- 1 tsp garlic powder
- 1/2 tsp onion powder
- 1/2 tsp salt
- 1/2 tsp black pepper
- 1/4 tsp cayenne pepper, optional
- oil for frying
- 2 tbsp butter for the buns
For the chili honey:
- 1/2 cup honey (170 g)
- 1–2 tsp chili flakes
- 1 tsp apple cider vinegar
- 1 tbsp butter
- a pinch of salt
Sauce:
- 1/2 cup mayonnaise (115 g)
- 1 tbsp Dijon mustard
- 1 tsp honey
- 1 tsp lemon juice
- a pinch of salt
Serving:</h4>
- thinly sliced pickles
- a little thinly shredded cabbage or lettuce leaves
- green onion, optional
How to Make
- Cut the chicken.
Cut the chicken into small pieces about the size of the buns. It’s better if the piece of chicken sticks out slightly past the edges of the bun — this makes the mini burgers look more appetizing. Chicken thighs will be juicier, while chicken breast will turn out neater and lighter in flavor. - Marinate the chicken.
In a bowl, mix the buttermilk or kefir with the egg. Add the chicken, mix, and leave it for at least 30 minutes. If you have time, you can put it in the fridge for 2–4 hours. The acidic base helps the meat become softer, and this is especially noticeable in small pieces that cook quickly. - Prepare the dry mixture.
In a separate bowl, mix the flour, cornstarch, smoked paprika, garlic powder, onion powder, salt, black pepper, and cayenne pepper. The cornstarch is important here: it helps make the crust lighter and crispier. - Coat the chicken.
Take the chicken pieces out of the marinade and coat them in the dry mixture. Press the flour on with your hands so it sticks well. Then let the chicken sit on a plate for 5–7 minutes. During this time, the coating will moisten slightly and hold better during frying. - Fry the chicken.
Heat the oil in a deep skillet to 350°F (175°C). Fry the chicken in small batches for 3–4 minutes on each side, until the crust becomes golden and the meat is fully cooked inside. Don’t fill the skillet with all the pieces at once, otherwise the oil temperature will drop and the crust will turn heavy. - Make the chili honey.
In a small saucepan, mix the honey, chili flakes, apple cider vinegar, butter, and a pinch of salt. Warm it for 2–3 minutes over low heat so the butter melts and the chili releases its aroma. Don’t boil it hard. We need a glossy, sticky sauce, not caramel. - Mix the sauce for the buns.
In a small bowl, combine the mayonnaise, Dijon mustard, honey, lemon juice, and a pinch of salt. The sauce should be soft, a little sweet, and a little tangy. It helps balance the heat of the chili honey. - Toast the buns.
Cut the brioche buns in half, brush the cut sides with a thin layer of butter, and quickly toast them in a dry skillet or in the oven. This way, the warm bun holds the sauce better and doesn’t get soggy right away. - Assemble the mini burgers.
Spread a little sauce on the bottom half of the bun, add lettuce leaves or thin cabbage, place a piece of chicken on top, drizzle with chili honey, and add a couple of pickle slices. Cover with the top half of the bun. If you like, secure with a small skewer.
How to Serve These Mini Burgers for Brunch
Mini burgers with chicken and chili honey are best served warm. They don’t have to be piping hot, but at least warm enough for the bun to stay soft and the chicken not to turn cold.
I would arrange them on a large plate or a low tray, not stacked up, but in one layer. Between them, you can add lemon wedges, pickles, a little greenery, or a small bowl of extra chili honey.
Small Tips
- For juiciness, it’s better to use boneless chicken thighs. They stay soft even after frying. Chicken breast will also work, just watch the time so it doesn’t dry out.
- It’s easier to control the heat in the chili honey, not in the chicken itself. Make the sauce milder, and place a small bowl with a spicier version nearby for those who like it hotter.
- You can fry the chicken a little ahead and keep it in a warm oven at 250°F (120°C) for 15–20 minutes. But it’s better to assemble the mini burgers closer to serving, so the buns stay soft but not wet.
For brunch, it’s better to plan for 1–2 mini burgers per person, depending on how many other dishes will be on the table. If there will also be sweet croissants, desserts, and fruit, one may be enough. But if guests arrive hungry or brunch is closer to lunch, it’s better to make one and a half batches right away.
4. Pomegranate Yogurt Parfaits
I usually serve these little cups in the middle of brunch. Because after warm and filling dishes, you want a spoonful of cold creamy yogurt, a little tang from pomegranate, and something crunchy. And it looks very attractive.
Pomegranate contains a lot of polyphenols, and studies link pomegranate juice and pomegranate extracts with antioxidant activity and support for vascular health. But in this recipe, it is first of all for taste, juiciness, and beauty.
Ingredients
For 6 servings:
- 3 cups thick Greek yogurt (720 g)
- 3 tbsp honey
- 1 tsp vanilla extract
- 1 1/2 cups pomegranate seeds
- 1 cup granola
- 1/2 cup chopped pistachios or almonds
- 1 tsp orange zest
- 1 tbsp orange juice
- a pinch of sea salt
- a few mint leaves for decorating, optional
For a beautiful presentation, it is better to use thick Greek yogurt. Regular runny yogurt will spread quickly, and the layers will look less neat.
How to Make
- Prepare the yogurt base.
In a bowl, mix the Greek yogurt, honey, vanilla extract, orange zest, orange juice, and a small pinch of salt. Stir with a spoon until the texture is soft and even. Don’t whisk too actively: thick yogurt is good exactly because of its density. - Taste it before assembling.
The yogurt should be slightly sweet, but not like dessert cream. The pomegranate will add acidity, and the granola will add sweetness, so it’s better not to overload the base with honey right away. If needed, add 1 more tsp of honey. - Add the first yogurt layer.
Add 2–3 tbsp of the yogurt base to the bottom of each glass. Smooth it out with a spoon, but don’t obsess over it. Small uneven spots in the layers are acceptable. - Add the pomegranate.
Sprinkle in a layer of pomegranate seeds. Try to place them closer to the sides of the glass so the ruby color is clearly visible from the outside. This immediately makes the portion prettier. - Add the crunchy layer.
Add a little granola and chopped pistachios or almonds. This layer should not be too thick, otherwise the parfait will turn a little dry. A couple of spoonfuls are enough to add crunch. - Repeat the layers.
Add a little more yogurt, then pomegranate, and a thin layer of granola with nuts on top. The top should look generous, but not heavy. I like when you can see the white yogurt, the red seeds, and the green pistachios on top. - Decorate before serving.
Add a few pomegranate seeds, a pinch of orange zest, and a mint leaf. Mint is optional, but it gives a fresh green accent. It looks especially pretty next to pink and red dishes at brunch. - Chill briefly.
These parfaits are best made shortly before brunch. After you have layered the yogurt, pomegranate, and granola, place the glasses in the fridge for 10–15 minutes — that is enough for the dessert to become cooler, but the crunchy layer will not have time to get soggy.
How to Serve These Parfaits for Galentine’s Brunch
Pomegranate yogurt parfaits are best served in clear glasses or small jars. This way, the layers are visible, and guests immediately understand what is inside. I would place them on a tray next to small spoons, napkins, and a little bowl of extra pomegranate.
They look especially good next to richer dishes: mini chicken burgers, frittatas, and cheese tartlets. The parfaits refresh the table and give a feeling of lightness.
Small Tips
- It is better to choose granola that is not too sweet. This recipe already has honey, pomegranate, and vanilla, so overly sweet granola can make the flavor flat.
- Pomegranate seeds are easy to prepare ahead and store in a closed container in the fridge. That way, in the morning, all you need to do is mix the yogurt and quickly assemble the little cups.
One portion per person is usually enough, especially if there will be other dishes on the table. But I would still make a couple of extra cups. These parfaits are often taken not instead of dessert, but when someone wants a cool, fresh, not-too-sweet snack.
5. Smoked Tomato Mini Quiches
Smoked tomato mini quiches are small creamy tartlets with egg, cheese, and a deep tomato flavor. You can take one at a time and add it to the rest of the food.
Lindy and I often make similar mini bakes when we need to use a lot of ripe tomatoes. On our small lot in Idaho, the harvest could ripen almost all at once, so we ate some tomatoes fresh and roasted the rest right away. That way, they took up less space, became sweeter and richer, and then worked well in breakfasts, pies, sauces, and these mini quiches.
For a home kitchen, roasted tomatoes with smoked paprika are exactly what you need. They give a soft smoky flavor without a smoker, charcoal, or half a day of adventures.
Ingredients
For 12 mini quiches:
-
- 1 sheet ready-made pie dough or shortcrust pastry
- 1 cup cherry tomatoes, cut in half
- 1 tbsp olive oil
- 1/2 tsp smoked paprika
- 1/4 tsp salt
- 1/4 tsp black pepper
- 4 large eggs
- 1/2 cup cream (120 ml)
- 1/3 cup whole milk (80 ml)
- 1/2 cup grated Gruyère or cheddar cheese (about 55 g)
- 1/4 cup soft goat cheese, crumbled (about 30 g)
- 1 tbsp finely chopped green onion
- 1 tbsp fresh basil, sliced into thin strips
- a pinch of nutmeg, optional
- a little oil for the pan
Tomatoes contain lycopene, which has antioxidant properties. And when tomatoes are heated, lycopene availability may increase, which is one reason roasted and cooked tomatoes deserve a place in the kitchen, not just fresh ones in a salad.
How to Make Smoked Tomato Mini Quiches
- Roast the tomatoes.
Preheat the oven to 375°F (190°C). Place the cherry tomato halves on a baking sheet, add the olive oil, smoked paprika, salt, and black pepper. Toss and arrange them cut side up. Roast for 18–22 minutes, until the tomatoes become soft, slightly wrinkled, and richer in flavor. They should not turn into sauce. We need small juicy pieces. - Prepare the dough.
While the tomatoes are roasting, lightly roll out the dough and cut circles slightly larger than the cups of a muffin pan. Carefully place the dough into the greased pan, pressing it to the bottom and sides. It’s okay if the edges are a little uneven. In homemade baking, that can even feel nicer than a perfectly smooth factory shape. - Make the egg base.
In a bowl, mix the eggs, cream, milk, a pinch of salt, black pepper, and a little nutmeg. Whisk until smooth, but not foamy. The filling should be tender, not airy like an omelet. - Add the cheese and herbs.
Stir in the grated Gruyère or cheddar, green onion, and part of the basil. It’s better not to fully mix in the goat cheese, but to add it in small pieces directly to each cup. That way, it stays as soft creamy spots inside the filling. - Place the tomatoes into the bases.
Add 2–3 roasted tomato halves to each dough shell. Don’t pack them in too tightly. Tomato is juicy, and if there is too much of it, the filling can become wet. - Pour in the egg mixture.
Carefully pour the egg base into each cup almost to the top, but leave a little space. Then add a small piece of goat cheese to each one. It won’t melt completely, but will become soft and creamy. That is very nice in mini quiches. - Bake until the edges are golden.
Lower the oven temperature to 350°F (175°C) and bake the mini quiches for 18–22 minutes. The edges of the dough should become golden, and the filling should set in the center. Don’t overbake them: egg filling quickly loses tenderness when it is dried out too much. - Let them rest for a little while.
Leave the mini quiches in the pan for 5–7 minutes. During this time, the filling will become more stable, and they will be easier to remove. Then gently run a knife around the edges and take out each mini quiche. Before serving, add a little fresh basil on top.
How to Serve These Mini Quiches for Galentine’s Brunch
Smoked tomato mini quiches are best served warm or at room temperature. You can bake them a little ahead, let them cool, and calmly take care of the drinks and fruit.
These quiches don’t need complicated serving. It’s enough to add a few fresh basil leaves and a couple of roasted tomatoes next to them on the plate for color. The salty, creamy, slightly smoky taste of the quiche breaks up the sweetness of the other dishes. Because a good brunch should not be only sweet, even when it is pretty and festive.
Small Tips
- It’s better to roast the tomatoes ahead. They can sit in the fridge until the next day, and in the morning all you need to do is place them into the dough and pour in the egg mixture.
- Goat cheese can be replaced with feta, but the taste will become saltier and sharper. Gruyère gives a softer creamy flavor, while cheddar is a little brighter and more familiar. I would choose Gruyère when I want a gentler presentation, and cheddar when there are a lot of sweet dishes on the table and something more expressive is needed.
- Don’t add hot tomatoes directly into the egg mixture. Let them cool a little.
These mini quiches taste best when they are no longer burning hot, but still warm. The dough stays tender, the cheese inside is soft, and the tomatoes give that deep flavor that makes the whole recipe worth making.
6. Maple Whipped Butter Boards
In this recipe, it is important to make the butter airy, slightly sweet, and not too sugary. Maple syrup gives a deep caramel flavor, salt balances it, and nuts or cinnamon add texture. It turns out not like dessert cream, but like a festive spread for baked goods. For a Galentine’s brunch, this is a very convenient thing: it looks pretty, comes together quickly, and everyone takes as much as they need.
Ingredients
For one medium board:
- 1 cup unsalted butter, softened (226 g)
- 3 tbsp maple syrup, for example, Coombs Family Farms Organic Maple Syrup
- 1 tbsp honey, optional
- 1/2 tsp vanilla extract
- 1/4 tsp fine sea salt
- 1/4 tsp ground cinnamon
- 1/3 cup toasted pecans or walnuts, finely chopped
- 1–2 tbsp dried cranberries, finely chopped
- 1 tsp orange zest, optional
- a little extra maple syrup for the top
- a pinch of flaky salt for serving
For serving:
- warm rolls
- pieces of croissants
- brioche toast
- apple slices
- plain crackers
- 1 medium serving board or a large flat plate
It is better to use a smooth wooden, marble, or ceramic board of medium size. The butter will sit directly on the surface, so the board should be clean, without cracks or a strong wood smell. You can line the board with a piece of parchment paper — it is a little less impressive, but easier to clean up.
How to Make a Maple Whipped Butter Board
- Soften the butter.
Take the butter out ahead of time and leave it at room temperature for 45–60 minutes. It should press easily with a spoon, but not be melted. Butter that is too cold will not whip properly, and melted butter will give a greasy, heavy texture. - Whip the butter.
Transfer the butter to a bowl and whip it with a mixer for 2–3 minutes, until it becomes lighter and softer. Whipping makes the spread light, not just sweet butter. - Add the maple syrup and spices.
Pour in the maple syrup, add the vanilla, salt, and cinnamon. Whip for another 30–40 seconds. You can add honey, but no more than 1 tbsp. Otherwise, the butter will quickly start to feel like dessert cream. - Taste and adjust the flavor.
The butter should be slightly sweet, creamy, and with noticeable salt in the background. If the flavor feels neutral, add a tiny pinch of salt. Very often, salt is what makes the maple flavor brighter. - Spread the butter on the board.
Take a clean serving board or a large flat plate. Use a spoon or a small spatula to spread the butter in wide strokes. Don’t spread it too thin: guests should be able to scoop up the butter with a piece of bread. - Add the nuts and cranberries.
Sprinkle toasted pecans or walnuts, finely chopped dried cranberries, and orange zest on top. The nuts add crunch, the cranberries add a light tang, and the zest makes the flavor fresher. - Finish with maple syrup and salt.
Lightly drizzle the board with a thin stream of maple syrup and add a little flaky salt. Don’t pour it all over the top. You want small sweet-salty spots, not puddles of syrup. - Serve right away or chill slightly.
You can place the board in the fridge for 10–15 minutes if the kitchen is warm. But don’t keep it there too long: butter that is too cold will become firm, and it will be hard to scoop with bread.
How to Serve This Board for Galentine’s Brunch
A maple whipped butter boards is good to serve with warm baked goods, for example, soft rolls, slices of brioche, pieces of croissants, or simple toast.
It is better to cut everything into small pieces ahead of time. This way, guests will not break a whole croissant over the board, and the table will stay neater. For apples, choose firm varieties like Honeycrisp or Pink Lady — they don’t fall apart and give a pleasant freshness.
Small Tips
- The butter can be whipped the day before and stored in a container in the fridge. Before serving, take it out ahead of time so it becomes soft again.
- It is better to lightly toast the nuts in a dry skillet for 3–4 minutes. This makes the flavor more noticeable and the texture more pleasant.
The butter can be prepared ahead, the nuts toasted in a few minutes, and before serving you just spread everything over the board. You get a soft, sweet-salty accent for baked goods that stays in harmony with the other dishes and helps make brunch more varied.
7. Blood Orange & Basil Mocktail Punch
This drink has a beautiful ruby-orange color, a light citrus tang, soft sweetness, and the herbal aroma of basil. And this is not juice from a carton, but a proper festive drink that you can pour into a large pitcher and serve with appetizers.
It refreshes. Blood orange gives a soft tang, basil adds a fresh green aroma, and sparkling water makes the punch lighter.
Ingredients
For 8–10 servings:
- 2 cups blood orange juice (480 ml)
- 1 cup orange juice (240 ml)
- 1/2 cup lemon juice (120 ml)
- 1/3 cup honey or simple syrup (80 ml)
- 2 cups chilled sparkling water (480 ml)
- 1 cup chilled pomegranate juice, optional (240 ml)
- 1 blood orange, thinly sliced
- 1 regular orange, thinly sliced
- 1 lemon, thinly sliced
- 8–10 fresh basil leaves
- 1–2 cups ice
- a pinch of salt
How to Make Blood Orange and Basil Mocktail Punch
- Prepare the citrus base.
Pour the blood orange juice, regular orange juice, and lemon juice into a large pitcher. Stir with a spoon. Blood orange gives color and a soft bitterness, regular orange makes the flavor richer, and lemon keeps the drink from becoming too sweet. - Add the honey or syrup.
Stir in the honey or simple syrup. Honey gives a deeper flavor, but it dissolves worse in cold juice. To make it easier, you can mix the honey with 2–3 tbsp of warm water ahead of time and then add it to the pitcher. - Add a pinch of salt.
This helps make the flavor brighter. You need very little salt, literally on the tip of a spoon. It should not be noticeable on its own. - Add the fruit slices.
Add the blood orange, regular orange, and lemon to the pitcher. Slice them thinly so the fruit floats beautifully in the drink and releases aroma faster. Thick slices look heavy and take up too much space in the pitcher. - Gently bruise the basil.
You can gently clap the basil leaves between your hands or press them lightly with a spoon. Don’t tear them into tiny pieces. We need aroma, not green bits all through the drink. - Chill the base.
Place the pitcher in the fridge for 20–30 minutes. During this time, the citrus and basil will give more flavor. Don’t leave it longer: the lemon peel can add extra bitterness. - Add sparkling water before serving.
Pour in the cold sparkling water right before placing the punch on the table. This way, the drink stays light and lively. After sitting too long, the bubbles disappear, and the punch becomes just citrus juice with fruit. - Add ice and check the flavor.
Add the ice, stir, and taste. The flavor should be fresh, citrusy, and not syrupy. For more acidity, add a little lemon juice. For a richer color, you can pour in pomegranate juice, but not too much, so it doesn’t overpower the blood orange.
How to Serve This Punch for Galentine’s Brunch
Blood orange and basil punch is best served in a clear pitcher or a large glass bowl. This way, you can see the citrus, the greenery, and the beautiful color of the drink. You can place glasses with ice and small orange slices nearby for decorating.
This drink pairs well with richer dishes: mini chicken burgers, mini tomato quiches, and frittatas with halloumi. It refreshes the taste after cheese, butter, and baked goods, but does not pull attention away from the food.
It is worth saying that croissants with vanilla butter, raspberry cheesecake jars, and yogurt parfaits are much more pleasant to eat when you can take a sip of a cold citrus drink between them.
Small Tips
- Add the basil closer to serving. It releases aroma quickly, but if it sits for too long, it can become too sharp.
- It is better to keep the sparkling water separate until the last moment. This is the easiest way to keep the drink fresh, not flat.
- For a more expressive color, add a little pomegranate juice. It makes the punch darker and more festive, but the blood orange flavor should still stay main.
This punch is convenient because the base can be prepared ahead. The juices, honey, and sliced citrus can wait in the fridge, and you add the sparkling water and ice right before serving. This bright, fresh alcohol-free drink goes with almost everything on the brunch table and does not make the menu feel heavier.
8. Raspberry Cheesecake Jars
After salty mini quiches, frittatas, and chicken buns, you want to snack on something sweet, and it should not be a huge slice of cake. A small jar with raspberry cheesecake is just right here: you take a spoon, taste the creamy layer, then the raspberry, then the crunchy crumb at the bottom. Simple and tasty.
Ingredients
For 6 small jars:
- 1 cup cookie crumbs (about 100 g)
- 3 tbsp melted butter
- 1 tbsp sugar
- 8 oz cream cheese, room temperature (225 g)
- 1/2 cup thick Greek yogurt (120 g)
- 1/3 cup powdered sugar (40 g)
- 1 tsp vanilla extract
- 1 tsp lemon zest
- 1 tbsp lemon juice
- 1/2 cup heavy whipping cream (120 ml)
- 1 1/2 cups fresh raspberries
- 1 tbsp honey or sugar for the raspberries, optional
- a pinch of salt
- a few raspberries for decorating
How to Make Raspberry Cheesecake Jars
- Make the cookie base.
Mix the cookie crumbs, melted butter, sugar, and a small pinch of salt. The mixture should look like wet sand. If the crumbs are completely dry and falling apart, add 1 more tsp of melted butter. - Divide the crumbs between the jars.
Place 1–2 tbsp of the base at the bottom of each jar and lightly press it down with a spoon. Don’t pack it too tightly. We need a crunchy bottom layer, not a hard slab that is difficult to scoop with a spoon. - Prepare the cream cheese.
The cream cheese should be soft. Cold cheese mixes badly and can leave lumps in the cream. Transfer it to a bowl, add the powdered sugar, vanilla, lemon zest, lemon juice, and a pinch of salt. Mix until smooth. - Add the yogurt.
Stir in the Greek yogurt. It makes the cream lighter and adds a pleasant tang. The flavor becomes closer to a real cheesecake, but without the feeling of a heavy creamy dessert. - Whip the cream separately.
In a separate bowl, whip the cold cream to soft peaks. Don’t make it too firm. The cream should hold its shape, but still stay tender. - Combine the cream with the whipped cream.
Gently fold the whipped cream into the cheese base. It is better to do this with a spatula, in 2–3 additions. This keeps the cream more airy. At this stage, don’t mix for too long, or the mixture will lose its lightness. - Prepare the raspberries.
You can lightly mash part of the raspberries with honey or sugar using a fork. Don’t turn them completely into puree. Let some berry pieces remain. This way, the top layer will be juicy, but not too runny. - Fill the jars.
Add the creamy filling on top of the crumb layer, then add a little raspberry. You can make one tall creamy layer with berries on top, or repeat the layers twice if the jars are taller. The main thing is not to fill them all the way to the edge, so the dessert is easy to eat. - Chill before serving.
Place the jars in the fridge for at least 1 hour. During this time, the cream will become firmer, and the flavor will become more even. Before serving, add a few fresh berries and a little lemon zest on top.
How to Serve These Jars for Galentine’s Brunch
Raspberry cheesecake jars are best served chilled. They look good on a tray, especially if the jars, like Ball Mini Mason Jars 4 oz, are the same size and the layers are visible through the glass. Be sure to place small spoons and napkins nearby so guests can take the dessert without extra fuss.
This dessert is good to place closer to the end of brunch, when there have already been salty dishes and light appetizers on the table. It is sweet, but not too heavy, so it does not feel like a large final cake after everything else.
Small Tips
- It is better to make the cream with room-temperature cream cheese. This is the easiest way to avoid lumps and get a smooth layer.
- Don’t press the cookie crumbs too hard into the bottom. In jars, it is more convenient when the bottom layer stays a little crumbly and is easy to scoop with the cream.
- Raspberries can be replaced with strawberries or a mix of berries, but raspberries give the best balance: they are bright, tangy, and don’t make the dessert too sweet.
The main thing is to fill the dessert so every spoonful has a little bit of everything: crumbs, creamy filling, and berries. Then this dessert does not feel like just sweet cream with decoration on top, but gives a real cheesecake flavor in a small portion.
This is a good final dessert for a table that already had salty appetizers and baked goods: sweet, berry-forward, and light.
9. Herbed Goat Cheese Tartlets
Everything is simple in these goat cheese tartlets with herbs: a crispy base, soft cheese filling, fresh herbs, and a little honey or lemon zest on top. They look very pretty, which matters for a festive table.
Goat cheese does not need ten add-ins, but thyme, green onion, parsley, and lemon zest will make its flavor more expressive. And maybe just a little honey on top.
Ingredients
For 12 small tartlets:
- 1 sheet ready-made puff pastry or ready-made pie dough
- 6 oz soft goat cheese, room temperature (170 g)
- 3 oz cream cheese, room temperature (85 g)
- 1 large egg
- 1 tbsp cream or milk
- 1 tbsp finely chopped parsley
- 1 tbsp finely chopped green onion
- 1 tsp fresh thyme
- 1/2 tsp lemon zest
- 1/4 tsp garlic powder
- 1/4 tsp black pepper
- a pinch of salt
- 1–2 tsp honey for serving, optional
- a little fresh greenery for the top
How to Make Goat Cheese Tartlets with Herbs
- Prepare the dough.
Preheat the oven to 375°F (190°C). Lightly roll out the dough and cut it into 12 squares or circles. The size should be slightly larger than the cups of the pan, so the dough covers the bottom and comes up the sides a little. - Place the dough into the pan.
Grease the pan with oil and gently press the pieces of dough into the cups. Don’t stretch the dough too much, or it may shrink while baking. The edges can be a little uneven — for this kind of appetizer, that is fine. - Make the cheese filling.
In a bowl, mix the soft goat cheese, cream cheese, egg, and cream. Mash with a spoon or whisk until the texture is smoother. Small bits of goat cheese are okay; they do not hurt the flavor. - Add the herbs and spices.
Stir in the parsley, green onion, thyme, lemon zest, garlic powder, black pepper, and a pinch of salt. Be careful with the salt: goat cheese can already be quite salty. - Fill the tartlets.
Add about 1 tbsp of the cheese filling to each dough base. Don’t fill them all the way to the top. The filling will rise slightly, and the dough needs space to become crisp around the edges. - Bake until golden.
Place the pan in the oven for 16–20 minutes. The dough should turn golden, and the filling should become firmer, but not dry. The center can stay a little soft: it will become more stable after cooling. - Let the tartlets rest.
Leave them in the pan for 5 minutes. Then gently run a knife around the edges and remove each tartlet. If you take them out right away, the hot filling may be too tender. - Add the final accent.
Before serving, add a little fresh greenery on top and, if you like, a drop of honey. Just a drop. Honey highlights goat cheese well, but too much of it quickly makes the flavor too sweet.
How to Serve These Tartlets for Galentine’s Brunch
Goat cheese tartlets with herbs are best served warm or at room temperature. And that is convenient, because you can bake them a little ahead and then not run to the oven at the last minute.
On the table, they will fit well next to mini quiches, yogurt parfaits, and citrus punch. Goat cheese gives a creamy tang, so fresh vegetables, grapes, apple slices, or thinly sliced cucumber will not hurt.
You don’t need many decorations for serving. The tartlets already have a nice contrast: golden dough, light cheese filling, and greenery on top. It is better to leave them on a wide plate in one layer so the edges do not soften.
Small Tips
- It is better to take the goat cheese out of the fridge ahead of time. Cold cheese does not mix well with cream cheese, and the filling can turn lumpy.
- It is better to use fresh thyme, because it gives a more delicate flavor than dried thyme. But if you only have dried thyme on hand, use 1/4 tsp, no more. It is stronger in aroma and can easily overpower the cheese.
- Lemon zest is here not for acidity, but for freshness. It makes the filling feel less heavy, especially if there are already baked goods and buttery dishes on the table.
These tartlets do not overpower the flavor of the other appetizers, but they add a cheesy, herby part to the menu that is often missing from a pretty brunch. And they are easy to eat without a knife and fork — for this format, that is always convenient.
10. Chocolate-Dipped Strawberry Skewers
Strawberries, melted chocolate, and a little crunch on top — what could be better for Galentine’s Brunch Foods? After salty tartlets, mini quiches, punch, and yogurt parfaits, chocolate-dipped strawberry skewers will be just right.
Ingredients
For 12 skewers:
- 24 large strawberries
- 8 oz semi-sweet melting chocolate (225 g)
- 1 tsp coconut oil, optional
- 1/4 cup finely chopped pistachios
- 2 tbsp shredded coconut
- 2 tbsp freeze-dried raspberries, crushed
- a pinch of flaky salt, optional
- 12 wooden skewers
How to Make Chocolate-Dipped Strawberry Skewers
- Prepare the strawberries.
Gently rinse the berries and dry them very well with a paper towel. If there is water left on the strawberries, the chocolate will stick worse and may go on unevenly. - Thread the berries onto skewers.
Add 2 berries to each skewer. Don’t push them too close together: leave a little space so the chocolate can cover each strawberry nicely. If the berries are very large, you can use one berry per skewer. - Melt the chocolate.
Place the chocolate in a heatproof bowl and melt it in the microwave in short 20–30 second bursts, stirring each time. Add coconut oil if you want a thinner, smoother coating. The chocolate should become fluid, but not hot. - Prepare the toppings.
Place the pistachios, shredded coconut, and crushed freeze-dried raspberries into small bowls. It is better to do this before you start dipping the strawberries. Chocolate sets quickly, and later you won’t want to search the kitchen for nuts with sticky hands. - Dip the strawberries in chocolate.
Hold the skewer by the free end and gently dip the berries into the melted chocolate. You can cover the strawberries fully or only halfway. For brunch, I like partial coating better: the red color of the berries stays visible, and the dessert looks lighter. - Add the topping.
While the chocolate is still soft, sprinkle the strawberries with pistachios, coconut, or raspberries. You don’t need to use everything on every skewer. It is better to make a few versions so the plate looks more interesting: some with pistachios, some with raspberries, and some with coconut. - Let the chocolate set.
Place the skewers on parchment paper and leave them at room temperature for 20–30 minutes. If the kitchen is warm, put them in the fridge for 10–15 minutes. Don’t keep them in the fridge for too long: the strawberries can start releasing moisture, and the chocolate will lose its nice surface. - Add the final touch.
Before serving, you can sprinkle some of the skewers with a tiny pinch of flaky salt. This works especially well with dark or semi-sweet chocolate. Salt makes the chocolate flavor brighter, but you need very little.
How to Serve These Skewers for Galentine’s Brunch
Chocolate-dipped strawberry skewers are best served on a flat plate or a long tray in one layer. This way, the chocolate will not crack, the berries will not get crushed, and guests can easily take one portion.
Strawberries and chocolate make a beautiful dessert finish, and because of the berries, it does not feel too heavy.
Small Tips
- It is better to use large and firm strawberries. Berries that are too soft release juice quickly, and the chocolate sticks worse.
- Do not overheat the chocolate. When it is almost melted, it is better to simply stir it with a spoon and let the remaining pieces melt from the heat of the bowl. This will give you a smoother coating.
- Toppings stick better while the chocolate is still glossy and soft. So it is easier to work in small batches: dip 3–4 skewers, decorate them right away, then continue.
In this dessert, the main things are fresh berries and a smooth chocolate texture. Prepare the strawberries ahead, but dip them in chocolate closer to serving or a few hours before brunch. Then the berries will stay juicy, the chocolate will stay even, and the skewers will look beautiful and appetizing on the table.
A Good Brunch
I think you should prepare ahead for a Galentine’s brunch, and for any gathering, really. But don’t try to make the whole menu at once. Choose a few ideas that work for you. Sometimes a couple of good dishes, a beautiful drink, and something small and sweet are enough to make the gathering feel special. Without the feeling that the holiday was for everyone except you.
What would you make first for your Galentine’s brunch table? Write in the comments what you prefer — something sweet, salty, creamy, berry-filled, or with a little heat.
I love peeking at these kinds of ideas from other home cooks. Usually, the tastiest little tricks are found right in the comments.