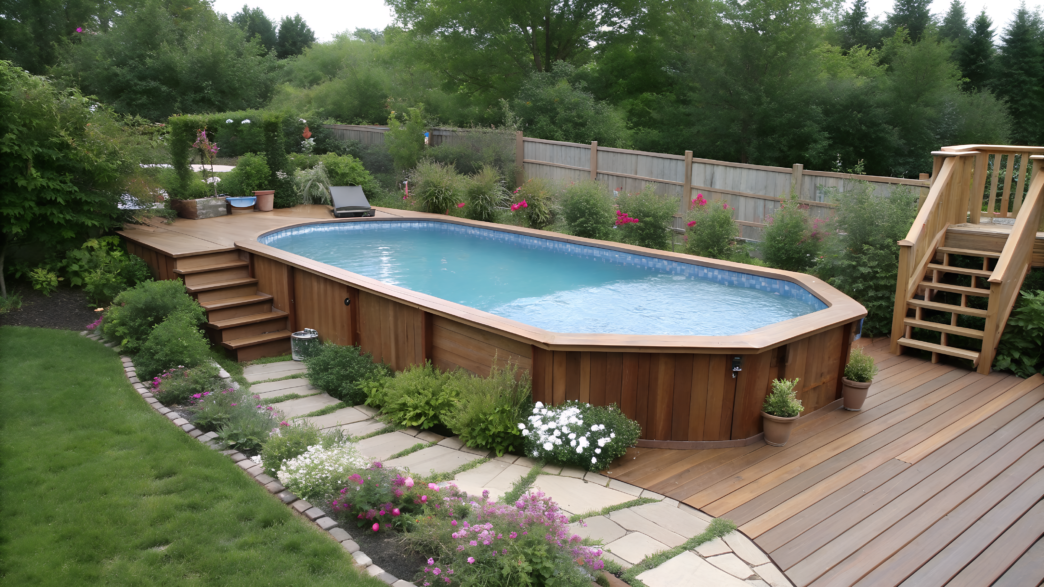
To make an above ground pool in the backyard not look like a temporary bowl, you don’t always need an expensive deck or a big construction project. Often, simple things make the difference — gravel, stone, dark shades, plants, lighting, privacy, and a neat entry area.
I love these kinds of solutions because they simply help the pool look like it belongs in its place. And that is already half the success.
But at the same time, you need to think not only about beauty, but also about the practical side: where the water will drain, how to reach the filter, where the kids will step out with wet feet, what will be visible from the house or from the neighbors.
When the pool has a clear zone around it, it immediately looks like a normal part of the yard.
1. Gravel Pad Base With Buried Border Pavers
In above ground pool ideas, it is important to pay attention to the base. A gravel pad with buried border pavers helps an above ground pool look visually built into the yard.
This is a practical solution, and it makes sense around a pool where wet grass, mud, and worn-down paths quickly appear. Water splashes out, kids run back and forth, someone will definitely step out of the pool to grab a towel and leave wet footprints. Gravel handles all of this better than lawn. For the area around the pool, this means less mud, fewer slippery spots, and a drier edge after swimming.
What You’ll Need
- A straight-edged shovel or a regular garden shovel.
- A rake for spreading gravel.
- A long level or a straight board 6–8 ft long (about 1.8–2.4 m).
- A hand tamper.
- Weed barrier landscape fabric.
- Crushed stone for the base — angular stone is better than round decorative rock.
- Border pavers about 2–4 in high (5–10 cm).
- Small decorative gravel or river rock for the top layer.
- Sand for leveling the pavers.
- A rubber mallet.
- A garden hose or spray paint for marking.
One important note about gravel: for the base, it is better to use crushed stone, because its angular edges lock together more tightly. And on top, where everything is visible, you can already add prettier small gravel or river rock.
How to Make a Gravel Pad With Buried Pavers
- Mark the pad larger than the pool itself.
Do not make the gravel strictly the same diameter as the pool. It is better to leave at least 18–24 in (45–60 cm) around it. That gives you space for the ladder, a towel, a couple of pots, or a small side table. The shape is easy to mark with a garden hose: move it around, look from a distance, adjust it. On paper, everything often looks easier than it does in real grass. - Remove the grass and top layer of soil.
Remove the sod about 3–4 in (7.5–10 cm) deep. Just pouring gravel over grass is a bad idea. Grass will push through, and the organic material under the base will settle over time. The goal is to remove the loose layer and reach firmer soil. - Tamp the ground.
Go over the whole pad with a hand tamper, especially around the edges and where the ladder will be. This is not the most fun part, but it is very important. After tamping, check the surface with a long board or level. The pool must stand level, otherwise the water will quickly show every mistake. - Lay the landscape fabric.
Lay the fabric with a 6–8 in (15–20 cm) overlap. It will not defeat weeds forever, but it will separate the gravel from the soil and slow down the layers mixing together. You can hold the edges down with stones or secure them with garden staples. - Install the border pavers.
Dig a narrow trench along the line of the pad. It is better to bury the pavers slightly so they do not look like random stones laid on top. It looks good when the top of the border rises about 1–1.5 in (2.5–4 cm) above the gravel. You can add a thin layer of sand to the bottom, set the pavers, and tap them into place with a rubber mallet. - Add the main layer of crushed stone.
Add 2–3 in (5–7.5 cm) of crushed stone and spread it evenly with a rake. If the ground is soft or damp, you can make the layer a little thicker — up to 4 in (10 cm). After that, tamp it well. A clean, firm edge around the pool instantly makes the whole area look more expensive. - Add the decorative top layer.
On top, you can add about 1 in (2.5 cm) of small gravel or river rock. Do not make the layer too thick in places where people will walk often: round stone is pretty, but it shifts more underfoot. I would keep the firm crushed stone under the pool and use the prettier stone along the visible edges. - Set the pool and check the level again.
It is better to check everything now, not when the pool is already filled with water. One gallon of water weighs about 8.34 lb (3.78 liters is about 3.78 kg), so even a small pool quickly becomes a serious load. If there is a soft spot or a tilt somewhere, fix it before filling. - Soften the edge with plants or decor.
So the pool does not look like it was just placed on a pad, put a few pots, ornamental grasses, or a low planting on one side. Just do not place plants too close to the water. It will look beautiful for the first two days, and then the leaves will be floating in the pool.
Why Gravel
A gravel base with buried pavers changes that temporary feeling. The pool gets a place, a shape, a border, and a normal connection to the yard.
And it is good that all of this can be done gradually. First, the gravel pad and border. Then add plants, then lights, then a privacy screen. You do not have to turn the yard into a resort all at once and spend everything that was saved for a quiet life.
If I were making this kind of area at my place, I would widen the pad on the ladder side, add 2–3 large containers with ornamental grasses, and leave part of the border visible. I would not hide the pool completely, but would give it a chance to take a harmonious, clear place in the garden.
2. Dark Liner and Black Mulch for an In Ground Illusion
Have you ever noticed that a dark liner makes the water in an above ground pool look visually deeper, while black mulch or dark stone around the base helps the lower part of the pool quietly blend into the landscape? It instantly creates a more intentional feeling around the whole setup.
You do not need to rebuild the whole yard. It is enough to remove the visual noise: light plastic, bright grass at the edge, random stones — and replace all of that with one dark, clean line.
Just do not pile wood mulch right against the pool walls. Water, splashes, and moisture will quickly turn that pretty edge into a wet mess. It is better to leave a small gap, use dark stone right near the wall, and add mulch a little farther out.
What You’ll Need
- A dark liner that is compatible with your exact pool model. This is important: you cannot choose a liner by color only.
- Black mulch or dark decorative material for the area around the pool.
- Weed barrier landscape fabric.
- Garden staples to secure the fabric.
- A shovel or garden trowel.
- A rake for spreading the mulch.
- Edging or low border, if you need to keep the mulch in place.
- A few large pots or ornamental grasses, if you want to soften the edge.
If the pool is already installed and you cannot or do not want to change the liner right now, you can start with the surrounding area only. Black mulch, dark edging, and plants will still noticeably change the whole feeling.
How to Create a Dark Look Around the Pool
- Choose the right dark liner.
If you are just buying a pool or planning to replace the liner, look for a dark blue, graphite, or almost black shade. A dark inner surface makes the water look visually deeper. But first, check that it fits the size and type of your pool. - Clean the area around the base.
Remove grass, weeds, old mulch, small debris, and anything that creates a messy edge. For a beautiful effect, you need not just black mulch, but a clean shape around the pool. Even a simple round or oval line already changes the picture. - Leave a gap near the pool wall.
Do not pile mulch directly against the wall. Leave at least 6–12 in (15–30 cm), especially if the area often gets wet. In this zone, it is better to use dark gravel, flat stones, or just a neat open edge. This way, the pool will look beautiful without extra moisture sitting at the base. - Lay the landscape fabric.
Lay the fabric over the prepared area with a 6–8 in (15–20 cm) overlap. Secure it with garden staples. It will help keep the mulch from mixing with the soil and slow down weed growth. Not forever, of course. Weeds are stubborn little things. But the start will be much cleaner. - Add black mulch in a thin layer.
Spread the mulch in a layer about 2–3 in (5–7.5 cm) thick. Do not make a huge “pillow” around the pool. A layer that is too thick looks heavy, holds more moisture, and can spread out after rain. Better to keep it thin, even, and neat. - Make the edge clear.
If the mulch borders lawn, a path, or gravel, add low edging. This can be simple plastic edging, a metal edge, or pavers. A clear line instantly makes the area look more expensive, even if the materials are budget-friendly. - Add plants for softness.
A dark background makes greenery stand out beautifully. Ornamental grasses, lavender, rosemary in pots, dwarf evergreens, or large container plants can look great here. The main thing is not to place them so close that leaves are constantly falling into the water. We are creating a beautiful zone, not a daily net-scooping workout. - Repeat the dark color in small details.
Add a couple of details in the same palette: black planters, a dark ladder, a graphite towel box, or a small side table. You do not need to make everything black. A few repeated details are enough for the yard to look more harmonious.
The Visual Effect of Dark Color
Light materials around an above ground pool often emphasize its height. Dark colors, on the other hand, visually push the base back. The lower part of the pool stands out less, the water looks deeper, and the whole area feels much more organized.
With this option, you do not need to dig up half the yard, pour concrete, or build a deck. You are simply working with what is already there: color, edging, mulch, and plants.
You do not need to try to make everything perfectly black, can use a dark liner, black mulch a little farther from the water, dark stone right at the base, and a few green grasses in large pots,will notice the difference right away. Of course, in the best possible way.
3. Retaining Wall Ring for Sloped Yard Setups
If your yard slopes, installing an above ground pool can be a little tricky. This is where a retaining wall ring can save the whole look.
A low retaining line made from blocks, stone, or pavers is built around the pool. It holds the soil, evens out the visual height difference, and helps the pool look like part of a more intentional area.
Instead of fighting the entire slope, you work only with the area around the pool. A clear circle, dark soil, stone, and plantings — and everything looks like it was planned that way from the beginning.
But if the drop is big, the soil is unstable, or the pool is large, do not try to be heroic. For a tall wall or a complicated slope, you need to bring in a professional. But a low decorative and practical ring for a small height difference can be planned by hand.
What You’ll Need
- Retaining wall blocks or dense concrete pavers.
- Crushed stone for the base under the blocks.
- Sand for leveling the first row.
- Landscape fabric to separate the soil from the drainage layer.
- A drainage pipe, if water may collect behind the wall.
- Gravel or river rock for filling around the area.
- A shovel and rake.
- A hand tamper.
- A long level or a straight board 6–8 ft long (about 1.8–2.4 m).
- A rubber mallet.
- Low plants or ornamental grasses to soften the edge.
How to Build a Retaining Wall Ring Around the Pool
- Find the lowest and highest point of the area.
First, look at where the slope is strongest. Place a long board with a level across the future pool area and mark the height difference. If the difference is small, the ring can stay low and decorative. If the drop is serious, it is better not to do everything “by eye.” - Mark the shape around the pool.
Leave at least 18–24 in (45–60 cm) around the pool. This way, the wall will not feel visually heavy, and there will still be room for gravel, the ladder, and maintenance. A garden hose is useful for marking the shape. It shows how the ring will look in a real yard, not just in your imagination. - Prepare the trench for the first row of blocks.
The first row is the most important one. Dig a shallow trench along the wall line, remove the soft soil, and add 2–3 in (5–7.5 cm) of crushed stone. Tamp it down. If the first row is crooked, the rest of the rows will simply repeat that sadness. - Level the first row.
Add a thin layer of sand, set the blocks, and check the level almost every step of the way. Tap them into place with a rubber mallet. Do not rush. A level first row makes the whole wall reliable and neat. - Build the ring to the height you need.
For a small slope, 1–3 rows of blocks are often enough. Do not make the wall higher than necessary just for the sake of making it look more “solid.” A low line usually looks more natural and does not compete with the pool. - Add drainage behind the wall.
If water can flow toward the pool from the slope, add gravel behind the wall and install a drainage pipe if needed. This is not the prettiest part of the job, but it is very important. Water behind the wall should drain away, not collect and push against the blocks. - Fill the area around the pool with gravel.
Inside the ring, you can use crushed stone as a firm base, then add river rock or small decorative gravel on top. This makes the area look cleaner, and wet grass around the pool will not turn into a never-ending problem. - Set the pool and check the level.
Before filling it with water, check everything again. The pool must stand level. Water will quickly show any tilt, and it is better to find out before there are hundreds of gallons inside. - Soften the upper edge with plantings.
Ornamental grasses, lavender, low shrubs, or large pots look good on the outside of the wall. They help tie the stone, pool, and slope together. Just do not plant too close to the water, or the leaves will quickly end up exactly where they should not be.
The Retaining Ring and the Slope
A retaining wall ring gives the pool a base, holds the shape of the area, and visually cuts it into the slope.
The main thing is not to turn a simple idea into an engineering challenge. If the height difference is small, a low ring of blocks can look very decent without eating the whole budget, the drop is large, it is better not to risk it and to bring in a professional.
If I were making this kind of area at my place, I would keep the wall low, add gravel inside the ring, and plant ornamental grasses along the outer edge. I would not try to hide the slope completely. You do not need to fight the natural features of the yard — you can try to turn them into advantages.
4. Half Buried Install With Simple Drainage Trench
With this method, the lower part of the pool wall goes into the ground, the top stays accessible, and the whole area looks much more natural and expensive.
But simply digging a hole and placing the pool inside is a bad idea. Soil holds moisture, water after rain looks for low spots, and pool walls are not always designed to handle ground pressure. So before this kind of install, you need to check the manufacturer’s instructions. Some pools can be partially buried, and some cannot.
This option works well where the yard is already a little lower on one side, or where you can carefully fit the pool into the landscape. Not fully bury it, not start a giant construction project, but visually lower the pool wall and give water a proper way to drain away.
What You’ll Need
- A shovel or mini excavator, if the pool is large.
- A tape measure and garden hose for marking.
- A long level or a straight board 6–8 ft long (about 1.8–2.4 m).
- Crushed stone for the base.
- Sand for a thin leveling layer, if your pool instructions allow it.
- Landscape fabric.
- A perforated drainage pipe, for example Flex-Drain 4 in. x 25 ft. Copolymer Perforated Drain Pipe (Amazon).
- River rock or gravel for filling the trench.
- A hand tamper.
- Border pavers or low edging for a clean edge.
- Ornamental grasses or large pots to soften the transition from the ground to the pool.
How to Do It
- Check if your pool can be buried.
Some above ground pools cannot be buried even partially, because their walls are not designed for ground pressure. If the instructions say not to bury it, choose another way to visually lower the pool instead — gravel, a retaining wall, or a low deck. - Choose the side you will bury.
You do not have to lower the pool evenly around the whole perimeter. Often, it is enough to bury the lower part on the side that stands out the most. Especially if the yard has a slight slope. This gives you the in ground pool effect, but with less digging. - Mark the area with extra space around the pool.
Leave at least 18–24 in (45–60 cm) of open space around the pool. This is needed for drainage, wall access, and a proper edge. A garden hose helps again: it is easy to mark the shape and see how the pool will sit in the yard. - Remove the soil gradually.
Dig in layers instead of trying to make a deep hole right away. For a half buried install, 12–24 in (30–60 cm) is often enough, but it depends on the pool model and the yard. The bottom should be firm and level. If the soil is soft, tamp it down. - Prepare the base under the pool.
Add a layer of crushed stone, spread it out, and tamp it. If the manufacturer allows a sand layer, add a little sand on top for leveling. Do not make a soft “pillow” that will settle later. A pool needs a level, firm base. - Make a drainage trench on the lower side.
Where water will naturally flow, dig a trench about 8–12 in deep (20–30 cm) and about 6–8 in wide (15–20 cm). It should carry water away from the pool, not collect it near the wall. If there is a natural slope, use it. - Lay the fabric, pipe, and gravel.
Place landscape fabric inside the trench, add a little gravel, lay the perforated drainage pipe, and cover it with more gravel. The fabric will help keep soil from clogging the drainage too quickly. This part of the project is hidden, but it often decides whether the area stays dry or turns annoyingly damp. - Do not press soil directly against the pool walls.
Leave a small gap and use gravel backfill where you need protection from moisture. Soil near the walls can hold water and push against the pool. We want a beautiful result, but not at the cost of extra risk. - Finish the upper edge.
Once the pool is level, add pavers, gravel, or low edging around the visible edge. This makes the transition look neat. Without an edge, a partially buried pool can look like a pool sitting in a hole. With an edge, it looks like a planned area. - Add plants, but not right against the water.
Ornamental grasses, low shrubs, or large pots can hide the hard line of the pool wall nicely. Just leave room to access the pool. I would not plant anything too close: you will be endlessly collecting plant leaves from the water.
That Built-In Effect
The main visual problem with an above ground pool is height, and the eye immediately sees the whole wall. A half buried install removes part of that height, so the pool looks much lower and closer to an in ground version.
Here, everything depends on the level base, the drainage trench, and the neat edge. Without those things, the pool may not look built in — it may just look buried in a hole. Big difference.
5. Stock Tank Style Surround With Pea Gravel
If you place a stock tank style pool on the grass in the yard, it does not exactly feel like a stylish relaxation area. But small gravel around the base instantly changes the feeling and makes the stock tank look more like a small built-in pool.
This kind of pool can be placed near a fence, next to a garden path, or in a quiet corner of the yard. And it can still look intentional if there is a gravel area around it, a clean shape, and a little greenery.
It is important to remember that small gravel should not be the only base under the pool if the manufacturer requires a firmer foundation. Under the tank, it is better to use a level, tamped layer of crushed stone or another base according to the instructions, and keep the small gravel on top and around it — where it will be pretty and practical.
What You’ll Need
- A galvanized stock tank style pool or a round above ground pool with a similar look.
- Crushed stone for the base, if you need to make a firm foundation.
- Small gravel for the top layer and the area around the pool.
- Weed barrier landscape fabric.
- Garden staples to secure the fabric.
- Edging or pavers for a clear edge.
- A shovel and rake.
- A hand tamper.
- A long level or a straight board 6–8 ft long (about 1.8–2.4 m).
- A rubber mallet, if you use pavers.
- Large pots, ornamental grasses, or kitchen herbs near the pool.
- A low outdoor side table for towels and drinks — for example, Christopher Knight Home Lilac Outdoor 12″ Iron Side Table (Amazon).
How to Create a Stock Tank Style Surround With Pea Gravel
- Choose where to place the pool.
These pools usually look best not in the middle of an empty lawn, but near an existing line: a fence, path, house wall, garden beds, or plantings. Then the pool becomes part of the yard, not a separate metal tank that was just placed “for now.” - Mark the area around the pool.
Leave at least 18–24 in (45–60 cm) around the tank. If the space is small, you can make the wider area only on one side — where the entry, towel, or small table will be. The shape can be round, oval, or slightly stretched. The main thing is that it looks intentional. - Remove the grass and loose top layer.
Remove the sod about 3–4 in (7.5–10 cm) deep. If you leave grass under the gravel, it will still push through, and the ground under the pool may settle. This is definitely not the place to be lazy. - Make a firm base.
Under the pool itself, you need a level and tamped base. Usually, crushed stone is used for this, spread in a 2–3 in (5–7.5 cm) layer and tamped well. After that, check the level with a board or long level. A round pool shows any tilt in the water very quickly. - Lay the landscape fabric.
Lay the fabric across the whole area around the pool with a 6–8 in (15–20 cm) overlap. Secure it with garden staples. It will help keep the gravel from sinking into the soil and slow down weeds. Not forever, of course. But the start will be much neater. - Add edging or pavers around the edge.
Without an edge, small gravel will quickly spread into the lawn or onto the path. You can use metal edging, flexible edging, or low pavers. A clear border makes the whole area look more expensive, even if the materials are simple. - Add small gravel around the pool.
Add a layer about 1.5–2 in (4–5 cm) thick. Do not make the layer too thick in the walking area, or the gravel will shift too much underfoot. Level it with a rake and keep the edge near the pool clean, without a mound of material pressed against the wall. - Add simple farmhouse-style details.
Near the pool, you can place galvanized planters, a wooden bench, clay pots, herbs in containers, rosemary, lavender, or ornamental grasses. But not all at once! A couple of useful pieces are better than ten “cute” items that later get in the way. - Make one comfortable entry point.
Place a flat stone, a couple of pavers, or a small wooden platform near the ladder. This keeps the small gravel from constantly shifting and gives your feet a proper surface before getting into the water. - Repeat the material in a nearby area.
If there is a path, garden bed, or planting area nearby, you can use the same small gravel in little “repeats.” Then the pool does not look like a separate insert. It becomes part of the overall pattern of the yard.
A More Intentional Gravel Zone
A stock tank pool does not need to be hidden completely. It is better to highlight that simplicity and give it a clean base. Small gravel makes the area dry, neat, and visually intentional.
For a smaller budget, this is one of the best options. You do not need a deck, a complicated retaining wall, or a full construction project. You need a level base, a good edge, and materials that do not compete with the pool itself.
6. Small Backyard Corner Placement With Screening Panels
Often, in a small backyard, an above ground pool looks too large. It sits in the middle of the yard, and all the attention goes straight to it.
But when the pool stands in a corner, near a fence or two existing boundaries of the yard, it no longer looks like a lonely object in the middle of the space. It gets a background. And if you add privacy screens, a little gravel, plants, and a clean entry area, the pool starts to look successfully built into a small relaxation zone.
What You’ll Need
- An above ground pool in the right size for the corner of the yard.
- Privacy screens or outdoor decorative panels.
- Posts or mounts for the panels, if they cannot be attached to the existing fence.
- Gravel, river rock, or mulch for finishing the base.
- Weed barrier landscape fabric.
- Garden staples to secure the fabric.
- Edging or pavers for a neat edge.
- A shovel, rake, and hand tamper.
- A long level or a straight board 6–8 ft long (about 1.8–2.4 m).
- Large pots or ornamental grasses to soften the corner.
How to Set Up a Pool in the Corner of a Small Backyard
- Choose a corner where the pool will not block the path.
Check that you can easily walk to the house, garden beds, gate, or relaxation area. The pool should not turn the yard into a maze where everyone walks sideways and pretends it was planned that way. - Leave space for maintenance.
Even if you really want to push the pool almost right up to the fence, leave a gap. Usually, it is worth having at least 18–24 in (45–60 cm) where you need access to the walls, filter, or hoses. A beautiful look should not get in the way of normal care. - Mark the pad around the pool.
Use a garden hose to mark the shape of the area. In a corner, a perfect circle usually does not look as good as a soft pad with a wider section near the entry. That is where you can place the ladder, a small table, a pot, or a basket for towels. - Prepare a level base.
Remove the grass and loose soil 3–4 in (7.5–10 cm) deep, tamp the ground, and check the level. If the base is crooked, the corner of the yard will not save it. The pool needs to stand level and without a tilt. - Lay the fabric and add gravel or stone.
Lay the landscape fabric with a 6–8 in (15–20 cm) overlap, secure it with staples, and add gravel. In a small yard, it is better not to use too many different materials. One reliable material underfoot immediately makes the area cleaner. - Install the privacy screens.
It is better to place panels not as a solid wall around the whole pool, but only where they are actually needed: on the side facing neighbors, the street, or an unattractive fence. This keeps the corner light and prevents it from turning into a box. Make sure the panels are stable and made for outdoor use. - Soften the hard lines with plants.
Add a couple of large pots, ornamental grasses, or narrow vertical plants. They make the transition prettier and help the pool look like part of the garden. Just do not place plants so close that leaves fly straight into the water. - Create a comfortable entry point.
Near the ladder, you can place pavers, flat stones, or a small wooden platform. This will be the busiest spot, so it needs a firm surface. Otherwise, the gravel will quickly spread out, and wet feet will carry small stones where they definitely do not belong. - Add one or two details, but do not overload the corner.
A small table, a towel hook, a lantern, or a pair of matching planters is enough. The fewer random objects there are, the more natural the whole area looks.
How a Backyard Corner Helps the Pool Look Intentional
In the corner of the yard, the pool gets a background, boundaries, and its own place in the layout.
Privacy screens help create a separate zone, almost like a small garden room. It does not look completely closed off, just a little more private. This is especially nice if there are neighbors, windows, or a street nearby.
In a small backyard, the goal is not just to place a pool somewhere, but to give it a corner where it does not take over the whole space and becomes part of the relaxation area.
7. Budget Privacy Wall With Outdoor Curtains and Tension Rods
When there are neighbors’ windows nearby, a fence with gaps, or a walk-through area, you want to close things off at least a little. A budget privacy wall with outdoor curtains and tension rods lets you do that without building a full fence. Especially if you already have two supports: walls, pergola posts, a sturdy fence, or a corner between structures.
Be sure to choose outdoor curtains, not regular indoor curtains. Regular fabric will quickly fade, get wet, become heavy, and start looking bad. Especially if there is a pool nearby.
What You’ll Need
- Outdoor curtains made from outdoor fabric, preferably water-repellent and sun-resistant.
- Tension rods or sturdy outdoor curtain rods.
- Strong supports: a fence, posts, a wall, a pergola, or separate wooden posts.
- Curtain clips or rings, if the curtains do not have grommets.
- Hooks or holders to secure the curtains when they are open.
- Weights for the bottom edge, if your yard is windy.
- Gravel, pavers, or a small deck surface underfoot near the pool.
- A few pots with plants to soften the lower line.
How to Make a Budget Privacy Wall
- Choose the side you actually need to cover.
You do not have to hang curtains all the way around the pool. Usually, one side is enough: where there are neighbors’ windows, the street, or gaps in the fence. This way, the area stays open, but it no longer feels like it is on display. - Check if you have reliable attachment points.
Tension rods work well between two firm surfaces, but they do not like weak, wobbly supports. If the distance is large or the place is windy, it is better to use a sturdy outdoor curtain rod with brackets. The curtain should hang securely, not fall every time someone steps out of the pool a little too energetically. - Choose the curtain height.
For privacy, 6–8 ft (about 1.8–2.4 m) is usually enough. You do not need to make the screen taller than the yard can handle visually. A curtain that is too tall can quickly turn a small space into a tight room. - Leave a gap at the bottom.
Do not let the fabric sit directly on the gravel or ground. It is better to leave 2–4 in (5–10 cm) between the bottom edge and the surface. This way, the curtain gets less dirty, dries faster, and does not collect water after rain. - Hang the curtains with a light fold.
Do not stretch the fabric like a bedsheet. Small folds look softer. Plus, the curtain moves better when you open and close it. Soft fabric next to the hard pool wall immediately makes the whole area feel more finished. - Secure the curtains from the wind.
If your yard is windy, add weights at the bottom or simple side holders. Otherwise, the curtains will fly into the pool and catch on the plants. - Finish the bottom with gravel or pavers.
Under the curtains, it is better to make a clean strip of gravel, river rock, or pavers. Fabric next to wet grass gets dirty quickly, and a neat lower line helps the screen look like an intentional solution, not something temporary. - Add plants at the base.
A couple of large pots, ornamental grasses, or rosemary in a container will help visually connect the curtains with the garden. Just do not place the plants so tightly that they stop the fabric from moving. You need balance here: a little greenery and a little air. - Think about where the curtains will open.
When the curtains are open, they should gather nicely to the side, not hang in a clump near the ladder or filter. Add holders, hooks, or simple ties.
Privacy for the Whole Area
Curtains create the feeling of a separate place around the pool. When the area has a boundary, a background, and soft coverage, the pool already looks naturally built into the relaxation zone, not like a random object in the middle of the yard.
This is a budget-friendly option. You do not need to build a new fence or install expensive panels. Strong supports and fabric that can handle outdoor conditions are enough.
If I were making this kind of area at my place, I would cover only one side, leave the others open, and add gravel along the bottom edge with a couple of large pots. This way, the curtains give privacy but do not take away the air. And you get your own quiet corner where you do not feel like you are swimming on a stage.
8. Low Cost Path Lighting With Solar Stakes and River Rock
This option does not require electricity. You do not need to run wires, call a professional, or tear up half the yard. Solar stake lights go straight into the ground, and river rock makes the path look neater and drier.
Just do not place the lights too often: a few light points along the path, at the pool entry, and maybe near the pots. Then in the evening, everything looks just right — stylish and intentional.
What You’ll Need
- Solar stake lights for pathways — for example, Eyrosa Solar Outdoor Lights, 10 Pack Waterproof Stainless Steel Solar Stake Lights (Amazon).
- Medium-sized river rock for finishing the path.
- Crushed stone or small gravel for the lower layer, if the path will be used a lot.
- Weed barrier landscape fabric.
- Garden staples to secure the fabric.
- A shovel or garden trowel.
- A rake.
- Edging or pavers, if you need to keep the stone in shape.
- A tape measure.
- A garden hose for marking the path line.
How to Make Low-Cost Path Lighting Near the Pool
- Mark the route to the pool.
The path does not have to be perfectly straight. A soft curve often looks more natural, especially if it leads from the patio, the house door, or a seating area. Lay a garden hose along the future line and look at it from a distance. If the route feels convenient, keep it. - Make the path wide enough.
For one person, 24–30 in (60–75 cm) is usually enough. If people will often walk there with towels, kids, or drinks, it is better to make it 36 in (about 90 cm). A path that is too narrow quickly becomes uncomfortable near a pool, especially when everyone is wet and barefoot. - Remove the grass and level the base.
Remove the top layer about 2–3 in (5–7.5 cm) deep. If you leave grass under the stone, it will start growing through, and the path will quickly lose its clean look. After that, lightly tamp the ground, especially near the pool entry. - Lay the landscape fabric.
Lay the fabric with a 6–8 in (15–20 cm) overlap and secure it with garden staples. It helps keep the stone from mixing with the soil and slows down weed growth. - Add a lower layer if the path will be used often.
If this is just a decorative strip, you can add the river rock right away. But if people will walk on the path every day, it is better to add 1–2 in (2.5–5 cm) of crushed stone or small gravel first. This makes the base firmer and helps prevent it from settling too quickly. - Add the river rock.
Add a layer of stone about 1.5–2 in (4–5 cm) thick and level it with a rake. Do not make the layer too thick: deep stone is uncomfortable to walk on barefoot, and near a pool, as you know, feet are always bare. - Place the solar lights along the edge.
Set the lights about 4–6 ft (1.2–1.8 m) apart. If you place them too close together, there will be too much visual noise. It is better to create a soft line of light leading to the pool. - Light the entry, not the whole pool in a circle.
The most important spots are the beginning of the path, the turn, and the area near the ladder. That is where light actually helps. Around the whole pool, lights often look unnecessary, especially if the area is small. - Check the sun during the day.
Solar lights need to get direct sunlight for at least a few hours. If you place them in the shade of a fence, trees, or large pots, they will glow weakly in the evening. And yes, it is very disappointing when you arranged everything beautifully, and they are like: “sorry, we are not in the mood today.” - Repeat the material once near the pool.
So the path does not look like a separate strip, add river rock at the base of the pool too, near the pots, or beside a small towel area. A repeated material ties the whole picture together and makes the design feel more cohesive.
Light and Stone for an Evening Zone
During the day, river rock creates a clean path and keeps mud away from the pool. In the evening, solar lights almost show the route to the water. It is a simple trick, but it changes the feeling of the yard.
For a smaller budget, this is a great option. You do not need complicated electrical work or a new built area. A clean line of stone, a few lights, and a proper pool entry are enough.
9. DIY Pool Filter Cover That Doubles as a Side Table
The filter for an above ground pool means hoses, a pump, a plastic body, wires… You want to hide all of that somewhere, and this is where a simple filter cover box helps — one that also works as a small side table on top.
On top of that, you add a useful surface: a place to set a glass of water, a towel, sunscreen, or a book you still will not finish because someone jumped into the pool again.
The pump needs air, access, and proper ventilation, so do not seal the filter inside a closed box. The cover should not be a tight box, but a light shelter with gaps, a door, or a removable panel.
What You’ll Need
- Outdoor boards or ready-made wooden panels.
- Wood beams for the frame.
- Outdoor screws.
- Hinges, if you want to make an opening door.
- Wood stain or protective wood oil.
- A saw or ready-cut pieces from the store.
- A drill driver.
- A tape measure.
- Sandpaper.
- A small tabletop made from wood, a paver, or outdoor tile.
- Furniture legs or adjustable feet, if the surface under the filter is uneven.
How to Make a Filter Cover That Becomes a Side Table
- Measure the filter together with the hoses.
Do not measure only the pump itself. Include the hoses, fittings, wire, and the space you will need to open the cover, clean the filter, or replace the cartridge. Add at least 3–4 in (7.5–10 cm) of free space on each side. - Choose the access side.
Decide right away where you will service the filter from. It is better to make one side open or fully removable. A beautiful box that you have to lift completely every time while quietly cursing under your breath is not very convenient. - Build a simple frame.
Use wood beams for the four vertical posts and the top frame. The frame should be stable, but not massive. Its job is to hold the panels and tabletop, not look like a tiny shed next to the pool. - Cover the frame with gaps.
Do not close the sides with solid walls. Leave gaps between the boards or use slatted panels. The filter needs ventilation, especially on hot days. A tight box can overheat and hold moisture. - Make the top surface flat.
On top, you can place a wooden tabletop, outdoor tile, or a wide paver. The main thing is that the surface is level and does not wobble. For a small pool, a table about 18–24 in (45–60 cm) wide is enough, if the space allows. - Leave space for the hoses.
Make cutouts for the hoses in the back or side. Do not squeeze them or force them into a strange angle. If the hose is stretched tight, the whole structure will look good only until the first maintenance day. - Protect the wood from moisture.
Sand the edges and coat the wood with stain, oil, or an outdoor protective finish. Near a pool, wood constantly meets splashes, wet towels, and sun. Without protection, it will quickly turn gray and tired-looking. - Check stability.
The box should not wobble, especially if people will place drinks on top or lean on it with a hand. If the base sits on gravel, you can add adjustable feet or place the structure on flat pavers. - Do not overload the top with decor.
One small tray, sunscreen, a glass of water, a folded towel — that is enough. If candles, plants, little figures, and three more “cute” things move onto the table, the technical area becomes visually noisy again. Just in a different way.
How to Hide the Technical Part
The filter can be built into the overall picture: cover it with a light box, repeat the color of the wood or fence, and add a useful surface on top.
Instead of a separate table and a separate filter cover, you get one item that does two jobs. Fewer objects, less chaos, more order.
If I were making this kind of box at my place, I would choose simple vertical slats, leave the side panel removable, and make the top slightly wider than the filter itself. Not a huge table, not a poolside bar. Just a neat cover that looks useful and pretty.
10. Landscaping Plan With Ornamental Grasses and No Dig Edging
I would use this option because it does not try to hide the pool completely. It simply visually connects the pool with the garden. It looks especially beautiful if the planting is not done as an even “little fence” around the whole pool, but in loose groups: taller in the back, lower near the entry, with an open spot by the ladder. This is where ornamental grasses and no dig edging work really well.
And do not plant everything right up against the pool. Plants need air, and you need access to the walls, filter, and ladder. You do not want every maintenance session to turn into a fight with leaves and stems.
What You’ll Need
What You’ll Need
- Ornamental grasses in pots or for planting in the ground.
- No dig edging to shape the planting line — for example, EasyFlex No-Dig Landscape Edging Kit – 100 ft., Black (Amazon).
- Landscape fabric or cardboard under mulch, if you need to suppress weeds.
- Garden staples to secure the fabric.
- Mulch, gravel, or river rock to fill the area.
- A shovel or garden trowel.
- A rake.
- A tape measure.
- A garden hose for marking a soft line.
- Large pots, if you do not want to plant the grasses directly in the ground.
- Compost to improve the soil in the planting spots.
How to Make a Landscaping Plan With Ornamental Grasses and No Dig Edging
- First, choose the side you need to soften.
You do not have to plant around the pool in a full circle. Often, it is better to design only 1–2 sides: the one you see from the house, the patio, or the yard entrance. This makes the pool look more built in, but the area does not become cramped. - Leave open access to the pool.
It is better to leave at least 18–24 in (45–60 cm) between the pool and the plantings. Near the filter, ladder, and hoses — even more. Plants should decorate the area, not get in the way of using the pool. - Mark a soft edging line.
Use a garden hose to mark the shape of the future planting area. I would avoid a perfect circle around the pool. A slight curve, a wider section on one side, a small “wave” — all of this looks more natural. - Install the no dig edging.
Lay the edging along the line and secure it with stakes. Do not rush to hammer everything in permanently right away. First, look at the shape from a distance. Sometimes one extra curve makes the planting look strange, while a simpler line looks better. - Prepare the area inside the edging.
Remove large weeds and debris. If the grass is thick, you can lay cardboard or landscape fabric, then add mulch or gravel on top. This does not stop weed growth forever, but it makes the start easier. - Choose grasses of different heights.
Taller ornamental grasses work well in the back. Near the entry, use shorter varieties so they do not block the path or reach into the water. Different heights make the planting feel alive, not like a green wall. - Plant in groups, not one grass at equal intervals.
It is better to plant 3–5 plants of the same type together than to place everything one by one like exhibits. Groups look more natural and create volume faster. Especially around a pool, where you need one complete picture, not a plant collection. - Add mulch or stone between the plants.
Mulch looks softer, while stone feels cleaner and drier near water. If the area often gets wet, I would choose river rock or small gravel closer to the pool, and keep mulch farther out near the plantings. - Leave room for growth.
Ornamental grasses often look modest on planting day, and then suddenly become twice as wide. Do not plant them too close to the pool or to each other. Give them space, or next season you will have to move everything around. - Repeat 1–2 plants in other parts of the yard.
If the same grasses appear near the path, by the fence, or next to the patio, the pool will stop looking like a separate zone. Repeating plants visually connects the whole yard better than any random decor.
Why Ornamental Grasses Work Here
Ornamental grasses give an above ground pool a softer transition into the landscape. They move in the wind, cover hard lines, and make the area feel more alive and natural.
No dig edging holds the shape of the planting, separates stone or mulch from the lawn, and does not require digging a trench across the whole yard. Basically, it helps visually pull the whole picture together.
This way, the pool stays practical, but it no longer looks like a random bowl on the grass. It becomes a full part of the garden, not a random guest on the lawn.
Your Yard, Your Rules
An above ground pool can look beautiful without a huge budget. Start with whatever hurts the look the most: bare grass around it, mud at the entry, an exposed filter, lack of privacy, or a pool wall that feels too harsh.
Then you can move step by step. First the base, then plants, then light. Then the small details that make the yard feel alive.
If you have already tried to make an above ground pool look more “built in,” share in the comments what worked best. And if you are only planning it, write what feels hardest in your own yard.