In February, I often see perfectly decorated cookies, smooth icing lines, intricate patterns, and dozens of tiny details that look incredibly beautiful. So beautiful that many people don’t even try to recreate them at home.
Lindy and I have a lot of experience baking holiday cookies, and we clearly understand that people are much more drawn to cookies that look handmade than to desserts that resemble a display case in an expensive bakery.
And by the way, the most memorable cookies often don’t require professional skills at all. This collection includes all kinds of Valentine’s Day cookie recipes that look impressive and can easily be made during a regular evening in the kitchen.
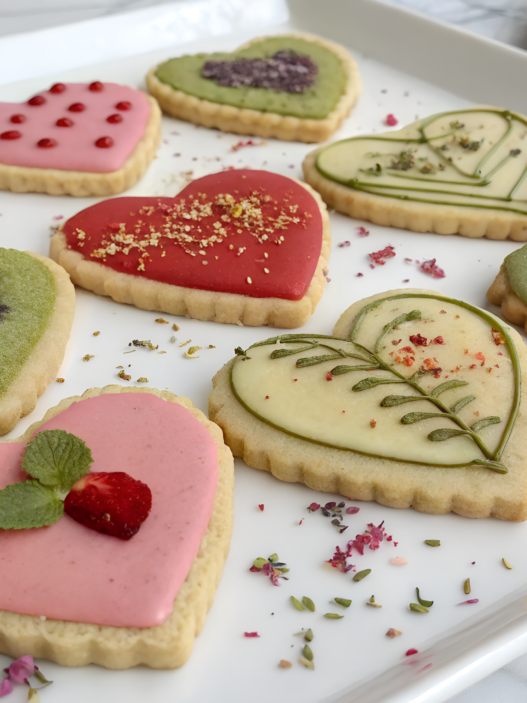
1. Royal Icing Heart Mosaic Cookies

These heart mosaic cookies look incredibly impressive. The whole trick is simply dividing the surface into small sections neatly and using a few beautiful icing shades.
For Valentine’s Day, this option works especially well. They look festive, neat, and impressive enough to become a gift for yourself and your loved ones.
What You’ll Need
For the Cookies:
- 2 1/2 cups flour (about 315 g)
- 3/4 cup unsalted butter, room temperature (170 g)
- 3/4 cup sugar (150 g)
- 1 egg
- 1 tsp vanilla extract
- 1/4 tsp salt
For the Icing:
- 4 cups powdered sugar (about 480 g)
- 3 tbsp meringue powder
- 6–8 tbsp water
- pink, red, and white food coloring
Additional Supplies:
- piping bags
- toothpicks
- heart-shaped cookie cutter
- rotating cookie decorating stand
How to Make It
- Beat the butter and sugar until light and creamy. Add the egg and vanilla extract, then gradually mix in the flour and salt. The dough will be soft and easy to work with. If it feels too sticky, don’t worry — it will become much easier to handle after chilling.
- Wrap the dough in plastic wrap and refrigerate it for at least one hour. After that, roll it out to about 1/4 inch (6 mm) thick and cut out heart shapes. I like making them slightly larger than usual — it’s easier to create the mosaic pattern on a larger surface, and the finished cookies look more festive.
- Transfer the cookies to a baking sheet and bake them at 350°F (175°C) for about 9–11 minutes. Watch the edges carefully: they should just begin to turn golden. Let the cookies cool completely before decorating. Even a slightly warm surface can ruin the icing design.
- Mix the powdered sugar, meringue powder, and water until smooth. Then outline each heart with white icing and fill the entire surface with a thin layer. This will be the background for the future mosaic. Let the cookies sit for 30–40 minutes so the surface can set slightly.
- Using white icing, divide the surface into small sections. Don’t try to make them identical. When the lines vary slightly in size, the cookies begin to resemble a real mosaic or stained-glass window. A little imperfection makes the design more interesting.
- Fill individual sections with icing in different shades of pink, red, and cream. Work gradually, moving from lighter shades to deeper ones. If you notice an air bubble, simply remove it carefully with a toothpick.
- Leave the cookies for several hours or overnight. Once the icing has fully hardened, the colors will become more vibrant and the surface will develop that neat appearance usually associated with expensive gift sweets.
Small Tips
I like leaving a few sections completely white. It makes the other colors look brighter and cleaner. Try to use only three shades. When the palette is limited, the cookies look more polished and elegant.
You can add just a couple of accents with a subtle pearlescent finish using an edible decorating spray. Don’t overdo it. A few light touches look much better than a surface completely covered in shimmer.
Serving
Once the icing has fully dried, place the hearts into clear gift bags and tie them with ribbon that matches the pattern colors. I think this kind of gift feels thoughtful and very personal.
For a holiday table, try arranging the cookies by shade — from soft pink to rich berry tones. It creates a beautiful display that immediately catches guests’ attention.
Many people are convinced that cookies like these require professional skills. In reality, the whole secret comes down to a few shades of icing, careful work, and one free evening in the kitchen.
2. Painted Rosewater Sugar Cookies
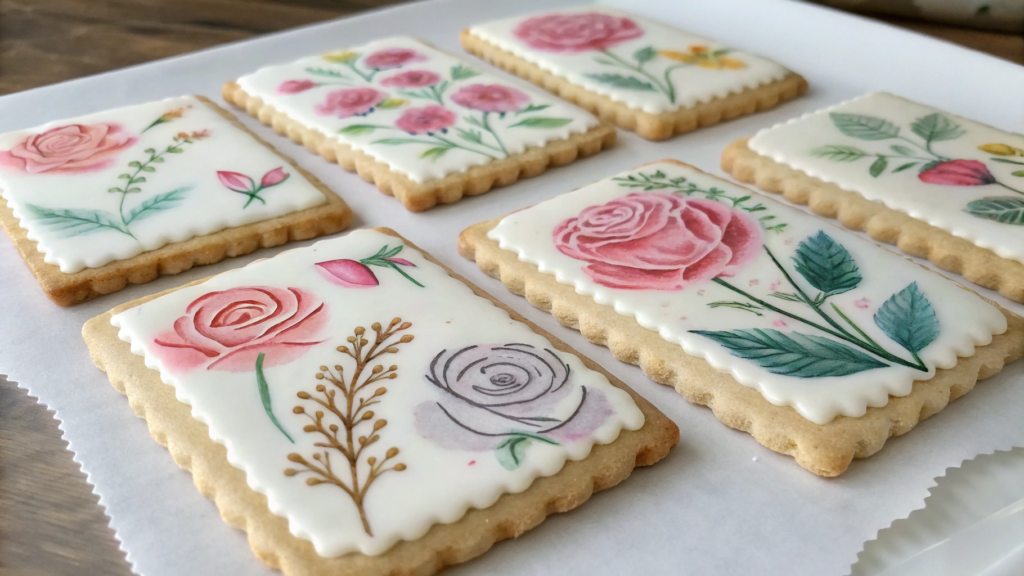
You don’t need any complicated piping tips, perfect lines, or hours of icing work for these cookies. Just a light floral aroma and a sense of celebration.
In this Valentine’s Day cookie version, every brushstroke turns out a little different. Some areas come out more vibrant, while others are almost transparent. In the end, each cookie looks like a small edible greeting card.
What You’ll Need
For the Cookies:
- 2 1/2 cups flour (about 315 g)
- 3/4 cup unsalted butter, room temperature (170 g)
- 3/4 cup sugar (150 g)
- 1 large egg
- 1 tsp vanilla extract
- 1/4 tsp salt
For the Icing:
- 2 cups powdered sugar (about 240 g)
- 2–3 tbsp milk
- 1 tsp rosewater
- pink, red, and peach food coloring
Additional Supplies:
- fine food-safe paintbrushes
- small palettes or dishes for mixing colors
- Fine Detail Paint Brush Set for cookie decorating
How to Make It
- Beat the butter and sugar until light and creamy. Add the egg and vanilla extract, then gradually mix in the flour and salt. The dough will be soft and delicate. Even at this stage, the kitchen starts to smell so good that it makes you want to bake a double batch.
- Chill the dough and cut out the cookies. Wrap the dough in plastic wrap and refrigerate it for at least 1 hour. Then roll it out to about 1/4 inch (6 mm) thick and cut out circles, hearts, or ovals. Simple shapes without intricate details work especially well for watercolor-style painting.
- Bake until lightly golden at 350°F (175°C) for about 9–11 minutes. The edges should remain fairly light. After baking, let the cookies cool completely. From my own experience, a warm surface can ruin the icing and make the colors look less vibrant.
- Make the rosewater icing. Mix the powdered sugar, milk, and rosewater until smooth. The aroma should be barely noticeable. Rosewater can easily become overpowering, so it’s better to add a little less than too much.
- Cover the cookies with white icing and let it dry completely. This white background is what allows the colors to look clean and resemble watercolor paints.
- Mix several shades for painting. Divide a small amount of icing into separate containers and tint them in different shades of pink, peach, and red. Add just a drop of water so the consistency becomes similar to thick watercolor paint.
- Apply the design with a brush using light strokes. These can be rose petals, loose floral elements, or simply abstract washes of color. I don’t even try to make every stroke identical because the most beautiful cookies usually happen when your hand moves freely.
Small Tricks for a Beautiful Result
- I start with the lightest layer and only then add more saturated shades on top. This technique creates depth and makes the design look more lively.
- If you want to paint roses, don’t start with outlines. A few loose brushstrokes that gradually come together into the shape of a flower look much more natural.
I would also recommend leaving part of the white background visible. When the design completely covers the surface of the cookie, it starts to look heavier. Small areas of white help preserve a light and airy feel.
Serving
These cookies look beautiful on a light ceramic plate alongside fresh berries or edible flower petals.
For gifting, place them in a box with parchment paper between the layers. These cookies look more like a collection of small watercolor paintings than ordinary homemade cookies. They look very charming and appealing.
3. Chocolate Drizzle Marbled Shortbread
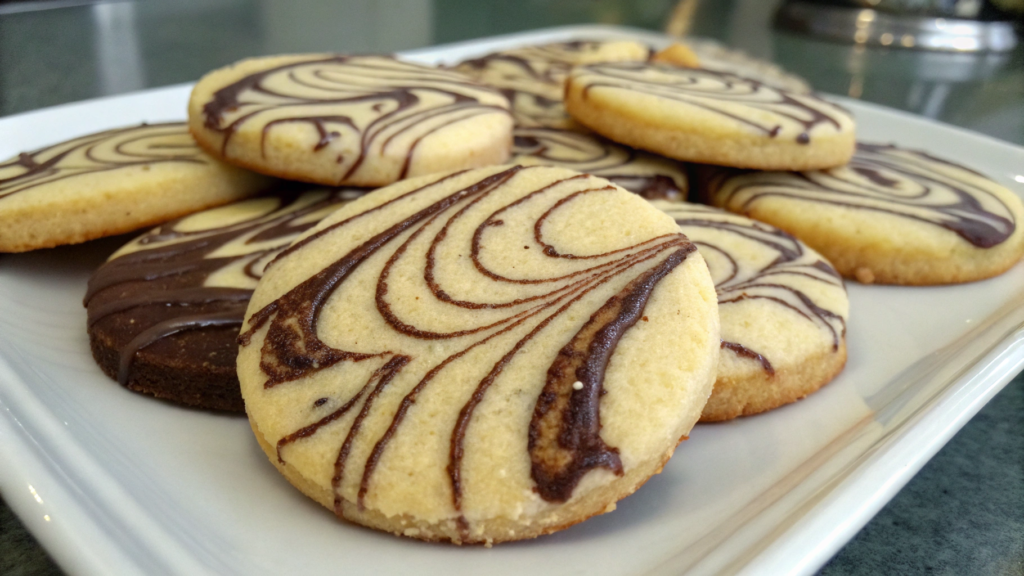
In these cookies, the marbled swirls appear right in the dough, while the thin chocolate lines on top make each cookie look a little like a beautiful piece of candy.
We love these cookies because they’re not only delicious, but they also have a festive look, which is why we make them for Valentine’s Day.
What You’ll Need
For the Cookies:
- 1 cup unsalted butter, room temperature (227 g)
- 1/2 cup powdered sugar (60 g)
- 2 cups flour (250 g)
- 1/4 tsp salt
- 1 tsp vanilla extract
- 2 tbsp cocoa powder
For Decorating:
- 1/2 cup semi-sweet chocolate chips (85 g), such as Ghirardelli Semi-Sweet Chocolate Chips
- 1 tsp coconut oil (optional)
Additional Supplies:
- baking sheet
- parchment paper
- piping bag or a small plastic bag with the corner cut off
How to Make It
- Beat the butter and powdered sugar until light and creamy. Add the vanilla extract, then gradually mix in the flour and salt. Shortbread dough is denser than regular sugar cookie dough.
- Divide the dough into two portions. Mix the cocoa powder into one half. You’ll end up with vanilla dough and chocolate dough. This is where the future marbled pattern begins.
- Combine both doughs in large pieces and gently twist them together. Don’t mix too thoroughly. A few movements are more than enough. This is exactly what creates the beautiful marbled swirls after slicing.
- Shape the dough into a log and chill it. Wrap it in plastic wrap and refrigerate for at least 1 hour. After chilling, slice it into rounds about 1/3 inch (8 mm) thick.
- Bake the cookies at 325°F (165°C) for about 12–15 minutes. The edges should remain light in color. Shortbread can dry out easily, so it’s better to check it a little early.
- Melt the chocolate and decorate the cookies once they have completely cooled. Drizzle the surface with thin, random lines. I don’t make perfect stripes, and I actually prefer the slight intersections. They highlight the marbled pattern and make the cookies look even more appealing.
A Few Helpful Observations
- If you mix the two doughs too aggressively, you’ll end up with light brown dough instead of a marbled effect. It’s better to stop sooner rather than keep mixing.
- For a more dramatic pattern, use dark cocoa powder. The contrast between the two colors will remain more noticeable even after baking.
Serving
Place these cookies on a wooden board and serve them with a cup of coffee or hot chocolate. If you’d like to make a sweet personal gift, arrange them in a box with parchment paper between the layers. It makes a lovely impression.
4. Geometric Pink Ombre Cookies
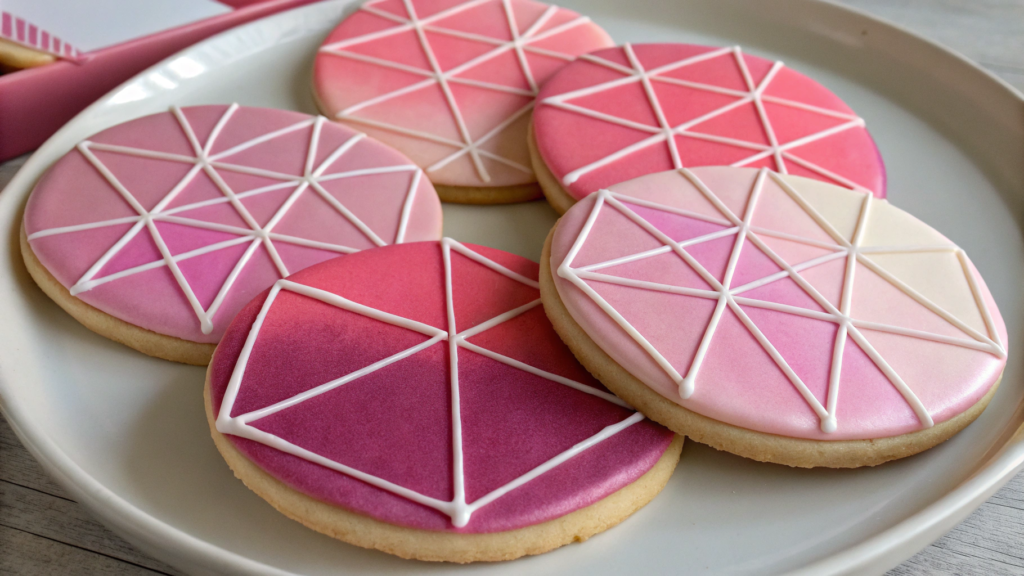
A few years ago, Lindy and I were making desserts for a small February dinner with friends. I was very worried about straight lines and symmetry on cookies with geometric designs, but Lindy reassured me and said that people remember the overall impression, not perfect angles. And she was right, as always!
What You’ll Need
For the Cookies:
- 2 1/2 cups flour (about 315 g)
- 3/4 cup unsalted butter, room temperature (170 g)
- 3/4 cup sugar (150 g)
- 1 large egg
- 1 tsp vanilla extract
- 1/4 tsp salt
For the Icing:
- 4 cups powdered sugar (about 480 g)
- 3 tbsp meringue powder
- 6–8 tbsp water
- pink food coloring
Additional Supplies:
- piping bags
- toothpicks
- decorating ruler
- piping tip set
How to Make It
- Beat the butter and sugar until light and creamy. Add the egg and vanilla extract, then gradually mix in the flour and salt. The dough should be soft and uniform with no sticky spots.
- Chill the dough and prepare the cookie shapes. Wrap it in plastic wrap and refrigerate for at least one hour. After that, roll it out to about 1/4 inch (6 mm) thick and cut out square, rectangular, or hexagonal cookies. Geometric shapes work especially well here.
- Bake the cookies at 350°F (175°C) for about 9–11 minutes. The edges should remain light in color. After baking, let the cookies cool completely.
- Prepare the icing using powdered sugar, meringue powder, and water. Divide it into several bowls and tint it in different shades of pink — from almost white to a rich berry tone. I usually use four or five shades. That’s more than enough for a beautiful ombre effect.
- Draw the design outlines on the cookie surface. These can be triangles, diamonds, or random polygons. There’s no need to pull out a ruler and aim for mathematical precision. Small differences make the design feel more alive.
- Fill the sections with icing, gradually moving from the lightest shades to the most saturated ones. This smooth transition is what creates the ombre effect. Work on one cookie at a time so the icing stays fresh and spreads easily within the outlines.
- Leave the cookies until completely dry. This usually takes a few hours. Once the icing hardens, the boundaries between the shades will become more defined, and the entire design will take on a neat finished look.
My Favorite Tricks for These Cookies
- The most beautiful result comes from muted pink shades rather than bright pink colors. Dusty pink, soft peach, and muted berry tones usually look much more interesting than neon food coloring.
- I also like leaving one section almost white. This small contrast helps the other shades appear brighter.
If the design feels too strict, try making a few large sections instead of many small ones.
Serving
Arrange these cookies on a large plate so that several shades sit next to one another in a gradient pattern. Lindy and I usually arrange them from the lightest shade to the darkest, and this simple trick always catches guests’ attention, even when the table is full of other beautiful desserts.
5. Pressed Flower Vanilla Sugar Discs
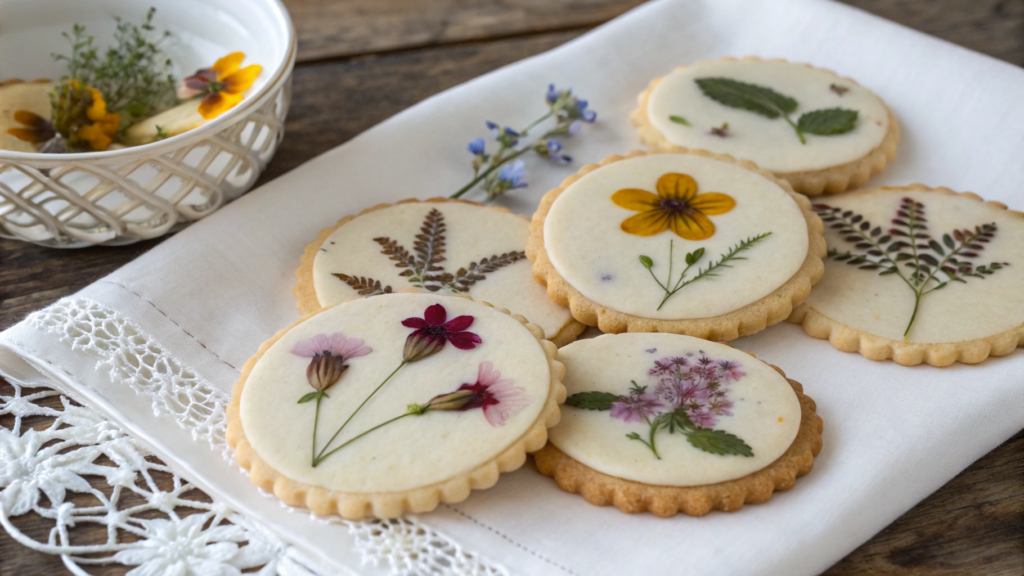
Lindy and I often pick flowers during our spring walks around the property. Most of them end up in vases, but the prettiest ones are usually tucked between the pages of old books to dry.
These cookies came from those flowers. There’s no need for complicated techniques here because the flowers do most of the work themselves.
What You’ll Need
For the Cookies:
- 2 1/2 cups flour (about 315 g)
- 3/4 cup unsalted butter, room temperature (170 g)
- 3/4 cup sugar (150 g)
- 1 large egg
- 2 tsp vanilla extract
- 1/4 tsp salt
For Decorating:
- 2 cups powdered sugar (about 240 g)
- 2–3 tbsp milk
- edible pressed flowers
- dried rose petals
- dried cornflower petals
- dried calendula petals
Additional Supplies:
- round cookie cutter
- decorating tweezers
- edible flower assortment
How to Make It
- Beat the butter and sugar until light and creamy. Add the egg and vanilla extract, then gradually mix in the flour and salt. Vanilla plays an important role here, so I usually don’t skimp on a good-quality extract.
- Chill the dough and cut out the circles. Wrap the dough in plastic wrap and refrigerate it for at least one hour. After that, roll it out to about 1/4 inch (6 mm) thick and cut out neat round cookies. A simple round shape highlights the floral decoration best.
- Bake the cookies at 350°F (175°C) for about 9–11 minutes. The edges should remain light in color. After baking, let the cookies cool completely before decorating.
- Make the icing with powdered sugar and milk. The consistency should be thick enough to hold the flowers in place but soft enough to spread evenly across the surface.
- Cover the cookies with a thin layer of icing. Don’t try to make the layer too thick. The flowers look more beautiful when they appear to rest on the surface rather than sink into the icing.
- Arrange the pressed flowers on each cookie. Use tweezers for more precise placement. Sometimes one small flower and a couple of petals are all you need to create a finished-looking design.
- Gently press the decorations into place and leave the cookies to dry. After a few hours, the icing will hold the flowers securely, and the surface will become smooth and neat.
A Few Things I Learned Through Trial and Error
- Not every beautiful flower is suitable for eating. For cookies like these, use only edible flowers that have been specifically prepared for culinary use.
- There’s no need to cover the entire surface with decorations. In practice, a few small flowers often look much more elegant than a large arrangement.
- A large flower paired with a few scattered petals creates a particularly harmonious look. This type of arrangement feels more natural and resembles a real pressed-flower collection.
Serving
Lindy and I often serve these cookies on a light ceramic plate or a wooden board during spring get-togethers with friends on the porch. Usually, everyone asks whether the flowers are real before reaching for their first cookie.
These cookies pair beautifully with a cup of Earl Grey, chamomile tea with honey, or a light white tea. These drinks don’t overpower the vanilla and floral notes — they simply complement them. If you prefer coffee, a smooth vanilla latte works much better than something too strong.
6. Hand-Stamped Cocoa Hearts

Before Valentine’s Day, I came across a set of small cookie stamps in the back of a kitchen drawer that I had bought years ago and completely forgotten about. Since then, these chocolate heart cookies have been showing up in our kitchen almost every February.
There’s no icing, complicated decorating, or a dozen finishing steps involved. That’s why these cookies turn out well even for people who can’t stand working with piping bags and brushes.
What You’ll Need
For the Cookies:
- 2 cups flour (about 250 g)
- 1/2 cup cocoa powder (50 g)
- 3/4 cup unsalted butter, room temperature (170 g)
- 3/4 cup powdered sugar (90 g)
- 1 large egg
- 1 tsp vanilla extract
- 1/4 tsp salt
For Finishing:
- 2 tbsp powdered sugar for dusting
Additional Supplies:
- heart-shaped cookie cutter
- cookie stamps
How to Make It
- Beat the butter and powdered sugar until soft and creamy. Add the egg and vanilla extract. Then mix in the flour, cocoa powder, and salt. The dough will be firmer than regular sugar cookie dough, but that’s exactly what helps the stamped design stay visible after baking.
- Chill the dough for at least one hour. If your kitchen is warm, you can leave it a little longer. Cold dough holds its shape much better and creates cleaner impressions.
- Roll the dough out to about 1/4 inch (6 mm) thick. Don’t make it too thin. A deep impression always looks more striking on a thicker cookie.
- Press the stamp into the surface of the dough. You can use hearts, floral patterns, words, or decorative ornaments. Then cut out the cookies with a heart-shaped cutter around each design. This order usually gives the neatest result.
- Bake the cookies at 350°F (175°C) for about 9–11 minutes. Watch the timing carefully. Chocolate cookies are harder to judge by color, so it’s better to rely on the edges and the aroma.
- Let the cookies cool completely, then lightly dust them with powdered sugar. The sugar will settle into the recessed parts of the design and make the pattern more noticeable.
A Few Tricks That Help Preserve the Design
- If the stamp starts sticking to the dough, lightly dip it in flour before making the next impression. It’s a small detail that saves a lot of frustration while working.
- Avoid overly complicated designs. Large elements tend to look best on cookies because they remain clearly visible even after baking.
Sometimes I intentionally leave a few hearts without powdered sugar. When they sit together on the same plate, the contrast between the matte chocolate surface and the lighter patterns looks especially nice.
Serving
The chocolate flavor is rich, so these cookies pair well with black tea, coffee, or hot chocolate for anyone who believes there’s no such thing as too much chocolate.
Lindy usually chooses coffee, while I tend to pour myself a cup of tea. But no matter the drink, these heart-shaped cookies are always popular with guests. Maybe it’s because people enjoy picking one up and studying the design before taking the first bite.
7. Lace-Inspired Butter Cookies
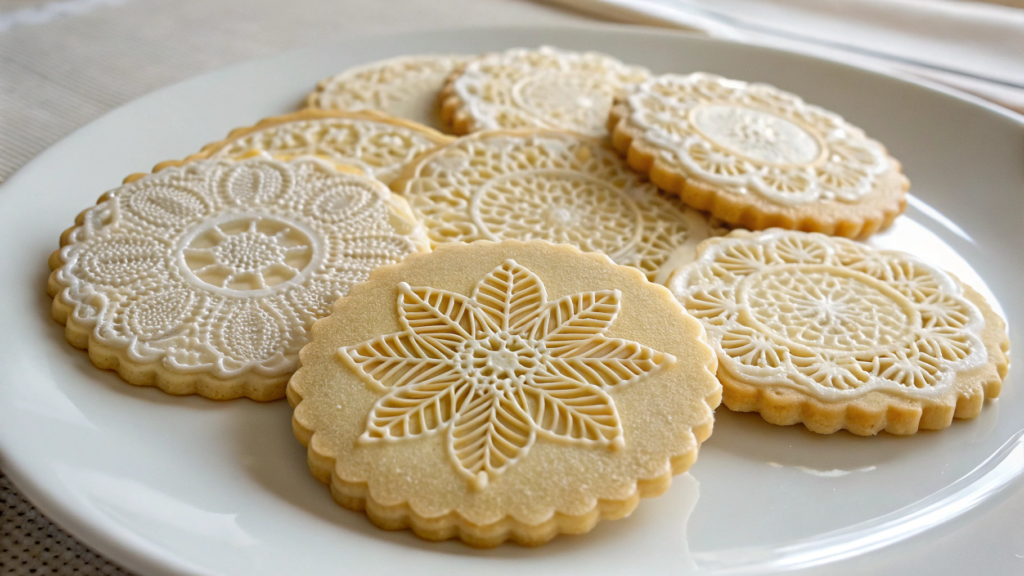
These butter cookies instantly create a festive mood because they resemble delicate lace patterns. And there’s no need to spend hours working with icing since most of the design comes from a simple imprint pressed into the dough.
What You’ll Need
For the Cookies:
- 2 1/4 cups flour (about 280 g)
- 1 cup unsalted butter, room temperature (227 g)
- 2/3 cup powdered sugar (80 g)
- 1 tsp vanilla extract
- 1/4 tsp salt
For Finishing:
- 2–3 tbsp powdered sugar
- 1 tbsp cocoa powder (optional)
Additional Supplies:
- lace-pattern silicone mat or texture mat (Silicone Lace Texture Mat)
- rolling pin
- round or oval cookie cutter
How to Make It
- Beat the butter and powdered sugar until soft and creamy. Add the vanilla extract and salt, then gradually mix in the flour. The dough will be firm but very pliable. This type of dough holds fine pattern details especially well.
- Refrigerate the dough for at least 1 hour. During this time, the butter will firm up again, making the dough much easier to work with. If you skip this step, the pattern may not turn out as clearly.
- Roll the dough out to about 1/4 inch (6 mm) thick. Place the lace silicone mat or texture mat on top and gently roll over it once more with the rolling pin. There’s no need to press hard. Usually, one confident pass is enough to transfer the pattern onto the surface.
- Cut out the cookies using a round or oval cutter. Try to position the cutter so the most attractive parts of the pattern end up in the center. Sometimes you need to move it around a little, but the result is worth it.
- Bake the cookies at 325°F (165°C) for about 12–14 minutes. The edges should remain light in color. It’s important for the cookies to keep their delicate buttery shade.
- Allow the cookies to cool completely. After that, lightly dust them with powdered sugar or sift a very small amount of cocoa powder over the pattern through a fine-mesh sieve. The design immediately becomes more noticeable.
A Few Observations
The simpler the cookie shape, the easier it is to see the lace pattern. That’s why I almost always choose circles, ovals, or large hearts without extra details around the edges.
If the pattern doesn’t seem visible enough, don’t rush to press the mat deeper into the dough. Additional chilling before rolling usually helps much more.
Serving
These cookies are practically made for Valentine’s Day. I love arranging them on a light-colored plate with fresh berries or a few edible flowers to highlight the lace pattern and delicate details. Because of this, they look as if they were custom-made by a small boutique bakery, even though they’re completely doable at home.
One of my favorite compliments is hearing someone ask, “Wait, you actually made these yourself?” They make the perfect treat for a romantic evening, a festive brunch, or a small gift for someone you’d like to make smile.
8. Berry Dust Dipped Hearts

These heart-shaped cookies don’t have much decoration, but they do have a rich berry color and a light fruity tang that comes from the berry powder.
Lindy suggested using freeze-dried strawberry powder as a decoration rather than mixing it into the dough. The result turned out surprisingly cute.
What You’ll Need
For the Cookies:
- 2 1/2 cups flour (about 315 g)
- 3/4 cup unsalted butter, room temperature (170 g)
- 3/4 cup sugar (150 g)
- 1 large egg
- 1 tsp vanilla extract
- 1/4 tsp salt
For the Coating:
- 1 1/2 cups powdered sugar (180 g)
- 2–3 tbsp milk
- 1/2 cup freeze-dried strawberry powder (about 20–25 g)
Additional Supplies:
- heart-shaped cookie cutter
- fine-mesh sieve
How to Make It
- Beat the butter and sugar until light and creamy. Add the egg and vanilla extract, then gradually mix in the flour and salt. The dough will be soft and fragrant, with the classic flavor of a sugar cookie.
- Chill the dough for at least one hour. After that, roll it out to about 1/4 inch (6 mm) thick and cut out heart shapes. I like making them medium-sized because the berry coating stands out best that way.
- Bake the cookies at 350°F (175°C) for about 9–11 minutes. The edges should remain light in color. After baking, let the cookies cool completely before decorating.
- Make the icing using powdered sugar and milk. The consistency should be thick enough that it won’t run off the edges, but still easy to spread across the surface.
- Dip half of each heart into the icing. Don’t try to create a perfectly straight line. A slight natural unevenness looks much better than overly precise geometry.
- While the icing is still wet, cover the coated section with berry powder. The easiest way is to gently sift it through a small sieve. The surface immediately takes on a rich berry color and a soft velvety texture.
- Leave the cookies until completely dry. After a few hours, the coating will become matte, and the color will look even richer.
What Helps Create a More Interesting Result
You don’t have to limit yourself to strawberries. Raspberry powder or mixed berry powder also creates beautiful color and slightly changes the flavor.
For a more decorative look, don’t cover the entire icing layer with berry powder. Leave a small section of white icing visible near the edge of the coating. The contrast between the white icing and the berry color makes the hearts look even more festive.
Serving
Many people initially mistake the berry powder for colored sugar. Then they’re surprised by the light strawberry tang. We usually serve these cookies with hot wild berry tea or regular black tea. If there’s coffee on the table, I usually go for a cappuccino. The creamy notes pair nicely with the berry coating without stealing attention from it.
These cookies also look wonderful in a gift box. The bright berry edge immediately stands out among other desserts and adds a pop of color even to the simplest holiday packaging.
9. Metallic Brushstroke Cookies

We had a small jar of edible gold dust left over. Lindy suggested using it not for complicated designs but for just a few loose brushstrokes. Because for festive cookies, especially for Valentine’s Day, sometimes a single small detail is enough.
What You’ll Need
The Cookies:
- 2 1/2 cups flour (about 315 g)
- 3/4 cup unsalted butter, room temperature (170 g)
- 3/4 cup sugar (150 g)
- 1 large egg
- 1 tsp vanilla extract
- 1/4 tsp salt
The Icing:
- 2 cups powdered sugar (about 240 g)
- 2–3 tbsp milk
For the Decoration:
- edible gold or rose gold luster dust, such as The Sugar Art Super Gold
- a few drops of clear extract or lemon juice
Additional Supplies:
- wide soft paintbrush
- fine detail brush
How to Make It
- Beat the butter and sugar until light and creamy. Add the egg and vanilla extract, then gradually mix in the flour and salt. The dough will be soft and firm enough for cutting shapes.
- Chill the dough for at least 1 hour. Then roll it out to about 1/4 inch (6 mm) thick and cut out circles, ovals, or hearts. Simple shapes without lots of details work best for this style.
- Bake the cookies at 350°F (175°C) for about 9–11 minutes. After baking, let them cool completely. Sometimes I even leave the cookies for a few hours so the surface becomes as dry as possible.
- Cover the cookies with white icing and allow it to set completely. This may take several hours. It’s worth being patient here. The smoother the background, the more striking the metallic brushstrokes will look.
- Mix the luster dust with a few drops of clear extract or lemon juice until it reaches the consistency of liquid paint. The mixture should load easily onto the brush without running across the surface.
- Apply a few loose brushstrokes to the surface of the cookies. Don’t try to create a detailed design. The whole idea is in the simplicity of the brush movements. One wide brushstroke can sometimes look more interesting than ten small details.
- Allow the decoration to dry for 15–20 minutes before serving or packaging. Once dry, the metallic shine becomes more noticeable while the surface remains neat and clean.
A Few Things I’ve Learned After Many Attempts
The most common mistake is using too much metallic decoration. Excessive shimmer tends to distract from everything else.
I prefer rose gold shades over bright gold. They look softer and fit better within a Valentine’s Day color palette.
If you create one wide brushstroke and add a couple of smaller accents nearby, the result usually looks more natural than a collection of identical lines.
Serving
These cookies usually end up on our table alongside simpler desserts. A few metallic brushstrokes immediately catch the eye and add a festive touch to the whole display.
Lindy and I usually serve them with coffee after dinner or with black or green tea. And when we put together gift boxes for friends, these cookies almost always end up on top. The metallic accents are easy to spot even through a clear lid, making the whole box look a little more special.
10. Minimalist Pastel Glazed Circles
A couple of years ago, I was making cookies for Valentine’s Day and decided not to overcomplicate things. I simply covered round cookies with icing in different shades. Once everything had dried, it became clear that no additional decoration was needed.
What You’ll Need
For the Cookies:
- 2 1/2 cups flour (about 315 g)
- 3/4 cup unsalted butter, room temperature (170 g)
- 3/4 cup sugar (150 g)
- 1 large egg
- 1 tsp vanilla extract
- 1/4 tsp salt
For the Icing:
- 3 cups powdered sugar (about 360 g)
- 3–4 tbsp milk
- pastel food coloring in pink, peach, cream, and light lavender shades
Additional Supplies:
- round cookie cutter
- piping bags
How to Make It
- Beat the butter and sugar until light and creamy. Add the egg and vanilla extract, then gradually mix in the flour and salt. The dough will be soft and have a pleasant buttery aroma.
- Chill the dough for at least 1 hour. After that, roll it out to about 1/4 inch (6 mm) thick and cut out round cookies. Circles really do work better than any other shape here. The entire idea is built around simplicity.
- Bake the cookies at 350°F (175°C) for about 9–11 minutes. Don’t wait for heavy browning. A lighter surface looks neater under the icing.
- Make the icing using powdered sugar and milk. Divide it into several bowls and tint it in different pastel shades. I like the colors to look slightly muted, almost as if they’ve been gently faded by the sun.
- Cover each cookie with a single color. Don’t blend shades on one cookie and don’t add patterns. This simplicity is exactly what makes the entire collection look more stylish. When four or five different shades are arranged together on a plate, the display looks beautiful on its own.
- Gently tap the baking sheet on the counter so the icing spreads evenly across the surface. Then leave the cookies for several hours until completely dry.
A Few Things That Really Matter Here
There’s no need to add sprinkles, glitter, or extra designs just because the surface seems empty. In these cookies, the empty space is part of the design.
If one of the shades turns out slightly uneven or less saturated during the process, don’t rush to redo it. When all the cookies come together on one plate, those small differences make the collection feel more alive and more handmade.
Serving
Lindy and I usually arrange these cookies by color, creating a smooth transition from the lightest shade to the richest one. Even a simple white plate looks festive when displayed this way.
We usually enjoy these cookies with black tea, green tea, or a smooth cappuccino. The buttery flavor of the cookies and the delicate icing do most of the work on their own. There’s no need for bold flavors here.
How Do You Decorate Cookies?
Every year, I tell myself I’m only going to make one or two types of cookies. And every year, somehow, there end up being far more baking sheets on the kitchen counter than I originally planned.
That’s probably why I love projects like this. It’s not really about the cookies themselves. It’s about the process, the smell of baking, the cup of tea between batches, choosing the decorations, and that moment when someone reaches for the first cookie on the plate.