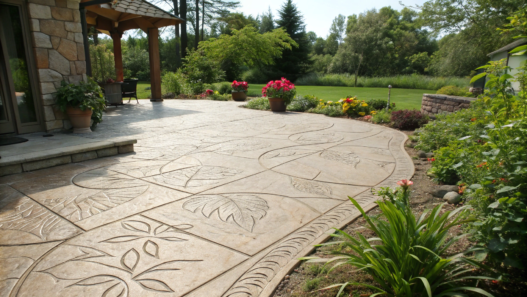
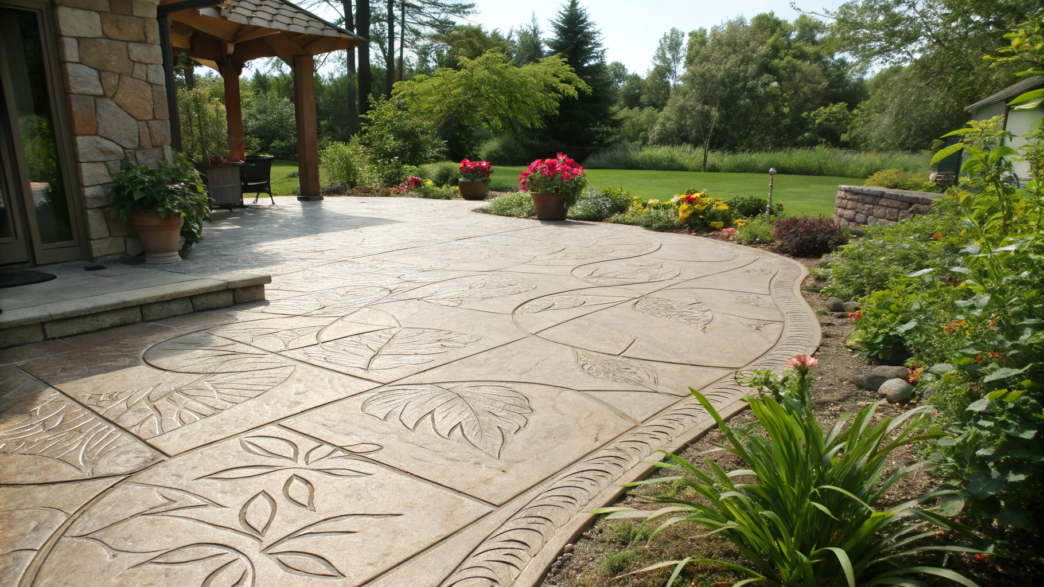
I’ve always wanted to understand how stamped concrete can transform an ordinary patio and how this technique actually works. It turns out that with special stamps and decorative stains, you can make concrete look like completely different materials. And sometimes, at first glance, it’s hard to even tell what you’re looking at!
I know how many questions come up when it’s time to choose materials. You want something that looks good, feels comfortable, and doesn’t require spending every weekend maintaining the surface.
So let’s explore 10 unexpected stamped concrete patio design ideas together. We’ll look at how these patterns are created, what materials you’ll need, and what to consider before getting started.
If you’ve never worked with stamped concrete before, it’s better to start with a small area and ask someone to help. You need to stamp the pattern while the concrete is still workable, and when you’re working on a large patio, timing really matters!
1. Marble-inspired stamped concrete finish
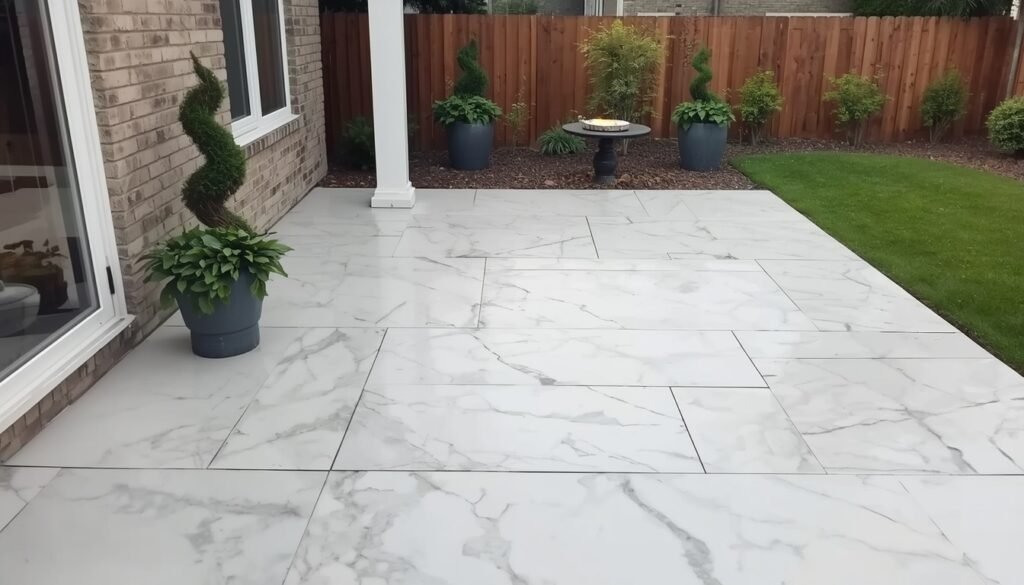
The first time I saw a concrete patio designed to look like white marble, I couldn’t even tell right away what the surface was made of. It had large rectangular slabs with thin gray veins, just like natural stone. It turned out to be ordinary concrete that had been given the right pattern using special stamps and decorative stains.
You can absolutely recreate this design in your own backyard. It’s best to choose the size of the rectangular slabs based on the size of your patio. A smaller pattern works for a small patio, while a spacious one can have larger slabs with thin joints between them.
What you’ll need
- Concrete stamps with a stone slab pattern. These create impressions of joints and a subtle stone texture in fresh concrete.
- Light-colored concrete pigment or color hardener. This helps create a white or light gray base.
- Stamp release agent. It prevents the stamps from sticking to fresh concrete and damaging the stamped pattern.
- Decorative stains for outdoor concrete in gray and charcoal shades.
- Fine brushes and sponges for creating the marble veins.
- Clear protective sealer for outdoor concrete with a compatible anti-slip additive.
How to create a marble-look patio
For this design, you’ll need freshly poured concrete, since stamps can only leave impressions while the concrete is still workable. The patio itself needs to be properly poured and leveled, with a slight slope to allow rainwater to drain away.
- Choose your slab pattern. Stamps with rectangular or square slabs and shallow joints will work well. Avoid overly rough stone textures, since finished marble usually has a fairly smooth surface.
- Prepare a light-colored base. You can add a suitable pigment to the concrete mix beforehand or use a light-colored hardener that’s applied to the fresh surface.
- Stamp the pattern. Once the concrete has started to set but is still workable, apply the release agent and place the stamps on the surface, lining up the pattern. Press the stamps into the concrete, then carefully lift the used stamps and move them forward. Keep going until you’ve covered the entire patio with a pattern that looks like stone tiles.
- Paint the marble veins. Wait until the concrete has hardened enough, then clean the release agent off the surface. Next, take a gray decorative stain for outdoor concrete and use a fine brush to paint irregular lines, branching them out in some places and blending them with a sponge. Don’t make all the veins look the same! On some slabs, they can be barely noticeable, while on others, they can be wider and darker. Before you start, make sure the stain is suitable for your chosen concrete surface.
- Apply a protective sealer. Once the stains have completely dried, apply a compatible clear sealer for outdoor concrete. Choose a product with anti-slip properties so the surface doesn’t become dangerously slippery after rain.
Before pouring the concrete, plan where the control joints will go. Then, when stamping, try to line them up with the joints between the decorative slabs so they don’t interrupt the marble pattern.
I think the most interesting part of this design is being able to create the marble veins your own way. You can leave some areas almost white and give others more noticeable gray lines. And don’t worry if the pattern turns out a little uneven. After all, you won’t find two completely identical slabs of natural marble either, right?
2. Natural stone illusion for elevated spaces
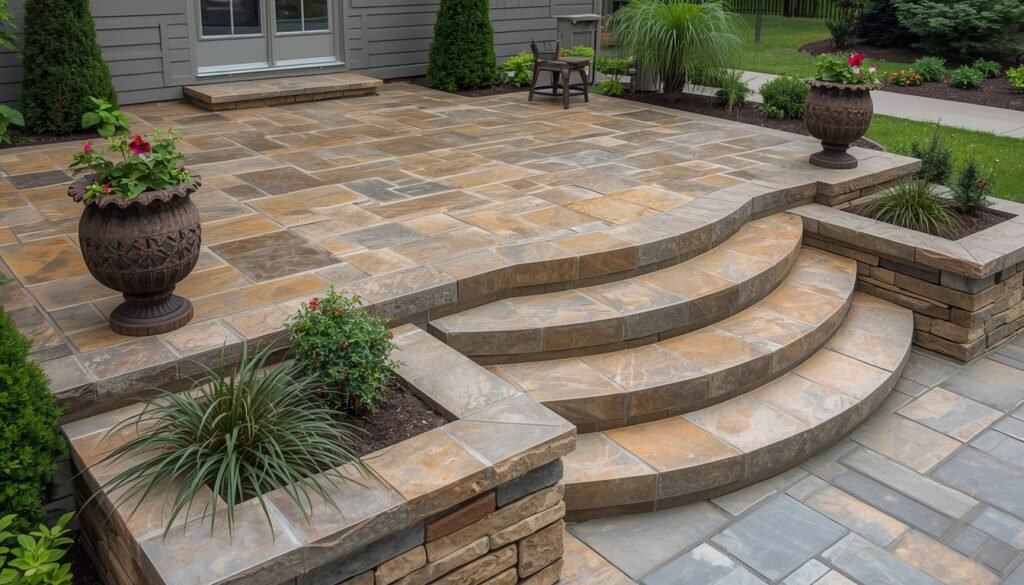
Stamped concrete often looks almost like real natural stone. You don’t even need to choose regular geometric patterns. You can create a pattern of slabs in different shapes, with uneven edges and small indentations on the surface.
This type of finish looks beautiful on elevated patios with steps leading up to them. For the patio, you can use stamps with slate or sandstone textures, or patterns that imitate irregular natural stone slabs. Then choose suitable concrete colors, from light beige to dark gray. And if there are flower beds, shrubs, and garden paths nearby, the patio will look even prettier.
What you’ll need
- Concrete stamps with a natural stone pattern. Choose stamps that imitate stone slabs of different sizes, with uneven edges and textured surfaces.
- Concrete pigment or color hardener. Gray, sandy, beige, or brown shades will work.
- Colored stamp release agent. It prevents the stamps from sticking to fresh concrete and can create darker shades in the indentations.
- Decorative stain for outdoor concrete. This lets you create additional shades after the concrete has hardened.
- Clear protective sealer for outdoor concrete with anti-slip properties.
How to create a natural stone finish
Natural stone patterns are created using special concrete stamps that are pressed into fresh concrete while it’s still workable. This leaves irregular outlines of stone slabs and a distinctive texture that resembles slate or sandstone.
- Choose the right stamp. For sandstone, look for stamps with large, irregular slabs. For slate, choose ones with its distinctive layered texture. Try to pick a pattern that matches your home’s exterior and garden paths.
- Choose the base color. For example, light beige concrete with brown tones will resemble sandstone, while gray concrete with charcoal areas will look like natural slate. You can add the main pigment to the concrete mix or apply a color hardener to the fresh surface.
- Stamp the stone pattern. Once the concrete has started to set but is still workable, apply the release agent and lay the stamps down, lining up the pattern. Press the stamps into the surface, then carefully lift the used stamps and move them forward. Keep going until you’ve covered the entire patio, making sure the pattern continues without noticeable gaps.
- Add a few different shades. Once the concrete has hardened and been cleaned, you can use compatible decorative stains. For example, make some areas a little darker and leave others lighter. Real natural stone is rarely exactly the same color throughout, so slight differences between the slabs will make the finish look more realistic.
- Apply a protective sealer. Once the decorative stains have dried, treat the patio with a compatible clear sealer for outdoor concrete. For a textured surface, it’s better to choose a matte finish with anti-slip properties.
I love how a stone patio looks when plants grow around its edges. On our homestead, Lindy and I try to use every available corner for greenery. And next to a patio like this, I’d definitely leave room for thyme, lavender, or low-growing ornamental grasses. Over time, the plants will spread, partly covering the edges of the patio and making the boundary between the garden and patio less noticeable.
3. Seamless patio-to-pool deck concrete design
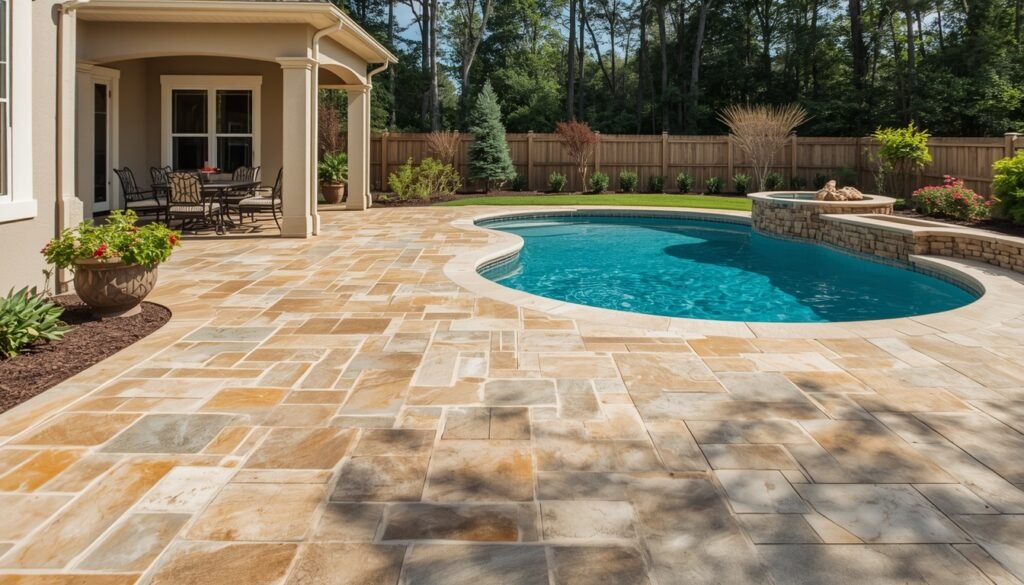
You can use the same stamped concrete for the patio and the area around the pool so they look like one large outdoor living space. Even if there are a few feet between the dining area and the pool, the same surface will visually tie them together.
For this kind of design, light-colored concrete with a natural stone texture works well. For example, you can choose stamps that imitate large sandstone slabs and use a light beige or sandy shade. In the sun, a light surface usually stays cooler than a dark one, which is especially important around a pool, where we often walk barefoot.
It’s important to remember that the surface around the pool should not be slippery, even when water gets on it. So choose stamps with a moderately textured surface and skip glossy finishes.
What you’ll need
- Concrete stamps with a natural stone texture. Choose one pattern for the patio and the entire area around the pool, Natural Stone Concrete Stamps on Amazon.
- Light-colored concrete pigment or color hardener. Sandy, creamy, and light gray shades will work well.
- Stamp release agent. So the stamps don’t stick to the fresh concrete.
- Decorative stain for outdoor concrete. You’ll need it if you want to give certain areas slightly different shades.
- Concrete sealer, suitable for use around pools, with anti-slip properties.
How to create a patio and poolside area
The whole point of this design is to keep the same concrete pattern and color on both surfaces. That way, the transition from the patio to the pool will be almost unnoticeable.
- Choose one overall pattern. Use the same stamps for both areas. For example, stamps with rectangular stone slabs or natural sandstone. Choose forms with a moderately textured surface so the area around the pool isn’t too smooth. Try to keep the pattern running in the same direction so the transition between the two areas is less noticeable.
- Choose a light shade. Cream, light sand, or pale gray concrete will look beautiful next to blue water. For coloring, you can use pigment added to the concrete mix or a color hardener applied to the fresh surface.
- Create the stamped pattern. Once the concrete has started to set but is still workable, apply the release agent and place the stamps, lining up the pattern. Press the forms into the surface, then carefully lift the used stamps and move them forward.
Keep going until you’ve finished the entire patio. Repeat the same pattern on the area around the pool. For safety, choose stamps with a texture that helps wet feet grip the surface better. - Add extra shades if needed. Once the concrete has hardened and been cleaned, you can use compatible decorative stains. For example, slightly darken some of the recessed areas in the stone pattern. The main thing is to keep the same palette in both areas so there isn’t a noticeable dividing line.
- Apply a protective sealer. Apply a clear protective sealer designed for outdoor areas around pools. Choose a matte finish with a suitable anti-slip additive. It’s better not to use glossy sealers here, since a wet surface can become too slippery.
When planning the area, it’s important to provide a slope for water drainage and a separation joint between the concrete and the edge of the pool. This helps prevent cracks caused by the concrete expanding in changing temperatures.
I think Lindy and I would spend most of the day here in the summer. Especially if we placed a few pots of our favorite herbs nearby and set up a little shady spot for relaxing. Ah, summer, summer…
4. Multi-tone concrete with gradient effect
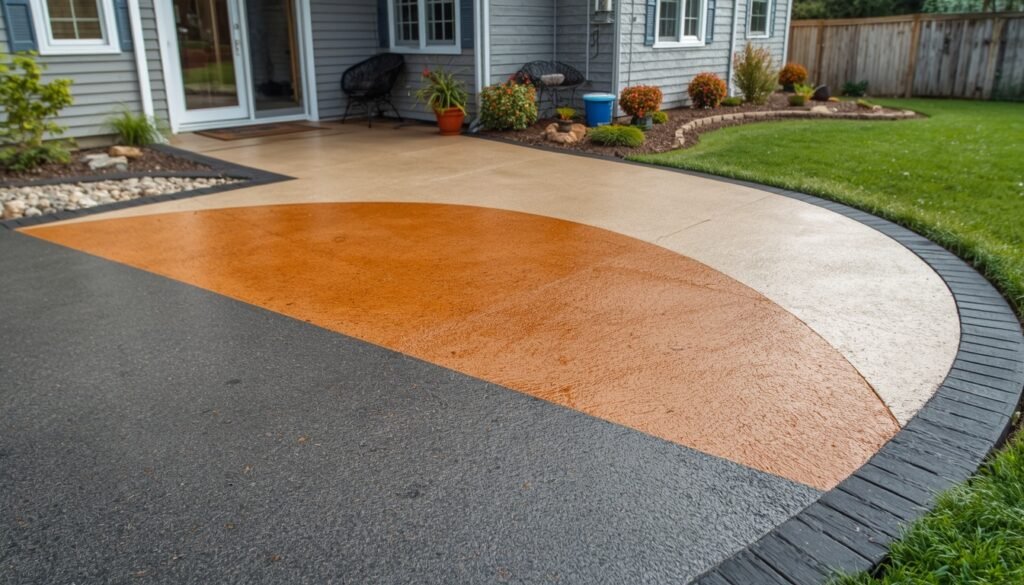
You can use several shades on a concrete patio and create a smooth transition from a lighter color to a darker one. For example, from sand near the house to a warm brown around the edges of the patio. Or you can combine light gray, gray, and charcoal shades.
This design feels like a great option for a spacious patio, where the color transitions will really stand out. For stamping, use forms with a subtle natural stone texture or large tile patterns. It’s better not to choose a very deep texture, so it doesn’t distract from the color transitions.
You can keep it to just two or three shades. The main thing is that the colors blend gradually, without harsh полосы and sharp boundaries.
What you’ll need
- Concrete stamps. Forms with a fine stone texture or a large tile pattern will work well.
- Concrete pigment or color hardener. This is needed to create the main surface color.
- Stamp release agent. It keeps the forms from sticking to fresh concrete.
- Decorative stains for outdoor concrete in two or three similar shades. It’s more convenient to use compatible water-based stains that can be applied in several layers.
- A garden sprayer for stains. This will help distribute the color evenly across the surface.
- Clear protective sealer for outdoor concrete with anti-slip properties.
How to create a smooth color transition
For this design, you first create the stamped surface, and then add shades using decorative stains. Color transitions are easier to do after the concrete has hardened, because it’s easier to control the intensity in each area that way.
- Choose the stamp pattern. A stone texture without deep indentations works well for soft color transitions. If you prefer a tile pattern, choose large enough forms so the color transitions will be visible.
- Create the base color. Add a light pigment to the concrete mix or use a color hardener on the fresh surface. For example, for a sand-to-brown transition, you can start with a light beige base.
- Stamp the pattern. Once the concrete has started to set but is still workable, apply the release agent and place the stamps, lining up the pattern. Press the forms into the surface, then carefully lift the used stamps and move them forward. Keep going until you’ve finished the entire patio.
- Apply the additional shades. Once the concrete has hardened and the release agent has been cleaned off, start staining. Begin with the lightest shade, then apply the middle tone to the center of the transition, and the darker shade closer to the edge of the patio you chose.
For this, use a sprayer designed for the stain you’ve selected. Apply the color in thin layers, gradually reducing the spray intensity at the boundaries between the shades.
For smooth transitions, use compatible decorative stains that allow layered application. First test the combination on a small sample area to see how the shades blend and how they look after drying. - Check the result and apply a protective sealer. Wait for the stains to dry and look at the color in daylight. If the transition came out too sharp, you can soften it with another thin layer of a compatible stain. Then apply a clear protective sealer for outdoor concrete with anti-slip properties.
I’ll say it one more time: before staining the entire patio, make sure to test the color combination on a small sample area. Concrete absorbs stains differently, and once they dry, the shades may look different from what you saw on the label.
I like the idea of using colors that already exist around the house. For example, if there are ornamental grasses with golden leaves nearby, and the walls of the house are finished in light stone, a sand-to-brown transition will look very natural. You don’t need to match the shades perfectly. It’s actually better if they vary a little. After all, nature rarely creates perfectly even color transitions.
5. Stamped concrete with pergola for outdoor dining
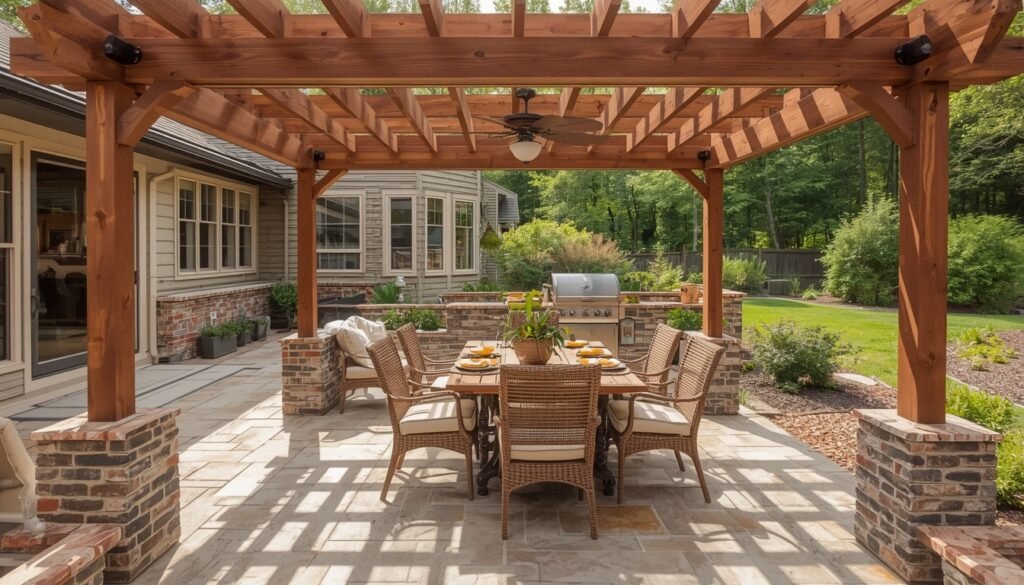
An outdoor dining area under a wooden pergola on a stamped concrete patio is a great place for family dinners, weekend breakfasts, and get-togethers with friends. Lindy and I love spending time outside, and when we can enjoy a meal right in the garden, even better! Although we do have to watch out for our chickens getting to the food before we do.
For this kind of patio, I suggest concrete with a natural stone pattern in sandy or light gray shades. You can install a wooden pergola over it, with enough room underneath for a dining table and a few chairs. And around the edges, you can plant climbing plants or place large flower pots.
What you’ll need
- Concrete stamps with a natural stone pattern. For a dining area, it’s better to choose stamps with shallow joints and a moderate texture so the table and chairs stand firmly on the surface.
- Concrete pigment or color hardener. Sandy, beige, and light gray shades will work well.
- Stamp release agent. Prevents the stamps from sticking to fresh concrete.
- Wooden pergola. You can buy a ready-to-assemble kit, such as a Wooden Patio Pergola Kit on Amazon.
- Pergola post anchors. Choose them based on the pergola’s design and the foundation planned for it.
- Clear protective sealer for outdoor concrete with anti-slip properties.
How to create an outdoor dining area under a pergola
Before getting started, decide where the table, chairs, and pergola will go. Leave enough space around the table so you can easily pull out chairs and walk between them. Lindy always tries to think through little details like these ahead of time. Everything looks spacious on paper, but then you put the furniture in place, and suddenly there’s barely room to walk!
- Prepare the area for the pergola. First, decide where the pergola will stand and how much space you’ll need for the dining table and chairs. Lindy always tries to think through little details like these ahead of time. Everything looks spacious on paper, but then you put the furniture in place, and suddenly there’s barely room to walk! Mark the locations for the pergola posts and prepare suitable concrete footings for them. Their size and depth depend on the pergola’s design and local building requirements.
- Choose the stamps and concrete color. For the dining area, stamps with a rectangular stone slab or sandstone pattern will work well. Choose stamps with shallow joints and a subtle texture so the table and chairs stand firmly on the surface. You can match the concrete color to the wooden pergola. For example, light sandy concrete will look beautiful with natural wood, while gray will pair well with dark wooden beams.
- Create the stamped concrete surface. Pour and level the concrete, using your chosen pigment or color hardener. Once the surface has started to set but is still workable, apply the release agent and press the stamps into the concrete. Carefully lift the stamps and move them to the next sections, lining up the edges of the pattern. Once the concrete has hardened enough, clean the surface and apply a protective sealer for outdoor concrete with anti-slip properties, following the manufacturer’s instructions.
- Install the pergola. Assemble the wooden structure according to the manufacturer’s instructions and secure the posts to the prepared footings. Make sure to use anchors designed for your pergola, since the structure needs to withstand not only its own weight but also wind loads. If the pergola is large, it’s better to ask someone to help with assembly. Lifting and installing long wooden beams is much easier with two people. Trust me!
- Set up the dining area. Put out a table, comfortable chairs, and a few large flower pots. You can hang outdoor string lights on the pergola and stretch a fabric canopy over it for shade from the hot sun. Another good idea is to plant grapevines nearby so they can eventually climb over the pergola. Just make sure the structure can support the weight of the mature vines.
By the way, a wooden pergola needs regular inspections and occasional refinishing, especially if it’s constantly exposed to rain and sun.
In summer, when the garden is full of fresh vegetables and herbs, it’s hard not to want to move dinner outside. Tomatoes, cucumbers, a little fresh basil, something cooked on the grill — and you can sit at the table until evening. And as you might have guessed, we have a small kitchen herb bed near our pergola. Rosemary, thyme, parsley, and basil are literally just a few steps from the dining table. That’s always a big plus for us!
6. Coastal blue and sand patio palette
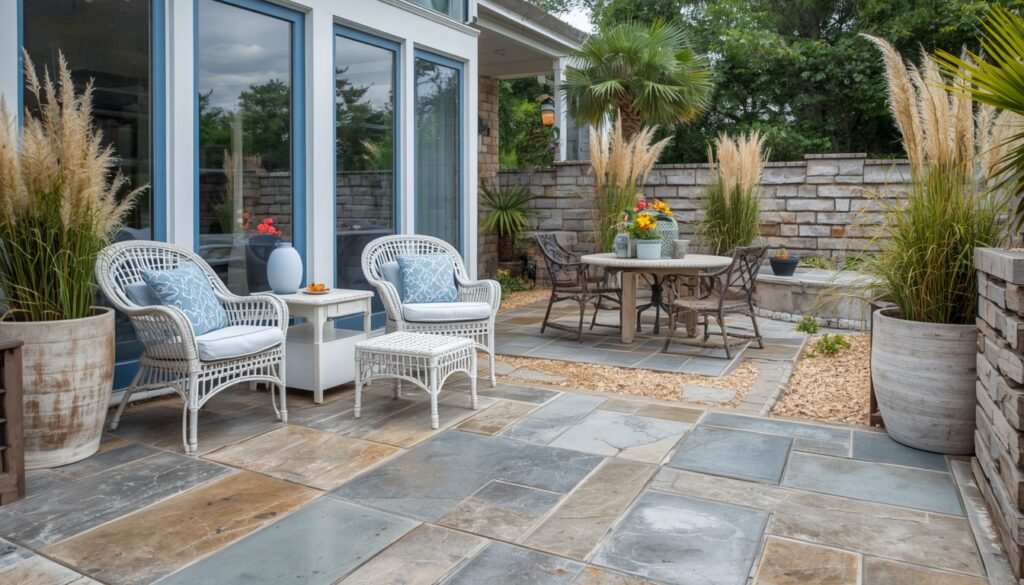
Blue and sandy shades on a concrete patio bring to mind the ocean, the beach, and summer vacations. Lindy is always amazed at how much of a difference the right color can make.
I think light beige concrete with blue-gray shades is a lovely combination. It reminds me of wet sand at the water’s edge. For stamping, you can use forms with a pattern of natural sandstone or large stone slabs. On a patio like this, you can place white wicker chairs, a wooden table, and large pots with ornamental grasses.
What you’ll need
- Stamps with a sandstone or natural stone texture. Choose forms with a shallow texture and irregular stone slab outlines.
- Sandy-colored concrete pigment or color hardener. This creates the main light beige shade.
- Stamp release agent. Helps you lift the stamps off fresh concrete without damaging the pattern.
- Blue and blue-gray decorative stains for outdoor concrete. Choose products that resist fading in sunlight and are compatible with the protective sealer.
- A sprayer for decorative concrete stains.
- Clear protective sealer for outdoor concrete with anti-slip properties.
How to create a patio in blue and sandy shades
For this design, it’s better to use sandy beige as the main color and keep blue for certain areas. This will make the surface resemble natural stone with unusual color transitions.
- Choose the stamp pattern. Forms with a sandstone texture or irregular stone slabs will work well. Choose the size and layout of the pattern based on the size of your patio.
- Color the concrete sandy beige. Add a suitable pigment to the concrete mix or apply a light beige color hardener to the fresh surface. You can choose a dry sand shade, cream, or light beige.
- Stamp the pattern. Once the concrete has started to set but is still workable, apply the release agent and place the stamps on the surface, lining up the pattern. Press the forms into the concrete, then carefully lift the used stamps and move them forward. Keep going until you’ve covered the entire patio.
- Apply the blue shades. Once the concrete has hardened and you’ve cleaned off the release agent, use a decorative stain for outdoor concrete. Start with small areas of blue-gray, then apply a lighter blue in a few places.
It’s easier to work with a sprayer, gradually reducing the color intensity toward the edges of the stained areas. The main light beige shade of the concrete should still be clearly visible. Test the stain combination on a small sample first and follow the application instructions. - Protect the surface. Once the stains have completely dried, coat the concrete with a compatible clear sealer for outdoor surfaces. For a patio, it’s better to choose a matte finish with anti-slip properties.
You can choose white or light blue cushions for your outdoor furniture and plant blue fescue, lavender, or other plants with silvery leaves nearby. They look beautiful with the blue shades of the concrete.
A small table with a pitcher of homemade lemonade and a plate of fresh fruit would be great on a patio in blue and sandy shades like this. Lindy and I love relaxing in the garden after work, especially in summer when we’ve spent the whole day tending the garden beds. And here, we could sit in the shade and imagine we’re somewhere by the sea, even if only for a little while. Except instead of listening to the waves, we’d hear our chickens clucking!
7. Brick-style stamped concrete walkout design
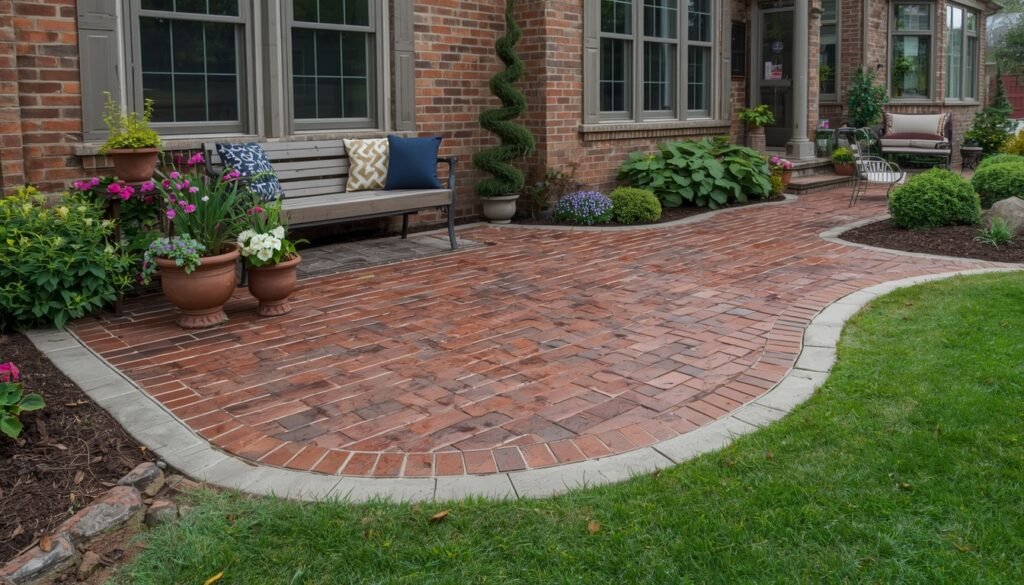
Brick patios always remind me of old country homes with a little backyard just outside the back door, flowers, a wooden bench, and a path leading into the garden. I love places like that! But you can create a similar patio without laying real bricks — by using stamped concrete.
I like reddish-brown shades with slight color variations. Some bricks can be darker, others a little lighter, as if the patio was laid many years ago. This pattern works well for patios next to houses with wood siding, white walls, or real brickwork.
What you’ll need
- Concrete stamps with a brick pattern. Choose stamps with rectangular bricks arranged in evenly spaced, staggered rows.
- Concrete pigment or color hardener. Terracotta, reddish-brown, and muted orange shades work well for a brick-style surface.
- Stamp release agent. It prevents the stamps from sticking to fresh concrete. You can choose a colored release agent to give the joints and small indentations a darker shade.
- Decorative stains for outdoor concrete. You’ll need these to create slight color differences between individual bricks.
- Brushes and sponges for applying the stains. For example, Painting Sponge Set on Amazon.
- Clear protective sealer for outdoor concrete with anti-slip properties.
How to make a patio with a brick pattern
Concrete stamps create an entire section of brickwork at once, including the lines between the bricks and a subtle surface texture.
- Choose the pattern layout. For a patio just outside the back door, a classic running bond pattern works well, with each row of bricks offset from the one before it. Decide ahead of time which direction the rows will run. If you’re planning a path into the garden, you can continue the same pattern along it.
- Choose a brick-like concrete color. For a traditional red brick look, use a terracotta or reddish-brown pigment. You can add it to the concrete mix or apply a color hardener to the fresh surface. You don’t have to choose a bright red. More muted shades look beautiful too.
- Stamp the brick pattern. Once the concrete has started to set but is still workable, apply the release agent and place the stamps on the surface, lining up the brick rows so the pattern continues without noticeable seams. Press the stamps into the concrete, then carefully lift the used stamps and move them forward. Keep going until you’ve covered the entire patio.
- Give the bricks slightly different shades. Once the concrete has hardened and the surface has been cleaned, you can use compatible decorative stains. Use a brush or sponge to slightly darken some bricks with a brown shade, leaving the others lighter. Don’t try to make every brick exactly the same color. Real fired clay bricks have slight color variations, and that’s what we’re trying to recreate.
- Apply a protective sealer. Once the stains have dried, treat the concrete with a compatible clear sealer for outdoor surfaces. It’s better to choose a matte finish with anti-slip properties, since the surface often gets wet when it rains.
By the way, you need to plan the patio height near the door and the slope for rainwater drainage before pouring the concrete. Water shouldn’t flow toward the doorstep or collect next to the house wall.
You can continue the brick pattern from the patio onto a garden path without changing the surface material. Lindy and I are constantly going back and forth between the house and the garden, especially during harvest season. And it’s great when this part of the yard is not only practical for everyday chores but also nice to look at.
8. Oversized tile look on concrete surface
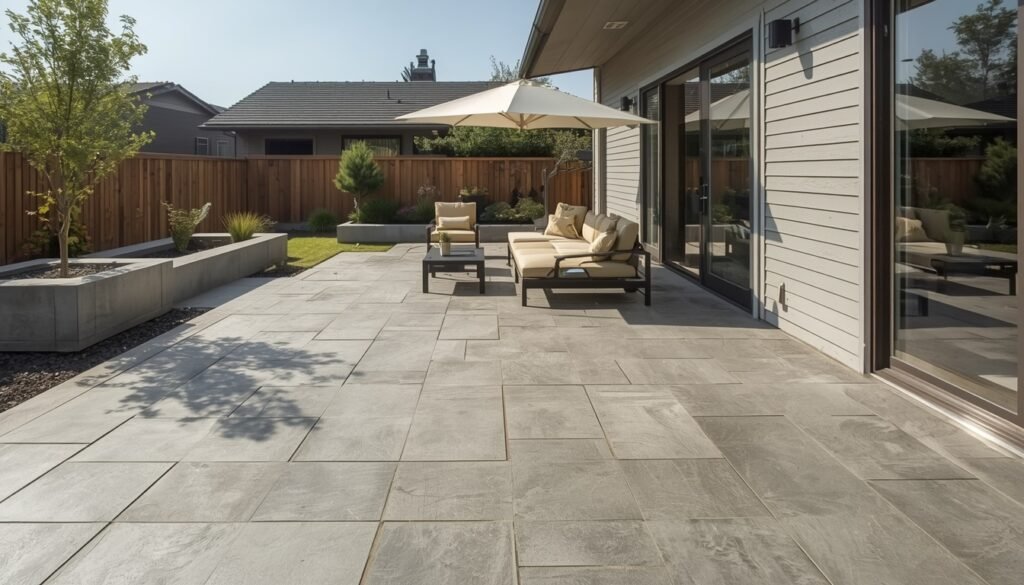
Large tiles on a patio look beautiful even without complicated patterns or bright colors. Wide rectangular or square tiles, thin joints, and an even surface — you can get all of this with stamped concrete.
This type of finish is a great choice for a modern patio with wooden or metal furniture. You can choose a light gray, beige, or cream shade for the tiles. The main thing is to match the tile size to your patio, so they look balanced even in a smaller space.
What you’ll need
- Concrete stamps with a large tile pattern. Choose stamps with square or rectangular sections and shallow lines between them.
- Concrete pigment or color hardener. Light gray, beige, and cream shades work well.
- Stamp release agent. This prevents the stamps from sticking to fresh concrete.
- Decorative stain for outdoor concrete. You’ll need it if you decide to darken the joints slightly or change the color of certain areas.
- A brush for decorative staining.
- Clear protective sealer for outdoor concrete with anti-slip properties.
How to create a patio with a large tile pattern
It’s important to keep the lines straight and the spacing between decorative joints consistent. So before pouring the concrete, plan how the pattern will be laid out, especially near the house walls and around the edges of the patio.
- Choose the tile size and layout. Pick a stamp with a square or rectangular tile pattern that suits the size of your patio. Draw a rough layout ahead of time to see how the pattern will fit and avoid narrow tile sections around the edges.
- Choose the concrete color. To imitate light-colored tiles, use gray, cream, or beige pigment. You can add it to the concrete mix or apply a color hardener to the fresh surface. You can stick with just one shade, without any extra color transitions.
- Stamp the pattern. Once the concrete has started to set but is still workable, apply the release agent and press the stamps into the surface. Carefully lift the stamp and move on to the next section, making sure the tile lines match up. Keep the rows straight, since mistakes will be noticeable with this kind of geometric pattern.
- Color the joints. Once the concrete has hardened and the surface has been cleaned, you can slightly darken the stamped lines with a compatible decorative stain. For example, choose a darker gray shade for light gray concrete. There’s no need to make the joints almost black. A small color difference is enough to highlight the tile pattern.
- Apply a protective sealer. Once the stains have dried, apply a clear protective sealer for outdoor concrete. It’s better to choose a matte finish with anti-slip properties to make walking on the patio safer after rain.
By the way, for a large tile look, choose stamps with a slightly rough texture rather than a completely smooth surface. This will help reduce the risk of slipping after rain.
Stamped concrete with a large tile pattern has another advantage. There are no actual gaps between the decorative tiles where weeds can grow. Of course, you’ll still need to clean the patio from time to time and reapply the protective sealer. But Lindy and I know very well how much time garden work takes, so the chance to have one less chore makes me happy.
9. Herringbone pattern patio for tight space
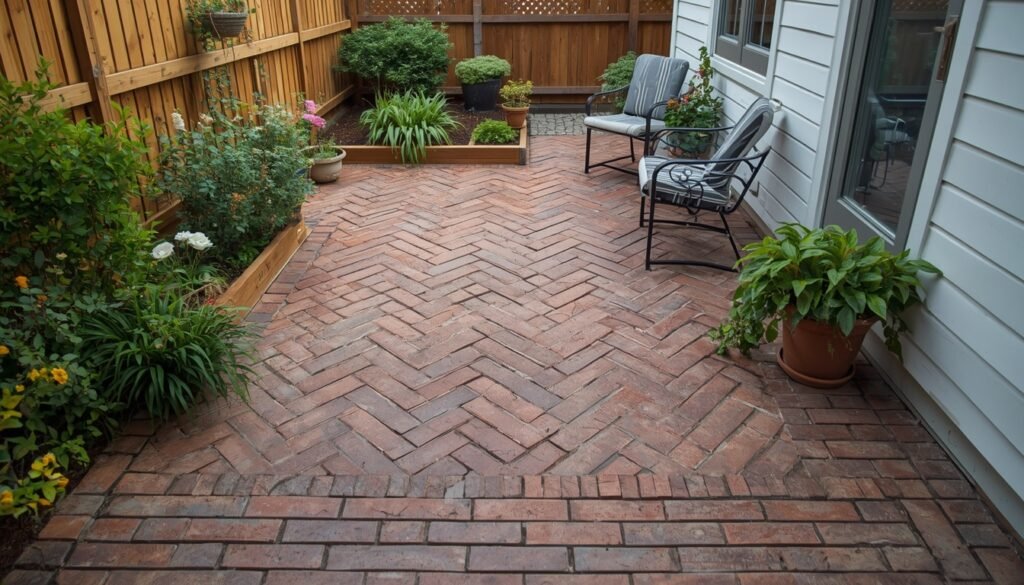
A herringbone pattern made of rectangular bricks is an interesting option for a small concrete patio, especially if the space is narrow or long. The bricks in this pattern are arranged at right angles to each other, creating repeating zigzags. Thanks to the diagonal lines, even a small patio can look a little longer.
These patterns look interesting even in a single color. For example, a terracotta herringbone pattern will pair well with wooden garden furniture and flower pots, while a light gray one will look great with white house walls and metal chairs.
What you’ll need
- A set of herringbone concrete stamps. Choose special concrete stamps that create impressions of several rectangular bricks arranged in a zigzag pattern at once.
- Concrete pigment or color hardener. Terracotta, light gray, sandy, or reddish-brown shades will work well.
- Stamp release agent. It prevents the stamps from sticking to fresh concrete and damaging the pattern.
- Decorative stain for outdoor concrete. You’ll need it if you plan to highlight the joints slightly or create some color variation across the surface.
- Clear protective sealer for outdoor concrete with anti-slip properties.
- Measuring tape and a chalk line to mark the direction of the pattern in advance.
How to create a herringbone patio
For this design, you use concrete stamps with a ready-made brick herringbone pattern. There’s no need to create each brick separately — one stamp creates an entire section of the pattern at once.
- Decide which direction the pattern will run. On a narrow patio, you can position the centerline of the herringbone pattern lengthwise, from the house toward the garden. This will draw the eye forward. Before starting, mark the main guide line you’ll follow while stamping.
- Choose the concrete color. Terracotta, reddish-brown, light gray, or sandy shades work well for a brick herringbone pattern. Consider the color of your house walls and the overall look of your yard. You can add pigment to the concrete mix or use a color hardener on the fresh surface.
- Stamp the pattern. Once the concrete has started to set but is still workable, apply the release agent and place the stamps on the surface, lining up the pattern. Press the stamps into the concrete, then carefully lift the used stamps and move them forward. Keep the pattern lines aligned so the zigzags continue without shifting. Gradually cover the entire patio.
- Finish the patio edges. You can create a narrow decorative border with a straight brick pattern around the perimeter. It will separate the herringbone pattern from the lawn or flower beds and give the design a neat finish along the edges. For this border, use a separate stamp with a suitable pattern.
- Finish staining and protect the concrete. Once the concrete has hardened and the surface has been cleaned, you can slightly darken the decorative joints with a compatible stain if needed. When everything has dried, apply a clear protective sealer for outdoor concrete with anti-slip properties.
Lindy and I love spending time outdoors, even when there’s only a little space to relax. On a patio like this, there’s enough room for a couple of chairs, a small table, and a few pots with plants. And the brick herringbone pattern will still be clearly visible between the furniture and along the patio edges. I think this is one of those cases where a beautiful floor pattern means you don’t need to spend money on extra decorations.
10. Woodgrain concrete patio that beats real wood
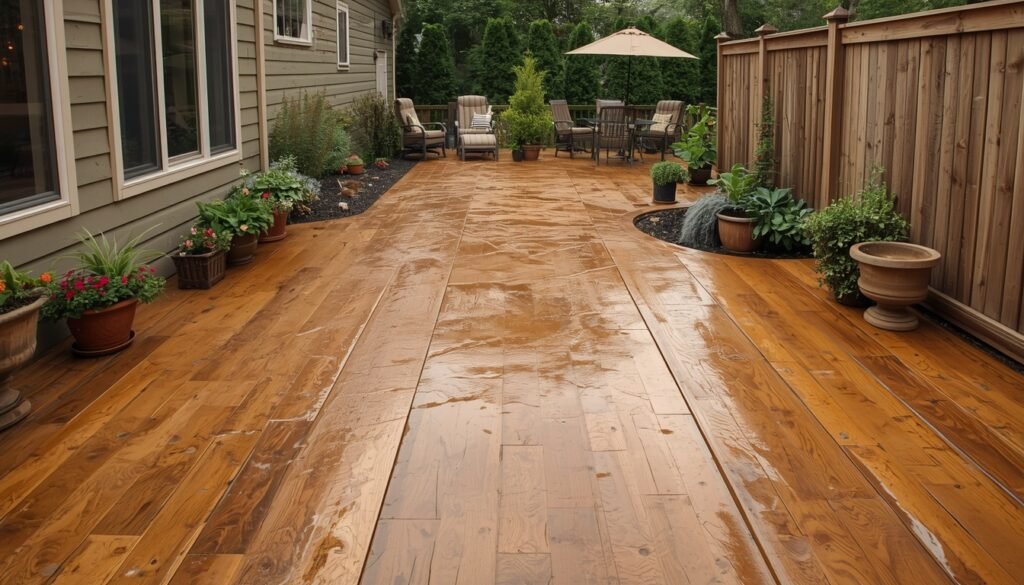
A wooden patio looks wonderful, but taking care of it can take quite a bit of time. The boards need to be cleaned from time to time, treated with protective products, and sometimes even replaced because of rot. But with stamped concrete, you can get a surface that looks like wooden boards, including wood grain, knots, and even small cracks. And the upkeep is much easier.
Personally, I like the idea of wide boards in warm brown shades. This kind of surface can be styled like aged wood that has darkened a little over time, or you can go with a lighter shade that looks like pine. Both options work well for a patio near the garden.
Lindy and I work with wood a lot on our property, so we know it needs attention. Concrete has its own maintenance needs too, but it doesn’t rot, warp from moisture, or leave splinters. And for an outdoor area that sits in the rain and sun all year long, those are serious advantages.
What you’ll need
- A set of stamps with a wood plank texture. Choose forms that show wood grain, knots, and the lines between boards.
- Concrete pigment or color hardener. Light brown, honey, or gray-brown shades work well for the base color.
- Stamp release agent. This keeps the forms from sticking to fresh concrete. A colored release agent can also help highlight the deeper parts of the wood texture.
- Decorative stains for outdoor concrete. For example, brown and dark brown, to bring out the wood grain and knots.
- Brushes for decorative staining.
- Clear protective sealer for outdoor concrete with anti-slip properties.
How to make a concrete patio look like wood
- Choose the board pattern. You can use stamps with wide boards or narrower planks. Think ahead about which direction the pattern should run so it looks neat across the whole patio. And if you prefer an aged wood look, choose forms with noticeable knots and wood grain.
- Choose the base color. To imitate pine, you can use a light honey-brown shade, and for darker wood, a rich brown. The pigment is added to the concrete mix or the color hardener is applied to the fresh surface. The surface doesn’t have to be dark, especially if the patio gets a lot of sun.
- Stamp the wood texture. Once the concrete has started to set, apply the release agent and place the stamps, lining up the board pattern. Press the forms into the surface, then carefully lift them and move on to the next section. Keep an eye on the direction of the boards so the wood pattern continues without obvious shifts.
- Highlight the wood grain. After the concrete has hardened and the release agent has been cleaned off, use compatible decorative stains. Apply a darker shade along the stamped grain, and highlight knots and recessed areas here and there. You can make some lines darker with a brush and soften the color a little with a sponge. There’s no need to color every board the same, since natural wood always varies in tone.
- Apply a protective sealer. Once the stains have dried, apply a compatible clear protective sealer for outdoor concrete. For a wood-look surface, a matte finish with anti-slip properties works well. It will preserve the look of the wood pattern without too much shine.
On our property, we always try to choose materials based on how much attention they’ll need later on. Besides the house, we have a garden, raised beds, and plenty of other things to deal with. So you can keep the familiar look of a wooden surface without worrying that after a few seasons, some of the boards will start to rot or dry out.
Best patio surface
By nature, I’m a curious person, and I’m always interested in how other people design their yards. Sometimes one photo in the comments gives more ideas than a whole collection of design projects.
Tell me in the comments which of these options you liked most. And if you already have a stamped concrete patio, share your experience. How long have you had it, are you happy with the surface, and is it hard to maintain?