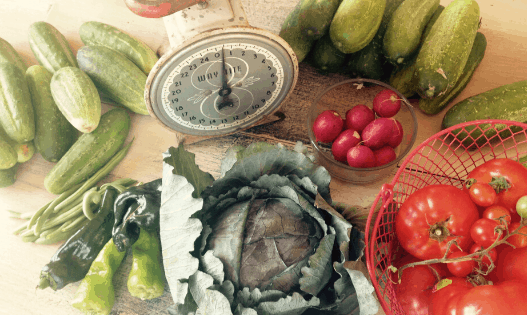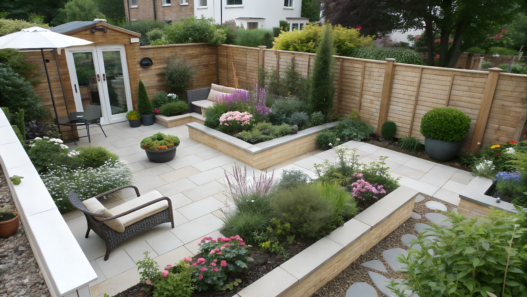
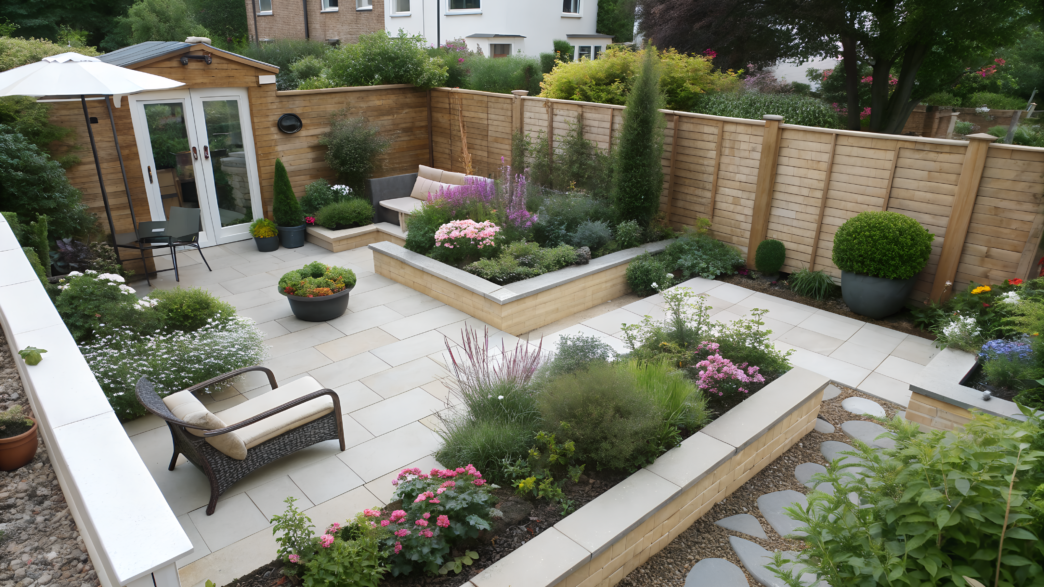
In a small garden, what matters most is not complicated ideas, but clear layouts that help you use every foot as much as possible. Picture how you will walk, water, cut herbs, tie up tomatoes, and generally live next to this garden. One path that is too wide, and there is already not enough room for planting. One garden bed in the far corner, and you will remember the basil when you have already finished dinner. We have had that happen. More than once.
Here I am sharing 10 Garden Planning Ideas for Small Backyards that you can start with, even if this is your first year gardening. And I am sure you will have a place where you do not just want to plant “something,” but want to make a garden that is convenient for you every day.
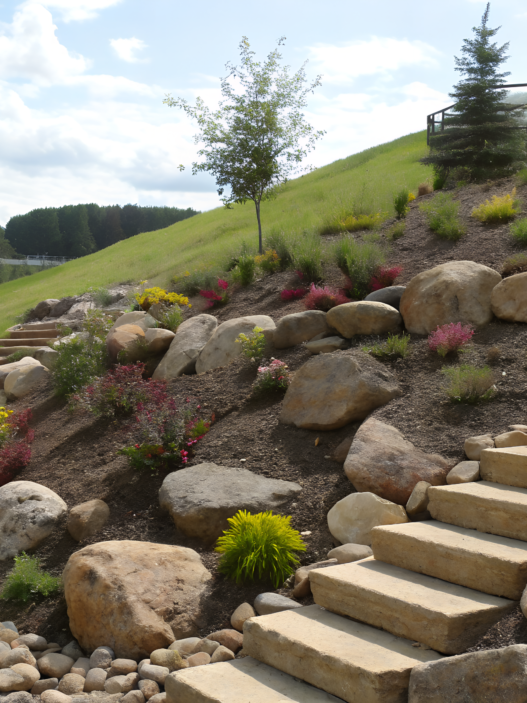
1. The One Path Layout That Makes a Tiny Yard Feel Twice as Big
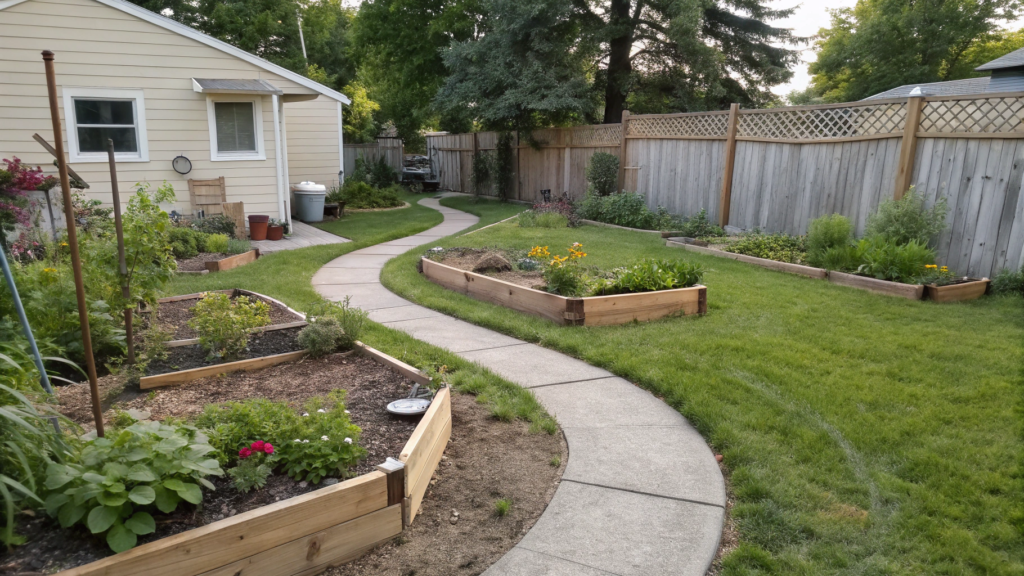
In a small yard, your eye often runs straight into a fence, a shed wall, or the back of the house. Especially when the garden beds sit in separate pieces: a container here, a flower bed there, a hose under your feet, a bag of soil in the corner.
But one well-thought-out path can visually stretch the yard. It gives the space direction and helps you walk between plantings normally. Even a path that is 12–18 feet long (about 3.6–5.5 m) can make a small area feel deeper, especially if it does not run strictly down the center, but shifts slightly to one side or gently turns toward the far corner.
What You’ll Need
- Garden hose or rope — so you can lay out the path line on the ground first, instead of digging blindly.
- Tape measure at least 25 feet long (about 7.6 m) — to measure the width of the walkway and planting areas properly.
- Plain cardboard without gloss or tape — if you need to cover grass or weeds under the future path.
- Wood mulch or wood chips — to cover the path on top.
- Compost — for the planting strips along both sides of the path.
- Garden staples or small stakes — if you need to hold down the cardboard or path edges.
- A simple trellis — if the path runs along a fence.
How to Make the One Path Layout
- Start with the real entrance to the garden.
Lay the hose from the door, gate, or patio — from the place where you will actually enter the garden. Walk along this line with a watering can or basket. If you already want to cut the corner at this stage, it is better to adjust the path right away. - Choose a comfortable width.
For a small yard, 18–24 inches (45–60 cm) is usually enough. You can walk along this kind of path, crouch down, and set down a harvest basket. If you plan to roll a wheelbarrow often, it is better to make it 30–36 inches (76–91 cm), but in a very small yard, that width can take up too much space. - Do not split a narrow yard exactly in half.
If the area is long and narrow, shift the path closer to one side. Then you will get a deeper planting strip on the other side. If the yard is almost square, give the path a gentle turn toward the far corner. At the end, you can place a large pot, a trellis, a water barrel, or a small bench. - Make the garden beds easy to reach.
If you can only access the plantings from the path side, keep the garden bed depth around 24–30 inches (60–76 cm). If you have access from both sides, you can go up to 4 feet (1.2 m). This way, you will not step into the bed every time you need to cut herbs or check the soil. - Plant low-growing plants along the edge of the path.
Right next to the walkway, it is better to plant lettuce, parsley, thyme, compact basil, calendula, nasturtium, green onions, radishes, or strawberries. Tomatoes, cucumbers, sunflowers, corn, and large cabbage should go farther back. Otherwise, by mid-season they will start pushing into the walkway, and the path will quickly disappear. - Use the fence if it is nearby.
If the path runs along a fence, add a narrow trellis 12–18 inches wide (30–45 cm). You can grow peas, beans, or cucumbers on it. This way, you use vertical space and do not take room away from lettuce, herbs, and other low-growing plants. - Cover the path with cardboard and mulch.
Mow the grass as low as possible, lay the cardboard with at least 6 inches (15 cm) of overlap, add 3–4 inches (7.5–10 cm) of mulch on top, and water it well. In a couple of weeks, the path will settle and feel firmer. After a season, you can add more mulch if the layer sinks.
Experienced Gardener Tips
Do not make the path too narrow. On paper, 12 inches (30 cm) may look tolerable, but in a real garden, it is almost always too little. Plants grow, leaves hang over the edge, and the walkway becomes uncomfortable.
Do not plant large plants right along the edge. Tomatoes, unsupported cucumbers, tall flowers, and large cabbage will quickly take over the path. Then you will have to keep tying, pruning, and squeezing between the leaves.
When This Layout Makes Sense
The One Path Layout works well for a narrow backyard, a side strip along the house, a small area near a fence, or a first vegetable garden. It immediately shows where the walkway will be, where the plantings will go, where to place a trellis, and where it is better not to crowd the space.
For a start, I would leave the hose on the ground for at least one day. Walk through in the morning, walk through in the evening, and see whether it is convenient to water and harvest. If something feels awkward, it is better to fix it now, not after the path has already been covered with mulch.
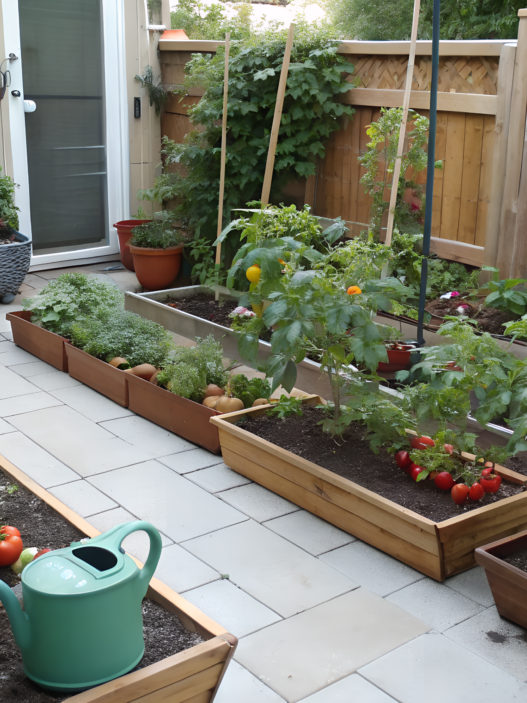
2. The 3 Zone Beginner Layout for First Time Growers
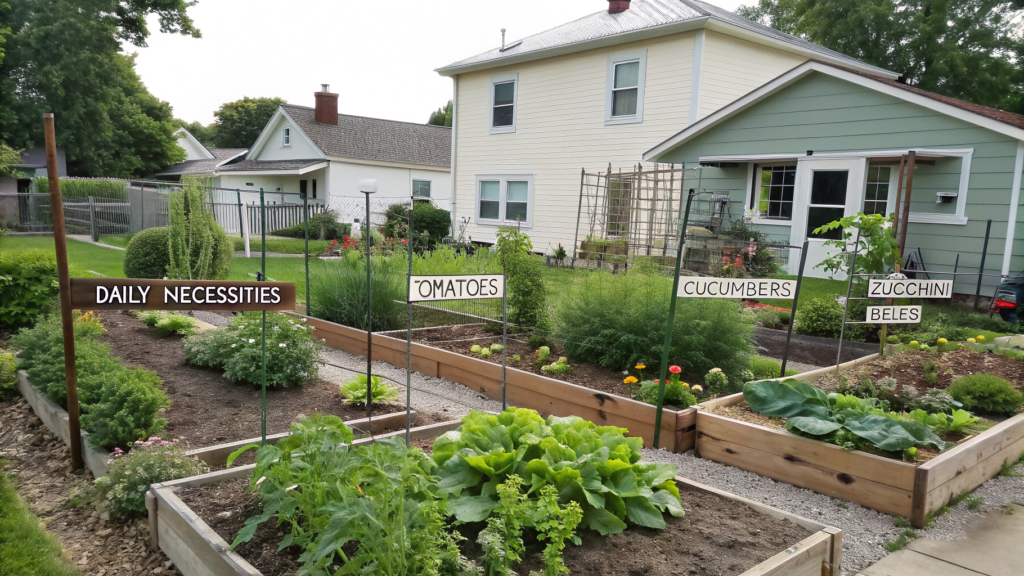
If the garden is small, there is always this urge to plant a little bit of everything. Lettuce, tomatoes, basil, cucumbers, strawberries, flowers for bees, and one more zucchini because the seed packet is already sitting there. So this is where the 3 Zone Beginner Layout helps you avoid turning a small yard into a random collection of garden beds.
You divide the space by how often each area needs care: the things you need almost every day go closer to the house, the main vegetables go in the middle, and the tall or longer-growing plants go farther back, near the fence or the back line of the garden.
Basically, you need to understand what should be within easy reach and what can grow a little farther away.
What You’ll Need
- Garden hose or rope — to mark the borders of the three zones right on the ground.
- 25-foot tape measure (about 7.6 m) — so you do not make the garden beds too wide.
- Compost — for the planting areas.
- Mulch — to cover bare soil.
- Garden markers — so you do not forget what was planted where.
- A simple trellis — if peas, beans, or cucumbers will grow in the back zone.
How to Make the 3 Zone Layout
- Zone 1: closest to the house — herbs and quick harvests.
This zone is best near the door, patio, gate, or any spot you can easily reach while cooking. This is a good place to grow lettuce, green onions, parsley, basil, cilantro, radishes, spinach, and thyme. Basically, anything you will cut often, a little at a time. To start, a narrow strip 18–24 inches deep (45–60 cm) or a few containers is enough. - Zone 2: the middle of the garden — main vegetables.
This is where you can plant crops that need regular care, but not daily harvesting: peppers, bush beans, Swiss chard, kale, carrots, beets, bush tomatoes, and eggplants. If you are making a garden bed, a beginner-friendly width is 3–4 feet (90–120 cm), so you can reach the middle by hand and not step into the planting area. - Arrange the middle zone by plant height.
Tall crops are better planted on the north side of the bed, if that works for your space. That way, tomatoes, trellised beans, or sunflowers will not block the light from lettuce, carrots, beets, and other low-growing plants. Quick crops like radishes or leafy greens can stay closer to the edge, where they are easier to harvest and replant. - Zone 3: the back part of the garden — tall and longer-growing plantings.
Send trellised cucumbers, peas, pole beans, sunflowers, corn, large flowers, perennial herbs, and berry bushes toward the fence or the back line of the garden. You can also place a composter, water barrel, or small garden storage box there if you have room. Just do not turn the far corner into storage. Nothing is more permanent than temporary. - Keep water close to the first and second zones.
Beginners often think about how the garden looks first, and then end up carrying a watering can across the whole yard. It is better to figure out where the hose will be right away. Place garden beds where there is easy access to water and enough sunlight for the crops you chose. If water is far away, I can promise you, the garden usually gets less care. That is just how it goes. - Leave walkways between the zones.
Even in a small yard, do not fill every inch with plantings. Leave at least 18–24 inches (45–60 cm) between zones so you can water, tie up plants, harvest, and pull weeds. If you have to step into the bed for a handful of basil, the layout is worth adjusting. - If the yard is very small, shrink the zones instead of removing them.
For example, in a space around 10 by 16 feet (3 by 4.8 m), the front zone can be in containers near the entrance, the middle zone can be one 4 by 6 foot bed (1.2 by 1.8 m), and the back zone can be a narrow strip along the fence with a trellis. The logic stays the same: frequent harvests close to the house, main vegetables in the middle, tall plantings farther back.
What Can Ruin This Layout
- Do not plant herbs and greens in the farthest corner. You will use them most often, so they need to be closer to the house.
- Do not plant the tallest crops in the front zone. Sunflowers, corn, unsupported cucumbers, and large tomatoes will quickly block the view and can shade lower plantings.
- Do not make the beds too wide. If you cannot reach the middle by hand, you will have to step into the soil. And compacted soil does not let air and water move to the roots as well.
Walk through the garden and test this layout on a normal garden day. Can you quickly cut herbs near the house? Is it easy to water the peppers and tomatoes? If yes, then this is the right layout. This kind of order helps a beginner avoid overloading a small garden and losing access to the plants by mid-summer.
3. The Salad Bar Garden Plan That Starts Paying Off in 21 Days
A small bed with salad greens is there so you can get a good harvest not in three months, but pretty quickly. You set aside a small garden bed, a container, or a strip along the path and plant crops that give you greens fast: radishes, arugula, leaf lettuce, spinach, mustard greens, garden cress, and green onions.
In 21 days, you will not be harvesting huge heads of lettuce yet, but you will already be able to cut your first greens for sandwiches, omelets, tacos, rice bowls, or a regular dinner.
What You’ll Need
- A shallow garden bed, container, or planting strip — to start, an area around 2 by 4 feet (60 by 120 cm) is enough.
- Compost — to refresh the top layer of soil before sowing.
- A watering can with a soft sprinkler head — so you do not wash away tiny seeds.
- Seeds for fast-growing crops — radishes, arugula, leaf lettuce, spinach, mustard greens, and garden cress.
- Garden markers — so you do not have to guess where the arugula is and where the radishes are.
- Greens scissors — if you want to cut leaves neatly without pulling out the plants.
How to Make the 21-Day Salad Bar Garden Plan
- Choose a spot closer to the house.
The salad greens area should be somewhere you can easily reach while cooking. Near the door, patio, path, or close to the kitchen is best. If you have to walk to the far corner of the garden for greens, you will do it less often. - Make a small but convenient planting area.
For the first time, a 2 by 4 foot bed (60 by 120 cm), a long container, or a narrow strip along the path is enough. The soil depth for salad greens can be around 6–8 inches (15–20 cm). The main thing is that water does not sit at the bottom, and you can reach the whole planting area by hand. - Divide the space into short rows.
Do not sow everything like one big carpet if you are just starting a vegetable garden. Make 4–6 short rows across the bed. This makes it easier to understand what is growing where, where you need to thin seedlings, and where you can already cut the first greens. In a small garden, a little order at the start saves a lot of nerves two weeks later. - Sow the fastest crops closer to the edge.
Plant radishes, arugula, garden cress, and mustard greens along the edge. They are easy to check, thin, and cut. Radishes often give the first edible result in about 21–30 days, and many microgreen crops can be cut even earlier. Microgreens are usually harvested 7–21 days after germination. - Plant leaf lettuce and spinach a little deeper in the bed.
They can also give young leaves pretty quickly, but it is better to leave them a bit more room. Do not wait for a huge head of lettuce. Cut the outer leaves, and the plant keeps growing. - Water gently and check the top layer often.
Salad greens have tiny seeds and shallow roots. If the top layer dries out, the seedlings may come up patchy. In the first few days, I water carefully. A strong stream from a hose can easily wash the seeds into one corner. - Sow again in small batches.
About 7–10 days after the first sowing, add one more short row of arugula, lettuce, or radishes. Then another one. This way, you do not get the whole harvest in one day. For a small garden, that matters: a little and often is better than one big wave of greens that nobody had time to eat.
What to Plant in This Bed
For this bed, I would choose no more than 5–6 crops. When there is too much going on, it is harder for a beginner to understand what grows fast, what needs more water, and what bolts right away in the heat.
A good starter mix:
- Radishes — fast, easy to notice, and a good way to show kids and adults that the garden is actually moving.
- Arugula — for sharp greens in salads, pasta, and sandwiches.
- Leaf lettuce — it is better to choose cut-and-come-again varieties, not only heading types.
- Spinach — likes cool weather and is good for spring and fall.
- Garden cress — very fast, especially for small containers.
- Green onions — you can cut them little by little once the tops grow.
If the weather is already hot, lettuce and spinach may struggle. Then it is better to give them morning sun and light shade in the afternoon. In heat, many salad crops get tougher and bolt faster.
In 7–10 days, you should see even seedlings, 14 days, you should already have normal rows of greens, 21 days, you can start the first small cuts: garden cress, arugula, young lettuce leaves, radish greens, or microgreens if you set aside a separate corner for them.
If you started adding greens to your food before the main crops in the garden woke up, that is a good result, and you did everything right.
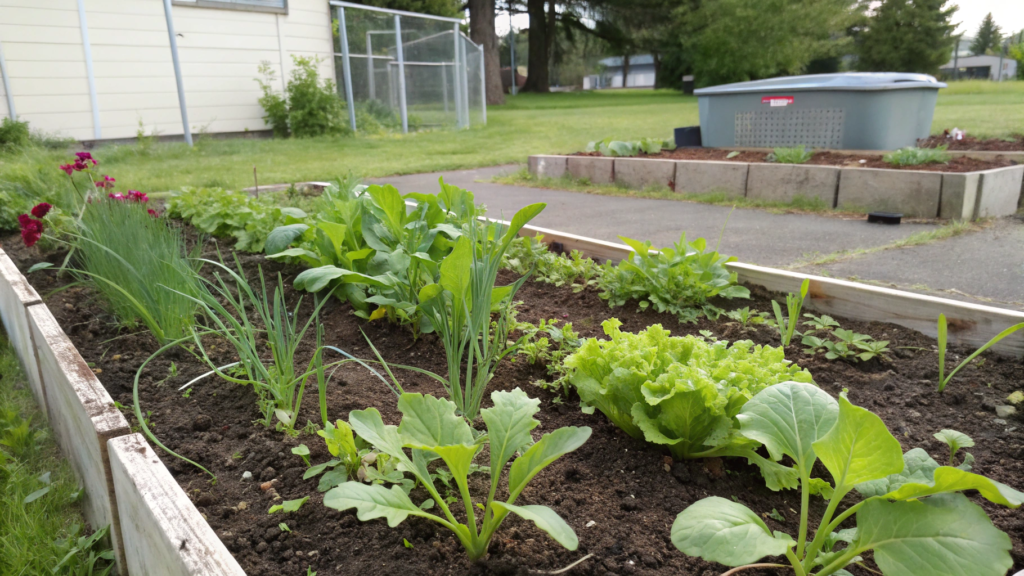
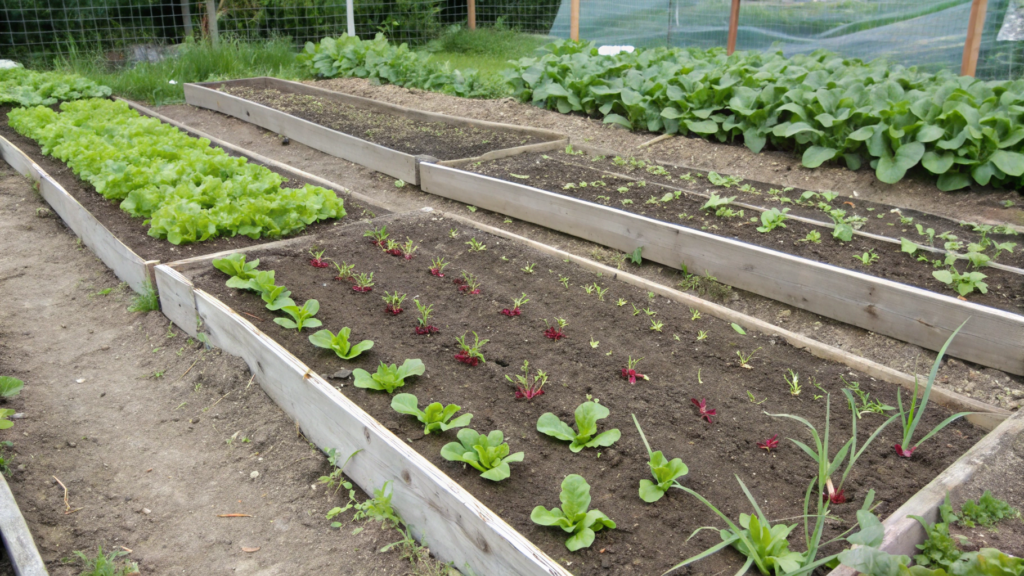
4. The Raised Bed Grid Plan That Prevents Crowding All Season
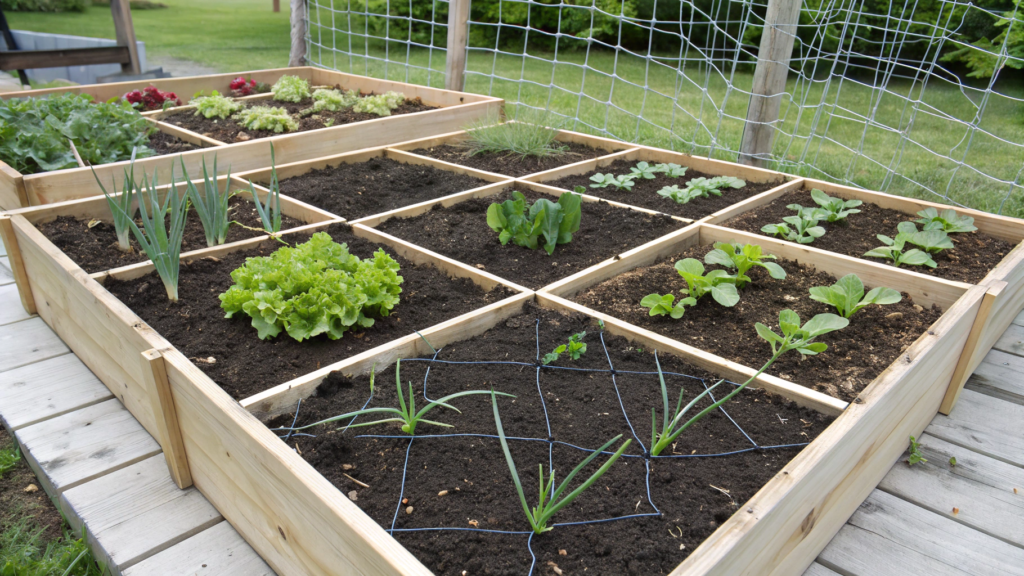
A grid plan helps you avoid planting “by eye.” You divide the raised bed into small sections, usually 1 foot by 1 foot (30 by 30 cm), and decide ahead of time how many plants will go into each square. This makes it easier not to overcrowd your plantings and not turn the bed into one green traffic jam.
This method is good for beginners because they can see right away: one large plant goes in this square, several onions go in that one, and a row of lettuce goes in another.
What You’ll Need
- Raised bed — a beginner-friendly size is 4 by 4 feet (1.2 by 1.2 m) or 4 by 8 feet (1.2 by 2.4 m).
- Tape measure — to mark out 1-foot squares (30 cm).
- Thin wooden strips, twine, or garden string — to make the grid on top of the bed.
- Compost — to refresh the top layer before planting.
- Mulch — to cover bare soil between plants.
- Garden markers — so you do not forget what was planted where.
- A small trellis — if cucumbers, peas, or beans will grow in the bed.
How to Make the Raised Bed Grid Plan
- Choose a bed where you can reach the middle by hand.
For beginners, the most convenient raised bed is up to 4 feet wide (1.2 m). That way, you can work from both sides and avoid stepping into the soil. - Mark the bed into 1-foot squares.
Measure every 12 inches (30 cm) along the length and width. Then stretch twine or place thin wooden strips crosswise. You will get a simple grid. It does not have to be permanent. In the first year, twine is more than enough. - Group plants by size, not by wishful thinking.
Large crops need more room. In one square, it is better to plant one trellised tomato, one pepper, one eggplant, or one large cabbage. Smaller crops can be planted more closely: several onions, a few lettuce plants, a row of radishes, or carrots. - Plant tall crops along the north edge of the bed.
Tomatoes, trellised cucumbers, peas, and pole beans are better placed on the north side, if that works for your space. That way, they will shade lettuce, basil, carrots, and other low-growing plants less. If the bed sits near a fence, use the fence side for the trellis. - Do not mix quick crops and large plantings without space between them.
Radishes, arugula, lettuce, and spinach can be sown in open squares between slower crops, but not right up against large plants. By July, tomatoes and cabbage will take up more space than they looked like they would on planting day. Give them air. - Label the squares right away.
A week after sowing, all seedlings look suspiciously alike. Especially if you are sure you will “totally remember.” No, you will not. I thought that too. Small markers save you from guessing where the carrots are, where the calendula is, and where the weed is. - Cover open spaces with mulch once the plants grow a bit.
When the seedlings become easy to see, gently mulch the bare soil with a thin layer. For most vegetable beds, 2–3 inches (5–7.5 cm) is enough, without pushing mulch against the stems. This helps the soil dry out more slowly and makes it harder for weeds to take over empty spots.
Planting Example for a 4 by 4 Foot Bed
A 4 by 4 foot bed gives you 16 squares. For the first time, I would not fill all of them with large crops. It is better to mix quick, medium, and vertical plantings.
You can lay it out like this:
- Back row – 2 squares with trellised cucumbers, 2 squares with peas or beans.
- Middle – 2 squares with peppers, 2 squares with bush beans, 2 squares with Swiss chard.
- Front edge – lettuce, radishes, green onions, basil, calendula.
Tall plantings go toward the back, medium ones stay in the center, and the crops you cut often grow along the edge.
Tip. Do not plant one large crop in every square. Tomatoes, cucumbers, zucchini, and large cabbage quickly take up more space than they seem to at the start. And do not forget about access to the plants. Even in a raised bed, you need room to tie plants up, cut leaves, check the soil, and harvest.
By mid-summer, you should see separate plantings, not one solid mass of leaves. You should be able to reach every plant by hand. Air should move between the larger crops. Low-growing plants should not disappear under tomatoes. And open squares can gradually be replanted with radishes, lettuce, or greens.
That is the whole point of the Raised Bed Grid Plan: every plant gets its own place before it starts spreading out.
5. The Container Only Plan for Patios and Small Decks
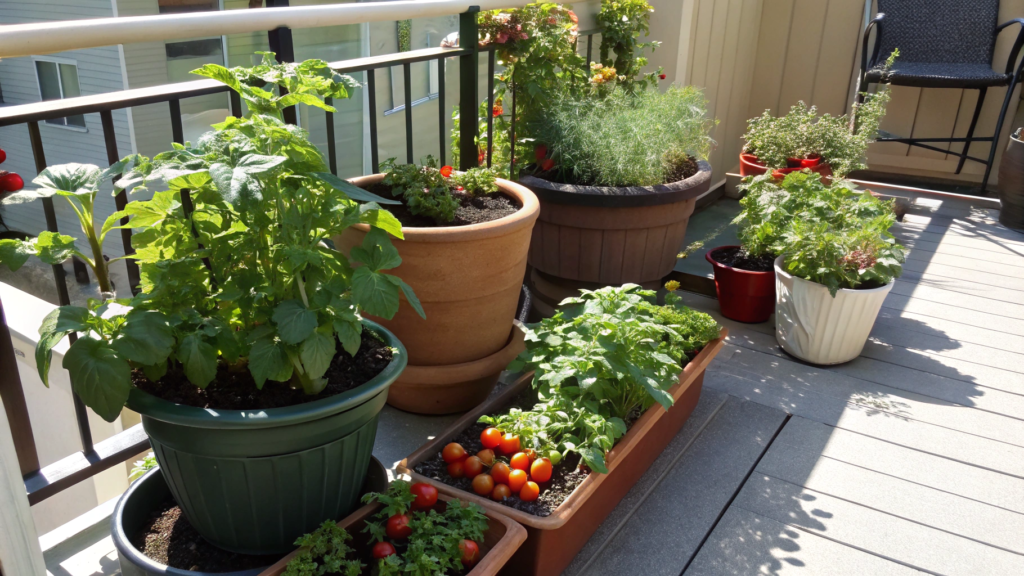
There is no reason to feel discouraged if you do not have a yard with soil. A patio, a small deck, a platform by the door, a sunny corner by the wall, a container — all of that is already enough to grow greens, peppers, strawberries, cherry tomatoes, and kitchen herbs.
A container garden does not need digging or reworking the whole space. You simply choose a few containers, good soil, place them closer to the light, and start with crops that do not need a large root volume.
What You’ll Need
- Containers with drainage holes — for greens, containers 6–8 inches deep (15–20 cm) will work; for peppers and tomatoes, it is better to use 5–10 gallon containers (19–38 L).
- Light potting mix for containers — not regular garden soil. In a pot, it often becomes dense and does not let water move through well.
- Compost — add a little into the mix before planting.
- Mulch — a thin layer on top, so the soil does not dry out too quickly.
- Trays or saucers — if the containers are standing on a deck where you do not want constant dirty runoff.
- A watering can with a soft sprinkler head — for gentle watering.
- Fabric grow bags — for example, VIVOSUN 5-Pack 5 Gallon Grow Bags, if you want lightweight containers that can be moved.
How to Make the Container Only Plan
- First, find the sunniest spot.
Most vegetables need around 6 hours of sun a day. If there is less sun, start with greens: lettuce, parsley, cilantro, mint, green onions, spinach. If the patio gets good light, you can add peppers, cherry tomatoes, strawberries, and dwarf eggplants. - Arrange the containers by height.
Tall containers with tomatoes, peppers, or supports are better placed near a wall, railing, or the far edge of the patio. Lower containers with greens should stay closer to the walkway or door. This way, you will not have to squeeze between leaves every time you want to cut a handful of basil. - Choose the container size for the plant.
For lettuce, radishes, and greens, a depth of 6–8 inches (15–20 cm) is enough. For basil, parsley, and strawberries, 8–10 inches (20–25 cm) is better. For a pepper or cherry tomato, use at least a 5 gallon container (19 L), or larger if you have room. A small pot dries out quickly, and the plant starts struggling on the first hot day. - Do not plant everything in one huge container.
A large container looks convenient, but for a beginner, it is easier to care for several medium containers. One for greens, one for herbs, one for a pepper or tomato. If something goes wrong with watering or soil, the problem stays in only one container. - Leave a walkway, even if space is tight.
There should be at least 18–24 inches (45–60 cm) between containers, so you can walk through with a watering can, scissors, or basket. Guess how I know. - Place the most-used plantings closer to the kitchen.
Basil, green onions, parsley, cilantro, thyme, and lettuce should be within easy reach. You cut them often, a little at a time. The closer they are to the door, the more likely they will actually end up in your food, instead of just looking pretty in a pot. - Think through watering before planting.
Containers dry out faster than garden beds, especially on decking, stone pavers, or in open sun. Check where the watering can will sit, where extra water will drain, and whether wet marks will collect under the containers. On hot days, small pots sometimes need to be checked every day.
What to Plant in a Beginner Container Garden
For a first container garden, I would not take too many crops. It is better to start with what is easy to use in the kitchen and does not need much space.
A good set:
- Leaf lettuce — for quick cuts.
- Green onions — you can cut them little by little.
- Basil — especially if you often cook pasta, eggs, salads, or pizza.
- Parsley — a patient green that is convenient to keep by the door.
- Strawberries — look good in containers and do not take much room.
- Pepper — one plant in its own 5 gallon container (19 L) or larger.
- Cherry tomato — a compact variety is better.
If space is really tight, start with three containers: one with greens, one with herbs, and one with a pepper or cherry tomato. That will be enough.
Tips
Do not use containers without drainage holes. Extra water needs to drain out, or the roots can start to rot.
Do not use heavy garden soil from the yard. In a pot, it often compacts, dries poorly, and becomes too heavy for the roots. For containers, it is better to use a light potting mix.
Do not forget about weight. A large container with wet soil can be heavy. If the garden is on a wooden deck or balcony, it is better not to gather everything in one place.
Start with a few containers that you know you can water and use in the kitchen. A container garden should be easy to care for. If you can walk between the pots, reach every plant, if the most-needed herbs are standing by the door, large containers do not block the walkway, and there are no puddles under your feet — you handled the task.
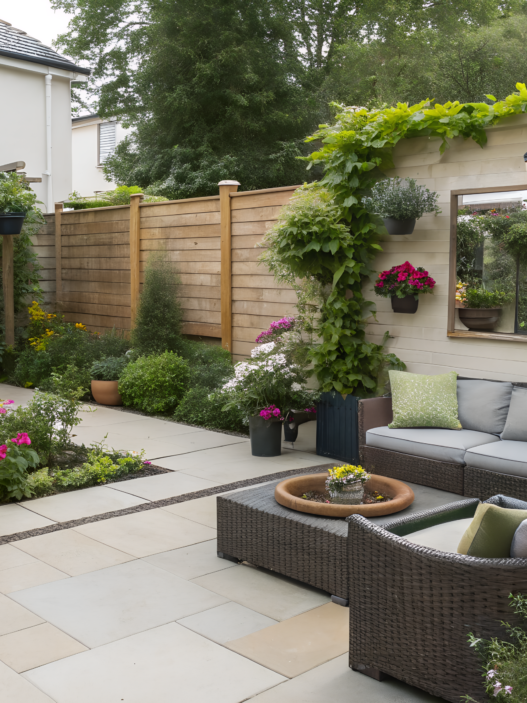
6. The Fence Line Vertical Plan Using Trellis Strips
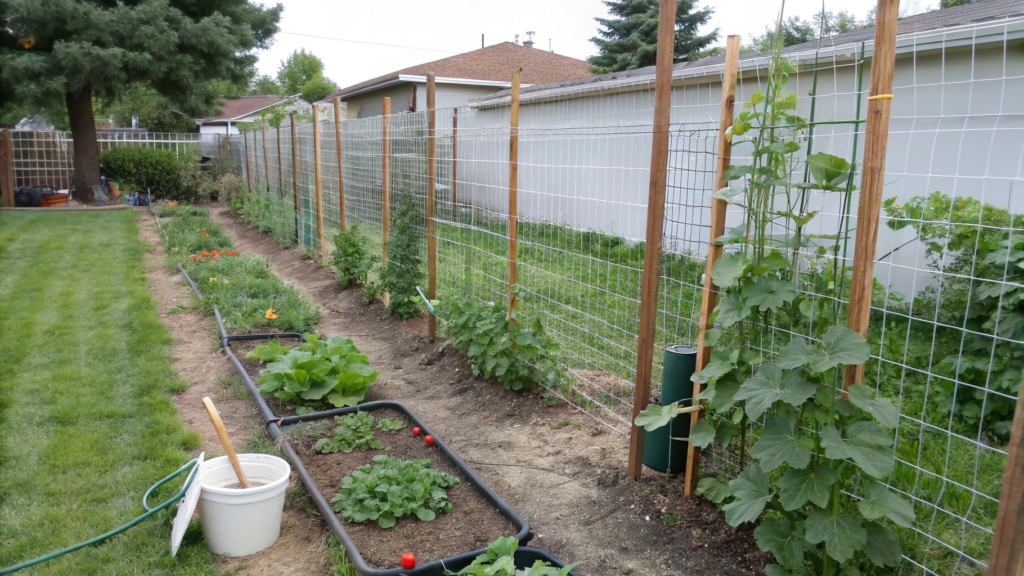
In a small yard, the fence often just sits there in the background. You look at it, lean a shovel against it, and stack empty pots nearby. But it can be one of the most useful lines in the garden, especially when you do not have much ground space.
Cucumbers, peas, beans, some flowers, and smaller climbing crops can be trained onto narrow trellises, leaving room below for lettuce, herbs, strawberries, or low-growing flowers.
For us, vertical plantings along the fence became a normal way to get more use out of a small space.
What You’ll Need
- A sunny fence line — ideally a spot with at least 6 hours of sun.
- Narrow trellises, netting, or panels.
- Compost — to improve the planting strip along the fence.
- Mulch — so the soil near the fence does not dry out too quickly.
- Garden string or soft plant ties — for young plants while they are learning to climb the support.
- Tape measure — so you do not plant everything too close together.
- Watering can or hose — because soil along a fence often dries out faster than it looks.
How to Make the Fence Line Vertical Plan
- Check how much sun the fence line gets.
Not every fence is right for vertical planting. If that spot is in shade almost all day, do not start there with cucumbers or beans. It is better to choose a sunnier side of the yard or plant greens that grow well in light shade. Climbing vegetables usually need enough sun, or you may get plenty of leaves and not much harvest. - Make a narrow planting strip.
Along the fence, a strip 12–18 inches wide (30–45 cm) is often enough. That gives you room for peas, beans, trellised cucumbers, or nasturtiums. Remove weeds, add compost to the top layer of soil, and think about watering right away. After planting, the back of that strip will be harder to reach. - Set up the trellises before planting.
Do not wait until cucumbers start lying on the ground. It is better to set the supports up right away. That way, you will not damage the roots later or try to push a trellis between plants that are already growing. In a small yard, it is easier to use several separate narrow trellises instead of one large structure along the whole fence: one for cucumbers, one for peas, and one for beans. - Do not plant everything in one crowded line.
It is easy to get carried away along a fence and plant too much. But climbing crops still need space. Peas can be sown more closely, beans need more air, and cucumbers definitely need room. If plants grow too densely, they become harder to water, tie up, and check. - Plant low-growing crops along the front edge.
In front of the trellises, you can leave room for lettuce, green onions, thyme, parsley, calendula, or nasturtiums. This keeps the lower part of the planting strip useful too. Just do not plant large crops there that will block access to the supports. - Guide young shoots by hand.
Peas and beans usually find the support pretty quickly, but cucumbers sometimes need help. Gently guide the stem toward the trellis and secure it with garden string, without tying it too tightly. Do not tie it down hard. The stem grows, thickens, and moves after rain and wind. - Leave room to walk.
If the trellises stand along a path, check whether leaves and vines will push into the walkway. In a small yard, this matters.
What You Can Grow on This Kind of Strip
For the first year, I would choose 2–3 main crops, not ten. That makes it easier to understand what grows well along your fence.
- Peas — especially for cool spring weather.
- Pole beans — for warm weather and a good harvest from a small area.
- Trellised cucumbers — if you have enough sun and regular watering.
- Nasturtiums — they spill nicely, attract pollinators, and do not need much fuss.
- Sweet peas — if you want more flowers, not just food.
If the fence is tall and solid, pay attention to airflow. Do not fill the whole line with dense planting. Sometimes it is better to plant less and get healthier plants with easier access to the harvest.
How to Avoid Mistakes
Do not attach supports to a weak or wobbly fence. After rain, plants get heavier, especially cucumbers and beans. If the fence is old, it is better to place separate supports in front of it instead of loading the boards.
Do not plant climbing crops too close to a wall or solid fence without airflow. That spot can be hotter, drier, and tighter than an open garden bed.
Do not forget about watering. Soil near a fence often gets less rain, especially if there is an overhang, a tree canopy, or a roof edge above it. Check the soil with your finger, not just your eyes. It may look fine on top and already be dry deeper down.
For a small yard, this is a practical way to use the space along the fence: climbing crops grow upward, low-growing plantings stay near the edge, and the narrow strip of soil does not sit empty. The main thing is not to pack it too tightly. Otherwise, instead of a vertical garden, you get a green wall that is hard to reach.
7. The No Dig Corner Garden Setup Using Cardboard and Compost
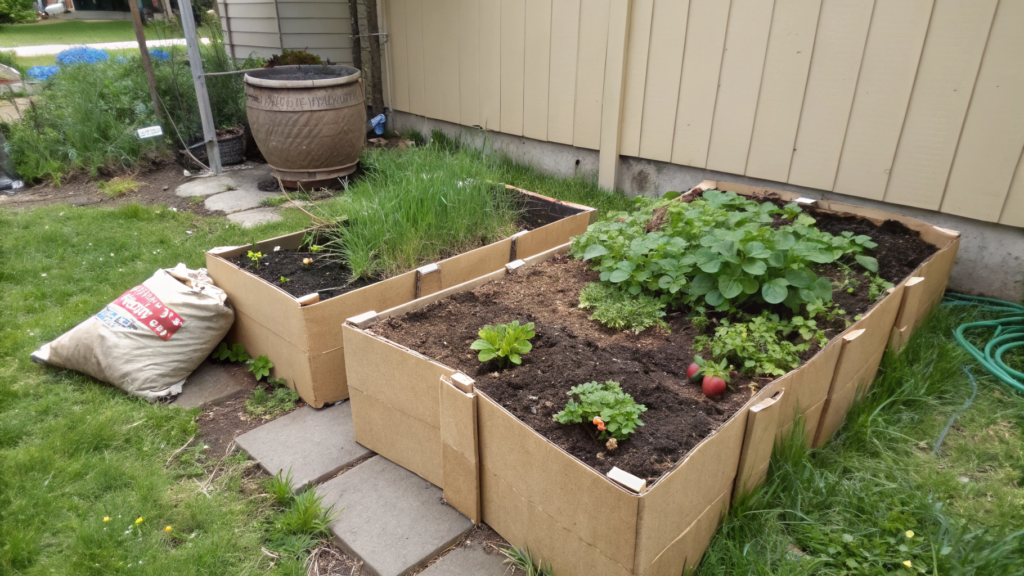
Every small yard has that one corner where an old pot is sitting, a bag of soil is leaning somewhere, the grass grows however it wants, and every time you walk by, you think, “Oh, I’ll clean that up later.” A no dig garden setup is a good fit for exactly that kind of spot. You do not remove all the sod, you do not dig through heavy soil, and you do not try to beat every weed at once. Instead, you cover the area with cardboard, add compost on top, and create a new planting area right over the old grass.
Beginners do not need to make a big bed right away. A 3 by 3 foot corner (90 by 90 cm) or a 4 by 4 foot corner (1.2 by 1.2 m) is enough to plant greens, herbs, flowers, strawberries, or a couple of compact vegetables.
What You’ll Need
- Plain cardboard without gloss, tape, or colored printing — it is better to cut boxes open and remove all labels.
- Compost — the main layer for planting.
- Garden soil or potting mix — optional, if you want to make the layer deeper for larger plants.
- Mulch — wood chips, straw, or dry leaves to cover the surface.
- Garden hose or watering can — the cardboard needs to be soaked well.
- Tape measure — so you can understand the size of the corner right away instead of doing everything “more or less.”
- Garden gloves — because wet cardboard, compost, and old roots will mess up your hands fast.
- Low-growing plants for the first year — lettuce, parsley, calendula, nasturtiums, strawberries, green onions, and thyme.
How to Make the No Dig Corner Garden Setup
- Choose a corner with light and access to water.
Do not choose the darkest corner just because it is empty. Greens and herbs may do fine with 4–5 hours of sun, but peppers, tomatoes, and strawberries need more. Also check whether the hose can reach that spot. - First, clear large debris and tall grass.
You do not need to dig out every root. Just cut the grass as low as possible and remove stones, branches, old plastic plant tags, and anything that will stop the cardboard from lying flat. If there are perennial weeds with strong roots, it is better to pull at least some of them by hand. - Lay the cardboard with overlap.
Place the cardboard so the edges overlap by at least 6 inches (15 cm). Weeds love gaps. If you leave open spaces, they will definitely find their way through. - Soak the cardboard well.
Dry cardboard will lift, move around, and sit poorly against the ground. Soak it with water so it becomes heavier and settles more softly over the old grass. If the day is windy, you can temporarily hold the edges down with stones or small boards. - Add a layer of compost.
Add 3–4 inches (7.5–10 cm) of compost on top. For greens, flowers, and herbs, this is usually enough to get started. If you want to plant something larger, it is better to make the layer deeper or add potting mix on top. Do not try to plant a huge tomato in a thin layer of compost and hope for the best. - Cover the surface with mulch.
Leave the planting spots open, and cover the rest of the surface with 2–3 inches (5–7.5 cm) of mulch. This helps the compost dry out more slowly and makes it harder for weeds to push through. Just do not press mulch right up against plant stems. - Start with simple plantings.
In the first year, I would plant lettuce, parsley, green onions, calendula, nasturtiums, strawberries, or thyme in this kind of corner. They do not need a huge soil depth, and they help you quickly see how the spot behaves. If the corner gets good light, you can later add a compact pepper or bush tomato in the deepest part.
How to Place Plants in a Corner Bed
In a corner bed, the tallest plants are better planted closer to the fence or the back line of the planting area. Medium plants go closer to the center. Low-growing plants go along the front edge, where they are easy to cut, water, and weed.
For example, in a 4 by 4 foot bed (1.2 by 1.2 m), you can plant nasturtiums on a small support or a compact berry bush along the back line, parsley and strawberries in the middle, and lettuce, green onions, and calendula along the edge. This way, the bed will not be packed full of leaves, and you will still be able to reach the plants.
If the space is very small, do not try to squeeze everything in at once. One row of greens, a few herbs, and a couple of flowers already make this kind of bed useful.
Tip. Do not use glossy cardboard, boxes with a lot of colored ink, or cardboard with tape left on it. Plain brown cardboard is better. Do not make the compost layer too thin either. The plants will quickly start pushing into the cardboard, and the soil will dry out. For normal planting, it is better to use at least 3–4 inches (7.5–10 cm).
For a small yard, this is often the fastest way to turn an empty corner into a useful space — especially if that corner used to collect weeds, old pots, and everything we kept putting off “for later.”
8. The Pizza Night Garden Plan With Space Saving Herbs
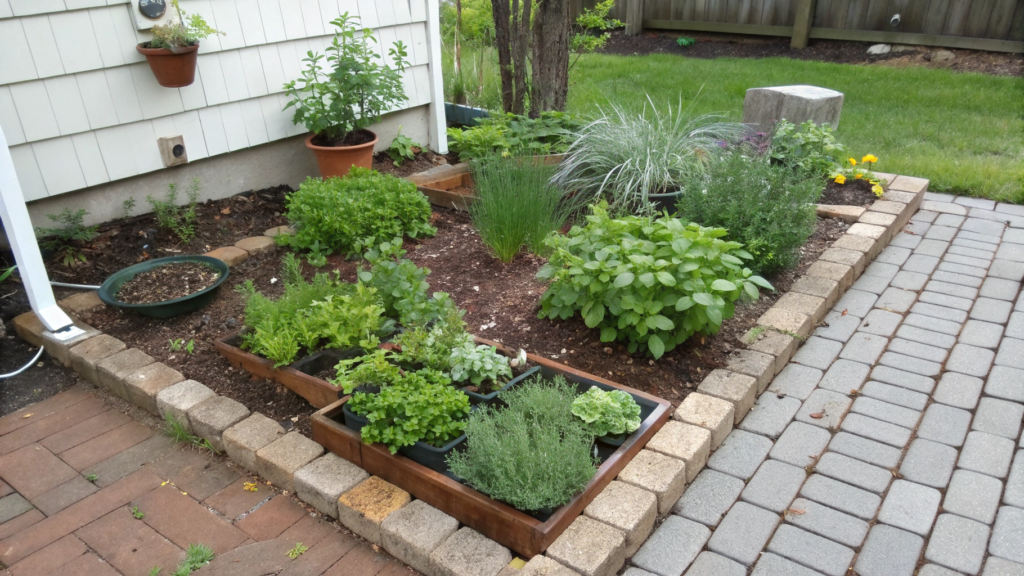
A small bed with herbs becomes pretty practical if you often make pizza at home. Basil, oregano, thyme, parsley, green onions, a little arugula, and one compact tomato make a good cooking set.
Many herbs can be grown in containers, in a narrow strip along a path, or in a corner near the patio. The main thing is not to try to plant everything at once.
What You’ll Need
- A container, narrow bed, or planting strip — to start, an area around 2 by 4 feet (60 by 120 cm) is enough.
- Potting mix or compost — to refresh the top layer before planting.
- Mulch — a thin layer on top, so the soil does not dry out too quickly.
- Small pots for herbs — especially for mint, if you suddenly decide to add it nearby. It is better not to let it loose in the ground without control.
- Garden scissors — to quickly cut basil, thyme, and oregano.
- Garden markers — if you are planting several herbs close together. Young oregano and thyme do not always look as obvious as you want them to.
- A small support — if you add a compact cherry tomato.
How to Make the Pizza Night Garden Plan
- Choose a spot near the kitchen or patio.
These plantings are better placed somewhere you can reach for a couple of minutes. By the door, near a path, by an outdoor table, close to the grill, or near the patio. If the spot is far away, the herbs will stay unused more often. - Start with herbs, not large vegetables.
The base of this planting is better made with basil, oregano, thyme, parsley, green onions, and arugula. They do not take up much space, and they are easy to cut a little at a time. One compact cherry tomato can be added if you have sun and a separate container. - Arrange the plants by height.
Send taller plantings toward the back: a cherry tomato on a support, tall basil, parsley. Lower and closer to the edge, you can plant thyme, oregano, green onions, and arugula. This way, you will not be reaching over the tomato for a tiny sprig of thyme. - Keep aggressive herbs separate.
Mint, lemon balm, and some strong perennial herbs are better grown in separate pots. They are not the most necessary herbs for pizza, but many people still like to keep them near the kitchen. Just do not plant mint in a small shared bed. It will quickly take over all the space. - Do not overload a small planting with tomatoes.
If space is tight, one compact cherry tomato is enough. A large tomato, especially without a good support, will quickly take light and space away from the herbs. - Cut herbs a little at a time, but often.
Basil is best cut just above a pair of leaves, so it can send out new side shoots. Thyme and oregano can be trimmed in small sprigs without stripping the whole plant bare. Arugula is easiest to cut as young leaves, before it gets too sharp and tough. - Sow greens in small batches.
Arugula, green onions, and parsley can be sown a little at a time, so the planting does not sit empty after the first cuts. Do not sow the whole packet at once. For pizza, you usually need a handful of greens, not a field of arugula that suddenly needs attention.
What to Plant for Pizza
I usually choose 5–6 plants, not more. This makes it easier to care for the bed and not get confused about what is growing where.
- Basil — for pizza, sauce, pasta, and salads.
- Oregano — the classic flavor for tomato sauce.
- Thyme — a little in sauce or with roasted vegetables.
- Parsley — for freshness after baking.
- Green onions — if you like adding them to finished pizza.
- Arugula — on top after the oven, especially with tomatoes and cheese.
- Cherry tomato — one compact plant, if there is enough sun.
If the space is very small, keep basil, oregano, thyme, and arugula. That is already enough to make pizza noticeably better.
Tip. Do not plant a tomato in the same small container where the herbs are growing. It will quickly take water, nutrients, and space. It is better to give it its own pot, at least 5 gallons (19 L).
Everything should be simple: step outside, cut basil, take a little oregano or thyme, add arugula after the oven — and go back to the kitchen without walking to the far end of the yard.
If the herbs grow close by, you can easily reach them with scissors, and the larger plants do not cover the smaller ones, then the planting is convenient. For a small yard, this is one of the nicest options: a little space, a few useful herbs, and homemade pizza immediately tastes better.
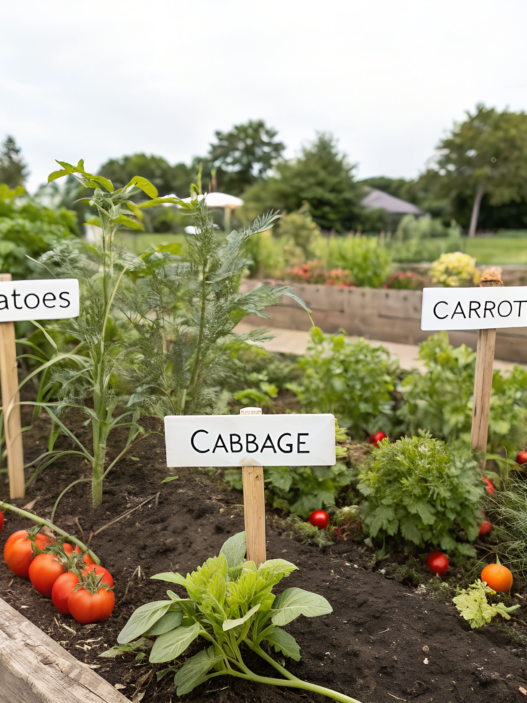
9. The High Yield Small Space Vegetable Layout With Succession Rows
In a small garden, it is easy to plant everything at once. And then the radishes all ripen in one week, the lettuce overgrows, the spinach bolts, and you have no idea what to do with all of it.
We have had that happen. Especially with radishes. They are so fast that at first you get excited about every single root, and then you realize you did not plant a garden bed. You planted a little radish factory.
A layout with succession rows solves this problem. You do not sow the whole bed at once. You sow one row now, the next one in 7–10 days, and then another one. This way, the harvest comes in waves instead of landing on you all in one week.
What You’ll Need
- A garden bed, planting strip, or raised bed — to start, an area around 3 by 6 feet (90 by 180 cm) is enough.
- Tape measure or garden ruler — to keep the rows even and avoid crowding the plantings.
- Compost — to refresh the top layer between sowings.
- Mulch — to cover open soil around plants once they grow a bit.
- Garden markers — to note the sowing date and the crop.
- A watering can with a soft sprinkler head — for gentle watering of small seeds.
- Small scissors — for cutting greens without pulling out the whole plant.
How to Make the Layout With Succession Rows
- Choose the crops.
For this kind of layout, the best choices are radishes, leaf lettuce, arugula, spinach, green onions, cilantro, dill, bush beans, and beets for young greens. Do not start with crops that take up space for months and give one big harvest at the end. The point here is small, frequent harvests. - Divide the bed into short rows.
In a 3 by 6 foot bed (90 by 180 cm), you can make several rows across the bed so each row is short and easy to manage. This makes sowing, watering, and harvesting easier. Long rows are often not needed in a small garden. - Do not sow all the rows in one day.
Sow the first 2–3 rows, and leave the rest empty or cover them with a thin layer of mulch. In 7–14 days, sow the next batch. Another week or two later, sow the next one. This is especially helpful for radishes, arugula, and lettuce: you get fresh greens and roots gradually instead of trying to urgently give the harvest away to neighbors. - Label not only the crop, but also the date.
Write more than just “radishes” on the marker. Write “radishes — April 4.” Then you know which row is ready to thin, which one will be ready soon, and which one has just sprouted. Without dates, everything quickly turns into a guessing game. - After harvesting, prepare the row for a new planting right away.
When radishes, lettuce, or arugula are done in a row, do not leave bare soil sitting for long. Remove leftover roots, add a little compost to the top layer, water, and sow a new batch. You do not need to redo the whole bed every time. Work with one row at a time. - Keep fast crops closer to the edge.
Radishes, lettuce, arugula, cilantro, and dill are better sown where they are easy to cut and replant. Longer-growing crops — like bush beans, Swiss chard, or beets — can go a little deeper into the bed. This way, frequent harvests do not turn into climbing through all the plantings. - Leave room for air.
Succession planting does not mean every inch has to be full. If the rows are too crowded, plants compete for light and water, and it gets harder for you to water and thin them. A small bed gives more back when you can actually reach the plants, not when it is packed to the last inch.
What to Plant for a High Yield in a Small Space
For the first time, I would choose 4–5 crops that show results quickly and do not need complicated care.
- Radishes — sow every 7–10 days in small rows.
- Leaf lettuce — cut young leaves and sow new rows.
- Arugula — sprouts quickly, but can get tough fast in hot weather.
- Green onions — easy to cut little by little.
- Bush beans — take longer, but give a good harvest from a compact space.
- Beets — you can use both the roots and the young greens.
If the weather is already hot, focus more on beans, green onions, basil, and warm-season crops. Lettuce, spinach, and arugula do better in cooler weather, so they are easier to sow in spring or closer to fall.
Small Tips
Do not leave empty rows uncovered. If the next sowing will happen in a week, cover the soil with mulch or a thin layer of compost. Bare soil dries out quickly, and weeds show up.
For a small yard, this is a very practical method: you are not expanding the garden, you are using the bed you already have better. After a few weeks, the bed should not give you one big wave of harvest that has to be eaten right away. One row is ready to harvest, the second is still growing, the third has just sprouted, and there is still open space for the next one.
10. The Mistake Proof Watering Layout With Soaker Lines and Mulch
Watering often gets remembered only after everything has already been planted. But then you spend time not on the garden, but running around with the hose.
A layout with soaker lines and mulch makes watering easier. Water slowly goes straight to the soil, mulch helps hold moisture, and you do not have to guess every time which part of the bed has already gotten water and which part only looks damp on top.
What You’ll Need
- Soaker hose or slow-watering line — for example, Flexon 50ft Three Tube Sprinkler Hose.
- Mulch — wood chips, straw, dry leaves, or another clean material for garden beds.
- Garden staples — to hold the hose in place.
- Tape measure — to understand the line length ahead of time.
- Regular garden hose — to connect the watering line to water.
- Compost — if you need to refresh the top layer before planting.
- Scissors or pruners — to trim plants if they start blocking access to the watering line.
How to Make the Watering Layout With Soaker Lines
- First, arrange plants by their water needs.
Do not plant things together if they like different watering routines. Lettuce, spinach, basil, and parsley like even moisture. Rosemary, thyme, and oregano do not like constantly wet soil. If you mix everything in one bed, something will be too dry, and something will be too wet. - Run the lines along the rows, not randomly.
A soaker hose is better placed near the base of the plants, not in the middle of an empty walkway. In a bed 3–4 feet wide (90–120 cm), it is usually convenient to make 2–3 watering lines. One line rarely covers the full width of the bed well, especially if the plantings are dense. - Do not press the hose right against the stems.
Leave a small gap — about 2–3 inches (5–7.5 cm) from the base of the plants. This way, water reaches the root zone, but the stems are not sitting in a constantly wet spot. This is especially important for basil, peppers, tomatoes, and young seedlings. - Test the watering before adding mulch.
Turn the water on for 10–15 minutes and look at where the soil darkens. If one part of the bed gets wet quickly and another stays dry, adjust the hoses right away. - Cover the soil with mulch after testing.
Once the hoses are lying correctly, add a layer of mulch about 2–3 inches (5–7.5 cm) deep. Do not pile mulch right up against the stems. Leave a small ring around each plant. Mulch helps the soil dry out more slowly and protects the top layer from overheating. - Leave access to the start of the line.
Do not hide the connection point under leaves, pots, or decor. You need quick access to the start of the hose: to turn it on, turn it off, check the pressure, or disconnect it if needed. In a small garden, this is especially important, because one inconvenient little thing starts getting annoying fast. - Water deeper, but less often, if the weather allows.
A soaker hose should not just wet the top layer of dust. It is better to let water slowly move deeper into the soil. Check by hand: is it moist 2–3 inches deep (5–7.5 cm), not just on top? If the soil under the mulch is still moist, you do not need to turn the water on “just in case.”
Where This Kind of Watering Helps
This kind of watering helps if you are growing:
- Tomatoes
- Peppers
- Trellised cucumbers
- Leaf lettuce
- Basil and parsley
- Strawberries
- Bush beans
You can use this option for containers too, but carefully. Small pots dry out faster, and large containers can hold water longer. You will still need to check the soil by hand more often there.
Practical Tip
Do not lay one hose across the whole bed and hope the water will get where it needs to go on its own. A soaker hose has a watering area, but it is not endless. If the bed is wide, it is better to make several lines.
This layout does not replace watching the garden. You still need to look at the weather, check the soil by hand, and remember that small plants drink less while larger plants drink more. But it removes the most frustrating part of watering: when you feel like you watered, but the water went to the wrong place.
The Benefit of a Small Yard
Even a small space can give a good result. But everything needs to be convenient. If plants are hard to reach, if watering annoys you every time, if herbs grow somewhere you almost never go, even the prettiest planting quickly becomes useless.
Start with one part of the yard. A path, containers by the door, or a no dig corner. And you do not need to redo everything at once.
Do you have a yard or a patio? Write in the comments what you are working with right now. I always like seeing how people find space for a garden where it first seemed like there was almost no space at all.