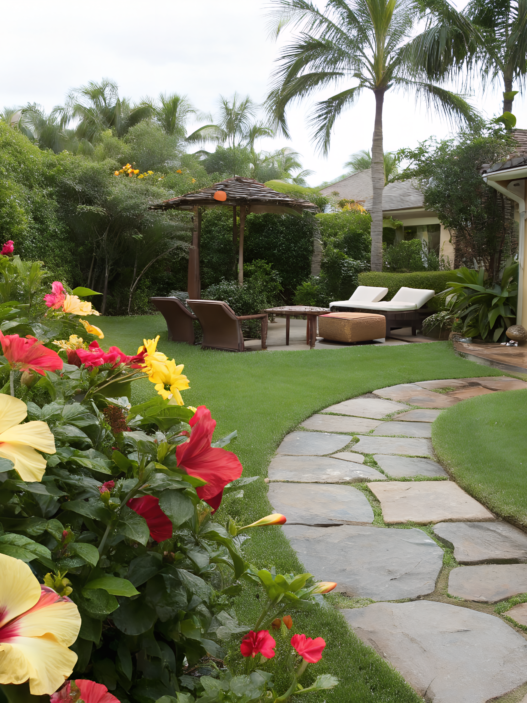
When we talk about raised garden bed DIY ideas, we want clear solutions that can actually be done, without complex builds that just stay in our plans forever.
In this process, only practice really matters. First, you try the simplest things — using whatever you already have. Then you start noticing what feels удобное, what works for you personally, and what starts to annoy you. Where there isn’t enough height, where the soil dries out, where it’s hard to reach the center. And постепенно the space starts adjusting to you.
Here I tried to collect different options — from very simple ones to more solid builds, and all of them solve specific tasks. Somewhere you save money, somewhere you build for years, and somewhere you maximize a small space. Everything is very individual, and only over time do you start to understand which format works best for you.
1. Simple Pallet Raised Beds for Budget-Friendly Gardening
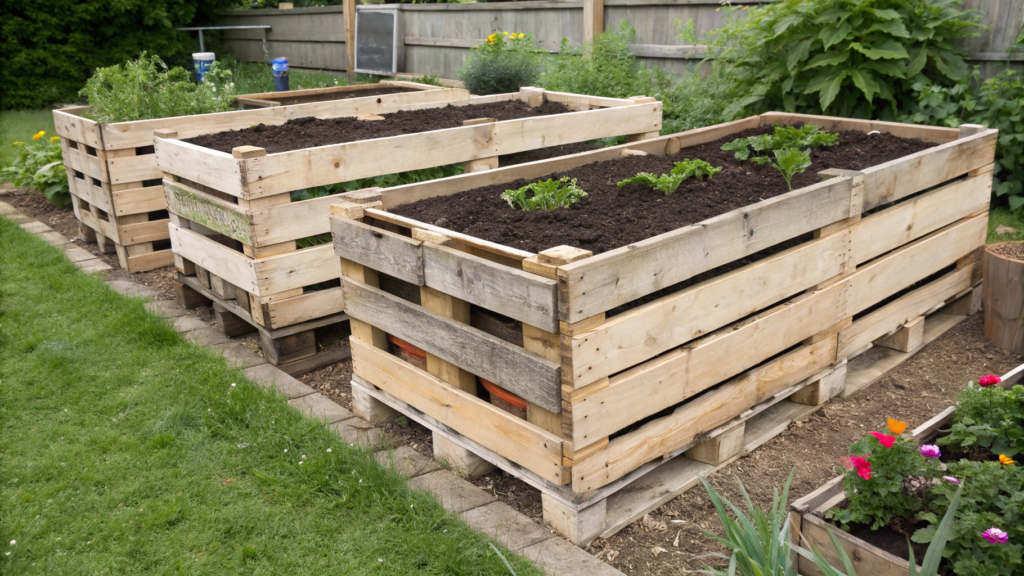
Here I’ll try to show how to make simple pallet raised beds easily, without extra costs, and why they still remain one of the most practical options — especially if you’re just starting out.
Pallets are already a ready-made structure. Boards with spacing, a solid frame, decent height. You don’t need to be a carpenter to build something usable.
But not all pallets are the same. And if you grab the first ones you see — you might end up with a problem instead of a garden bed.
- Look for the HT (Heat Treated) marking — it means the wood was treated with heat, not chemicals
- Avoid pallets marked MB (methyl bromide — chemical treatment)
- Try to choose pallets without strong запах or stains
This isn’t just “being careful”. There are studies showing that chemically treated wood can release substances into the soil and affect plants and soil micro-life.
What you’ll need
Here’s a basic setup. Nothing extra:
- 1–2 wooden pallets (usually 40 x 48 inches / ~100 x 120 cm)
- Drill or screwdriver
- Wood screws (2.5–3 inches / 6–7.5 cm)
- Landscape fabric or burlap
- Staples or a staple gun
- Soil mix
How to make
- Decide whether to take the pallet apart or not
You can go the quick route and leave the pallet as it is — then you’ll get more of a sectioned bed. But if you want a proper box, it’s better to take it apart. This way it’s easier to adjust the size to your space. - Build a box of the right size
From the boards, assemble a rectangular frame. A good reference is about 3–4 ft (90–120 cm) wide, so you can easily reach the center. A height of 10–12 inches (25–30 cm) works for most vegetables and greens. That’s enough for roots to feel comfortable. - Block weeds from the bottom
Lay landscape fabric or a few layers of thick cardboard at the bottom. Over time it will break down, but for now it will hold back weeds and help retain moisture. - Fill the bed with a working soil mix
Don’t just dump soil from your yard. A simple mix works much better: about 40% regular garden soil, 40% compost, and around 20% aeration material — perlite or coarse sand works well.
If possible, you can add some branches or rough organic matter at the very bottom — this helps drainage and makes the soil more “alive” over time. - Place it where it will stay
Once the bed is filled, it gets heavy. So it’s better to choose the spot right away: at least 6 hours of sun, a flat surface, and not too far from water.
What grows best in pallet beds
These beds are usually not very deep and tend to dry out faster, so it’s better to choose crops that don’t need a large soil volume and can handle small moisture changes.
Greens and fast-growing crops work especially well. Lettuce, spinach, arugula — they grow quickly and don’t need much depth. Radishes and green onions are also a great choice, especially if you want to see results in just a couple of weeks.
For something a bit more substantial, you can plant strawberries or low-growing herbs like basil and thyme. They don’t take much space and feel comfortable in these conditions.
When pallets make the most sense
There are situations where this option fits especially well. It’s not about being perfect — it’s about being practical for the moment.
- if your budget is limited
- if you want to start quickly
- if the space is temporary
- if you just want to try without pressure
Of course, they’re not forever. After 2–4 years the wood will start to wear out. But by that time, you’ll already understand what you actually need.
2. Concrete Block Garden Beds That Last for Years
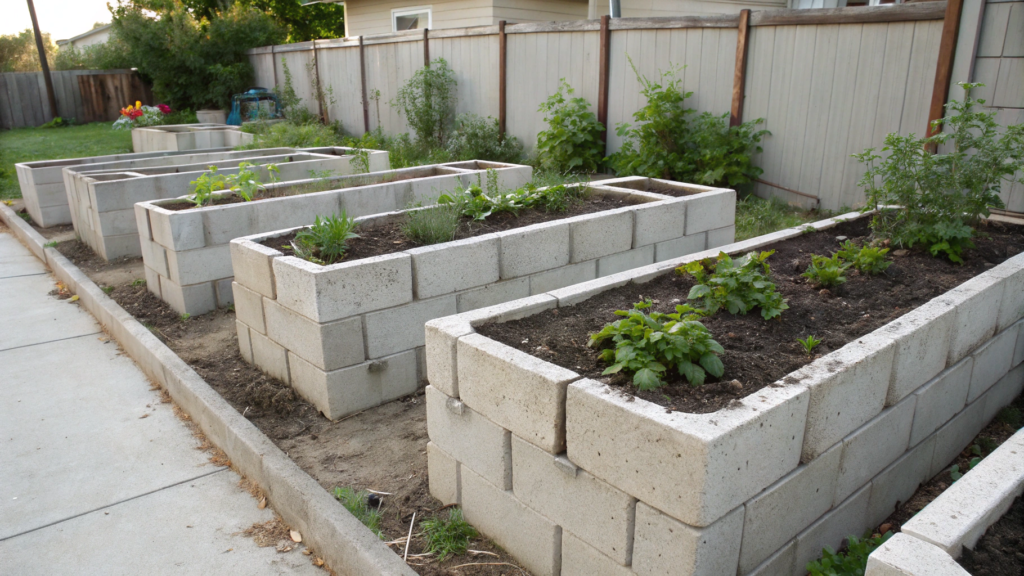
Concrete block garden beds are not about putting something together from whatever you found behind the shed. We first had pallets, then wood… and somewhere around the third season we built structures that don’t need to be redone every couple of years.
Concrete doesn’t rot, doesn’t fear moisture, and easily survives winter after winter. Unlike wood, where after a couple of seasons you start noticing material fatigue, here nothing changes. The same dimensions, the same angles, the same stability. And these beds hold their shape perfectly.
What you’ll need
- Concrete blocks (usually 8 x 8 x 16 inches / ~20 x 20 x 40 cm)
- Level
- Rubber mallet
- Gravel or crushed stone for the base
- Soil mix
- Optional — adhesive for blocks
If you want to speed up the installation and fix the structure, it’s convenient to use Loctite PL Premium Construction Adhesive — it holds the blocks very securely, especially if the bed is more than one row high.
How to make: step by step
- Prepare the area and level the base
Start with marking. Outline the future bed directly on the ground. Then remove the top layer of grass and dig slightly — about 2–3 inches (5–7 cm). Add a layer of gravel at the bottom. It helps water drain and prevents the structure from shifting after rain. - Lay the first row as level as possible
This is not the place to rush. The first row defines everything. Check each block with a level and adjust with a rubber mallet if needed. If this step is done carefully, everything else comes together almost automatically. - Build the walls to the desired height
Most of the time, 2 rows of blocks are enough — that’s about 16 inches (40 cm).
If you want it higher, you can go up to 3 rows, but then it’s better to use adhesive between layers so the structure stays more solid. - Use the block openings effectively
This is one of the most practical features. The hollow spaces inside the blocks can be filled with soil and used to plant herbs or flowers. We often grow basil and calendula there. It looks natural and saves space. - Fill the bed and let it settle
We use roughly the same mix as in other beds: about 40% garden soil, 40% compost, and 20% aeration material.
After filling, it’s better to let the bed sit for a couple of days before planting — the soil will settle slightly.
From our observations
These beds warm up faster. Concrete absorbs heat during the day and releases it in the evening. And it’s noticeable. In spring, plants start a bit earlier, and at night the soil doesn’t cool down as sharply. And these small details add up to a positive result.
Why choose concrete beds
There are situations where they fit especially well:
- if you want to build once and not return to it every season
- if the space is already established and planned long-term
- if clean geometry and a neat look matter
- if there is wind or unstable soil
They are not the cheapest option at the start. But if you look at it over several years, this is one of the most low-maintenance options. A season passes, then another — and you realize you’re no longer thinking about the structure at all. Only about what’s growing inside.
3. Elevated Garden Bed Designs for Easy Access
We came to elevated garden bed designs from a simple unpleasant feeling in the back after a long day in the garden. You start looking for ways to make things easier, and at that point raised beds become almost necessary.
When the bed is at waist height or slightly below, you stop constantly bending. According to the National Institute for Occupational Safety and Health, long periods of work in a bent position increase strain on the lower back and may raise the risk of pain. So reducing that kind of load is a reasonable decision.
What you’ll need
Before starting, it’s better to understand what the structure will be made of and what height you need. This saves time and avoids rebuilding later.
- Boards (usually 2×6 or 2×8 inches / ~5×15 or 5×20 cm)
- Posts for legs (4×4 inches / ~10×10 cm)
- Wood screws
- Drill or screwdriver
- Level
- Soil mix
Once everything is ready, you can move on to assembly without unnecessary pauses.
How to make
The structure looks more complex than it actually is. In reality, it’s just a box on legs.
- Determine a comfortable height
Height is the first thing to decide. Usually it’s around 30–36 inches (75–90 cm), roughly at waist level.
It’s better to adjust it once for yourself than to adapt to it every day later. - Build the main box
A rectangular frame is assembled from boards. It’s better to keep the width within 3–4 ft (90–120 cm) so you can easily reach the center.
The joints are fixed with screws, and corners can be reinforced if needed. - Attach the legs
Posts are fixed to each corner. They need to be strong, because a filled bed can easily weigh 200–300 lbs (90–135 kg).
This is not the place to save on крепления — the structure needs to stay stable. - Add a bottom and drainage
Unlike standard beds, here a bottom is required. Boards with small gaps or a strong mesh are used.
It’s important that water can drain freely, otherwise the soil will stay too wet. - Fill with a light and nutrient-rich mix
Since the volume is limited, it’s better to use a more lightweight soil mix: about 40% compost, 30% garden soil, and 30% aeration material (perlite or coco coir).
This helps retain moisture without overloading the structure with extra weight.
Where these beds are especially useful
You start to appreciate these structures in real conditions, not in theory. There are several scenarios where they make a noticeable difference and simplify the process.
- if there is strain on the back or you just don’t want to bend constantly
- if the space is used often, almost every day
- if it’s important to keep everything neat and on the same level
- if you want full control over the soil composition
Over time, you realize this is not just a “convenient alternative”. These beds often replace standard ones because you get used to them faster than expected.
After installing these beds, the whole rhythm of work changes. You’re not squatting every few minutes, not looking for where to place your knee, not thinking about how to reach the far corner. The work becomes more even. You can спокойно handle planting, weeding, or harvesting longer, without that feeling of fatigue in your body.
4. Compact Layouts for Small Spaces
Imagine a small yard, a narrow strip along a walkway, a piece of space that technically exists… but it’s unclear how to use it.
We had a corner like that. Between the fence and the shed — about 10 ft (3 m) long and just over 3 ft (1 m) wide. At first, we just put everything there. Pots, boxes, tools. It looked more like storage than a garden.
And this is exactly where compact layouts for small spaces come in. Compact beds allow you to:
- reduce the distance between plants without harming them
- retain moisture in the soil better
- maintain and manage plantings faster
Approaches from intensive gardening, discussed for example by University of California Agriculture and Natural Resources, show that with proper dense planting you can use space and light more efficiently and get more from the same area.
What you’ll need
Before starting, it’s important to understand that everything here depends on precision. You don’t need many materials, but you do need more attention to size and placement.
- Boards or ready-made bed modules
- Marking line or measuring tape
- Wood screws
- Drill or screwdriver
- Soil mix
- Optional — vertical supports
For compact builds, it’s convenient to use Fiskars Steel Measuring Tape 25 ft — with proper measurements it’s easier to set the right geometry from the start. Once everything is marked, it becomes clearer how much will actually fit and where to leave paths.
How to make
The main idea here is not to “fit in as much as possible”, but to build a structure that feels comfortable to use every day.
- Mark the space in advance
Before building anything, lay everything out directly on the ground. Mark where the beds will be and where the paths go. The minimum path width is about 18–24 inches (45–60 cm), otherwise it becomes difficult to maintain the beds. - Make narrow but long beds
Instead of one wide bed, it’s better to create several narrow ones. A width of about 2–3 ft (60–90 cm) is enough to reach the center. The length depends on the space, but elongated shapes work better than square ones. - Use corners and boundaries of the space
Small areas often have irregular shapes. Corners, strips along fences, areas near walls — all of this can be used. Herbs and compact crops tend to do well in these spots. - Add vertical elements where possible
Even one trellis or support can free up a lot of space. Cucumbers, beans, peas — they grow upward instead of spreading across the ground. - Fill beds with dense planting in mind
The soil should be nutrient-rich and loose: about 40% compost, 40% garden soil, and 20% aeration material. Plants are placed slightly closer than usual, but with enough room to grow without interfering with each other.
When a compact layout makes the most sense
There are situations where this approach becomes almost necessary:
- if the space is limited
- if you need to combine a garden with a seating or living area
- if the land is narrow or irregular
- if you want to maximize a small space
In these conditions, a compact layout gives both space efficiency and the feeling that you’re getting the most out of your yard.
When everything is arranged compactly, the space stops feeling small. It starts to feel structured. You’re not walking back and forth unnecessarily, not wasting time going around, not losing track of your plantings — everything is close, everything is under control. And most importantly, taking care of the garden becomes easier, which means you do it more often and with less effort.
5. Vegetable Garden Bed Plans That Maximize Yield
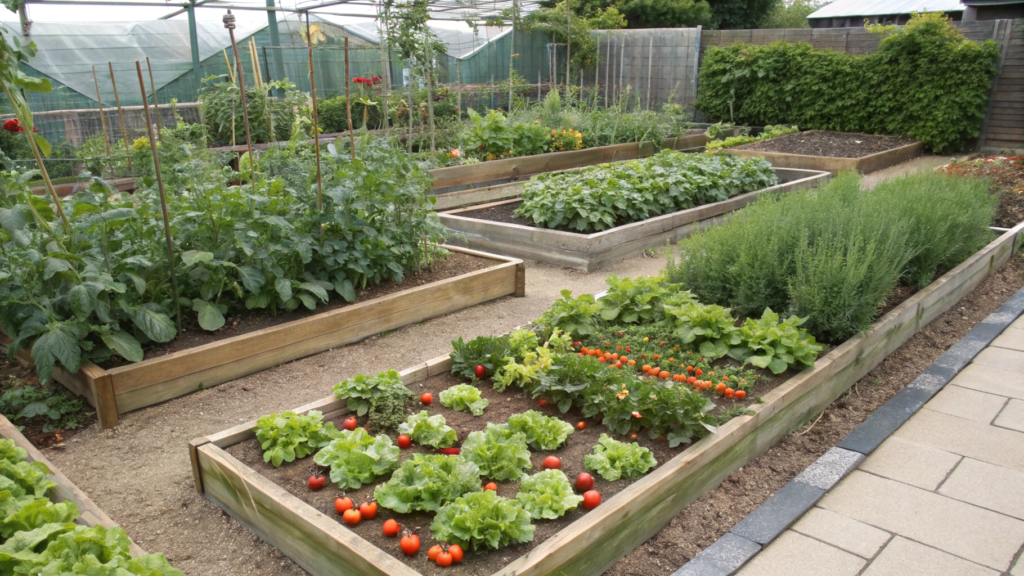
We always try to build a bed so that each plant works toward a result. That’s why vegetable garden bed plans that maximize yield become almost essential.
At first, we planted by intuition — tomatoes here, lettuce there, something else wherever there was space. But when a bed is planned, plants compete less for light, water, and nutrients. And this directly affects growth.
Crop rotation and planting density help use space more efficiently. This approach has long been used in intensive gardening: with proper placement, you can get more from the same area without expanding your beds.
What you’ll need
Before starting, it’s better to understand what crops you want to grow and how much space they need. This helps avoid changes in the middle of the season.
- Boards or ready-made bed structures
- Planning (paper or notes — even a simple sketch)
- Seeds or seedlings
- Soil mix
- Plant supports if needed
If you’re planning multiple beds, it’s helpful to sketch it out in advance — even a simple plan gives clarity.
How to make: step by step
- Decide on the main crops in advance
First, choose what will grow in the bed. Different plants need different amounts of space. For example, tomatoes and squash take more room, while greens and radishes can be planted closer together. - Divide the bed into zones
Instead of random planting, mentally split the bed into sections. One side for taller plants, the other for lower ones. This helps prevent blocking light. - Consider plant height when placing them
Taller crops are better placed on the north side so they don’t shade the rest. This is a simple rule, but it makes a noticeable difference. - Combine fast and slow-growing crops
While larger plants are still developing, you can plant faster crops between them — lettuce, radishes, greens. They grow quickly and free up space before the main plants spread out. - Maintain fertile and stable soil
A standard mix works well: about 40% compost, 40% garden soil, and 20% aeration material. The key is not just the mix itself, but regularly adding organic matter during the season.
Where this approach works best
This method becomes especially effective in certain situations, where planning starts to make a real difference.
- if space is limited and every area needs to be used
- if multiple crops are grown at the same time
- if you want a steady harvest instead of one big wave
- if the goal is to increase yield without adding more beds
In these conditions, even simple planning begins to show noticeable results.
When a bed is planned, the feeling of randomness disappears. You’re not guessing where to plant — you just know. Maintenance becomes easier. Watering, feeding, harvesting — everything happens more evenly, without overload in one area and empty space in another.
6. Upcycled 55-Gallon Drum Planters
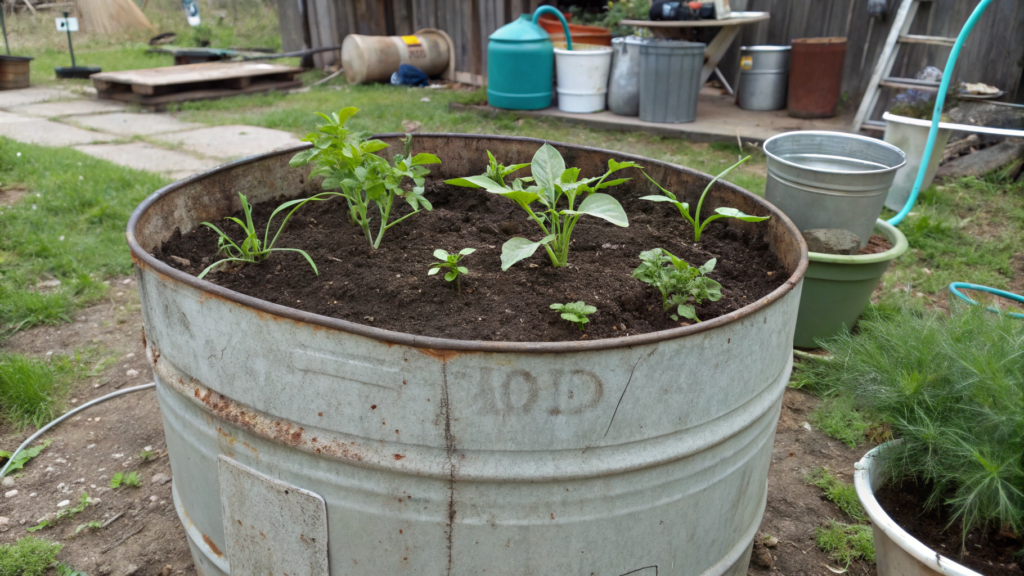
You probably know the feeling when it’s hard to throw something away that can still be useful. We had these barrels sitting on our property for a long time. Old, a bit worn, but still solid. At first, we just used them as water containers. Then one of them accidentally turned into a garden bed. And it turned out to be very convenient.
A 55-gallon drum is a solid volume for the root system of most crops. Because of the depth, the soil holds moisture longer, and the structure itself doesn’t depend on the quality of the ground on your site.
What you’ll need
Before starting, it’s important to decide whether you’ll cut the barrel in half or use it as is. This affects both the structure and the number of plantings.
- Metal or plastic 55-gallon drum (≈208 L)
- Angle grinder or saw (for cutting)
- Drill
- Drill bit for drainage holes
- Soil mix
- Gloves and protective gear
How to make: step by step
The key here is to work carefully and understand how the barrel will be used.
- Prepare and clean the barrel
Before doing anything, wash it thoroughly. Especially if it was used for something technical.
It’s better to use barrels that previously held food products or water. - Decide on the format: whole or cut in half
If you leave the barrel whole, you get a deep container that works well for tomatoes, potatoes, or bushy crops.
If you cut it lengthwise, you get two long planters that are convenient to place along a wall or fence. - Make drainage holes
You need to drill several holes at the bottom — about every 4–6 inches (10–15 cm).
Without this, water will collect and the roots will start to suffer. - Add a drainage layer
At the bottom, add a layer of gravel or expanded clay — about 2–3 inches (5–7 cm).
This helps water drain faster and prevents the soil from becoming compacted. - Fill with a light and nutrient-rich mix
Since this is a container, the soil should be more airy: about 40% compost, 30% garden soil, and 30% aeration material (perlite, coco, or sand).
This mix holds moisture but doesn’t turn into a dense mass.
Where this works best
Barrels become especially useful in situations where regular beds are inconvenient or not possible. They help solve very specific problems without reworking the whole space.
- if part of the area is covered with gravel or плитка
- if you don’t want or can’t dig into the ground
- if you need to add planting space without rebuilding the yard
- if you want to reuse materials you already have
In these beds, tomatoes and peppers, greens and salads, strawberries, and potatoes (especially in a deep barrel) grow well. There are fewer weeds because you control everything, starting with the soil.
There’s no need to build a system of ten barrels right away. Start with one, plant something simple, and see how the soil and plants behave. After that, it becomes clear where these containers really work best.
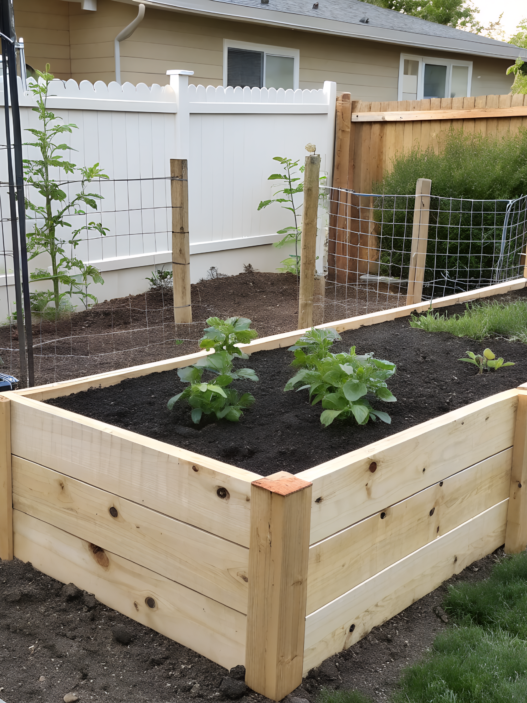
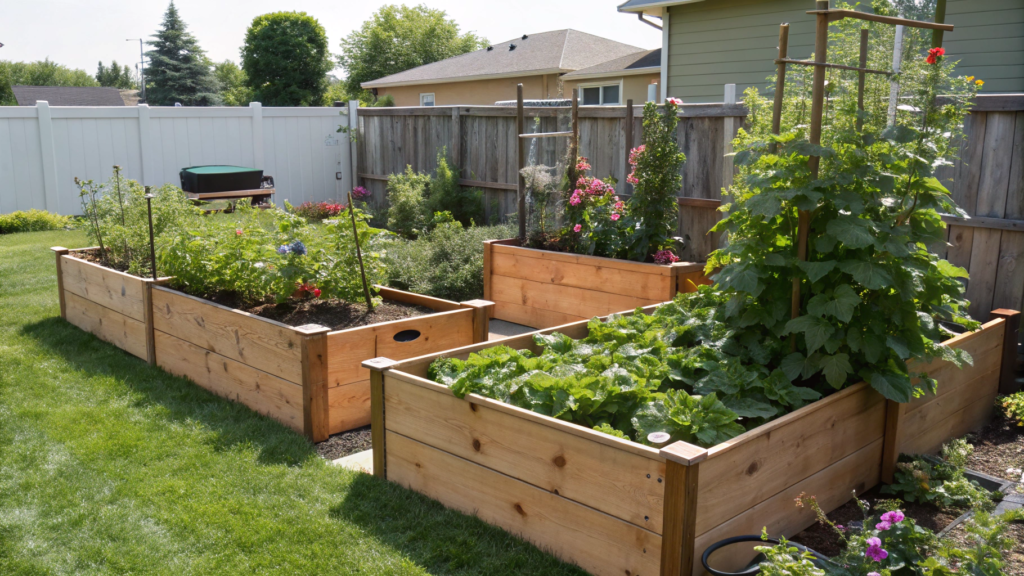
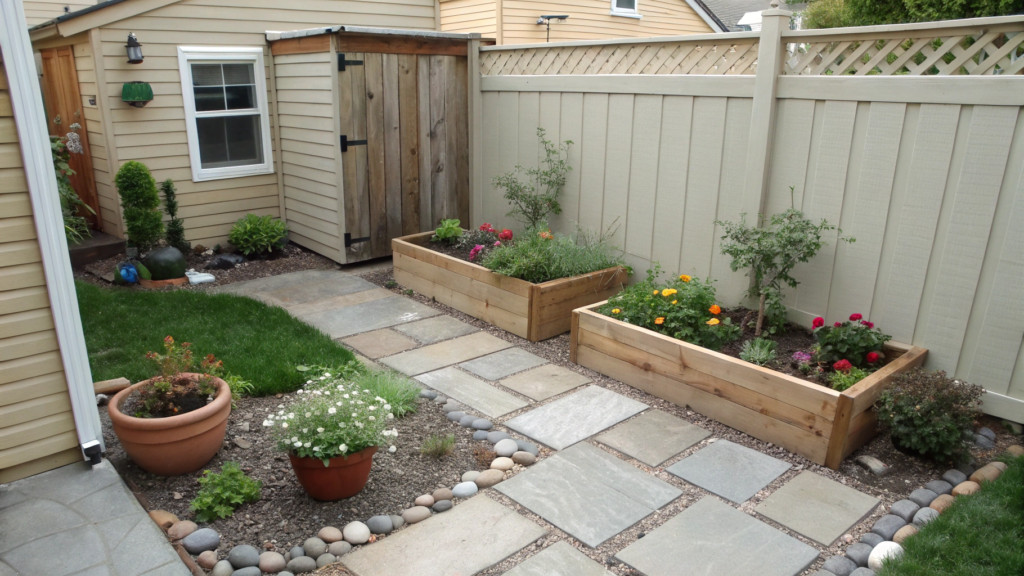
7. Wood Frame Beds That Fit Any Backyard Style
Wood frame beds are easier to integrate into the overall look of your yard. They don’t stand out, don’t feel like a temporary solution. They give flexibility, and you can adjust them to almost any need.
What you’ll need
Before building, it’s better to decide on the size and style right away. This helps avoid reworking things when the structure is already partially done.
- Boards (often 2×6 or 2×8 inches / ~5×15 or 5×20 cm)
- Corner posts or blocks
- Wood screws
- Drill or screwdriver
- Level
- Soil mix
How to make
- Determine the size for your space
At first, we copied standard sizes, but later realized they’re not always convenient.
It’s better to work from your actual space. A width of about 3–4 ft (90–120 cm) stays practical, and the length can be adjusted to your layout. - Build a solid frame
The boards are assembled into a rectangle, and the corners are fixed with screws through posts. If the bed is longer than 6–8 ft (180–240 cm), it’s worth adding a support in the middle so the sides don’t start to spread over time. - Level the frame before filling
This step seems small, but it affects everything. If the bed sits unevenly, water will move to one side, and plants will develop unevenly. - Prepare the base (a step often skipped)
If the bed sits directly on the ground, a bottom is not needed. It’s enough to lay down cardboard or landscape fabric — it helps control weeds but doesn’t block roots from going deeper.
If the bed is placed on a hard surface (tile, concrete, gravel), then a bottom is required. In this case, boards with gaps or a strong mesh are used so water can drain freely. - Protect the inner walls (optional)
If you want to extend the lifespan, you can line the inside with plastic or geotextile.
This reduces direct contact between the wood and влажная soil. - Fill with a balanced soil mix
A standard mix works well here too: about 40% compost, 40% garden soil, and 20% aeration material. If the soil is heavy, adding a bit more aeration material makes a noticeable difference in structure.
Where these beds work best
Wood structures perform especially well in situations where flexibility and appearance matter. They adapt easily and don’t feel out of place in a finished yard.
- if the space is already established and you want a consistent style
- if you plan to change the layout over time
- if it’s important to match the house, paths, and other elements
- if you want a simple structure without heavy materials
In these conditions, wood beds remain the most understandable and manageable option.
If you’re not sure where to start — begin with one bed and fit it to a specific spot. Not to a picture from the internet, but to your actual space. After the first one, it usually becomes clear which size and shape really work.
8. Modern Metal Garden Beds with Rustic Charm
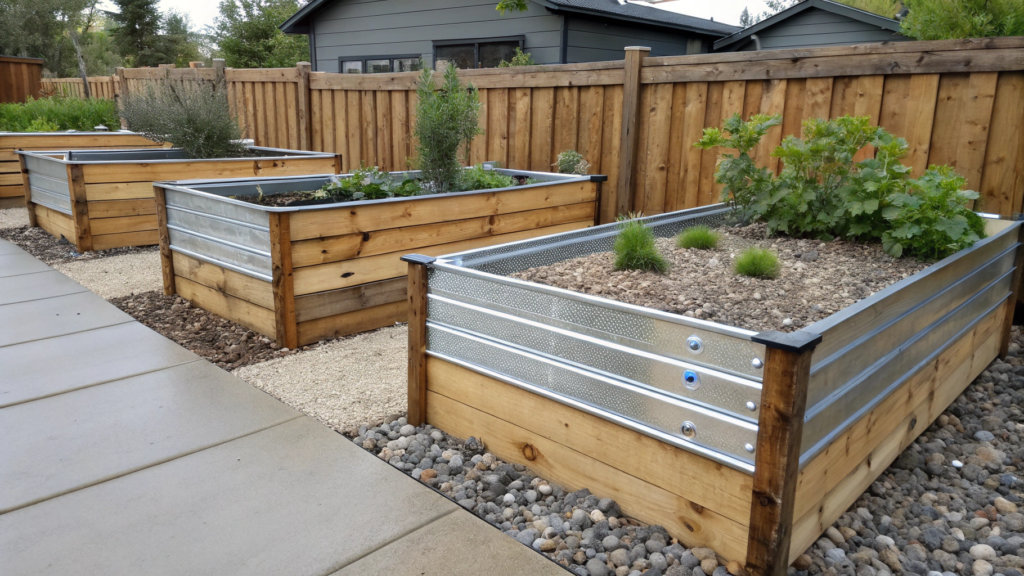
Modern metal garden beds with rustic charm look neat and a bit more restrained compared to wood. We placed these beds next to wooden ones, and they complement each other well. Especially if there is gravel, stone, or simple paths around.
Metal doesn’t warp, doesn’t rot, and doesn’t require regular replacement. Most often, galvanized steel is used. It resists corrosion, handles moisture, and tolerates temperature changes. These beds also warm up faster in spring because metal transfers heat to the soil.
What you’ll need
Before starting, it’s important to decide whether you’ll assemble the bed from a ready-made kit or build it from scratch. Both options work, but a kit saves time.
- Sheets of galvanized metal or a ready-made set
- Corner brackets or metal profiles
- Bolts and nuts
- Drill or wrench
- Gloves (important — edges can be sharp)
- Soil mix
If you want to simplify the process, it’s convenient to use ready-made solutions like Best Choice Products Metal Raised Garden Bed — everything is already sized and prepared.
After preparation, you can move to assembly without unnecessary adjustments along the way.
How to make
- Decide on the shape and size in advance
Metal beds are often made elongated — for example, 4 x 8 ft (120 x 240 cm) or narrower.
It’s better to keep the width within 3–4 ft (90–120 cm) so you can work comfortably from both sides. - Prepare the ground and base
Remove the top layer of grass and level the surface. If the soil is soft, you can add a layer of gravel 2–3 inches (5–7 cm) thick to keep the structure stable. - Assemble the walls with corner connections
Metal sheets are connected using brackets and bolts. It’s important not to tighten everything fully at once — first assemble the structure, level it, and only then secure all connections. - Cover sharp edges
This step is often ignored. Edges can be folded inward or covered with a protective strip. This makes the bed safer, especially if there are children nearby. - Reinforce the structure if needed
If the bed is longer than 6–8 ft (180–240 cm), it’s better to add a cross brace. This prevents the walls from bulging under the pressure of the soil. - Fill with a light but moisture-retaining mix
Metal heats up faster, so the soil can dry out more quickly. An effective mix is about 40% compost, 40% garden soil, and 20% aeration material (perlite or coco).
Sometimes we add a layer of mulch on top — it helps keep moisture in.
What grows best in these beds
Metal beds work well for crops that like warmth and a stable soil structure.
Most often, we grow:
- tomatoes and peppers
- eggplants
- greens (especially in spring and fall)
- carrots and beets
Because the soil warms up faster, plants tend to start earlier, especially at the beginning of the season.
When it makes sense to choose metal
In certain conditions, metal beds provide results that are harder to achieve with other materials. Especially when stability and low maintenance are important.
- if you want a long-term solution without replacement
- if the space is already designed and clean geometry matters
- if the climate has temperature and moisture fluctuations
- if minimal maintenance is important
In these cases, metal works in a very predictable way. You’re not repairing, not thinking about replacing boards — you just focus on the plants. Over time, this makes the whole gardening process much easier.
We noticed that metal garden beds keep their shape well even after heavy rain and temperature changes. And if they are assembled properly once, after that you just work with the plants. At first, Lindy was worried they would stand out too much. But once we added wood and greenery around them, the metal became more of a background than a focal point.
9. Raised Beds for Vertical Vegetable Gardens
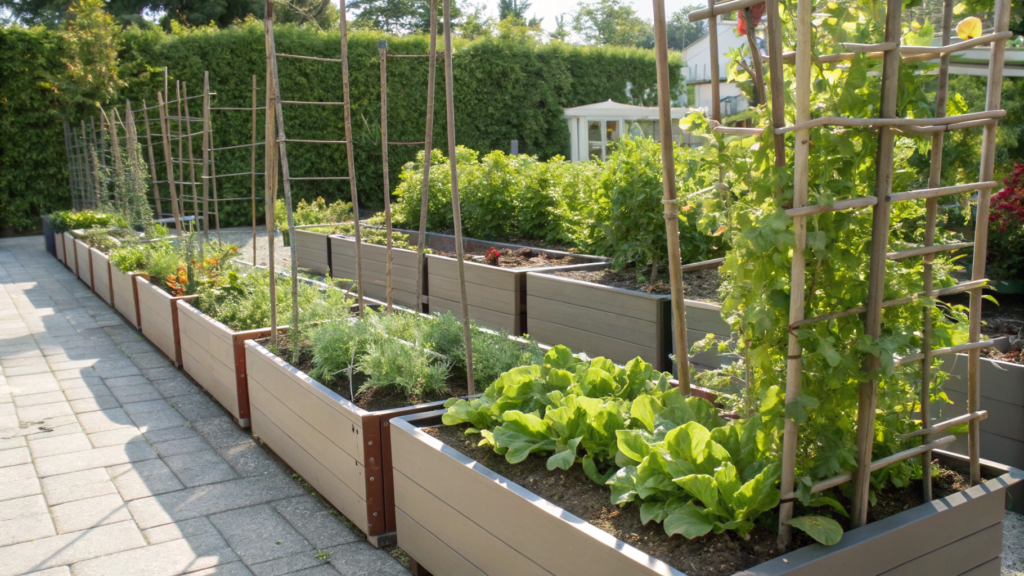
With raised beds for vertical vegetable gardens, everything starts growing not outward, but upward. When plants grow vertically, space at ground level is freed up. This allows you either to increase the number of crops or make planting more comfortable.
Vertical structures also improve air circulation, which helps reduce the risk of disease. This is supported by research on growing in vertical systems.
What you’ll need
Before starting, it’s important to understand which plants will grow vertically. This determines the type of support and its height.
- Wooden or metal frame for the bed
- Supports: trellises, mesh, or grids
- Fasteners (staples, wire, or screws)
- Drill or screwdriver
- Soil mix
- Optional — rope or garden netting
Once all elements are ready, you can move on to assembly — it’s important to plan not only the bed, but also the plant support from the start.
How to make
- Build a base bed with reinforced sides
Start with a regular box, like a standard raised bed. Width — about 3–4 ft (90–120 cm), length — depending on your space.
But there’s one detail: one of the long sides should be strong enough to hold the vertical structure. It’s better to use thicker boards or add an extra support beam. - Install vertical posts before filling with soil
This is a key step. Along the back side of the bed, install vertical posts about 5–7 ft (150–210 cm) high. They should either be set into the ground 8–12 inches (20–30 cm) or firmly attached to the frame.
If you add them later, once the bed is filled, the structure will be less stable. - Attach mesh or trellis between the posts
Stretch mesh or secure a trellis between the vertical supports.
It’s important that it is tight, without sagging — plants will add weight over time, and weak support will start to move. - Plan orientation based on sunlight
The vertical section is best placed on the north side of the bed.This way, taller plants won’t shade the rest, and light will be distributed more evenly. - Fill the bed with a stable, nutrient-rich mix
The composition stays standard: about 40% compost, 40% garden soil, and 20% aeration material. It’s important that the soil holds moisture well, since vertical plants use more of it. - Plan plant support from the beginning
As plants grow, they need to be guided. You can use soft ties, rope, or clips. It’s better to do this early, not when stems are already heavy.
Which crops work best
Not all plants are suited for vertical growth, so choosing the right ones is important.
In these beds, the following usually work well:
- cucumbers
- beans and peas
- tomatoes (especially indeterminate varieties)
- squash and pumpkins (with strong support)
These crops not only save space but also make harvesting easier — everything is visible and accessible.
When vertical beds make sense
Vertical structures are not always needed at the beginning. But in certain situations, they quickly become a key part of the garden.
- if space is limited and you want to grow more
- if you are growing climbing crops
- if improving airflow is important
- if you want to simplify care and harvesting
In these conditions, you use not only ground space but also height, which changes the entire feel of the area.
Vertical beds make the space feel more layered and structured. You’re not just moving along the bed — you’re working with it at different levels. This simplifies maintenance: less bending, less confusion between plants, and easier control over growth. The garden starts to look more organized and intentional.
10. Affordable DIY Garden Beds for Beginners

With affordable DIY garden beds for beginners, the main thing is not a perfect structure, but the process itself. A simple bed lets you move to planting faster and actually see results.
What you’ll need
You don’t need a long list here. Most of it can be found around your yard or bought without serious cost.
- Boards or any available materials (including leftovers)
- Screws or nails
- Drill or hammer
- Cardboard or fabric for the base
- Soil mix
If you don’t have tools, you can start with something basic. For example, BLACK+DECKER Cordless Drill Kit 20V is enough for most simple builds.
How to make
The goal here is to build your first working bed quickly, without unnecessary complexity, but in a way that it won’t fall apart in a month and will hold soil properly.
- Choose a simple and practical location right away
A flat area with at least 6 hours of sun works best. It’s better if you can access the bed from one or two sides — you’ll be coming back to it often. - Build a simple box of a practical size
A good reference is about 3 x 6 ft (90 x 180 cm) with a height of 10–12 inches (25–30 cm). Boards are connected at the corners with screws or nails. If the length is more than 6 ft (180 cm), add one support in the middle so the sides don’t spread. - Prepare the base without overcomplicating it
You don’t need to perfectly remove all grass. It’s enough to lay 2–3 layers of thick cardboard directly on the ground — it blocks light for weeds and will break down over time. - Fill the bed with a simple working mix
No need to overthink it: about 50% garden soil, 30% compost, and 20% aeration material (sand or perlite). If the soil is heavy, you can slightly increase the aeration part — it improves structure right away. - Plant something simple and fast right away
Lettuce, radishes, greens, green onions work well. They grow quickly, and you immediately see that the bed is working.
This approach helps you avoid getting stuck in preparation. You build it, plant it, and see how everything behaves.
When it’s better not to overcomplicate things
Sometimes it doesn’t make sense to try to do everything perfectly from the start. It’s much more useful to begin simple and understand what you actually need along the way.
- if it’s your first bed and you have no experience
- if the budget is limited
- if the space is not fully planned yet
- if you want to start quickly without long preparation
In these situations, a simple structure works better. It gives you experience and understanding, and only after that it makes sense to add complexity where needed.
Our first bed was slightly uneven, built from different boards, not the most attractive one. But that’s when we understood that we could actually make something ourselves. Lindy said that the most important thing is to see something growing from what you built with your own hands. And that feeling outweighs all small imperfections.
Your experience, your beds
Over time, you stop thinking about what the bed is made of. What matters is that it stands where it’s convenient, doesn’t require constant rebuilding, and gives a solid result. Everything else becomes secondary.
You rarely get the best option right away. Some things need to be changed, some rebuilt, and some unexpectedly stay for years. And that’s a normal part of the process, not a mistake.If something here stood out to you — try it on a small part of your space. There’s no need to rebuild everything at once. One working bed gives more understanding than ten saved ideas.
Write in the comments which option you would start with or what you’ve already tried. It’s always interesting to see what actually works in different conditions.