In fall, any front porch can be quickly freshened up before guests arrive. A couple of good planters, some pumpkins, and a few suitable plants — and the space already looks completely different.
I put together 10 Fall Planter Ideas Front Porches that you can recreate without a lot of prep or unnecessary purchases. Some are very simple, while others take a little more time with planting or arranging.
But in every case, you can adjust everything to the size of your porch and use what you already have on hand. The main thing is that everything can actually live on the porch, handle fall weather, and not look like a seasonal decor store display.
1. Pumpkin and Mum Layered Planter
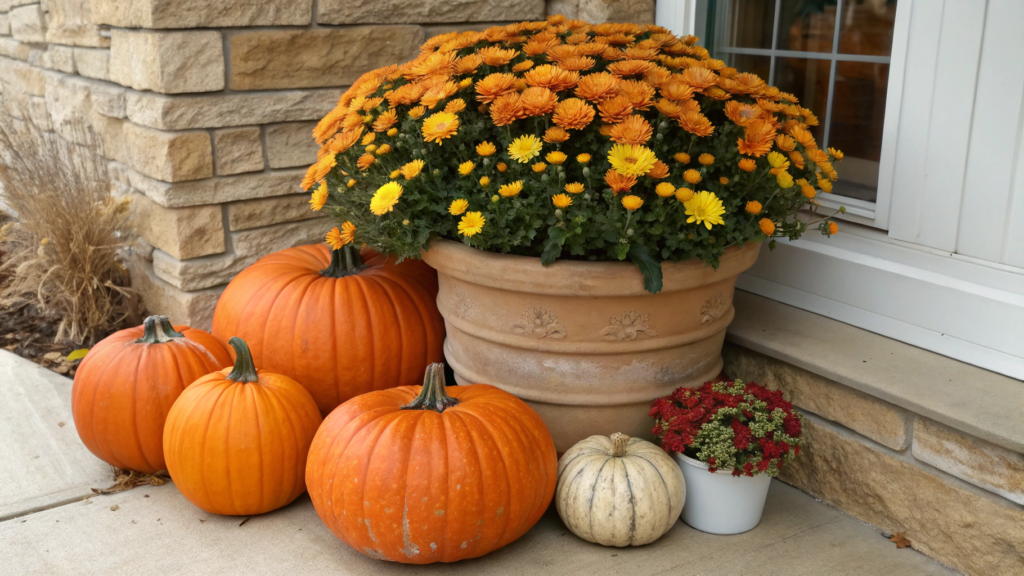
The base of this arrangement is a large potted mum, with several pumpkins of different sizes around it. And we’re not going for perfect symmetry here. Quite the opposite — when one pumpkin sits slightly forward, another is almost hidden behind the planter, and a third is placed a little off to the side, everything looks natural and relaxed.
What you’ll need
- 1 large mum in a pot around 10–12 inches (25–30 cm). For this arrangement, it’s better to choose a full plant with plenty of buds rather than one that has already finished blooming.
- 3–5 pumpkins in different sizes. You can use one large pumpkin and another two or three smaller ones. White, orange, and muted green pumpkins are easy to mix together.
- 1 outdoor planter slightly wider than the nursery pot the mum comes in. If you already have an older planter at home, there’s definitely no need to buy a new one just for one fall arrangement.
- A little container potting mix if you’re going to transplant the mum instead of simply placing its nursery pot inside the decorative planter.
How to make a Pumpkin and Mum Layered Planter
1. Start with the mum. Place it closer to the back of the planter or slightly off-center. This leaves room around it for the pumpkins and keeps the whole arrangement from turning into one big round bush.
Mums need well-draining soil, and when grown outdoors, they do best in a sunny spot. So the planter should definitely have a drainage hole at the bottom to keep excess water from sitting around the roots.
2. Place the largest pumpkin at the base of the planter. Shift it slightly to one side of the mum so it partly covers the planter and makes the arrangement look more natural.
3. Place two or three smaller pumpkins next to the large one. Put one closer to the edge of the step and another beside the large pumpkin or slightly behind it. Using pumpkins in different sizes gives the arrangement more depth without taking up too much space.
4. Take a few steps back and look at the arrangement from a distance. You’ll immediately see if one of the smaller pumpkins has disappeared behind the planter or if all the decor has ended up crowded on one side. If something looks off, just move one or two pumpkins.
Don’t forget to keep an eye on the soil moisture. Mums have a shallow root system, so the potting mix in a container can dry out fairly quickly. Stick your finger about 1 inch (2–3 cm) into the soil, and if the top layer is already dry, it’s time to water the mum. Illinois Extension recommends not letting the soil dry out completely, while also avoiding keeping it constantly wet.
I think there’s no need for any extra decor here. A mum, a few pumpkins, and a good planter already bring enough color and texture.
At the end of fall, the pumpkins go into the compost, while the planter stays for future plantings. We try to take care of what we already have and avoid buying extra things when we don’t need them.
2. Copper Urn With White Pumpkins
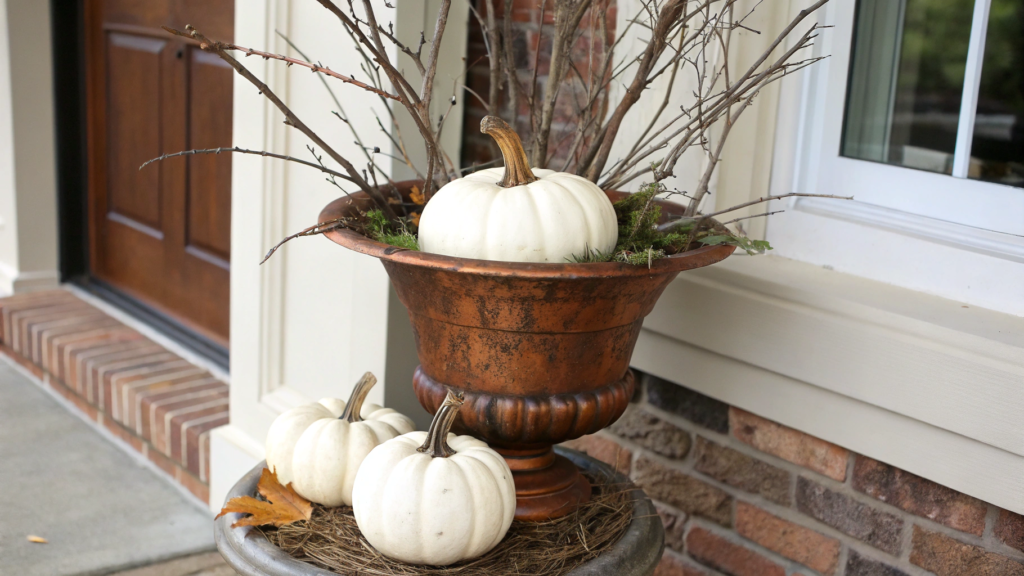
A copper urn already has a strong enough shape, so there’s no need to place a lot of decor around it. Two or three white pumpkins at the base and dry branches inside the urn itself, if you want, give you everything you need for a fall front porch arrangement.
What you’ll need
- A copper urn or a planter with a copper finish, for example, Copper Urn Planter
- 2–3 white pumpkins in different sizes. It’s better to take one large one and one or two smaller ones.
- 5–7 dry branches of different lengths, for example birch or willow. If you don’t have dry branches, you can replace them with artificial ones.
- Dry floral foam to secure the branches inside the urn.
How to make
1. First, place the urn in the chosen spot. If the urn is heavy, it’s better to decide right away where it will stay permanently. After that, it’s easier to build the arrangement and see how much space is left around it. On a narrow porch, it’s important to understand right away whether the urn blocks the walkway and whether it stands too close to the door.
2. Secure the branches inside the urn. Place dry floral foam at the bottom and insert the branches into it at different heights. It’s better to place the longest ones closer to the center or slightly toward the back, and the shorter ones at the sides. Don’t gather them into one dense bunch. It’s better to leave a little air between the branches, then the urn won’t get lost and the whole arrangement will look lighter.
3. Arrange the white pumpkins at the base of the urn. Place the largest one slightly to the side. Put one or two smaller ones nearby so they read as one small group rather than randomly scattered decor. If one of the smaller pumpkins gets lost next to the large one, you can lift it slightly on a low stable plant stand.
4. Look at the arrangement from a few steps away. Check whether the urn itself is clearly visible, whether the pumpkins are covering too much of it, and whether the branches are evenly distributed. If they’ve bunched up too tightly, spread them out a little. Usually one or two small adjustments are enough — move a pumpkin slightly or turn a couple of branches.
White pumpkins, copper urns, and restrained fall decor look expressive in a front porch arrangement. I noticed that copper looks especially beautiful in cloudy weather and in the evening, when its warm tone becomes more noticeable next to the white pumpkins.
3. Ornamental Cabbage Porch Container
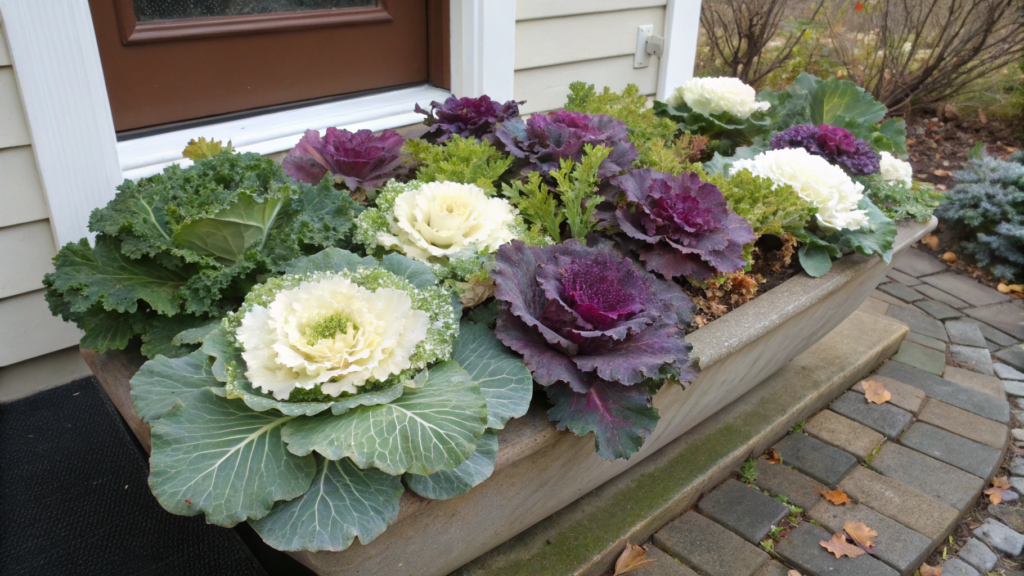
Ornamental cabbage is valued for its large rosette of leaves. There are varieties with green, white, cream, and purple shades, and the color becomes brighter as the weather gets cooler.
On a porch, even one large rosette is already enough, and if the planter is wide, you can plant several plants in the same shade or mix white and purple varieties.
What you’ll need
- 1–3 ornamental cabbage plants depending on the size of the planter. Before buying, it’s better to check the mature size of the specific variety. Ornamental cabbage rosettes can take up quite a lot of space, and the recommended spacing between plants is often around 12–15 inches (30–38 cm).
- A planter with drainage holes. For one large plant, it’s better to choose a container where the rosette won’t press its leaves against the sides right after planting.
- Container potting mix.
- If needed, gardening gloves, for example, Pine Tree Tools Bamboo Working Gloves.
How to make
1. Choose the plant to match the size of the planter. For a small pot, it’s easier to use one well-formed ornamental cabbage and leave it room to grow. In a wide container, you can place two or three, but don’t plant them too close together. For ornamental cabbage forms, the recommended spacing is about 12–15 inches (30–38 cm) between the centers of the plants.
2. Check the holes at the bottom and fill the planter with soil. Ornamental cabbage prefers moist but well-drained soil. After watering, the water should flow down freely, not stay inside.
3. Plant the cabbage at the same depth it was growing in the nursery pot. Don’t bury the base of the leaves. After planting, lightly press the soil around the roots with your hands and water well so the soil settles around the root ball.
4. If there is more than one plant, first arrange them while they are still in their nursery pots. This is easier than digging up already planted cabbage several times. Turn the rosettes so their best sides face the direction the porch is most often seen from, and only then transplant them.
5. Light. Ornamental cabbage is recommended to be grown in a sunny spot. Cool fall weather suits it well, and the leaf color often becomes richer as the temperature drops. The plant belongs to cold-tolerant annuals and handles light frosts well.
6. Check the soil before watering. Push your finger about 1 inch (2.5 cm) into the soil. If the soil is dry at that depth, it’s time to water. In cool weather, containers use water more slowly, so in fall it’s better not to water them on the same schedule you used in summer.
If someone has already grown ornamental cabbage, then they know that it is especially beautiful in fall. When most summer flowers have already faded, it is only starting to gain color — white, cream, pink, or purple becomes brighter as the weather gets cooler. On a porch, this looks incredibly beautiful if you choose a large rosette and a suitable planter.
4. Modern Pumpkin and Grass Planter
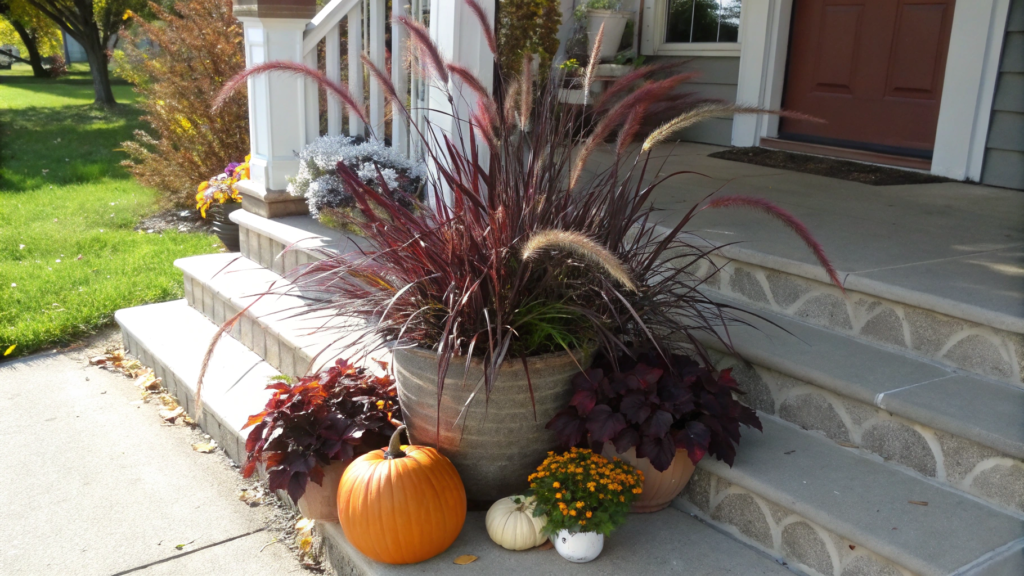
A tall ornamental grass and a few pumpkins are a great option for decorating a front porch. There are no lush mums or lots of small details here. The grass adds height, while the pumpkins stay low, and that difference makes the arrangement look good even in one large planter.
I think red fountain grass, for example, is a good choice. It has burgundy leaves and light purple flower plumes, and a mature plant reaches around 3–4 feet (90–120 cm). It works well in containers and keeps its color best in a sunny spot. But in a cold climate, this species won’t overwinter outdoors.
What you’ll need
- 1 ornamental grass for container growing. Check the mature height before buying. Some varieties grow taller than 4 feet (120 cm), which may already be too much for a small porch.
- A tall outdoor planter
- 2–4 small pumpkins. You can use two colors, for example white and orange or white and green.
- Container potting mix.
How to make
1. First, choose the grass and a suitable planter. A small plant from the garden center can grow noticeably within a few weeks, so check the information for the specific variety on the label. It’s better to choose the planter size after that instead of judging only by the nursery pot the grass comes in.
2. Check the drainage and fill the planter with soil. Drainage holes at the bottom are essential — excess water needs to flow out after watering. If water constantly stays inside, the roots won’t get enough oxygen.
3. Plant the grass closer to the center of the planter. If the planter stands against a wall, you can shift the plant slightly toward the back. If the planter is visible from all sides, it’s better to keep the grass in the center. This same principle is used in container planting — tall plants go in the center when the planter is viewed from all sides, or closer to the back when it is mainly seen from one direction.
4. Arrange the pumpkins at the base of the planter. Place the largest one next to it, and one of the smaller pumpkins can be raised on a low, stable stand — an upside-down terracotta pot or a plant stand. Keep the others lower. This puts the pumpkins at different heights and makes the arrangement look fuller and more dimensional. The main thing is to keep the walkway clear and not cover the planter completely with pumpkins.
5. Check the soil before watering. Containers dry out faster than garden soil, but how often you need to water depends on the weather, the size of the planter, and the plant itself. Check the soil with your finger at a depth of about 1 inch (2.5 cm). If it is already dry at that depth, it’s time to water the plant. Keep watering until water starts coming out through the drainage holes at the bottom.
Even when the leaves start to dry, the tall stems and flower plumes still hold their shape and look good on the porch. Red fountain grass works especially well for fall decorating: by this time it has already reached a good height, and its burgundy leaves and plumes look great next to pumpkins.
5. Mum Planter With Trailing Vines
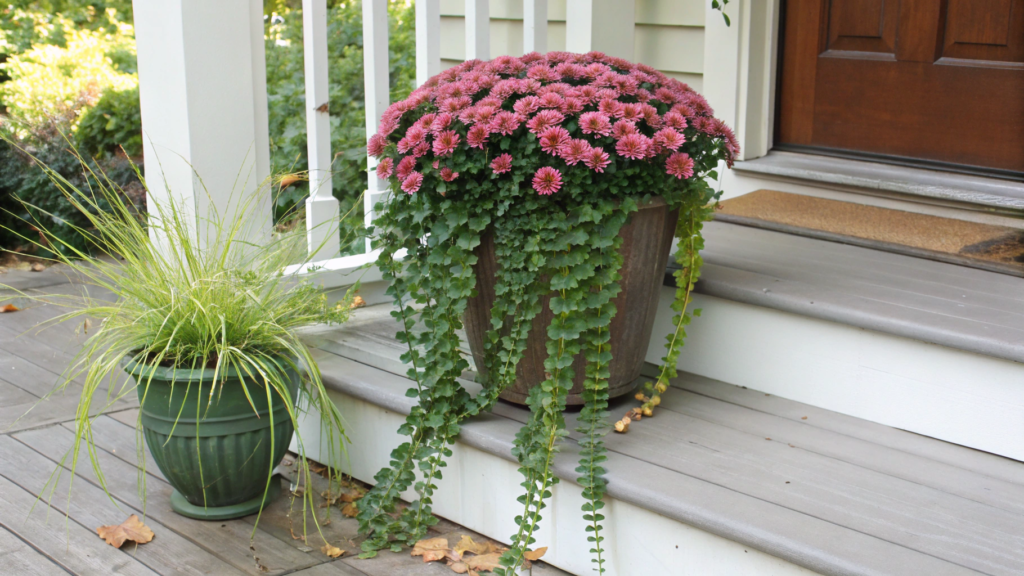
For decorating a front porch, you can add trailing greenery, for example, ivy, to a mum in a planter. The mum will still remain the main plant, while the ivy shoots will gradually fall over the edge of the planter and cover part of its sides.
For this kind of planting, it’s better to use an already well-shaped mum and a small ivy plant with several long shoots.
What you’ll need
- 1 mum with a dense shape and lots of buds that have not opened yet.
- 1–2 small ivy plants. For a small planter, one is usually enough.
- An outdoor planter with drainage holes.
- Container potting mix.
How to make
1. First, test the plants in the planter. Don’t take them out of their nursery pots right away. Place the mum in the center and the ivy closer to the edge. If the planter will stand against a wall, the mum can be shifted slightly toward the back, leaving the front and side area for the ivy.
2. Fill the planter with soil and plant the mum. Keep it at about the same depth it was growing at before transplanting. Mums need good drainage, so water should not stay at the bottom of the container.
3. Plant the ivy right at the edge of the planter. Direct the shoots outward right away so they fall over the rim instead of growing inward toward the mum. One plant is usually enough on one side; in a wide planter, a second ivy can be planted on the opposite side.
4. Water well after planting. The water should soak the soil and come out through the holes at the bottom. After that, check the soil with your finger about 1 inch (2.5 cm) deep. If it is dry at that depth, it’s time to water.
5. Make sure the ivy doesn’t get lost under the mum. If the mum grows a lot and presses down the shoots, just guide them back out over the edge of the planter. There’s no need to cut healthy long shoots just to make them all the same length — they are exactly what creates the trailing edge that the ivy is added for.
You can combine these two plants in different ways — white mums with dark green ivy, burgundy mums with variegated leaves, or yellow mums with regular green ivy. If the ivy starts to stretch too much, you can trim it back a little, but there’s no need to make all the shoots perfectly even, because a slight looseness actually looks more natural.
6. New England Inn Inspired Planter
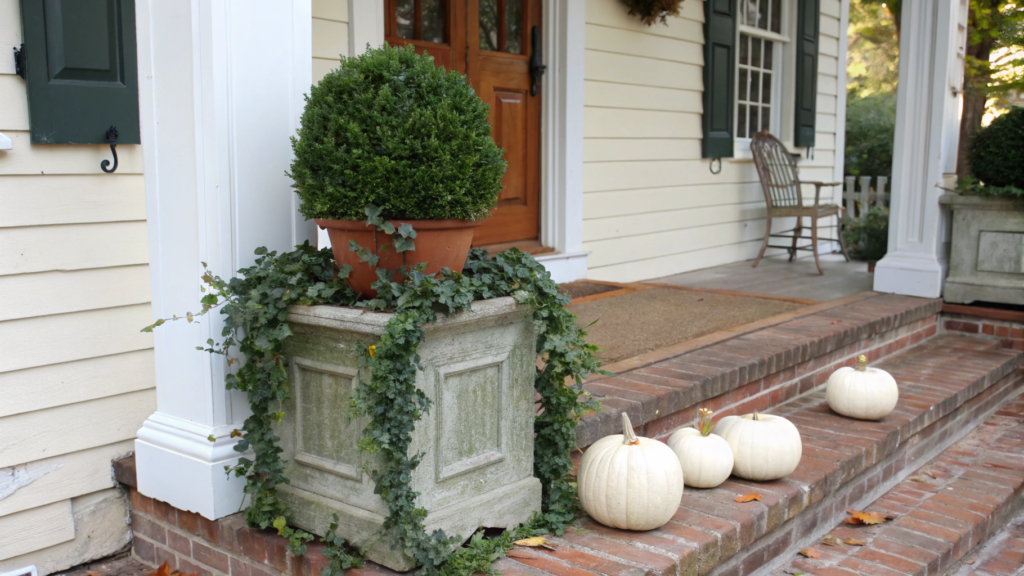
For a front porch inspired by old New England inns, a small boxwood, ivy around the edge of the planter, and a few white pumpkins work well. Together, these plants give that classic look that suits older homes, inns, and porches with a Northeastern feel.
By the way, Massachusetts container garden designer Susan Nock uses evergreens, including boxwood, in late-fall planters, with English ivy added around the edges as a trailing element.
What you’ll need
- 1 small boxwood suitable for growing in a container.
- 1–2 ivy plants with already fairly long shoots.
- A large outdoor planter with drainage holes.
- Container potting mix.
- 2–4 small white pumpkins for the porch.
How to make
1. Start with the boxwood. Place it in the center of the planter while it is still in its nursery container and see how much space is left around the edges. The ivy needs some open soil closer to the rim, so the boxwood should not take up the entire width of the planter. If the root ball is too large, it’s better to choose a wider container right away instead of trying to squeeze the other plants into the remaining gaps.
2. Fill the open space with soil. Plant the boxwood at the same depth it was growing in its nursery container. Then lightly press the soil around the root ball so the shrub stands straight.
3. Plant the ivy closer to the edge. One plant can go at the front or side, and the second on the opposite side. Direct the shoots outward over the rim so they can hang down freely. There’s no need to spread them evenly around the entire planter — leave part of the edge open.
4. Water well after planting. The water should move through the soil and come out through the drainage holes at the bottom. After that, check the moisture with your finger about 1 inch (2.5 cm) deep. If the soil is dry at that depth, it’s time to water.
5. White pumpkins. Place one larger pumpkin at the base and two or three smaller ones nearby on the step. There’s no need to push them into the planter itself — it’s better to keep the pumpkins as a separate group beside it.
This kind of planter is easy to picture at the entrance of a small inn somewhere in Vermont or Massachusetts — a tall door, wooden steps, a pair of lanterns, and two matching planters on either side. If you have enough space, this is one of those cases where making a pair and placing them symmetrically makes sense. Then the focus shifts from the individual plants to the porch as a whole.
7. Cold Tolerant Cabbage and Kale Container
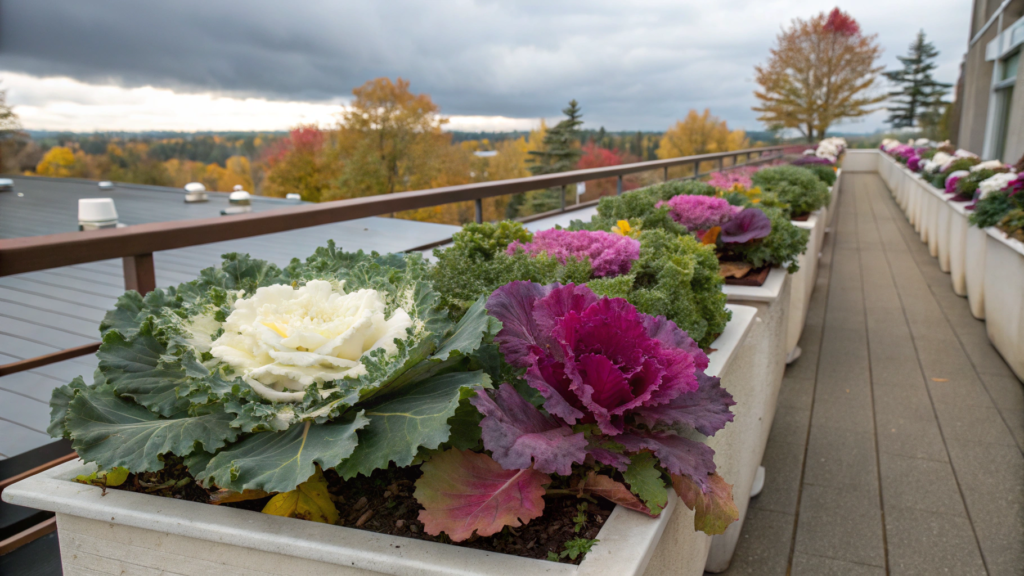
Ornamental cabbage and kale handle cooler temperatures and light frosts well, so they keep looking neat in fall planters for a long time, while the white, pink, and purple shades in the leaves become even brighter.
And the cold really does benefit these plants. After acclimating, some ornamental varieties can tolerate temperatures down to around 5°F (-15°C), although hardiness depends on the specific variety and growing conditions.
What you’ll need
- 1–2 ornamental cabbage plants. It’s better to choose large rosettes with white, pink, or purple centers.
- 1–2 ornamental kale plants. Choose varieties with wavy or ruffled leaves so they differ from the cabbage not only in color but also in shape.
- A wide outdoor planter with drainage holes.
- Container potting mix.
- Mulch for any exposed areas of soil that remain visible after planting.
How to make
1. Start by choosing plants in the right size. Ornamental cabbage and kale don’t grow as quickly after fall planting as plants do in spring. So at the garden center, it’s better to choose large, full rosettes that are already close to the size you want for your planter. It also looks better when the plants differ not only in color but in leaf shape.
2. Arrange the plants before planting. First, place them inside the planter while they are still in their nursery pots. You can shift the larger rosette slightly toward the back and place the kale with its more textured leaves closer to the front edge. If you have three plants, place the third one to the side. Perfect symmetry isn’t necessary here — the main thing is to keep the rosettes from sitting on top of each other.
3. Fill the planter with soil and plant everything. You can bury the stems up to the lower leaves so the rosettes sit firmly and don’t lean to one side. This is a common planting method for ornamental cabbage and kale. After planting, gently press the soil around the roots.
4. Water the planter well. The water should move through the entire soil mix and drain out from the bottom. After that, check the soil with your finger about 1 inch (2.5 cm) deep. If it feels dry at that depth, it’s time to water. In colder weather, the soil dries more slowly, so it’s better to judge by the soil itself rather than by the number of days since the last watering.
5. Place the planter in a sunny spot. Ornamental cabbage and kale develop better color with good light and cooler weather. Light frosts usually don’t harm them, and many varieties become even brighter after temperatures drop.
As the temperature drops, sugars build up in the leaves, helping the plant tolerate frost better, while the red, pink, and purple shades become more noticeable. I find these planters especially interesting to watch in fall — they can look brighter at the end of October than they did on the day you planted them.
8. DIY Stacked Pumpkin Planter
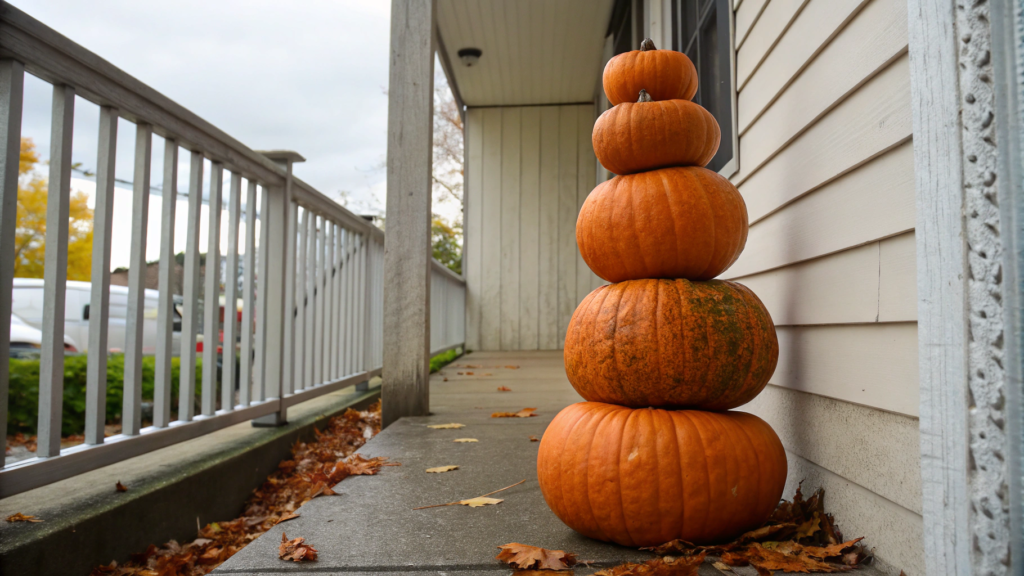
Pumpkins don’t have to be spread out across the steps or around a planter. You can stack them vertically, from the largest at the bottom to the smallest at the top. This kind of arrangement works well on a narrow porch because it doesn’t take up much space width-wise.
It’s better to choose slightly flattened varieties with a relatively even top. They sit more securely on top of each other. If the pumpkin stack stays in place without extra support, it’s better not to pierce the pumpkins — they will last longer that way.
What you’ll need
- 3–4 pumpkins in different sizes. The largest goes on the bottom and the smallest on top. Wide, slightly flattened pumpkins work best.
- A classic outdoor planter with a diameter slightly smaller than the bottom pumpkin.
- A short wooden dowel for extra support if the pumpkins don’t feel stable enough.
- Spanish moss for any small visible gaps between the pumpkins.
How to make
1. Start by building the stack on the ground. Place the largest pumpkin on the bottom, then the medium one, and only then the smallest. Don’t rush to move them into the planter. First, check how evenly they sit on top of each other and whether the upper part leans to one side.
2. Prepare the bottom pumpkin and the planter. The planter should be slightly narrower than the bottom pumpkin so the pumpkin rests on the rim instead of dropping inside.
3. Stack the pumpkins from largest to smallest. You can remove the stems from the top two pumpkins if they keep the next pumpkin from sitting flat. Add each pumpkin only after making sure the one below it doesn’t wobble.
4. If the stack feels stable, you can stop there. With real pumpkins, that’s actually preferable because you won’t need to pierce them. If the stack is wobbly, Pike Nurseries suggests securing it with a short wooden dowel sharpened at both ends and pushed through several pumpkins. This makes the arrangement more stable, but pierced pumpkins usually don’t last as long.
5. Fill any small gaps between the pumpkins. If you can see noticeable spaces between them, tuck in a little Spanish moss. There’s no need to pack it tightly — a few small pieces are enough where the pumpkins don’t fully touch.
6. Check the stability once the planter is on the porch. Place it on a flat surface and gently steady the top pumpkin with your hand. If the whole stack shifts with the base or noticeably leans, it’s better to take it apart and adjust the pumpkins instead of hoping it will stay in place.
There’s a practical side to this too — the whole stack of pumpkins takes up almost the same footprint as a single planter. That makes it especially useful for a small porch, where decor can quickly spread across the steps or get in the way. And if you find three pumpkins with really good shapes, you barely need anything else around them.
9. Front Porch Planter With Seed Pods
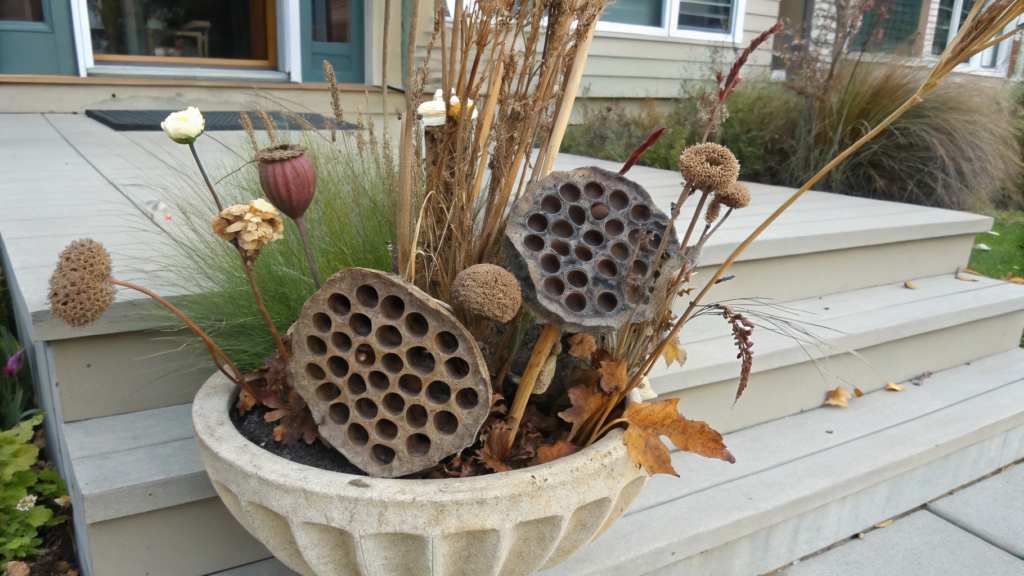
Dry seed pods, seed heads, and stems can be used in a fall planter instead of flowers. Dried lotus pods with their large round openings look especially striking — you can buy them already dried. And if you still have attractive seed heads or dry stems left in the garden, part of the arrangement can easily come from what you grew yourself.
We actually don’t rush to cut everything back in fall — some dried plants still look good for quite a while, and the seeds remain food for birds.
What you’ll need
- 1 foliage plant, for example heuchera. Choose one that fits the size of your planter.
- 5–7 dry seed pods or seed heads on stems. These can be lotus pods or dried seed stems from your own garden.
- 3–5 thin dry branches, for example birch or willow, if you want extra height.
- A planter with drainage holes.
- Container potting mix.
- If you don’t have your own dried pods, you can use dried lotus pods, for example, Dried Lotus Pods.
How to make
1. Start by planting the heuchera. Place it slightly closer to the front of the planter, leaving some open space behind it for the dry stems. Plant it at the same depth it was growing in its nursery container and gently press the soil around the roots.
2. Place the dry branches closer to the back of the planter. Thin birch, willow, or other branches with a nice shape will work. Don’t gather them into one tight bunch — a few separate branches will add height without blocking the heuchera in front.
3. Add the seed pods. Start with the three largest ones. Push their stems into the soil between the branches and the heuchera, but keep them at different heights. Leave one pod higher, bring another closer to the leaves, and shift the third slightly to the side. After that, add the remaining ones only where there is actually some open space.
4. Check how securely the dry stems are holding. The lower part of each stem should go deep enough into the soil so the pods don’t fall out from a light movement. If a stem is too short or brittle, it’s better not to use it on an open porch.
5. Water only the living plant. The dry pods obviously don’t need water. Pour water directly onto the soil around the heuchera and make sure it drains out through the holes at the bottom. If heavy rain hits the planter directly, check the dry elements from time to time — softened or damaged stems should be replaced.
In fall, these pods can sometimes look better than flowers. And if they grew in your own garden, they’re even more valuable. For us, that’s a pretty normal part of homestead life — let the plant go through its full cycle first, then find a use for what remains after flowering. And you definitely don’t need lotus for this: dry seed heads from many garden plants can look just as good.
10. Beginner Friendly Mum and Pumpkin Pot
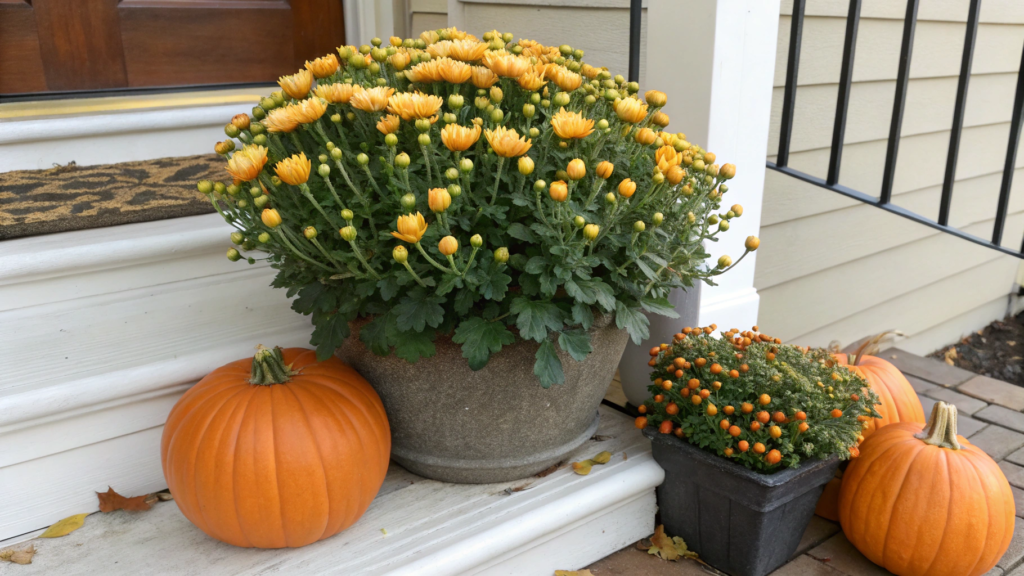
If you’re trying fall porch decorating for the first time, a mum and a few pumpkins are one of the easiest options to start with. It’s hard to go wrong here. One good-sized plant already brings plenty of color, while the pumpkins fill the space around the planter without needing any extra plants.
It’s better to choose a mum with plenty of unopened buds. It will keep blooming longer than a plant already covered in fully open flowers.
What you’ll need
- 1 medium or large mum with plenty of buds.
- 2–3 pumpkins in different sizes. You can use one larger pumpkin and a couple of smaller ones.
- An outdoor planter with drainage holes.
- Container potting mix.
How to make
1. First, test the mum in the planter. Place it inside while it’s still in its nursery container and see if the size works. The plant shouldn’t get lost in an oversized planter or, on the other hand, completely cover its edges.
2. Check the drainage and prepare the soil. The planter should have holes at the bottom so excess water can drain out after watering. Add enough soil so that after planting, the mum sits at roughly the same depth it was growing before.
3. Plant the mum and water it well. After planting, gently press the soil around the root ball. Keep watering until water starts coming out through the bottom. After that, check the soil with your finger about 1 inch (2.5 cm) deep. If it feels dry at that depth, it’s time to water the mum.
4. Arrange the pumpkins. Place the largest one at the base of the planter. One of the smaller pumpkins can go on a low plant stand or on a small upside-down planter, while the third stays on the floor nearby. If your porch has steps, you can use those instead of a stand. This keeps the pumpkins at different heights so they don’t all blend into one line.
If the mum is large and there are already two or three pumpkins around it, you can stop there. For your first fall planter, it’s better to start with a simple arrangement and then decide if you actually want to add anything else.
You can put this planter together in one go without learning complicated planting schemes or buying a dozen plants. From there, it’s easy to experiment — change the mum color, use white or green pumpkins, or choose a different planter. Getting a good result on the first try is much more enjoyable than turning your porch into a practice project.
How would you decorate your porch?
Fall decorating turns out differently for everyone, even when the starting plants are the same. Someone may already have an old copper planter on the porch, someone else has steps that seem made for pumpkins, while another person may be starting with just one empty corner by the door.
I really enjoy looking closely at how different people approach it. If you liked any of these ideas, tell me in the comments what you chose and what you ended up changing on your own porch. You can even share what was already growing at home and what you didn’t have to buy.
Those little details are often more useful than any perfect picture.