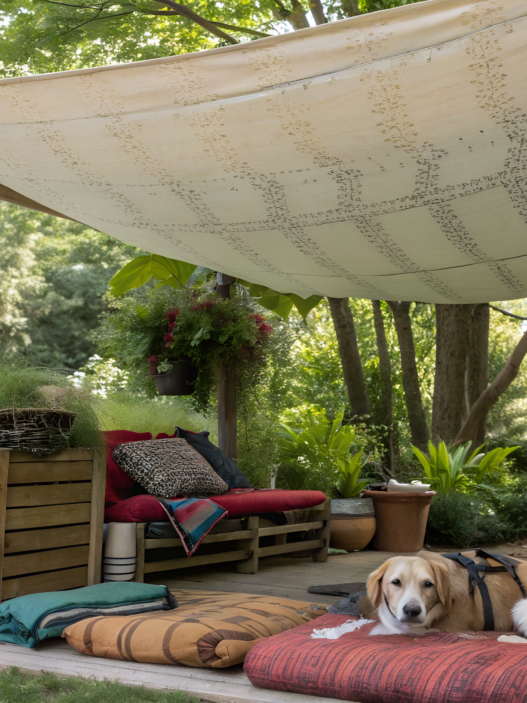
DIY shade outdoor is great for those moments when you have a patio, the furniture is in place, everything looks pretty… but during the day, it’s impossible to sit there under the direct rays of the sun.
A shade cover does not have to be expensive. Sometimes, fabric, rope, a bamboo shade, PVC pipes, or a simple lattice panel are enough to make an ordinary corner of the yard much more pleasant. It is important to choose calm colors, stretch the material neatly, not overload the structure, and think about how the sun moves throughout the day.
Here are 10 simple ways to make shade on your patio yourself — without a huge budget and without the feeling that it is a temporary structure for one day.
1. Drop Cloth Curtain Canopy With Grommets
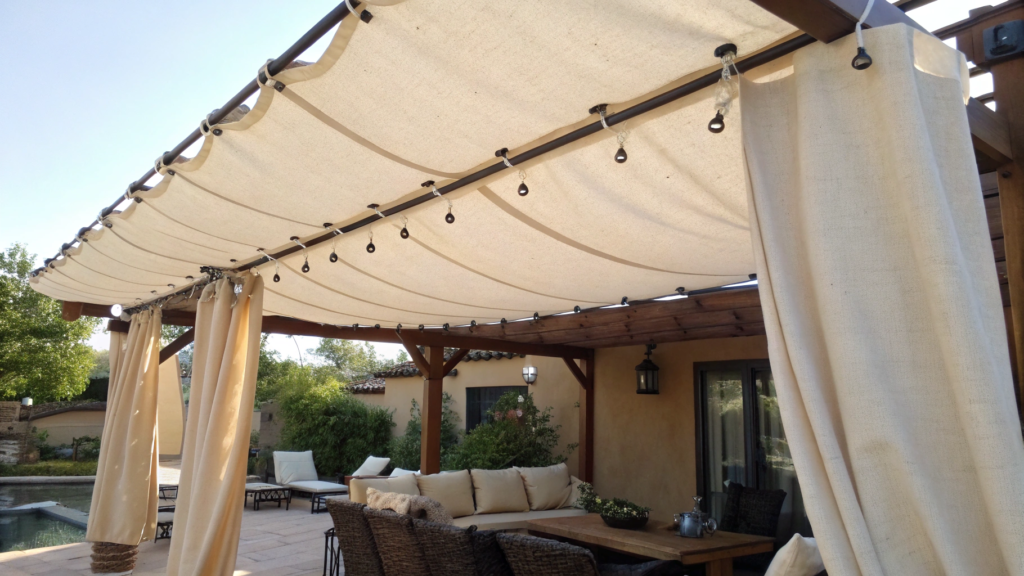
A drop cloth canopy with grommets is fairly simple to make. You take a thick drop cloth, add grommets, stretch it over the seating area — and the patio immediately becomes more pleasant and easier to live in.
Here, you do not need to build a full pergola or buy expensive outdoor curtains. Everything is much simpler: fabric, fasteners, rope, and a little patience.
Drop cloth has a pleasant, slightly rough texture that gives it a more expensive, natural look. This kind of fabric does not have to hang perfectly straight. A slight wave even makes it more beautiful.
What You’ll Need
- Thick drop cloth about 9 x 12 ft (around 2.7 x 3.6 m). This is usually enough for a small seating area, for example Trimaco SuperTuff Canvas Drop Cloth on Amazon
- Grommet installation kit. It is better to use metal grommets about 1/2 inch (around 1.3 cm), so the rope can pass through them easily
- Strong outdoor rope about 1/4 inch thick (around 6 mm). A rope that is too thin can cut into the fabric
- Carabiners or S-hooks, if you want to quickly remove the canopy during wind or rain
- Hooks, screw eyes, or wall mounts — depending on where you will fix the canopy
- Tape measure, pencil, scissors, and hammer for marking and installing the grommets
- Water-repellent fabric spray, if desired
How to Make It
- Choose the place where shade is really needed.
Look at the patio during the hottest hour of the day and mark where the sun bothers you the most. Do not try to cover the whole yard at once. Often, it is enough to create shade over the table, chairs, or a small seating area. - Lay out the fabric and check the size.
Lay the drop cloth on the floor or on the grass and roughly estimate how it will hang. If the fabric is too wrinkled, you can lightly iron it, but there is no need to make it perfect. The natural texture is valued here. - Mark the spots for the grommets.
At minimum, you need grommets in the corners. If the fabric is large, add a few more along the long sides, spaced about 24–30 inches (60–75 cm) apart. Step back from the edge about 1.5–2 inches (4–5 cm), so the fabric does not tear under tension. - Install the grommets.
Make holes according to your marks and secure the grommets following the instructions in the kit. If the fabric seems thin, you can reinforce the attachment points with small pieces of fabric on the back side. This helps the canopy last longer. - Secure the hooks or attachment points.
Use the house wall, wooden posts, a fence, or an existing structure. The main thing is to attach the canopy to a reliable base, not to a weak decorative rail. Fabric acts like a sail in the wind, and it is better to keep that in mind right away. - Stretch the fabric with a slight slope.
Thread the rope through the grommets or use carabiners. First secure one side, then the opposite side. Do not stretch the fabric like a drum. A small soft sag looks more beautiful, but one edge should be slightly lower so water does not collect in the center after rain. - Check the shade after an hour.
The sun moves, and it is easy to forget that. Look at where the shade falls after some time. Sometimes it is enough to raise or lower one corner by a few inches for the canopy to become much more useful. - Add a couple of simple details.
Large planters, wooden furniture, calm pillows, and a warm string light look good next to this kind of canopy. Do not overload it. The fabric itself already gives a soft, expensive effect.
Small Tips
This kind of canopy is better to remove during strong wind. Even thick fabric can stretch or tear near the grommets if you leave it tightened during bad weather. That is why a carabiner system is very convenient here: you remove it in a couple of minutes — and stop worrying.
And do not treat this option as a full roof from rain. Drop cloth gives shade, softens the sun, and makes the patio more pleasant, but after heavy rain, it can get wet and become heavier.
It is better to choose fabric that is not too thin. If the description includes weight, aim for about 8–10 oz. Lighter options may look nice in the package, but can turn out almost transparent in the sun.
Personally, I like this idea because it does not require a big budget and quickly turns an ordinary corner of the yard into a summer seating area, where you already want to sit in the shade and finally stop squinting every five seconds.
2. Sail Shade Made From Painter’s Plastic and Rope
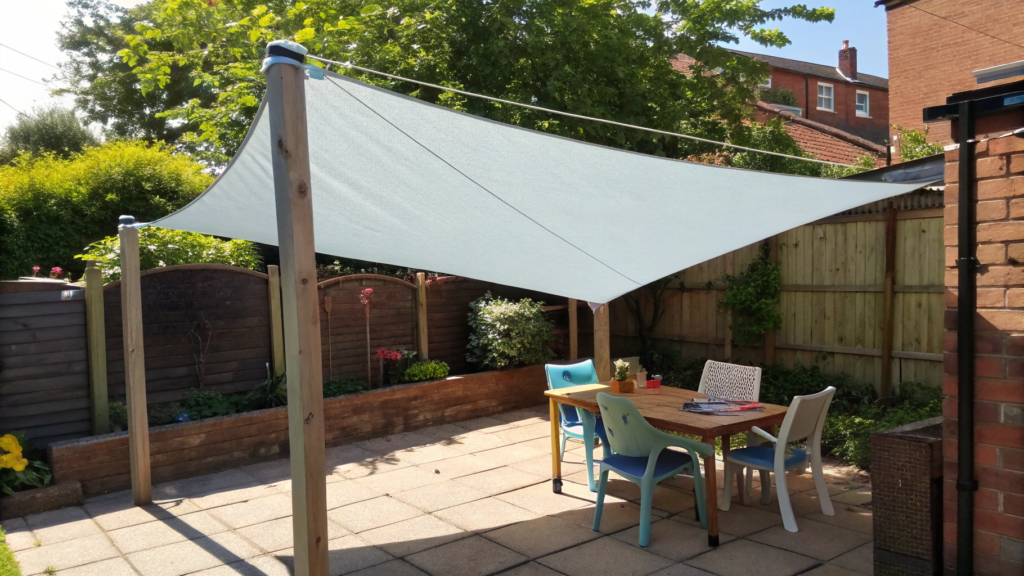
In this option, there is no expensive fabric, metal frame, or complicated hardware. Just thick painter’s plastic, rope, and a few attachment points.
If you try to choose plastic that is not the thinnest kind and stretch it properly at an angle, you get a fairly neat temporary shade cover. Especially for an area with garden chairs, a kids’ table, a small patio, or a spot where the sun hits hard during a certain part of the day.
This is a quick temporary solution that you can put together in one evening, take down before strong wind, and replace as soon as the plastic gets old.
What You’ll Need
- Thick painter’s plastic. It is better to choose something more durable, not thin disposable plastic, around 3–4 mil. It holds its shape better and tears less when stretched
- Strong outdoor rope about 1/4 inch thick (around 6 mm)
- Carabiners or S-hooks, if you want to quickly remove the shade
- Fasteners for walls, posts, or a fence: screw eyes, hooks, or existing attachment points on the structure
- Scissors or a utility knife
- Wide strong tape for reinforcing the corners
- Fabric clips or small clamps, if you do not want to make holes in the plastic
How to Make It
- Choose a place for the shade.
This kind of shade is better to set up not over the whole patio, but over a specific area: a table, chairs, a bench, or a kids’ corner. First, look at where the sun comes from, and only then decide where to stretch the plastic. - Cut the plastic to the right size.
Lay the plastic on the ground and cut a piece with some extra room. For a small area, about 8 x 10 ft (around 2.4 x 3 m) is usually enough. A piece that is too large will catch more wind, and then it is no longer shade, but a sail with attitude. Better not. - Reinforce the corners.
Stick wide tape on each corner from both sides. This is needed so the plastic does not tear where the tension will be. If you want to make holes for the rope, make them only after reinforcing the corners. - Prepare the fasteners.
Find four points: the house wall, a fence, wooden posts, a pergola, or supports. It is better to make one corner lower than the others, so water does not collect in the middle after rain. - Secure the plastic with rope or clips.
You can thread the rope through the reinforced corners, or you can fix the plastic with clips and tie the rope to them. The second option is gentler on the material and often lasts longer. - Stretch the shade.
The plastic should hold its shape, but it should not be stretched to the limit. Leave a little give, otherwise the corners will start tearing with the first gust of wind. - Check the shade and adjust the angle.
After 30–60 minutes, look at where the shade has moved. Sometimes you just need to lower one edge or slightly turn the shade so it starts covering the exact place where people actually sit.
A Few Things to Know Before Installing
Painter’s plastic does not look as expensive as fabric, so neat installation matters a lot here. If the edges are flapping, the corners are crooked, and the ropes are hanging messily, it will feel like a temporary patch. But if you stretch it evenly, the result can look much more decent than you expect.
Do not leave this kind of shade up in strong wind. The plastic is light, and it quickly starts flapping, stretching, and tearing. It is better to use carabiners or clips, so you can remove the shade in a couple of minutes.
Clear or semi-clear plastic mostly softens the sun rather than blocking it completely. For a very hot spot, it is better to use white or milky plastic if you can find it in the right thickness. Then the light will be diffused, and sitting under the shade will feel much more pleasant.
As you can see, a sail shade made from painter’s plastic and rope is not the most long-term or the most designer-looking idea, but it quickly gives shade where it was impossible to sit just yesterday. It is a good fit for a rental home, a temporary summer solution, or a first test before a more expensive shade cover. And later, you can decide whether it is worth investing in something more permanent.
3. Bamboo Reed Roll Shade on a Wire Line
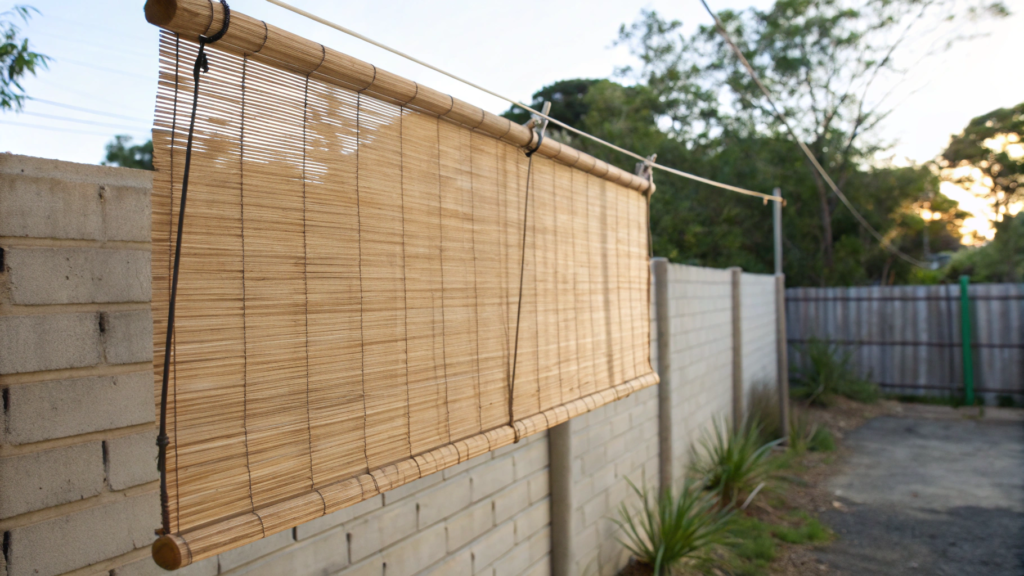
A bamboo reed roll shade on a wire line brings in natural texture, soft shade, and the feeling of a more closed-off corner, even if there is just a regular fence, concrete, or an empty wall around it.
Bamboo does not block everything completely, and it lets a little light through beautifully. You get not a dark box, but a light partial shade.
What You’ll Need
- Bamboo roll-up shade in the width you need. For a patio, it is often convenient to use one that is 4–6 ft wide (around 1.2–1.8 m), but it all depends on the area. For example, Radiance Cordless Bamboo Roll-Up Shade on Amazon
- Wire rope or a strong coated steel line. It is better to choose an outdoor option so it does not rust too quickly
- Two screw eyes or hooks for attaching the wire
- A wire tensioner, if desired, if you want to make the line more even
- Carabiners, S-hooks, or metal rings to hang the shade from the wire
- Tape measure, pencil, and level to measure everything neatly
- Drill or screwdriver, if you are attaching it to wood, a wall, or posts
How to Make It
- Find where the side sun comes from.
Look at the patio in the morning or evening, when the sun comes in at an angle. This is where a bamboo shade is most useful: along a fence, at the edge of a pergola, near a dining table, or next to chairs. - Measure the width of the area.
You do not have to cover the whole side completely. Sometimes one 4 ft wide shade (around 1.2 m) is enough to block the most annoying light. If the area is large, you can hang two shades next to each other, but leave a small gap between them so everything does not look too heavy. - Attach the wire between two points.
These can be wooden posts, a pergola beam, a strong wall, or fence posts. The wire should run straight and high enough so the shade does not block the walkway. It is usually convenient to hang it at about 7–8 ft high (2.1–2.4 m). - Tighten the line well.
If the wire sags, the shade will also hang crooked. Use a tensioner or just tighten the fasteners by hand. It does not have to be perfect, but there should not be a strong sag. - Hang the bamboo shade.
Attach it with carabiners, rings, or S-hooks. This method is convenient because you can remove the shade if strong wind starts or if you want to put it away for winter. - Check how it rolls down and up.
Unroll the shade fully and see if it catches on furniture, planters, or the edge of the table. If it swings too much at the bottom, you can add small side ties or hooks to fix it in place. - Add plants or warm light nearby.
Bamboo looks beautiful next to large planters, greenery, wooden furniture, and string lights.
Before You Attach It
A bamboo shade is not solid sun protection, but more like a light filter. It gives a pleasant partial shade, but it will not block the sun as strongly as thick fabric or a special shade cloth.
Do not leave it lowered in strong wind. Bamboo is light, but a long shade can start swinging, hitting the wall, or stretching the fasteners. If it is often windy where you live, it is better to make a removable attachment with carabiners and put the shade away when the weather becomes unpredictable.
I would suggest choosing a more natural, slightly muted bamboo. It goes better with wood, stone, white walls, and black metal furniture.
A bamboo reed roll shade on a wire line gives you a way to hide from side sun. What is especially nice is that the whole setup stays light: you want it down — you lower it, you want it up — you raise it, the wind starts — you remove it. Convenient and beautiful.
4. Pergola Look Frame Built From EMT Conduit
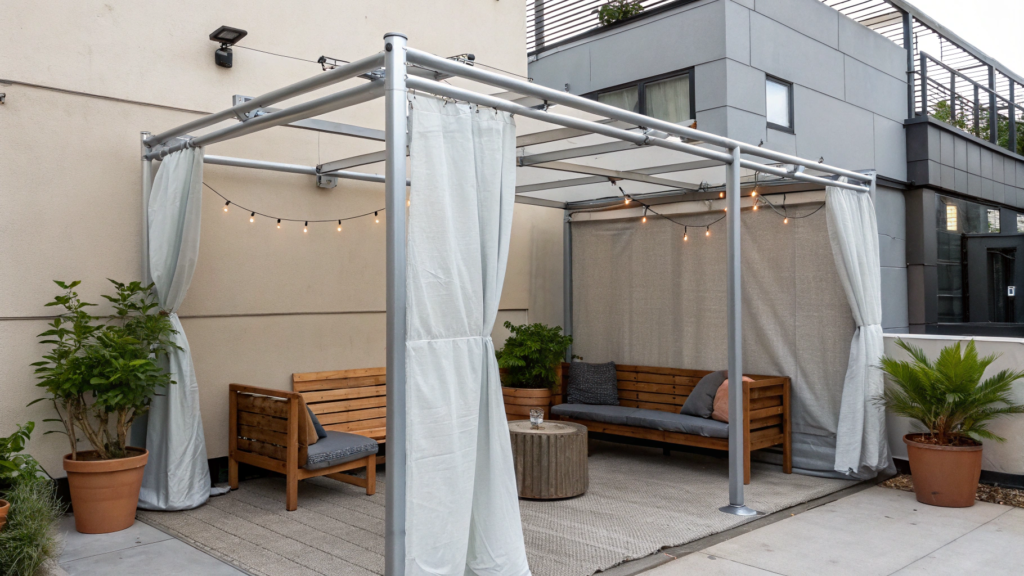
When you want to do more than just stretch fabric between a wall and a fence, and you want to create a clear shape over the seating area, a frame built from EMT conduit can be really useful. Then it is easy to add fabric, light mesh, curtains, or even string lights on top.
The result does not feel like something temporary for sun protection, but more like a minimalist metal pergola. Especially if there are potted plants, wooden furniture, or light fabric on top nearby.
What You’ll Need
- EMT conduit with a diameter of 3/4 inch or 1 inch (around 19–25 mm). For a small frame, 3/4 inch is usually more convenient, but if the structure will be wide, it is better to use 1 inch
- Corner connectors for conduit or metal fittings to assemble the top frame
- Mounts for securing the pipes to a wall, deck, wooden posts, or heavy bases
- Shade fabric, shade cloth, or thick outdoor fabric for the top part
- Clamps, carabiners, or strong zip ties to secure the fabric to the frame
- Pipe cutter or metal hacksaw, if you need to adjust the length
- Tape measure, marker, and level so the frame does not turn out crooked
- Black or matte spray paint for metal, if desired, to create a more expensive look
How to Make It
- Decide on the size of your future “pergola.”
First, measure the area you want to cover. For a small patio, a frame of about 6 x 8 ft (around 1.8 x 2.4 m) is often enough. It is better not to make it too large the first time: the wider the structure, the more important rigidity and secure fasteners become. - Plan four support points.
The frame can be attached to a wall and two front posts, placed on four posts, or tied into an existing structure. The main thing is that the base is reliable. EMT conduit is lightweight, but the fabric on top will catch wind. - Cut the conduit to the needed size.
Mark the length with a marker and carefully cut it with a pipe cutter or hacksaw. After cutting, it is better to remove sharp edges so they do not cut the fabric or scratch you during assembly. - Assemble the top rectangular frame.
Connect the pipes with corner fittings. Check the diagonals or at least use a level, so the shape does not turn into a strange rhombus. A small inaccuracy is not a big deal, but a straight frame always looks more expensive. - Secure the posts or supports.
If the frame stands on its own, secure the vertical pipes well. You can use mounts on the deck, heavy bases, or wooden posts as supports. Do not leave the structure simply “standing on trust.” - Paint the conduit if you want a more finished look.
Gray metal looks fine, but matte black paint often makes the frame look much neater. It is better to paint before the final installation so you do not have to struggle with corners or spray the patio. - Attach the fabric on top.
Stretch shade cloth or thick fabric over the top frame. Secure it with clamps, carabiners, or zip ties. Do not pull it too tight: the fabric should sit evenly, but still have a little room to move. - Add simple details.
String lights, light side curtains, hanging planters, or climbing plants in containers work well on a frame like this. Just do not overload it. The simpler the structure, the more expensive it looks.
So It Does Not Look Like a Temporary Structure
If your pipes are different lengths, the fabric sags at strange angles, and the fasteners stick out in every direction, the frame quickly starts to look like a utility structure. But if you paint the metal one color, stretch the fabric neatly, and hide the extra ends of the zip ties, the whole thing immediately looks much better.
Do not make the top too heavy. An EMT frame is good for light shade, not for a massive roof. Fabric, shade cloth, thin slats, or a light string light — yes. Heavy panels, wet tarp, or large hanging elements — better not.
Do not forget about wind. Even simple fabric on top can create a strong load. If you often get gusts of wind, it is better to make the top part removable: secure it with carabiners or zip ties that are easy to cut and replace.
5. Outdoor Curtain Rod Shade Using Fence Posts
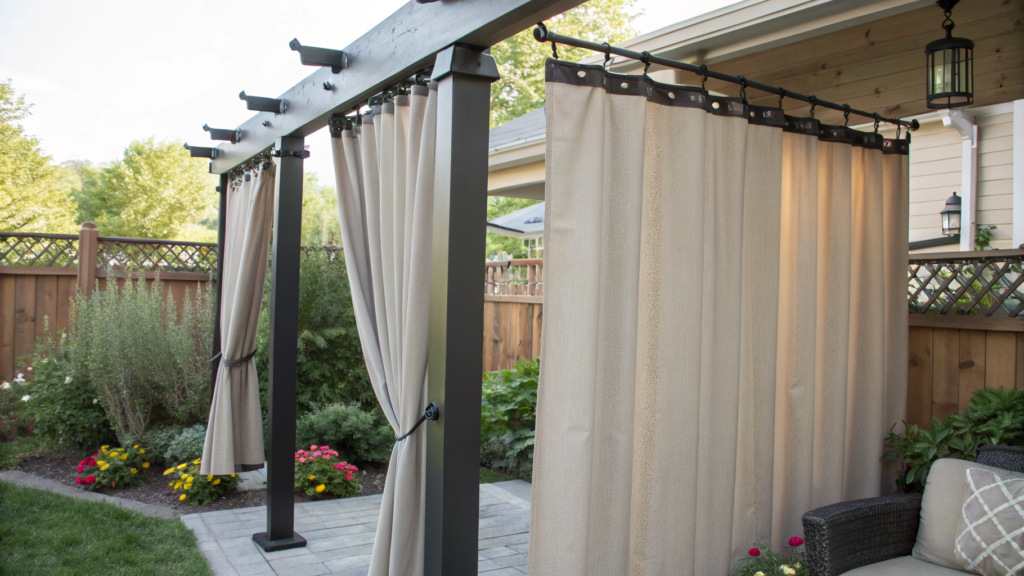
This idea is good in places where there are already fence posts or strong vertical supports nearby. You simply use the existing base, add a curtain rod, hang outdoor curtains — and it is ready. And it looks much more interesting than hard panels or stretched tarp.
This option makes sense for patios where the sun comes from the side, not only from above. You can keep the curtains open when the light is soft, and close them exactly when you want more shade.
What You’ll Need
- Outdoor curtain rod or a strong metal pole of the right length
- Outdoor curtains made from thick fabric. It is better to choose options that are suitable for outdoor use and are not afraid of sun and moisture
- Curtain rod brackets
- Fence posts or other strong vertical supports
- Screws, anchors, or bolts — depending on the material of the supports
- Tape measure, pencil, and level
- Screwdriver or drill
- Curtain tiebacks, if desired, if you want to fix them on the sides
How to Make It
- Choose the side where the curtains will actually be useful.
Look at where the sun most often comes from and where you want a little more privacy. Usually, this option is good for the side of the patio, near a table, small sofa, or chairs. - Measure the distance between the supports.
Measure the width between the fence posts or other attachment points. Think right away about whether the curtains will simply hang freely or whether you want them to gather nicely on the sides. - Attach the curtain rod evenly.
Install the brackets and check the level. Even a small tilt will be noticeable later, especially when the curtains are closed. A straight line affects the overall look. - Hang the curtains.
Put them on the curtain rod and check how they move. They should open and close easily, without catching or pulling too much. - Check the length.
The curtains can almost touch the floor or end slightly above it. If they drag across the deck or ground, it will quickly ruin both the fabric and the overall look. - Add side fixation.
If the curtains will usually stay open, plan tiebacks or hooks right away. This way, everything will look neater, and the fabric will not keep flying around with every movement of air. - See how it performs throughout the day.
Sometimes closing only one side is enough to make the seating area much more comfortable.
Where This Idea Makes the Most Sense
As I already mentioned above, this option is good where there is already a fence, posts, or wooden supports that can easily hold a curtain rod. If there is an empty open space nearby without a proper base, the structure becomes more complicated and loses some of its simplicity.
It is also important not to choose curtains that are too thin or too “indoor-looking.” It is better to choose thick outdoor fabric right away, something that holds its shape and does not look tired after a couple of weeks.
If the curtains are a neutral color — milky, sandy, light gray — the whole area usually looks more elegant and expensive. Too-active patterns and bright colors here often make the picture look cheaper rather than decorate it.
There is no feeling of a temporary structure here, because the curtains immediately add softness, depth, and the feeling that this place is truly being used. And that is exactly what makes even a simple corner of the yard more attractive.
6. String Light Canopy With UV Shade Fabric Panels
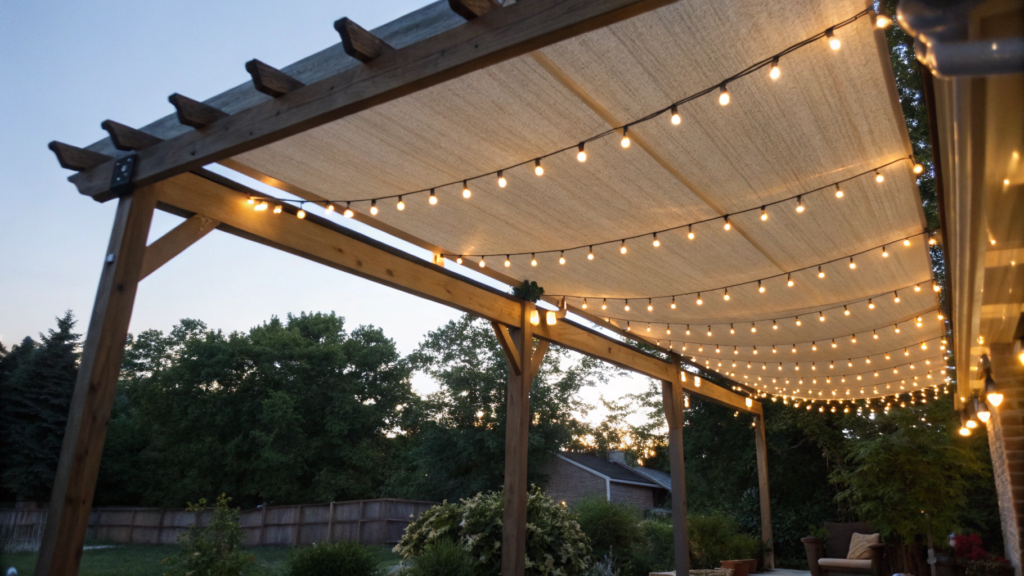
A string light canopy with UV shade fabric panels does not require a heavy structure. If you already have a pergola, posts, fence supports, or at least two reliable attachment points, you can create a very pretty canopy without a big budget.
What You’ll Need
- Outdoor string lights with warm light. It is better to choose an option made specifically for outdoor use, with moisture protection and a strong cable. For example, Brightech Ambience Pro Outdoor String Lights on Amazon
- UV-protective fabric panels or shade cloth. It is better to choose fabric in a neutral color: sandy, light gray, or milky
- Strong cable, rope, or metal line for tensioning
- Carabiners, rings, zip ties, or clips for attaching the fabric
- Hooks or screw mounts for walls, beams, or posts
- Tape measure, scissors, and pencil
- Screwdriver or drill, if you need to install mounts
- Hem tape or grommets, if desired, if you want to make the panels neater and more durable
How to Make It
- Decide which area you want to cover.
It is better to understand right away where exactly you need shade: over a dining table, small sofa, chairs, or a soft seating corner. Do not try to cover too large an area if the supports are not very reliable. - Prepare the attachment points.
These can be pergola beams, posts, the house wall, or a strong fence. First, stretch the main lines that will hold the string lights and fabric panels. - Place the string lights.
Hang them so they run along the edges of the canopy or softly cross the space overhead. Use only outdoor string lights designed for moisture and weather changes, and do not press the bulbs right against the fabric. It is better to leave a small gap so the fabric does not touch the bulbs, especially if the lights stay on for a long time in the evening. This way, the canopy will be both beautiful and safe. - Cut the fabric into separate sections.
It is more convenient to use not one solid piece, but several separate strips or sections. This makes the canopy look lighter, and the fabric pulls less on the structure and handles wind more calmly. - Attach the panels on top.
Secure the fabric to the stretched lines with carabiners, zip ties, or clips. Leave small gaps between the panels so the structure looks lighter and does not catch as much air. - Create a slight slope.
If one side is slightly lower than the other, the fabric will look more natural, and water will not collect in the center after rain. - Check the look during the day and evening.
During the day, see if there is enough shade. In the evening, turn on the string lights and check whether the fabric blocks the light too much. Sometimes it is enough to move one panel slightly, and everything looks much better.
What to Pay Attention To
A lot in this idea depends on the color of the fabric and the type of light. If you choose fabric that is too bright or cool white string lights, the patio quickly loses the soft effect this whole idea was made for. Calm fabric shades and warm light look much more pleasant.
Do not make the panels too wide and heavy. Several separate sections almost always look neater than one large sagging piece of fabric. And it is better to keep the lines simple: straight fabric, clean fasteners, no extra decor.
If you often have strong wind, it is better to make the panels removable. You take them down in a couple of minutes — and you do not have to worry that the fabric will start pulling the whole structure with it.
During the day, a string light canopy with UV shade fabric panels makes the patio comfortable, and in the evening it adds soft lighting and a cozy feeling. And this is exactly where you want to stay a little longer, spend time alone with yourself, or have an evening with friends.
7. Tarp and Paracord Triangle Shade Over Seating
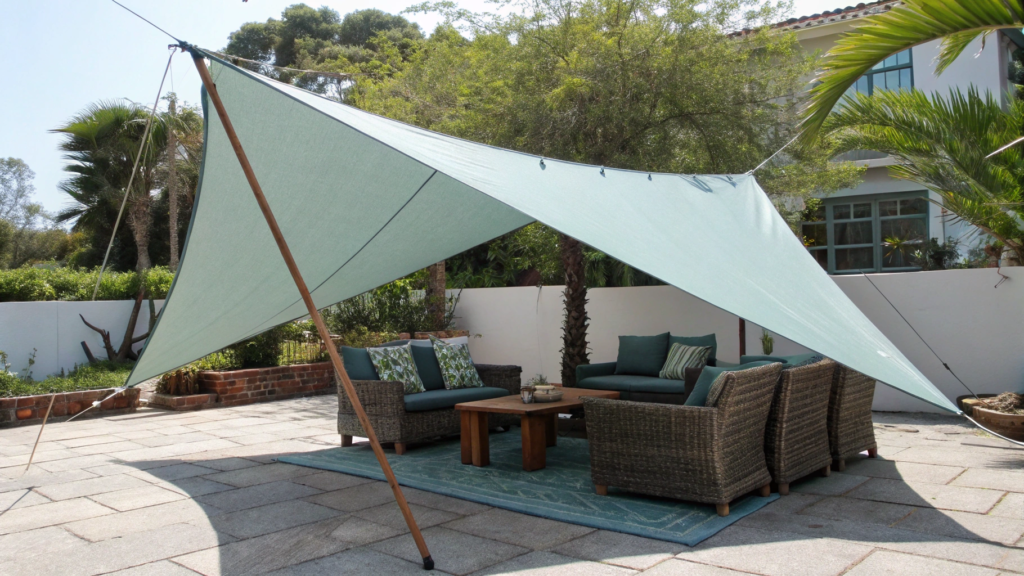
A tarp and paracord triangle shade is inexpensive, fairly simple to put together, and still looks much neater than you might expect from an ordinary tarp.
The triangle shape is convenient because it looks lighter than a square canopy and is often easier to stretch between three attachment points. And if you choose a tarp in a calm color, everything looks quite intentional and pretty.
What You’ll Need
- A tarp in the right size, preferably triangular, or a regular one that can be used neatly as a triangle shade. For a small area, a side length of about 8–10 ft (around 2.4–3 m) is usually enough
- Paracord or another strong outdoor cord
- Three reliable attachment points: posts, supports, a fence, a tree, a beam, or a wall
- Carabiners or strong hooks for attaching
- Rope tensioners, if desired, if you want to adjust the tension more easily
- Tape measure and scissors
- Metal stakes or anchors, depending on the situation, if you need to create one of the attachment points separately
How to Make It
- Choose the area you want to cover.
First, place the chairs, bench, or table where they will actually stand. Then look at where the sun bothers you the most and figure out how to position the triangle shade so the shadow falls exactly over the seating area. - Find three attachment points.
This is the base of the whole idea. It is best if the points are at different heights: this makes the canopy look lighter, and rainwater will not collect in the center. The main thing is that the supports are strong, not decorative. - Prepare the tarp.
Lay it out on the ground, check the size, and see which position will stretch the neatest. If the tarp already has reinforced corners with grommets, that makes the job much easier. - Secure the first corner.
Tie one corner of the tarp to the most convenient point. Do not tighten everything all the way right away. It is better to build the general shape first. - Pull the second and third corners.
Secure the remaining sides with paracord and carabiners. Tighten gradually so the tarp does not twist. It should hold its shape, but not be stretched too hard. - Create a slight slope.
It is better to leave one corner a little lower. This helps both visually and practically: after rain, water will not hang in a big pocket in the middle. - Check the shade and comfort.
Sit under the canopy and see if there is enough shade, whether it blocks the walkway, and whether it hangs too low above your head. Sometimes a small change in the tension angle makes the whole structure look noticeably better.
How to Avoid Annoying Mistakes
The most common mistake here is choosing too large a tarp for a small area. It seems like more shade is always better. In reality, a large tarp catches more wind, sags, and starts to look heavy. For two chairs or a small bench, a compact size is better than a huge piece of material over half the yard.
I would choose calm shades: sandy, gray, muted green, beige. A bright blue or acid-orange tarp also gives shade, but it will look simpler and cheaper.
And as always, do not forget about wind. Even a good tarp with a good cord is better to remove or loosen if strong gusts are expected. Especially if the attachments are fixed to a fence or a structure that is not very massive.
8. Upcycled Bed Sheet Shade With Clothespin Clips
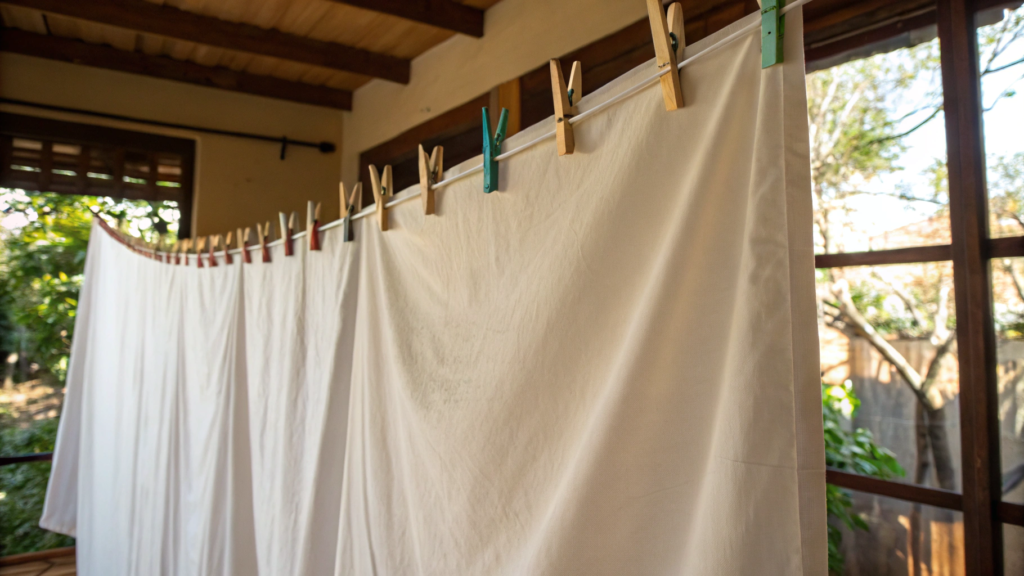
An upcycled bed sheet shade with clothespin clips sounds very simple and homey. But if you use a solid-colored sheet, stretch it neatly, and do not overload everything with extra details, it turns out much nicer than you might expect.
By the way, this option is easy to redo without feeling bad about it. Do not like how it hangs? Stretch it again. Is the sheet too long? Fold it under. Need to remove it for the evening or before the wind? Take it down in a couple of minutes.
What You’ll Need
- An old bed sheet — preferably thick, solid-colored, light, or in a calm natural shade. For a small area, a Twin or Full size is convenient
- Large clothespin clips or utility clips that hold fabric firmly
- Rope or strong cord for stretching
- Attachment points: a fence, posts, pergola, tree branches, or wall hooks
- Scissors, if needed
- Hooks or carabiners, if desired, if you want to make the structure easier to remove
How to Make It
- Choose the place where shade is needed most.
It is better to understand right away what exactly you want to cover: a bench, a couple of chairs, a lounger, or a corner by the wall. For a large area, a bed sheet is usually too small, but for a compact zone, it works well. - Stretch the rope between the attachment points.
Make one or two lines, depending on how you want to place the fabric. If the shade will be overhead, it is better to plan a slight slope right away so the fabric does not sag too much. - Prepare the bed sheet.
Smooth it out and see which side is better to hang. If the fabric is very thin, you can fold it in half. The shade will become denser, and the canopy itself will look neater. - Secure the fabric with clothespins or clips.
Fix the sheet to the rope, spreading the fabric evenly. Do not attach it only by two corners — it is better to add several fixing points so the material does not flap around or gather into a shapeless bag. - Tighten and straighten the shade.
Gently stretch the fabric. A small soft wave looks fine, but too much sagging already ruins both the look and the shade itself. - Check how the shade falls.
Look at the canopy after some time. Sometimes it is enough to move one edge slightly or change the height of the attachment to get noticeably more shade. - Add simple side fixation, if desired.
If the fabric hangs too loosely, you can secure the sides with extra clips or tie them with cord. This will make the structure look more finished.
A Few Things to Know Before Installing
Again, simple solid-colored fabric looks best here. If you use a sheet with bright colors, tiny flowers, or a pattern that is too active, the shade quickly starts to look less like a stylish backyard idea and more like a random thing you just hung out to dry.
A bed sheet is not outdoor fabric. It does not like heavy rain, constant moisture, or strong wind. So this option is better for dry weather, calm days, and temporary use. Hang it for the day, take it down in the evening — that is where it feels most appropriate.
Try to use large neat clips, not random small laundry clothespins in every color at once. The whole structure looks much better that way, believe me.
This is how a simple idea can help on a hot day without requiring almost any money. Hang it quickly, get shade, make the yard more pleasant — and that can already be enough to make you want to sit outside a little longer.
9. PVC Pipe Shade Frame With Removable Fabric Top
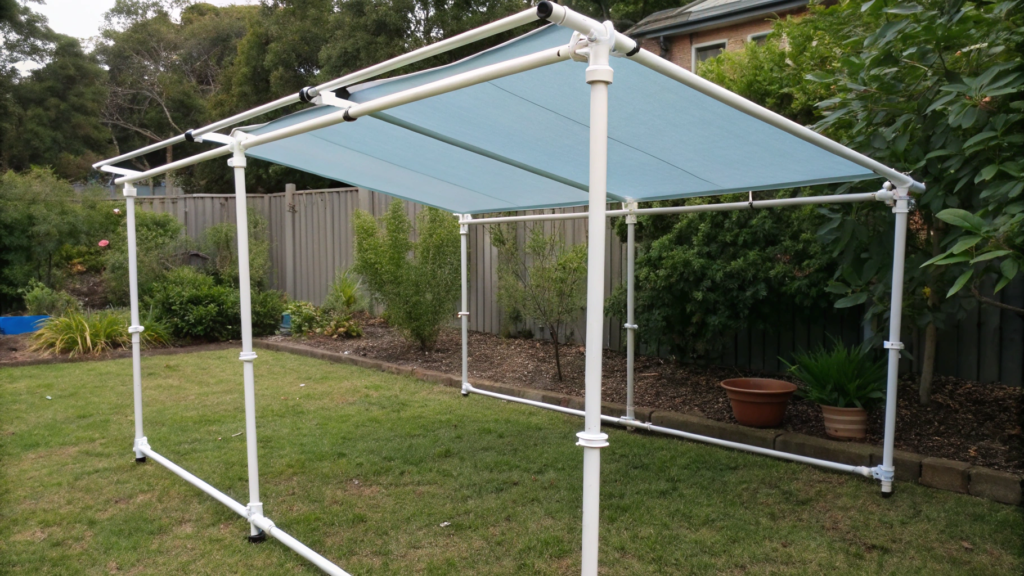
A PVC pipe shade frame with a removable fabric top helps you avoid depending on a wall, fence, or already existing pergola. The PVC pipe frame itself is fairly easy to assemble, and the fabric top can be removed if the wind picks up, rain starts, or you simply want to take the canopy down for a while. And that is already much more practical than a structure where everything is fixed permanently and then gets in the way at the worst possible moment.
What You’ll Need
- PVC pipes with a diameter of 3/4 inch or 1 inch (around 19–25 mm). For a small structure, 3/4 inch is usually enough, but for a wider frame, it is better to choose a thicker option
- PVC elbows and tees for assembling the frame
- PVC glue, if desired, if you want to make some of the connections permanent
- Thick fabric for the top — outdoor fabric, a thick curtain, canvas, or shade cloth
- Clips, zip ties, Velcro, or grommets for attaching the fabric
- Tape measure, marker, and hacksaw or a special PVC cutter
- Sandpaper for smoothing the edges after cutting
- Base weights, if desired: heavy planters, concrete blocks, sandbags, or attachment to the deck
How to Make It
- Decide on the size of the canopy.
First, measure the area you want to cover. For two chairs or a small table, a structure of about 6 x 8 ft (around 1.8 x 2.4 m) is often enough. It is better to start with a compact size than to build a frame that is too large right away. - Cut the pipes to the needed sizes.
Mark the length with a marker and carefully cut the pipes. After that, lightly sand the edges so they are even and do not catch on the fabric. - Assemble the top and side parts of the frame.
Connect the pipes with elbows and tees to create a simple rectangular structure. It is better to assemble everything without glue first, check the sizes, and only then decide which connections should stay removable and which ones should be fixed. - Place the frame where it will stand.
Put the structure over the seating area and check whether it stands evenly. If the patio is open and windy, think right away about base weights or extra fixation. - Prepare the fabric top.
Cut the fabric to size with a little extra room. The top can be made as one piece or two strips for a lighter look. Calm shades — milky, sandy, light gray — usually look best. - Attach the fabric to the top part.
Use clips, zip ties, Velcro, or grommets. The most convenient thing here is that the top should come off easily, without extra fuss. Then the canopy will actually be convenient to use, not just something to admire from a distance. - Check the stability and amount of shade.
See how the shade falls throughout the day, whether the fabric sags, and whether the structure wobbles. Sometimes it is enough to tighten the top a little or move the frame a few inches for the result to look noticeably better.
What to Keep in Mind
PVC pipes are light, affordable, and easy to assemble. But because they are light, this kind of structure does not like strong wind. So for open areas, it is better to plan a removable top and a more stable base right away.
It is also not worth making the frame too tall. If the canopy goes too high, there is less shade, and the structure itself looks less cozy. For a small area, a height of about 7 ft (around 2.1 m) is usually enough, sometimes a little more.
10. Lattice Panel Roof With Shade Cloth Staples
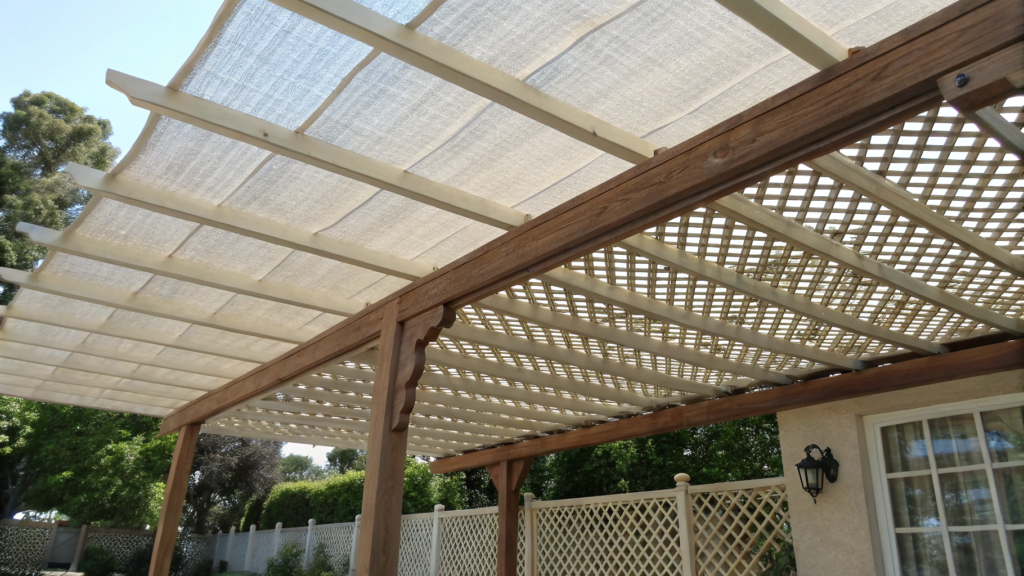
In this option, a regular lattice panel becomes the base, and shade cloth is attached to the top or bottom of it. In the end, you get a light structure that gives shade, lets air through, and does not create the feeling of a “closed box.” The light still passes through softly, a light breeze moves through, and there is a neat covering overhead that often makes the yard look visually more expensive.
What You’ll Need
- Outdoor lattice panel. You can use wood or vinyl. The size is often around 4 x 8 ft (around 1.2 x 2.4 m)
- Sun shade fabric or shade cloth. For a patio, it is usually convenient to use fabric with about 70–90% shade, depending on how strong you want the shade to be
- Heavy-duty stapler and outdoor staples
- Wooden frame, beams, posts, or an existing pergola where the panel will be attached
- Screws or mounting plates to secure the lattice panel
- Tape measure, pencil, and scissors
- Screwdriver or drill
- Wood protective finish, if desired, if you are using a wooden lattice
How to Make It
- Choose a place for the panel.
This idea is best for places where there is already a top frame or supports: a simple pergola, wooden beams, a passage between a wall and a fence, or a separate structure over the seating area. Without a base, you will need to build a frame first. - Measure the area of the future roof.
Lattice panels are often sold in standard sheets, so it is easier to adapt the project to their size. If the area is small, one 4 x 8 ft panel may be enough. - Prepare the shade cloth.
Cut the fabric with a little extra around the edges. It is better not to cut it too close: this will make it easier to stretch it evenly and attach it without crooked spots. - Attach the fabric to the lattice.
Lay the panel on the ground, stretch the fabric over the top or underneath, and secure it with staples around the perimeter. Go gradually: first the corners, then the sides. This way, the fabric will not gather into waves. - Trim the extra edges.
Once the fabric is secured, carefully remove the excess. Do not cut too close to the staples, so the edge does not start pulling out after wind or rain. - Install the panel on the frame.
Lift the finished panel and secure it with screws or mounting plates. It is better to do this with two people: the sheet is large, and it is easy to tilt it awkwardly during installation if you are doing it alone. - Check the shade and the view from below.
Look at how the structure appears from the seating area. Sometimes the fabric looks better attached under the lattice, and sometimes on top — it depends on which look you prefer and how neatly the fabric is stretched.
How to Make It Neater
Do not rush the fabric tension. If you attach it in waves, the roof will immediately look messy. It is better to spend a few extra minutes and work from the corners toward the center, gradually smoothing out the material.
It is also important to choose the right color. Black or dark green shade cloth often gives denser shade, but visually it can make a small patio feel heavier. Sandy, light gray, or beige fabric looks softer and fits better for a seating area near the house.
If you use a wooden lattice, do not leave it unprotected. Outdoors, wood wears down quickly from sun and moisture, so it is better to treat it right away with stain, oil, or an exterior protective finish. Over time, you will appreciate it and thank yourself.
A lattice panel roof with shade cloth staples is a more “finished” option among cheap shade ideas. It does not look random, does not hang on ropes, and can easily become part of the patio for the whole season. And you will gladly rest there, not just hide from the sun.
A Tucked-Away Spot
Good shade changes a patio right away. Where it used to be hot and uncomfortable, there is now a place where you want to sit, drink something cold, read, chat, or simply rest without squinting from the sun’s rays.
Start with the place where the sun bothers you the most. Often, one simple canopy or side curtain gives more benefit than a big expensive project for “someday later.”Write in the comments which idea you would try first — especially if you have already had experience creating DIY shade in your yard.