Anyone who keeps chickens knows that the most time-consuming part is regular cleaning under the roosts. And honestly, the chickens are not really the problem here. It’s just that in a small or medium chicken coop, any uncomfortable shelf starts getting annoying very quickly.
Sometimes you can’t properly reach it with a scraper, sometimes everything falls onto the floor, and sometimes droppings stick to the plywood so badly after just a couple of days that it feels impossible to clean.
In our coops, we tried quite a few different options: sliding shelves, sand, vinyl, removable trays, folding doors, and many other things.
Here I collected the most convenient options in my opinion. Many of them can easily be built in one evening from the most basic materials.
1. Removable Poop Shelf Tray With Newspaper Liner
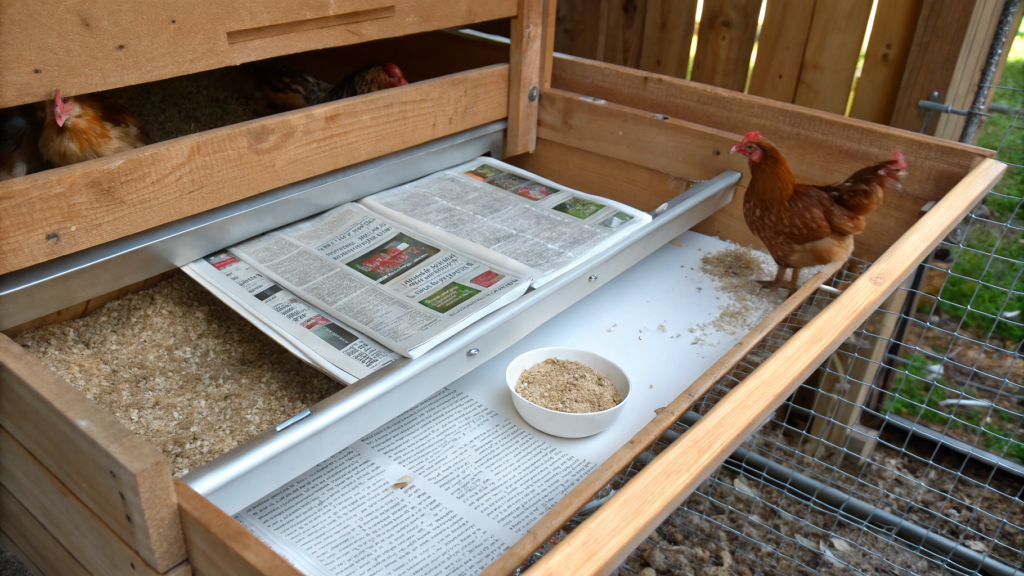
To spend less time cleaning the coop, I really like the idea of a removable poop shelf tray with a newspaper liner. Nothing complicated, but it cleans up literally in just a couple of minutes.
At some point I decided to try making a sliding tray under the roosts. And now I would never go back to a regular shelf again.
The newspaper layer is also very important here. Several layers of regular newspaper help:
- collect droppings faster;
- reduce sticking to the surface;
- speed up cleaning;
- keep the wood dry.
Higher moisture and buildup of droppings increase the risk of respiratory issues in birds. Especially in small coops without good ventilation.
What You’ll Need
- 1/2 inch (1.2 cm) plywood sheet
- 1×2 inch boards for rails
- wood screws
- drill or screwdriver
- newspapers or paper liners
- cleaning scraper
- protective wood coating
- measuring tape
- sandpaper
- small handle for the tray
- waterproof wood sealer — Waterproof Wood Sealer on Amazon
How to Make a Removable Poop Shelf Tray
- Measure the space under the roosts
First measure the area directly under the roosting bars. I usually make the poop shelf about 24–30 inches (60–76 cm) deep. That is enough for most chickens so the droppings land on the surface instead of missing it.
Do not make the shelf too narrow. Chickens are not trying to stay neat at all. Especially in the morning.
If you have 4–6 hens in a small coop, a width of around 36–48 inches (91–122 cm) is usually enough. - Make a simple sliding tray
Cut the plywood to the size of the future shelf. It’s better to lightly sand the edges. Otherwise you constantly scratch your hand during cleaning later.
Attach wooden rails made from 1×2 inch boards on the sides. The tray should slide out easily but not wobble around.
I leave a small gap of about 1/4 inch (0.6 cm) on each side. Wood slightly expands and contracts between winter and summer, especially when humidity changes a lot. - Cover the surface with a protective layer
Do not skip this step, otherwise after a year the plywood starts smelling like it’s a hundred years old. I usually use a simple waterproof wood sealer. After that, the surface becomes much easier to clean, and the droppings soak in less.
Sometimes people use linoleum on top of plywood. That works too. But for a newspaper system, regular sealed plywood is already enough. - Add the newspaper layer
Before installation, simply spread several layers of newspaper over the tray. Usually 3–5 sheets are enough.
Some people use:
- construction paper;
- packing paper;
- old feed bags;
- cardboard.
- But regular newspaper still remains the cheapest option. Especially if the coop is small.
I change the top layer about every 2–3 days in summer. In winter, a little less often. - Add a convenient handle
Attach a simple handle to the front of the tray so you can quickly pull it out with one hand. You’ll appreciate the convenience early in the morning when there’s coffee in one hand and the chickens are already putting on a concert for the entire yard.
Why This System Actually Saves Time
The main advantage here is that all the dirty work turns into one simple movement. Droppings do not collect directly on the wood under the roosts but fall onto a removable tray with a newspaper layer. As a result, you don’t have to spend time scraping surfaces or cleaning corners every single time.
Usually the cleaning process looks like this:
- pull out the tray;
- roll up the top newspaper layer;
- throw it away;
- place a new layer back.
The whole thing takes literally just a few minutes. In winter, when there’s cold wind outside and your hands freeze almost immediately, you really feel the difference. Nobody wants to stand in the coop for twenty minutes with a bucket and scraper.
The wood stays dry and clean much longer. Newspaper absorbs part of the moisture, and the tray itself can quickly dry or be carried outside into the sun. Cleaning becomes simple, so you do it more often, and because of that the coop looks and smells completely different. Especially in summer.
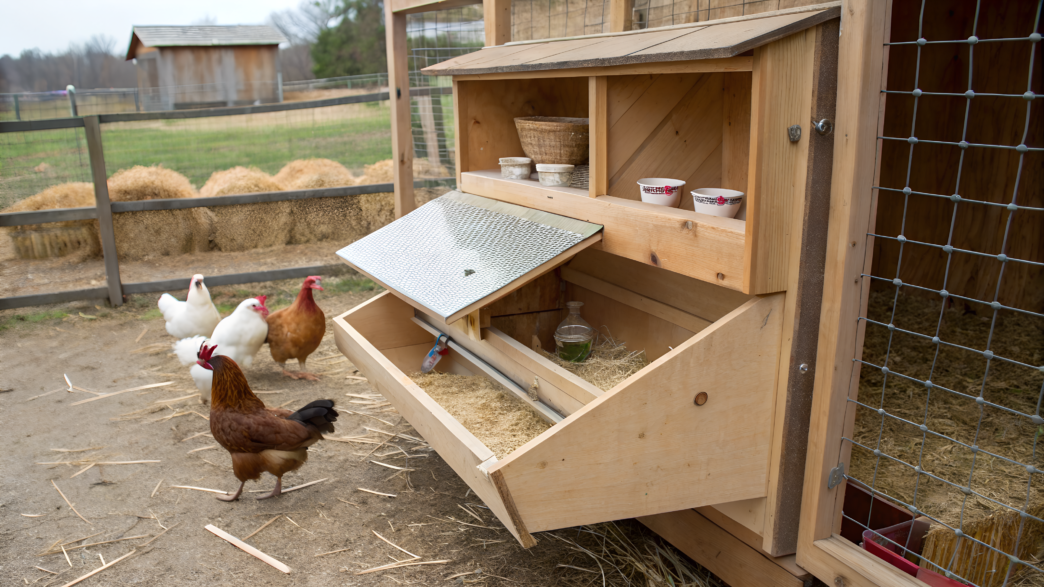
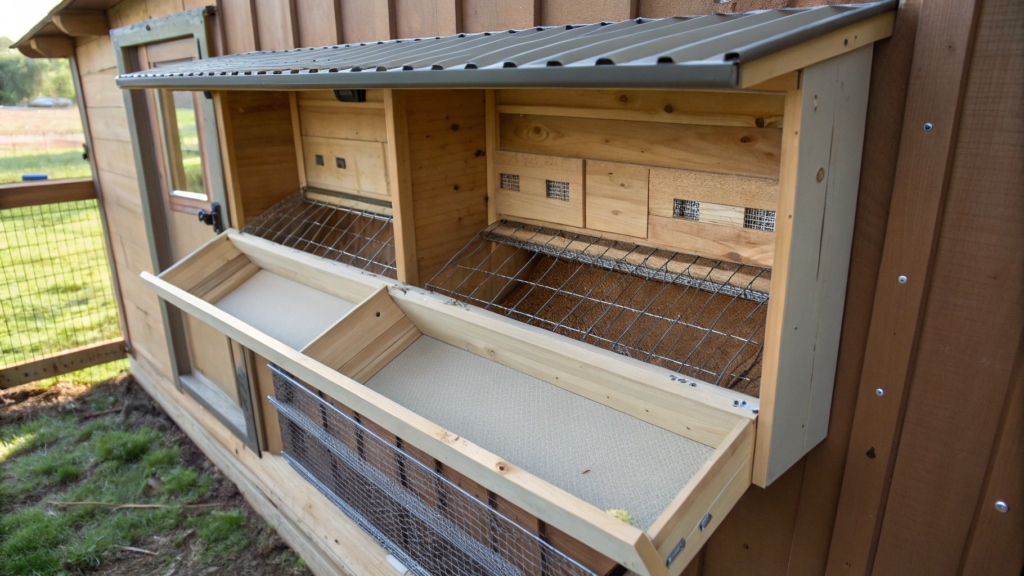
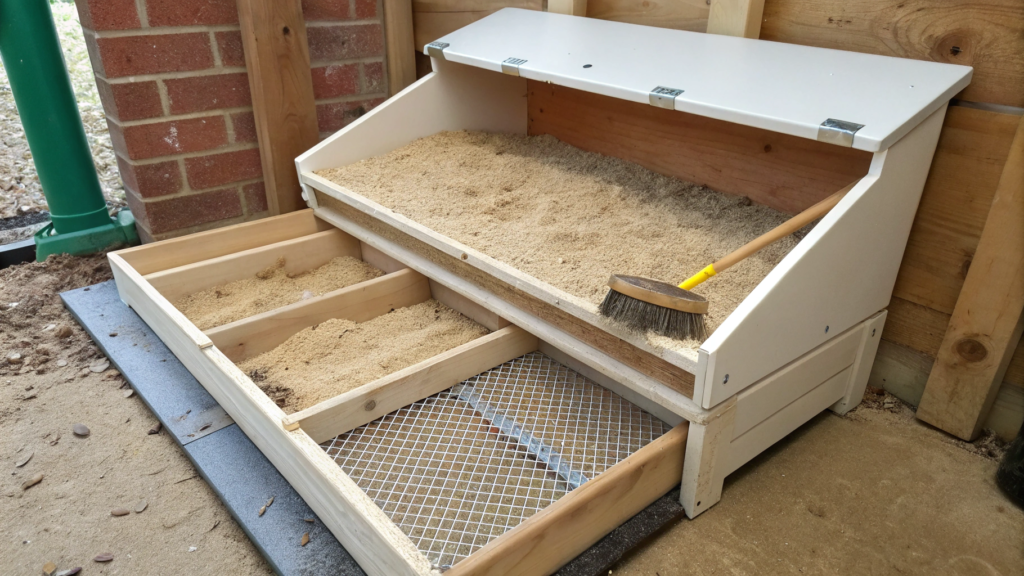
2. Slide Out Poop Shelf Using Drawer Slides
In a chicken coop, you quickly start appreciating the things that actually save time and effort. After we installed a slide out poop shelf on drawer slides, cleaning became much easier. The shelf literally slides out like a big drawer. No need to climb inside the coop, reach under the roosts, or sweep droppings out in small sections.
This system works especially well for:
- small backyard chicken coops;
- narrow coops;
- coops with low ceilings;
- winter cleaning;
- people who do not want to spend half an hour cleaning every day.
When cleaning takes five minutes, you stop putting it off, and because of that your coop stays clean all the time.
What You’ll Need
- 3/4 inch (1.9 cm) plywood sheet
- pair of heavy-duty drawer slides 20–24 inches (51–61 cm) long
- wood screws
- screwdriver
- measuring tape
- level
- sandpaper
- metal or plastic scraper
- waterproof wood coating
- handle for the sliding shelf
How to Make a Slide Out Shelf Using Drawer Slides
- Determine the shelf size
First measure the space under the roosts. The shelf should cover the entire area where droppings fall. For 4–6 chickens, a depth of around 24 inches (61 cm) is usually enough. If the roost is long, it’s better to make the shelf wider than constantly sweep around it later.
I always leave a little extra space on the sides. Around 1/2 inch (1.2 cm). That way the shelf moves easier even after humidity changes. - Choose strong drawer slides
Cheap regular slides quickly fill with dust and start sticking. For a chicken coop, it’s better to use reinforced options.
The best ones are usually:
- metal ball-bearing slides;
- full-extension models;
- anti-sag designs.
If the shelf is long and heavy, weak slides start sagging after just a few months.
- Build the shelf base
Cut the plywood to size. It’s better to lightly sand the edges. Later it becomes much more comfortable to pull the shelf out by hand.
Some people also add a small edge about 1–2 inches (2.5–5 cm) high so bedding does not fall off while sliding the shelf out.
It’s worth coating the surface with a waterproof finish. After that, droppings scrape off much easier with a regular scraper. - Install the drawer slides
The slides must be perfectly parallel to each other. Even a small misalignment causes the shelf to catch during movement.
I usually secure one side first, then insert the shelf, and only after that attach the second slide.
If everything is level, the shelf moves almost effortlessly. - Add a bedding layer
Many people use on this type of shelf:
- sand;
- mineral odor absorbent;
- fine wood shavings;
- hemp bedding;
- wood pellets.
We usually use a thin layer of sand. It’s easy to level quickly with a small rake.
Why a Slide Out Shelf Is More Convenient Than a Regular One
With a regular shelf under the roosts, the most annoying part is not the droppings themselves, but trying to reach them. There is always some far corner where it’s awkward to move a scraper or reach with your hand. With a sliding shelf system, this problem almost disappears.
The shelf fully slides out, so all the mess ends up directly in front of you. In just a few movements, you can scrape the surface clean, check the corners, and slide everything back into place.
In winter, you do not have to keep the coop door open for a long time during cleaning, and there is less moisture and dirt under the roosts and around wooden supports.
For a small homestead, this noticeably simplifies daily chores. You start appreciating simple things once you realize how much less time goes into regular everyday cleaning.
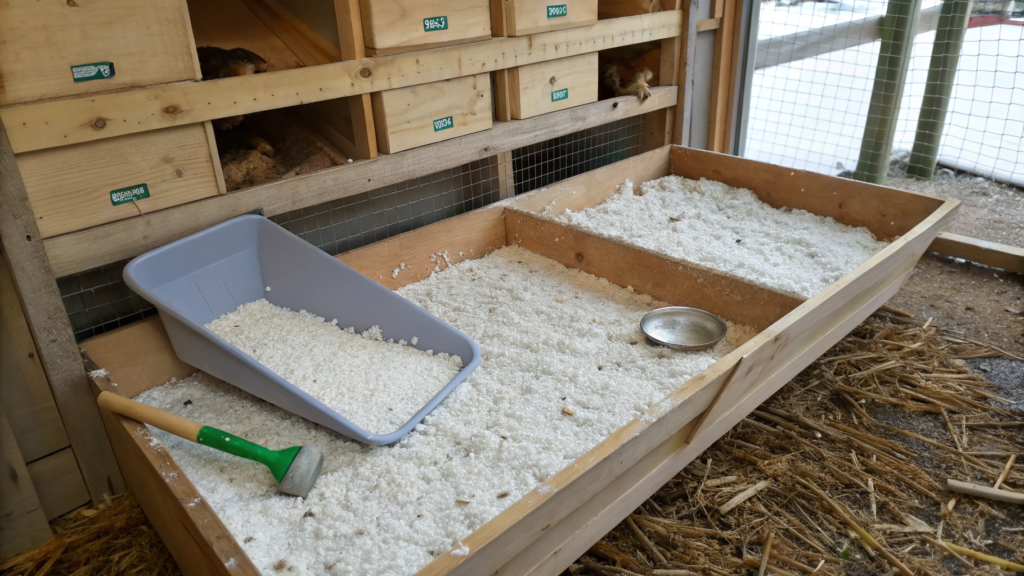
3. Dropping Board With Sweet PDZ and a Sifter Scoop
I think you know that chicken coop smell that appears much faster than you would like. Not extremely strong, but in the morning you walk in for eggs and immediately feel it: time to clean again.
During one rainy season, when the chickens stayed inside for almost a week because of wet weather, we first tried using a dropping board with Sweet PDZ and a sifter scoop.
Sweet PDZ is a mineral absorbent based on zeolite. It is often used in barns and chicken coops to absorb moisture and odors. Zeolite is actually capable of trapping ammonia, and this has been used in livestock and poultry housing for a long time.
Because of this:
- the surface stays dry longer;
- odor becomes weaker;
- cleaning goes faster;
- you do not need to completely replace the bedding every day.
BUT! If the coop is damp and poorly ventilated, absorbent alone will not solve the problem.
What You’ll Need
- 3/4 inch (1.9 cm) plywood sheet
- boards for shelf support
- wood screws
- screwdriver
- scraper
- small rake
- metal sifter scoop
- zeolite mineral absorbent such as Sweet PDZ Coop Refresher on Amazon
- measuring tape
- sandpaper
How to Make a Dropping Board With Absorbent
- Prepare the shelf under the roosts
The shelf should be a few inches wider than the roosting area. Chickens are not very concerned about accuracy.
For a small coop, a depth of around 24 inches (61 cm) is usually enough. If there are several roosts, it is better to make one long shared surface instead of separate small sections.
The shelf itself should be positioned so you can comfortably reach it with a scraper and scoop. - Cover the surface with a protective layer
Untreated plywood quickly starts absorbing moisture and odors. Once we decided not to seal it right away and thought, “We’ll finish it later.” A couple of months later the wood looked like it had been sitting outside in the rain for half a year.
After applying sealant, cleaning becomes noticeably easier. Droppings stick less, and the surface itself stays in much better condition longer. - Add a thin layer of absorbent
You do not need a thick layer here. Usually around 1/2 inch (1.2 cm) is enough. The absorbent is spread across the surface like a thin dry layer. It helps hold moisture and reduce odor around the roosts.
Some people mix it with sand. We tried both options, but pure zeolite is easier to sift later with the scoop. - Use a sifter scoop for cleaning
A scoop with holes works almost like a cat litter scoop. Droppings stay inside while the clean bedding falls back onto the shelf.
Instead of completely replacing the whole layer, you simply remove the waste and quickly level the remaining material.
In practice, cleaning takes literally just a few minutes even in the middle of the week when the coop is being heavily used.
Where This System Works Best
The biggest difference is noticeable in small coops where chickens sleep close together. Moisture and odor build up much faster there.
This type of shelf also works really well in winter when you do not want to completely replace bedding all the time because of cold and damp conditions. The surface stays drier, and the coop itself looks cleaner much longer between full cleanings.
Basically, it’s just a regular shelf, a little absorbent, and a good scoop. Small changes, but somehow these little things end up making the biggest difference.
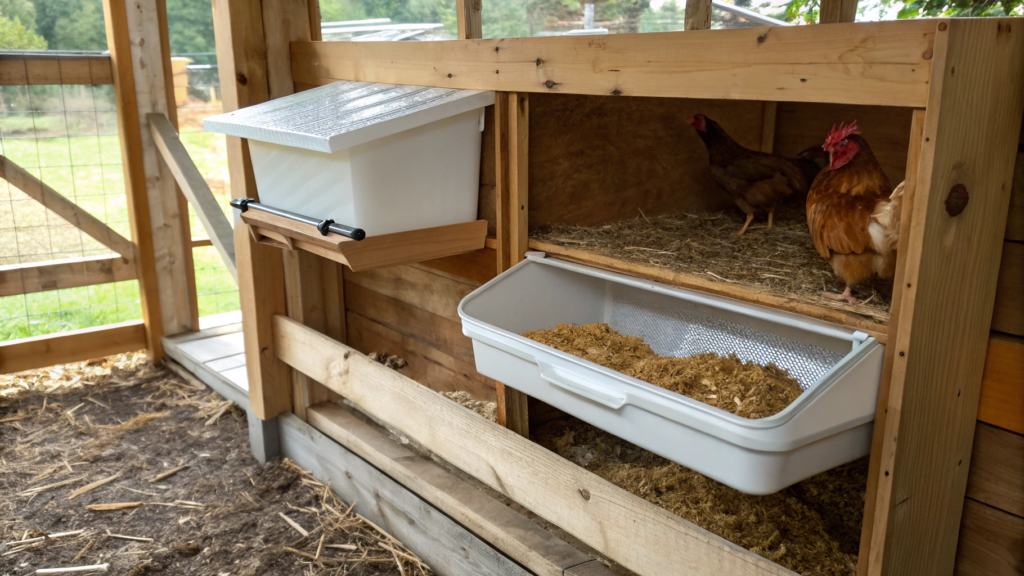
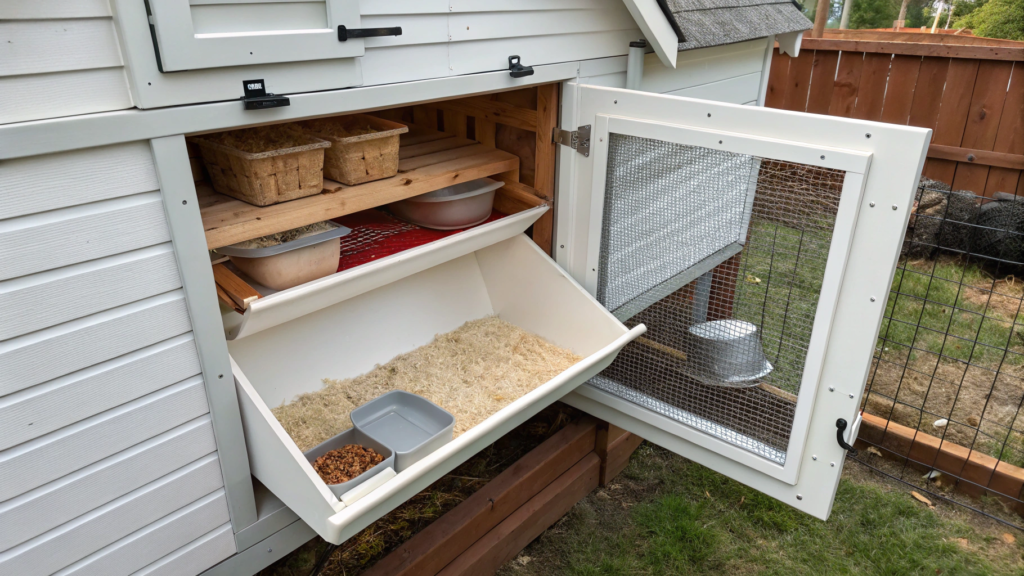
4. Poop Shelf With Hinged Cleanout Door
There is one thing I started appreciating in chicken coops much more with age — the ability to clean something without climbing completely inside.
In theory, cleaning under the roosts sounds simple. But in practice it’s not exactly like that, you know.
That’s why I really liked the idea of a poop shelf with a hinged cleanout door. You do not climb into the coop, but instead open an outside panel, quickly scrape the droppings out, and close everything back up. For small backyard chicken coops, this is genuinely convenient.
What You’ll Need
- 3/4 inch (1.9 cm) plywood sheet
- hinges for the exterior door
- 2×2 inch boards for the frame
- wood screws
- screwdriver
- latch or hook to secure the door
- cleaning scraper
- waterproof wood coating
- measuring tape
- pencil for marking
- sandpaper
How to Make a Poop Shelf With a Hinged Cleanout Door
- Plan the shelf placement in advance
This type of system is best planned before building the roosts. The door should open exactly where it will be comfortable to clean the surface.
Usually the shelf is placed directly under the roosts, while the door opens through the outside wall of the coop. That way cleaning happens completely from outside.
For 4–6 chickens, a depth of around 24–30 inches (61–76 cm) is usually enough. If the roost is long, it is more convenient to make one large shelf instead of several small sections. - Build a strong base
The shelf constantly deals with moisture and weight, so thin plywood is not the best option. The base is usually built from:
- plywood;
- wooden framing;
- side supports;
- reinforcing cross braces.
If the shelf is longer than 4 feet (122 cm), an additional center support is definitely worth adding. Otherwise the surface may start sagging over time.
- Cut the cleanout door
This is where many people first make the door too small and later struggle during cleaning. The opening should allow you to comfortably work with a scraper across the entire surface. I would not make it narrower than 18–20 inches (46–51 cm).
It’s better to sand the edges right away. The door too. Otherwise clothes constantly catch on rough wood splinters later. - Install the hinges and latch
The door should open freely but still close tightly during rain and wind. For the outside part of the coop, these work best:
- galvanized hinges;
- moisture-resistant latches;
- metal hooks;
- exterior handles.
If the coop stands outdoors, water always finds weak spots. And after that, everything inside starts getting damp much faster.
- Cover the surface with a protective coating
On untreated wood, droppings soak into the surface very quickly. After applying a waterproof coating:
- the shelf becomes easier to clean;
- the wood absorbs less moisture;
- odor stays weaker;
- the surface stays in good condition longer.
Sometimes people also attach a thin sheet of vinyl or linoleum on top. That type of surface also noticeably speeds up cleaning.
What Changes After Installing This Type of Door
The main difference is that cleaning stops feeling uncomfortable.You no longer need to:
- climb inside the coop;
- move a bucket between the roosts;
- stand bent over;
- sweep debris out of far corners by hand.
You open the door, quickly scrape the surface, collect the waste — and that’s it.
This type of system does not require complicated maintenance. Basically, there is nothing tricky here — just a regular shelf, an exterior door, and proper access for cleaning. But these are exactly the kinds of simple solutions that end up saving the most effort in everyday routine.
5. Poop Shelf Sized for a Small Chicken Coop
In our first chicken coop, we made the shelf under the roosts very wide, almost across the entire depth of the coop. But when it came time for the first full cleaning, it turned out there was simply no comfortable way to move around inside.
To reach the far side of the shelf, you practically had to lie down on the bedding. And if there was also a bucket or a bag of feed inside, there was barely any room left at all.
Yes, the size of a poop shelf really affects daily cleaning. After rebuilding it, the coop did not become less comfortable for the chickens. But cleaning it became much easier.
What You’ll Need
- 1/2 or 3/4 inch (1.2–1.9 cm) plywood sheet
- 2×2 inch boards for support
- wood screws
- screwdriver
- measuring tape
- pencil
- sandpaper
- cleaning scraper
- waterproof wood coating
- optional: thin linoleum or vinyl flooring
How to Make a Poop Shelf for a Small Chicken Coop
- Do not make the shelf too deep
For a small coop, a depth of around 18–24 inches (46–61 cm) is usually completely enough. Many people make the shelf much wider “just in case,” and later it becomes almost impossible to comfortably turn around during cleaning.
The shelf should collect droppings under the roosts, not turn into a second floor inside the coop. If the roost sits low, an oversized shelf can also make it harder for chickens to climb down comfortably in the morning. - Place the shelf closer to the roosts
The smaller the distance between the roost and the shelf, the less mess ends up around it. Usually around 10–12 inches (25–30 cm) between them works well. Chickens can sit comfortably, flap their wings, settle in for the night — and at the same time most of the droppings stay directly on the shelf.
In small coops, you notice this very quickly. If the distance is too large, the bedding on the floor gets dirty in just a couple of days.
Sometimes people intentionally place the shelf lower because they worry the birds will not have enough room. But for regular backyard chickens, that height is usually completely fine. - Check access to the shelf before final installation
While the shelf is not permanently fixed yet, try scraping the entire surface. Reach the far corner by hand. Imagine cleaning this in winter while wearing a jacket and gloves.
Most problems usually appear:
- near roost supports;
- in back corners;
- next to side braces;
- around the coop door.
Once we had a support placed so awkwardly that the scraper constantly caught on it during cleaning. In the end we still had to rebuild everything, only this time with a dirty shelf and chickens inside.
- Make the surface as smooth as possible
Untreated plywood quickly starts absorbing moisture and odors. And in a small coop, you feel it much more because there is less airflow and humidity builds up faster.
After adding a waterproof coating, cleaning becomes much easier. Droppings stick less to the surface, and the shelf itself stays in good condition much longer.
Some people also attach on top:
- leftover linoleum;
- vinyl flooring;
- plastic sheet;
- thin PVC sheet.
On a smooth surface, the scraper moves much easier, and daily cleaning takes less time.
Why a Compact Shelf Is Often Better in a Small Coop
In a small coop, every extra detail starts getting in the way very quickly. If the shelf is too wide or awkwardly placed, you notice it literally every day during cleaning. Somewhere the bucket does not fit, somewhere you have to squeeze sideways around the roosts, and somewhere half the mess still ends up on the floor next to the bedding.
With a compact poop shelf, everything is usually much simpler. It is easier to fully clean. Most of the mess stays directly under the roosts instead of spreading across the entire coop. Because of that, the bedding on the floor gets dirty slower, and you do not need to fully replace it as often.
In small chicken coops, simple solutions create the biggest difference. Because every extra 5 inches of construction starts feeling very noticeable in everyday life surprisingly fast.
6. Poop Shelf With Built In Roosting Bars
When the roosts and the poop shelf are built as two separate structures inside the coop, cleaning turns into constantly walking around supports, catching the scraper on mounts, and trying to properly reach the corners.
It is much more convenient to make a poop shelf with built in roosting bars, where the roosts attach directly to the shared shelf structure.
I like this system for two reasons:
- the structure takes up less space;
- it becomes easier to clean under and around the shelf.
And the coop itself looks cleaner and more organized.
What You’ll Need
- 3/4 inch (1.9 cm) plywood sheet
- 2×4 inch boards or round poles for roosts
- 2×2 inch framing boards
- wood screws
- screwdriver
- measuring tape
- level
- sandpaper
- cleaning scraper
- waterproof wood coating
How to Make a Poop Shelf With Built In Roosting Bars
- First determine the roost height
For most backyard chickens, roosts are placed around 18–36 inches (46–91 cm) above the floor. But in a small coop, roosting bars that are too high later make cleaning harder and take up extra upper space.
For heavy chicken breeds, too much height is usually uncomfortable anyway. - Build one shared frame
Instead of separate supports, it is much more convenient to build one combined structure right away:
- the lower section works as the poop shelf;
- the upper section holds the roosts;
- side supports keep everything together.
Because of this, there are fewer unnecessary parts inside, and there is more open space near the coop walls.
If the shelf is longer than 4 feet (122 cm), it’s better to add a center support. Otherwise the surface may eventually start sagging.
- Leave proper spacing between the roosts
Chickens do not like sitting too close together at night. Even if during the day they calmly walk around as a group.
Usually people leave:
- around 12 inches (30 cm) between roosting bars;
- at least 8–10 inches (20–25 cm) from the wall;
- enough space above for tails and wings.
If everything is placed too tightly, part of the droppings will still miss the shelf.
- Make the shelf surface smooth
On untreated plywood, droppings quickly dry and soak into the wood. After that, cleaning takes much more time.
After adding a waterproof coating or a layer of linoleum, the surface becomes noticeably easier to clean. The scraper moves smoother, and the shelf itself stays in good condition much longer.
Some people also add a thin layer of sand, wood shavings, zeolite absorbent, or hemp bedding. But even without that, a smooth surface already makes cleaning easier.
Why Built In Roosting Bars Are Often More Convenient Than Separate Structures
When the roosts are built directly into the poop shelf, there are fewer unnecessary supports, legs, and mounts inside the coop. During cleaning, you notice this immediately.
Because of that, you do not have to:
- move around separate supports;
- clean debris between legs;
- constantly catch the scraper on mounts;
- partially disassemble the structure just to get proper access.
For small backyard chicken coops, this often ends up being one of the most practical options because the structure stays compact, sturdy, and without extra hassle every single time you clean.
7. Poop Shelf With Sand Base and Rake Finish
We tried making a poop shelf with a sand base under the roosts, and it turned out to be one of the simplest systems for everyday cleaning.
Just do not pour sand in a thick layer like on a beach. This type of shelf works properly only when there is a thin dry layer on top that you can quickly go over with a small rake or scoop.
What You’ll Need
- 3/4 inch (1.9 cm) plywood sheet
- boards for shelf support
- wood screws
- screwdriver
- waterproof wood coating
- sand
- small metal rake, for example Garden Hand Rake on Amazon
- scraper
- measuring tape
- sandpaper
How to Make a Poop Shelf With a Sand Base
- Build a strong and level shelf
For a sand system, the surface needs to be sturdy and without sagging. If the shelf starts sinking in the middle, the sand slowly slides to one side, and cleaning becomes uncomfortable.
Some friends of ours tried to save time and used plywood that was too thin for a long shelf without a center support. The first few weeks everything looked fine. Then the sand started collecting in the center, while the edges almost emptied out.
For this type of shelf, it’s better to immediately build:
- a strong frame;
- side supports;
- center support if the shelf is longer than 4 feet (122 cm).
After assembly, the surface should be coated with a waterproof finish. Untreated plywood inside a coop quickly absorbs moisture and odor, and with sand you notice it even faster.
Some people also add leftover linoleum or vinyl on top. The scraper moves much easier afterward, and the shelf itself stays in good condition longer.
- Add a thin layer of sand
You do not need a deep sand layer for a shelf under the roosts. Usually around 1/2–1 inch (1.2–2.5 cm) is enough. That is sufficient to keep the surface drier and easy to clean with a rake.
A layer that is too thick later creates other problems:
- the sand dries slower;
- it becomes heavier;
- it starts clumping around the roosts.
For this type of system, regular construction sand without large rocks works best. Very fine sand inside a chicken coop starts creating noticeable dust during cleaning.
Sometimes people also mix in a little zeolite absorbent to help control odors. But even a regular dry sand base already makes daily cleaning much easier.
- Use a small rake for daily cleaning
Instead of completely replacing everything on the shelf, you simply rake through the surface with a small hand rake, collect the droppings, and lightly level the sand back into place. The clean portion stays right where it is.
Near our coop, we usually always keep:
- a small metal rake;
- a scoop;
- a waste bucket.
These simple tools make cleaning quick and require almost no preparation.
Why Many People Prefer a Sand Shelf
Sand does not spread around the coop as much as lightweight shavings or dry bedding. And in small coops, you notice this very quickly.
The surface of this type of shelf looks neat even between cleanings, and there is no feeling of a wet loose mess under the roosts two days after cleaning.
This works especially well for people who do not want to completely replace the shelf contents too often. Part of the sand can easily stay in place for weeks as long as the surface stays dry and gets regularly raked through.
8. Poop Shelf With Vinyl Flooring for Quick Scrape

On untreated plywood, droppings slowly soak into the surface, especially during summer or humid weather. Even after cleaning, the wood still looks somewhat dirty. With vinyl, everything is different — the scraper moves almost effortlessly, and the shelf itself stays smooth much longer.
For small backyard chicken coops, this is a really convenient system because daily cleaning starts taking literally just a few minutes.
What You’ll Need
- 3/4 inch (1.9 cm) plywood sheet
- leftover linoleum or vinyl flooring
- utility knife
- screws or construction adhesive
- screwdriver
- measuring tape
- sandpaper
- cleaning scraper
- waterproof wood coating
How to Make a Poop Shelf With Vinyl Flooring
- Prepare a smooth base
First, build a regular sturdy shelf under the roosts. It’s better to sand the surface well right away because any bumps later become noticeable through the vinyl.
If the shelf is long, it’s better to add a center support in advance. Over time, the structure constantly deals with moisture, cleaning, and the weight of the surface itself. - Attach the vinyl to the surface
You do not need thick soft linoleum here. For this type of shelf, people usually use:
- thin vinyl flooring;
- rigid linoleum;
- leftover kitchen flooring;
- self-adhesive vinyl tiles.
The main thing is that the surface stays smooth and does not absorb moisture. It’s better to secure the edges of the covering well right away. If a corner starts lifting, dirt and damp bedding quickly get underneath.
- Use a wide scraper for cleaning
On a smooth surface, droppings do not stick as much, so cleaning goes very quickly. Sometimes just a few passes with a scraper are enough.
We usually clean this type of shelf in the morning after opening the coop or in the evening before locking the chickens in for the night. If you do not skip cleaning for an entire week, the whole process takes very little time overall.
Advantages of Vinyl Flooring
On regular plywood, even after good cleaning, stains, rough spots, and soaked-in areas gradually remain. With vinyl, the shelf stays looking neat and clean much longer.
On top of that, this type of surface absorbs less moisture and odor. In small coops, you notice this quickly because dampness builds up much faster inside.
As you can see, this type of system does not require expensive materials or complicated construction. Sometimes all you need is an ordinary leftover piece of linoleum from a renovation project that sat somewhere in the garage for years waiting for its moment.
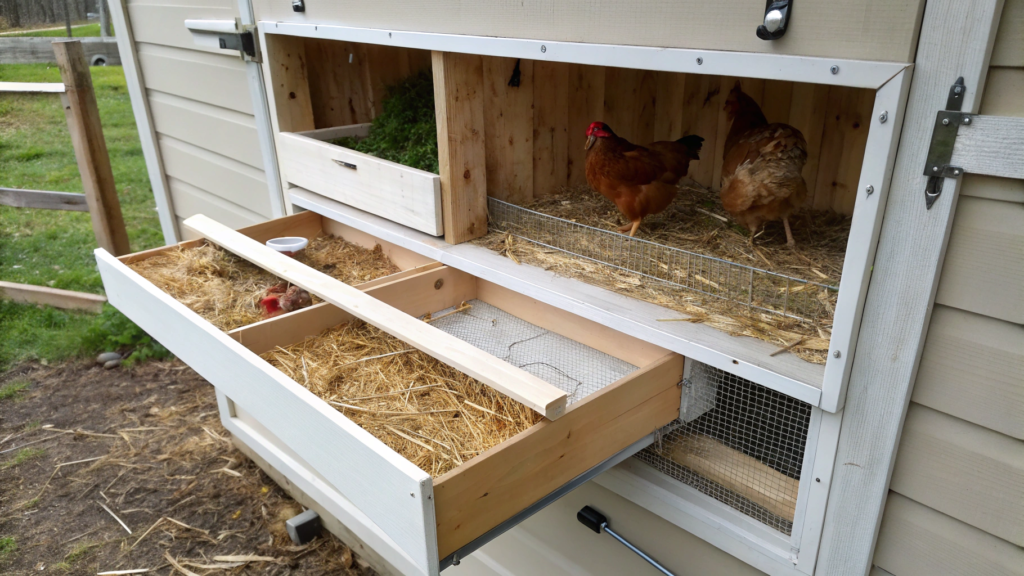
9. Poop Shelf With Lip Edge to Stop Mess Spillover
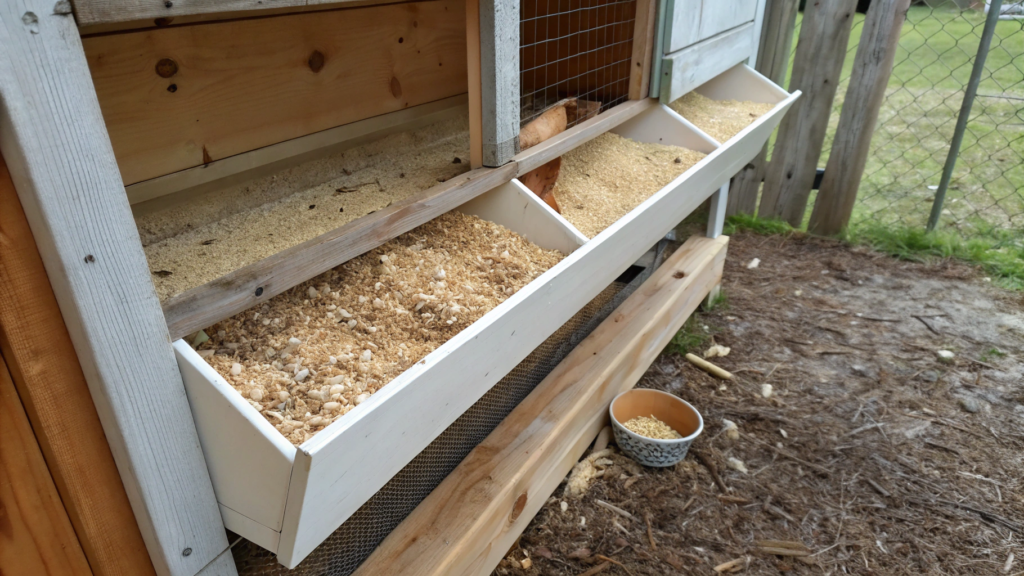
Open shelves under roosts are nice, of course. But after a few days, a thin line of mess slowly starts appearing around the coop — droppings, sand, bedding, small wood shavings. Little by little, everything spills off the edges of the shelf during cleaning or when chickens jump down from the roosts.
After that, we added a simple lip edge — a low border around the shelf edges. The structure looked almost the same, but there was immediately much less mess around it.
The edges should not be too tall, otherwise they start getting in the way during cleaning.
What You’ll Need
- 3/4 inch (1.9 cm) plywood sheet
- 1×2 inch or 1×3 inch boards for the edges
- wood screws
- screwdriver
- measuring tape
- sandpaper
- cleaning scraper
- waterproof wood coating
How to Make a Shelf With Edge Borders
- Do not make the edges too high
For most poop shelves, an edge around 1–2 inches (2.5–5 cm) high is enough. That is sufficient to stop sand, bedding, and debris from spilling out during cleaning.
If the edge is too tall, the scraper constantly catches on it, corners become harder to clean, and it’s more difficult to quickly scrape droppings outward. - Attach borders on three sides
Many people leave the front edge open, especially if they scrape directly into a bucket or scoop.
But the side edges and back edge help hold:
- sand;
- wood shavings;
- zeolite absorbent;
- small debris around the roosts.
In small coops, you notice this very quickly. Without borders, part of the bedding gradually ends up on the floor near the walls.
- Make the surface smooth
After adding a waterproof coating, the shelf becomes much easier to clean. Some people also additionally cover the surface with:
- linoleum;
- vinyl flooring;
- plastic sheet.
On a smooth surface, droppings stick less to the wood, and cleaning goes faster. It’s also better to sand the edge borders in advance. Later you stop catching your hands or sleeves on rough corners during cleaning.
Why People Appreciate Edge Borders
From the outside, it looks like a small detail. Just a narrow strip along the edge of the shelf. But after a few weeks, it becomes noticeable how much less debris ends up around the roosts.
The floor near the shelf stays clean longer, bedding mixes less with droppings, and inside the coop there is no constant feeling of mess around the roosting area.
I think this is one of those upgrades that is easy to add even to an already finished chicken coop. You do not need to fully rebuild the structure or buy expensive materials. Sometimes a couple of wooden strips and half an hour of evening work are enough.
10. Budget Poop Shelf Using Scrap Plywood and Cleats
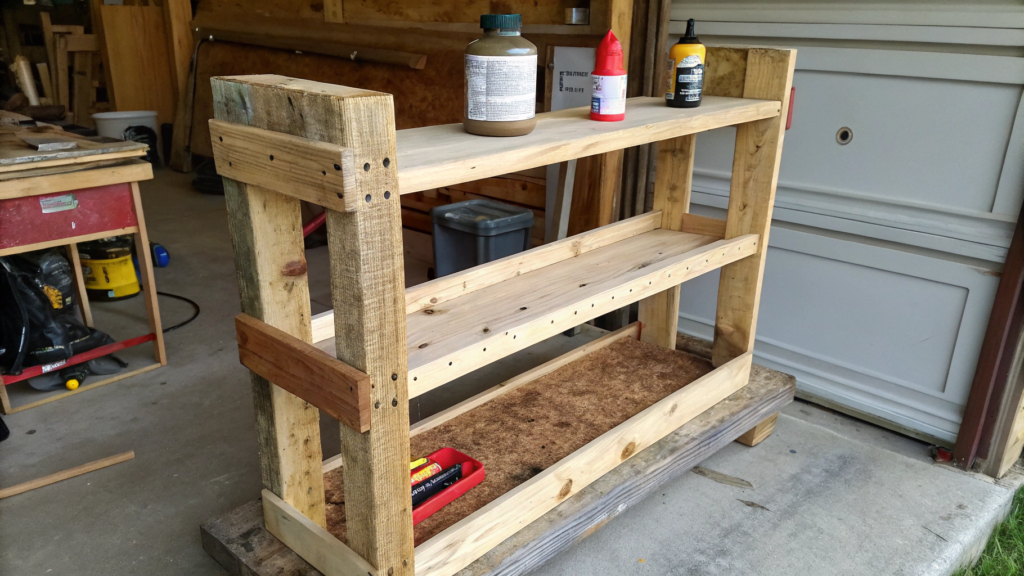
For a small poop shelf, you definitely do not need to buy expensive new materials. If you already have leftover plywood, old boards, or scrap wood sitting in the garage, that is often completely enough.
At one point, we built one of these shelves literally from leftover pieces after repairing a shed. The sizes did not match perfectly, and some of the wood even came from old shelving. But after assembly, the structure easily handled daily use and constant cleaning.
These shelves are easy to rebuild, improve, or adjust to real life inside the coop without worrying about expensive materials.
What You’ll Need
- leftover plywood 1/2 or 3/4 inch (1.2–1.9 cm) thick
- wooden cleats or scrap boards for support
- wood screws
- screwdriver
- measuring tape
- pencil
- sandpaper
- cleaning scraper
- optional waterproof wood coating
How to Make a Budget Shelf From Scrap Plywood
- Use what you already have
This type of shelf does not need perfect brand-new plywood without a single scratch. Under the roosts, nobody is going to judge the “quality of the finish” anyway.
People often use:
- leftover shelving;
- construction plywood scraps;
- renovation leftovers;
- old boards from sheds or crates.
The main thing is checking that the wood stays dry and has not started separating from moisture.
- Attach the shelf to simple supports
This is exactly where regular wooden cleats help. They attach to the coop walls as supports, and the shelf sits directly on top.
For small chicken coops, this is usually completely enough without complicated framing or heavy drawer slides. If the shelf is long, you can add a center support so the surface does not start sagging over time. - Think about cleaning in advance
Some people build the shelf as quickly as possible, and later realize that the scraper is awkward to use because of supports or tight corners.
Before final installation, it’s better to check:
- can your hand reach the far edge;
- are the supports getting in the way;
- is it comfortable moving the scraper across the surface.
This feels like a tiny detail right until the first big cleaning day.
- Make the surface smoother
Even old plywood becomes noticeably easier to clean after a simple waterproof coating.
Some people also place leftover linoleum or a thin plastic sheet on top. Others simply paint the surface with regular exterior paint. For a budget shelf, that is often already enough to make cleaning faster and stop the wood from absorbing moisture so aggressively.
Why Budget Shelves Are So Convenient
Very often, the most useful things around a homestead do not look perfect at all. And this type of structure is exactly like that — inexpensive, quick to build, and easy to adjust for the exact size of your chicken coop.
If later you want to change something — add an edge, make the surface wider, or move the roost — everything can be rebuilt without worrying about ruining expensive materials.
At some point, you simply grab leftover wood, a couple of support boards, and by evening the coop already becomes noticeably easier to clean.
A Comfortable Roost Setup
Chickens very quickly show whether the shelf under the roosts is actually convenient or not. While the coop is still new, many things seem fine. But after a few weeks, it becomes obvious where cleaning feels awkward, where dirt collects, and what starts annoying you every day.
As it turns out, many good solutions are surprisingly simple. Sometimes a small edge helps. Sometimes it’s just a leftover piece of linoleum. And sometimes a simple sliding shelf saves a huge amount of cleaning time every week.
If you already have your own convenient poop shelf system, I would genuinely love to see it in the comments. And maybe it will help other chicken owners too.
Good luck!