Steep hills often make a yard look more interesting and visually attractive, but taking care of them is usually harder than maintaining a flat lot. You end up dealing with sliding mulch, awkward climbs, burned grass, and water trails after every heavy rain…
Here I tried to put together 10 Steep Hill Landscaping Ideas that can make a slope more functional, neat, and visually expensive without huge costs. Most of these projects are actually realistic to build gradually with your own hands, even if the area currently looks far from perfect.
A lot of these solutions eventually require even less maintenance than a regular lawn on a hill. And honestly, that part alone is pretty nice.
1. Gravel Switchback Path With Timber Edging
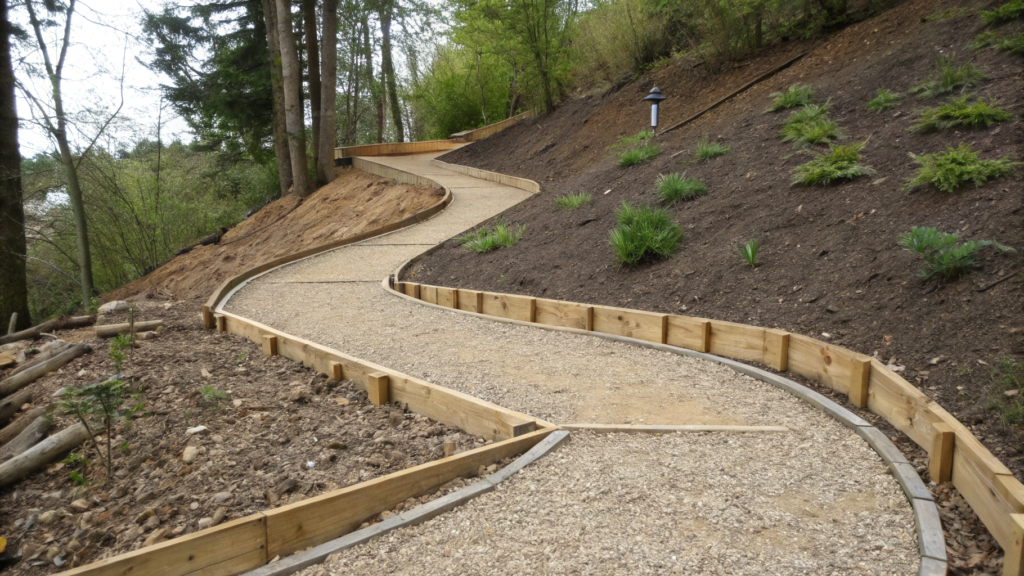
A slope stops feeling like a problem once there’s a proper comfortable path on it. This type of path can look surprisingly expensive even with a pretty average budget. Gravel, timber edging, and soft curves create the feeling of a thoughtfully designed landscape without complicated construction work.
After heavy rainstorms, water no longer rushes down in one aggressive stream washing soil away, which noticeably helps reduce soil erosion.
What You’ll Need
- Medium-sized gravel — crushed gravel or decomposed granite usually works best
- Landscape fabric for the base
- Wooden beams or treated boards for the edging. Timber sized around 4×4 in or 6×6 in (10×10 cm or 15×15 cm) works well
- Metal stakes or anchors to secure the wood
- A garden hose or rope for marking curves
- A shovel
- A rake
- A hand tamper or plate compactor
- A level
How to Build a Path on a Slope
- Mark the shape of the path
First, lay a hose or rope across the slope so you can see the future turns. Try not to make the path too straight. Soft curves look much more natural and make climbing the hill easier. - Decide on the width
For a regular garden path, about 3 ft wide (90 cm) usually feels comfortable. If you plan to move wheelbarrows through it, closer to 4 ft (1.2 m) works better. - Remove the top layer of soil
Usually removing around 3–4 in of soil (7–10 cm) is enough. Around curves, you may need to cut slightly deeper into the slope so the surface looks smoother. - Compact the base
Before laying materials, lightly compact the soil. This matters especially on loose slopes, otherwise the path may start sinking later. - Install the timber edging
Place the beams along both sides of the path and secure them with metal stakes every 3–4 ft (90–120 cm). The edging helps keep the gravel in place and makes the whole path look cleaner. - Lay the landscape fabric
The fabric helps reduce weed growth and keeps the gravel more stable over time. It’s better to overlap the strips by around 4–6 in (10–15 cm). - Add gravel in layers
Pour the gravel gradually instead of dumping the entire thickness at once. Compact each layer before adding the next one. Usually a layer around 2–3 in thick (5–7 cm) is enough. - Check the water runoff
Once everything is finished, look at where water flows after rain or watering. If water starts gathering in one area, it’s better to fix it right away with a rakein full sun because over time it tends to look dusty and faded faster.
Helpful Tip
If the slope is fairly long, try not to make all the turns identical. Slightly changing the spacing between curves makes the path feel much more natural. I also wouldn’t use very light-colored gravel
A path like this makes it easier to walk uphill after rain, move garden carts around, and maintain the slope much more comfortably. Visually, these winding paths also help break up a steep incline, making the whole yard feel more polished and thoughtfully designed even without an expensive landscaping project.
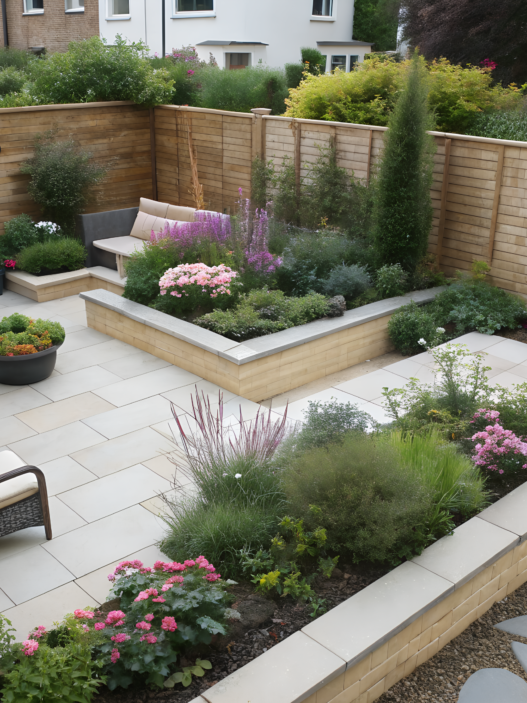
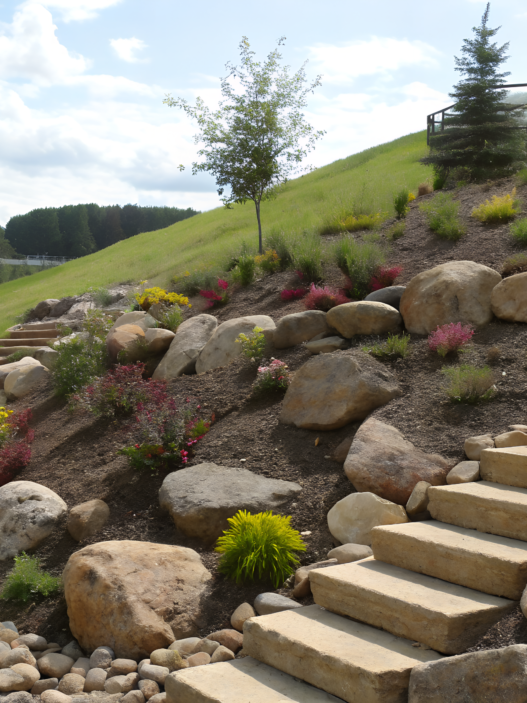
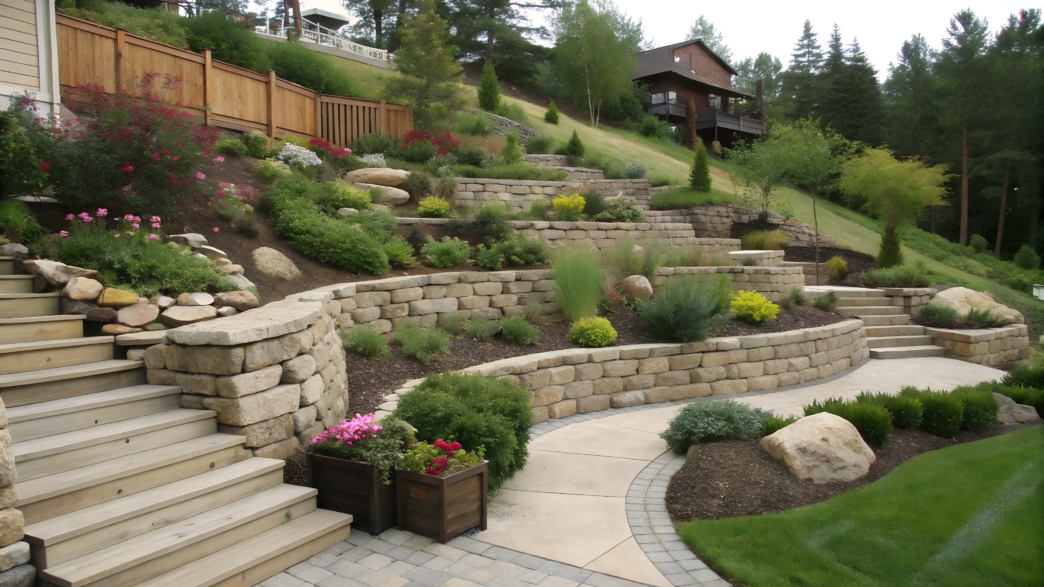
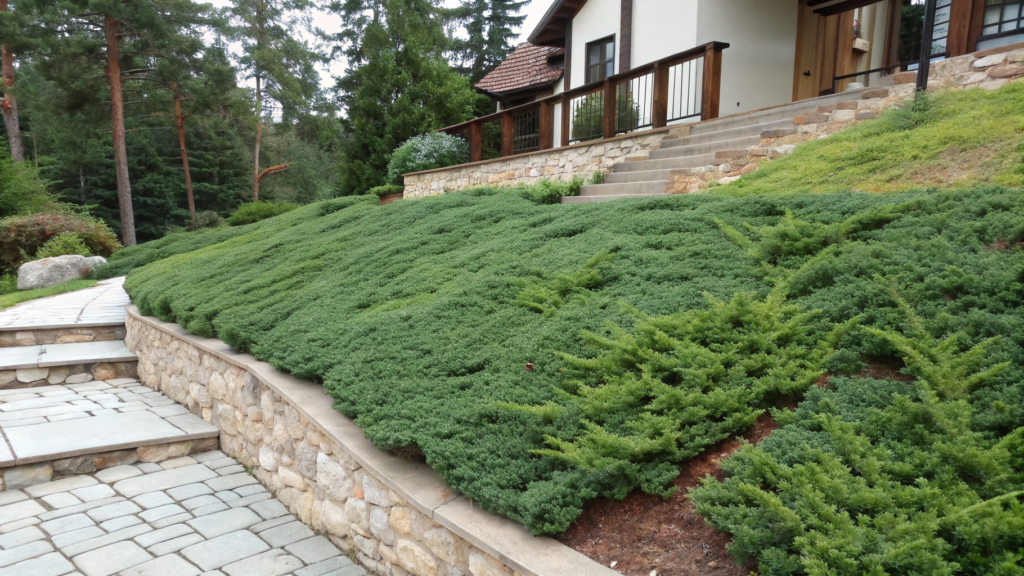
2. Three Tier Retaining Wall With Budget Blocks
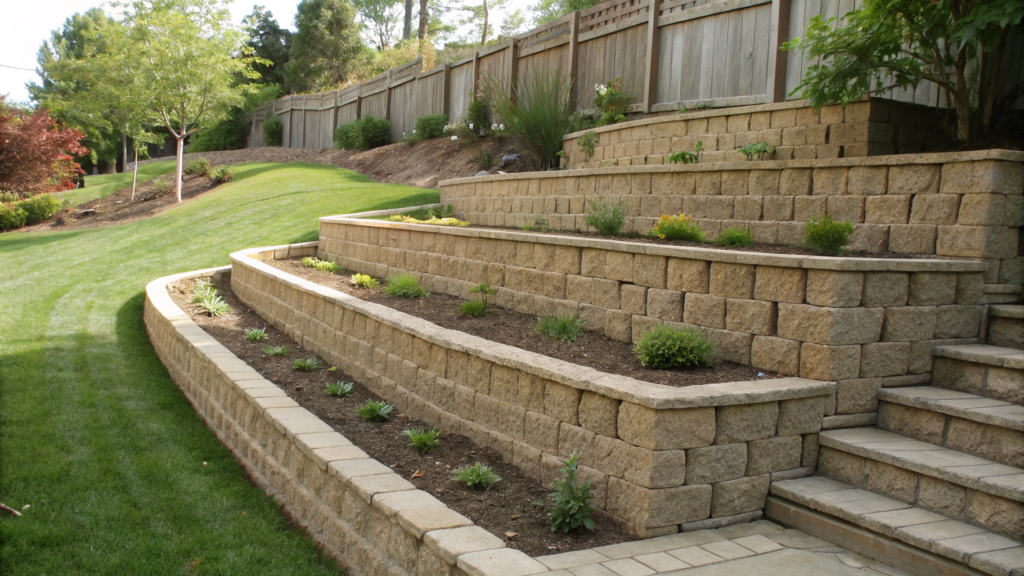
When a yard has a steep slope, a three-tier retaining wall can completely change the situation. You suddenly get flat planting areas, and the whole yard starts looking much more polished.
Projects like this used to intimidate us because retaining walls sounded like heavy equipment, concrete, and huge expenses. But regular budget retaining wall blocks can handle the job just fine if you’re not trying to build an 8 ft wall (2.4 m) all at once.
In most cases, several lower levels are also easier to maintain. The soil puts less pressure on the structure, water distributes more evenly, and plants usually establish themselves more easily.
What You’ll Need
- Retaining wall blocks. Regular concrete blocks for slope terracing from a hardware store work well
- Gravel or crushed stone for the base
- Drainage gravel behind the walls
- Landscape fabric
- A shovel
- A level
- A rubber mallet
- A measuring tape
- A tamper
- A perforated drainage pipe for water runoff behind the lower wall level
- Work gloves
How to Build a Three-Tier Retaining Wall
- Mark the terrace levels on the slope
First, decide where each terrace will go. Usually leaving around 2–4 ft of depth (60–120 cm) between levels gives enough room for plants or mulch. - Don’t make the levels too tall
For budget blocks, a comfortable height for one level is usually around 18–24 in (45–60 cm). Lower walls look cleaner and require less reinforcement. - Prepare the base
Remove the soil and dig a trench for the first row of blocks. The base is usually filled with about 4–6 in of gravel (10–15 cm), then compacted well. - Lay the first row as evenly as possible
The first row is basically half the success of the entire wall. If it starts shifting or leaning, the rest of the structure will only get worse. We checked the level after almost every second block. - Add drainage
Gravel is placed behind the wall, and if needed, a drainage pipe is installed as well. Without proper drainage, retaining walls often start leaning after only a couple of seasons. - Build the second and third levels
The upper terraces are built using the same process. Between the levels, you can leave planting pockets for grasses, groundcovers, or low shrubs. - Backfill and compact the soil gradually
After each level is installed, it’s better to add soil little by little and lightly compact it instead of dumping all the soil onto the slope at once.
What to Plant Between the Levels
These terraces work especially well for:
- ornamental grasses;
- lavender;
- creeping thyme;
- junipers;
- echinacea;
- dwarf evergreen plants.
I personally like the combination of stone with silver or blue-green foliage the most. Even inexpensive blocks start looking noticeably better next to plants like that.
Helpful Tip
Don’t try to level every inch of the slope perfectly between terraces. In real yards, a little natural unevenness usually looks much more balanced than strict geometry.
It’s also smart to buy around 10–15% more blocks than your original estimate. Slopes almost always end up needing extra cuts, small extensions, or those moments where you suddenly think, “Maybe we should extend it just a little farther over here.” In our experience, that happens almost every single time.
Once the terraces are finished, the area becomes easier to plant, easier to maintain, and starts feeling like a real part of the garden instead of an awkward zone everyone tries to avoid.
3. Rock Mulch Planting Pockets for Full Sun
If a slope sits under blazing sun all day, half the plants can start looking rough by August. With rock mulch planting pockets, though, the whole area can completely change without constant watering.
Stone adds texture and dimension, and the plants themselves look much cleaner because there’s no bare dry soil around them. Rock mulch also really helps hold moisture in the ground. On slopes, that matters a lot because the top layer of soil dries out faster than anywhere else.
What You’ll Need
- Rock mulch or decorative gravel, such as decorative landscape stone
- Large rocks or boulders for shaping the planting pockets
- Drought-tolerant plants
- A shovel
- Garden gloves
- Compost
- Landscape fabric if needed
- Drip irrigation or a regular garden hose for the first weeks after planting
How to Create Planting Pockets on a Slope
- Choose the pocket locations
Don’t try to cover the entire slope evenly with plants. Different-sized groupings usually look much better. One larger pocket here, two smaller ones nearby, then an open rocky section in between. - Dig shallow planting pockets into the slope
For each pocket, removing soil to a depth of around 6–10 in (15–25 cm) is usually enough. This helps keep water near the roots instead of letting it run straight down the hill. - Place the larger rocks
The rocks are usually positioned along the lower edge of the pocket and partly along the sides. They help hold soil in place and visually break up the slope. It also looks much more natural when the stones are slightly buried into the ground instead of sitting right on top. - Add improved soil
Sunny slopes often have poor soil that dries out quickly. We usually mix the native soil with compost so the roots establish themselves faster. - Plant in groups
Clusters of 3–5 plants of the same type tend to look much more natural than single plants spaced evenly apart. This becomes especially noticeable on slopes. - Cover the surface with rock mulch
A layer around 2–3 in thick (5–7 cm) is usually enough. The stone helps reduce moisture loss and keeps the slope looking cleaner even during winter when some plants lose their color or shape. - Water more often only at the beginning
During the first few weeks, the plants need steady watering. Once established, many drought-tolerant varieties can survive with very little maintenance.
Plants That Work Well Here
For full sun and slopes, plants that tolerate heat and limited watering usually work best:
- creeping juniper;
- lavender;
- sedum;
- yucca;
- blue fescue;
- Russian sage;
- echinacea;
- gaura;
- feather grass and ornamental grasses.
Combinations of plants with different heights — like low groundcovers next to taller grasses or yucca — usually look especially attractive.
Tip From Experience
Try not to use too much small white stone on a sunny slope. In hot climates, it starts reflecting a lot of light and can make the whole area feel visually overheated. More natural gray, sandy, or mixed tones usually look calmer and keep their appearance longer.
If the slope is fairly steep, it’s usually smarter to start with just 2–3 larger planting pockets instead of trying to landscape the whole hill immediately. That makes it much easier to see how water behaves after rain, which plants actually tolerate the intense sun well, and where the soil dries out the fastest.
4. Railroad Tie Steps With Crushed Stone Treads
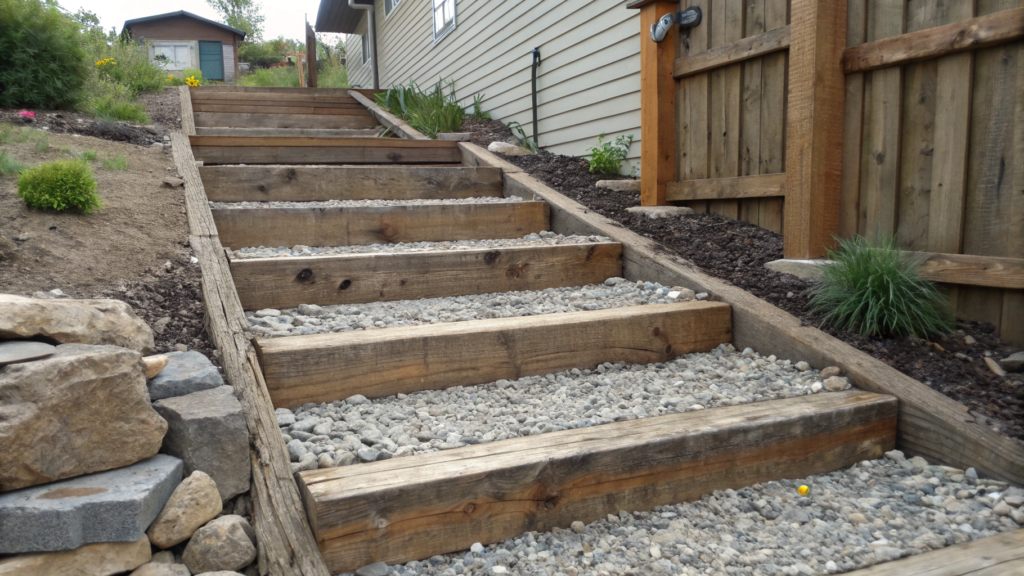
Railroad tie steps filled with crushed stone look solid and reliable at the same time. The wood adds structure, the stone fill makes the surface comfortable to walk on, and the final result often looks much more expensive than the actual cost of the materials.
Old railroad ties treated with creosote are usually not the best choice for residential yards. For home landscapes, people more often use landscape timbers or new untreated beams that create a similar look but are considered safer around gardens and living areas.
What You’ll Need
- Wooden beams or treated landscape timbers, such as 6-Pack Pressure Treated Landscape Timbers on Amazon
- Small crushed stone for the stair treads
- Gravel for the base
- A shovel
- A level
- A measuring tape
- Metal stakes or rebar for securing the beams
- A hand tamper
- Gloves
How to Build Steps on a Slope
- Choose the path of the stairs
Walk the slope several times and see where climbing feels the most comfortable. The best route is not always perfectly straight. Sometimes a slight curve makes the climb feel much easier. - Mark the number of steps
For comfortable walking, each step is usually around 6–7 in high (15–18 cm). The depth should ideally be at least 12–16 in (30–40 cm), especially on steeper hills. - Start from the bottom
The bottom step sets the level for the entire structure. First, dig out a small flat area, add gravel for the base, and compact it well. - Install the first timber
Place the beam along the front edge of the step and secure it with metal stakes. It’s much easier to check the level immediately than to fix alignment problems later. - Create the tread surface
Fill the space behind the timber with gravel or crushed stone. Lightly compact the fill so the surface doesn’t sink after rain. - Move up to the next level
Each new step partly rests against the slope above it. It’s usually easier to work gradually: one step, then fill, then compact, then move to the next step. - Keep the spacing consistent
Even small differences in step height become noticeable while walking, especially in the evening or after rain. It helps to actually walk the stairs during construction instead of relying only on measurements. - Add drainage if needed
If the slope stays wet for a long time after rain, small drainage channels are sometimes added along the sides of the stairs.
Plants That Look Good Around These Steps
Plants that soften the hard lines of wood and stone usually work especially well here:
- creeping thyme;
- ornamental grasses;
- sedum;
- dwarf junipers;
- lavender;
- heuchera;
- low evergreen shrubs.
On shady slopes, ferns and hostas often look great between the steps as well.
Helpful Tip
Try not to make the steps too narrow just to save space. In real use, a few extra inches of depth make a huge difference, especially when carrying tools, watering cans, or baskets up and down the hill.
For the treads, angular crushed stone usually works better than smooth round pebbles. The rougher gravel locks together more easily and shifts less under your feet.
With steps like these, climbing the slope becomes safer, the yard becomes easier to maintain, and the hill itself stops looking like an awkward problem area and starts feeling like an attractive part of the landscape.
5. Dry Creek Bed Runoff Channel With River Rock
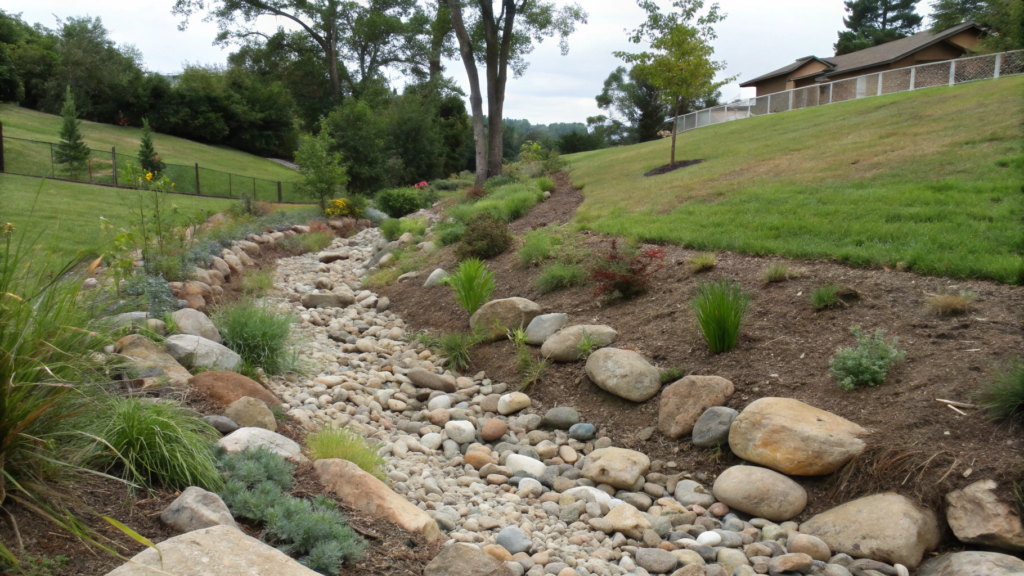
On sloped yards, water eventually starts carving its own path straight through the landscape. We had one area like this near the side of our yard. After winter rains, water rushed downhill so aggressively that mulch kept washing away and some plants ended up with nearly exposed roots. What finally helped was a dry creek bed runoff channel, which ended up looking like a natural part of the landscape instead of a drainage solution.
What You’ll Need
- River rock or smooth pebbles in different sizes
- Gravel for the lower base layer
- Landscape fabric
- Large rocks or boulders for the edges
- A shovel
- A rake
- Work gloves
- A garden hose for shaping the layout
- Drought-tolerant plants if desired
How to Build a Dry Creek Bed on a Slope
- Find the natural water flow
After rainfall, watch where the water naturally moves downhill. In most cases, the slope already shows you the best location for the channel. There’s usually no reason to completely redirect the flow. - Mark the shape of the creek bed
Use a hose or rope to create a soft curved line for the future dry creek bed. Gentle curves almost always look better than a perfectly straight channel. The width is usually around 18–36 in (45–90 cm) depending on how much water moves through the area. - Remove the soil
The channel is usually dug about 4–8 in deep (10–20 cm). In the center, you can make a slightly deeper section to help water move more easily after heavy rain. - Compact the base
If the soil is loose, lightly compact the bottom of the channel. On steeper slopes, this helps prevent stones from shifting over time. - Lay the landscape fabric
The fabric helps reduce weeds and keeps the stones looking cleaner longer. The edges are usually secured with rocks or landscape staples. - Add the gravel base layer
A thin layer of gravel helps stabilize the bottom and improves drainage. Around 2 in (5 cm) is usually enough. - Place larger stones along the edges
Boulders and larger rocks make the channel look more natural and help maintain the shape after storms. It usually looks better when part of the rock is slightly buried into the ground. - Fill the channel with river rock
Larger stones are often placed near the center while smaller pebbles go closer to the edges. Mixed stone sizes make the dry creek bed feel much more natural. - Add plants between the rocks
Ornamental grasses, sedum, junipers, or groundcovers look especially good along the edges. They soften the look of the stone and help connect the whole feature to the slope.
Plants That Usually Work Best
Near dry creek beds, plants that tolerate sun and occasional dry conditions usually perform best:
- ornamental grasses;
- creeping juniper;
- lavender;
- sedum;
- echinacea;
- yarrow;
- blue fescue;
- sage;
- creeping thyme.
In slightly wetter spots near the lower end of the channel, irises or dwarf sedges can also work nicely.
Helpful Tip
Try not to use only one size of smooth round pebbles. In nature, dry creek beds always look more varied — one large rock here, a patch of smaller gravel nearby, then another cluster of boulders farther down. Mixing different stone sizes instantly makes the slope feel more natural.
It’s also smart to make the channel slightly wider than you think you need. After especially heavy rain, water almost always spreads farther than expected.
With a dry creek bed like this, you quickly notice that the slope becomes more stable, water moves through the yard in a much more controlled way, and the whole area looks cleaner even during the driest parts of the year.
6. Groundcover Terrace Using Creeping Juniper
Small terraces with creeping juniper groundcover are a great way to landscape some of the most difficult slopes. It looks especially beautiful once the juniper slowly starts covering the surface like a dense carpet. The slope begins to feel more unified, while the surrounding stone and wood stand out much more visually.
Junipers work especially well on slopes because of their dense root systems and drought tolerance. You can usually notice the difference after just a couple of growing seasons.
What You’ll Need
- Creeping juniper
- Stones, blocks, or wooden beams for small terraces
- Compost
- Mulch or decorative stone
- A shovel
- Garden gloves
- A rake
- Drip irrigation if needed
How to Build Terraces With Creeping Juniper
- Divide the slope into several levels
There’s no need to build tall, dramatic terraces. Even small stepped sections around 12–18 in high (30–45 cm) already help hold the soil in place and make the planting areas look cleaner. - Create flat planting areas
Around the planting zones, lightly level the surface so water doesn’t immediately run downhill after watering. On steeper slopes, this becomes especially important during the first months after planting. - Install terrace borders
Stones, concrete blocks, or wooden beams all work well for smaller terrace levels. It’s usually better to partially bury them in the ground so the structure stays stable after rain. - Prepare the soil
Creeping juniper doesn’t like heavy, overly wet soil. If the ground feels dense, people usually mix in some compost and loosening materials before planting. - Leave enough room for growth
Small juniper plants can look pretty modest at first, which makes it easy to plant them too close together. Most varieties need around 3–5 ft of spacing (90–150 cm) depending on the type. - Mulch the surface
Decorative stone or mulch can be added between young plants. This helps retain moisture and reduces weed growth. - Water regularly only in the beginning
Once established, juniper usually requires very little maintenance. Mature plantings often only need watering during especially hot and dry periods.
What You Can Add Between the Terraces
To keep the slope from looking too uniform, you can mix in:
- decorative boulders;
- blue fescue;
- sedum;
- low ornamental grasses;
- lavender;
- thyme;
- dwarf evergreen plants.
I especially like the combination of blue-green juniper with sandy stone or light-colored gravel.
Helpful Tip
Don’t try to cover the entire slope with plants right away. During the first year or two, creeping juniper spreads fairly slowly, and that’s completely normal. Slopes usually start looking much more natural gradually, as the plants slowly connect together over time.
One more thing worth planning early: on sunny slopes, it’s smart to leave some type of access path even if it doesn’t seem necessary right now. After a few seasons, you’ll probably still need a way to reach the upper part of the slope for pruning, irrigation repairs, or maintenance around nearby plants.
Over time, the juniper covers most of the surface, the slope becomes more stable, and the whole yard starts looking more balanced and maintained even during the driest summer months.
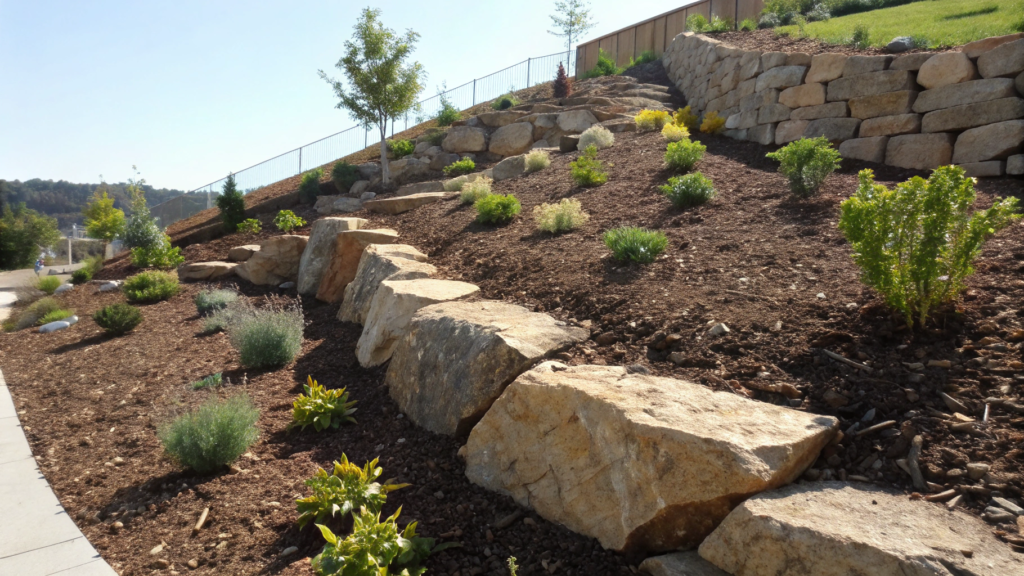
7. Boulder Accent Line With Low Water Grasses
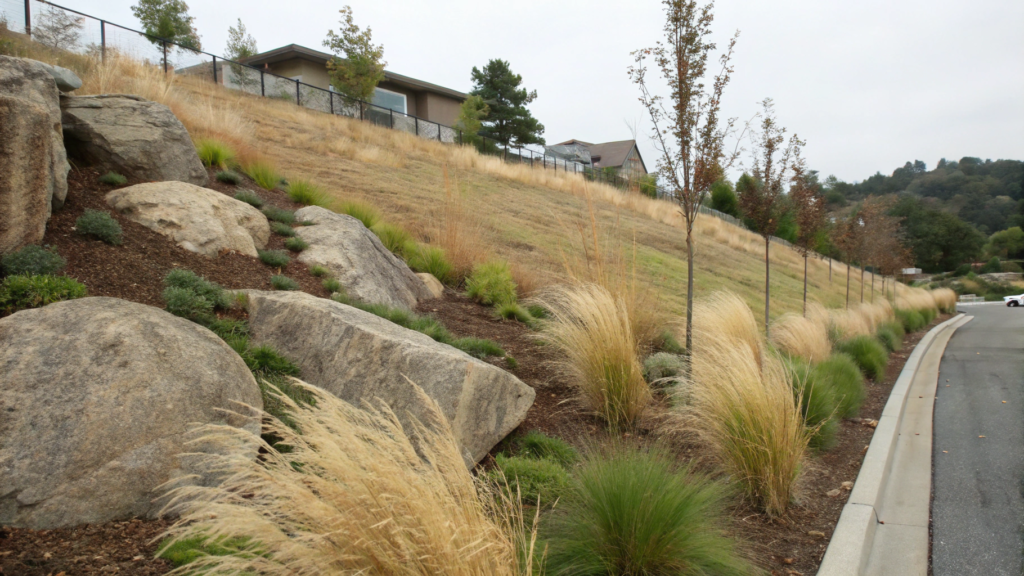
A line of large boulders combined with drought-tolerant ornamental grasses can make a slope feel much more dimensional. And it does this without complicated flower beds, expensive plantings, or constant watering. The stones add texture and structure, while the grasses move in the wind and visually break up the long repetitive line of the hill.
This type of landscaping also looks good almost year-round. Even during winter, the boulders still hold the structure of the space, while dry grasses continue adding volume instead of leaving the slope looking empty.
What You’ll Need
- Large boulders or decorative rocks
- Drought-tolerant ornamental grasses
- Gravel or decorative stone
- Compost
- A shovel
- Gloves
- A wheelbarrow for moving rocks
- Landscape fabric if needed
How to Landscape a Slope With Boulders and Ornamental Grasses
- Plan the main rock line
Try not to arrange the boulders in a perfectly straight row. A soft diagonal line or slightly curved layout usually looks much more natural along a slope. - Place the largest rocks first
The biggest boulders usually go in first, then the smaller elements are added around them. In most cases, an odd number of large rocks with uneven spacing looks better visually. - Partially bury the boulders
Rocks almost always look more natural when part of them sits below ground level. If they’re simply placed on top of the soil, the slope can start looking like a rock display area at a garden center. - Prepare planting spaces for the grasses
Leave planting areas around 18–36 in wide (45–90 cm) between the boulders. If the slope is especially dry or rocky, mixing compost into the soil usually helps. - Plant grasses in groups
Ornamental grasses usually look better in repeating clusters of 2–5 plants rather than single plants spaced evenly across the hill. - Add gravel or rock mulch
A thin layer of decorative gravel helps retain moisture and gives the slope a cleaner appearance. Natural gray or sandy tones usually look especially good. - Leave some open space
There’s no need to completely fill the slope with plants and stones. Small open areas help the whole composition feel calmer and more expensive.
Grasses That Usually Work Well
For sunny slopes with minimal watering, people often choose:
- blue fescue;
- mexican feather grass;
- fountain grass;
- switchgrass;
- little bluestem;
- fescue;
- feather grass;
- dwarf miscanthus.
Lavender, sage, sedum, and creeping juniper also pair beautifully with large boulders.
Helpful Tip
Try not to place boulders of the same size at equal distances from each other. In nature, rocks almost never appear that evenly arranged, and on a slope it can immediately start looking too artificial.
It’s also usually better not to cut ornamental grasses down immediately in fall after the season ends. On slopes, the dry grass clumps help maintain visual structure through winter, and frost or snow on the grasses tends to look much more interesting than bare soil.
8. Sloped Yard Micro Patio With Pea Gravel
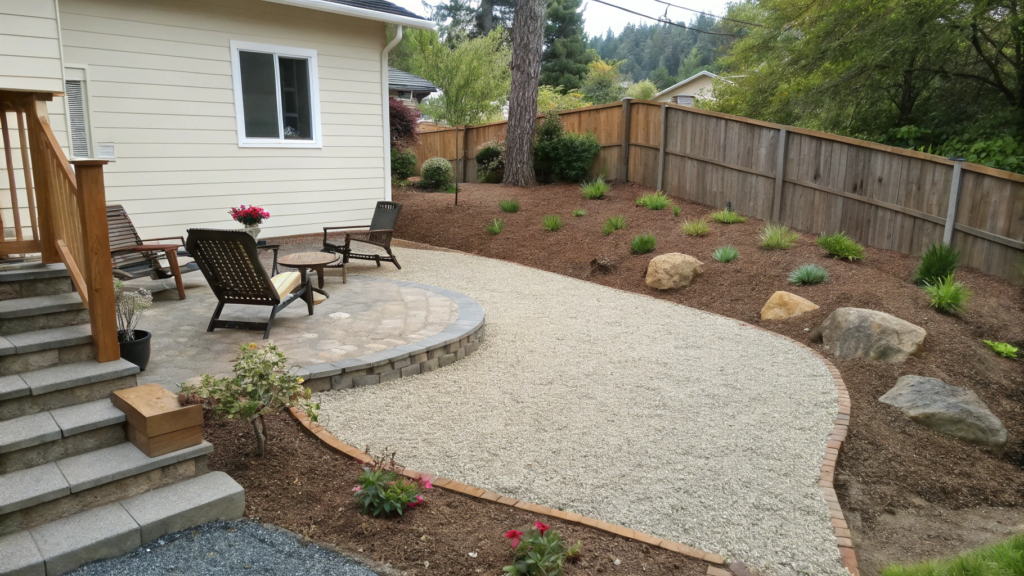
What I really like about micro patios on slopes is that they don’t require a huge budget or complicated construction. Especially if you use pea gravel instead of full paving. Add a couple of small chairs and a few plants, and the slope still feels natural while looking much more intentional and inviting.
What You’ll Need
- Small pea gravel, such as decorative gravel Southwest Boulder & Stone Pea Gravel on Amazon
- Gravel for the base layer
- Landscape fabric
- Stones, blocks, or wooden beams to hold the patio edge in place
- A shovel
- A rake
- A hand tamper
- A level
- Outdoor chairs or a small bench
- Container plants if desired
How to Build a Small Patio on a Slope
- Choose a spot with the best view
On slopes, even a tiny patio feels completely different when it overlooks trees, a garden, or a sunset. It’s worth walking around the yard a few times before deciding where you’d actually want to sit. - Create a flat surface
Usually, part of the slope is cut into slightly while the lower edge gets lightly built up. For a micro patio, an area around 6×8 ft or 8×10 ft (1.8×2.4 m or 2.4×3 m) is often enough. - Reinforce the outer edge
The lower edge of the patio should be supported with stones, blocks, or wooden beams right away. Otherwise, pea gravel will slowly start sliding downhill after rain. - Compact the base
A layer of gravel around 3–4 in thick (7–10 cm) is usually spread over the prepared area and compacted well. This helps the patio stay level much longer. - Lay the landscape fabric
The fabric helps reduce weeds and keeps the gravel separated from the soil underneath. - Add the pea gravel
The top layer is usually around 2–3 in thick (5–7 cm). The surface is lightly smoothed with a rake. After the first rains, part of the gravel naturally settles into place. - Add furniture and plants
Smaller patios usually look better when they aren’t overcrowded. In many cases, two chairs, a small table, and a couple of containers with herbs or ornamental plants are more than enough.
Plants That Fit Well Around a Micro Patio
Near patios like this, certain plants tend to look especially natural:
- ornamental grasses;
- lavender;
- junipers;
- herb containers;
- low evergreen plants;
- solar lanterns;
- large boulders;
- wooden planters.
Small surrounding plantings help the patio feel connected to the yard instead of looking like an isolated little island.
Helpful Tip
For slopes, smaller pea gravel usually works much better than large decorative rock. Fine gravel is easier to walk on and makes outdoor furniture feel more stable.
It’s also better not to make these patios too large. In real yards, compact slope patios often feel cozier and require far fewer retaining structures. A small area with two chairs usually ends up being used much more often than a large patio near the house.
I’ve also noticed that these patios work especially well in upper yard areas that would otherwise stay empty and unused. The slope suddenly becomes part of daily life, and the yard itself gains another functional level instead of just a long incline of dirt and grass.
9. Backyard Slide Path for Kids With Safety Mulch

Instead of constantly fighting with a slope, it can actually become a fun slide path for kids with a soft mulch landing area. The hill stops eroding, and children suddenly get a space that feels intentionally designed for them instead of just being an awkward part of the yard.
You also don’t need expensive playground structures here. Even a simple slope starts feeling like a play area once you add soft safety mulch, a comfortable slide path, and a few plants around it.
The American Consumer Product Safety Commission specifically recommends soft surfaces like mulch or engineered wood fiber in play areas to help reduce injuries from falls. On slopes, that matters even more because movement speed is naturally higher than on flat ground.
What You’ll Need
- Soft playground mulch
- A shovel
- A rake
- Landscape fabric if needed
- Wooden beams or logs for edging the path
- Gravel for drainage if needed
- Small boulders or plants for the edges
- Gloves
- A garden hose for shaping the layout
How to Build a Kids’ Slide Path on a Slope
- Choose a safe slope
Slopes with a moderate incline and without large rocks or sudden drops usually work best. The bottom area should always have enough open space for stopping safely. - Mark the shape of the path
Slide paths rarely look best when perfectly straight. Gentle curves or slight turns usually feel more natural and visually interesting. A width around 3–4 ft (90–120 cm) is common. - Clear the slope of rocks and roots
Before adding mulch, remove anything sharp or hard that could end up underneath the surface. It’s especially important to carefully check the lower part of the slide area. - Create a shallow recessed path
Usually around 3–5 in of soil (7–12 cm) is removed so the mulch stays more contained and doesn’t spread across the slope too quickly. - Install edging along the sides
Wooden beams or small logs work especially well here. They help keep the mulch in place and make the path look more intentional. - Add drainage if necessary
If the slope tends to stay wet after rain, adding a little gravel near the lower section can help water drain away faster. - Add a thick layer of safety mulch
Play areas usually need around 4–6 in of mulch (10–15 cm). On active slopes, the mulch gradually shifts downhill over time, so it occasionally needs to be raked back into place and topped off. - Test the slide path several times
Before kids start using it heavily, it’s smart to walk the full route yourself and check for overly fast sections, slippery spots, or areas where the mulch quickly slides downhill.
What Looks Good Around a Slide Path
Around these types of play areas, people often add:
- low ornamental grasses;
- log seating;
- small flags or trail markers;
- boulders;
- wooden side steps;
- solar lanterns;
- shrubs along the slope edges.
If there’s enough room nearby, kids often start using the upper part of the slope as a little play zone or “base camp.”
Helpful Tip
Try not to use regular decorative wood chips meant for flower beds. They usually scatter much faster on slopes and often contain harder, rougher pieces of wood. Playground mulch tends to be softer and works much better for active use.
It’s also worth planning a simple climbing path next to the slide route right away. After the first ten rides down the hill, kids almost always start looking for the shortest way back up
These play paths work especially well in backyards where the slope previously sat completely unused. Kids naturally start spending more time there, and the hill itself finally gets a clear purpose instead of remaining an awkward area everyone avoided.
10. Front Yard Mailbox Terrace With Native Perennials
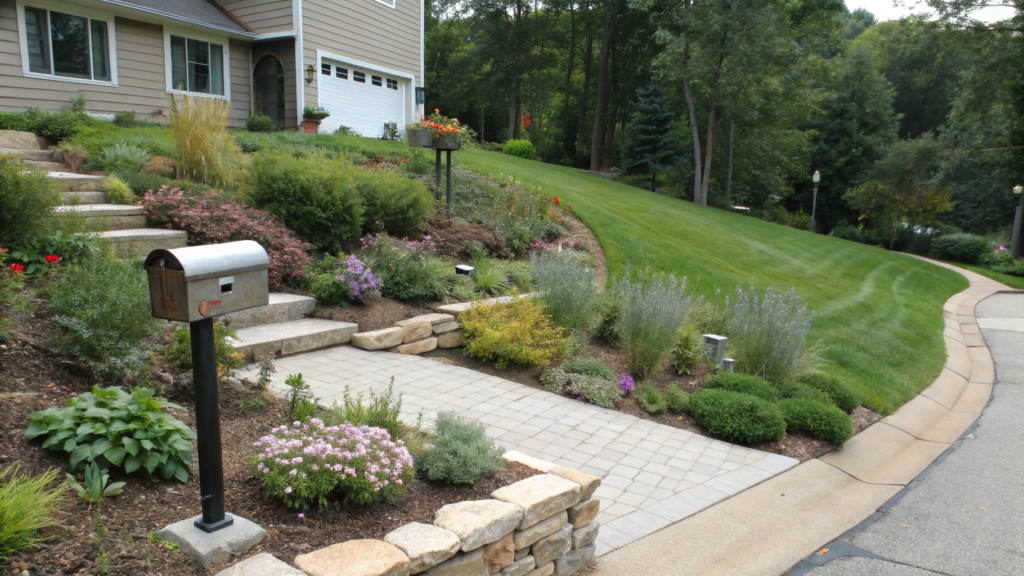
The space around a mailbox on a slope can look surprisingly attractive when it’s placed inside a small terrace filled with native perennials.
What I like about this idea is that it doesn’t require replanting flowers every season. The perennials slowly spread over time, the slope becomes more stable, and the mailbox itself stops looking like a lonely post in the middle of the yard.
Native perennials are also a great choice for front yard landscaping because they’re usually better adapted to the local climate, need less water once established, and help support pollinators.
What You’ll Need
- Stones, blocks, or small boulders for building the mini terrace
- Native perennial plants
- Compost
- Mulch or decorative gravel
- A shovel
- A rake
- Gloves
- A garden hose for marking the shape
- Low-growing perennials for sunny areas, such as Purple Coneflower Echinacea Seeds on Amazon.
How to Build a Mailbox Terrace
- Choose the shape of the terrace
Around a mailbox, soft rounded or slightly stretched shapes usually work best. Tiny circles often look random, especially on a slope. - Lightly level the area
On a slope, even a small flat step around the mailbox base can make a huge visual difference. The height change is usually minimal, but it immediately helps the planting area look cleaner. - Install stones or blocks
Small rocks along the lower edge help hold soil and mulch in place after rain. Partially burying some of the stones also makes the terrace feel more stable and natural. - Prepare the planting soil
Soil near roads is often dry and compacted. Adding compost helps perennial roots establish themselves faster. - Plant in repeating groups
Instead of mixing too many different flowers together, repeating a few plant groupings usually creates a cleaner look. On smaller front yard terraces, this becomes especially noticeable. - Add mulch or decorative gravel
Mulch helps hold moisture and reduces weeds. On sunny slopes, decorative gravel can also look especially attractive. - Leave room to access the mailbox
This sounds obvious… until the plants suddenly start blocking the mailbox door or make it annoying to reach after rain.
Perennials That Usually Work Well Here
For sunny roadside slopes, plants that tolerate heat and require minimal maintenance are usually the best fit:
- echinacea;
- black-eyed susan;
- sage;
- yarrow;
- lavender;
- coreopsis;
- penstemon;
- blue fescue;
- low ornamental grasses.
If the area gets partial shade, heuchera or dwarf hostas can also work nicely.
Helpful Tip
Try not to make the plantings too tall near the road. Once plants completely hide the mailbox base or start leaning over the walkway, the whole area can quickly begin looking messy.
It’s also important to think about how perennials look at the end of the season, not just while blooming. Some plants start collapsing or losing shape after August, and on small front yard terraces this becomes very noticeable.
Even a small landscaped area around a mailbox can start feeling like a complete part of the yard, while the roadside slope itself looks much more maintained without requiring constant care.
Useful Slopes
A slope rarely becomes your favorite part of the yard right away. Usually it starts with awkward climbs, washed-out soil after rain, and the feeling that you honestly have no idea what to do with the space. But once paths, terraces, stones, or planting areas appear, the whole yard starts feeling completely different.
Surprisingly, many of these projects are actually realistic to build without a massive budget if you approach them gradually instead of trying to rebuild the entire slope in one weekend.If you also have a difficult slope in your yard, I’d genuinely love to hear how you’ve been landscaping it or what ideas you’ve already tried. Share your experience and ideas in the comments.