Black eyed peas recipes — a strange thing. Just regular beans, nothing special. But once you start cooking them, they somehow quietly become part of your routine.
At first it’s just “let’s try it, everyone does it.” And then you catch yourself thinking about which version to make this time. And honestly, there are way more options than it seems.
Some are classic with ham, thick and calm. Some are quick versions that save you in the evening when you’re out of energy. There are meatless recipes where the flavor builds differently. And some where spices and small details make all the difference.
Here you’ll find 10 recipes you can actually cook at home. Not because you have to, but because they turn out good and make sense.
And almost every one of them, over time, you’ll want to tweak a little to fit your taste. And that’s normal.
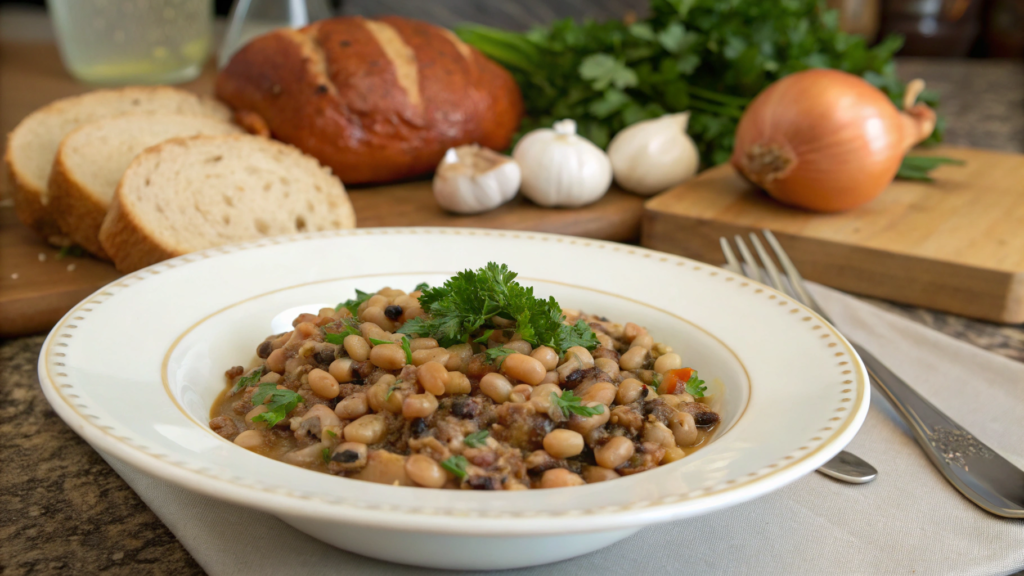
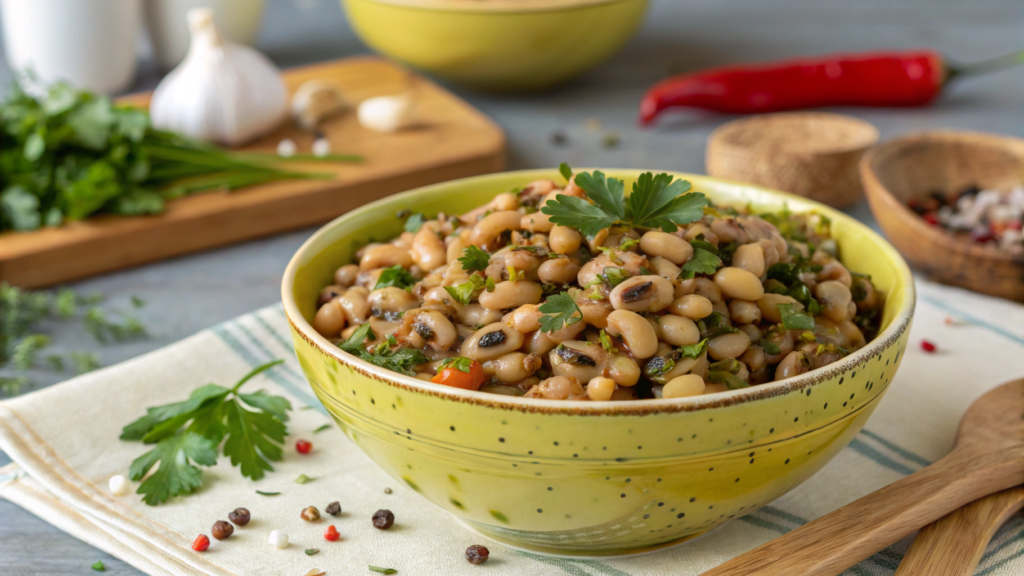
1. Classic Southern-Style Black Eyed Peas with Ham
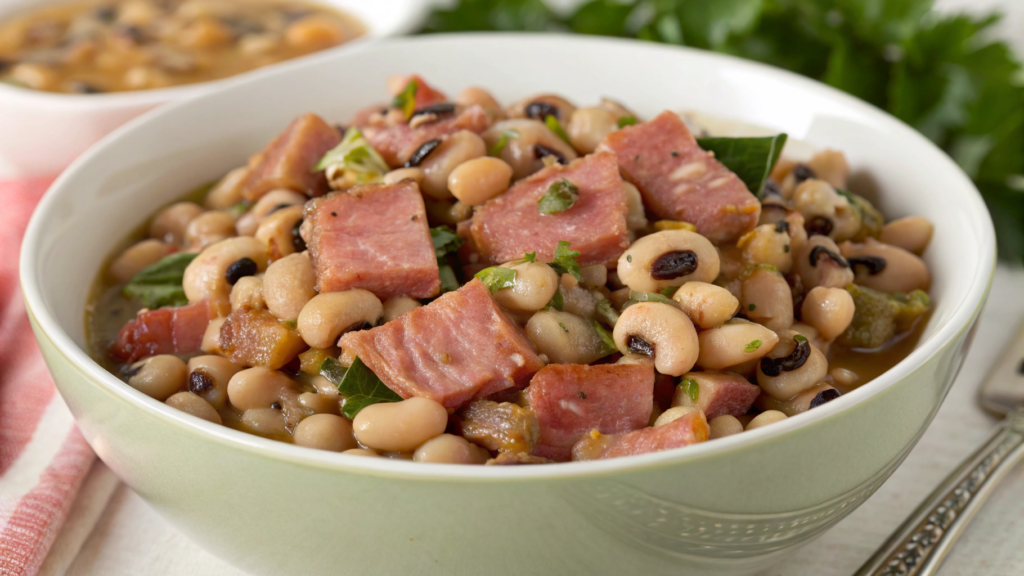
Black eyed peas recipes are simple ingredients, a clear process, and a result that doesn’t disappoint. Once you master this base version, all the others start to feel like variations.
Ingredients
There’s no long list of ten spices here. Everything is grounded and logical, and that’s exactly why the flavor feels complete, not overloaded.
What matters isn’t just the amount of ingredients, but their quality — especially the ham.
- 1 pound (≈450 g) dried black eyed peas
- 6 cups (≈1.4 L) water or chicken broth
- 1 smoked ham hock or 1–1.5 cups (≈200–250 g) chopped ham
- 1 medium onion, chopped
- 3 garlic cloves, minced
- 1 teaspoon salt (to taste)
- ½ teaspoon black pepper
- ½ teaspoon smoked paprika
- 1 bay leaf
- 1 tablespoon olive oil
If you cook dishes like this often, it makes sense to use a solid heavy pot, like the Lodge 6 Quart Enameled Cast Iron Dutch Oven.
Preparation
A lot of people skip this step and then wonder why the beans take forever to cook or stay firm inside. Soaking isn’t complicated, but it changes the result a lot.
If you want a softer texture without extra time at the stove — don’t ignore it.
- Rinse the beans under cold water and remove anything unwanted
- Cover with water and leave for 6–8 hours or overnight
- Before cooking, drain and rinse again
If you don’t have time — you can cook them as is. But plan for more time and expect a slightly firmer texture.
How to cook
Here it’s not just about following steps, but understanding what’s happening. That’s what makes the dish consistent, not random.
The process is simple, but it needs attention to detail.
- Heat the oil and start with the onion
Place the pot over medium heat and add olive oil. Let it warm for about 30–40 seconds. Add the onion and cook for 4–5 minutes, stirring occasionally. It should become soft, slightly translucent, and start giving off a sweet aroma.
Don’t let it brown — you need a soft base, not caramelization. - Add garlic and don’t rush
Once the onion is ready, add the minced garlic. Stir and cook for about a minute. If you overcook it, it turns bitter — and that’s hard to fix later. - Bring the ham into the process
Add the chopped ham or ham hock right into the pot. Let it warm through for 2–3 minutes with the onion and garlic. - Add beans and liquid
Add the prepared beans and immediately pour in water or broth. The liquid should cover the beans by about 1–2 inches (2–3 cm). Stir so nothing sticks to the bottom — especially important if the pot is already hot. - Add spices and bring to a boil
Add bay leaf, paprika, and black pepper. Be careful with salt — the ham already adds some. Bring to a gentle boil over medium heat. Not aggressive bubbling, just steady movement. - Lower heat and simmer
Reduce heat to low and cover the pot, leaving a small gap. The dish should gently simmer, not boil hard. Let it cook for 1–1.5 hours, stirring occasionally and checking liquid levels. Add hot water if needed. - Check doneness and adjust
After about an hour, taste the beans. They should be soft but still hold shape.
If they’re still firm — just keep cooking. Time works in your favor here.
At the end, taste the broth and add salt if needed. - Handle the ham hock (if using)
Remove the ham hock, take the meat off the bone, and return it to the pot.
Stir and let it sit for a few more minutes on low heat.
This process isn’t fast, but it’s straightforward. Nothing extra — just a gradual build-up of flavor.
What to pay attention to
There are a few details that strongly affect the result. You won’t see them directly in the recipe, but they decide whether the dish feels rich or flat.
Keep these in mind and the result will almost always be solid.
- Beans shouldn’t fall apart — that means the heat was too high
- Thin broth usually means it needed more simmering time
- Weak flavor is often caused by low-quality ham
- It’s better to salt at the end to avoid overdoing it
- Foam may appear at the beginning — it’s better to skim it off
And one more thing. If it feels done — give it another 10–15 minutes. The difference is noticeable.
From our experience
The next day, the broth thickens and everything tastes more насыщенный. If you try it, pay attention to the ham. It’s interesting how much it changes the final result.
Serving
This dish doesn’t need complicated plating, but a few details make it noticeably better. Everything stays simple.
And this is one of those cases where small additions enhance the flavor, not distract from it.
- Serve in a deep bowl
- Add freshly ground black pepper
- Sprinkle some green onions on top
- Serve with cornbread on the side
Sometimes we add a few drops of apple cider vinegar — it doesn’t make the dish sour, but it brings out the flavor. When it’s served hot, with steam and that smoky aroma… nothing else is really needed.
2. Smoky Crock Pot Black Eyed Peas for Busy Weeknights
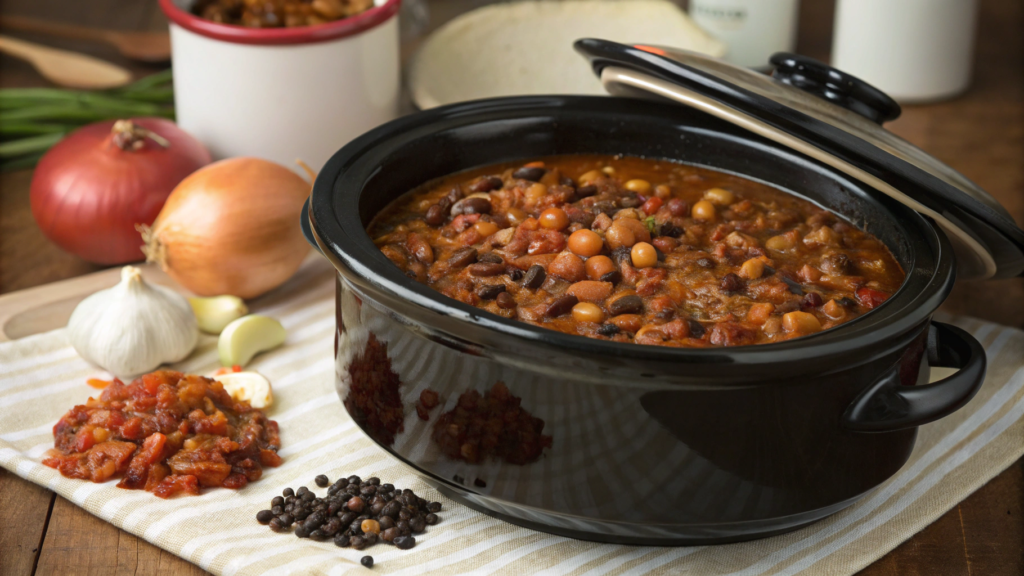
This is a hands-off slow cooking version. You throw everything in, go about your day, come back — and you’ve got something warm, thick, and with that smoky flavor.
And honestly, it feels like the slow cooker handles this better than the stovetop.
Ingredients
The ingredients are almost the same as the classic version. But there are a couple of details that help build more flavor without active effort.
And yes — in a slow cooker, spices develop more gently, so the balance shifts a bit.
- 1 pound (≈450 g) dried black eyed peas
- 6 cups (≈1.4 L) chicken broth or water
- 1–1.5 cups (≈200–250 g) chopped smoked ham
- 1 medium onion, chopped
- 3 garlic cloves, minced
- 1 teaspoon salt (to taste)
- ½ teaspoon black pepper
- 1 teaspoon smoked paprika (you can go slightly heavier here)
- ½ teaspoon dried thyme
- 1 bay leaf
- 1 tablespoon olive oil
If you plan to cook like this often, take a look at the Crock-Pot 7 Quart Oval Manual Slow Cooker.
Preparation
You can simplify things in a slow cooker, but it’s still not a good idea to skip prep completely. Especially when it comes to the beans.
- Rinse the beans and check for any debris
- If possible, soak for 4–6 hours (not required, but better)
- Drain before adding to the slow cooker
If you skip soaking — just increase the cooking time. Everything else stays the same.
How to cook
With a slow cooker, you can end up with “just food” — or something actually rich. The difference is in the details.
- Build the base directly in the pot
Add beans, onion, garlic, and ham into the slow cooker. Try to spread everything evenly instead of dumping it in one spot. This helps the flavor distribute evenly, instead of staying in layers. - Add liquid and spices
Pour in broth or water — it should fully cover the beans with a little extra. Add paprika, thyme, pepper, and bay leaf.
Be careful with salt — it’s better to adjust at the end than fix an over-salted dish after hours of cooking. - Add a bit of fat for balance
Pour in a tablespoon of olive oil on top. It’s a small step, but it makes the texture smoother, especially if your ham is lean. - Set the mode and walk away
Turn on the slow cooker:
- LOW for 7–8 hours
- or HIGH for 4–5 hours
- LOW for 7–8 hours
- If you can — go with LOW. The flavor turns out deeper and softer.
- Check toward the end
About an hour before it’s done, open the lid and taste the beans. They should be soft but still hold shape. If there’s too much liquid — leave the lid slightly open so it reduces a bit. - Adjust the flavor
At the very end, add salt to taste. Stir and let it sit for another 10–15 minutes on warm. This gives the flavor time to come together, instead of feeling separate. - Optional texture adjustment
If you want it thicker — lightly mash a small portion of the beans right in the pot.
Not everything, just about 10–15%. The broth becomes noticeably richer right away.
That’s it. After that, the slow cooker takes care of everything.
What to pay attention to
Slow cooking feels easy, but there are still a few things that can go wrong. Not many — but worth knowing.
- Don’t open the lid too often — you lose heat and extend cooking time
- If beans stay hard after 6–7 hours — they’re probably old
- Too much liquid is normal — easy to fix by reducing
- Lack of flavor is usually from mild ham or too few spices
- Salt builds stronger in slow cooking — better to under-salt at first
And one more thing. In a slow cooker, flavor develops slowly but evenly.
Time-saving tip
If you make these beans often, try cooking a double batch. Keep part in the fridge for 2–3 days, and freeze the rest in portions — it becomes a ready-to-use base.
Let the dish cool completely before freezing — that helps preserve texture and keeps the beans from turning watery when reheated.
Serving
Serving stays simple, but a few details make it feel more like real home food. Nothing complicated — just finishing touches.
- Serve hot in a deep bowl
- Add freshly ground black pepper
- Top with green onions or parsley
- Serve with cornbread or simple toast
You can add a few drops of hot sauce — not for heat, but to enhance the flavor. After resting for 10–15 minutes, the dish actually tastes better.
3. Instant Pot Black Eyed Peas in Under 30 Minutes
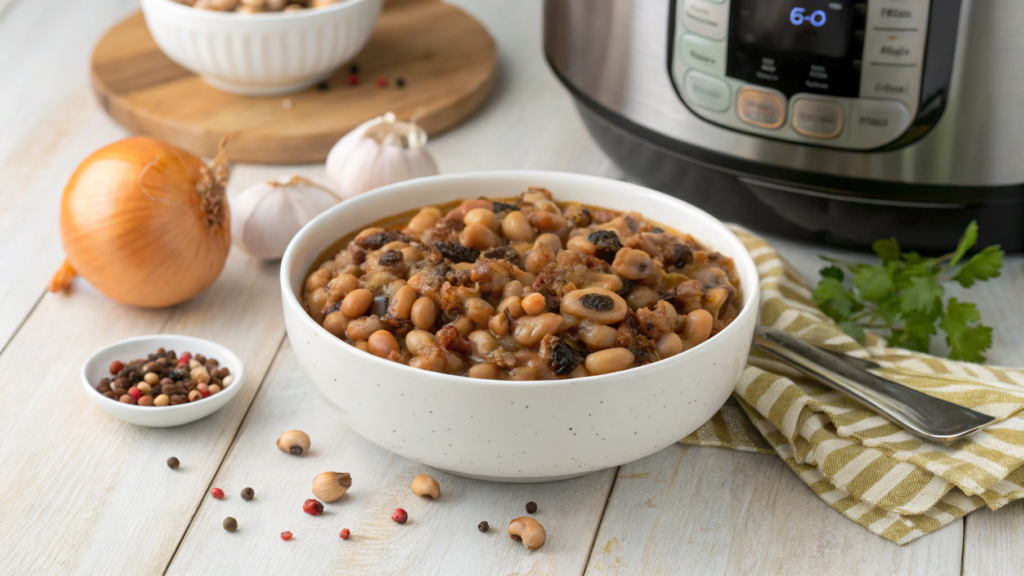
Black eyed peas recipes don’t always need long slow cooking. Sometimes you want that same rich flavor, but faster — without spending a whole day with a slow cooker.
That’s where the Instant Pot comes in. Here, the technique really saves time without sacrificing flavor.
Ingredients
Liquid plays a key role here — it affects both the texture and the depth of flavor.
- 1 pound (≈450 g) dried black eyed peas
- 4–4.5 cups (≈950 ml – 1.1 L) water or chicken broth
- 1–1.5 cups (≈200–250 g) chopped smoked ham
- 1 medium onion, chopped
- 3 garlic cloves, minced
- 1 teaspoon salt (to taste)
- ½ teaspoon black pepper
- 1 teaspoon smoked paprika
- ½ teaspoon dried thyme
- 1 bay leaf
- 1 tablespoon olive oil
If you don’t have a pressure cooker yet, take a look at the Instant Pot Duo 7-in-1 Electric Pressure Cooker — it’s one of the most reliable options, especially for beans.
Preparation
Good news — you can skip soaking here. That’s exactly what makes this recipe convenient.
But there’s still one detail you shouldn’t ignore.
- Rinse the beans under cold water
- Remove damaged or very small ones
- If you have 1–2 hours — you can lightly soak them (helps with even cooking)
Without soaking, it still works great — the texture will just be slightly firmer.
How to cook
The process is fast, but it needs precision. With the Instant Pot, the steps matter.
If you do everything carefully, the result is very consistent.
- Turn on sauté mode and build the base
Turn on sauté mode and add olive oil. Once the pot heats up, add the onion and cook for 3–4 minutes until soft. Then add garlic and cook for about a minute, stirring constantly. - Add the ham and build flavor
Add the ham to the pot and let it heat through for 2–3 minutes. At this point, fat starts to release, and the flavor becomes richer. It’s a short step, but it makes a big difference. - Add beans and liquid
Add the beans and immediately pour in water or broth. The liquid should fully cover the beans, but not go too far above — balance matters here. Stir to make sure nothing sticks to the bottom. - Add spices
Add bay leaf, paprika, thyme, and black pepper. Be careful with salt — pressure cooking intensifies flavor. Stir again so everything is evenly distributed. - Close the lid and select the mode
Close the lid and set the valve to sealing. Choose Pressure Cook (or Manual):
- 15 minutes for a firmer texture
- 18–20 minutes for softer beans
- 15 minutes for a firmer texture
- Let the pressure release naturally
When the program ends, don’t rush to open it. Let the pressure release naturally for 10–15 minutes, then carefully open the valve. This step matters — the beans continue to cook inside. - Adjust flavor and texture
Open the lid and taste the beans. Add salt if needed and stir. If you want a thicker broth — turn on sauté for a few minutes or mash a small portion of the beans.
That’s it. At this point, the dish is fully ready.
What not to ignore
Fast cooking doesn’t forgive mistakes, but they’re easy to avoid if you know the key points.
These details help keep the result consistent.
- Not enough liquid can cause pressure errors
- Too much water makes the flavor diluted
- Don’t open the lid right away — the beans won’t finish properly
- Salt is better added at the end
- Old beans may stay firm even under pressure
In the Instant Pot, there’s no time for flavor to “develop on its own,” so you need to build it at the start — through sautéing and a proper base, not during cooking.
Time-saving tip
If you use the Instant Pot often, try cooking without soaking but increase the time by 2–3 minutes — it gives a good balance between speed and texture.
And one more thing: after cooking, leave it on Keep Warm for 15–20 minutes — the flavor becomes deeper, almost like it cooked longer.
Serving
Serving stays similar to the classic version, but because of the denser texture, the dish feels slightly different. And that can work in your favor.
- Serve hot in a deep bowl
- Add freshly ground black pepper
- Sprinkle some fresh herbs on top
- Serve with rice or cornbread
Sometimes this version is even more convenient — it comes out more structured and holds its shape better.
4. Stove Top Black Eyed Peas with Bacon and Onions
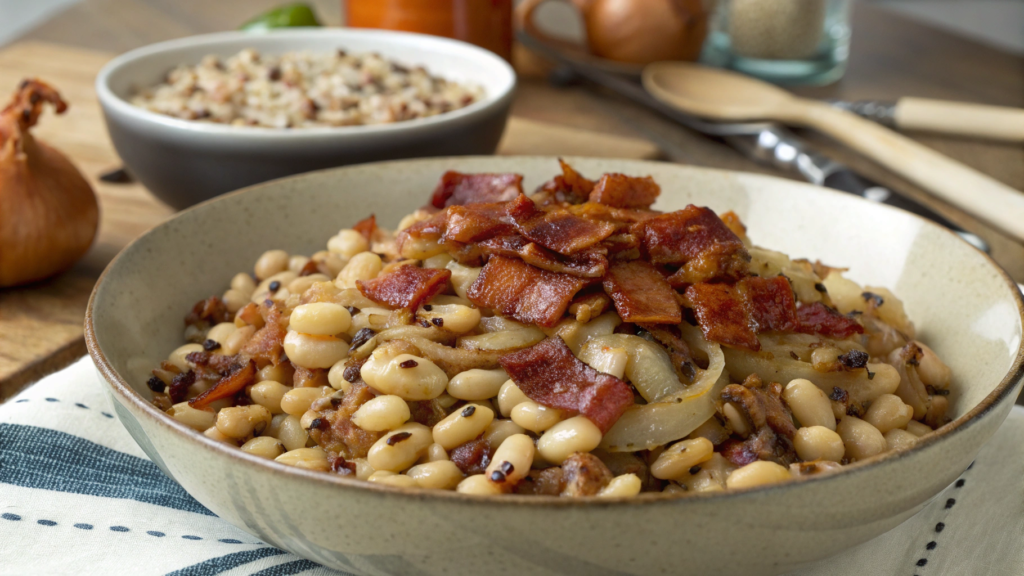
Black eyed peas recipes don’t always need a smoked ham hock or long simmering. Bacon and properly cooked onions give the dish a completely different character — brighter, slightly more “fried,” with crispy notes.
Ingredients
Everything here is built around bacon. It brings fat, salt, and aroma — and that immediately shifts the flavor profile of the dish.
- 1 pound (≈450 g) dried black eyed peas
- 5–6 cups (≈1.2–1.4 L) water or chicken broth
- 6–8 strips bacon (≈200–250 g), chopped
- 1 large onion, chopped
- 3 garlic cloves, minced
- 1 teaspoon salt (to taste)
- ½ teaspoon black pepper
- ½ teaspoon smoked paprika
- 1 bay leaf
Preparation
Preparation matters a bit more here than it seems. Bacon cooks fast, beans don’t — and you want everything to come together at the right time.
A couple of simple steps ahead of time make the whole process easier.
- Rinse the beans and soak them for 6–8 hours
- Drain before cooking
- Cut the bacon into small pieces (about 1 inch / 2–3 cm)
If you skip soaking, the beans will take longer to cook, and the bacon may lose its texture by that point.
How to cook
This recipe starts with frying. That’s where most of the flavor develops. Don’t rush — let each step do its job.
- Cook the bacon to the right texture
Heat a pot or deep pan over medium heat and add the bacon. Cook for 6–8 minutes, stirring occasionally. It should turn golden and slightly crispy, but not dry out.
Once ready, move part of the bacon to a plate, leaving the fat in the pot. Keep some pieces inside for the flavor base. - Add onions and use all the fat
Add chopped onion into the same fat. Cook for 5–7 minutes until soft and lightly browned at the edges. This is where depth builds — the onion absorbs the bacon fat and becomes more насыщенный. - Add garlic and keep it quick
Add the garlic and cook for about a minute. Stir actively so it doesn’t burn.
The aroma becomes noticeably stronger — that’s your sign everything is going right. - Add beans and liquid
Add the prepared beans and pour in water or broth. The liquid should cover the beans by about 1–2 inches (2–3 cm).
Stir to lift everything from the bottom — that’s where the concentrated flavor is. - Add spices and bring to a boil
Add bay leaf, paprika, and black pepper. Bring to a boil over medium heat, then reduce immediately. Don’t add salt yet — bacon already gives enough at this stage. - Simmer until ready
Lower the heat and cook for 1–1.5 hours. Cover with a lid, leaving a small gap.
Stir occasionally and keep an eye on the liquid level. - Return bacon and finish the flavor
Add the reserved bacon back into the pot. Taste and adjust salt if needed.
Let it sit for 5–10 minutes on low heat — the flavor becomes more cohesive.
This version turns out a bit bolder and more expressive than the classic one. And that’s exactly its strength.
What to pay attention to
In this recipe, a lot depends on the beginning. If the bacon and onion are done right — the rest becomes easy. The mistakes are usually the same.
- Overcooked bacon loses texture and flattens the flavor
- Undercooked onion means no depth
- Too much heat while simmering breaks the beans apart
- Adding salt too early makes it easy to overdo
- Not enough liquid leads to uneven cooking
And one more thing. Bacon fat is not a byproduct — it’s the foundation of flavor. Don’t remove it.
A tip that boosts flavor
If you want a deeper taste, keep part of the bacon for serving and cook part of it with the onions. That creates balance: some flavor inside the dish, some in the texture on top.
And it noticeably changes how each bite feels.
Serving
Serving here can feel a bit more rustic — and it works well.
Nothing extra, just a focus on texture.
- Serve hot, with bacon pieces on top
- Add some fresh green onions
- Sprinkle with black pepper
- Serve with cornbread or just warm bread
Sometimes this version is even eaten on its own, without any side dish.
5. Vegetarian Black Eyed Peas Stew with Collard Greens
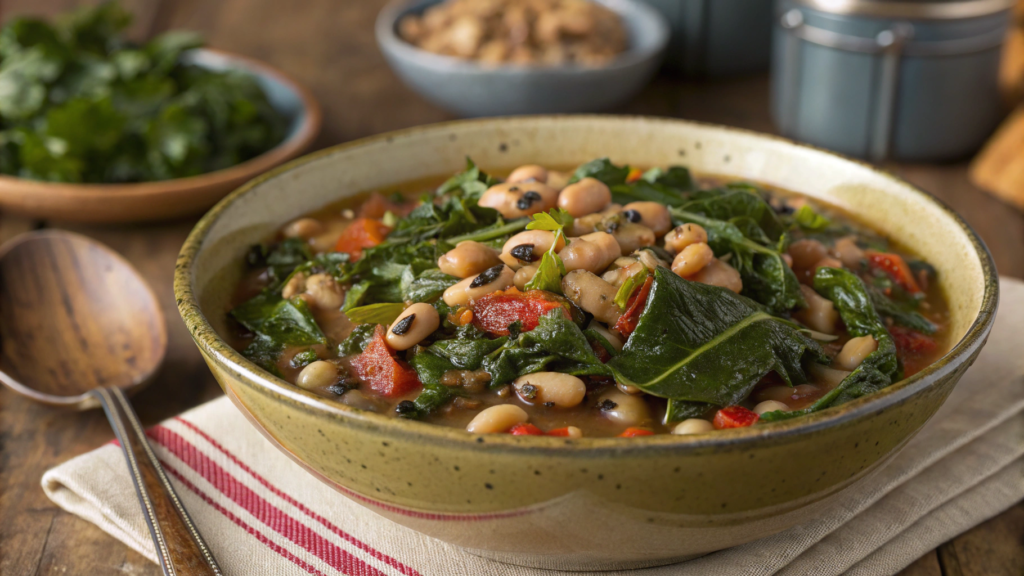
Black eyed peas recipes can feel completely different — built through greens, spices, and the right broth texture.
This version skips ham and bacon, but still gives a deep, насыщенный flavor that doesn’t feel empty. And yes, collard greens do half the work here.
Ingredients
It’s important not to overload the ingredient list — that keeps the flavor clean and clear.
- 1 pound (≈450 g) dried black eyed peas
- 5–6 cups (≈1.2–1.4 L) vegetable broth or water
- 1 large bunch collard greens (≈200–250 g), chopped
- 1 medium onion, chopped
- 3 garlic cloves, minced
- 1 carrot, diced small
- 1 teaspoon salt (to taste)
- ½ teaspoon black pepper
- 1 teaspoon smoked paprika
- ½ teaspoon dried thyme
- 1 bay leaf
- 1–2 tablespoons olive oil
Preparation
Here, preparing the greens properly matters. They’re dense, with a strong texture, and if you just throw them in as is — they can feel rough.
A couple of steps make them noticeably softer and more pleasant.
- Rinse the beans and soak for 6–8 hours
- Drain before cooking
- Remove tough stems from the collard greens and slice the leaves into strips
If the greens are young — you can leave some stems, but older ones are better removed completely.
How to cook
This recipe builds gradually. First the base, then the beans, and only at the end the greens — that’s how you keep both texture and flavor balanced.
- Start with the vegetables
Heat olive oil in a pot over medium heat. Add onion and carrot, cook for 5–7 minutes until soft. The onion should turn translucent, and the carrot should become slightly sweet. - Add garlic and spices
Add garlic, paprika, and thyme. Cook for about a minute, stirring активно. At this point, the spices open up and the aroma becomes deeper. - Add beans and liquid
Add the beans and pour in vegetable broth or water. The liquid should cover everything by about 1–2 inches (2–3 cm). Stir and lift everything from the bottom of the pot. - Bring to a boil and lower heat
Add bay leaf and black pepper. Bring to a gentle boil, then reduce heat to low. Cover with a lid, leaving a small gap. - Cook until beans are tender
Let it simmer for 1–1.5 hours. Stir occasionally and check the liquid level. Add hot water if needed. - Add collard greens at the right moment
About 20–25 minutes before it’s done, add the chopped greens. Stir — at first they’ll seem like a lot, but they quickly shrink. This step matters: if added too early, the greens lose their structure. - Adjust flavor and let it rest
At the end, add salt to taste. Let the dish sit for 10–15 minutes on low heat or just covered. This is when the flavor becomes more cohesive.
This version turns out softer in taste, but still full and balanced.
What to pay attention to
There’s no meat here, so keeping depth matters. That comes from technique, not extra ingredients.
A few details make the difference.
- If greens go in too early — they turn overcooked
- Not enough spices makes the flavor flat
- Too much heat breaks the beans’ texture
- Vegetable broth gives a richer result than water
- At the end, you can add a bit of acidity (vinegar or lemon juice) for balance
And one more thing. Here, the flavor builds in layers, not all at once.
A tip that improves flavor
If you want more depth without meat, add a bit more smoked paprika at the start and slightly increase the olive oil. That creates a richer feel, even without animal fat.
And another trick — let the dish sit for 20–30 minutes after cooking. The flavor becomes noticeably more integrated.
Serving
This dish works great on its own. It’s hearty and filling, but you can still enhance it with simple touches.
And here, texture matters just as much as flavor.
- Serve hot in a deep bowl
- Add some fresh herbs on top
- Lightly drizzle with lemon juice
- Serve with bread or rice
Sometimes people add hot sauce — it contrasts well with the softness of the beans.
6. Vegan Black Eyed Peas with Smoky Paprika
This recipe is also meat-free, with no complicated ingredients. And all the work here is done by smoked paprika — it gives that same depth that usually comes from bacon or ham.
This recipe came up on one of those days when “there’s nothing at home.” Well — beans are there, onion is there, spices are there… And from that, you can easily build a dish you end up making again and again.
Ingredients
Before the list — one small thing: don’t skimp on paprika. It’s what defines the character of this dish.
- 2 cups (≈400 g) dried black eyed peas or 2 cans (15 oz / ≈425 g each)
- 1 medium onion, chopped
- 3 garlic cloves, minced
- 2 tablespoons olive oil
- 1.5 teaspoons smoked paprika
- ½ teaspoon black pepper
- ½ teaspoon cumin (optional)
- 3–4 cups (≈700–900 ml) vegetable broth
- 1 bay leaf
- 1 teaspoon apple cider vinegar or lemon juice
- salt to taste
Important note — if you’re using dried beans, it’s better to soak them overnight. It’s not required, but the texture will be more even.
How to cook
- Prepare the beans
If using dried beans — soak them for at least 6–8 hours, then rinse. If using canned — just drain and rinse. This removes the heavy, “canned” taste. - Build the aromatic base
Heat olive oil over medium heat. Add onion and cook for 5–6 minutes until soft and slightly sweet. No need to brown it — the goal is to soften it. - Add garlic and spices
Add garlic, smoked paprika, pepper, and cumin. Stir and cook for about a minute. At this point, the spices start releasing aroma — that’s your signal everything is working. - Add beans and liquid
Add the beans, pour in vegetable broth, and add the bay leaf. The liquid should slightly cover the beans, but not turn it into soup. - Let the flavor develop
Bring to a light boil, then reduce heat and cook:
- 35–45 minutes for dried beans
- 15–20 minutes for canned
- 35–45 minutes for dried beans
Stir occasionally. The broth will gradually thicken, and the flavor becomes richer.
- Final balance
At the end, add apple cider vinegar or lemon juice. This is not for sourness — it’s for balance. Taste, add salt if needed, and let it sit for 5 minutes.
There’s no meat here, but the flavor still comes out deep — as long as you don’t skip the spice step.
What to pay attention to
In vegan recipes, it’s easy to end up with something clean but empty. Here, that’s avoidable if you don’t skip the details.
And those details make the difference.
- Smoked paprika is the key ingredient — without it, the flavor is simpler
- Oil matters — it carries the spice flavor
- Broth works better than water — the difference is noticeable
- A bit of acidity at the end makes the flavor brighter
- Don’t rush the heat — let the beans develop properly
This is one of those cases where simple ingredients give a solid result — if handled carefully.
Helpful tip
If the flavor feels not strong enough, don’t rush to add more spices. Try adding a bit of acidity (vinegar or lemon) and a little salt first.
Very often, that’s enough for the flavor to open up, and the dish changes completely.
Serving
Serving is simple, but you can add a bit of texture and freshness. And it immediately changes how the dish feels.
- Serve hot in a deep bowl
- Add some fresh herbs (parsley or cilantro)
- Drizzle a bit of olive oil on top
- Serve with rice or bread
If you want a bit of contrast — a squeeze of fresh lemon juice on top works really well.
7. Black Eyed Peas and Rice (Hoppin’ John Classic)
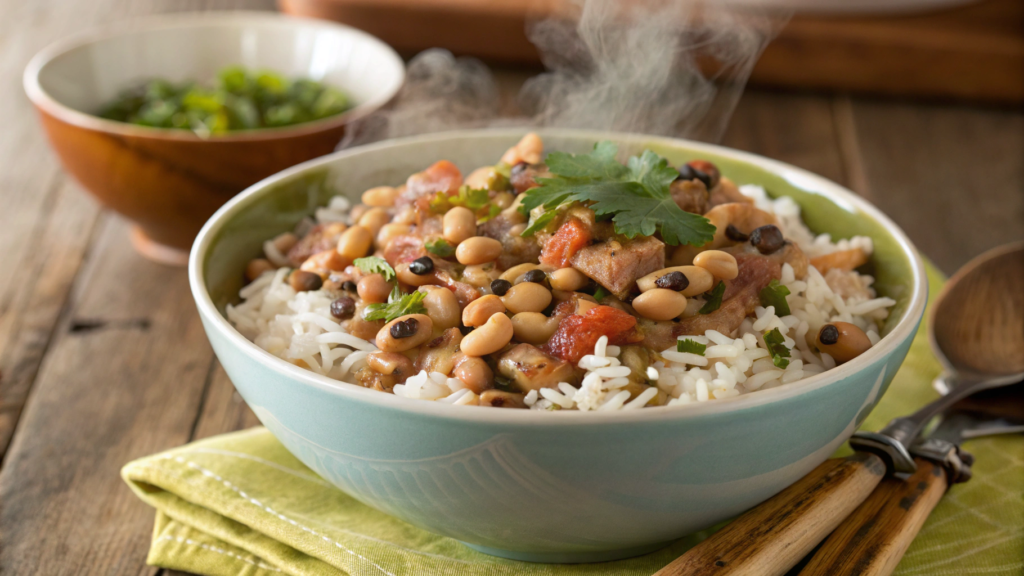
This is a classic Southern dish: black eyed peas, rice, an aromatic base, and a flavor that feels simple but very home-like.
In this recipe, everything comes together in one bowl — hearty, texture, aroma, and a light smokiness. And if you do it right, you don’t need anything else.
Ingredients
Hoppin’ John doesn’t have an overloaded ingredient list, but balance matters a lot. The beans shouldn’t get lost behind the rice, and the rice shouldn’t feel like just a filler.
That’s why proportions matter, and the aromatic base shouldn’t be skipped.
- 1 pound (≈450 g) dried black eyed peas
- 1 cup long-grain white rice (≈190–200 g)
- 5–6 cups (≈1.2–1.4 L) chicken broth or water for the beans
- 1–1.5 cups (≈200–250 g) chopped smoked ham or 5–6 strips bacon
- 1 medium onion, chopped
- 1 celery stalk, finely chopped
- 1 small green bell pepper, diced
- 3 garlic cloves, minced
- 1 teaspoon salt (to taste)
- ½ teaspoon black pepper
- ½ teaspoon smoked paprika
- 1 bay leaf
- 1 tablespoon olive oil (if using ham instead of bacon)
Preparation
Before cooking, decide whether you’ll cook the rice separately or add it directly at the end. The second option works better, because it gives you more control over texture and avoids overcooked rice.
Plus, separately cooked rice is easier to reheat and store later.
- Rinse the beans and soak them for 6–8 hours or overnight
- Drain before cooking
- Rinse the rice 2–3 times until the water runs clearer
If using bacon, cut it into pieces ahead of time. If using ham — prep it in advance so you don’t get distracted once the base is already cooking.
How to cook
This recipe works better when you don’t rush to mix everything too early. First build rich beans, then cook proper rice, and only then combine them so each part keeps its character.
- Start with the aromatic base
Place a heavy pot over medium heat. If using bacon, add it first and cook for 5–7 minutes until it releases fat and starts to turn golden. If using ham, heat olive oil first, then add the ham and cook for 2–3 minutes.
After that, add onion, celery, and bell pepper. Cook everything together for about 6–8 minutes, stirring occasionally, until the vegetables soften and the kitchen fills with that “right” aroma.
No aggressive frying here — the vegetables should soften and absorb the fat. - Add garlic and spices, but don’t overdo it
Once the vegetables are soft, add garlic, paprika, and black pepper. Stir and cook for about a minute. This step is short but important — garlic should open up, and spices should warm in the fat.
If you overcook the garlic, it brings bitterness, which doesn’t belong here. - Add beans and liquid
Add the prepared beans and pour in broth or water. The liquid should cover the beans by about 1–2 inches (2–3 cm), since some will evaporate during cooking.
Add bay leaf, stir gently, and bring to a light boil. Not aggressive bubbling — just steady movement. - Simmer until beans are tender
Lower the heat, cover the pot with a small gap, and cook for 1–1.5 hours. Stir occasionally and check the liquid level. If needed, add hot water gradually.
The beans should become soft but not fall apart. If the heat is too high, the outer layer breaks before the inside is ready. - Cook the rice separately
While the beans are cooking, prepare the rice. In a separate pot, combine 1 cup rice with about 1.75–2 cups water (≈420–480 ml), add a pinch of salt, and bring to a boil.
Then reduce heat to low, cover, and cook for 15–18 minutes until the water is absorbed.
Turn off the heat and let it sit covered for another 10 minutes. Then fluff with a fork.
This step matters — if you mix raw or overcooked rice into the beans, the dish won’t have the right texture. - Combine rice and beans properly
Once the beans are ready, taste the broth and adjust salt. Remove the bay leaf. Then gradually mix the cooked rice into the beans, not all at once.
Stir gently so the rice absorbs the flavor without breaking apart. If there’s still too much liquid, let the beans sit uncovered for a few minutes before adding rice.
This keeps the final texture more structured, not mushy. - Let it rest
Once combined, turn off the heat and leave Hoppin’ John covered for 5–10 minutes.
It’s a small step, but it works. The rice absorbs aroma, the structure settles, and the dish becomes more cohesive.
In the end, this is not just rice with beans — it’s a full Southern dish with smokiness, soft texture, and a very clear, home-style flavor.
What to pay attention to
This recipe has one common issue: it’s easy to make it too dry or too wet. That’s why it’s important to watch the texture, not just follow steps.
A few things really help avoid mistakes.
- If you add rice too early, it absorbs too much liquid and turns overly soft
- If beans are overcooked, they fall apart when mixed
- Too much liquid at the end makes it spoon-like instead of fluffy
- Separately cooked rice gives a much cleaner texture
- Bacon gives a stronger, more direct flavor, while ham is softer and deeper
And one more thing. Hoppin’ John shouldn’t be dry like pilaf, but it shouldn’t be soup either. The best version is soft and moist, but still holds its shape on the plate.
Helpful tip
If you want a more aromatic result, cook the rice separately and then mix it into the beans gradually — not the other way around. That gives you better control over texture and avoids a heavy, sticky mass.
And one more thing: the next day, this dish reheats really well if you add just 1–2 tablespoons of water before warming it up. The rice softens again and doesn’t dry out.
Serving
Serve Hoppin’ John hot, while the rice is still fluffy and the beans are soft and rich. It doesn’t need complicated plating, but a few simple details make it better.
- Serve in a deep plate or wide bowl
- Add some fresh green onions on top
- Sprinkle with freshly ground black pepper
- Serve with cornbread or warm crusty bread
If you want a slightly brighter flavor, you can add a few drops of hot sauce. But don’t overdo it — the focus should stay on the beans, rice, and smoky base.
8. Easy New Year’s Day Black Eyed Peas Tradition
Black eyed peas recipes can look very different. Sometimes with rice, sometimes with greens, sometimes just with a piece of bread. This version is as straightforward as it gets. Just a solid dish you can cook even on a busy day.
Ingredients
Everything here is very basic. And this is exactly the case where simplicity works best.
- 1 pound (≈450 g) dried black eyed peas
- 5–6 cups (≈1.2–1.4 L) water or chicken broth
- 1 cup (≈150–180 g) chopped ham or 3–4 strips bacon
- 1 medium onion, chopped
- 2–3 garlic cloves, minced
- 1 teaspoon salt (to taste)
- ½ teaspoon black pepper
- ½ teaspoon smoked paprika
- 1 bay leaf
- 1 tablespoon olive oil (if not using bacon)
If you want to simplify things and not watch the stove, you can use a Crock-Pot, but this version works perfectly in a regular pot too.
Preparation
There’s nothing complicated here, but a bit of prep helps avoid extra stress. Especially if you’re cooking on a holiday when a lot is happening at the same time.
It’s better to do a couple of things in advance and cook calmly.
- Rinse the beans under cold water
- Soak them for 6–8 hours or overnight
- Drain before cooking
If you don’t have time — you can cook them as is, just increase the time. But soaked beans cook more evenly and give a softer texture.
How to cook
- Prepare the aromatic base
Heat a pot over medium heat, add oil or start with bacon. If using bacon — cook it for 5–6 minutes until it starts releasing fat. If using ham — just warm it for 2–3 minutes. Then add onion and cook for another 5 minutes until soft. This creates the base that spreads through the whole dish. - Add garlic and spices
Add garlic, paprika, and black pepper. Stir and cook for about a minute. Don’t overcook the garlic — it should bring aroma, not turn dark. - Add beans and liquid
Add the beans and pour in water or broth so they are covered by about 1–2 inches (2–3 cm). Stir so nothing sticks to the bottom. Add the bay leaf. - Bring to a boil and reduce heat
Bring to a gentle boil, then lower the heat. Cover with a lid, leaving a small gap.
The dish should simmer, not boil aggressively. - Cook until tender
Let it cook for 1–1.5 hours. Stir occasionally and check the liquid level. Add hot water if needed. The beans should be soft but still hold their shape. - Adjust the flavor
At the end, add salt to taste. Taste the broth — it should be rich but not heavy. If using bacon, you may need very little extra salt. - Let it rest
Turn off the heat and leave it covered for 10–15 minutes. During this time, the flavor becomes more balanced, and the broth thickens slightly.
What to pay attention to
It’s easy to make this too simple and lose flavor. But a few details help avoid that.
And then even a basic recipe feels like a complete dish.
- If you use mild ham or bacon without a smoky taste, the dish will be less rich
- Strong boiling breaks the bean texture
- Not enough salt makes the flavor feel diluted
- Too much water at the end makes it watery
- Letting it rest after cooking is almost necessary
Helpful tip
If you’re making this specifically for New Year’s Day, try cooking it in the morning or even the night before.
After a few hours, the flavor becomes deeper, and the texture more even. And on the day itself, you don’t have to stand at the stove — just reheat and serve.
Serving
Serving stays simple, but it completes the dish. Without it, something feels missing.
And there’s no need to overthink it.
- Serve hot in a deep bowl
- Add some green onions
- Lightly sprinkle with black pepper
- Serve with bread or rice
Sometimes a few drops of vinegar are added — it makes the flavor a bit brighter, but not sharper.
9. Southern Spiced Black Eyed Peas with Garlic and Herbs
This is a much more aromatic version of black eyed peas. Here the focus shifts toward spices and herbs, which makes the dish brighter, a bit more spiced, and overall more “alive”. At the same time, the goal is not to overpower the beans, but to enhance their natural flavor.
Ingredients
The key here is balance. There should be enough spices to give character, but not so much that they cover the beans completely. And one more important detail — fresh garlic and herbs really lead this recipe.
- 1 pound (≈450 g) dried black eyed peas
- 5–6 cups (≈1.2–1.4 L) chicken or vegetable broth
- 1 medium onion, chopped
- 4–5 garlic cloves, minced
- 1 teaspoon salt (to taste)
- ½ teaspoon black pepper
- 1 teaspoon smoked paprika
- ½ teaspoon cayenne pepper (optional)
- 1 teaspoon dried thyme
- ½ teaspoon dried oregano
- 1 bay leaf
- 2 tablespoons olive oil
- fresh parsley or green onion for serving
Preparation
Before you start cooking, it helps to prep everything in advance. This recipe moves faster than it seems, and it’s much easier when everything is ready.
Also, garlic is better chopped ahead of time so you don’t rush it at the wrong moment.
- Rinse the beans and soak them for 6–8 hours
- Drain before cooking
- Measure all spices and prep garlic in advance
If you skip soaking, cooking time will increase, and the way spices come through might feel slightly different.
How to cook
- Heat the oil and soften the onion
Place a pot over medium heat, add olive oil, and let it warm up. Add onion and cook for 5–6 minutes until soft and slightly translucent.
You’re not trying to brown it — just build a smooth base. - Add garlic and release aroma
Add garlic and cook for about a minute, stirring constantly. It should become fragrant, not dark. This step is small but has a big impact on the final taste. - Add spices and bloom them in oil
Add paprika, thyme, oregano, cayenne (if using), and black pepper. Stir and cook for 30–60 seconds. This is where spices open up in the fat, making the flavor deeper and more layered. - Add beans and liquid
Add the beans and pour in broth so they’re covered by about 1–2 inches (2–3 cm). Stir to combine everything. - Bring to a gentle simmer
Add the bay leaf, bring to a light boil, then reduce heat immediately. Cover with a slight gap. - Simmer until tender
Cook for 1–1.5 hours. Stir occasionally and check the liquid level. Add hot water if needed. The beans should be soft but still hold their shape. - Adjust and finish with freshness
Add salt to taste at the end. Remove from heat and mix in fresh herbs. Let it rest for 10–15 minutes — the aroma becomes more rounded and cohesive.
This version turns out more aromatic, slightly spiced, and very balanced.
What to pay attention to
It’s easy to overdo the spices here. But if you keep balance, the result feels clean and well-structured rather than heavy.
A few things make a real difference:
- Too many spices make the dish heavy
- Not enough fat prevents spices from developing fully
- Overcooked garlic adds bitterness
- Strong boiling breaks the bean texture
- Fresh herbs at the end noticeably improve the result
Here, the flavor is built more through aroma and layering, not just richness.
Helpful tip
If you want a deeper flavor, try adding most of the spices at the beginning, and a small pinch again at the end. This creates a more noticeable aroma.
And one more thing — if you let the dish sit for 20–30 minutes after cooking, the spices soften and blend better, making the flavor more balanced.
Serving
Serving here can feel a bit fresher than in more classic versions, and that actually works in its favor.
- Serve hot in a deep bowl
- Add fresh herbs on top
- Lightly drizzle with lemon juice
- Serve with bread or rice
If you want a bit more kick, you can add a small amount of hot sauce — just don’t overpower the spice balance.
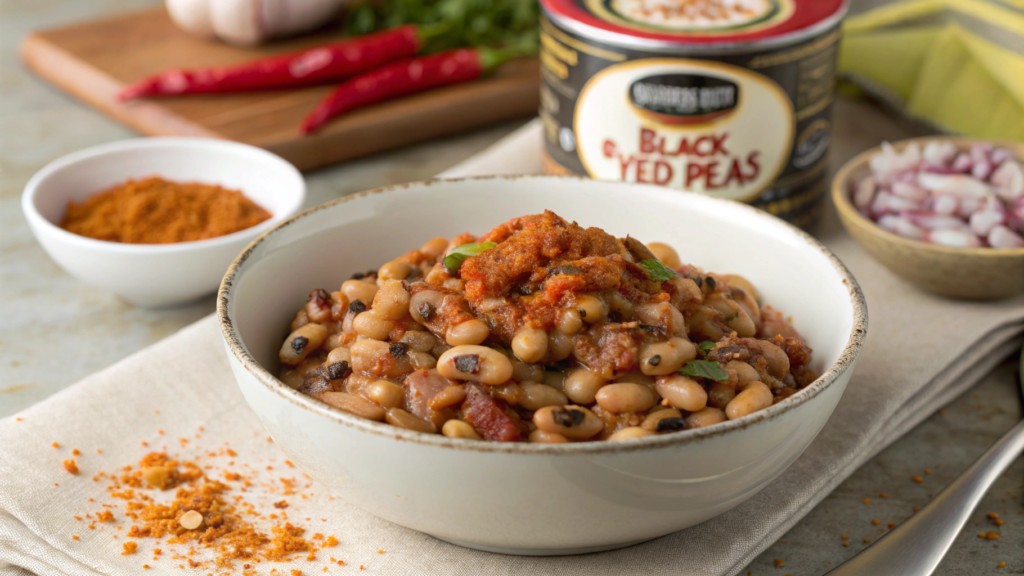
10. Comforting Canned Black Eyed Peas Upgrade

When you have a can of black eyed peas in the pantry and about 20–25 minutes, that’s already enough to make something genuinely good — not just “heat and eat.”
The difference between straight-from-the-can and this version is huge.
Ingredients
- 2 cans (15 oz / ≈425 g each) black eyed peas, drained and rinsed
- 1–1.5 cups (≈200–300 ml) chicken or vegetable broth
- 4–5 strips bacon or 1 cup (≈150–200 g) chopped ham
- 1 medium onion, chopped
- 2–3 garlic cloves, minced
- ½ teaspoon black pepper
- ½ teaspoon smoked paprika
- pinch of cayenne (optional)
- 1 teaspoon apple cider vinegar (to taste)
- 1 tablespoon olive oil (if not using bacon)
Preparation
Canned beans should always be rinsed — it removes excess liquid and that slightly “canned” taste. It only takes a couple of minutes, but it changes the result noticeably.
- Drain the cans
- Rinse under cold water
- Let them sit for a minute to dry slightly
If you skip this step, the flavor will feel heavier and less clean.
How to cook
- Start with bacon or ham
Heat a pan over medium heat. If using bacon — cook it for 5–6 minutes until golden and slightly crispy.
If using ham — add a bit of oil and warm it for 2–3 minutes.
You can set aside some bacon for topping, but keep the fat in the pan. - Add onion and build the base
In the same fat, add onion and cook for 4–5 minutes until soft. It absorbs the flavor and becomes more насыщенным → more deep and rounded in taste. - Add garlic and spices
Add garlic, paprika, and black pepper. Stir and cook for about a minute. This is where the aroma really starts to develop. - Add beans and broth
Add the rinsed beans and pour in broth. Stir to combine. Keep the liquid controlled — this is not a soup, but a thick, hearty dish. - Simmer and build flavor
Let it cook gently for 8–10 minutes. The beans absorb flavor, and the broth thickens slightly. Stir occasionally. - Add acidity for balance
Add a small amount of apple cider vinegar at the end. It doesn’t make the dish sour — it simply enhances and sharpens the flavor, making everything taste clearer. - Finish and rest
Taste and adjust salt if needed. Add the reserved bacon on top and let it sit for 2–3 minutes before serving.
What to pay attention to
A few small steps make a big difference here. This is where the upgrade really happens.
- Don’t skip rinsing — it removes the canned taste
- Not enough fat makes the dish flat
- Too much liquid turns it into soup
- Acidity at the end improves flavor noticeably
- No need to cook too long — the beans are already done
Helpful tip
Keep a couple of cans of black eyed peas in your pantry — it’s one of the fastest ways to build a real meal.
And if you add onion, garlic, and a bit of fat, even the simplest version starts to feel like proper home cooking, not something thrown together last minute.
Serving
Serving is simple, but texture matters here. A bit of contrast on top makes the dish more interesting.
- Serve hot in a deep bowl
- Add crispy bacon on top
- Sprinkle fresh herbs
- Lightly season with black pepper
It works great with bread or as a side to something simple.
Which one will you choose?
With recipes like these, it rarely happens that you just cook once and forget about it. Usually, it goes differently. You try one version — it’s good. Then you make another and start noticing the differences. By the third time, you catch yourself thinking you want that same flavor again… but slightly adjusted.
And that’s exactly when your own version appears. Not necessarily perfect, but the one you come back to without thinking — because it feels like yours.Which one will you start with? Write in the comments. It’s интересно to see which one sticks with you — the classic, the quick version, or something completely unexpected.