
A steep slope in the yard often turns into a problem because it is hard to walk on, the soil washes out after rain, and not every plant can handle the heat in full sun. But this awkward slope does not always need to be completely leveled or covered with lawn. Sometimes it is better to accept its shape and make it useful: add a comfortable path, hold the soil in place, add plants, create a small seating area, or add a water feature. In this article, we will look at 10 steep hill landscaping ideas that help make a slope more comfortable and prettier without fighting the yard too much. In some places, you may need large boulders, in others stepping stones and gravel will be enough, and in others lavender, thyme, cannas, or other full-sun plants will do the main job.
Ready to get started?
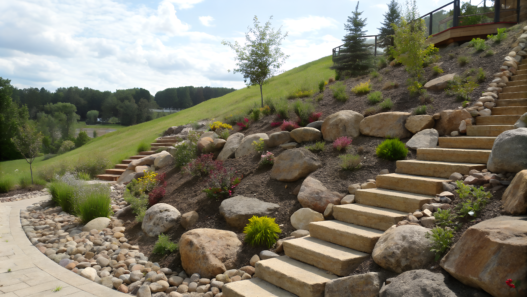
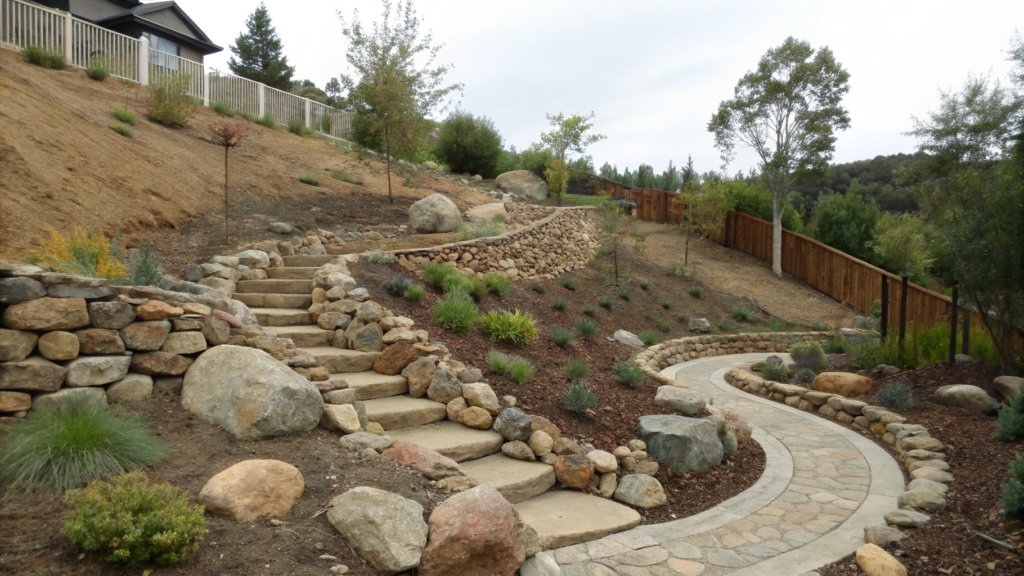
1. Boulder Staircase With Decomposed Granite Landings
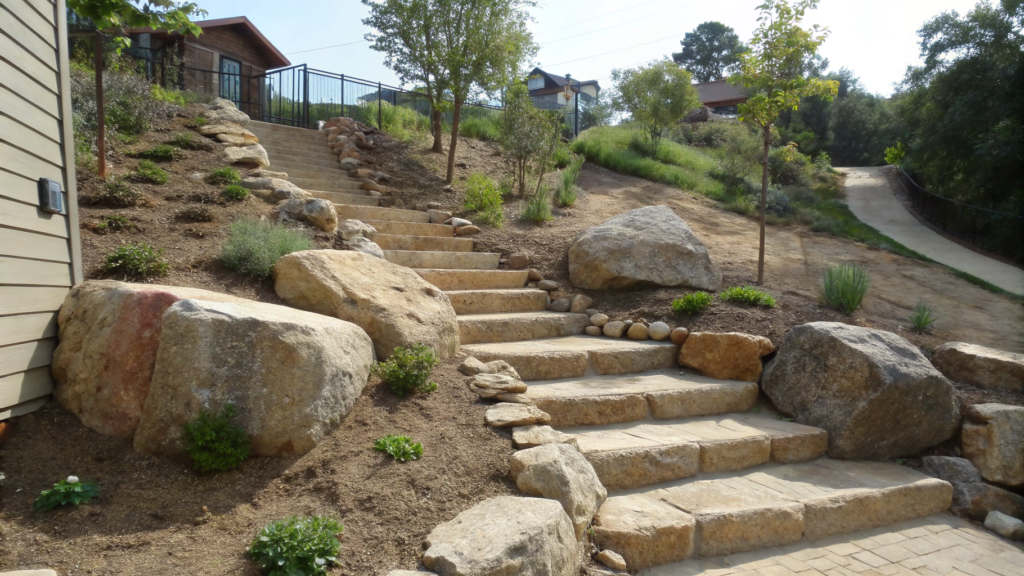
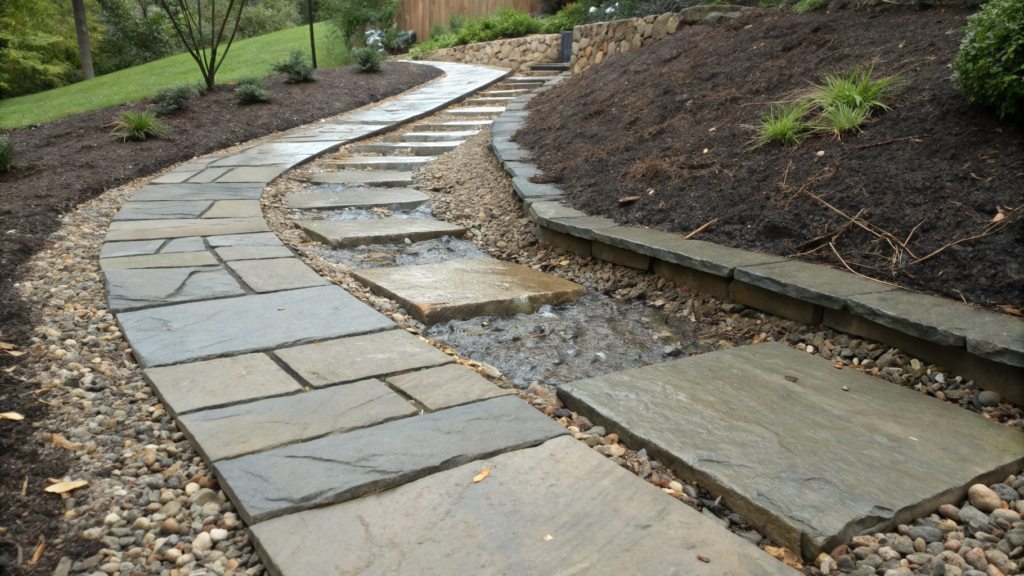
On a steep sunny slope, a staircase made from large boulders helps create a proper path where there used to be slippery soil and weeds. And decomposed granite landings between the steps give your feet a break and help water avoid rushing downhill in one stream.
This option feels convenient to me because you do not have to pour concrete over the slope. Stone looks natural, especially if you use local rock or stone that looks like what is already on the property.
For a comfortable step, it is better to make the step height about 6–8 inches (15–20 cm), and the depth about 14–18 inches (35–45 cm). If the slope is steep, it is better to add more short landings than to try to make one long staircase without breaks.
What You’ll Need
- Large flat stones or stone slabs for the steps.
- Side stones for edging. They go along the edges of the staircase and landings to hold the decomposed granite in place.
- Decomposed granite for the landings between the steps.
- ¾-inch crushed stone (about 2 cm) for the base.
- Geotextile fabric, if the soil is loose, clay-heavy, or quickly turns into mud.
- Shovel, rake, level, wheelbarrow.
- Hand tamper
- Low full-sun plants: thyme, lavender, sedum, sage, yarrow.
How to Build This Staircase
- Walk the slope first. First, look at the route you use most often around the yard: from the house to the garden, from the parking area to the backyard, from the terrace to the beds. If you put the staircase somewhere that is not convenient to walk, a second path will quickly appear nearby — already worn in by feet.
- Break the climb into steps and landings. On a steep slope, it is better not to make one long straight run. Make several stone steps, then a landing about 3–5 feet (90–150 cm) long, then steps again. This makes the climb easier, especially if you are carrying a basket, watering can, or bag of mulch.
- Cut a level shelf for each step. Steps are not placed directly on sloped ground. For each large flat stone, cut a small horizontal pad into the slope: remove extra soil from the upper side, and if needed, add crushed stone to the lower side and tamp it down. You get a tiny terrace for one step.
- Prepare the base for the steps. Add 3–4 inches (7–10 cm) of crushed stone to each of those shelves and tamp it well. Then place the large flat stone on top — this will be the step. Check that it does not wobble under your foot. You do not need to level the whole slope, only the spots for the steps and landings. The stone can be irregular in shape, but the top should be comfortable to step on.
- Make the decomposed granite landings. Between groups of steps, you also make short level areas, like small terraces. For each landing, remove about 4–6 inches (10–15 cm) of soil, lay geotextile fabric, add crushed stone, tamp it, then add about 2 inches (5 cm) of decomposed granite. It is better to give the landing a slight slope toward the plantings or drainage so puddles do not form.
- Secure the edges of the landings and staircase. Decomposed granite will spread if you leave it without a border. Along the sides, you can place separate large stones for edging or use low metal edging. These side stones are not steps — they simply hold the material in place and visually pull the staircase together.
Good to Keep in Mind
Do not make the staircase too narrow. For a garden path, a comfortable width is at least 30–36 inches (75–90 cm), because people often walk this kind of staircase with their hands full, carrying a basket, tools, a watering can, or a bag of mulch.
For the main steps, it is better not to use smooth round stones. They may look nice in a pile by the road, but they get slippery fast under a wet sole. For steps, rough boulders with a flatter top are a better fit.
After the first heavy rain, be sure to check the staircase. Look where water washed out the decomposed granite, where a soft edge appeared, or where a stone started to move a little. On a slope, it is better to fix these small things right away before they turn into a bigger repair.
And do not plant right up against the steps. Thyme, sedum, and lavender can frame the path beautifully, but underfoot should stay clean, without plants. Otherwise, in a month, you will not be walking up the staircase — you will be pushing through wet stems.
As you can see, large flat stones give your foot a steady place to land, decomposed granite makes the landings more comfortable, and plants along the edges cover bare soil. In the end, the slope looks like a pretty part of the garden while still keeping the natural look of the yard. And of course, you do not slide over the soil every time you need to go down or climb back up.
2. Natural Stone Steps Set Into Rock Mulch
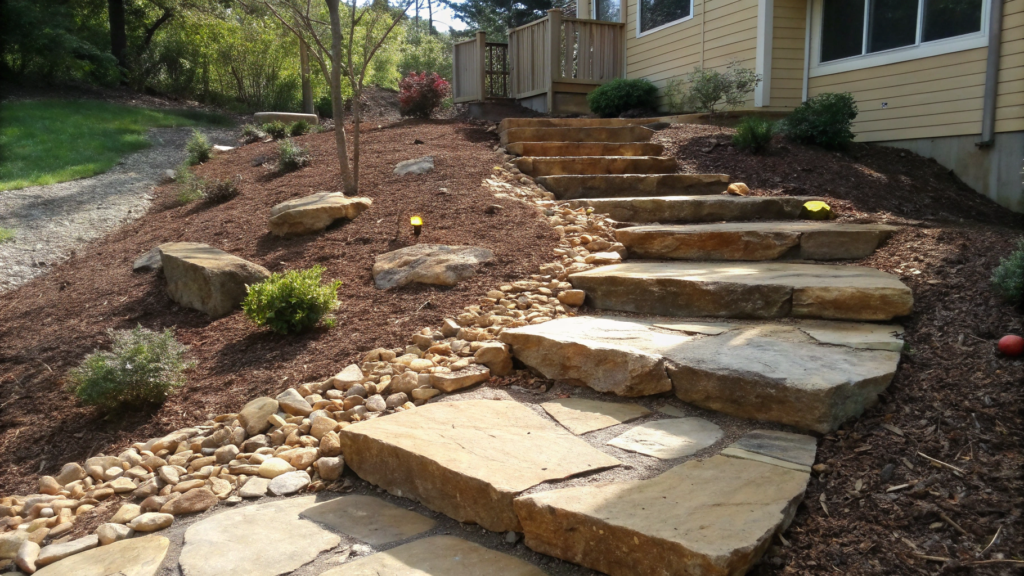
This option fits well in a front yard, a side path, or a sunny area near the house. The idea is that you lay wide flat stones as steps, and cover the space around them with rock mulch. In the end, the slope does not look empty, the soil is not left exposed, and you stop walking through dust, mud, or slippery grass.
What You’ll Need
- Flat stone slabs for the steps.
- Rock mulch: small gravel, crushed stone, or river rock.
- ¾-inch crushed stone (about 2 cm) for the base under the steps.
- Geotextile fabric, so the stones do not sink into the soil.
- Shovel, rake, level, rubber mallet.
- Garden staples for the geotextile fabric.
How to Make This Path
- Mark the walking line. First, look at where it is actually comfortable for a person to walk up the slope: from the gate to the house, from the terrace to the garden, from the parking area to the side entrance. On a steep area, it is better not to run the path perfectly straight uphill. A gentle curve makes the climb softer and helps the steps look as if they have been part of this place for a long time.
- Choose large flat stones. For the steps, use stones that can fit almost your whole foot. A good depth to aim for is about 16–20 inches (40–50 cm). Stones that are too small quickly become annoying: going up may still be fine, but going down feels awkward.
- Prepare the spot for each step. Remove the soil under the stone, make a shallow base, and add 3–4 inches (7–10 cm) of crushed stone. Tamp the crushed stone, lay the stone, and test it with your foot. The step should not wobble, sink, or slide forward under weight.
- Leave the stones slightly above the mulch. When you cover the slope with rock mulch, do not bury the steps completely. Let the top of each stone sit above the surrounding layer. This way, a person can immediately see where to place their foot, and small stones are less likely to get onto the step surface.
- Fill the space with rock mulch. Lay geotextile fabric around the steps, secure it with staples, and add a layer of rock mulch about 2–3 inches (5–7 cm) deep. Do not make the layer too thick: on a slope, extra stone can slide downhill. It is better to make an even layer and bring it neatly up to the edges of the steps.
- Plant the area. Lavender, thyme, sedum, sage, agave, or low ornamental grasses look good near this kind of path. Plant them in groups along the edges, not in a straight line along every step. This makes the slope look more alive, while the path stays open and easy to use.
Tips From Experience
Do not use stones that are too small for the steps. If only half your foot fits on the stone, the path will be uncomfortable to walk on, especially downhill.
Do not use very light rock mulch in hot full sun if the area is right in front of windows or near the entrance. It can reflect a lot of light and visually “heat up” the space. Medium gray, sandy, or warm brown tones usually look softer.
And watch that the rock mulch does not get onto the surface of the steps. After rain or a lot of foot traffic, small stones can move onto the slab, and then the step becomes slippery. Every few weeks, just sweep it back.
You do not need to build a big staircase here to guide someone neatly through the slope. The stone steps give you a place to step, and the rock mulch covers the soil around them so the slope does not look bare or unfinished.
3. Gabion Wall Terrace Filled With Local Rock
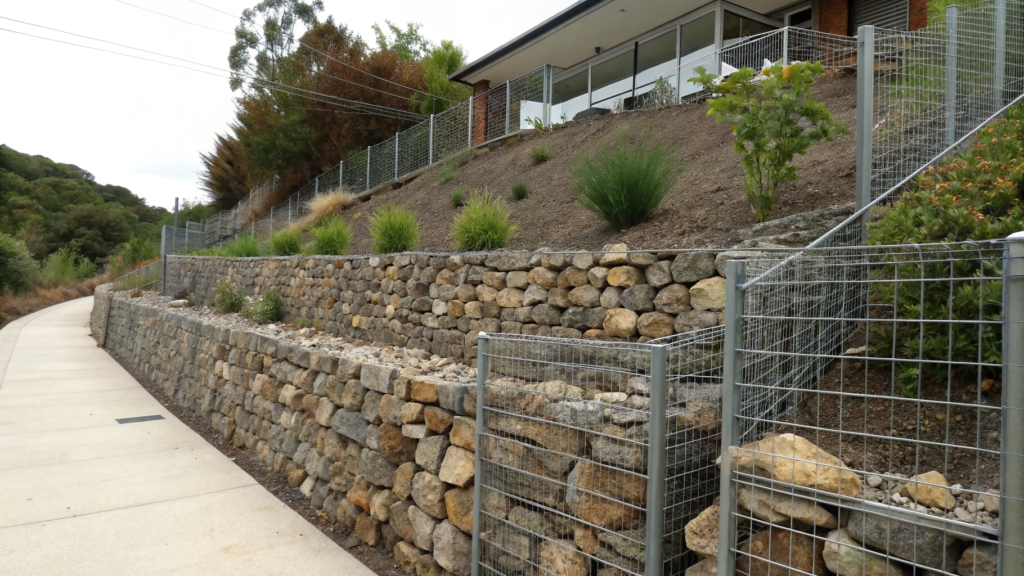
A gabion wall turns a steep slope into a level terrace. Basically, you set up a strong metal basket, fill it with stone, and get a low retaining wall. Behind it, you can make a small flat area, plant something, or simply stop the soil that keeps sliding downhill.
This is a good idea for yards that already have a lot of rock. You do not have to hide it or haul it away. You can use local rock as part of the design. I love options like this — the thing that used to be in the way starts working for you.
What You’ll Need
- Gabion baskets in the height and length you need, for example, vidaXL Gabion Basket.
- Local rock or another strong stone for filling.
- ¾-inch crushed stone (about 2 cm) for the base.
- Geotextile fabric behind the wall, so the soil does not wash out through the stones.
- Shovel, level, rake, wheelbarrow.
- Wire or spiral fasteners, if they are not included.
How to Build This Terrace
- Choose the spot for the wall. A gabion is best placed where you need to hold a slope and get a small level area: along a path, near plantings, by a seating area, or at the lower part of a hill. For a home yard, a wall about 1–3 feet (30–90 cm) tall is usually enough. If you need a higher retaining structure, it is better to bring in a specialist. At that point, it is work for professionals.
- Make a level base. Remove loose soil and prepare a strip for the gabion. The base should be wider than the basket itself and well tamped. Add a layer of crushed stone about 4–6 inches (10–15 cm), level it, and check it with a level. If the base is crooked, the whole wall will start to look crooked too. And you will see it.
- Assemble the gabion basket. Lay out the panels, connect them with the fasteners, and place the basket on the prepared base. Do not rush to fill it with stone right away. First, check that the whole structure is standing level, the corners line up, and the wall does not move back and forth.
- Fill the basket with stone. Larger, nicer stones are better placed closer to the visible side, and simpler stones can go inside. This will make the wall look neater. The stone should be larger than the mesh openings, otherwise it will fall out. Usually, stones about 4–8 inches (10–20 cm) work well.
- Protect the soil behind the wall. Lay geotextile fabric on the back side of the gabion. It is needed so soil does not wash out through the stones after rain. Between the soil and the wall, you can add a narrow layer of crushed stone for drainage. This is especially important on clay soil, where water likes to sit.
- Make a level terrace above. After the wall is installed, add soil behind the gabion and level the area. It does not need to be perfectly flat. It is better to leave a slight slope away from the house or path, so water moves toward the plantings or a drainage area. On this terrace, you can plant lavender, sage, sedum, thyme, ornamental grasses, or other full-sun plants.
What to Watch With a Gabion
Do not place a gabion directly on soft soil. Even a heavy stone wall can sink if the ground underneath is loose. The base is what decides whether the wall will stand straight.
And do not forget about access to the upper terrace. If the gabion creates a new level, think right away about how you will get there: with stone steps, a side path, or a few flat slabs. Otherwise, you end up with a pretty area that is annoying to use.
A gabion wall helps hold the slope and turn it into a useful terrace. You can immediately see that it is a strong part of the yard. It used to be just a steep slope with rocks, and now it becomes a place where you can plant herbs, put a bench, or make a proper path.
4. Full Sun Mediterranean Slope With Lavender and Thyme
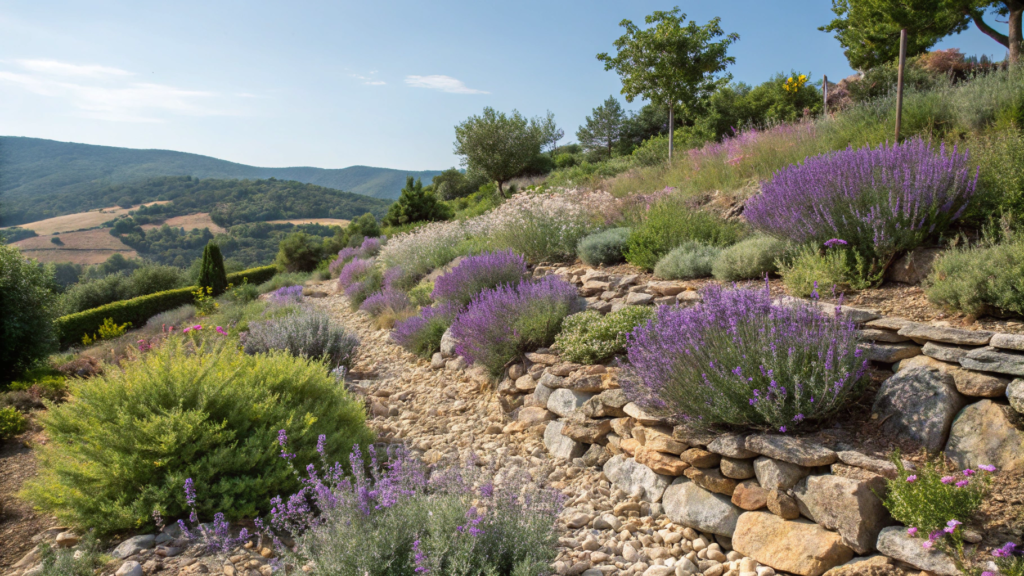
Following the logic of Mediterranean gardens, where there is a lot of sun, stones, aromatic herbs, and plants that do not need constant watering, we will not fight the heat. Instead, we will plant lavender, thyme, sage, rosemary, and sedum on the slope. These are exactly the plants that need light, dry air, and soil that does not need constant watering.
What You’ll Need
- Lavender for the main volume and color.
- Creeping thyme for the lower edge, gaps between stones, and small spots near the path.
- Sage, rosemary, or oregano, if your climate allows.
- Sedum for the driest spots.
- Rock mulch or small gravel.
- Compost, but not too much: these plants do not need overly rich, wet soil.
- Hand trowel, garden gloves, pruners.
- Drip irrigation hose, for example, Rain Bird Drip Irrigation Landscape/Garden Watering Kit
How to Plant This Slope
- Choose the sunniest spot. Lavender and thyme love full sun. A good guideline is at least 6 hours of direct light a day, and more is even better. If the slope only gets morning sun, the plants will survive, but the flowering will be weaker.
- Check if water sits there. Mediterranean herbs do not like wet roots. After rain, look where water stays the longest. It is better not to plant lavender in those spots. It is easier to lose lavender from dampness than from heat.
- Plant in groups. Not one bush at equal distances like little soldiers. It is better to make several patches: for example, 3 lavender plants higher up the slope, 5–7 thyme plants closer to the stones, and a couple of sage plants on the side. This makes the planting look more alive and helps cover the soil faster.
- Leave room for growth. Lavender needs space after a couple of seasons. Usually, it is best to leave about 18–24 inches (45–60 cm) between lavender plants. Thyme can be planted closer — about 10–12 inches (25–30 cm), if you want it to fill in faster.
- Add rock mulch. After planting, cover the soil with a thin layer of gravel or small stone. A layer of about 1–2 inches (2.5–5 cm) is usually enough. Do not pile stone right against the base of the stems. Leave a small open ring around each plant so moisture does not get trapped at the crown.
- Water more often only at the beginning. During the first weeks after planting, the plants need help, especially on a hot slope. But after that, it is better to slowly reduce watering. Lavender and thyme should root in and move into a drier rhythm. If you keep the soil constantly moist, they get weaker and are more likely to get sick.
Where It Is Easy to Go Wrong
Do not improve the soil too much. Your hand naturally wants to add more compost, because of course we want to “feed” the plants. But lavender and thyme do not like a rich, wet bed. They prefer light, well-drained soil.
Do not plant lavender at the bottom of the slope if all the water runs there. The lower part often looks convenient for planting, but that is exactly where the soil stays wet longer after rain.
On this kind of slope, you do not need to constantly fight the heat. You simply choose plants that fit this weather. And yes, these plants are useful too — thyme can be used in the kitchen, lavender smells good after rain and in the heat, and the soil is not left exposed.
You get a simple, sun-loving piece of garden that looks beautiful and does not require a daily rescue trip with a watering can.
5. Tropical Look Slope With Hardy Banana and Canas
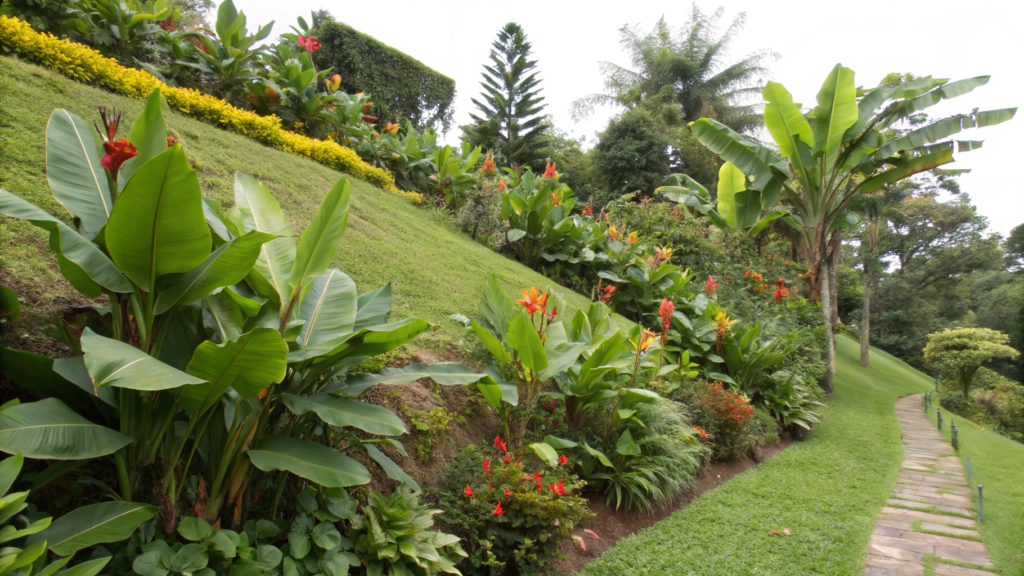
We are not trying to grow a real tropical garden in the wrong climate. The point is to choose plants with large foliage and strong shapes that can do beautifully in a regular garden with the right planting and care.
What You’ll Need
- Hardy banana for height and large leaves.
- Cannas with green, bronze, or burgundy leaves.
- Low plants for the lower layer: coleus, ornamental sweet potato vine, sedum, or low grasses.
- Compost for the planting holes.
- Mulch, so the soil does not dry out too quickly.
- Stones or low edging, to hold the mulch on the slope.
- Shovel, garden gloves, pruners.
- Coconut coir mulch.
How to Plant This Slope
- Plant the banana as the main accent. Hardy banana is best placed where it will be clearly visible: at the upper part of the slope, near a curve in the path, or by a wall. It needs space, because over time the leaves will get large and start setting the whole look of the planting.
- Add cannas in groups. Cannas look better not as single plants, but in patches of 3–5 plants. You can plant them below the banana or to the side of it, so the slope fills in with several levels instead of one single point. Leave about 18–24 inches (45–60 cm) between cannas.
- Add compost to the planting holes. Banana and cannas like more nutritious soil than lavender or thyme. When planting, mix the soil with compost, but do not make the hole soggy and heavy. Water still needs to move through, otherwise the roots can suffer after rain.
- Cover the soil with mulch. These plants have large leaves, and in full sun the soil dries out quickly. Mulch helps hold moisture longer and keeps the ground from overheating. On a slope, it is better to hold it in place with stones or low edging, so it does not slide downhill after rain.
- Make a lower layer. Do not leave empty soil between the larger plants. Add patches of coleus, ornamental sweet potato vine, low grasses, or sedum. They will cover the soil and make the planting look fuller.
- Water deeply. Banana and cannas need more generous watering, especially in hot weather. It is better to soak the soil well a few times a week than to lightly wet the top layer every day. On a slope, water already moves down quickly, so shallow watering does not help much.
Possible Mistakes
Do not plant banana in an open windy spot. The large leaves tear easily, and the plant quickly loses its neat look. It is better to choose a place with a little protection, for example near a wall, fence, group of shrubs, or a turn in the slope.
Do not make the planting only from tall plants. Banana and cannas will give height, but without a lower layer, the soil between them will look empty. You need low plants that tie the planting together.
In cold zones, the top part of a hardy banana may die back, and the base of the plant needs to be well mulched. In cold climates, cannas are often dug up: the tubers are dried and stored until spring in a cool, dry place, such as a basement, garage, or garden shed where they will not freeze.
Large leaves, several layers, and covered soil make the planting feel fuller and warmer. Even a regular sunny slope starts to look like a small tropical green corner, not just a place that needs to be planted with something.
This is a good approach for a spot that looks too open and dry.
6. Rock Garden Spiral Path for Sloped Yard Access
This idea is good for a yard where the slope is not huge, just awkward. A straight path there often ends up too steep, and regular steps can look out of place. A spiral path helps a person get up the hill along a route that naturally leads upward.
What You’ll Need
- Flat stones or large stone slabs for the path.
- Small gravel or decomposed granite for the path.
- Large stones for the edges and accents.
- ¾-inch crushed stone (about 2 cm) for the base.
- Geotextile fabric, so the path does not mix with the soil.
- Low plants for sun: sedum, thyme, hens and chicks, sage, low grasses.
- Garden edging.
- Shovel, rake, level, garden gloves.
How to Make This Path
- Draw the route right on the ground. First, lay out a hose, rope, or garden flags along the future line of the path. Do not make the curves too tight. A person should be able to walk comfortably, not circle a flower bed like a maze. For a garden path, a normal width is about 30–36 inches (75–90 cm).
- Make the climb gradual. The job of a spiral path is to make the steep slope feel less intense. If one section still feels too sharp, it is better to add a small curve or a short level landing. These are useful spots to pause with a basket, watering can, or tools.
- Prepare the base. Remove the top layer of soil along the path line. Then lay geotextile fabric, add 3–4 inches (7–10 cm) of crushed stone, and tamp it down. On a slope, this is especially important: if the base is loose, the gravel will start to slide, and the stones you walk on will begin to wobble over time.
- Lay the stones. It is better not to place the flat stones too far apart. Use a natural step as your guide, about 18–24 inches (45–60 cm) from the center of one stone to the center of the next. Each stone should be slightly set into the base, so it does not sit on top like a temporary tile.
- Fill the path with gravel. After laying the stones, fill the gaps with small gravel or decomposed granite. A layer of about 2 inches (5 cm) is usually enough. Do not add too much: on curves, extra material will spill onto the stones and roll downhill.
- Build the rock garden between the curves. The inner areas of the spiral can be filled with large stones and low plants. First, place the stones, then plant between them. This makes it easier to see the shape of the planting and avoid filling the whole slope with tiny plants.
- Plant in patches. Sedum and hens and chicks can go closer to the stones, thyme can go near the path edge, and sage or low grasses can sit a little higher on the slope. Do not try to cover everything at once. A rock garden looks better when there is a little breathing room between the plants and the stone itself is still visible.
What Matters With This Shape
Do not make the spiral too decorative. If the path looks pretty but is uncomfortable to walk on, you will quickly start cutting across it. The path should lead where you actually need to go: to the beds, seating area, compost, gate, or upper part of the yard.
It is better to make the path a little wider on the curves. That is where your foot often does not land perfectly in the center, especially when you are walking downhill. A couple of extra inches of width will not be wasted.
And do not leave the gravel without edging. On a slope, it will move. The edge can be made from large stones, metal edging, or a dense planting of low plants. The main thing is to keep the path material from spreading after every rain.
A spiral path softens the climb, gives you a proper route, and leaves space for planting between the turns. It does not feel like a separate little path or a separate flower bed, but like a part of the garden that is actually easy to use.
7. Stepping Stone Run With Gravel Joints for Drainage
If you have a slope where water runs through the same spot after rain and the soil quickly turns into a muddy path, this idea will fit. You lay flat stone slabs, and fill the gaps between them with gravel. Water does not sit on the surface, but drains down through the joints.
What You’ll Need
- Flat stone slabs or ready-made stepping stones.
- Small gravel for the joints between the slabs.
- ¾-inch crushed stone (about 2 cm) for the base.
- Geotextile fabric, if the soil is soft or clay-heavy.
- Sand for a thin leveling layer.
- Rubber mallet.
- Shovel, level, rake, garden gloves.
How to Make This Path
- Lay out the slabs by your step. First, simply place the stones on the ground and walk across them. The spacing should feel comfortable for walking. Usually, people leave about 18–24 inches (45–60 cm) between the centers of the slabs, but it is better to test it with your feet.
- Do not make the path too narrow. Even if this is not a wide garden path, a person still needs room for a normal step. For a single walkway, a width of about 24–30 inches (60–75 cm) is enough. If you often carry baskets, tools, or bags of soil along the path, it is better to go closer to 36 inches (90 cm).
- Prepare the base under each slab. Under each slab, remove the soil, add 2–3 inches (5–7 cm) of crushed stone, and tamp it well. On top, you can add a thin layer of sand to make it easier to level the stone. The slab should not wobble, even if you step on the edge.
- Leave joints for gravel. You do not need to place the slabs tight together, stone to stone. Leave gaps of about 2–4 inches (5–10 cm). This is where the gravel will go, and through these joints, water will drain down instead of running over the surface of the path.
- Fill the gaps with gravel. Pour small gravel into the joints and level it with a brush or with your gloved hands. Do not raise the gravel above the surface of the slabs. If it ends up on top, it will feel unpleasant to walk on, and small stones will start getting under your shoes.
- Make a slight slope. The path should not send water toward the house, steps, or a wall. Even a small slope toward plantings or a drainage area helps after heavy rain. On a slope, water will run downhill anyway. The only question is whether it runs along the path or next to it.
What to Check After Installation
Walk the path several times, uphill and downhill, with empty hands and with some kind of load in your hands. If one slab feels too far away, it is better to move it right away. Later, when everything is filled with gravel, you will not feel like doing it.
After the first rain, look where water carried gravel away or where a small washout appeared. These spots are easy to fix: add more gravel, lift the edge of a slab a little, or add a stone on the side. On a slope, it is better to catch these small things early.
And do not use smooth slabs if the path will often be wet. For a path on a slope, it is better to choose a rough surface. Especially if kids, older people, or you yourself with a full basket of tomatoes will be walking on it.
Gravel joints make the path drier and more practical. Water does not collect between the slabs in muddy puddles, but drains through the gaps. The slabs are comfortable to step on, and the gravel covers the soil and helps keep the path from quickly turning into a muddy little ditch.
8. Front Yard Rock Ribbon Border With Drought Plants
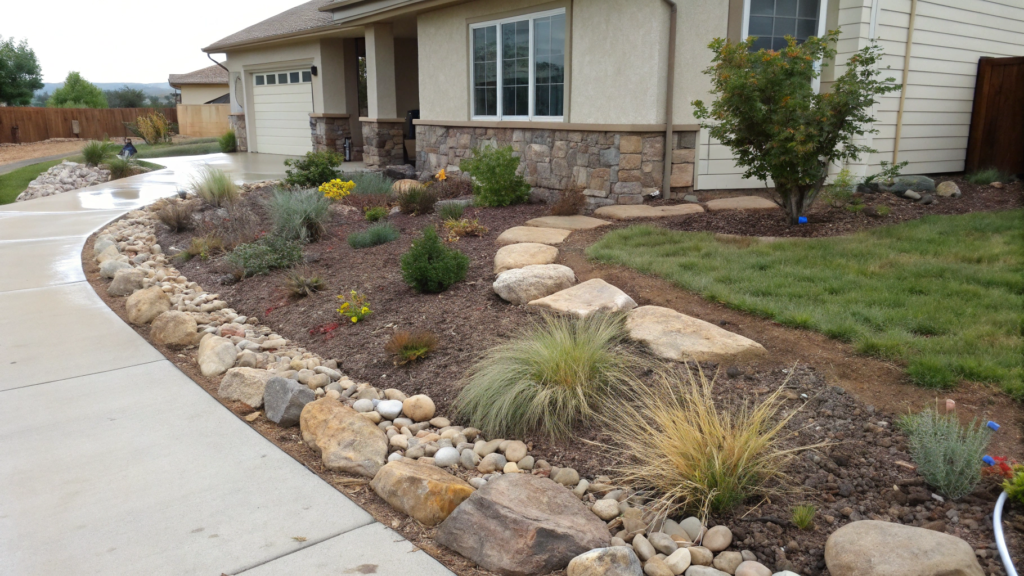
A Front Yard Rock Ribbon Border With Drought Plants helps quickly tidy up a slope, especially if there is bare soil, dry grass, or a washed-out lawn edge near the entrance. You make a long, gentle line of stone, and inside or near it, you plant plants that handle sun and occasional watering well.
It looks best when this stone line is not perfectly straight, but curves slightly with the shape of the yard. That way, it looks natural and fits well into the front yard design.
What You’ll Need
- Large stones for the outer edge.
- Small gravel or crushed stone to fill the ribbon.
- Geotextile fabric, so weeds do not come through the stone too quickly.
- Drought-tolerant plants: lavender, sage, sedum, yarrow, agave, low grasses.
- Shovel, rake, garden gloves.
- Garden staples for geotextile fabric
How to Make This Rock Ribbon
- Mark the shape of the border. Lay out a hose or rope where the stone line should go. For a front yard, it is better not to make the curves too sharp. A soft wave usually looks more natural and is easier to maintain, especially if there is a lawn or path nearby.
- Make the ribbon wide enough. A good guideline is 18–30 inches (45–75 cm) wide. If the slope is strong, you can make the lower part of the ribbon wider: this way, the stone will cover the soil better and help hold the edge of the planting.
- Remove the top layer of soil. Remove grass, weeds, and loose soil inside the marked ribbon. You do not need to dig deep. Usually, 2–3 inches (5–7 cm) is enough to remove the layer and prepare the spot for geotextile fabric and stone.
- Lay the geotextile fabric. Spread it across the whole ribbon and secure it with garden staples. On curves, make small overlaps so the fabric does not bunch up. Geotextile fabric does not remove weeding forever, but it greatly reduces the number of weeds between stones.
- Lay large stones along the edge. First, make the outer outline from large stones. They set the shape of the whole ribbon and help hold the small gravel inside. Do not lay them in a perfectly even chain: you can set some stones slightly into the soil and turn others at an angle. This makes the border look more natural.
- Add plants in groups. Plant them not one by one at equal distances, but in small patches. For example: 3 lavender plants, then 5 sedums nearby, then 2 sage plants and a few low grasses. This makes the front yard look more alive, and the planting does not look like a row of identical little shrubs by a parking lot.
- Fill the open spaces with gravel. After planting, add small gravel or crushed stone in a layer about 2 inches (5 cm) deep. Do not pile stone right against the base of the plants. Leave a little open space around the stems, so extra moisture does not sit there.
Small Tips
Do not choose plants only by color. For a front yard in full sun, it matters more that they can handle heat, wind, and dry soil. A pretty shrub that needs watering every day will quickly ruin the whole idea.
Do not make the whole border from only small gravel without large stones. That kind of ribbon can look flat, especially on a slope. A few large stones immediately give it shape and help the eye understand the edge of the planting.
And do not forget the mature size of the plants. If you plant everything too close together, after a while the shrubs will close in too tightly, and some plants will start covering the path or spilling out onto the lawn.
Over time, you will see that the rock ribbon covers dry soil, helps hold the edge of the slope, and gives space for plants that do not need constant watering. This gives the house a pretty, neat look.
9. Backyard Seating Nook Carved Between Two Rock Tiers
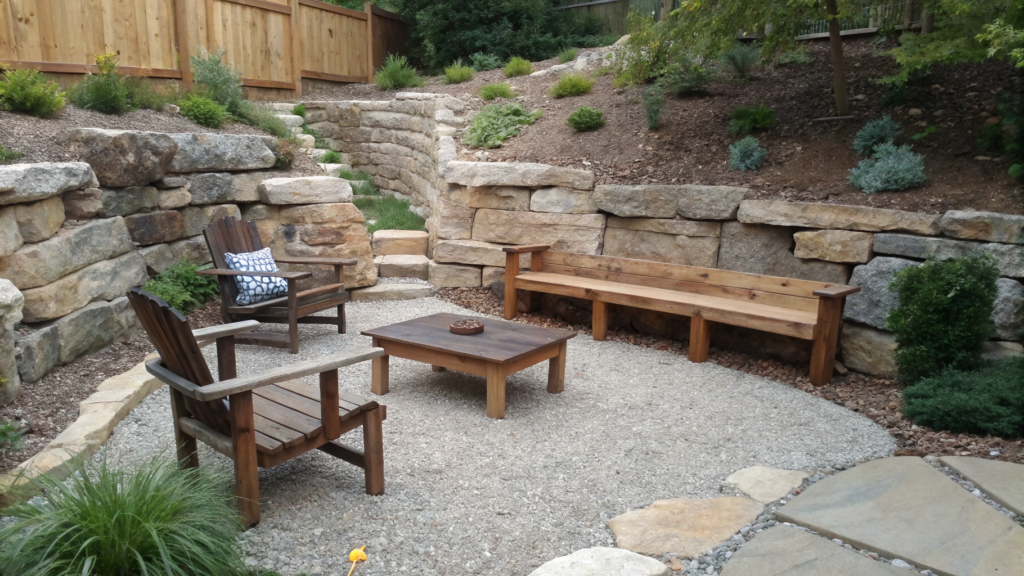
A slope does not only have to be reinforced and planted. Sometimes, between two rock tiers, you can make a small seating nook: a bench, a couple of chairs, a gravel pad, and plantings along the edges. The slope stops being just a change in ground level and starts giving you a separate area in the garden.
The main thing is not to make this area too deep or too tight. A person should be able to step in, sit down, stretch their legs, and get back out without catching on the rocks.
What You’ll Need
- Large stones or stone blocks for two tiers.
- ¾-inch crushed stone (about 2 cm) for the base.
- Geotextile fabric under the gravel pad.
- Small gravel or decomposed granite for the floor.
- A bench or two garden chairs.
- Low plants along the edges: thyme, sedum, sage, lavender, low grasses.
- Outdoor bench cushion — Pillow Perfect Outdoor Bench Cushion
- Shovel, level, rake, wheelbarrow.
How to Make This Area
- Choose a place where you want to sit. Look at where you get a view of the garden, trees, beds, fire pit area, or house. If you put a bench in front of a fence or directly under the blazing evening sun, this spot will rarely be used.
- Make the lower rock tier. It will hold the pad, so the base under the stones needs to be prepared properly: remove loose soil, add 4–6 inches (10–15 cm) of crushed stone, and tamp it down. For a home yard, it is better to keep these tiers low — about 1–2 feet (30–60 cm). If the wall ends up higher, it is better not to build it “by eye.”
- Level the seating pad. Between the two tiers, you need a flat area at least 5–6 feet (1.5–1.8 m) deep if there will be a bench. For two chairs, it is better to leave more space, so it is comfortable to sit.
- Prepare the gravel surface. Lay geotextile fabric, add a layer of crushed stone, and then add 2 inches (5 cm) of small gravel or decomposed granite on top. This kind of surface dries quickly after rain and does not turn into mud under your feet. Just do not make the layer too thick: chair legs and bench legs can sink in.
- Make the upper rock tier as a backdrop. The upper line does not have to be perfectly straight. You can lay the stones a little more loosely, add plantings in the gaps, and leave a few large boulders as accents. The upper tier should not press in on the seating area, but simply separate it from the rest of the slope.
- Plant along the edges. Right by the pad, it is better to use low plants that will not creep into the walkway: thyme, sedum, low grasses, sage. Taller lavender or shrubs can be planted higher up, closer to the second tier. This way, the seating area will not get overgrown, but it also will not look like a gravel pocket between rocks.
Keep These Details in Mind
Do not make the pad too small. You need room for your feet, a cup of tea, a harvest basket, or a dog that will absolutely lie down exactly where you wanted to walk.
Check where water goes after rain. If the upper tier sends water straight into the seating area, the gravel will keep washing out. It is better to direct water toward the plantings right away or make a small drainage edge.
Do not place a wooden bench right against the stone wall. Leave at least 12–18 inches (30–45 cm) behind the back or on the side, so air can move through, leaves do not get trapped, and you can actually clean up debris after windy weather.
Now your slope is a place where you can stop and rest, not just an area that needs to be reinforced. The rock tiers hold the soil, the gravel gives you a dry pad, and the bench turns the change in height into a part of the yard you actually use. Really, sometimes one small level pocket between rocks is enough to create a spot for morning coffee in the yard.
10. Pocket Water Feature Using a Hidden Reservoir Basin
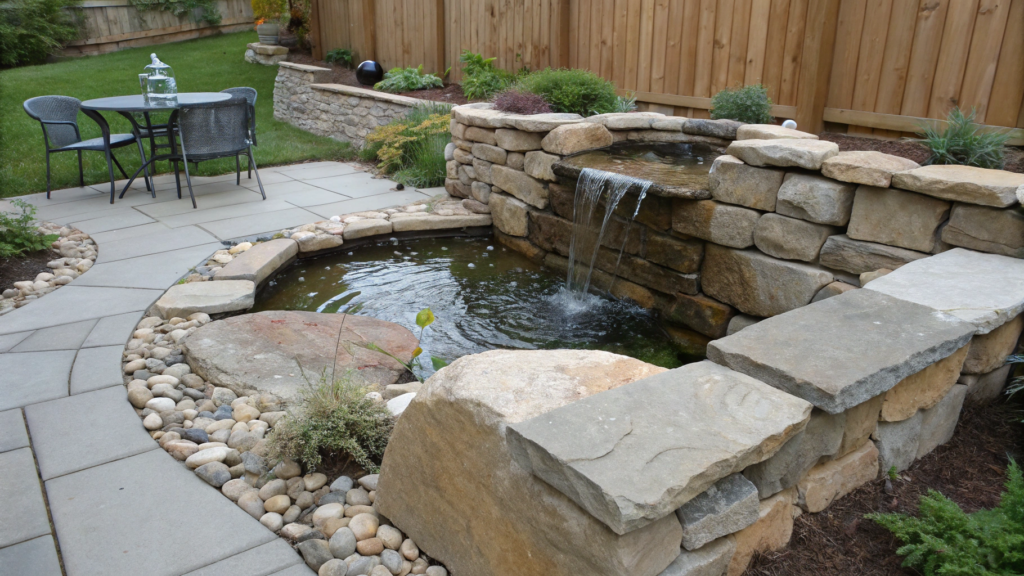
This idea is good for a small yard where you do not need to dig a large pond, put up a barrier, or worry that open water will constantly sit at the bottom. It is more like a stone pocket with circulating water that can be built near a path, beside a seating area, or in the lower part of a slope.
What You’ll Need
- Hidden reservoir or a ready-made basin for a water feature.
- Pump for circulating the water.
- Flexible tubing to carry the water upward.
- Large stones for the upper part and the edge.
- Small gravel to cover the reservoir.
- A strong grate or lid that can support a layer of stone on top.
- Moisture-loving plants along the edges: iris, sedge, mint in a container, dwarf papyrus in warm zones.
- Ready-made fountain reservoir.
How to Make This Water Feature
- Choose a spot in the lower part of the slope. A hidden reservoir is easier to place where water naturally wants to move downward. But do not put it in a spot where a muddy puddle collects after rain. We need a small water feature, not a catch basin for all the runoff from the yard.
- Dig a hole for the reservoir. The container should sit level and stable. Usually, the hole is made slightly wider than the reservoir itself, so there is room to level the base. You can add a thin layer of sand or small crushed stone to the bottom, and then check the level. If the basin sits crooked, the water will go somewhere you did not plan.
- Install the pump and tubing. The pump goes inside the reservoir, and the tubing runs upward to the place where the water will come out. It is better to leave access to the pump right away, so you can clean it. Do not seal everything in with stones as if no one will ever need to get in there again.
- Build the upper stone part. Water can come out from under a large stone, from a small gap, or from a short stone mound. Do not make the flow too strong. On a small slope, a thin stream or gentle trickle over stone looks better. This way, the water does not splash onto the path or wash out the gravel around it.
- Cover the reservoir with a grate and gravel. Once the pump is checked, place a strong grate or lid on top, and then cover it with gravel and small stones. The layer should hide the reservoir, but not stop the water from returning downward. Leave one spot where you can quickly reach the pump.
- Plant around the edges. Around this kind of water pocket, plants that like a little more moisture around their roots look good. But do not fill the whole edge with them. Let some of the stone stay visible, otherwise the water will get lost among the leaves. Mint is better planted in a container, because it will take over the whole area without warning.
What to Check Ahead of Time
The pump needs an outdoor outlet with moisture protection. And you definitely should not run some random extension cord through the garden. If there is no proper connection nearby, it is better to solve the electrical issue first.
Also think about how often you are willing to top up the water. In hot weather, small water features lose some water from evaporation and splashing. If the reservoir is too small, the pump may start running almost dry, and that will ruin it quickly.
Do not place this kind of feature directly under a tree that constantly drops leaves. A few leaves are not a big deal. But if the reservoir quickly clogs with debris, you will get tired of cleaning the filter all the time.
A hidden reservoir is easier to fit into a small yard, especially if the slope is already landscaped with stones and plantings. You get a small water accent that does not take up much space and fits beautifully into your garden landscape design.
Landscaping Your Slope
A steep slope does not need to be turned into something perfectly flat. Most of the time, it just needs a clear and simple plan: where to walk, where to hold the soil, where to plant, and where to leave the stone exposed.
If you have this kind of sloped area, do not try to redo the whole thing at once. Start, for example, with the path you use most often or with the lower edge where mud always collects after rain.
What would you change first on your slope? Write in the comments — I would love to see what kind of areas you have and which ideas you want to try.