
Every summer brings a new set of flavors, trends, and summer dinner ideas that everyone tries — but only a few of them actually stick around. In 2025, there were more of those than we expected. Simple, fresh, and diverse, they brought together a whole new wave of American cooking: a little bit of TikTok, a bit of family tradition, and a bit of kitchen improvisation.
The result? Dinners you don’t get tired of — because there’s nothing forced about them. Just practical, feel-good food that seems made for you, not for the camera.
Here are 10 of those recipes. The kind we’ve been cooking again and again this summer. And definitely will keep cooking.
1. Balsamic Chicken with Watermelon Salsa That Took Over Pinterest in 2025 For Summer Dinner
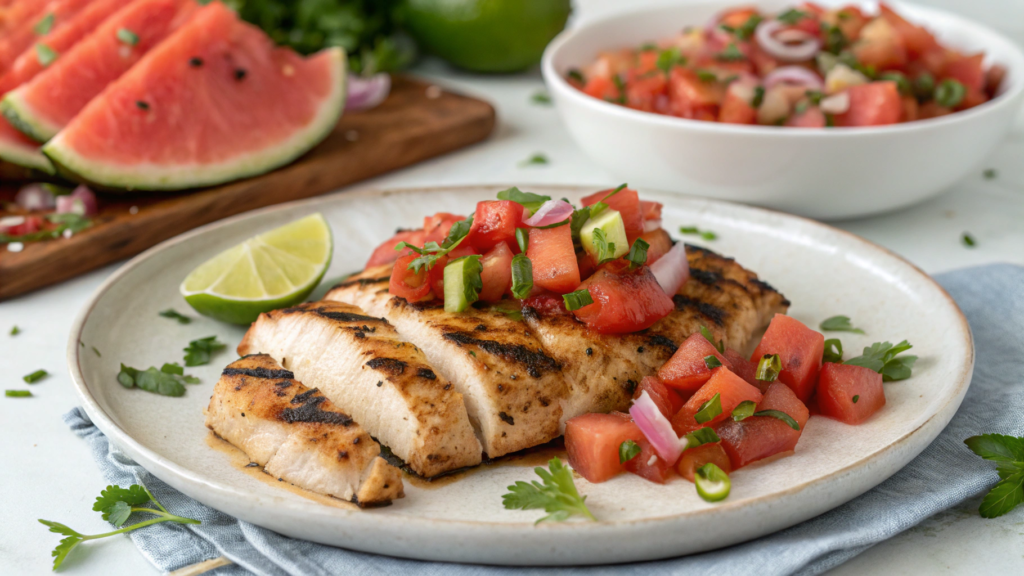
At some point, this dish just blew up on Pinterest. Maybe it’s the balsamic-marinated chicken breast that turns an ordinary dinner into a full-on summer moment. Or maybe it’s because it’s so ridiculously simple. Either way, this recipe became a true 2025 American summer icon — fresh, bright, and just a little bold.
And the steps? Easy. Marinate, grill, slice, eat. That’s it. The flavor? Like something straight off a fairground stand, serving only the juiciest things.
What You’ll Need (Serves 2–3)
For the chicken:
- 2 chicken breasts (6–8 oz / 170–225 g each)
- 1/4 cup (60 ml) balsamic vinegar
- 2 tbsp olive oil
- 1 tbsp honey or maple syrup
- 1 tsp Dijon mustard
- 2 garlic cloves, minced
- 1/2 tsp salt
- 1/4 tsp ground black pepper
For the salsa:
- 2 cups (approx. 300 g) chopped seedless watermelon
- 1/4 cup finely chopped red onion
- 1/4 cup chopped fresh mint
- 1/2 avocado, diced
- Juice of 1 lime
- Pinch of salt
How to Make It
1. Marinate the chicken
Mix balsamic vinegar, olive oil, honey, mustard, garlic, salt, and pepper. Add the chicken and let it sit for at least 30 minutes, or up to 4 hours in the fridge.
We usually marinate it in the morning, and by dinner it’s pretty much ready to go.
2. Grill it
Heat your grill or pan to medium. Cook the chicken for 5–6 minutes on each side, until golden and cooked through (165°F / 74°C inside).
A meat thermometer helps take the guesswork out.
3. Make the salsa
While the chicken cooks, toss all salsa ingredients together in a bowl. Be gentle with the avocado — it should stay soft but intact.
4. Plate it up
Slice the chicken and serve over a big spoonful of salsa. You could add salad or boiled potatoes on the side, but honestly? We usually skip them — it’s that good on its own.
Watermelon isn’t just for sweetness. According to research, it’s rich in L-citrulline, an amino acid that helps improve circulation and reduce fatigue in the heat.
Balsamic-marinated chicken is a classic for a reason — the antioxidants in vinegar actually get more active when heated, giving the dish that deep, caramel-like finish.
And honestly? It’s just really good-looking. That’s probably why it went viral in the first place.
Where and How to Serve It — So It Sticks in Memory
You’re not just trying to eat well. You want dinner to feel like a little piece of summer.
This dish is perfect served on a big wooden board as a group-style appetizer. Slice the chicken and spread the salsa on top. Let it look a bit casual — that’s the charm. Think backyard picnic in late July, maybe with dragonflies buzzing and something cold in your hand.
Or wrap it all in a flatbread or tortilla. Drizzle with lime yogurt. And serve it on an old plate with a faded edge — the kind passed down from mom to daughter.
At our place, we serve it on a chipped enamel tray we found at a flea market. The balsamic stains? They just add to the story.
2. Sweet Corn Nachos Become Summer’s Most Surprising Stovetop Dinner

Nachos in a skillet? Sounds like college, right? But last July, when we really didn’t want to turn on the oven, I tossed some corn, beans, cheese, and chips into our cast iron — and wow. Just wow.
That little “wow” moment spread fast on Reels and Shorts. Skillet nachos became the unexpected answer to hot weather dinners — when all you want is something that tastes like it came from a food truck in Austin.
What You’ll Need (Serves 2–4)
- 1 tbsp olive oil
- 1/2 red onion, finely chopped
- 1 garlic clove, minced
- 1 can (15 oz / ~425 g) black beans, rinsed
- 1.5 cups fresh or frozen corn (grilled or boiled both work)
- 1/2 tsp paprika
- Pinch of salt and pepper
- 3–4 handfuls plain corn tortilla chips
- 1.5 cups shredded cheddar or Mexican cheese blend
- Juice of 1 lime
- Sliced jalapeño (optional)
Serving:
- Sour cream
- Chopped green onion
- Cilantro
- Avocado slices
- Cast iron skillet (If you don’t have one yet — it’s a game-changer for summer dinners!)
How to Make It for Summer Dinner
1. Build the base
Heat the skillet over medium. Add olive oil, then sauté the onion and garlic for 2–3 minutes until soft. Add the beans, corn, paprika, salt, and pepper. Cook for another 4–5 minutes until everything’s warm and a little caramelized.
2. Assemble right in the pan
Push the mixture to the sides. Lay down a layer of chips in the center, top with a bit more of the corn mix, then pile on the cheese. Cover with a lid or foil and let it melt for 2–3 minutes on low heat. That’s it — done.
Want your chips extra crispy? Toast them separately and add the topping after.
We love corn for the taste — but also for what it gives us in the heat. In just one cup of boiled corn, you get:
- 3g of fiber (keeps you feeling full)
- Around 10% of daily vitamin C
- 10% of daily folate (important in summer, especially when you’re active outside)
Corn isn’t just a side dish. It’s a cornerstone of Southern and Mexican cooking, which makes it perfect for evenings when you want something easy but still seriously good.
How to Serve It
Sometimes we serve it right in the skillet, set on a wooden board to keep the heat. On top — a spoonful of sour cream, a squeeze of lime, a little cilantro. It turns into a meal without much effort.
Feeling extra? Add ranch or chipotle sauce — that little kick makes the dish feel more grown-up.
Want meat? Toss in some leftover chicken or ground beef. Going vegan? Swap the cheese for a plant-based one.
It’ll still hit. Every time.
3. Summer Dinner: Pineapple Chicken Tacos Cooked in a Crockpot Like on TikTok
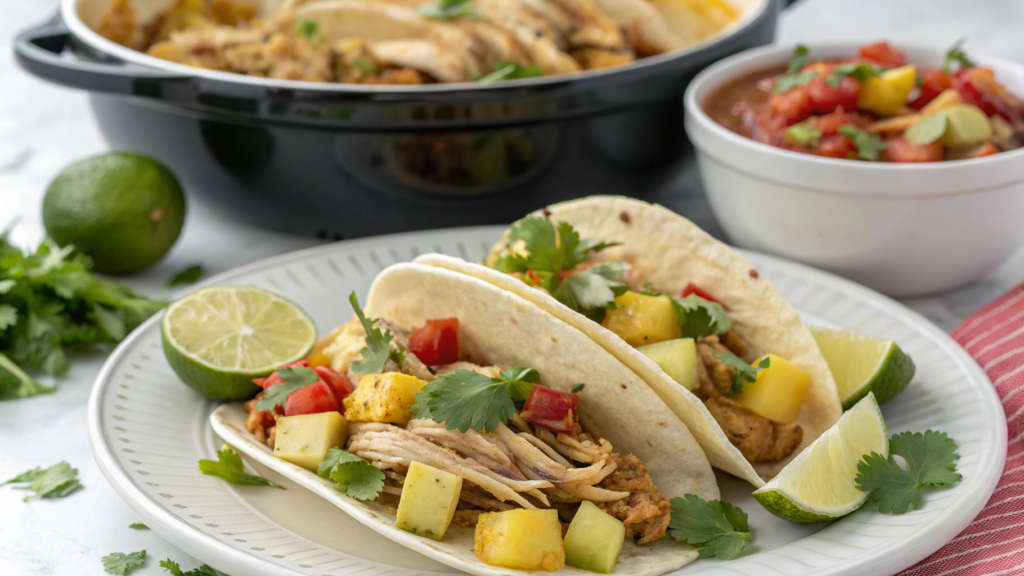
(Summer pineapple chicken tacos from a crockpot – yep, just like on TikTok!)
It’s perfect when a summer dinner cooks itself. While you’re out in the garden, the chicken simmers in pineapple juice, soaking up all the sweetness and spice… Then you come back with a basket of zucchini — and your taco filling is already done, smelling amazing.
This recipe became a true TikTok hit in summer 2025, and for good reason. Minimal effort, maximum wow. And it scales easily for a party (or when you want to keep some for tomorrow).
What You’ll Need (Serves 4–6)
- 2 large chicken breasts (about 1 lb / 450 g each)
- 1 can pineapple in juice (20 oz / ~565 g)
- 1/2 cup pineapple juice from the can
- 1/2 cup salsa (tomato or mango – your choice)
- 1 tsp smoked paprika
- 1 tsp garlic powder
- 1/2 tsp ground cumin
- 1/4 tsp cayenne pepper (optional)
- Salt and pepper to taste
- Juice of 1 lime
- 8–10 small corn tortillas
For serving:
- Shredded red cabbage
- Cilantro
- Sour cream or yogurt
- Extra pineapple (optional)
- A small 4-quart crockpot — if you’re not in the crockpot club yet, this is a great way to start
How to Make It
1. Load the crockpot
Into the crockpot go: the chicken, half the pineapple (chopped), salsa, spices, and pineapple juice. Stir a little. Cover and cook:
- 3–4 hours on high
- or 6–7 hours on low
We usually set it to low in the afternoon — by dinner, it’s ready and all you need is to slice the cabbage.
2. Shred the chicken
Once the chicken is tender, shred it right in the crockpot with two forks. Add the lime juice and the rest of the pineapple. Stir. Let it sit another 10 minutes so the flavors meld.
3. Build the tacos
Warm the tortillas in a dry skillet (about 15 seconds per side). Then fill each one with:
- cabbage
- a scoop of pineapple chicken
- a dollop of sour cream
- a few cilantro leaves
- and if you want — a slice of chili pepper or thin-sliced radish
Why This Recipe Took Off on TikTok
It’s visually juicy. Chicken in sauce, bright cabbage, pineapple — all in mini format. That’s TikTok material.
It truly doesn’t require any cooking skills. You just toss it in the crockpot — and it works its magic.
And fresh pineapple is rich in bromelain, a natural enzyme that helps with digestion and tenderizes meat. So yeah, it’s tasty and smart.
We love setting it all up on the back patio — one big board with tortillas, a bowl of chicken, a dish of cabbage, and a bunch of little spoons. Everyone builds their own.
Or, if you prefer a neater look — wrap everything in wax paper, like at a street food stand — and serve it with a homemade limeade on the side.
4. Grilled Avocado and BLT Layers Reinvent the Classic Sandwich 2025

A sandwich with bacon, lettuce, and tomato… nothing new, right?
Now imagine this: you slice into a warm, golden toasted sandwich, and instead of cheese spilling out (surprising, right?), it’s grilled smoky avocado, crisped on the outside and creamy on the inside.
This version of the BLT went viral in 2025 — it started on Reddit, then hit Pinterest, and soon TikTok picked it up. From there, it just took off. Because the combination of warm avocado and classic BLTs is just a new level of flavor.
What You’ll Need (For 2 sandwiches)
- 1 ripe but firm avocado, sliced lengthwise into 4 pieces
- 4 slices good bacon (can sub with turkey or vegan bacon)
- 4 slices ripe tomato
- 4–6 leaves of romaine or iceberg lettuce
- 4 slices of bread — sourdough, rye, whole grain, your choice
- 1–2 tbsp mayo (add Dijon or garlic if you want)
- Pinch of salt and pepper
- Drizzle of olive oil for the grill
- Grill pan or sandwich press — perfect for grilling avocado without it falling apart
How to Make It
1. Cook the bacon
Fry the bacon in a dry pan until crispy. Transfer to a paper towel to drain the extra fat.
2. Grill the avocado
Brush the avocado slices with olive oil and lightly salt them. Grill on a hot pan for 1–2 minutes per side, until grill marks appear and there’s a light smoky aroma.
Just don’t flip them too early — let them sear a bit before touching.
3. Build the new BLT
Toast the bread (in a toaster or pan), spread mayo on each slice. Then layer:
- lettuce
- tomato
- bacon
- warm avocado
Top with the second slice of bread — and serve right away!
Why Grilled Avocado Was a Game Changer
- First, it’s the texture. Grilling gives avocado a light crust, so it holds its shape in the sandwich — no more slipping out when you bite.
- Second, the flavor. Grilling brings out the nutty, buttery notes — especially in Hass avocados. That’s not just a guess — it’s backed by studies.
- And finally, avocado isn’t just a “healthy fat” like people say. It’s a food rich in potassium, fiber, and vitamin E, according to the USDA.
We like to slice the sandwich diagonally, place it on a wooden board, and sprinkle it with black salt flakes or chili pepper. Add a side of beet or carrot chips, or just some cucumbers with vinegar.
Want to make it look good and keep it fresh? Wrap it in wax paper, café-style — gives it that picnic feel, even if you’re just in your own backyard.
5. Summer Dinner: Cucumber Noodle Salad That Was Made for Hot Days Only

On really hot days, cooking turns into a battle with the heat — and only the recipes that cool you down like an ice bath truly win.
This salad is our personal heatwave champion. Light, crisp, cold. And best of all — 100% no stove involved, which in summer dinner feels like a blessing. On TikTok, they call it “spa noodles”, but we just call it: “What you want to eat when it hits +100°F.”
What You’ll Need (Serves 2–3)
- 2 large English cucumbers, or 3–4 regular ones
- 1/2 tsp salt
- 1/2 cup thinly sliced carrot
- 1/4 cup finely shredded red cabbage
- 1/4 cup chopped green onion
- 1/2 avocado (optional, for creaminess)
- 1 tsp sesame seeds
For the dressing:
- 2 tbsp rice vinegar
- 1 tbsp soy sauce
- 1 tsp honey
- 1 tsp toasted sesame oil
- 1 tsp freshly grated ginger
- Juice of 1/2 lime
- Pinch of chili flakes (to taste)
Use a spiralizer or veggie peeler for those thin, noodle-like strips.
How to Make It
1. Prep the cucumbers
Turn the cucumbers into noodles. No spiralizer? Just slice thinly lengthwise. Sprinkle with salt and let them sit in a colander for 10 minutes to draw out moisture. Then pat dry with a towel.
2. Assemble the salad
Mix the cucumber noodles, carrots, cabbage, green onion, and avocado. Pour the dressing over, toss gently, and top with sesame seeds.
Why This Salad Works So Well in the Heat
- Cucumbers are 95% water, and that’s not just a fun fact. According to the USDA, they contain only 16 calories per 100g and help with hydration, especially in the heat.
- Foods high in water and fiber, like cucumbers and cabbage, help lower body temperature and keep you feeling full longer.
- Ginger in the dressing, oddly enough, helps the body regulate temperature by increasing heat release — like a tiny built-in air conditioner.
This salad is best served cold, in a glass bowl that’s been chilled in the fridge. It’s a small trick, but in hot weather, it really makes a difference.
You can serve it as a side dish for grilled food, but more often we eat it as a main course — with a spoonful of peanut butter or some cold tofu slices.
And don’t forget a splash of lime on top, a few more sesame seeds, and maybe a sprinkle of mint leaves.
6. Summer Dinner: Peach Glazed Chicken with Creamy Grits Inspired by Grandma’s Book
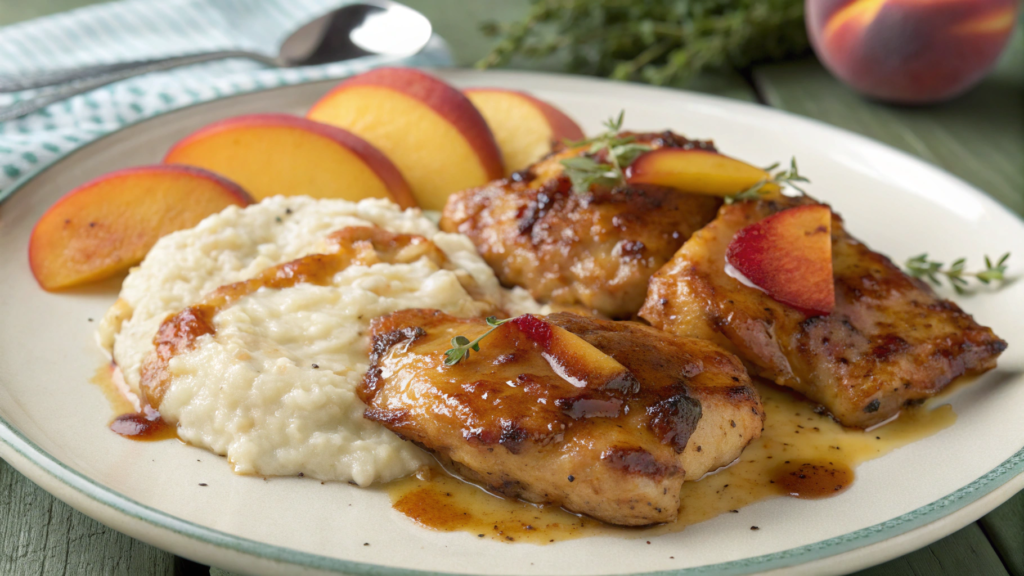
One day, Lindy pulled out an old worn notebook with a pencil-written — almost unreadable — recipe for “Sunday peach chicken.” The date said 1978. We tried it, added a few touches of our own — and it turned into a perfect summer dinner for two.
The mix of sweet, spicy, creamy, and crispy hits on every level. This is true America on a plate: grits from the South, grill from the West, and fruit from everywhere.
What You’ll Need (Serves 4)
For the chicken:
- 4 bone-in, skin-on chicken thighs
- Salt and pepper to taste
- 1 tsp paprika
- 1 tsp olive oil
The glaze:
- 1 cup peach jam
- 1 tbsp apple cider vinegar
- 1 tsp soy sauce
- 1/2 tsp ground ginger
- Pinch of cayenne or red pepper flakes
The creamy grits:
- 1 cup yellow corn grits
- 4 cups water
- 1/2 cup milk
- 1/2 cup shredded cheddar cheese
- 2 tbsp butter
- Pinch of salt
How to Make It
1. Cook the chicken
Preheat oven to 400°F (200°C). Pat chicken dry, season with salt, pepper, and paprika, and rub with olive oil. Sear skin-side down in a hot pan for 4–5 minutes until golden. Transfer to a baking dish.
2. Make the glaze
In a bowl, mix all glaze ingredients. Pour generously over the chicken. Roast for 25–30 minutes, until the glaze caramelizes and the chicken is cooked through.
If the glaze darkens too fast, cover loosely with foil.
3. Cook the grits
While the chicken bakes, boil the water with a pinch of salt. Slowly stir in the grits, whisking constantly. Reduce heat to low and simmer for 15–20 minutes, stirring often. Add milk, cheese, and butter. Stir until smooth and creamy.
Peaches are a natural source of beta-carotene and vitamin C, according to USDA FoodData Central.
Grits are rich in complex carbohydrates and offer slow, lasting satiety, as shown in research on low-glycemic index diets.
How to Serve — and Feel Like You’re in Georgia
Scoop the grits into deep bowls, place a chicken thigh on top, and spoon over some glaze. Sprinkle with fresh thyme.
Want to go full classic? Add a side of pickles — just like Grandma used to.
7. Lemon Chickpea Skillet that Proves Vegetarian Can Be Addictive for summer dinner

Our neighbor just doesn’t get how people eat without meat. Recently, she came over for dinner, grabbed a serving of this skillet, and said the one thing we still love repeating:
“I didn’t even realize there was no meat in this.”
That’s the goal. Not to push plant-based meals. But to make them genuinely enjoyable.
This skillet — with warm chickpeas, caramelized onions, garlic, and lemon juice — does exactly that. It takes 20 minutes to make, smells like a Mediterranean tavern, and tastes just as good the next day.
What You’ll Need (Serves 2–3)
- 2 tbsp olive oil
- 1 can chickpeas (15 oz / ~425 g), rinsed and dried
- 1/2 red onion, sliced into half moons
- 2 garlic cloves, sliced
- 1 tsp dried oregano
- Salt and black pepper to taste
- Juice and zest of 1 lemon
- 1/4 cup vegetable broth or water
- A bunch of spinach (or chard)
- Pinch of chili flakes (optional)
A nonstick skillet — perfect for quick meals without sticky edges
For serving:
- A slice of sourdough bread
- Grated Parmesan or vegan cheese (optional)
- Yogurt or tahini
How to Make It
1. Crisp the chickpeas
Heat the skillet, add olive oil and chickpeas. Sauté over medium heat for 6–8 minutes, until slightly crisp. Don’t stir too much — let them brown.
2. Add onion and garlic
Add the onion and cook for 2–3 minutes until soft. Then add garlic, oregano, salt, and pepper — cook for 1 more minute.
3. Final touches
Pour in the lemon juice, add the zest, a splash of broth, and the spinach. Cook until the greens just wilt. That’s it. Turn off the heat. Sprinkle chili flakes if you want a bit of heat.
Chickpeas are one of the best sources of plant-based protein and fiber.
Lemon isn’t just sour — it’s a source of vitamin C, which helps the body absorb iron from plant foods.
And also: chickpeas seared in lemon glaze are just a textural joy. Not mushy, not crunchy — just right. And totally addictive.
How to Serve It for summer dinner
The easiest way? Straight from the skillet, with toasted bread and a spoonful of cold yogurt. Or tahini mixed with lemon juice — makes a light sauce.
Sometimes we add cooked quinoa or buckwheat — and that’s a full dinner.
And if there are leftovers — just reheat and add fresh herbs. That’s it. No “leftovers feeling” at all.
8. Zucchini Boats Stuffed with Sloppy Joe for a 2025 Makeover

If you’ve ever had Sloppy Joe in a school cafeteria, you know exactly what that is.
⠀
In 2025, we thought — what if we took the best parts of that idea and gave it a fresh new take?
That’s how this recipe was born. We’ve been making it every week in August, when zucchinis grow faster than you can carry them out of the garden.
What You’ll Need (Serves 3–4)
The boats:
- 3 medium zucchini, sliced lengthwise
- 1 tbsp olive oil
- Salt and pepper to taste
For the “Sloppy Joe” filling:
- 1/2 lb (225 g) ground turkey or beef
- 1/2 onion, finely chopped
- 1 garlic clove
- 1/2 cup tomato sauce
- 1 tbsp ketchup
- 1 tsp mustard
- 1/2 tsp paprika
- 1 tsp vinegar (apple cider works best)
- Pinch of sugar
- Salt and pepper to taste
For serving:
- Shredded cheese (cheddar, mozzarella)
- Green onion
- Baking dish
How to Make It For Summer Dinner
1. Prep the zucchini
Scoop out the centers with a spoon to form “boats.” Salt them, brush with olive oil, and place in a baking dish.
Bake at 375°F (190°C) for 15 minutes — they should be soft but not falling apart.
2. Make the filling
Brown the ground meat in a skillet. Add onion and garlic — cook another 3–4 minutes.
Add tomato sauce, ketchup, mustard, vinegar, and spices. Let it simmer for 5–7 minutes until thick and flavorful.
3. Assemble the boats
Fill the baked zucchini with the hot mixture and top with cheese. Return to the oven for 10 more minutes, until the cheese melts.
4. The finish
Top with chopped green onion. And that’s it. They’re ready.
Sometimes we serve them with a corn salad, or with crispy chips to scoop up the extra sauce.
You can also slice the zucchini halves into bite-size pieces as appetizers.
And if there are leftovers — they store perfectly and make a great lunchbox meal the next day.
9. BBQ Quesadillas Straight from a Nashville Backyard Party

Some recipes just have a smell. These quesadillas smell like smoke, sticky sauce, spilled beer, and freshly cut grass. Just like that party in Nashville, summer dinner 2025, when we showed up with a pack of tortillas, some leftover pulled pork, and a bit of cheese.
⠀
It took 20 minutes — and 14 quesadillas were gone. Then we made two more batches. Since then, this has been our go-to recipe for summer gatherings.
What You’ll Need (Makes 4 quesadillas)
- 2 cups BBQ meat (pork, chicken, or vegan pulled jackfruit — all work)
- 1/2 cup BBQ sauce
- 1/2 red onion, thinly sliced
- 1 cup shredded cheese (cheddar, mozzarella, or Mexican blend)
- 4 large flour tortillas
- Oil for frying
- Pinch of chili flakes or smoked paprika (optional)
- Quesadilla press — if you want to start making them often
How to Make It
1. Make the filling
If you’ve got leftover BBQ meat — just heat it in a skillet with sauce and onion. It should be warm and sticky.
No meat? You can use rotisserie chicken or even beans with BBQ sauce (yep, that’s good too!).
2. Assemble the quesadillas
On half of each tortilla, layer:
- a bit of cheese
- meat with onions
- then more cheese on top. Fold the tortilla over and press it gently.
3. Fry them up
Heat a skillet or grill with oil. Cook for 2–3 minutes per side, until the outside is crispy and the cheese is melted. Don’t flip too early — or it’ll fall apart.
This is a perfect way to use up leftover meat or BBQ sauce. The protein stays high, and the flavor is rich and balanced (sweet tangy sauce + melted cheese + heat).
Want a vegan version? Use jackfruit or mushrooms, smoked paprika, and vegan cheddar — works great.
How to Serve It
Cut into triangles, serve on a wooden board with a bowl of sauce (ranch or sour cream with lemon works best).
On the side — a corn salad, pickled cucumbers, and a glass of homemade lemonade.
10. Pesto Ranch Pasta Salad That Started as a Lunch and Took Over Summer Dinner

This salad actually started as a way to use up leftover pasta. We mixed it with whatever we had on hand: some pesto, leftover ranch, herbs, a little cheese…
And just like that, we had a salad that felt kind of thrown together — but always disappeared first. We make it ahead of time, keep it in the fridge, pull it out on a hot day… and just enjoy.
What You’ll Need (Serves 4–6)
- 12 oz (340 g) short pasta (penne, fusilli, rotini — anything that holds sauce well)
- 1/2 cup pesto (homemade or store-bought)
- 1/3 cup ranch dressing
- 1 cup halved cherry tomatoes
- 1/2 cup cooked green peas (frozen is fine)
- 1/3 cup finely chopped red onion
- 1/4 cup Parmesan
- Pinch of salt, freshly ground black pepper
- Juice of 1/2 lemon
- A bunch of basil or parsley (optional)
How to Make It
1. Cook the pasta
Boil in salted water until al dente. Drain, rinse under cold water, and let it cool.
2. Make the dressing
Mix pesto, ranch, lemon juice, a pinch of salt and pepper. Taste it — it should be bold, but not overly sour.
3. Build the salad
In a large bowl, combine the pasta, tomatoes, peas, onion, cheese, and herbs. Add the dressing and toss gently.
Refrigerate for at least 30 minutes — the flavors need time to settle.
We like to serve this salad in a deep bowl, topped with more basil and grated cheese. You can toss on some crunchy pine nuts, or… crisped bacon bits (if you’re feeling it).
Goes great with a glass of cold white wine. Or lime soda, if it’s a weekday.
Summer Dinner Invitation
One of the biggest shifts in recent years is how we treat home-cooked meals. Summer Dinner is no longer just “something quick.” It has become a time to slow down, shut off the noise, and choose flavors that feel real and alive.
Each of these recipes isn’t just about taste — it’s a state of being. They don’t require complex techniques, they’re not trying to be some kind of culinary performance. But they are flavorful, rich, made from simple ingredients — and they always make you want to come back to them.Which dish did you like the most? Have you tried cooking any of them yet? Leave a comment, share your thoughts and your favorite flavors.