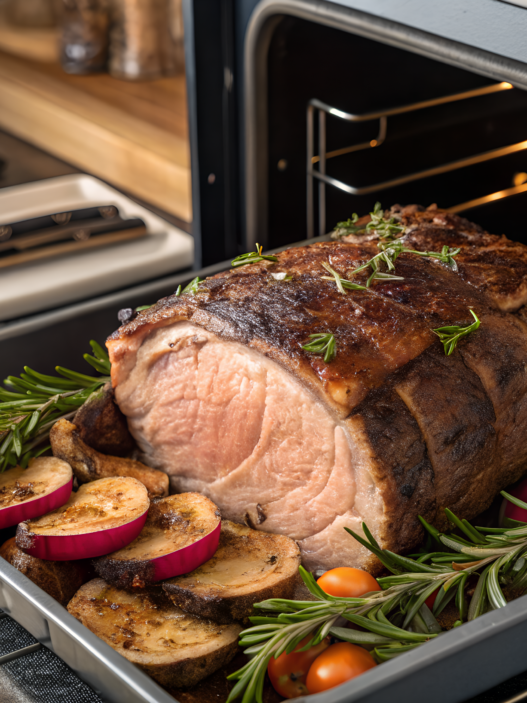

Make-ahead breakfast casseroles are the kind of casseroles that make morning chaos so much easier because they’re prepared ahead of time.
You calmly do everything in the evening, put the baking dish into the fridge, and in the morning all that’s left is placing it into the oven. And honestly, that helps a lot more than desperately trying to figure out “what to cook quickly” again.
There are different versions here, and none of them require some kind of perfect presentation. A little melted cheese around the edges, a golden top, a big spoon straight from the dish — that’s exactly what breakfasts like this usually look like in our house.
1. Overnight Sausage Egg Casserole
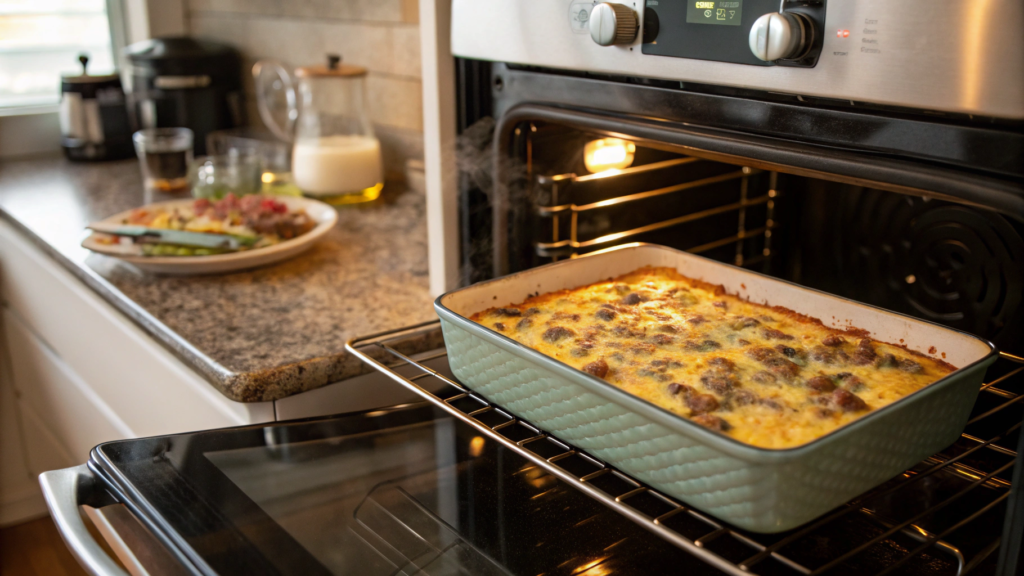
You have to admit, it feels good when the coffee is just starting to brew in the morning and a hot overnight sausage egg casserole is already rising in the oven.
What You’ll Need
- 1 lb breakfast sausage (about 450 g)
- 8 large eggs
- 2 cups milk (about 480 ml)
- 1 tsp salt
- 1/2 tsp black pepper
- 1 tsp dry mustard
- 6 cups cubed bread
- 2 cups shredded cheddar cheese (about 200–220 g)
- 2 tbsp butter for the baking dish
For casseroles like this, especially if you make them often, a deep dish like 9×13 Casserole Dish on Amazon is honestly much more convenient than regular thin baking pans.
How to Make the Casserole
- Brown the sausage in a skillet until nicely cooked. Don’t dry it out too much. When the pieces stay slightly soft inside, the casserole turns out juicier later.
- Prepare the bread. Cut it into cubes. Fresh soft bread is better to avoid because it turns into a soggy mess too quickly. Slightly dried or day-old bread is a much better choice for an overnight breakfast casserole.
- Grease the baking dish with butter. After that, add half of the bread, some of the sausage, and some of the cheese. Then repeat the layers again.
- In a separate bowl, whisk together the eggs, milk, salt, pepper, and dry mustard. The mustard isn’t here for heat. It simply makes the flavor of the cheese and sausage brighter.
- Pour the egg mixture over the bread. Then gently press the top with a spatula or your hands so the bread starts absorbing the liquid. No need to press hard.
- Cover the dish and place it into the fridge for at least 6 hours. We usually leave it overnight. During that time, the bread absorbs everything properly, the layers become more solid together, and the casserole later cuts into neat squares instead of falling apart.
A high-protein breakfast helps you stay full longer compared to breakfasts with a lot of sugar. That’s one reason many people prefer recipes like this for busy mornings.
How to Bake It in the Morning
- Take the dish out of the fridge about 20–30 minutes before baking. Especially if you’re using a ceramic dish.
- Preheat the oven to 350°F (about 175°C) and bake the casserole for around 45–55 minutes. The top should become golden and the center should fully set.
- If the cheese on top starts browning too quickly, simply cover the dish with foil for the last 10 minutes.
- Before serving, let the casserole sit for a few minutes. That makes it much easier to slice.
Serving
This casserole can absolutely be a full breakfast on its own, but it’s even better if you serve it with fresh fruit, green onions, avocado slices, or hot sauce.
Sometimes we also place a small plate of tomatoes and greens nearby, and during colder months we add hot bread with butter too. It turns into a very homey, filling breakfast.
2. Crockpot Cheddar Potato Bake
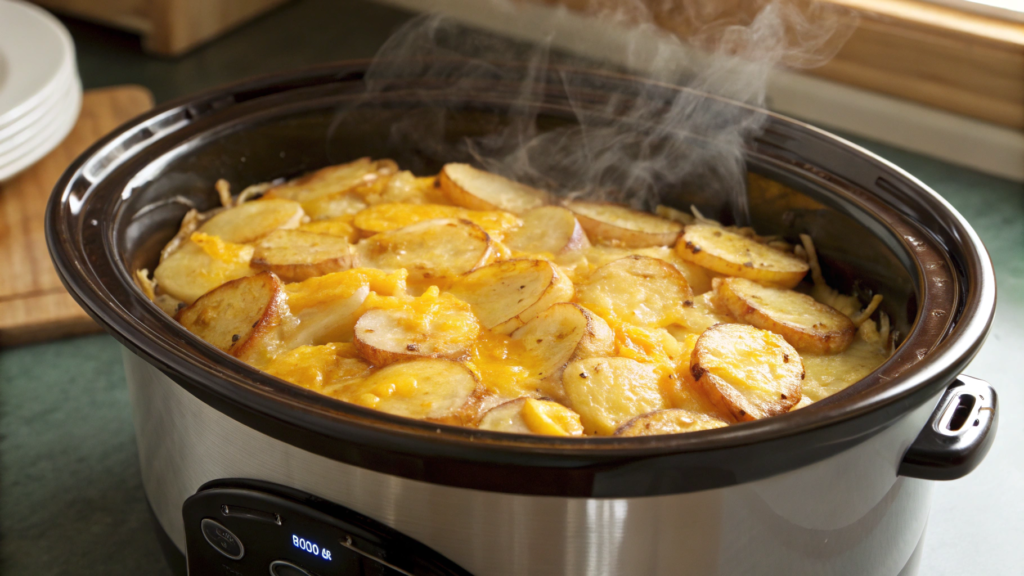
A lot of people love potato breakfasts for that feeling of “real food” instead of a quick bite on the go. Especially when there’s melted cheese on top, soft potatoes inside, and an amazing smell slowly filling the kitchen.
And I also like that this recipe is pretty flexible. You can make it more filling by adding meat, or leave it mostly cheesy and potato-heavy.
What You’ll Need
- 30 oz frozen hash brown potatoes (about 850 g)
- 2 cups shredded cheddar cheese (about 220 g)
- 1 cup sour cream (about 240 ml)
- 1 can cream of chicken soup (10.5 oz / about 300 g)
- 1/2 cup milk (120 ml)
- 1 small onion, finely chopped
- 3 tbsp butter
- 1 tsp salt
- 1/2 tsp black pepper
- 1/2 tsp garlic powder
It’s more convenient to use a model with a ceramic insert like Crock-Pot Slow Cooker on Amazon. I think dishes like this heat more evenly in them and dry out less around the edges.
How to Make the Casserole
- Lightly grease the slow cooker bowl with butter. Potatoes and cheese tend to stick to the sides more than you’d expect at first. I usually grease not only the bottom but also part of the sides — later it’s much easier to scoop portions out and wash the bowl.
- In a large bowl, mix the hash browns, sour cream, soup, milk, and spices. The mixture should turn out thick but not dry. If it looks too dense, you can add a couple more tablespoons of milk. Stir carefully so the potatoes don’t start breaking apart and turning into mashed potatoes before cooking.
- Add the onion and half of the cheese. It’s better to save the second half for the top — that way you get a more appetizing cheesy crust after cooking. I personally like using finely chopped onion so it almost melts into the casserole without overpowering the potatoes.
- Transfer the mixture into the slow cooker and gently level it out. There’s no need to pack the potatoes down too tightly. When the mixture sits a little looser, the texture turns out better. If everything is pressed down too much, the center later becomes heavy and dense.
- Sprinkle the remaining cheese on top and add small pieces of butter. I think butter is exactly what gives the top a richer flavor and that classic homemade taste of old-school American breakfast casseroles. While cooking, the butter slowly melts and helps the cheese brown nicely around the edges.
- Cook on LOW for 6–7 hours or about 3–4 hours on HIGH. During cooking, it’s better not to open the lid too often. Every time the slow cooker loses heat, the cooking time starts stretching out.
While cooking, the potatoes become soft, the cheese fully melts, and the edges start lightly browning. That’s usually the moment when you want to open the lid every ten minutes “just to check.”
Common Mistakes
I think one of the most common mistakes is using too much liquid. Then instead of a casserole, you end up with something closer to potato mush. I usually take the hash browns out of the freezer about 20–30 minutes ahead of time. They start cooking more evenly and don’t cool down the entire mixture inside the slow cooker.
You can also add:
- a little crispy bacon;
- green onions;
- smoked paprika;
- hot sauce;
- small cubes of ham.
USDA research shows that potatoes contain a good amount of potassium, which is important for normal muscle and nerve function. Of course, there’s still cheese and a creamy base here, so this isn’t exactly a “light fitness breakfast.” But for a filling family breakfast — it’s a great option.
Serving
I like serving this casserole with fresh herbs, tomatoes, or eggs on top. Sometimes we also place a bowl of hot sauce and crispy bacon nearby.
The leftovers taste even better the next day. The cheese becomes firmer, the potatoes hold their shape better, and the pieces can easily be crisped up in a skillet until golden brown.
Have you ever made a casserole like this before?
3. Healthy Veggie Breakfast Casserole
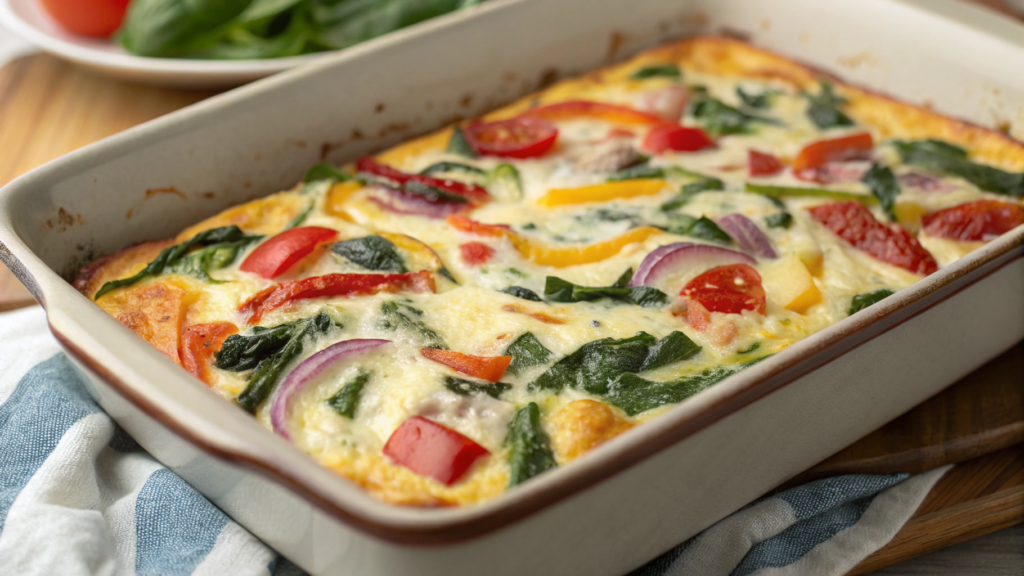
Vegetable casseroles can actually be pretty filling if you find a good version. The “bad” ones often turn out watery and pale. But when the vegetables get lightly browned, the cheese melts on top, and the eggs hold everything together — it becomes a completely different story, just like in this healthy veggie breakfast casserole.
I like that this casserole is convenient to make when there are random vegetables left in the fridge little by little.
What You’ll Need
- 10 large eggs
- 1/3 cup milk (80 ml)
- 1 red bell pepper, diced
- 1 zucchini, cut into small pieces
- 2 cups spinach (about 60 g)
- 1/2 small onion
- 1 cup mushrooms, sliced
- 1 cup shredded mozzarella (about 100 g)
- 2 tbsp olive oil
- 1 tsp salt
- 1/2 tsp black pepper
- 1/2 tsp garlic powder
How to Make the Casserole
- Preheat the oven to 375°F (about 190°C) and lightly grease the baking dish with oil. I usually use a medium ceramic dish so the casserole turns out slightly thicker instead of too flat.
- In a skillet, heat the olive oil and add the onion and mushrooms. Cook them for 4–5 minutes until the mushrooms start shrinking and lightly browning. This is exactly the stage where a richer flavor appears. If the vegetables are only “steamed,” the casserole ends up tasting bland.
- Add the bell pepper and zucchini. Cook for a few more minutes, stirring occasionally. I think zucchini is especially important not to overcook — if it becomes too soft in the skillet, it almost disappears later inside the casserole.
- At the very end, add the spinach and wait until it slightly wilts down. Usually this takes about a minute. After that, remove the vegetables from the heat and let them cool slightly.
- In a large bowl, whisk together the eggs, milk, and spices. There’s no need to turn the mixture into foam with a mixer. A regular whisk is more than enough for the yolks and whites to combine properly.
- Add the vegetables and half of the cheese into the eggs. Stir carefully. If the vegetables are still very hot, it’s better to wait a minute or two, otherwise parts of the eggs may start cooking too early.
- Cover the dish and place it into the fridge for at least 6 hours or overnight. During that time, the vegetables and spices blend together better, and the mixture itself becomes more even.
- In the morning, take the dish out of the fridge about 15–20 minutes before baking. Then bake for around 30–35 minutes until the center becomes firm and the edges turn lightly golden.
Tips From Personal Experience
I think the biggest problem with veggie breakfast casseroles is extra moisture. Especially from mushrooms and zucchini. That’s why I almost always sauté the vegetables properly in a skillet first instead of adding them raw.
And I also try not to overload the recipe with ten different vegetables at once. When there’s too much going on, the flavor becomes unclear.
A lot of people also choose vegetable breakfasts with eggs because the combination of protein and fiber helps keep you full longer.
Serving
In our family, this casserole is usually served with avocado, fresh herbs, cherry tomatoes, or a spoonful of thick yogurt. Sometimes there’s also a little hot sauce or chili flakes on top. The leftover pieces are also really convenient to reheat directly in a skillet. A light golden crust appears on the bottom while the casserole stays soft and juicy inside.
4. Biscuits and Bacon Morning Bake
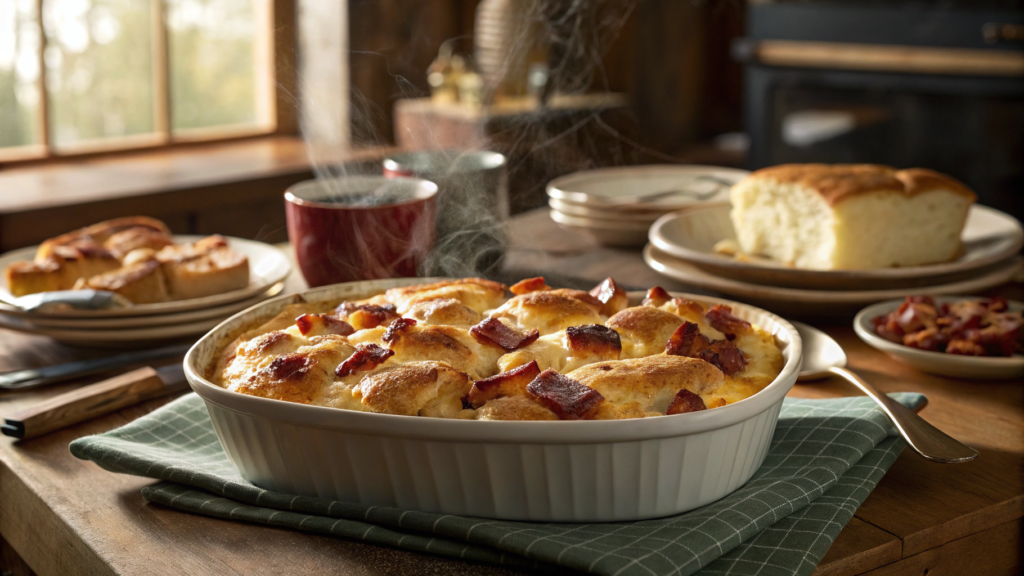
Lindy and I prefer hearty breakfasts, and Biscuits and Bacon Morning Bake is exactly that kind of recipe. Filling, hot, with crispy bacon pieces, soft layers of dough, and melted cheese on top.
I think casseroles like this are especially loved on weekends, when nobody is rushing anywhere and you can calmly place the baking dish right in the center of the table. After breakfasts like this, our kitchen smells like bacon and butter for a long time. And honestly, the smell gathers everyone around the oven almost immediately.
At the same time, the recipe itself is pretty simple. No complicated techniques or weird ingredients. Everything is built around familiar products that together create a very “American-style breakfast” in the best possible way.
What You’ll Need
- 1 can refrigerated biscuit dough (16 oz / about 450 g)
- 8 slices bacon
- 6 large eggs
- 1/2 cup milk (120 ml)
- 1 1/2 cups shredded cheddar cheese (about 160 g)
- 1/2 tsp salt
- 1/2 tsp black pepper
- 1/2 tsp garlic powder
- 2 tbsp chopped green onions
- 1 tbsp butter for the baking dish
For a recipe like this, I like using thick-cut bacon, because after baking it stays meatier and doesn’t disappear among the dough and eggs. I often buy Thick Cut Bacon on Amazon.
And ready-made biscuit dough saves a lot of time in the morning. If you want a version with a more buttery flavor, you can check out Pillsbury Grands Biscuits on Amazon.
How to Make the Casserole
- Preheat the oven to 350°F (about 175°C) and lightly grease the baking dish with butter. I usually use a 9×13 dish because the dough rises pretty actively while baking.
- Cook the bacon until golden brown. There’s no need to make it too dry or brittle. It will finish cooking a little more in the oven. After the skillet, transfer the bacon onto paper towels to remove excess grease.
- Cut the cooked bacon into small pieces. I think medium-sized pieces work better than tiny crumbles — this way the bacon is noticeable in every bite instead of simply disappearing inside.
- Open the dough and cut each biscuit into 4 pieces. The pieces don’t need to be perfectly even. Actually, a slightly messy shape makes the casserole texture more interesting after baking.
- Spread the dough into the baking dish and add the bacon together with half of the cheese on top. I personally like leaving a little bacon for the top — after baking, the surface turns out crispier and more appetizing.
- In a separate bowl, whisk together the eggs, milk, and spices. There’s no need to whisk for too long. Once the mixture becomes smooth, that’s enough.
- Pour the egg mixture over the dough. Try to distribute it evenly across the whole dish so there are almost no dry spots left. Then lightly sprinkle everything with green onions.
- Add the remaining cheese on top, cover the dish, and place it into the fridge for at least 6 hours, or preferably overnight. During that time, the lower biscuit pieces become softer and absorb the flavor of the bacon and cheese.
- In the morning, take the dish out of the fridge about 15–20 minutes before baking. Then bake for around 35–40 minutes until the top becomes golden and the center fully sets.
While baking, the biscuits rise between the layers of eggs and cheese, so the casserole turns out soft inside and slightly flaky on top at the same time.
My Observations
Some people add too much bacon. But if you overdo it, the casserole starts feeling heavy and overly salty. And there’s also no need to pour too much egg mixture over the dough. The biscuits should remain partially visible on top — that makes the texture much more interesting.
Serving
Most of the time, I serve this casserole with hot sauce, fresh fruit, or sliced tomatoes. Sometimes there’s also a bowl of pickled jalapeños nearby for people who like brighter flavors.
We never throw the leftovers away. The next day they reheat beautifully in the oven or even in a dry skillet. The bottom layer becomes slightly crispy again, the cheese melts once more, and breakfast almost feels freshly made.
5. Tater Tot Southwestern Casserole
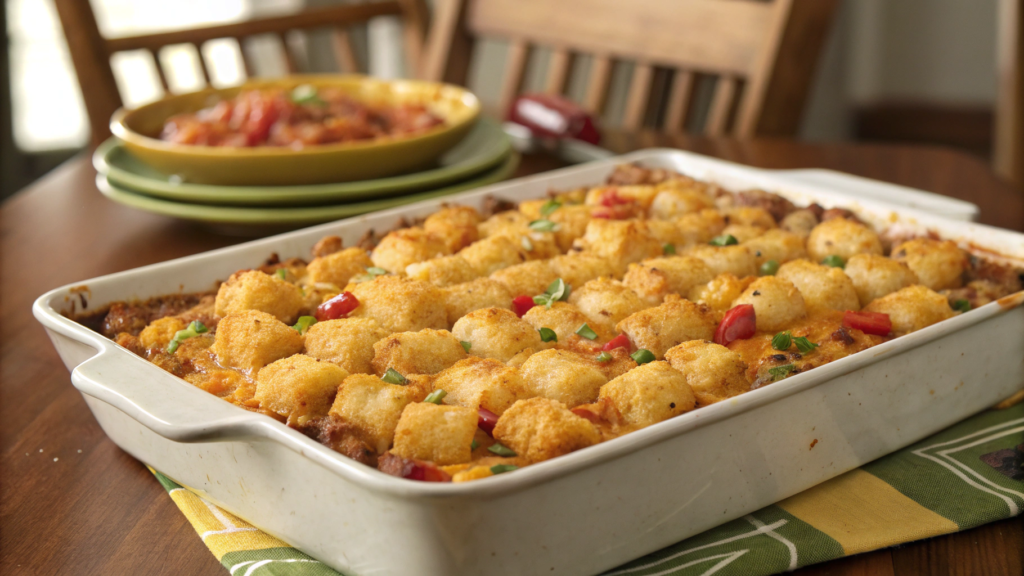
We usually make tater tot southwestern casserole during colder months or when friends come over. There’s cheese and potatoes here, but also peppers, spices, herbs, and a little heat. That combination is exactly what we love most about it.
What You’ll Need
- 1 bag frozen tater tots (32 oz / about 900 g)
- 1 lb ground beef or breakfast sausage (about 450 g)
- 8 large eggs
- 1/2 cup milk (120 ml)
- 1 1/2 cups shredded cheddar cheese
- 1 cup black beans
- 1 small red bell pepper
- 1/2 cup corn
- 1 small onion
- 1 tsp chili powder
- 1/2 tsp smoked paprika
- 1/2 tsp garlic powder
- 1/2 tsp salt
- 1/2 tsp black pepper
- 2 tbsp chopped cilantro or green onions
For this recipe, I like using smoked paprika because it creates that feeling like the dish was cooked on a grill.
How to Make the Casserole
- Preheat the oven to 375°F (about 190°C) and lightly grease the baking dish with oil. I usually use a larger dish so the tater tots sit more loosely and brown properly on top.
- In a skillet, cook the ground beef or sausage together with the onion. Cook until nicely browned, breaking the meat apart with a spatula from time to time. I think it’s especially important here not to leave huge chunks of meat — the casserole slices much cleaner later.
- Add the bell pepper, corn, and black beans. Cook for another 3–4 minutes. The pepper should soften slightly but not turn mushy. When the vegetables keep some texture, the whole dish becomes much more interesting.
- Add the spices and mix everything well. Smoked paprika and chili powder really open up in a hot skillet, so the smell becomes very strong at this stage.
- In a separate bowl, whisk together the eggs, milk, salt, and pepper. I personally don’t like an overly “eggy” flavor in casseroles like this, so the milk really helps make the texture softer.
- Transfer the meat mixture into the baking dish and spread part of the cheese evenly on top. Then pour in the eggs. Don’t worry if some of the cheese already starts melting right away — after baking it actually looks even better.
- Arrange the tater tots on top either in neat rows or randomly. I think the second option looks more homemade and appetizing. The main thing is not to press the potatoes too deeply into the mixture.
- Sprinkle the remaining cheese on top and bake for around 40–45 minutes. The top should turn golden while the edges start bubbling slightly from the cheese.
If you want to completely free up your morning, you can easily assemble the dish in the evening and keep it in the fridge until the next day. But this recipe also turns out great without overnight waiting — sometimes I make it right away, especially on weekends.
A Few Things That Really Help
I think the most important thing in this recipe is not overloading it with spices. A southwestern-style casserole doesn’t need to be extremely spicy. It’s better to serve hot sauce separately so everyone can adjust the heat themselves.
And I also try not to use overly wet corn or beans straight from the can without preparing them first. It’s better to dry them slightly, otherwise the bottom layer can turn out too wet.
Serving
I like serving this casserole with avocado, fresh cilantro, sour cream, or hot sauce. Sometimes there’s also a little pickled jalapeño on top.
Simple salsa and a big bowl of fresh tomatoes are also a great addition. Especially during summer when the tomatoes are cold straight from the fridge.
6. Spinach Feta Egg White Casserole
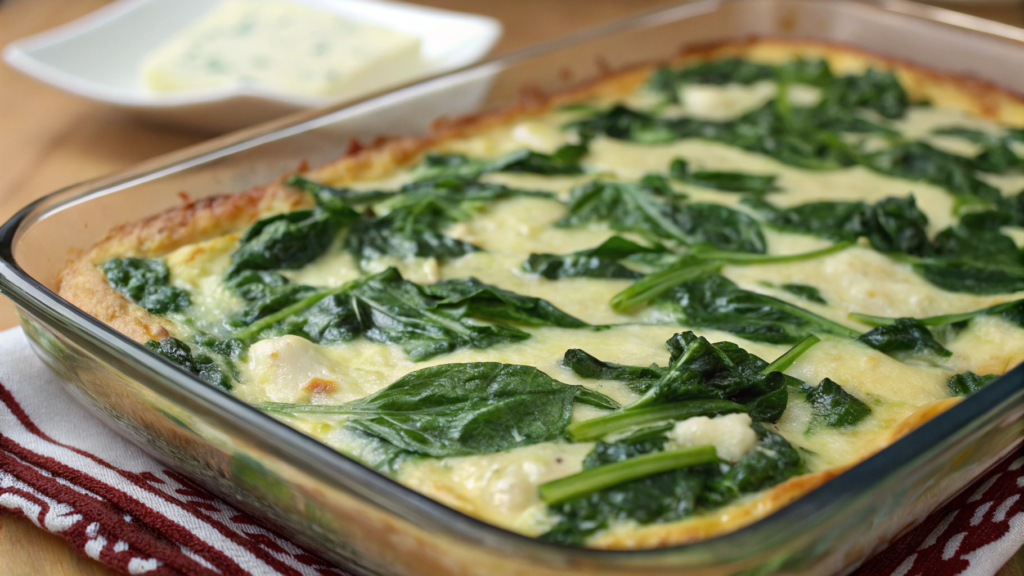
Spinach Feta Egg White Casserole turns out airy, slightly salty because of the feta, and pretty fresh in flavor thanks to the spinach.
I think a lot of egg white casseroles end up too dry, but here the feta gives a creamier texture and makes the flavor feel more alive even though mostly egg whites are used.
What You’ll Need
- 12 egg whites (or 3 cups liquid egg whites / about 700 ml)
- 2 cups fresh spinach
- 3/4 cup crumbled feta cheese
- 1 small onion
- 1/2 red bell pepper
- 1 tbsp olive oil
- 1/3 cup milk (80 ml)
- 1/2 tsp salt
- 1/2 tsp black pepper
- 1/2 tsp oregano
- 1/4 tsp garlic powder
How to Make the Casserole
- Preheat the oven to 350°F (about 175°C) and lightly grease the baking dish with oil. I usually avoid making the layer too thin because egg white casseroles dry out faster that way.
- In a skillet, heat the olive oil and add the chopped onion. Cook it for 3–4 minutes until soft. There’s no need to brown it heavily — the flavor here should stay fresher and lighter.
- Add the bell pepper and cook for another couple of minutes. I think small cubes work better here than long strips — the casserole slices more neatly later.
- At the end, add the spinach and stir everything together. It shrinks very quickly, so at first it always looks like way too much. As soon as the leaves soften slightly, you can remove the skillet from the heat.
- In a large bowl, mix together the egg whites, milk, and spices. I personally like adding a little oregano — together with the feta it instantly gives the dish more of a “Greek-style” flavor.
- Add the vegetables and half of the feta into the egg white mixture. Stir carefully so the cheese doesn’t completely dissolve. Small pieces of feta inside taste much better later.
- Pour everything into the baking dish and sprinkle the remaining feta on top. It doesn’t need to be perfectly even. When some areas end up with a little more cheese, those salty spots become especially good after baking.
- If you’re making the casserole ahead of time, cover the dish and place it into the fridge for at least 6 hours or overnight. Before baking, let it sit at room temperature for about 15–20 minutes, especially if you’re using a ceramic dish.
- Bake for around 30–35 minutes. The center should fully set, but the casserole itself should still stay soft inside. Egg white dishes dry out very easily, so it’s better not to leave the dish in the oven for an extra 10 minutes “just in case.”
But if you have enough time in the morning, this casserole can absolutely be assembled and baked right away — it still turns out really delicious.
A Few Things That Really Help
It’s easy to make mistakes with the amount of fat or cheese in egg white casseroles. If there’s too little of either, the texture becomes rubbery and bland.
I also try to squeeze spinach really well if I’m using frozen instead of fresh. Extra water ruins the structure of the casserole very quickly here.
Serving
We love serving this casserole with cucumbers, tomatoes, avocado, or a spoonful of thick Greek yogurt. Sometimes there’s also a little fresh dill or extra feta on top.
The leftovers the next day usually become a quick lunch for us. Especially together with a simple salad and warm bread.
7. Make-Ahead Crescent Roll Casserole
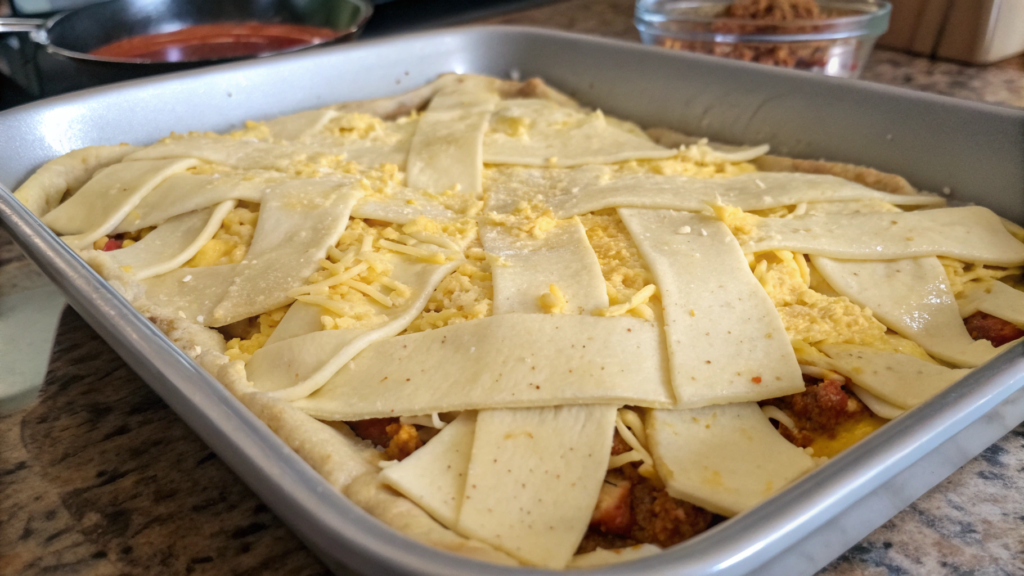
There are breakfasts that look like they took half a day to make, even though in the evening you simply assembled the dish and placed it into the fridge. Make-ahead crescent roll casserole is exactly one of those recipes in our house.
The flaky dough on top rises and turns golden, while inside there are eggs, cheese, and filling, and the edges become slightly crispy. I think crescent rolls are exactly what make casseroles like this feel a little more “special occasion” even on an ordinary morning.
And I also like that this recipe looks very homemade without trying to be perfect. In some spots the dough rises higher, in others the cheese melts over the edges — and honestly, that’s exactly what makes the dish look appetizing later.
What You’ll Need
- 2 cans refrigerated crescent roll dough (8 oz / about 230 g each)
- 8 large eggs
- 1 cup milk (240 ml)
- 1 1/2 cups shredded cheddar cheese
- 1 cup cooked breakfast sausage or ham
- 1/2 small onion
- 1/2 tsp salt
- 1/2 tsp black pepper
- 1/2 tsp garlic powder
- 2 tbsp chopped green onions
- 1 tbsp butter for the baking dish
How to Make the Casserole
- Preheat the oven to 350°F (about 175°C) and grease the baking dish with butter. I usually use a 9×13 dish so the dough has enough room to rise without pushing against the sides.
- Open the dough and place the first layer of crescent rolls on the bottom of the dish. Gently press the seams together with your fingers so the bottom layer feels more solid. Small holes can later let the egg mixture leak down too much.
- Spread the cooked sausage or ham together with the onion on top. I think it’s better not to make the meat layer too thick — otherwise the bottom dough turns out wet.
- Add about half of the cheese. At this point the dish already looks pretty appetizing, especially if the cheese starts slightly melting from the warm filling.
- In a separate bowl, whisk together the eggs, milk, and spices. I like adding a little extra black pepper — it goes really well with the buttery dough.
- Pour the egg mixture over the filling. Do it slowly so the liquid spreads more evenly instead of collecting in one corner of the dish.
- Carefully place the second layer of crescent rolls on top. Don’t worry if the dough tears a little or looks uneven. After baking, everything looks much more natural and honestly even tastier.
- Sprinkle the remaining cheese and green onions on top. Cover the dish and place it into the fridge for at least 6 hours, or preferably overnight. During that time, the bottom dough layer absorbs some of the egg mixture, while the filling becomes more balanced in flavor.
- In the morning, take the dish out of the fridge and let it sit at room temperature for about 15–20 minutes. Then bake at 350°F (about 175°C) for around 35–40 minutes until the top becomes golden and the center fully sets.
While baking, the dough starts rising beautifully around the edges, and the top layer becomes lightly flaky and crispy.
What You Shouldn’t Do
Definitely don’t overload the casserole with too much filling. Then the layers start sliding apart, and the dough doesn’t bake properly inside.
I also try not to use overly wet ingredients like fresh tomatoes or large amounts of mushrooms. Crescent roll dough absorbs extra moisture very quickly.
If you lightly brush the top layer with melted butter before baking, the crust later turns out more golden and aromatic.
Serving
The serving options can be completely different — with fruit, fresh herbs, or hot sauce. Sometimes there’s also a bowl of sour cream or sliced tomatoes nearby.
And the leftovers are really convenient to reheat in the oven. The top becomes slightly crispy again, while the cheese inside melts almost like it did right after baking.
8. Bread and Cheese Strata

Strata is basically a baked bread pudding in a savory version. The top becomes golden and slightly crispy, while inside the bread absorbs the creamy egg mixture and the cheese stretches between the layers.
Day-old bread is absolutely perfect for this recipe. Sometimes I even leave half a loaf specifically “for strata,” because fresh bread honestly isn’t even the best option here.
What You’ll Need
- 1 loaf crusty bread, cut into cubes (about 10–12 cups)
- 8 large eggs
- 2 1/2 cups milk (600 ml)
- 2 cups shredded Gruyère cheese or sharp cheddar
- 1/2 cup grated parmesan
- 3 tbsp butter
- 1 tsp salt
- 1/2 tsp black pepper
- 1/2 tsp garlic powder
- 1 tsp dried thyme
- 2 tbsp chopped parsley
For strata, I especially like using Gruyère cheese because it melts very smoothly and gives a slightly nutty flavor. I usually buy Gruyere Cheese on Amazon.
And for the dish itself, sourdough bread or any dense rustic bread with a good crust works best. Fresh soft bread honestly turns out less successful here because after soaking, it loses texture too quickly.
How to Make Strata
- Preheat the oven to 350°F (about 175°C) and grease the baking dish with butter. I usually use a fairly deep dish because the bread rises slightly while baking.
- Cut the bread into cubes and, if it’s too fresh, lightly dry it in the oven for about 8–10 minutes. I think this is one of the most important parts. Slightly dried bread absorbs the egg mixture much better and doesn’t turn into a soggy mess.
- Place half of the bread into the dish and add part of the Gruyère and parmesan on top. Then repeat the layers again. There’s no need to make everything perfectly even — strata actually looks better with slightly messy layers.
- In a large bowl, whisk together the eggs, milk, and spices. I personally like adding the thyme directly here instead of sprinkling it on top later. The flavor spreads more evenly that way.
- Slowly pour the egg mixture over the bread. Do it gradually so the liquid has time to move through the layers instead of simply sitting on top.
- Gently press the bread down with a spatula or your hands. Don’t press too hard. You only need to help the top pieces start absorbing the mixture.
- Cover the dish and place it into the fridge for at least several hours, or preferably overnight. During that time, the bread fully absorbs everything and the structure becomes more cohesive.
- Before baking, let the dish sit at room temperature for about 20 minutes. Then place it into the oven for around 45–50 minutes.
While baking, the top becomes golden and slightly crispy, while the inside of the strata stays soft and creamy.
What’s Especially Important Here
I think strata is most often ruined by two things: bread that’s too soft and too much liquid. Then instead of beautiful layers, you end up with something close to mush.
And please, don’t save on the cheese. In this recipe, the cheese is exactly what gives the dish depth of flavor. Without it, the bread and eggs start tasting too plain.
You can also add a little extra parmesan right before the end of baking. The top will turn out more golden and slightly crispier.
Serving
I prefer serving bread and cheese strata with fresh herbs, fruit, roasted tomatoes, or a small salad. Crispy bacon also fits perfectly here, especially if the breakfast feels a little more festive.
And the leftovers the next day become even more interesting in texture. The layers firm up, the cheese inside stays soft, and the slices brown beautifully in a skillet.
9. Hashbrown Ham Casserole
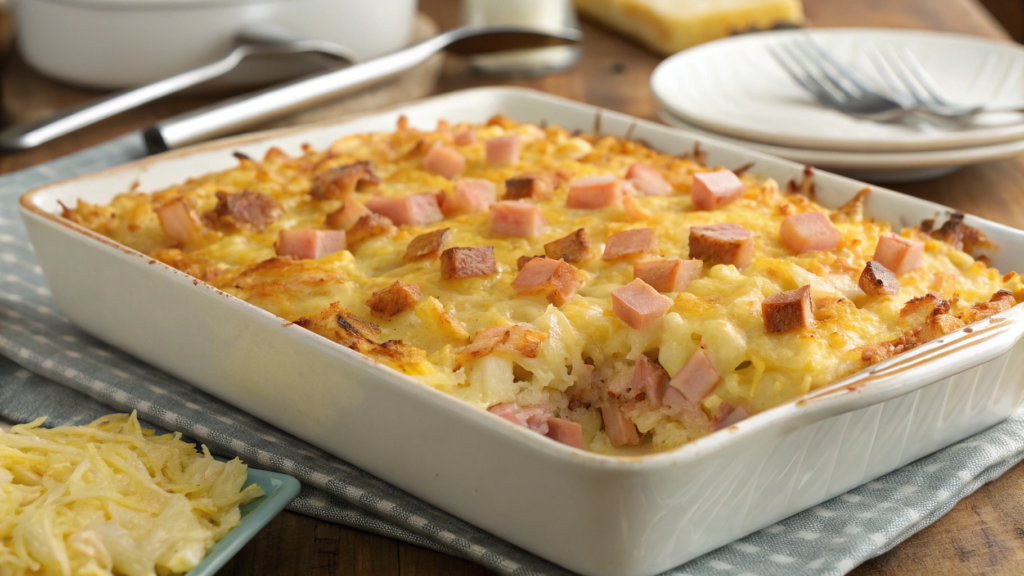
We often make this casserole after big dinners, when there’s still a good piece of baked ham left in the fridge and nobody wants to turn it into regular sandwiches again. Hashbrown ham casserole usually gets eaten almost completely — soft potatoes, salty ham, a cheesy top, and a hot creamy center… honestly, what could be better?
What You’ll Need
- 30 oz frozen shredded hash browns (about 850 g)
- 2 cups diced ham
- 2 cups shredded cheddar cheese
- 8 large eggs
- 1 cup milk (240 ml)
- 1/2 cup sour cream
- 1 small onion, finely chopped
- 2 tbsp butter
- 1 tsp salt
- 1/2 tsp black pepper
- 1/2 tsp garlic powder
- 2 tbsp green onions
How to Make the Casserole
- Preheat the oven to 375°F (about 190°C) and grease the baking dish with butter. I usually go over the corners of the dish with extra butter too — that’s exactly where the cheese likes sticking the most later.
- If the hash browns are heavily frozen, let them sit at room temperature for a little while. There’s no need to fully thaw them, but potatoes that are too icy make the casserole bake less evenly.
- In a large bowl, mix together the potatoes, ham, onion, and half of the cheese. I personally like cutting the ham into small cubes instead of long strips — that way it spreads more evenly throughout the casserole.
- In a separate bowl, whisk together the eggs, milk, sour cream, and spices. The sour cream makes the center softer and creamier. Without it, the texture turns out slightly drier.
- Combine both mixtures and stir carefully. There’s no need to overmix the potatoes — otherwise they start breaking apart and become denser after baking.
- Transfer everything into the baking dish and lightly smooth the top. Then sprinkle the remaining cheese and green onions on top. I think a little greenery on top makes heavy dishes like this look much fresher.
- If you’re making the casserole ahead of time, cover the dish and place it into the fridge for at least 6 hours or overnight. Before baking, let it sit at room temperature for about 15–20 minutes, especially if you’re using a ceramic dish.
- Bake for around 40–50 minutes. The top should become golden while the center fully sets. If the cheese starts browning too quickly, you can cover the dish with foil during the last 10 minutes.
While baking, the potatoes absorb part of the creamy mixture, the cheese melts between the layers, and a light golden crust appears around the edges. That’s usually everyone’s favorite part.
What to Pay Attention To
Don’t use overly wet ham. If it contains too much moisture, the bottom layer can turn watery. I usually pat the pieces dry slightly with paper towels before adding them.
And don’t overdo the spices. The ham and cheese already bring plenty of flavor and salt on their own.
By the way, the combination of eggs, potatoes, and ham makes this breakfast pretty filling. Protein and carbs together help keep you satisfied longer, so after breakfasts like this, people usually don’t start looking for snacks an hour later.
Serving
This casserole goes really well with fresh herbs, tomatoes, or fruit. Sometimes there’s also hot sauce or a small bowl of sour cream nearby.
And of course, the leftovers can be fried in a skillet until golden brown. The outside gets lightly crispy while the inside stays soft and cheesy.
10. Greek-Style Breakfast Bake
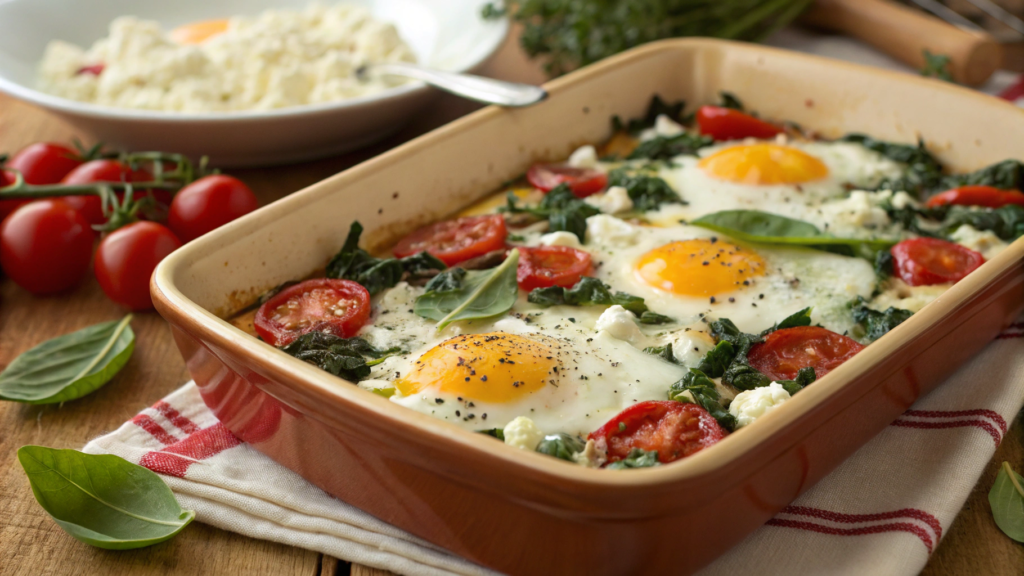
Greek-style breakfast bake usually appears in our house during spring or summer, when we want more vegetables and fresh herbs. I think it’s exactly the combination of feta, tomatoes, spinach, and oregano that makes breakfasts like this so recognizable, while the smell during baking immediately feels Mediterranean.
The combination of eggs, vegetables, and olive oil is also common in Mediterranean-style eating patterns, which are regularly associated with a more balanced diet and better fullness after meals.
What You’ll Need
- 8 large eggs
- 1/2 cup milk (120 ml)
- 2 cups fresh spinach
- 1 cup cherry tomatoes, cut in half
- 3/4 cup crumbled feta cheese
- 1/2 small red onion
- 1/2 cucumber, cut into small cubes
- 1 tbsp olive oil
- 1 tsp dried oregano
- 1/2 tsp salt
- 1/2 tsp black pepper
- 1/4 tsp garlic powder
- 2 tbsp fresh parsley or dill
For this casserole, I especially like using Greek feta in brine because it stays creamier and doesn’t dry out after baking.
How to Make the Casserole
- Preheat the oven to 375°F (about 190°C) and lightly grease the baking dish with olive oil. I usually use a slightly smaller dish so the casserole turns out thicker and doesn’t dry out around the edges.
- In a skillet, lightly cook the red onion in olive oil. There’s no need to caramelize it heavily. The flavor here should stay fresher and softer.
- Add the spinach and cook for about a minute, until the leaves slightly shrink down. If you use too much spinach without sautéing it first, extra moisture may appear inside the casserole later.
- In a separate bowl, whisk together the eggs, milk, oregano, and spices. I personally like adding a little extra oregano — after baking, the aroma becomes very warm and homey.
- Transfer the spinach and onion into the baking dish, then add the tomatoes, cucumbers, and half of the feta on top. Cucumbers may sound unusual in a hot dish, but after baking they stay slightly firm and add a fresh texture.
- Pour the egg mixture over the vegetables. Do it slowly so the ingredients don’t shift to one side of the dish.
- Sprinkle the remaining feta and herbs on top. I think the feta pieces on top look especially appetizing after baking — lightly browned around the edges but still soft inside.
- Bake for around 30–35 minutes until the center fully sets. The top should become lightly golden, while the tomatoes begin roasting slightly around the edges.
During baking, the smell of oregano, feta, and warm tomatoes quickly brings everyone into the kitchen. Especially when coffee is brewing at the same time.
My Observations
I think the main secret of this casserole is not overloading it with ingredients. In Greek-style combinations, the flavor usually comes from simple products rather than too many things at once.
I also don’t add too much salt ahead of time. Feta is already pretty salty on its own, and after baking the flavor becomes even stronger.
You can add a few spoonfuls of shredded mozzarella on top before baking. But personally, I like the version with just feta and no extra cheese more.
Serving
I like serving this casserole with warm bread, fresh vegetables, or a small salad. A bowl of olives or thick Greek yogurt with herbs also fits perfectly here. Whatever feels right to you.
A Calmer Morning
It feels good when the morning starts calmly and most of the cooking is already done.
There’s no need to fry eggs, chop vegetables, and wash pans all at the same time before the first cup of coffee. You simply take the dish out, place it on the table, and everyone slowly gathers because of the smell.
You’ve probably already noticed that many of these casseroles taste even better the next day. Especially the potato and cheese-heavy versions. Sometimes we intentionally make a double batch because the leftovers reheat beautifully in a skillet or in the oven later.If you try one of these recipes first, leave your thoughts in the comments. I’m genuinely curious which version ends up being your favorite.