
A bottle of water, standard chips, some random protein bar from the store — the usual beach kit. And then comes that moment when everything’s sticky, bland, half-melted in the sun, and you catch yourself craving something that doesn’t feel like vending machine food. That’s where real Beach Snack Ideas come in — the kind that are fresh, satisfying, and actually worth bringing along.
Been there. Until I started actually thinking through my beach snacks. And I realized something: delicious, healthy, and even good-looking food isn’t a luxury on the beach — it’s the new normal. If you know what to make.
This list features 10 recipes that Lindy and I come back to every single summer. For ourselves, for friends, for road trips, picnics, or quiet early mornings by the water. They’re simple, but never boring. Fresh, but filling. And most importantly — you’ll find yourself making them again and again.
1. This Viral Frozen Yogurt Bark Is the Beach Snack You’ll Regret Not Trying
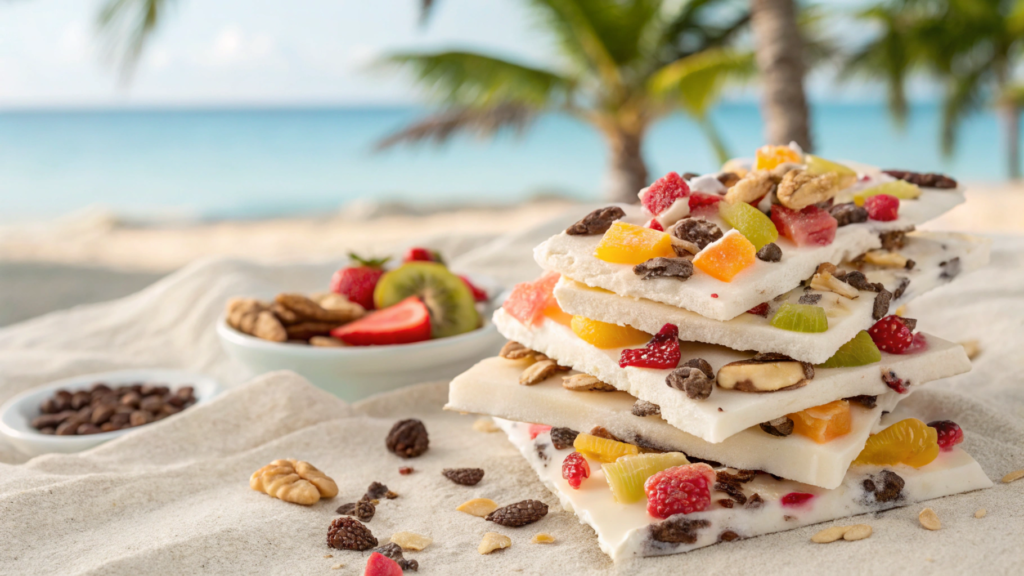
I’ve been making this bark for three summers in a row now. I love it not just for the taste (it really does feel like a café-style dessert), but because it’s super easy to bring to the beach. No dripping, no stickiness, no melting mess. And, honestly, it looks kind of fancy too.
I first saw it on Instagram from a girl in Bali — she posted a video breaking apart this frosty yogurt slab and the crunch… I rewatched it three times and ran straight to the kitchen for yogurt.
So what exactly is this bark?
It’s a thin frozen layer of yogurt topped with fruit, nuts, berries — anything your heart desires. You break it into pieces like a chocolate bar. And it feels like you’re vacationing on the California coast, even if you’re just out by the local lake.
Why I fell in love with it after the first bite:
- It’s ultra-refreshing, but not like ice cream — no added sugar, no sticky film on your tongue.
- No spoons, no napkins, no beach snack drama.
- Made with the most basic ingredients, even if your fridge is down to just yogurt.
- And let’s be honest, it’s more photogenic than most beach snacks — especially when topped with strawberries and mint.
Our go-to recipe (it actually works every time)
Ingredients:
- 2 cups (about 470 ml) plain Greek yogurt (get the unsweetened kind — you got this)
- 1 tbsp honey or agave syrup
- ½ cup (around 75 g) fresh strawberries, sliced
- ½ cup blueberries
- ¼ cup chopped pistachios or walnuts
- Optional: a bit of chocolate chips or shredded coconut
How to make it:
- Mix the yogurt with honey. Add a splash of vanilla if you want — I sometimes use lavender extract, and it’s amazing.
- Spread the mixture on a baking sheet lined with parchment. Keep the layer about ½ inch thick (1–1.5 cm).
- Scatter the toppings evenly — berries, nuts, anything you like.
- Freeze for 3–4 hours.
- Break into chunks with your hands and store in a container. Boom — you’ve got the perfect grab-and-go beach snack for your next three beach trips.
Transport tip
- Bring a portable cooler — I use this Carhartt Deluxe Lunch Cooler Bag — and toss in a small ice pack. Lindy and I take this bark everywhere: beach days, hikes, car rides, you name it.
- Just a heads up — once you make it, you’ll be hooked. Because let’s be honest… there are far too few beach snacks for adults that are this tasty, convenient, and actually good for you.
2. TikTok’s Obsession: Watermelon Feta Skewers for Your Next Beach Trip
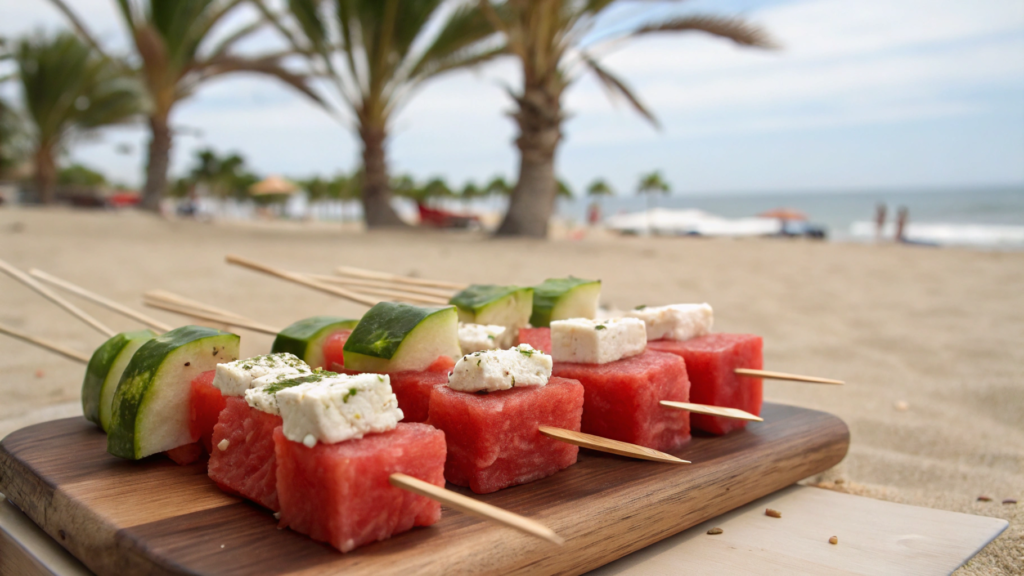
I’m not a fan of watermelon. Sure, it’s summer, it’s traditional, it’s juicy. But I always found it either too watery or completely tasteless. Until I tried it with feta. And after that — there was no going back.
This recipe is so simple, you won’t believe how fast it blew up on TikTok. But what really matters is that it’s a super convenient, refreshing, juicy, and… adult beach snack. And yes, adult. No sticky hands, no plastic forks, no sugar crash.
Why it works
- Feta gives it a salty creaminess, watermelon adds that crisp juiciness and sweetness. And if you throw in a mint leaf or a drizzle of balsamic… oh yes, it hits.
- And it’s not just subjectively tasty — studies show that pairing sweet and salty flavors enhances the perception of both due to sensory contrast.
What you need (almost nothing)
Ingredients:
- 2 cups (about 300 g) diced watermelon
- 1 cup (about 150 g) diced feta cheese
- Fresh mint — about 10–12 leaves
- Balsamic glaze (optional)
- Wooden skewers — like these from Amazon (100-pack lasts us all summer)
How to put this delicious thing together:
- Dice the watermelon and feta into similar-sized cubes — that’s important for keeping them stable on the skewer.
- Assemble each skewer like this: watermelon → feta → mint → watermelon.
- Drizzle a little balsamic glaze on top — just a light touch.
- Chill for 20 minutes in the fridge (or in a cooler with an ice pack) so they firm up and taste extra refreshing.
- Serve straight from a container or from your favorite reusable bamboo lunch box — we use the same ones for picnics, car rides, and beach days.
Tips from Lindy and me:
- If it’s a long trip, don’t drizzle the balsamic ahead — it makes things slippery. Bring a little jar and add it just before eating.
- Vegan? Swap out the feta for something like Violife vegan cheese — we tested it, and it’s great too.
- And please — choose a ripe watermelon. If it doesn’t crunch, the whole point is lost.
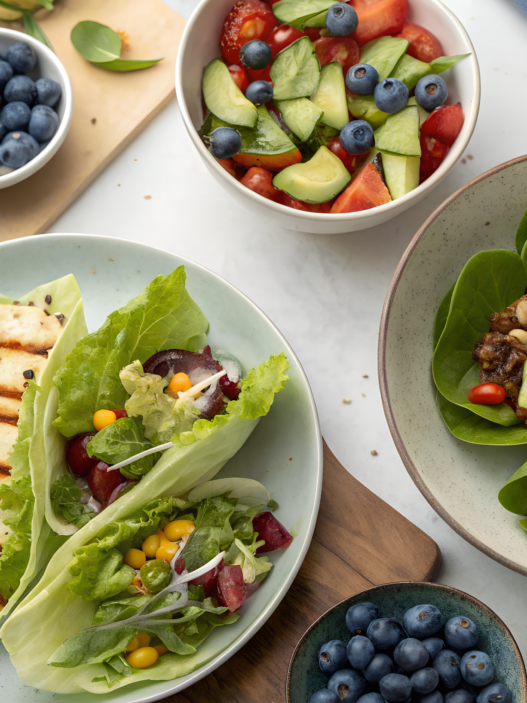
3. Fun Mini Veggie Wraps That Are Healthy, Easy, and Pinterest Viral

I don’t know how things go in your house, but in ours, if something — anything — is wrapped in a tortilla, it disappears in five minutes. These wraps are no exception. But they’re way healthier than sandwiches and far more appealing than a sad plastic tub of carrots.
I make them before beach days, road trips, garden picnics — even when we’re just planting tomatoes and need a quick bite without getting our hands messy. They’re like refrigerator sushi, but made of veggies. And yes, these are exactly the kind of recipes that end up trending on Pinterest in the “Healthy Summer Snacks Adults Actually Love” section. Tested and proven.
What you need:
Ingredients:
- 4 large wraps or thin tortillas (gluten-free or low-carb work too)
- 4 oz (about 100 g) hummus — classic, or beet, curry, whatever you like
- 1 cup grated carrots
- 1 cup thinly sliced cucumber
- ½ cup thin strips of sweet bell pepper
- A small handful of arugula or spinach
- Optional: a bit of shredded cheddar cheese or sliced avocado
How to build it:
- Spread hummus all over the wrap — don’t hold back, it acts like glue and adds creaminess.
- Place the veggies near one edge, leaving a couple fingers of space from the edge — not in the center. This makes rolling way easier.
- Roll it up tightly, tucking in the veggies as you go so everything stays in place.
- Slice into 3–4 pieces for perfect little hand-held rolls.
- Pack in a thermal container to keep them cool and fresh.
Sometimes I’ll add thinly sliced radish or even a bit of sauerkraut (yes, it sounds weird, but the flavor is incredible — especially with garlic hummus). And if you want a little heat, go ahead and add a drop of Sriracha — just a drop!
Don’t use thick tortillas — they don’t hold the shape well and make it feel like all bread, no filling. Thin lavash or soft Mexican-style tortillas work best.
And one more thing: don’t prep them 6 hours in advance — the hummus will soak in and make everything soggy. Best window is 30–60 minutes before heading out. Or wrap them tightly in cling film if you’re packing them to go.
4. 2025’s Best Gluten-Free Beach Nachos You’ll Make on Repeat

Sometimes you just want something crispy, warm, cheesy, and a little spicy. But without it feeling like fast food from a box. That’s exactly why I started experimenting with gluten-free nachos for our summer trips.
Lindy and I made a batch at home before a river day. And while I was still packing the bag, she was already finishing the leftovers straight from the baking tray. The nachos never made it to the beach.
These nachos are gluten-free, no store-bought cheese powder, and absolutely no sketchy additives.
Why gluten-free?
First — the lightness. These chips don’t weigh you down or make you sleepy after eating.
Second — they don’t crumble like typical flour-based tortillas.
And finally — they hold their texture even after baking. That crunch stays for 2–3 hours easily.
Ingredients:
1 bag of gluten-free corn chips (we like the ones with blue corn or chia)
1 cup cooked beans or chickpeas
¾ cup shredded cheddar or Mexican cheese mix
½ cup diced fresh tomato
¼ cup thinly sliced red onion
½ avocado, diced or mashed
A bit of cilantro or parsley
Optional: sour cream, chili sauce, lime, olives
How to make them:
- Preheat your oven to 375°F (190°C).
- Spread the chips on a parchment-lined baking sheet. Keep it to 1–2 layers max for even baking.
- Top with beans, cheese, tomatoes, and onion.
- Bake for 10–12 minutes, until the cheese melts and the chips start to turn golden.
- Add avocado, herbs, sour cream or whatever else you like on top.
- Let cool for 3–5 minutes, then transfer to a lidded lunch container.
I wouldn’t recommend keeping these nachos out all day in the sun — they’re at their best within 2–3 hours of making. So if you’re packing them for the beach, use a thermal container and try not to wait too long before eating.
The key here is not to overload. These nachos shine in their simplicity. One, maybe two toppings after baking — and the flavor stays clean, fresh, and balanced.
5. Avocado Tuna Salad Cucumber Boats: The New Beach Snack Craze

Lindy can’t stand tuna. Hasn’t liked it her whole life. But one day last June, during a picnic, I made these cucumber boats simply because we were out of bread. I sliced a cucumber, scooped it, added a quick tuna salad — and it clicked. Crunch, creaminess, freshness. Nothing else needed.
And yes, Lindy tried one. Then ate three. No comments. Just looked away like nothing happened. That’s when I knew: this beach snack works on everyone.
These boats are awesome because they don’t get soggy like crackers or bread. You can eat them with your hands, mess-free. The salad inside is cold, filling, and flavor-balanced. And they take maybe 10 minutes to make — tops.
What you’ll need:
- 2 ripe avocados, peeled and pitted
- 1 can (around 5 oz / 140 g) tuna in water, drained
- 1–2 tbsp lemon juice
- 1 tbsp Greek yogurt or mayo
- Salt and pepper to taste
- Optional: diced celery, onion, dill, a touch of mustard
- 2–3 long cucumbers, halved lengthwise and scooped into “boats”
How to make it:
- Mash the avocado with a fork until smooth.
- Add the tuna, lemon juice, yogurt or mayo. Mix well. Taste and adjust salt, pepper, or extras.
- Cut the cucumbers lengthwise and scoop the center to form little boats.
- Fill each boat with the salad. Use a spoon or a piping bag if you want it to look extra neat.
- Pack in a flat container with a tight lid — no leaks, no fuss.
This is such a practical beach snack, especially when you don’t feel like cooking. It’s filling but not heavy. Refreshing, but not watery. And honestly, if you had told me ten years ago I’d be happily eating tuna in a cucumber while chilling by the water — I would’ve laughed.
6. Air Fryer Sweet Potato Chips: Your Next Addictive Beach Treat
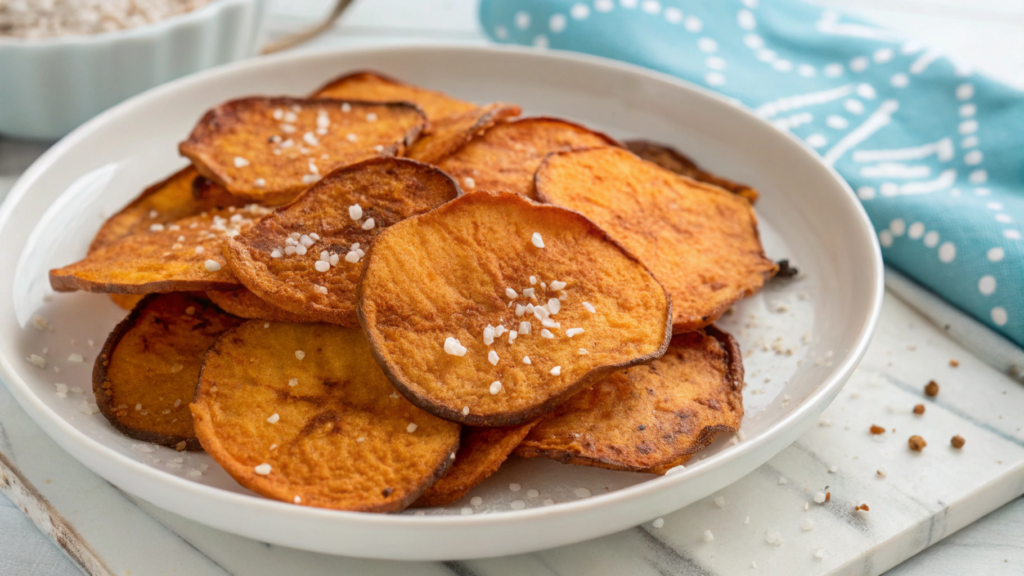
I wasn’t planning on making them. I had sweet potatoes and an air fryer, but honestly thought, “Come on, what could really come of this?”
Then I sliced one up, tossed it in the basket, added some salt, and 12 minutes later — the house smelled like someone was cooking chips with a caramel crust. Just… without oil. No stickiness. And the taste? Absolutely amazing.
Now I make them almost every week — especially in summer. Because on the beach, they stay crisp just right, and no one even realizes they’re healthy. They just eat.
Sweet potatoes are packed with beta-carotene and fiber, and unlike regular chips, they won’t spike your blood sugar. They’re easy to slice, hold their shape, and don’t fall apart during frying.
Plus, you control the salt, spices, and thickness. No additives, no fake flavors — just you and the potato.
Ingredients:
- 1–2 medium sweet potatoes, peeled and thinly sliced
- 1 tbsp olive oil or avocado oil
- ½ tsp sea salt
- Optional: paprika, garlic powder, rosemary, or black pepper
How to make them:
- Slice the sweet potato into thin, even rounds — no thicker than 1/8 inch.
- Toss them in a bowl with the oil and spices.
- Arrange in a single layer in your air fryer basket — no overlapping.
- Cook at 360°F (182°C) for 10–12 minutes. Check every 5 minutes — they can burn fast.
- Let them cool completely. They’ll crisp up even more as they rest.
When you’re packing them for the beach, line the container with a paper napkin — it’ll absorb moisture and help keep the crunch.
And if you’re into a slightly sweet twist, add a pinch of cinnamon and a touch of maple syrup before frying. You’ll get something between a beach snack and a dessert.
They pair perfectly with a simple dip of Greek yogurt, lemon juice, and a drop of Dijon mustard.
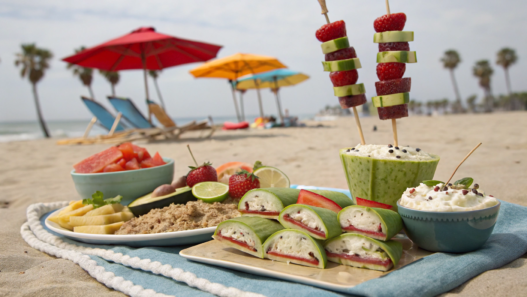
7. DIY Fruit and Cheese Kabobs Adults Are Loving This Summer

These fruit-and-cheese skewers have become our go-to summer beach snack. They cool you down, keep you full, don’t melt, and look absolutely lovely laid out on a picnic blanket.
Why they’re the perfect grown-up snack:
First — the flavor balance. The sweetness of the fruit and the saltiness of the cheese is a classic combo that’s both refreshing and energizing.
Second — they’re super convenient. No forks, no spoons, no sticky fingers.
And finally — they look elegant, even inside a basic plastic box.
What to mix & match:
Base ingredients:
- Cheese cubes: cheddar, gouda, goat cheese, mozzarella
- Fruit: grapes, strawberries, melon, apples, kiwi
- Optional: mint, walnuts, dried cranberries
You can create your own combinations, but here are a few favorites we go through first:
- Cheddar + green apple + grapes
- Goat cheese + strawberries + a mint leaf
- Gouda + melon + dried cranberries
How to assemble:
- Cut the cheese and fruit into even-sized cubes or slices. That’s key for neat, stable skewers.
- Alternate pieces in a checkerboard pattern. Fruit — cheese — fruit, or the reverse.
- Add mint leaves between the layers for extra flair.
- Keep chilled in the fridge or in a sectioned cooler if you’re heading outdoors.
When I prep them for a picnic, I often wrap 2–3 skewers in parchment, tie them with string, and place them in a shared container. It’s easy, clean, and honestly — kind of pretty. Yes, I’m one of those people who wants even beach snacks to look like they came out of a lifestyle magazine. But honestly? It’s just a habit now. And not a hard one.
Pro tip. Avoid soft cheeses like brie — they’ll melt or slide right off. Stick with firmer ones.
Also — don’t go heavy on juicy fruits (like peaches) if you plan to store the kabobs for more than 2 hours. They’ll release juice and make everything soggy.
8. Low-Carb Zucchini Roll-Ups Perfect for a Beach Picnic
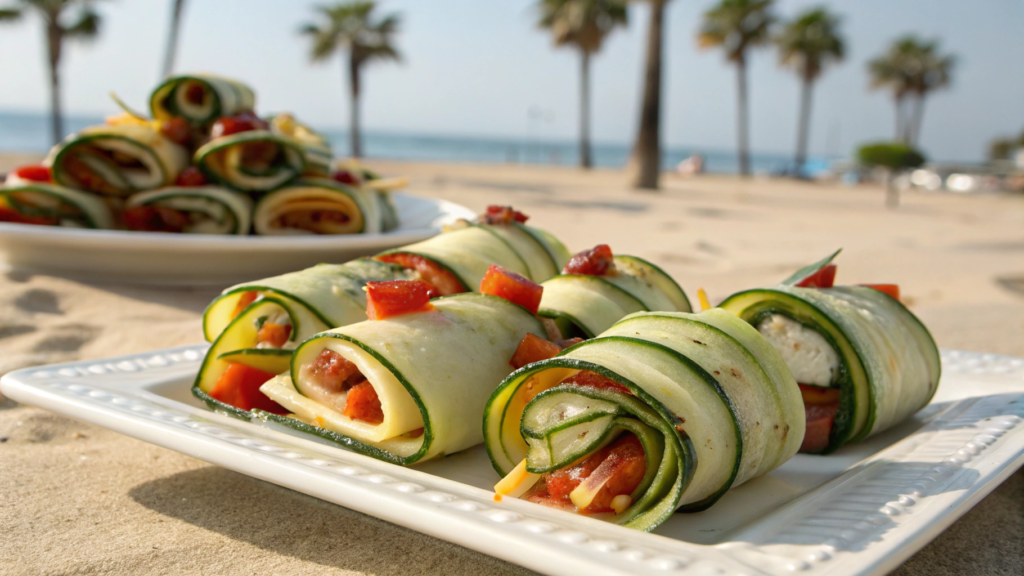
Why bother with bread when you can wrap your filling in zucchini? Every time I make these roll-ups, I’m reminded — you really don’t need dough. They’re light, vibrant, flavorful, and if you chill them a little — super refreshing too.
Lindy and I made them “just to try” one afternoon, and even our friends’ kid (who usually complains about anything remotely healthy) ate three and said, “It’s like sushi, but better.”
Why they’re perfect for the beach:
- They’re easy to eat with your hands — nothing spills or crumbles
- They hold up well in the cooler and don’t fall apart
- They won’t weigh you down — especially on hot days
- You can whip up a dozen in just 15 minutes.
Ingredients:
- 2–3 zucchini (not too thin, easier to slice)
- ½ cup cream cheese or soft goat cheese
- ¼ cup Greek yogurt
- 1 tsp lemon juice
- A pinch of garlic powder
- Fresh herbs: dill, basil, or parsley
- Optional: thinly sliced turkey or ham for extra protein
If you want perfectly even slices, use a good vegetable peeler like this one.
How to make them:
- Slice zucchini lengthwise into thin long strips — about 1/8 inch thick is ideal.
- Mix the filling: combine cream cheese, yogurt, lemon juice, garlic powder, and chopped herbs in a bowl.
- Spread a bit of the mixture onto each zucchini strip.
- Add a slice of turkey or spinach if using.
- Roll them up gently and place in a container.
- Store in an airtight, stackable container — they’ll hold their shape, even if you toss them in your surf bag for a couple hours.
I usually make two batches — some with meat, some without. The vegetarian ones taste just as good, especially if you add a few pine nuts or sun-dried tomatoes.
They look festive, eat in two bites, and no one associates them with “healthy but boring.” Exactly the kind of beach snack that surprises people in the best way.
9. Epic Beach Snack: S’mores Cones You’ll Want to Make for Every Trip

S’mores bring you straight back to childhood. Campfires, gooey marshmallows, melted chocolate, a little smoke… and sticky caramel-covered fingers.
But if you, like me, are kind of over the mess that comes with classic s’mores — here’s your solution. We take all the same ingredients and stuff them into an ice cream cone. Yep, just like that. Then bake.
No sticks, burnt marshmallows, drama with falling chocolate pieces.
Why this works:
- Everything stays inside the waffle cone — no spills.
- You can make them ahead — bake at home or cook over the grill.
- Perfect served warm or cold — ideal for beach trips.
- Easy to store in a container and no messy fingers.
Ingredients (for 4 cones):
- 4 waffle cones (go for deep ones like sugar cones)
- ½ cup mini marshmallows
- ½ cup broken chocolate pieces or chocolate chips
- ¼ cup crushed crackers or digestives
- Optional: peanut butter, shredded coconut, banana slices, strawberries, or extra marshmallow chunks
How to make them:
- Start by adding chocolate and marshmallows at the bottom of the cone.
- Add some crushed crackers.
- Layer more marshmallows, chocolate, and fruit if desired. Fill the cone all the way to the top.
- Wrap each cone in foil. Important: if you’re cooking over a fire, the foil protects from burning.
- Grill or cook over a campfire for 5–7 minutes, until everything is gooey and melted.
- At home: bake in the oven at 375°F (190°C) for 8–10 minutes.
Pro tip. If you’re taking these to the beach, bake them ahead of time, let them cool, and pack them in a container.
They’re just as good cold — the marshmallow stays chewy, the chocolate firms up a bit, and the cone keeps that satisfying crunch. Basically, s’mores… but on a new level. No fire needed, sand in your crackers and burnt lips.
10. Viral Pesto Pasta Salad Cups: The Beach Snack Everyone’s Talking About

I spotted this trend back in the spring. It showed up in a little café at a Brooklyn food market, where everything is served in jars or paper cups. People were lining up to get these little plastic cups filled with cold pasta tossed in pesto, cherry tomatoes, and grated parmesan. And I thought — this is actually genius.
Because this is the kind of salad you can hold with one hand, eat with a fork while sitting on a towel, prep ahead, and not worry about it spoiling.
Since then, it’s been a regular in our beach cooler.
Why is this convenient?
- Pasta holds its shape and flavor, even 3–4 hours later in a container.
- Pesto isn’t mayo or yogurt — it won’t go sour in the heat.
- The “cup format” keeps it tidy, cute, and perfectly portioned.
- You can easily make it vegan or gluten-free without sacrificing flavor.
What you’ll need:
Ingredients (serves 4):
- 2 cups penne or fusilli, cooked al dente
- ⅓ cup pesto (homemade or a good-quality store version)
- 1 cup cherry tomatoes, halved
- ¼ cup grated parmesan
- A handful of arugula or basil
- Salt and pepper to taste
- Optional: olives, sun-dried tomatoes, roasted broccoli
For serving, we love using reusable clear cups with lids. They look sleek and hold up well in a beach bag.
How to make it:
- Toss the warm pasta with the pesto — it spreads more evenly this way.
- Add tomatoes, parmesan, and greens. Mix gently.
- Scoop into cups, small jars, or containers.
- Right before serving, drizzle with a bit of olive oil and sprinkle with freshly ground pepper.
Worried it might dry out? Don’t be. Pesto keeps it from sticking, especially if you’re generous with the sauce and oil.
Want to elevate the flavor even more? Throw in pine nuts and a few slices of prosciutto. But honestly, even the basic version is already a solid ten.
A Taste of Summer on the Beach
I’m not asking you to host a gourmet event by the ocean. I’m just saying — bring something with you that sparks joy. For yourself, your people, that one day under the sun when food should feel like a reward, not an afterthought.
If even one of these 10 fun and creative beach snack ideas for adults makes it into your summer rhythm — this post did its job. And if you’ve already tried any of them, I want to hear how it went. What worked, didn’t. What twist you added that made it yours. Drop a comment — I always read them. Because food? It’s not just about taste. It’s about sharing.