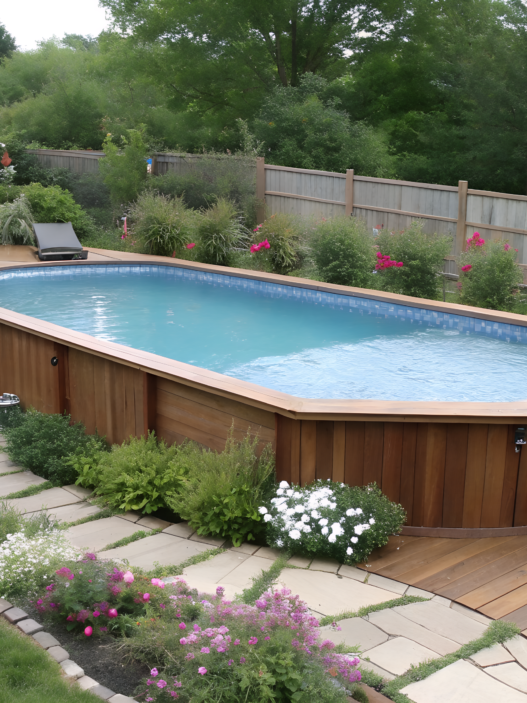

Very often, the pool itself looks fine, but the area around it feels temporary and unfinished. A plastic ladder, wet towels hanging on the fence, toys under your feet, and absolutely no comfortable place where you can just sit down after swimming.
And it only takes a few smart pool deck upgrades to completely change the situation.
Here you’ll find 10 above ground pool deck ideas that help make your backyard more comfortable, organized, and visually expensive without a huge renovation project. There are different solutions here, and many of them are actually realistic to build yourself over a weekend or gradually throughout the season.
So… ready to try?
1. Simple Platform Deck With One Wide Step
Even a small pool starts looking completely different when there’s a proper platform next to it instead of a plastic ladder sitting in the middle of worn-out grass.
All it takes is a small platform near the entrance and one wide step. Suddenly, there’s a place where you can sit after swimming, leave your flip-flops, put down a towel, or simply stand with a cup of coffee in the morning while the kids are already splashing in the pool.
From my own experience, I can say that for a compact backyard, a platform around 6 by 8 ft (about 1.8 by 2.4 m) is usually enough. If you want more open space, you can make it 8 by 10 ft (about 2.4 by 3 m). But the step itself should definitely be wide, almost across the entire front part of the platform. This kind of entrance looks much nicer than a regular narrow ladder.
Wet surfaces around pools are one of the most common reasons for summer falls in the backyard. That’s why a wide non-slip step really matters here. A non-slip surface near water is not just a decorative detail.
What You’ll Need
- Pressure-treated lumber in 2×6 or 2×8
- Deck boards
- Concrete blocks or foundation supports
- Galvanized connectors
- Exterior screws
- Drill
- Circular saw
- Measuring tape
- Level
- Sanding sponge
- Exterior wood stain
- Non-slip tape for the step, like 3M Safety-Walk Outdoor Tread Tape — this type of tape helps make the step safer around water
How To Build a Platform Deck With One Wide Step
- Choose the side of the pool that feels easiest to access from the house. It’s worth walking through the backyard a few times and imagining a normal summer day instead of only looking at a layout sketch. Very often, the perfect location is simply where people naturally walk every day.
- Mark the platform area. For a small backyard, 6 by 8 ft (about 1.8 by 2.4 m) is usually enough. If friends or kids often gather around the pool, it’s better to make the space a little larger. Even a couple of extra feet make a difference later.
- Prepare the base. Remove the top layer of grass and level the ground. Even a small uneven spot becomes very noticeable later, especially near water.
- Install the supports. The area around the pool constantly deals with moisture, so placing a deck directly on the ground is a bad idea. After one season, the wood may start sinking or shifting.
- Build the frame. The spacing between inner joists is usually around 16 inches (about 40 cm). This makes the deck feel sturdier under your feet and keeps it from becoming bouncy after a few months of use.
- Secure the deck boards with small gaps between them so water can drain easily after rain or swimming.
- Build one wide step across the entire front section of the platform. An ideal depth is around 16–20 inches (40–50 cm). A step like this feels comfortable even with wet feet, and it’s much easier for kids to enter the pool calmly without jumping or rushing.
- Check the step height. A comfortable height is usually around 6–7 inches (15–18 cm). A step that’s too high near a pool starts annoying everyone pretty quickly.
- Sand the corners and board edges. Bare feet find imperfections very fast. Especially in the evening, when everyone is relaxed and nobody is paying attention anymore.
- Add non-slip tape along the front edge of the step. Near water, this small detail is genuinely important.
- Protect the wood with stain. Light wood shades near water usually feel fresher, and the pool itself visually looks cleaner and brighter.
Once the pool becomes part of everyday life instead of just a weekend activity, you really start appreciating a platform like this. There’s finally a proper entrance instead of a shaky ladder, less dirt gets dragged into the water, kids can enter the pool more safely, and there’s finally a comfortable place near the water where you can sit down and breathe for a minute after a hot day.
And at the same time, there’s still enough room left in the backyard for grass, games, garden beds, or evening hangouts.
2. Wraparound Deck With Built In Bench Seating
Built-in benches instantly solve a bunch of small problems without adding extra furniture.
This kind of pool deck works especially well for family backyards where people actually spend evenings near the pool. Someone sits with a drink, kids dry off after swimming, someone just hangs out nearby. And this is exactly where built-in seating unexpectedly becomes one of the most useful parts of the whole structure.
For a medium-sized above ground pool, people often build a deck about 8–10 ft wide (around 2.4–3 m) along one side and partially continue it around the corners. You don’t have to wrap the entire pool. Sometimes even an L-shaped deck is enough to make the whole area feel finished.
What You’ll Need
- Pressure-treated lumber in 2×8 or 2×10
- Deck boards
- Boards for built-in benches
- Concrete supports or foundation blocks
- Galvanized connectors
- Exterior screws
- Drill
- Circular saw
- Level
- Measuring tape
- Exterior stain or protective finish
- Outdoor furniture cushions
- Non-slip covering for steps
How To Build a Wraparound Pool Deck With Built-In Benches
- Plan the deck shape in advance. A full wraparound deck is not always necessary. For smaller backyards, a partial deck with one or two seating zones is often much more practical.
- Determine the platform size. Around built-in seating areas, it’s best to leave at least 3–4 ft (around 90–120 cm) of open walking space so people can move comfortably even with towels and pool toys in their hands.
- Prepare the base. Remove grass, level the ground, and check where rainwater drains beforehand. Around pools, drainage problems become noticeable very quickly.
- Install supports under the main platform and separately under the bench areas. Benches create additional weight, especially when several people gather around the pool in the evening.
- Build the deck frame. For larger sections around the pool, it’s better to use heavier lumber so the structure feels stable and doesn’t shift or bounce under your feet.
- Secure the deck boards with small gaps for drainage. After rain or active swimming, the surface will dry much faster.
- Build built-in benches along the outer side of the deck. A comfortable seat height is usually around 18 inches (about 45 cm), while the depth is around 16–20 inches (40–50 cm).
- Leave storage space under the benches if the structure allows it. It’s a convenient place for pool floats, towels, or a box with kids’ pool toys.
- Check all corners and edges. Around pools, people almost always walk barefoot, so sharp edges are better removed right away.
- Protect the wood with stain or sealant. Lighter wood tones near water usually look cleaner and stay cooler during summer heat.
- Add non-slip covering on the steps and around the pool entrance. After swimming, wood becomes noticeably slippery, especially in the evening or after rain. These strips barely stand out visually, but the deck instantly feels safer to use.
- Add soft cushions or outdoor fabric. Even a couple of neutral-colored cushions completely change the feeling of the whole seating area.
This kind of wraparound deck with built-in bench seating slowly becomes part of everyday backyard life. Kids sit there eating ice cream after swimming, adults gather with drinks in the evening, and someone always ends up sitting there barefoot with coffee in the morning.
And the built-in benches make the whole space feel comfortable without the backyard looking overcrowded with random furniture.
3. Budget Deck Skirting Using Lattice and Hinges
No matter how neat the deck looks from above, the open space underneath almost always ruins the overall look. You can see blocks, supports, pipes, tools, and sometimes toys the kids shoved under the deck a week ago. And the whole area instantly starts feeling unfinished and messy.
When we added decorative panels under the deck, the backyard immediately looked much cleaner even without any other changes.
I honestly think the most convenient part of this idea is the hinged panels. They don’t just hide the lower part of the deck — they also give you easy access underneath. And near a pool, that’s incredibly useful because this space often holds hoses, the pump, pool chemicals, or random garden supplies.
For a budget-friendly version, people usually use either plastic or wooden lattice. Plastic is lighter and easier to maintain, while wood feels warmer and looks more natural next to a wooden deck. At that point, it really comes down to personal taste and budget.
What You’ll Need
- Outdoor decorative lattice
- Lumber for frames
- Outdoor hinges, like National Hardware Outdoor Gate Hinges
- Latches or magnetic catches
- Exterior screws
- Drill
- Circular saw or handsaw
- Measuring tape
- Level
- Exterior stain or paint
- Sandpaper
How To Build Decorative Deck Skirting
- Inspect the space under the deck and decide in advance where you’ll need access panels. Usually this is near the pump, filter, or hose connections.
- Measure the height and length of the open sections. It’s better to divide long sides into several separate panels. The structure looks cleaner this way, and the panels are easier to open.
- Build simple wooden frames sized for each section. Even inexpensive lattice looks much better when it sits inside a clean frame.
- Attach the lattice inside the frames using screws or construction staples. There’s no need to stretch the material too tightly.
- Leave several panels hinged and openable. This is exactly where the hinges become useful. A removable panel may seem convenient at first… until you’re standing near the pool with wet hands trying to figure out where to put it.
- Install latches or magnetic catches so the panels don’t swing open in the wind.
- Check the bottom edge of the structure. The lattice should not sit directly on the ground. It’s better to leave a small gap for ventilation and to keep the material from absorbing moisture after rain.
- Protect the wood with stain or sealant if you’re using wooden lattice or wooden frames. Around pools, humidity stays high almost constantly during summer.
- Match the color to the deck. Light wood shades make the whole structure feel visually lighter, while darker tones help hide shadows underneath the deck.
- Do not seal the space completely closed. Air still needs to move underneath the deck, otherwise moisture starts building up very quickly.
With this kind of deck skirting, keeping the area organized becomes much easier. Toys, hoses, storage boxes, and technical supplies stop catching your eye every single time you walk outside. Even a budget-friendly deck with simple skirting suddenly starts looking much more expensive and visually finished.
4. Gate and Handrail Layout That Feels Custom
A deck can look beautiful, the boards can be perfectly straight, and the color can match the water beautifully… But if the gate and handrails look random, the whole area instantly loses its appeal.
A well-designed pool gate and handrail layout creates direction naturally. It immediately becomes clear where the entrance is, where people should walk, where to hold on, and where kids should not run without adults nearby. The backyard instantly starts feeling like a proper summer space where everything makes sense at first glance.
The main thing is to make the gate and handrails in the same style as the deck itself, using matching boards, colors, and clean hardware.
What You’ll Need
- 4×4 posts
- Boards for the gate and handrails
- Boards or slats for filling the gate
- Outdoor hinges
- Gate latch
- Exterior screws
- Galvanized connectors
- Drill
- Circular saw
- Measuring tape
- Level
- Speed square
- Sanding sponge
- Exterior stain or paint
- Non-slip covering for steps if the gate leads directly to stairs
How To Build a Pool Gate and Handrails
- Decide where the main pool entrance will be and think about movement flow right away. The gate should be placed where people actually walk every day. A comfortable opening is usually around 36 inches (about 90 cm), so people can easily pass through carrying towels, toys, or pool supplies.
- Install strong 4×4 posts and carefully check the level before securing them. A gate constantly opens and closes, so weak or uneven posts quickly start wobbling. This becomes especially noticeable around pools where wood deals with constant moisture and sun exposure.
- Build the gate using the same materials as the deck. This helps the entire structure feel cohesive. Most people use a simple frame with vertical slats or boards inside. It’s also smart to leave a small gap underneath around 1–2 inches (2.5–5 cm) so the gate doesn’t drag against the deck after rain or collect debris.
- Install outdoor hinges and a strong latch. Regular indoor hardware starts rusting very quickly near a pool. The gate should open smoothly and close without sagging. If kids use the backyard, a reliable latch becomes even more important.
- Plan the handrail placement before building the stairs. The handrail should sit exactly where someone naturally reaches after getting out of the water. A comfortable height is usually around 34–38 inches (about 86–96 cm). It also looks much cleaner when the handrail line matches the deck railing.
- Sand all surfaces people will touch with their hands or feet. Bare feet around a pool find rough spots very quickly.
- Protect the wood with an exterior finish. Gates and handrails deal with constant stress: sun, humidity, splashing water, wet towels, and hands touching them all day long. Without protection, wood starts looking worn surprisingly fast.
- Add non-slip covering on steps and near the pool entrance. After swimming, wood becomes noticeably slippery, especially in the evening or after rain.
- Test the setup in real life. Open the gate with wet hands, walk barefoot after swimming, and check whether the handrail feels comfortable and whether anything blocks the pathway.
When the pool gate closes properly, wet feet don’t slide near the entrance, and the handrail sits exactly where it should — this is where beauty and comfort finally work together perfectly. It immediately becomes clearer where the entrance is, where it’s safe to hold on, where kids should stop, and where the pool zone begins.
5. Deck Corner Bar Shelf for Towels and Drinks
At first glance, a detail like a corner bar shelf may not seem necessary at all. But when friends come over and gather near the pool, everyone constantly needs somewhere to place a glass, set down a phone, sunglasses, or a wet towel. But as soon as we built a small corner shelf, the whole pool area started looking much cleaner visually.
It takes up very little space, which really matters in small backyards where every free foot counts. For a standard deck near an above ground pool, a shelf about 18–24 inches wide (around 45–60 cm) on each side of the corner is usually enough. That gives you enough space for drinks and different little things.
What You’ll Need
- Boards for outdoor use
- Lumber for mounting
- Exterior screws
- Drill
- Measuring tape
- Level
- Circular saw
- Sanding sponge
- Stain or protective finish
- Towel hooks
- Metal brackets to reinforce the structure
How To Build a Corner Shelf Near the Pool
- Choose the deck corner that sits close to the seating area but doesn’t block the walkway. Exterior deck corners usually work best because people don’t constantly walk through them with wet feet.
- Decide on the shelf size. For a compact version, around 18–24 inches (45–60 cm) on each side is enough. If the shelf is too deep, it can start visually weighing down the corner.
- Prepare the mounting base. The shelf should attach to strong frame elements or deck posts, not just the top deck boards.
- Build the shelf frame from lumber and reinforce it underneath with metal brackets. Even a small shelf can carry a surprisingly heavy load in summer, when drinks, plates, and half the kids’ stuff all end up on it at once.
- Attach the top boards with small gaps for water drainage. Near a pool, the surface almost always deals with moisture.
- Round and sand the corners. Sharp edges near a seating area get annoying fast, especially when people walk barefoot or sit nearby.
- Add lower hooks for towels or bags. This small detail unexpectedly clears up the whole deck around the pool.
- Protect the wood with an exterior finish. The shelf constantly sits in the sun, gets splashed with water, and holds drinks and wet towels.
- Think through the height of the structure. If the shelf is used as a small poolside bar, a comfortable height is usually around 40–42 inches (about 100–107 cm). For a regular side surface, you can make it lower.
- Don’t overload the corner with decor. Sometimes one clean shelf is enough to make the whole pool area feel more comfortable and organized.
People naturally start placing drinks, towels, and little things on a corner bar shelf before swimming. And the backyard looks cleaner without extra side tables or plastic furniture. So even a small detail like this shelf makes the whole deck feel more thought-out and more convenient for ordinary summer life.
6. Pergola Shade Frame Attached to Deck Posts
I think almost everyone knows the situation where regular folding umbrellas stand next to the deck. And half the time goes not into relaxing, but into fighting with those umbrellas. This is exactly where a lightweight shade frame attached to deck posts becomes incredibly useful. It creates soft shade, makes the space feel more comfortable, and helps you actually use the pool even during the hottest part of the day.
For a smaller deck, a structure around 8–10 ft wide (about 2.4–3 m) is usually enough. That gives enough coverage for a seating area with a bench, a couple of chairs, or a place for towels.
What You’ll Need
- 4×4 or 6×6 posts
- Boards or beams for the upper frame
- Exterior screws
- Metal brackets
- Drill
- Circular saw
- Measuring tape
- Level
- Exterior stain or protective finish
- Outdoor fabric or shade sail, like LOVE STORY Sun Shade Sail
- Sanding sponge
- Anchor hardware for extra reinforcement
How To Build a Shade Structure Over the Deck
- Decide which area actually needs shade. There’s no need to cover the entire deck. Most of the time, it’s enough to shade the seating area, chairs, or the shelf for drinks.
- Watch how the sun moves during the day. Sometimes shifting the structure just a couple of feet creates much more useful shade during peak afternoon heat.
- Use existing deck posts if they’re strong enough. This visually connects the entire structure and keeps the backyard from feeling overloaded with extra supports.
- Install additional posts if the deck is small or the existing supports don’t feel solid enough. Around pools, it’s always better to build with extra strength in mind.
- Build the upper frame using beams or boards. Even a simple rectangular frame already makes the whole space feel more finished visually.
- Keep the structure visually light. Around pools, oversized heavy beams can sometimes feel too bulky, especially in smaller backyards.
- Secure the shade fabric so it stays slightly stretched but doesn’t turn into a stiff solid roof. A little softness makes the whole structure feel lighter and more relaxed.
- Check the height of the frame. A comfortable height is usually around 7–8 ft (about 2.1–2.4 m). Lower structures quickly start feeling heavy and cramped near water.
- Sand all exposed edges and corners. Around pools, people constantly walk barefoot, touch the posts with wet hands, and lean against them after swimming.
- Protect the wood with an exterior finish. Sun and moisture near a pool quickly change the appearance of untreated wood.
- Add soft lighting if the structure will be used in the evening. Even a simple string light between the beams completely changes the atmosphere after sunset.
With this kind of shade structure, there’s finally a comfortable place where you can sit during the day without dealing with direct sun exposure. Drinks stop heating up in ten minutes, kids can rest between swims without hiding inside the house, and visually the whole pool deck area starts looking much more polished and inviting.
7. Under Deck Storage Hatch for Floats and Chemicals
The space underneath an above ground pool deck often stays completely unused. But if you build a proper storage hatch with access underneath, it can easily hold pool floats, nets, hoses, water testing kits, accessory boxes, and part of your pool chemicals.
But it’s important not to store everything together in one pile. Especially if there are kids at home. Pool chemicals should stay inside closed containers and separate from toys and towels.
What You’ll Need
- Lumber for the frame
- Boards for the hatch cover
- Outdoor hinges
- Exterior screws
- Drill
- Circular saw
- Measuring tape
- Level
- Hatch latch or handle
- Gas struts or opening supports
- Plastic storage containers (they help protect items from moisture and random splashes near the pool)
- Vent covers
- Exterior stain or protective finish
How To Build a Storage Hatch Under the Deck
- Inspect the space underneath the deck and check how much usable room is actually available. Sometimes the area under the platform fits far more than it seems at first.
- Choose a hatch location that’s easy to reach with wet feet and doesn’t require moving furniture every time. Most people place the hatch closer to the outer edge of the deck.
- Plan the hatch size carefully. A hatch that’s too small quickly becomes annoying because large pool floats or storage boxes are difficult to pull through. A width around 24–30 inches (about 60–76 cm) is usually comfortable.
- Reinforce the frame around the future opening. After cutting the hatch opening, the deck should still feel solid and stable under your feet.
- Build the hatch cover using the same boards as the deck itself. This helps the surface look seamless so the hatch doesn’t stand out visually.
- Install outdoor hinges and check that the lid opens smoothly without shifting. If the hatch cover feels heavy, adding gas struts or opening supports makes it much easier to use.
- Add a handle or hidden grip for lifting the hatch. Without one, the hatch quickly becomes the awkward part of the deck nobody wants to open.
- Create ventilation underneath the deck. Fully enclosed storage near a pool collects moisture very quickly, especially during summer.
- Use storage containers inside the compartment. Pool floats, chemicals, and tools should not sit directly on the ground in one messy pile.
- Keep chemicals separate from towels and children’s items. Even if the storage space is large, it’s still better to divide it into at least two sections.
- Test the hatch barefoot. It should sit flush with the deck surface, stay stable, and not catch under your feet while walking.
- Protect the wood with an exterior finish. The hatch deals with the same stress as the rest of the deck: sun, water, and constant temperature changes.
Finally, all those summer items get a proper place instead of moving around the backyard every single day. Everything stays literally under your feet while still remaining hidden from view. For smaller backyards, this is a huge improvement: the space feels much more organized, and the whole pool area stays cleaner and more visually calm even in the middle of summer.
8. Deck Lighting Plan Using Low Voltage Caps and String Lights
After we replaced the bright pool floodlight with softer lighting, the whole atmosphere changed literally overnight. The deck immediately started looking much better because this setup combines two different types of lighting. Low-voltage lights on the posts help people move safely around the deck and stairs, while string lights create soft evening lighting without harsh shadows. Together, this feels much more comfortable than one powerful light shining near the pool.
What You’ll Need
- Low-voltage post lights
- Outdoor string lights, like Brightever LED Outdoor String Lights
- Mounting hardware for string lights
- Drill
- Exterior screws
- Outdoor extension cord
- Timer or smart plug
- Cable clips
- Plastic zip ties
- Level
- Ladder
- Waterproof connectors
How To Light a Pool Deck
- Think through evening movement around the deck first. Lighting is not only there “for looks.” People will walk barefoot after swimming, step down stairs, and look for towels or drinks in low light.
- Identify the main lighting zones. Usually this includes the deck entrance, stairs, handrails, seating area, and the space near benches or drink shelves.
- Use soft warm lighting instead of overly bright cool-toned bulbs. Near water, cold lighting often feels too harsh and quickly becomes tiring at night.
- Install low-voltage lights on deck posts. They help outline the edges of the structure and make movement around the deck safer. This type of lighting works especially well near stairs.
- Don’t install lights too close together. Sometimes less lighting actually looks much more expensive. If every single post glows individually, the deck can start looking like a public park walkway.
- Hang string lights above head level so they don’t interfere with movement or create the feeling of a low ceiling above the seating area.
- Use existing deck posts or a shade structure to attach the string lights. This helps the wiring look cleaner and prevents cables from hanging randomly above the pool.
- A slightly relaxed string line usually looks better than perfectly tight lighting. Extremely straight lines often make the lighting feel visually stiff.
- Hide wires and mounting hardware as much as possible. Small details have a huge impact on how clean the space feels in the evening.
- Check all waterproof connections carefully. Around pools, humidity stays constantly higher, and exposed electrical connections quickly become a problem.
- Add a timer or smart plug. It’s a small detail, but surprisingly enjoyable. The lights turn on automatically in the evening, and the backyard instantly feels alive without any effort.
- Test the lighting at night, not during the day. Very often, a layout that seems perfect during installation creates too much brightness in one corner and almost none in another after sunset.
- Leave part of the backyard slightly darker. A pool area completely flooded with light rarely feels cozy. Soft shadows and gentle transitions make the space much more comfortable in the evening.
It’s also important to remember the combination of electricity and moisture. For this kind of lighting, it’s best to use only outdoor-rated fixtures and waterproof connections, while keeping wires and extension cords away from places where splashes or puddles constantly appear.
Especially if kids run around near the pool. Beautiful evening lighting should feel not only cozy, but safe for the whole family too.
9. Small Backyard Deck Footprint That Leaves Room to Play
A compact deck near an above ground pool often turns out to be much more practical than a huge one. It requires less maintenance, doesn’t overwhelm the backyard, and still leaves room for a ball, garden hose, kids’ games, dogs, garden beds, or simply grass that feels nice under bare feet in summer.
For a smaller backyard, a deck around 6 by 8 ft or 8 by 10 ft (about 1.8 x 2.4 m or 2.4 x 3 m) near the pool entrance is usually enough. That gives you comfortable access to the pool, space for a couple of seats, and room to store small items.
What You’ll Need
- Pressure-treated lumber
- Deck boards
- Concrete supports or foundation blocks
- Exterior screws
- Drill
- Circular saw
- Measuring tape
- Level
- Exterior stain or protective finish
- Non-slip covering for steps
- Landscape fabric or gravel for the area underneath the deck
How To Build a Compact Pool Deck
- Look at the entire backyard first, not only the pool. It’s important to understand where kids usually run, where the main walking paths are, and how much open space will actually remain after the deck is installed.
- Mark the layout directly on the grass using rope or a garden hose. On paper, decks almost always look smaller than they feel in real life.
- Leave an open play area. Even if you feel tempted to make the deck “just a couple feet bigger,” it’s usually smarter to preserve part of the yard as open space. During summer, that free area gets used constantly.
- Build the deck only near the pool entrance instead of wrapping the entire structure. In most cases, this is the section people use the most anyway.
- Think carefully about the deck shape. For smaller backyards, rectangular or L-shaped deck layouts usually work especially well because they keep the space feeling cleaner and less crowded.
- Install the supports and frame properly based on real weight and usage. Even a compact deck should feel stable and solid under your feet.
- Don’t overcrowd the deck with furniture. One small seating corner almost always looks better than stuffing the whole deck with chairs and loungers.
- Leave a comfortable walkway around the pool. People should not have to squeeze between the deck, fence, and plants.
- Use the space underneath the deck for storing pool toys or accessories. This becomes especially useful in small backyards.
- Protect the wood with light stain or a natural finish. Lighter shades visually make small backyards feel more open and airy.
- Add a little greenery near the deck, but avoid turning the pool area into dense landscaping. Around water, overly packed plants quickly make the space feel cramped.
- Test the layout after installation. Walk through the backyard carrying a towel, a ball, or a garden hose. It becomes obvious very quickly where you should have left a little more open space.
A compact pool deck layout still leaves room for games, evening hangouts, lawn space, gardening, or simply that feeling of openness in the backyard. And because of that, it often feels much more practical in everyday life than oversized deck structures that only look impressive in photos.
10. DIY Deck Stain Color Pairings That Make Water Look Bluer
Next to a deck, the color of pool water starts looking completely different. And sometimes simply changing the deck stain color around the pool is enough to make the water look brighter, cleaner, and fresher without replacing the pool itself.
When the wood around the water has overly red, orange, or very warm tones, the blue color visually disappears. But cooler wood shades, soft grays, or light natural tones usually make the water look much brighter.
And this is one of those projects you can realistically finish over a weekend without rebuilding the entire deck.
What You’ll Need
- Exterior wood stain
- Brushes or rollers
- Paint tray
- Sander or sandpaper
- Deck cleaner
- Protective gloves
- Painter’s tape
- Fabric or plastic sheeting to protect the pool
- Dust brush
- Protective wood sealer if needed
How To Choose the Right Deck Color Near a Pool
- Look at the water color during the day, not only in the evening or in photos. In direct sunlight, colors around the pool look completely different.
- Avoid overly orange and red wood tones if you want the water to appear more blue. These shades often visually absorb the fresh look of the water.
- Light gray and cooler wood tones usually make pool water appear brighter. This becomes especially noticeable with blue or turquoise pool liners.
- Soft gray-brown shades often feel calmer than pure gray. The deck still feels warm visually, but the water looks fresher at the same time.
- Test stain samples directly near the pool. The exact same color can look completely different in the store versus next to water.
- Check the stain color at different times of day. Morning sun, evening light, and cloudy weather all dramatically affect how wood and water look together.
- Avoid making the deck too dark. Dark wood heats up much faster during summer and visually makes the water feel heavier.
- Don’t combine too many different stain tones at once. Sometimes pool owners try mixing gray, red, walnut, and sandy shades together. In the end, the water disappears visually against all those competing colors.
- Clean the deck thoroughly before staining. Dust, old dirt, and leftover finish can seriously affect the final color result.
- Always test the stain on a small section first. Once the entire deck is covered, changing the shade becomes much harder and more expensive.
- Allow the finish to dry completely before judging the final result. Some stain colors initially appear much darker.
- Coordinate the deck color with furniture and fabrics. Light towels, white planters, and neutral outdoor fabrics help pool water appear cleaner visually.
- Add warm evening lighting if the pool is used at night. The right lighting helps the blue tones in the water feel deeper and more pleasant after sunset. And don’t forget about safety — use only outdoor-rated lighting and waterproof electrical connections, while keeping wires and extension cords away from areas where splashes or puddles constantly appear.
Even an older above ground pool can suddenly look much fresher simply because of the right deck color around it. The water appears brighter, the whole pool area feels more attractive, and the backyard starts looking more cohesive and thoughtfully designed.
And all of that happens without rebuilding the deck or buying a new pool.
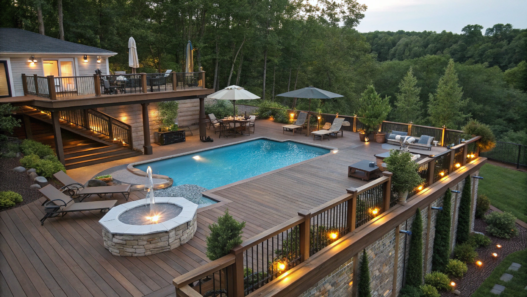
Upgraded Pool Deck
For me, the most important thing is that the space around the pool works well for your actual everyday life. Wet towels should stop being annoying after the first week. Evenings near the water should feel relaxing instead of making everyone rush back inside. Kids should still have enough room to move around the backyard, and the deck shouldn’t take over the entire space.
Do you already have a deck around your pool? What ended up being the most useful upgrade — lighting, built-in benches, hidden storage, or something completely unexpected? Share your photos, ideas, and favorite solutions in the comments. Real backyard setups always help more than perfect-looking catalogs.