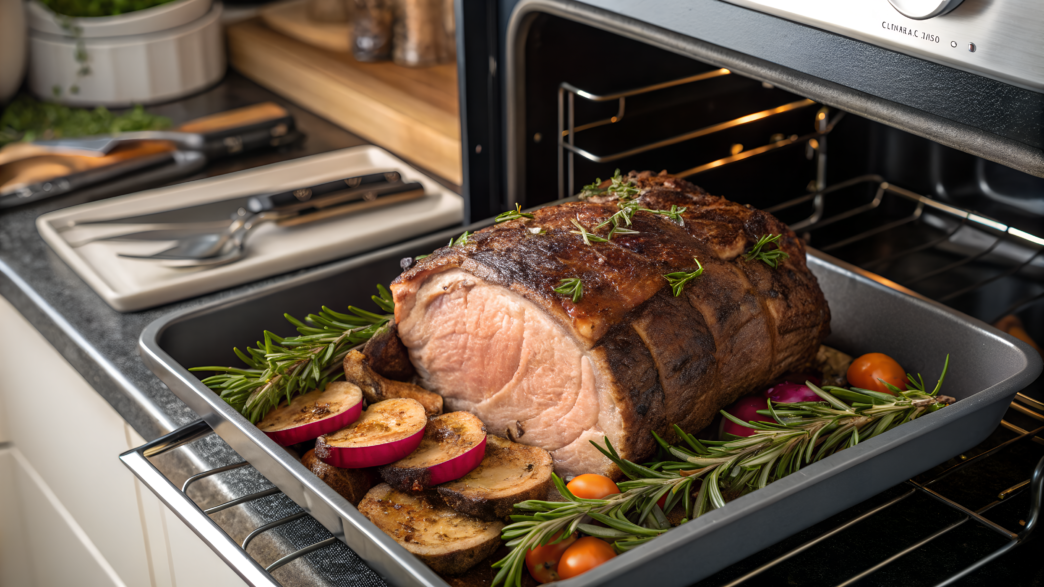
Prime rib roast oven cooking secrets — this is a set of clear steps that help you not mess up a good piece of meat. Everything is pretty simple when you understand and pay attention to the details.
These are the techniques we actually use at home when we want a solid dinner without stress. The first time, the meat turned out fine on the outside, but inside it didn’t reach the right doneness. Another time — the opposite, we overcooked the edges. And everything seemed to follow the recipe. We just didn’t account for the details that matter more than they seem in real cooking.
Only with experience do you start to notice how the meat behaves, how the oven reacts, and how much time is really needed. And eventually, you understand and feel what result you’re going to get at the end.
1. The 500-Degree Prime Rib Oven Technique Explained
When we first tried cooking prime rib in the oven without a thermometer, we were honestly worried about how it would turn out. The cut was expensive, and we really didn’t want to mess it up.
But this method actually works, because high heat at the start quickly seals the surface of the meat, creates a crust, and then the meat finishes cooking on residual heat. The key here is not to rush and not to open the oven every 10 minutes.
What you’ll need
- Prime rib roast — about 4–6 lb (1.8–2.7 kg)
- Coarse salt — 1–2 tbsp (15–30 g)
- Black pepper — 1 tbsp (15 g)
- Butter — 3 tbsp (45 g)
- Garlic — 4–5 cloves
- Roasting pan with rack (for example, Amazon Basics Roasting Pan with Rack)
- Aluminum foil
- Timer or clock (basic one is fine)
How to do the 500-degree method step by step
- Take the meat out ahead of time
Leave it at room temperature for 2–3 hours. This is not a small detail. A cold piece cooks unevenly inside, and the result will be different. - Prepare the surface
Mix salt, pepper, soft butter, and minced garlic. Rub the meat with your hands generously. Yes, your hands will get oily — that’s normal. - Preheat the oven to 500°F (260°C)
Exactly to this temperature. Not “around it.” A full preheat. - Roast at high temperature
Place the meat in the oven and calculate time like this: 5 minutes per pound (lb)
For example, a 5 lb piece → 25 minutes at 500°F - Turn off the oven
After that, just turn the oven off and… that’s it. Don’t open the door at all.
Leave the meat inside for 2 hours.
Now you need some patience, because you’ll want to check, touch, and peek.
But if you open the oven — the temperature drops, and the whole point of the method is lost.
It’s important to understand that high heat triggers the Maillard reaction — the process that creates that flavorful crust and deep meat taste. Research in food chemistry confirms that these compounds actively form at temperatures above 285–330°F (140–165°C). Then the residual heat inside the oven slowly brings the meat to the right doneness without drying it out.
What to pay attention to
- Don’t open the oven too early
- Don’t lower the starting temperature
- Measure the weight of the meat accurately
- If your oven doesn’t hold heat well, the result may vary
Sometimes you cut into your prime rib and the center is still a bit undercooked. Don’t stress — nothing went wrong. Just put the piece back in the oven at 275–300°F (135–150°C) for about 10–15 minutes, and that’s usually enough. If the crust is already there — just cover it with foil so it doesn’t dry out.
If you already sliced the meat, spread the pieces on a pan and warm them for another 5–10 minutes. You can also finish them quickly in a pan for about a minute on each side, but keep the heat moderate so you don’t ruin the texture.
2. Timing Your Roast Perfectly Without a Thermometer
It’s hard to trust recipes that don’t use a thermometer. A good cut of meat costs too much to just guess. Ovens are different, cuts are different… and you still want a reliable result.
What you’ll need
- Prime rib roast — 4–8 lb (1.8–3.6 kg)
- Salt — 1–2 tbsp (15–30 g)
- Black pepper — 1 tbsp (15 g)
- Timer or regular clock
- Roasting pan with rack
How to calculate time without a thermometer
Here’s what you should always keep in mind:
- Rare — 10–12 minutes per 1 lb
- Medium rare — 13–15 minutes per 1 lb
- Medium — 16–18 minutes per 1 lb
This works at around 325°F (160°C).
For example: a 5 lb piece → medium rare = about 65–75 minutes
But always remember, the oven can run a bit hotter or cooler, and the meat itself can start colder or warmer.
I had a time when the meat came out slightly underdone, even though everything was done by the book and I followed the timing exactly. Yes, that happens. Since then, I always leave a bit of extra time in reserve. It’s better to pull it a little earlier and finish it than to dry it out.
How to “read” the meat without a thermometer
Here are a few simple ways to understand the doneness:
- Finger press
Soft and springy — closer to rare
Firm but still with some give — medium rare
Dense — closer to medium - Juices when cutting
Bright red — too early
Pink — just right
Clear — closer to fully done - Visual cues
A good crust and slight firmness usually mean it’s at the right stage
What to pay attention to
- The oven can be off on temperature — this affects total time
- Cold meat takes longer — always let it sit at room temperature for 2–3 hours before cooking
- The weight of the cut is key — don’t estimate it roughly
- Without a thermometer there’s always some margin of error — so leave extra time
A tip from experience. When the time is up, just turn off the oven and leave the meat inside for another 10–15 minutes. This helps it finish gently without drying out. That’s how I handle it every time now.
It might not come out perfect the first time. But with each try, you start to feel the process better.
3. Bone-In Prime Rib: The Flavor Advantage
Bone-in prime rib gives you a more pronounced, deeper flavor.
Before, we only bought boneless cuts because it felt easier to handle. But that time the butcher insisted: “Take it with the bone, you’ll understand the difference.”
Later we remembered his words, because even during roasting the aroma was different — richer and more meaty.
There are a few reasons for this, and they are directly related to how the bone behaves during cooking.
- The bone slows down heating
The meat near the bone cooks more gently and doesn’t dry out as quickly. The texture in that area turns out more tender. - The bone affects heat distribution
Heat moves through the meat less evenly, and the bone creates a more gradual internal warming. This helps avoid a sharp contrast between the outer edges and the center. - Meat near the bone retains more moisture
Those sections often stay juicier because they are less exposed to direct heat compared to the outer surface.
Overall, the flavor feels deeper not because the bone “adds flavor” directly, but because better texture and moisture make the meat taste richer.
What you’ll need
- Bone-in prime rib roast — 4–8 lb (1.8–3.6 kg)
- Coarse salt — 1–2 tbsp (15–30 g)
- Black pepper — 1 tbsp (15 g)
- Garlic — 4–6 cloves
- Butter — 3–4 tbsp (45–60 g)
- Roasting pan with rack
How to prepare bone-in prime rib
- Take the meat out ahead of time
Leave it at room temperature for 2–3 hours. Don’t skip this step — a cold piece cooks unevenly inside. I usually place it on a tray on the counter, loosely cover it so it doesn’t dry out, and let it sit. During this time, the fat softens a bit, and the seasoning sticks better instead of sliding off. - Salt it in advance
The best option is to salt it 12–24 hours before cooking. Rub salt over the entire surface and leave it in the fridge uncovered. It may look unusual at first, but this helps the surface dry slightly and later creates a clean, even crust. The salt also distributes gradually inside, so the flavor develops throughout the meat, not just on the outside. - Apply the seasoning mixture
Before roasting, mix soft butter, garlic, and black pepper. You can add a bit of rosemary or thyme, but don’t overdo it — the meat should still be the focus. Rub the mixture in with your hands, working it across the entire surface. Pay extra attention to the top — this is where the main crust forms, and it shapes the first impression. - Place it bone-side down
Set the meat bone-side down on the pan. The bone works like a natural rack, so the meat doesn’t sit in its own juices and cooks more evenly. A rack is helpful, but even without one this setup works well. The key is to keep a bit of space underneath so the bottom doesn’t steam but actually roasts.
Tip. The bone can be cut off in advance and then tied back on with butcher’s twine. This makes slicing easier after cooking, while the flavor and texture stay the same. It’s a simple step that saves time when serving.
What to pay attention to
It may seem straightforward with a bone-in cut, but a few details still affect the result:
- It cooks slightly longer than a boneless cut — allow extra time, especially for larger roasts
- It’s harder to slice neatly if you don’t prepare it ahead of time
- Always include the bone in the total weight when calculating time
- Meat near the bone can look more pink — this is normal due to how heat moves through that area
It’s important to understand that the pink color near the bone is not a sign of undercooked meat. This color appears because of pigment reactions in the meat next to the bone during roasting. It’s completely normal and safe. Once you know this, it doesn’t raise concerns when serving.
4. Boneless Prime Rib for Effortless Slicing
If you’ve ever dealt with a bone while carving meat on a cutting board, boneless prime rib will feel like a relief. The flavor stays rich, but slicing becomes much easier.
What you’ll need
- Boneless prime rib roast — 4–6 lb (1.8–2.7 kg)
- Coarse salt — 1–2 tbsp (15–30 g)
- Black pepper — 1 tbsp (15 g)
- Butter — 3 tbsp (45 g)
- Garlic — 4–5 cloves
- Butcher’s twine (for example, Regency Wraps Cotton Butchers Twine)
- Roasting pan with rack
You can probably see why many people choose the boneless option. It’s simply easier to slice. There’s no need to work around a bone, and the slices come out even, clean, and consistent in thickness. It’s also easier to control the shape. You can tie the roast with twine, make it more compact, and it will cook more evenly. And one more thing — it usually cooks a bit faster, because heat moves through the meat more easily without the bone, so total cooking time is slightly shorter.
What to pay attention to
There are a few details worth keeping in mind when working with boneless prime rib:
- It cooks faster than a bone-in cut — easy to overcook if you’re not watching the time
- Without tying, the shape can spread, and heating becomes less even
- There’s less protection from drying out, so timing matters more
- Juices can run out more easily when slicing if you don’t let the meat rest
Boneless cuts are indeed easier to dry out. But with proper timing and a rest after cooking, the meat stays juicy and tender, just with a slightly different texture.
When you see those clean, even slices after cooking, it becomes clear why this option is so popular. It’s convenient and gives a consistent, good-looking result without extra stress.
5. The Reverse Sear Oven Method for Ultimate Tenderness
We’re used to searing meat first and then finishing it in the oven. Reverse sear does the opposite: slow roasting first, then high heat at the very end. Because of this order, you get a more tender texture inside and a clear, crisp crust on the outside.
What you’ll need
- Prime rib roast (bone-in or boneless) — 4–6 lb (1.8–2.7 kg)
- Coarse salt — 1–2 tbsp (15–30 g)
- Black pepper — 1 tbsp (15 g)
- Butter — 3–4 tbsp (45–60 g)
- Garlic — 4–6 cloves
- Roasting pan with rack
- Heavy skillet or a high-heat oven setting
This method gives a softer result because at low temperature the meat heats up slowly and evenly. The fibers don’t tighten up sharply like they do with high heat at the start, so the texture stays more tender. Then at the end, high heat creates that golden crust everyone looks for.
How to cook reverse sear prime rib
- Let the meat come to room temperature
Leave it out for 2–3 hours. This helps with even cooking. A cold center will always throw things off. - Salt in advance
Rub the meat with salt on all sides 12–24 hours before cooking and leave it in the fridge uncovered. The surface will dry slightly, which helps create a better crust later. - Add seasoning before cooking
Right before the oven, add pepper, garlic, and a bit of butter. Don’t overdo it. - Roast at low temperature
Preheat the oven to 225–250°F (110–120°C). Place the meat on a rack and cook:
about 20–25 minutes per 1 lb for medium rare.
For example, a 5 lb piece (≈2.3 kg) takes about 1 hour 40 minutes to 2 hours.
The meat will look pale — that’s normal. The crust comes later. - Let it rest briefly
After the oven, let it sit for 10–15 minutes. This helps the internal temperature even out. - Finish with high heat
There are two options:
- in the oven at 500°F (260°C) for 5–7 minutes
- or in a very hot skillet for 1–2 minutes per side
- The goal is to create a deep crust quickly without drying the inside.
What to pay attention to
This method has its own details, and it’s better to understand them ahead of time:
- Cooking takes longer overall — plan ahead
- The meat looks pale at first — this is expected
- The final sear needs attention — it’s easy to overdo
- You need a stable low temperature — the oven should hold it well
If you skip the final high-heat step, the meat will be tender but without the crust you expect. And it’s exactly that contrast between soft interior and crisp exterior that makes this method work so well.
In the end, the meat comes out without dry edges and without an undercooked center. When slicing, it’s satisfying to see that the color inside is even across the whole cut, without gray bands around the edges.
6. Prime Rib Resting Secrets for Juicy Texture
Imagine this: guests are already at the table, everything is ready, you slice into your prime rib right away… and half of the juice runs out onto the board. That happened to me once, and it was a real disappointment. Since then, the meat always rests after the oven. It’s not optional — it’s a required step.
During cooking, the juices inside the meat are actively moving because of the heat. When you take it out of the oven, that process doesn’t stop right away.
If you cut it immediately, the juices simply run out. If you let the meat sit, they redistribute inside, and every slice turns out more juicy.
What you’ll need
- Cooked prime rib (bone-in or boneless)
- Foil
- Cutting board
- Slicing knife
How to let the meat rest properly
- Take it out and don’t touch it right away. Move the meat to a board or tray. Don’t start slicing immediately.
- Cover with foil. Lightly, without wrapping it tightly. Just cover the top. This helps keep the heat without trapping steam.
- Let it sit for 15–20 minutes. For a 4–6 lb piece, this is the right timing. Larger cuts can rest up to 25 minutes.
- Don’t worry about it cooling down. The meat stays warm inside. At the same time, the texture improves noticeably.
Common mistakes
Even experienced cooks run into these sometimes.
- Cutting right after the oven — juices don’t have time to settle
- Wrapping tightly in foil — extra moisture builds up on the surface
- Not resting long enough — the effect barely shows
- Rushing because of temperature concerns — unnecessary
The key is to understand that this step isn’t just for the sake of it. It’s part of the process and directly affects the result.
If you do it right and don’t rush, the juice stays inside, the slices hold their shape, and the texture feels softer. A little patience, and the difference becomes obvious.
7. Herb And Salt Crusts That Transform Your Roast
Salt in this method helps pull excess moisture from the surface, herbs add aroma, and butter or a bit of olive oil helps everything stay on the meat instead of falling off into the pan.
These simple combinations instantly make the roast feel more special and finished.
What you’ll need
- Prime rib roast — 4–6 lb (1.8–2.7 kg)
- Coarse salt — 2 tbsp (30 g)
- Black pepper — 1 tbsp (15 g)
- Fresh rosemary — 1 tbsp, finely chopped
- Fresh thyme — 1 tbsp, finely chopped
- Garlic — 4–6 cloves, minced
- Olive oil or soft butter — 3 tbsp (45 ml / 45 g)
- Small bowl
- Sharp knife
- Roasting pan with rack
- For convenience, you can use Morton Coarse Kosher Salt or a similar coarse salt
Salt and herbs for prime rib
Salt helps the surface of the meat become drier, which leads to a better crust. A wet surface doesn’t brown well, so it’s best to pat the meat dry with paper towels before applying the mixture.
Herbs bring aroma. Rosemary and thyme work well with beef because they hold up during long roasting and don’t get lost against the meat’s flavor. Garlic is best minced finely so it doesn’t burn in larger pieces on the surface.
How to make herb and salt crust
- Pat the meat dry
Before applying the mixture, go over the meat with paper towels. Don’t rub too hard, just remove excess moisture. On a dry surface, salt and herbs stick better, and the crust browns more evenly. - Mix the base for the crust
In a small bowl, combine coarse salt, black pepper, rosemary, thyme, garlic, and oil. The mixture should look like a thick paste. If it’s too dry, add a bit more oil. If it’s too loose, add a pinch of salt or herbs. - Apply the mixture by hand
Spread the paste over the top and sides of the meat. Don’t just smear it — gently press it into the surface. Pay extra attention to the fat cap — it creates the most aromatic crust after roasting. - Let the meat sit before roasting
After applying the mixture, leave the roast at room temperature for 30–45 minutes. During this time, the salt starts working, and the coating settles onto the surface. The meat shouldn’t go into the oven cold. - Roast without disturbing it
Place the meat on a rack, fat side up. During roasting, don’t keep basting or touching the surface. The less you disturb it, the more even the crust will be.
What temperature and time to use
After applying the herb and salt crust, it’s important not to ruin it with the wrong oven setting.
- Oven temperature — 325°F (160°C)
This allows the crust to brown without burning. - Cooking time:
- Rare — 10–12 minutes per 1 lb
- Medium rare — 13–15 minutes per 1 lb
- Medium — 16–18 minutes per 1 lb
For example: a 5 lb piece (≈2.3 kg) → 65–75 minutes to medium rare
Important! During the first 20–30 minutes, don’t open the oven. The crust is forming at this stage, and sudden temperature drops can affect it.
If the top starts browning too quickly, just cover the meat with foil toward the end of cooking. This won’t ruin the crust and helps keep everything balanced.
What can ruin the crust
Pay attention to small details:
- A wet surface prevents proper browning — always pat the meat dry
- Fine salt can make the flavor too sharp if used in the same amount as coarse salt
- Large pieces of garlic brown faster and can turn bitter — keep it finely minced
- Too many herbs can overpower the beef — less is better
- A thick layer of oil can drip off — the mixture should be a paste, not a sauce
I wouldn’t recommend turning this crust into a heavy coating of spices. Prime rib already has a strong flavor, and the goal is to enhance it, not compete with it.
After roasting, the top turns salty, aromatic, and golden, while the inside stays tender. This kind of crust looks especially good on a holiday roast — when you slice it, each piece has that thin edge of herbs, salt, and garlic.
8. Butter And Garlic Baste for Oven Roasting Success
Butter and garlic baste — in this method, butter helps retain moisture, while garlic adds a warm aroma you can notice even before slicing the meat.
There were times when the meat tasted a bit flat and not rich enough. The next time, I added a simple butter and garlic baste with a few herbs, and the result turned out completely different.
What you’ll need
- Prime rib roast — 4–6 lb (1.8–2.7 kg)
- Butter — 4 tbsp (60 g)
- Garlic — 5–6 cloves, finely chopped
- Black pepper — 1 tbsp (15 g)
- Coarse salt — 1–2 tbsp (15–30 g)
- Fresh thyme or rosemary — 1 tbsp, optional
- Basting brush
- Roasting pan with rack
How to cook with butter and garlic baste
- Let the meat come to room temperature
Leave it out for 2–3 hours. This helps the meat cook evenly and prevents it from tightening too quickly in the oven. - Salt in advance
Rub the piece with salt on all sides 12–24 hours before cooking and keep it in the fridge uncovered. The surface becomes slightly drier, and the crust turns out better. - Prepare the butter mixture
Melt the butter over low heat, then add garlic, pepper, and herbs. Don’t overheat it — the garlic should release aroma, not brown. Let the mixture cool slightly so it’s warm, not hot. - Apply the first layer
Before placing in the oven, brush the meat with part of the mixture. Cover it evenly, especially the top — this is where the main crust forms. - Preheat and start roasting
Set the oven to 325°F (160°C) and place the meat on a rack, fat side up.
Use these time guidelines:
- Rare — 10–12 minutes per 1 lb
- Medium rare — 13–15 minutes per 1 lb
- Medium — 16–18 minutes per 1 lb
- For example, a 5 lb piece (≈2.3 kg) takes about 65–75 minutes to reach medium rare.
- Baste during cooking
Every 20–25 minutes, open the oven and gently brush the meat with the remaining mixture. Don’t pour too much — just refresh the layer. This helps maintain moisture and aroma. - Let the meat rest
After cooking, leave it for 15–20 minutes. This allows the juices to redistribute and makes the meat easier to slice.
Possible mistakes
Pay attention to small details and don’t ignore them:
- Butter that is too hot can start cooking the surface too early
- Opening the oven too often lowers the temperature and increases total time
- Too much butter runs off and doesn’t give the intended effect
- Large pieces of garlic can burn on the surface
Try to keep a balanced approach — a thin layer, careful reapplication, and a steady oven temperature.
At the end, you get meat with a tender interior and an aromatic, lightly glossy crust. The garlic stays subtle, just enough to enhance the flavor without overpowering it. And when slicing, that thin layer of butter and seasoning makes each piece noticeably richer.
9. Prime Rib Cook Time Chart for Every Oven Type
You look at the numbers — it all seems simple. Set a timer and wait. But then in one oven the meat turns out perfect, and in another — not quite the same.
The first few times, I followed the timing strictly. Then I started noticing that the result changes not only because of the oven. The weight of the cut, its shape, and even how cold it was before roasting also affect the result.
Here is a reference table that is convenient to use as a starting point when cooking.
Quick time guide (325°F / 160°C)
| Weight | Rare | Medium rare | Medium |
| 4 lb (≈1.8 kg) | 40–48 min | 52–60 min | 64–72 min |
| 5 lb (≈2.3 kg) | 50–60 min | 65–75 min | 80–90 min |
| 6 lb (≈2.7 kg) | 60–72 min | 78–90 min | 96–108 min |
If the cut is a different size, use this base – 10–12 minutes per 1 lb for rare, 13–15 for medium rare, and 16–18 for medium.
How to take your oven into account
The same piece behaves differently in different conditions. This is normal, it’s just better to take it into account in advance.
- Standard oven — stick to the base numbers, sometimes add 5–10 minutes if it seems to run a bit cooler
- Convection oven (with fan) — either lower the temperature to 300°F (150°C) or reduce the time by about 10–15%
- Gas oven — allow a small extra margin of time and try not to open the door too often
- Oven with unstable temperature — it’s better to stay closer to the lower end of the timing and add more if needed
These are not strict rules, but practical guidelines. After a couple of times, you start to understand how your oven behaves.
If you use other methods, the timing will be different (see above):
- For the 500°F method — 5 minutes per 1 lb, then the oven is turned off and the meat stays inside for 2 hours
- For reverse sear — about 20–25 minutes per 1 lb at 225–250°F (110–120°C)
These are different cooking methods, so the numbers don’t match — and that’s completely normal.
Backup option. If there is any doubt about doneness, it’s better to add another 10–15 minutes at 275–300°F (135–150°C). This kind of temperature gently finishes the meat without drying it out.
You simply adjust the timing based on your oven and the specific cut of meat. When you know its weight, keep the base timing in mind, and understand how your oven behaves, you already feel more confident about the result.
10. Christmas Day Prime Rib Step-by-Step Guide
Everyone wants their Christmas prime rib to turn out perfect. You need a clear sequence of steps to get the result you expect.
What you’ll need
- Prime rib roast — 5–7 lb (2.3–3.2 kg)
- Coarse salt — 1–2 tbsp (15–30 g)
- Black pepper — 1 tbsp (15 g)
- Butter — 4 tbsp (60 g)
- Garlic — 5–6 cloves
- Fresh rosemary or thyme — optional
- Roasting pan with rack
- Foil
- Timer
How the whole process works step by step
- Prepare the meat in advance (the day before)
Rub it with salt on all sides and leave it in the fridge uncovered for 12–24 hours. The surface dries slightly — this gives a clean crust, and the flavor becomes deeper. - Take the meat out ahead of cooking
Leave it at room temperature for 2–3 hours. This removes the temperature shock and helps the meat cook evenly. - Make a simple aromatic mixture
Mix soft butter, garlic, pepper, and herbs. Don’t overload it. For Christmas, you want the taste of the meat, not heavy seasoning. - Apply the mixture to the meat
Spread it over the surface with your hands. The top can be coated a bit more — this is where the main crust forms. - Preheat the oven and start roasting
Set it to 325°F (160°C) and cook:
use 13–15 minutes per 1 lb for medium rare.
For example, a 6 lb piece (≈2.7 kg) takes about 80–90 minutes. - Watch the top toward the end
If the crust starts browning faster than needed, just cover it with foil. This is a normal step. - Let the meat rest
After the oven, leave it for 15–20 minutes. During this time, it’s convenient to finish the sides. The juices redistribute, and the meat slices cleanly. - Slice and serve calmly
Cut into medium-thick slices, without rushing. This is the moment when you see the result — even color inside and juicy texture.
During Christmas, the main issue is usually rushing. Everything happens at once, and it’s tempting to speed things up.
- the meat goes into the oven cold
- resting time gets shortened
- the oven gets opened too often
- there’s a tendency to “fix” things with high heat
And in the end, the result is not what you expected.
How to make it easier
It’s better to start preparing the Christmas meal in advance. It’s more reliable when the meat is already prepared the day before, and on cooking day you only need to bring it to the final result.
Take it out of the fridge, let it warm up, put it in the oven — and then just follow the timing. That’s when everything works the way it should.
Predictable result
So the main takeaway is simple — don’t rush the process, keep the temperature under control, and give the meat time after the oven. These steps don’t require extra effort, but they are what change the result.
Once you start paying attention to these details, the meat comes out even, juicy, and consistent. No surprises when slicing and no feeling that “this time it just worked by luck.”
Write in the comments which method worked best for you. These things are easiest to compare in your own kitchen.