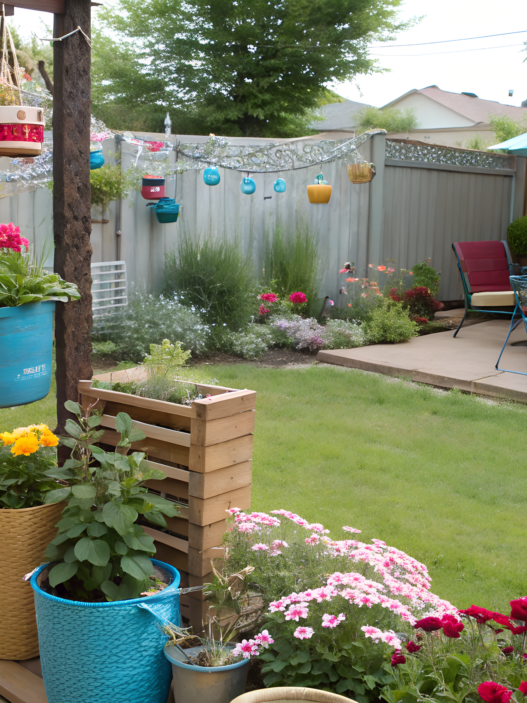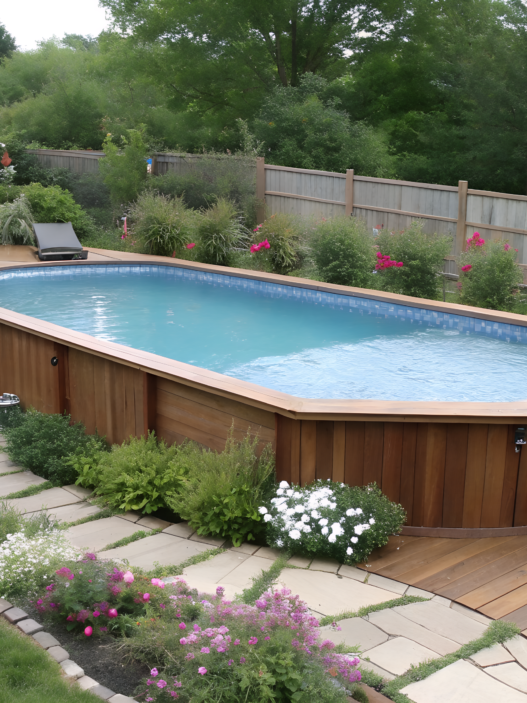
A wall is often seen as something secondary and left “for later,” covered with plants or simply ignored. But it’s actually one of the most noticeable parts of a yard. These 10 garden wall ideas that look designer without hiring anyone help you create a visually strong wall with your own hands, without complex tools and without the feeling that you’ve started a big renovation.
These ideas can be adapted to different conditions: concrete, wood, fence, house wall. In some cases you’ll need a brush, in others a drill, and none of the options require professional skills.
I hope you’ll be able to choose not just “what to do,” but how exactly it will fit into your yard.
1. Limewash Color Block Garden Wall Painting
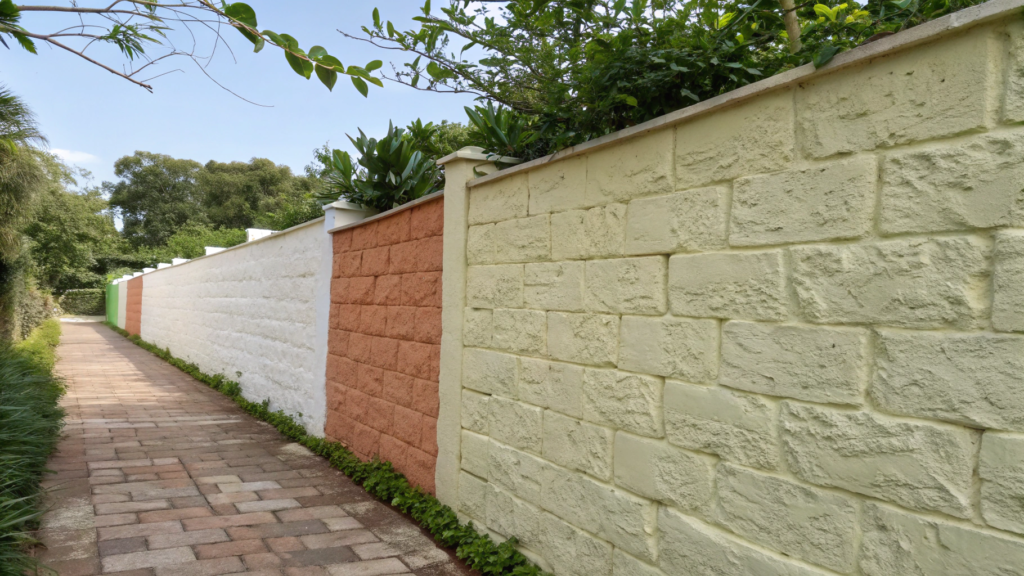
This option worked for us almost on the first try, which, by the way, is rare.
Limewash doesn’t form a dense film, but absorbs and bonds with the mineral surface, which creates a matte depth. It is breathable, so moisture escapes outward, which reduces the risk of peeling.
For ourselves, we chose limewash color block garden wall painting with two shades: a soft lime white and a calm terracotta. We didn’t try to make the lines perfectly even. And that’s exactly what gave that “expensive” look, without the feeling that everything was measured with a ruler.
What you’ll need
- limewash paint (2 shades), for example, Romabio Classico Limewash Interior/Exterior Paint
- wide natural bristle brush (4–6 inches / 10–15 cm)
- mixing bucket
- water
- sponge or soft cloth
- ladder (if the wall is higher than 6 ft / ~1.8 m)
How to do it
- Prepare the surface
Remove dust, dirt, and peeling paint. Perfect leveling is not needed — a slight texture even helps. - Apply the first color
Cover the main part of the wall with the first shade. Work with strokes in different directions, don’t even them out. Let it dry for 4–6 hours. - Add the second color partially
Apply the second shade not to a separate “clean” area, but partially over the first — about 20–30% of the surface. Move freely, with strokes. - Make the boundary feel alive
Don’t draw a straight line. Let the transition between colors be soft and slightly uneven — this makes the wall look deeper. - Enhance the color if needed
After drying, you can go over some areas with another layer to add depth. - Soften transitions (optional)
If the boundary looks too sharp — lightly go over it with a damp sponge.
Practical tip
If the wall faces the sunny side — make a test patch about 2×2 ft (60×60 cm). Color in sunlight looks noticeably lighter than in the shade. We skipped this step once… and had to repaint part of the wall.
Don’t try to “fix” every stroke. Limewash works better when you give it a bit of freedom.
After a couple of days, the wall starts to look different. The color evens out, the strokes become softer, and the whole surface feels like it comes together. And over time, this wall looks even better than at the beginning.
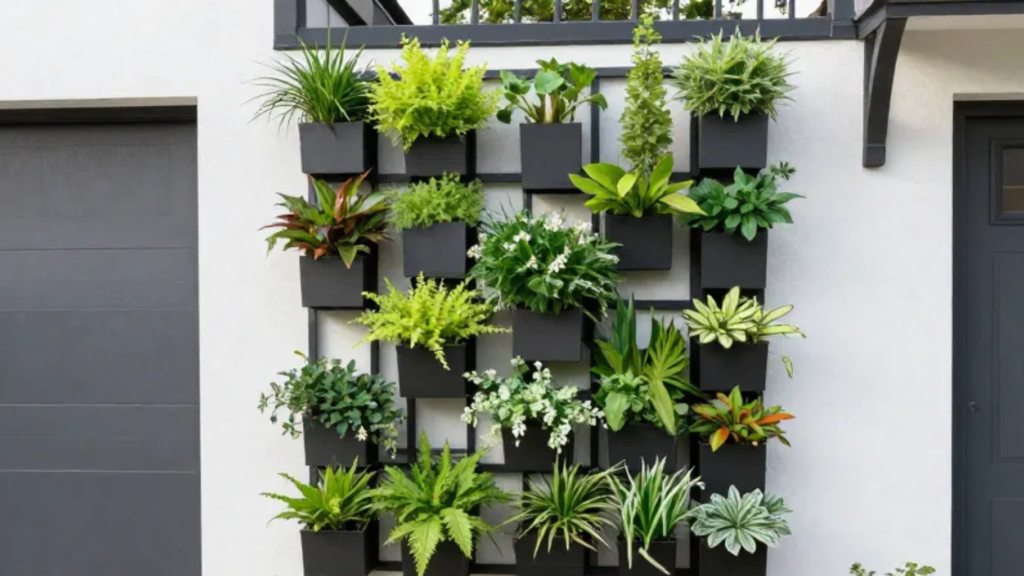
2. Cinder Block Garden Wall With Built In Planter Pockets
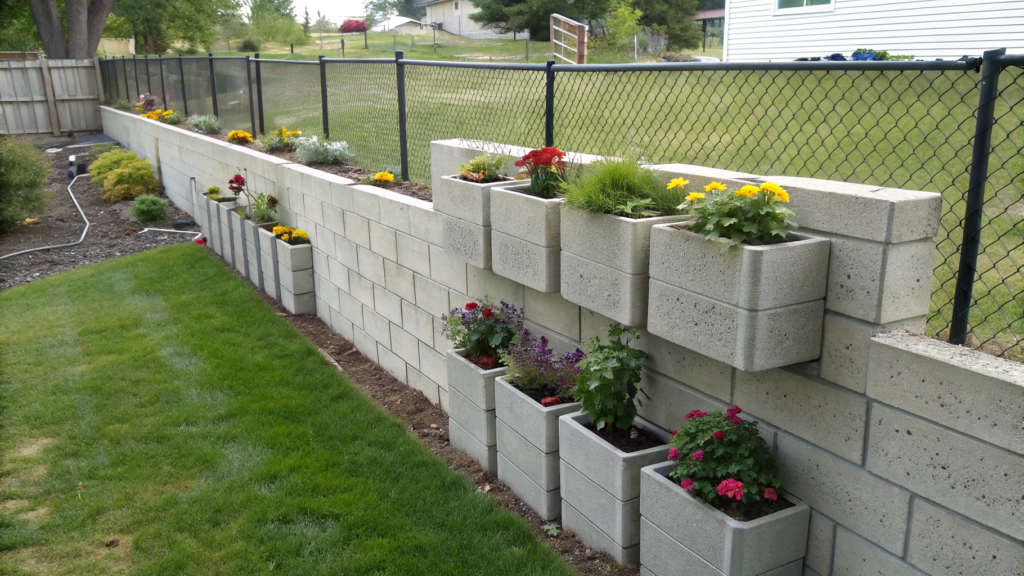
We needed to cover an area near the fence where trash kept collecting and the wind was constantly pushing leaves around. Ready-made decorative walls were very expensive. That’s how the idea of a cinder block garden wall with built in planter pockets came up.
This is how we ended up with a wall that both divides the space and works as a vertical planter.
What you’ll need
- concrete blocks (16×8×8 inches / ~40×20×20 cm)
- level
- rubber mallet
- gravel or crushed stone
- geotextile (optional)
- light soil mix (with perlite or sand)
- plants (herbs, flowers, trailing plants)
- hose or watering can
How to do it
- Prepare the base
Remove the top layer of soil to a depth of about 3–4 inches (7–10 cm). It may seem like a small thing, but without it the wall will start to shift over time. Add gravel, level it, and compact it well. If the soil is soft or влажная — add a bit more crushed stone. The base should feel firm, almost like a path. - Lay the first row perfectly level
Don’t rush here. Literally stop and take your time. Check each block with a level — both lengthwise and crosswise. If a block wobbles, add a bit of gravel under it and level it again. - Stack the blocks with offset
Lay the second row with a half-block offset — like brickwork. This distributes weight and makes the structure stable even without mortar. Just place the blocks on top, their own weight is enough to hold them. - Create planter pockets
Turn some of the blocks so the holes face outward. Don’t do this for every block — better every other one or whole rows. This way the wall looks cleaner and not overloaded. Plus it’s easier to take care of the plants. - Add geotextile inside the pockets
If you don’t want soil falling through the bottom holes — line the inside with geotextile. - Fill the pockets with soil mix
Use a light soil mix. Regular garden soil is too dense — water stagnates, and roots start to rot. A good option is a mix with perlite or sand. Don’t fill all the way to the top, leave about 1 inch (2–3 cm) so water doesn’t overflow. - Plant with level in mind
At the top, trailing plants look great — they “soften” the geometry of the wall. In the middle, you can plant herbs or flowers. At the bottom — more dense plants that hold their shape. We planted thyme, strawberries, and a few succulents — it turned out unexpectedly convenient and practical. - Water everything after planting
The first watering should be generous. Water helps the soil settle and fill the empty spaces inside the pockets. After that, you may need to add a bit more soil.
Tip
If you plan a wall higher than 3 ft (≈90 cm), make a slight backward tilt — just 1–2 inches (2–5 cm) across the full height. It’s almost invisible, but adds stability, especially after rain. And don’t try to fill every pocket right away. Live with this wall for a couple of weeks. You’ll start to notice where greenery is missing, and where you actually want to leave more space.
This kind of wall doesn’t look like a temporary solution made from blocks. It looks like a part of the garden — both visually and functionally. You can add plants if you want, or change the composition. Everything is flexible, without rebuilding from scratch.
3. Outdoor Gallery Grid With Weatherproof Garden Wall Art
Outdoor gallery grid with weatherproof garden wall art is a great way to use things you already have: old frames, metal panels, even pieces of textured wood.
What you’ll need
It’s better to decide on a style in advance — it speeds up choosing elements.
- frames (wood, metal, or plastic — the main thing is that they’re for outdoor use)
- weatherproof images or prints
- clear protective spray (UV and moisture protection)
- screws or anchors (depending on the wall), weather-resistant
- drill or screwdriver
- level
- measuring tape
- paper or cardboard for templates
How to do it
- Define the gallery area
Choose a section of the wall. It’s better if it’s not overloaded with other elements. For us, it was a wall about 8 ft wide (≈2.4 m) — ideal for a composition of 6–10 elements. - Lay out the composition on the ground
Don’t hang anything right away. Lay the frames on the ground or even on the grass. Move them around, swap positions. - Make paper templates
Trace the frames on paper or cardboard and cut them out. Tape them to the wall with painter’s tape. This way you’ll see the real composition and can adjust spacing. - Leave “breathing space” between elements
Don’t place frames too close. Leave about 2–4 inches (5–10 cm) between them. This makes the composition readable, especially from a distance. - Prepare images for outdoor use
Regular prints fade and get damaged quickly. Use ready-made weatherproof materials, or coat images with a protective spray with a UV filter. - Install the mounts
If the wall is concrete or brick — use anchors. If it’s wood — screws are enough. In windy areas, it’s better to fix everything firmly, without “hoping it holds.” - Hang frames using the template
Start with the central elements, then add the rest. Check the level, but don’t aim for perfect symmetry — a slight difference makes the composition feel more alive. - Add texture variety
Mix materials: photos, metal elements, wood. We, for example, added an old garden trellis — and it became the accent.
Tip
If the wall gets a lot of sun, avoid dark frames without protection. They heat up more and wear out faster. Light or treated finishes behave more stable. Don’t hang everything at once. Leave 1–2 spots empty. After a couple of weeks, you’ll get ideas for what to add — and it will look much more natural.
This kind of gallery gradually fills up, changes, and collects a story. It’s not just wall decor, but a part of your space that grows together with the garden.
4. Cafe Style Garden Wall Lights With Plug In Hooks
The idea of cafe style garden wall lights with plug in hooks instantly changes the atmosphere. No wall reconstruction, no wiring, no “let’s call an electrician and check the estimate.”
These lights are often used in small patios, on balconies, in townhouse yards — where there’s no option for fixed lighting. And at the same time, everything starts to look like a cozy outdoor café, especially in the evening.
I’ve seen solutions like this in very different places — from tiny city courtyards to neat home gardens. And everywhere it looks great.
What you’ll need
- outdoor string lights (with weather protection)
- hooks or clips for mounting
- extension cord (if the outlet is not nearby)
- level or a visual line reference
- measuring tape
- cloth or alcohol (for adhesive mounts)
How to do it
- Figure out the power source
Check where the nearest outlet is. This is your starting point. From it, you’ll build the entire light line. It’s better to understand in advance if the string is long enough or if you’ll need an extension cord. - Plan the light line
You can make a straight line, a soft arc, or a slight sag. I think the second option looks more natural. The height is usually 6–8 ft (≈1.8–2.4 m), so it doesn’t interfere with walking. - Mark mounting points
Mark where the hooks will go. The distance between them is about 12–24 inches (30–60 cm), depending on the weight of the lights. The heavier the bulbs, the more frequent the mounts should be. - Prepare the surface
If you’re using adhesive clips — wipe the wall with alcohol and let it dry. This affects how long they will hold. - Install hooks or clips
Install all mounts at once, not one by one. It’s easier to control the line this way. If the wall allows it, you can use screws — it’s more reliable in windy conditions. - Hang the string lights
Start from the outlet and move along the line. Don’t pull too tight — a slight sag looks softer and reduces stress on the mounts. - Protect connections from moisture
If the connection between the string lights and the extension cord stays outdoors — raise it off the ground and cover it with a protective case or place it under a cover. This simple step strongly affects outdoor safety. - Test and turn on
Before fixing everything окончательно, turn the lights on and see how they spread. Sometimes you’ll want to slightly adjust the height or spacing.
Tip
If you have a windy area — don’t leave long unsupported sections. At first it feels like it will hold, but over time the string starts to pull down. Choose warm light bulbs. Cool white makes the space feel more “technical,” while warm light feels softer in the evening.
This kind of lighting changes the feeling of the space almost instantly. You can remove it, rehang it, or change the shape at any time. It gives a sense of freedom — you’re not locked into one setup.
5. Faux Venetian Plaster Finish for a Small Patio Wall
Faux Venetian plaster finish for a small patio wall — of course, this is not the real Venetian plaster layer that craftsmen apply for weeks. This is a more accessible version you can do yourself — and get a very close visual effect.
I’ve seen walls like this in compact courtyards and on small townhouse patios. And every time they looked more expensive than they actually were. Not because of the materials — but because of the depth, light, and slight irregularity of the finish.
What you’ll need
- ready decorative plaster (Modern Masters Venetian Plaster Decorative Finish) or a mix for faux Venetian finish
- metal spatula or trowel (6–10 inches / 15–25 cm)
- primer
- fine grit sandpaper
- clean cloth
- bucket
- protective wax or sealer
How to do it
- Prepare the wall
The surface should be clean and relatively even. Not perfectly smooth, but without peeling paint or dirt. Brush it off, and lightly sand if needed. - Apply primer
This improves adhesion. Especially important if the wall is concrete or previously painted. Let it dry completely — usually 4–6 hours. - Apply the first thin layer
Use a spatula to apply the mix in a thin layer, almost scraping it on. Movements can be chaotic — short, crossing strokes. Don’t try to make it look perfect right away, the first layer is just the base. - Let it dry and lightly sand
After drying (about 6–8 hours), go over it with fine sandpaper. Remove sharp edges and uneven spots. Make sure to wipe off the dust. - Add the second layer with varied strokes
Now you can play with the direction of strokes. A bit more pressure, a bit less — this creates light and dark areas. That’s what builds visual depth. - Apply a third layer if needed
If you want a richer effect, add another thin layer. But don’t make it thick — everything here is built on thinness. - Burnish the surface with the trowel
When the last layer is almost dry, go over it with a clean trowel with light pressure. This creates a soft sheen. - Protect with wax or sealer
Especially if the wall is outdoors. This adds moisture resistance and enhances the color.
Small nuance that affects the result
Don’t try to control every stroke. Overly precise work kills the effect. Venetian plaster is valued for variation, not perfection.
As always, try it first on a small area about 2×2 ft (60×60 cm). This helps you understand how the material behaves on your specific wall.
This kind of finish works best on smaller areas, where it adds depth. And over time, it looks even better: light changes, the surface “moves,” and the wall stops being just a background.
6. Garden Wallpaper Aesthetic Panel Using Exterior Rated Paste
Garden wallpaper aesthetic panel using exterior rated paste sounds a bit strange until you see it in real life. Wallpaper — outside? Imagine — yes. But not on the whole wall, just as a separate panel.
I first saw this approach on a small patio at friends’ place — they had a regular wooden fence, and a panel with a botanical print on it. Just one accent. And the whole area immediately started to look more interesting.
This is a good option if you don’t want to paint or build something. The panel can always be removed, replaced, updated — your choice.
What you’ll need
- dense wallpaper (better vinyl or non-woven)
- exterior rated adhesive (moisture-resistant)
- plywood or moisture-resistant panel (½ inch / ~12 mm thick)
- roller or brush
- wallpaper knife
- ruler or level
- sealer or clear protective coat
- screws or mounting hardware
How to do it
- Prepare the panel base
Don’t glue wallpaper directly onto a fence or concrete. Use plywood or a moisture-resistant board. Choose the size based on your wall. - Sand and prime the surface
Light sanding removes roughness, primer helps the adhesive hold better. Don’t skip this step — outdoors, adhesion is everything. - Cut wallpaper with extra margin
Cut a piece with about 1–2 inches (2–5 cm) extra on each side. This allows for clean trimming after applying. - Apply adhesive evenly
Use a roller or brush. The layer should be even, without dry spots. Don’t rush — this affects whether bubbles appear. - Attach wallpaper to the panel
Start from one edge and gradually smooth toward the other. Use a dry cloth or plastic spatula to remove air. - Trim the edges
Once the wallpaper sets slightly, carefully trim the excess along the edges. Use a sharp knife — a dull one will tear the material. - Protect the surface
Apply a clear protective coat or sealer. This extends the life of the panel, especially outdoors. - Mount the panel on the wall
Use screws or mounting hardware. It’s better to leave a small gap (about ½ inch / 1–1.5 cm) between the panel and the wall for ventilation.
Useful tip
If the panel is in the sun, choose wallpaper with fade-resistant pigments. Cheap prints fade faster than you expect. Light backgrounds behave more stable in these conditions. Don’t make the panel too large. One accent works better than trying to cover the whole wall.
This kind of panel doesn’t overload the space, and it’s easy to replace if you want something new. No repainting, no extra work — just remove it and make another one.
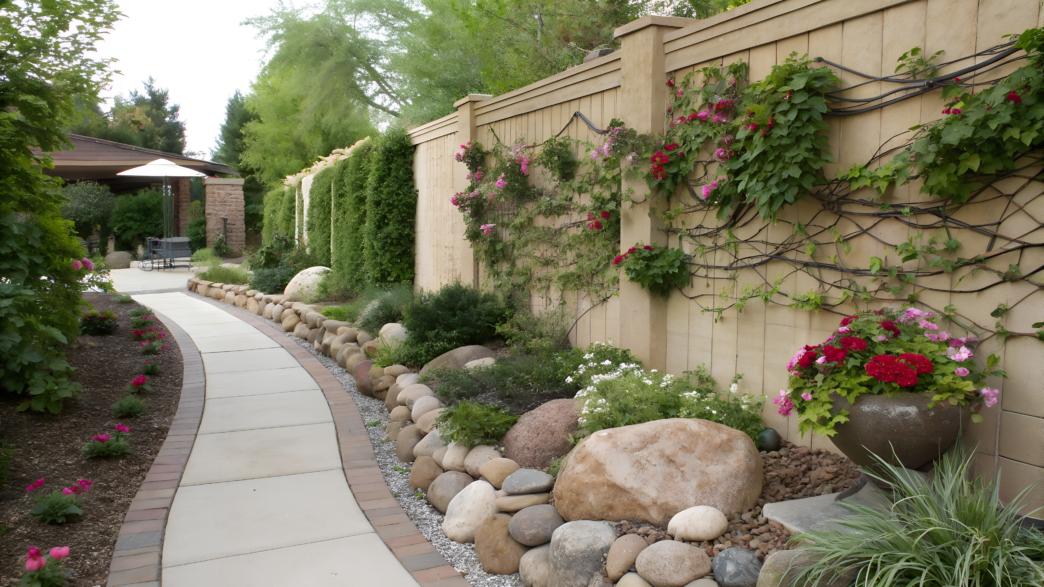
7. Shadow Box Trellis Wall for Instant Vertical Greenery
I’ve seen this idea brought to life in narrow courtyards, on the back walls of garages, and even on balconies. This is not just a plant trellis. It’s a volumetric structure with depth — small, but enough for greenery to look denser and more interesting.
What you’ll need
- wooden slats or strips (width 1–2 inches / 2.5–5 cm)
- frame beams (depth 2–4 inches / 5–10 cm)
- outdoor screws
- drill
- level
- measuring tape
- wood stain or protective oil
- wall mounting hardware
- plants (climbing or trailing)
You can choose a ready-made option, for example, Outsunny Wooden Garden Trellis Expandable Wall Lattice Panel
How to do it
- Build the frame (shadow box)
First, make the base — a rectangular frame from beams with a depth of 2–4 inches (5–10 cm). This creates that “shadow” effect. Choose the size based on your wall, but most often it’s 3×5 ft (≈90×150 cm) or a similar format. - Attach the inner trellis
Inside the frame, add slats crosswise or parallel. You can make a classic grid or a more свободный pattern. The distance between slats is about 4–6 inches (10–15 cm). - Treat the wood with protection
Before installation, обязательно apply oil or stain for outdoor use. This extends the lifespan and protects from moisture. - Mount the structure on the wall
Use reliable hardware. If the wall is concrete — anchors, if wood — screws. Leave a small gap between the wall and the structure (about 1 inch / 2–3 cm) for air circulation. - Add plant support at the base
If plants will grow from below, prepare a planting area: a container or soil. It’s important that the roots don’t dry out. - Plant the greenery
Choose climbing or attaching species. Ivy, jasmine, sweet pea, or even beans work well. If the space is small — you can add trailing plants from above. - Guide plant growth
In the first weeks, help the plants attach — gently fix the shoots to the trellis. Later, they will start clinging on their own. - Water and observe
After planting, water well. After that, just maintain moisture and occasionally guide growth.
One practical detail
If you want a faster effect — use already grown plants, not seedlings. The difference in time is weeks versus months.
It’s better not to make the trellis too dense. Plants need light and air, otherwise they start stretching and look weaker.
Shadow Box Trellis Wall for Instant Vertical Greenery doesn’t just add greenery — it changes how the wall feels. You get depth, movement, shadows. Over time, it becomes a living part of the space that grows and changes every season.
8. Mosaic Stripe Border Made From Broken Plate Pieces
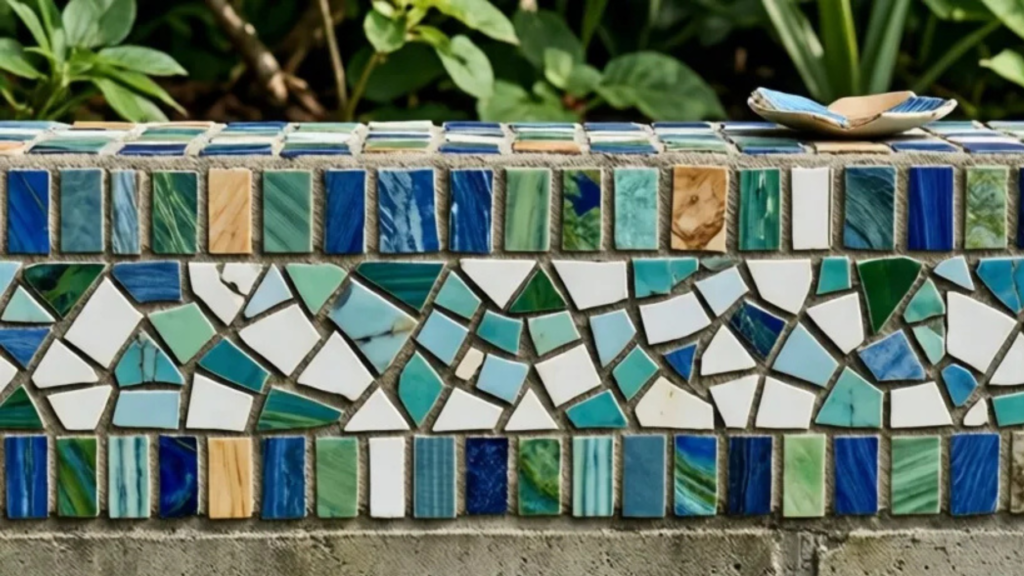
Different plates, a few chips, something already incomplete… it feels wrong to throw them away, but pointless to keep. And it’s exactly from things like this that the most interesting details come out.
I’ve seen these mosaic stripe borders along garden walls, around small patios, and even as an accent on concrete fences.
What you’ll need
- old ceramic plates
- hammer
- thick cloth or bag (to break safely)
- protective gloves
- safety glasses
- outdoor tile adhesive
- grout
- spatula
- sponge
- bucket of water
How to do it
- Prepare your workspace and protection
Before breaking plates, put on gloves and glasses. Wrap the plate in thick cloth or place it in a bag. This reduces flying shards. - Break plates into different-sized pieces
Don’t try to make identical fragments. Different shapes create a more natural pattern. For us, pieces from 1 to 3 inches (≈2.5–7.5 cm) looked best. - Lay out the border “dry”
Right on the ground or near the wall, arrange a strip from the pieces. Play with colors, spacing, density. This step saves a lot of time later. - Clean the wall surface
The area where the mosaic will go should be clean and dry. Remove dust, dirt, and old paint residue. - Apply tile adhesive
Use a spatula to apply adhesive to a small section (about 1–2 ft / 30–60 cm at a time). Don’t cover everything at once — the adhesive may start to dry. - Press pieces into the adhesive
Gently press each piece. Leave small gaps between them — about ¼–½ inch (0.5–1 cm). This space will later be filled with grout. - Continue along the full length
Move step by step, section by section. Keep the line roughly level, but don’t try to make it perfectly straight. - Let the adhesive dry
Usually 12–24 hours. Don’t touch it during this time — let everything set. - Apply grout
Spread grout over the entire surface, filling the gaps between pieces. Don’t worry about getting it on the pieces — that’s normal. - Clean excess and reveal the surface
After 10–20 minutes, go over it with a damp sponge. Remove excess and lightly clean the pieces so their color shows again.
Tip from experience
Try not to use very sharp pieces on outer edges. Slightly smooth them or place them deeper in the line, especially if it’s an area where people walk often. And stick to one color palette, adding contrast plates as accents.
9. Japanese Shou Sugi Ban Style Wood Slat Accent Wall
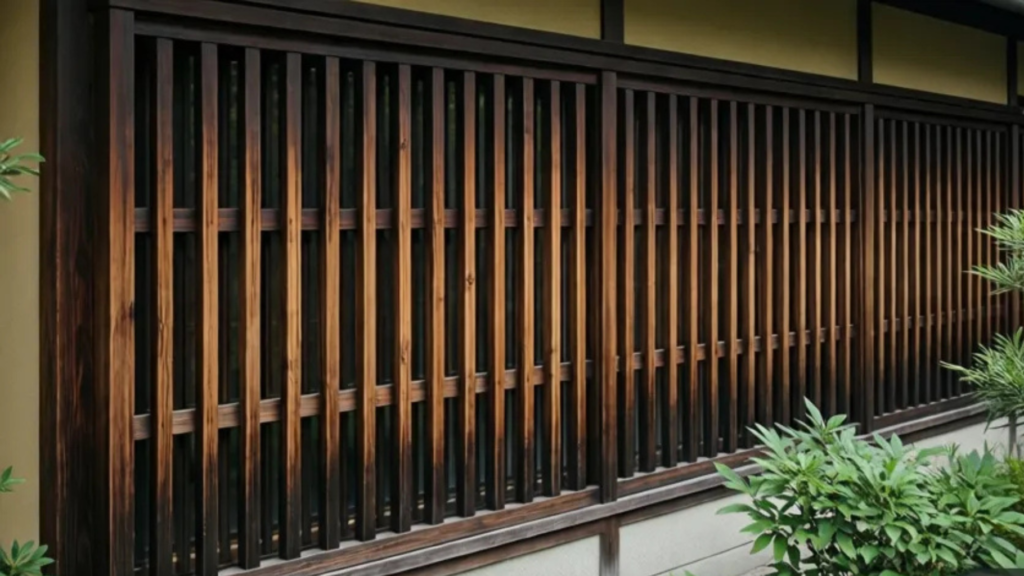
Japanese shou sugi ban style wood slat accent wall — this technique comes from Japan (Shou Sugi Ban or Yakisugi), where wood is charred to make it more resistant to moisture, insects, and time. Research on thermal wood treatment shows that charring reduces its hygroscopicity — it absorbs less moisture and lasts longer.
We’re making an adapted version, but with the same visual effect.
What you’ll need
- wooden slats or boards (width 3–6 inches / 7–15 cm)
- gas torch
- metal brush
- sandpaper
- outdoor oil or sealer
- gloves
- safety glasses
- drill and screws
- level
How to do it
- Prepare the workspace
Work outdoors, away from dry grass and anything that can catch fire. Lay the boards on a stable surface. - Char the wood surface
Use a torch and move evenly across the board. Don’t stay in one spot too long — the goal is not to burn it through, but to char the top layer. The color should become deep, almost black. - Let the wood cool
Don’t touch it right after charring. Let the boards cool completely — this takes about 15–30 minutes depending on temperature. - Brush with a metal brush
Lightly remove the loose charcoal layer. This reveals the grain texture and makes the surface more expressive. - Sand if needed
If the surface feels too rough — lightly sand it. Don’t overdo it, so you don’t remove the effect. - Apply protective oil or sealer
This locks in the result and protects the wood. Oil also enhances the depth of color. - Mark the wall for installation
Decide how the slats will be arranged — vertical, horizontal, or with gaps. Leave about ½–1 inch (1–2.5 cm) spacing if you want to add rhythm. - Mount the boards on the wall
Use screws or hidden fasteners. Check the level, but don’t aim for perfect symmetry — slight variation looks better.
Small detail that’s often overlooked
After charring, wood can leave marks. If this is an area near a walkway — make sure to seal the surface with oil or sealer, otherwise the black pigment will transfer to hands and clothes. Experiment and try different levels of charring on a few boards. Light charring gives a dark brown tone, strong charring — almost graphite.
This kind of wall stands out immediately, even if it covers a small area. And over time, it doesn’t lose its look — the texture becomes more visible, the color stabilizes, and the whole surface starts to feel more cohesive.
10. Secret Garden Door Mural With Trompe L’oeil Perspective
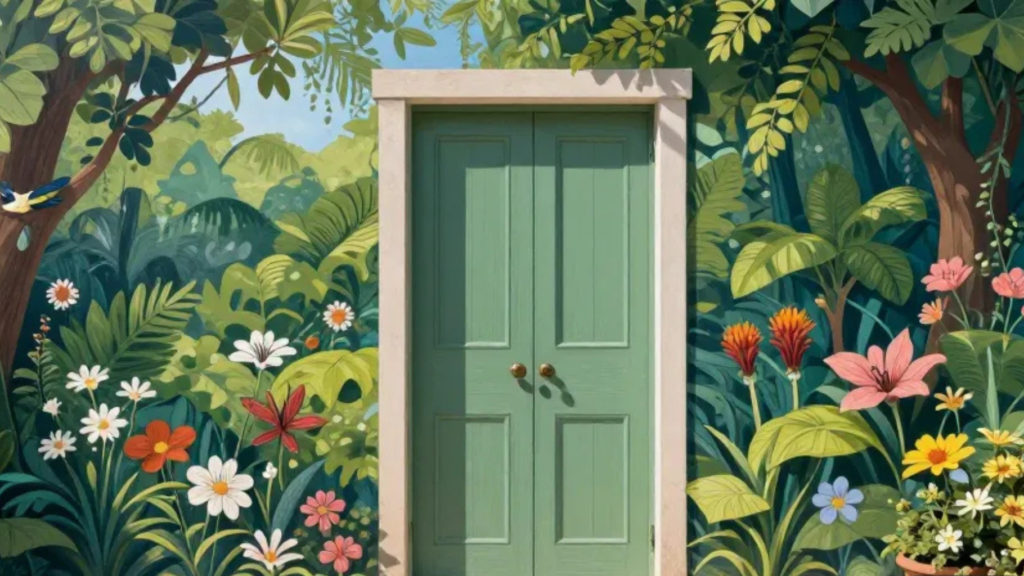
Secret garden door mural with trompe l’oeil perspective — works anywhere you want to “expand” the space without moving the wall itself.
The trompe l’oeil technique (translated from French as “deceive the eye”) has been used in architecture for a long time. Research in visual perception shows that elements like perspective, light, and shadows really affect the sense of depth, even if the surface stays flat.
What you’ll need
- exterior paints (several shades)
- brushes of different widths
- thin brush for details
- pencil or chalk for marking
- ruler or level
- painter’s tape
- sponge
- clear protective coat (for outdoor use)
How to do it
- Define the size and shape of the “door”
Usually it’s 6–7 ft in height (≈1.8–2.1 m) and 2–3 ft in width (≈60–90 cm). Draw a rectangle — this will be the base of the composition. - Mark the perspective
Add lines that create a sense of depth: door frame, steps, path, or arch. A slight tilt of lines already creates the effect of “going inward.” - Sketch the drawing with a pencil
Don’t press too hard. This is just a guide. You can draw a garden, a path, an arch with plants, or even a “view” to a distant area. - Apply base colors
First, fill in large areas: background, sky, greenery, the “inner” part of the scene. Don’t go into details at this stage. - Add shadows and light
This is where depth appears. Shadows along the edges of the “door,” a lighter center, darker sides. This creates the illusion of volume. - Work on details
Add leaves, stone texture, small accents. Use a thin brush. Don’t overload it — it’s better to leave some air. - Soften transitions with a sponge
Light touches with a sponge help remove harsh edges and make the image more natural. - Protect the mural
Apply a clear protective coat. This extends durability and preserves colors.
Tip
If you want to enhance the effect — consider eye level. The main perspective should be built around 5–5.5 ft (≈150–165 cm). Then the illusion works better, because it matches the point where people usually look from. And don’t make everything too contrasty. Soft transitions feel more realistic.
This kind of mural doesn’t just decorate the wall. It changes the feeling of the space. And when you walk past, your взгляд for a second “falls into” it — and that’s exactly the effect it’s meant to create.
Your “Designer” Walls
These kinds of walls share one thing — they don’t look “finished once and forever.” You add something, change something, try a different color or plant. And over time, the wall becomes a part of the space, not just a background.If you try something from this list — write in the comments what you chose and how it turned out. Or share which idea you would adapt for your own yard — it’s interesting to see how it works in different conditions.