The fence itself often gets in the way and rarely makes the yard feel better. But everything changes when the line along it becomes part of the landscape.
Here I tried to introduce you to 10 ideas for landscaping along the fence, which help quickly add privacy fast and at the same time make the yard look more expensive. Here everything is simple. The main focus is on plantings that give results right away: block the view, add depth, remove the feeling of emptiness along the fence.
The approaches here are very different. Somewhere it is a dense green line, somewhere — a flower bed, somewhere — a simple stone strip that removes dirt and chaos. And it is important that all these ideas can be adapted to your yard, regardless of its size.
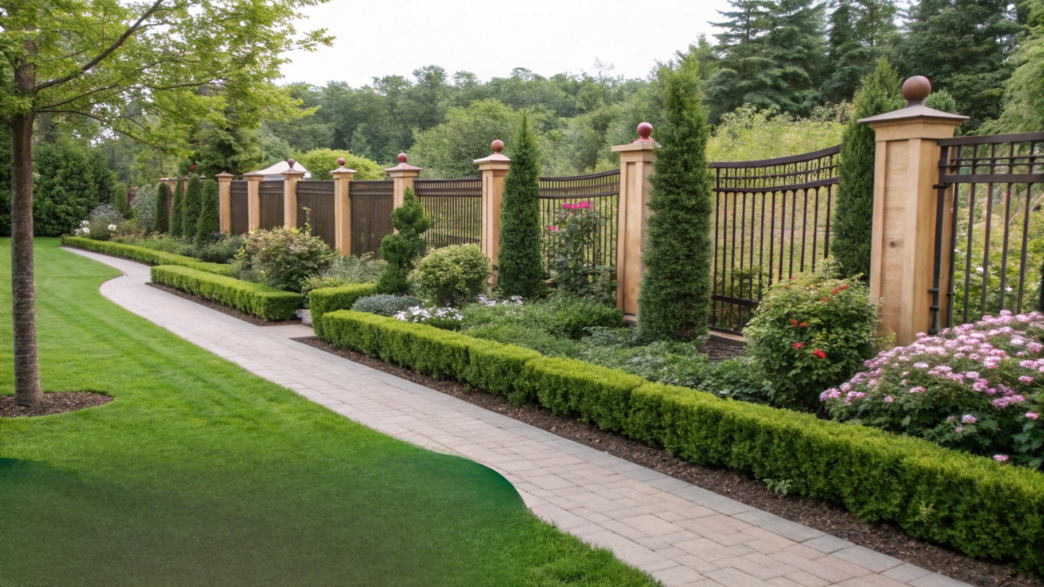
1. Staggered Evergreen Screen With Two Heights
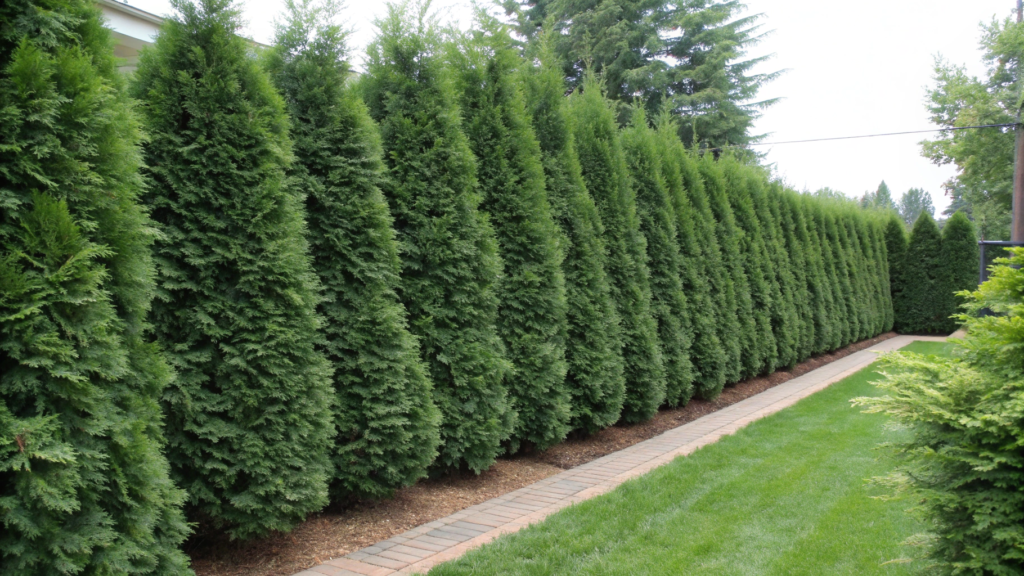
Staggered evergreen screen with two levels solves the privacy issue much faster than a regular hedge.
One row of evergreens almost always looks like a simple flat line. But two levels, shifted relative to each other, give a completely different effect — volume appears, softness, and the yard immediately looks more thought-out and layered.
Because you create a two-level evergreen screen:
- back row — taller (6–10 ft / 1.8–3 m)
- front row — lower (3–5 ft / 90–150 cm)
- planting goes in a staggered pattern, not “line to line”
As a result, the fence is fully covered, there is no feeling of a blank wall, and the space feels deeper and more natural.
What you’ll need
- Seedlings for the back row (Thuja Green Giant, cypress, juniper)
- Seedlings for the front row (dwarf thuja, boxwood, low junipers)
- Mulch (bark or wood chips)
- Compost or soil improver
- Slow-release fertilizer
- Shovel
- Hose or watering — for example, Flexzilla Garden Hose 50 ft
How to do it
- Mark two planting lines.
First just walk along the fence and visually estimate where the back row will be. Usually it is 2–3 ft (60–90 cm) from the fence — this is enough so plants don’t press against it and can grow normally. Then step back another 2–3 ft and mark the front row. You can use a string or just mark the line with a shovel. - Choose plants so they are not the same.
Here it is easy to fall into uniform planting — take the same thujas and plant them in two rows. But the result will be weak. It’s better to mix textures and shapes: for example, take more vertical forms (thuja) for the back row, and more rounded or spreading ones (boxwood or juniper) for the front. This difference creates a strong depth effect. - Plant the back row with proper spacing.
You don’t want to plant too sparsely, but also don’t want to overcrowd plants. Optimal is 5–6 ft (1.5–1.8 m) between seedlings. This distance allows them to grow and close over time, without competing for light and nutrients. - Place the front row in a staggered pattern.
Now the most important thing — don’t repeat the back row. The front plants should be shifted so they cover the gaps between the back ones. If you look from above, it will form a zigzag pattern. This removes gaps and makes the screen dense from the start. - Prepare the soil, even if “it’s fine as is”.
If the soil is heavy or compacted, roots will develop slowly. Add compost directly into planting holes and mix it with native soil. This small step strongly affects how fast plants start growing. - Water well after planting.
It is important not just to “water from above”, but to let water go deep into the soil. You can water twice in a row with a short interval. This helps water reach the root zone, and plants handle transplant stress easier. - Mulch the surface.
A 2–3 inches (5–7 cm) layer of bark or chips retains moisture and immediately makes the line look clean and finished. Without mulch, planting often looks raw. With it — everything feels complete and intentional.
Tip
I would recommend not closing everything completely from day one. It’s better to leave small gaps, especially if there is greenery or a nice view behind them. This approach makes the space feel lighter and more alive.
Combine plants. Even a small variety gives a much more expensive visual effect than the same row along the entire length.
Already in the first season you notice that the fence fades into the background. After a year, the planting becomes denser, and the space feels more private and calm. At the same time, the line does not look heavy or overloaded, but stays neat and natural.
2. Full Sun Flower Bed Border With Long Bloomers
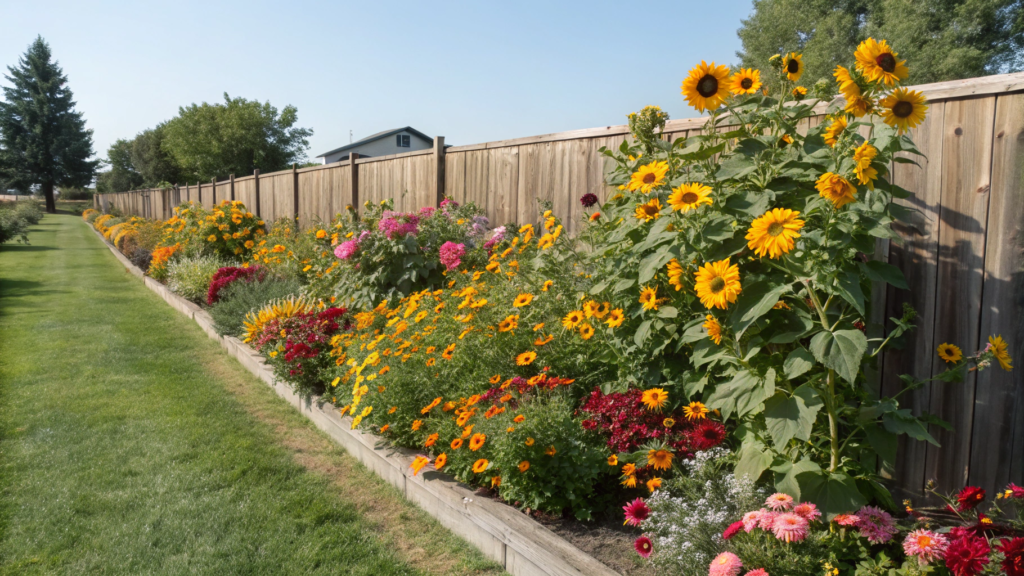
If there is a full sun area along the fence, it can be turned into a bright flower border with long bloomers.
How this flower border is structured
Here the idea is not just to plant flowers along the fence. You think through sequential blooming that overlaps in time. As a result, there is no moment when everything suddenly fades and becomes empty.
Main principles:
- the fence fades into the background and becomes a visual backdrop
- the flower bed keeps color from spring to fall, without gaps
- the lower part of the fence is covered, and the line looks cleaner and softer
Then the layering logic comes in. Near the fence go taller plants, closer to the edge — lower ones. This makes the planting visually deeper. Plus, annuals are added — they quickly fill empty spaces while perennials are still growing.
And because of this, you get not a “one-time picture”, but a stable, living border that draws attention all season.
What you’ll need
- Seedlings of long-blooming perennials (echinacea, rudbeckia, coreopsis, salvia)
- A few annuals to boost color (petunia, zinnia, alyssum)
- Mulch (bark or wood chips)
- Compost or rich soil
- Fertilizer for flowering plants
- Pruners
- Watering can or garden hose
How to do it
- Define the full sun zone.
Watch the area during the day. You need at least 6–8 hours of direct sunlight. If the sun is only in the morning or evening — that’s a different case. Full light is important, otherwise plants won’t show their full blooming potential. - Divide the planting by height.
Place taller plants near the fence (2–4 ft / 60–120 cm), like echinacea or rudbeckia. Closer to the edge — lower ones (8–18 inches / 20–45 cm), like alyssum or dwarf varieties. This creates a clean layered line. - Build a mix with different bloom times.
Don’t take everything “for July”. Mix plants so some start earlier, others later. For example:- spring — salvia
- early summer — coreopsis
- mid and late season — echinacea and rudbeckia
This way the flower bed stays alive all season, not just a short burst.
- Add annuals for density.
Even good perennials grow slowly at first. So you can plant annuals between them — petunias or zinnias. They quickly fill gaps and give an instant full look. - Prepare the soil in advance.
Flowers love loose, nutrient-rich soil. Add compost to the top layer and lightly mix it. This gives plants a strong start and reduces the need for feeding later. - Water and control moisture in the first weeks.
After planting, it’s important to keep the soil slightly moist, especially in heat. Don’t overwater, but don’t let it dry out either. Once plants root, they become much more resilient. - Regularly remove spent blooms.
This is a simple but very powerful technique. By cutting off faded flowers, you stimulate new blooming. Pruners really make it easier — quick pass along the border, and everything looks neat again.
Tip
Don’t try to make everything too perfectly symmetrical. Slight irregularity makes the flower bed feel more natural. And it’s better to choose a limited color palette — for example, 2–3 shades. Then the border looks intentional, not random.
In such a flower bed, the first accents appear within a couple of weeks, and then they only grow stronger. The fence stops catching the eye, because attention shifts to the color and shape of plants. And at the same time, maintenance stays clear and doesn’t require constant effort.
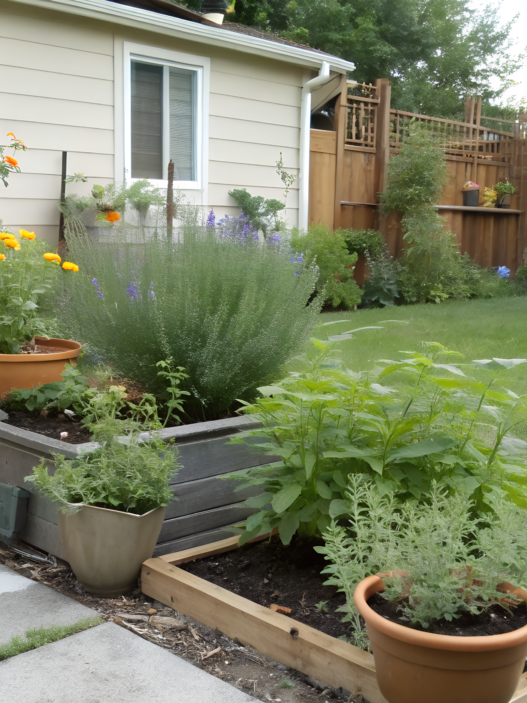
3. Hydrangea Privacy Row With Morning Sun Placement
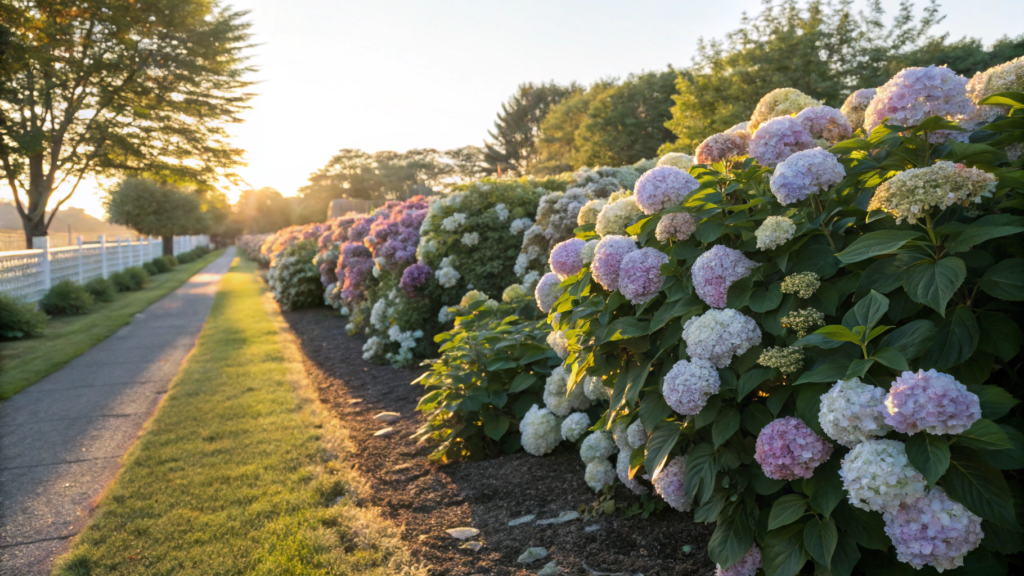
A row of hydrangeas with the right sun placement gives a very beautiful and full result. Here privacy appears through volume, foliage, and large blooms that visually block the view.
Why morning sun works best
Hydrangeas love light, but not overheating. Morning sun gives them enough energy for active blooming, and after noon they rest in light shade. In this режим:
- leaves don’t get burned
- flowers last much longer
- bushes look denser and healthier
In ornamental shrubs, with moderate light without overheating, stress decreases and blooming lasts longer. This directly affects how the planting looks overall.
What you’ll need
- Hydrangea seedlings (Hydrangea paniculata or Hydrangea arborescens — more resilient options)
- Compost or rich soil
- Mulch (bark or wood chips)
- Fertilizer for flowering shrubs
- Pruners
- Watering can or garden hose
How to do it
- Choose a spot with morning sun.
Ideally — the east side of the yard, where there is sun until noon, and then light shade appears. If you plant hydrangeas under direct sun all day, especially in hot climates, leaves will lose moisture too quickly, and bushes will look stressed and tired. - Mark the planting line with extra width in mind.
Hydrangeas grow and spread. Leave 3–5 ft (90–150 cm) between bushes so they can form a dense row, but not compete with each other. It’s important to think about their future size, not the current one. - Prepare planting holes with good soil.
Hydrangeas love loose, nutrient-rich soil. Add compost to each hole and mix it with native soil. This gives roots a strong start and helps retain moisture. - Plant bushes at ground level.
Don’t bury the root crown. Planting should be clean and careful: roots spread out, soil lightly pressed by hand. After that, water immediately to remove air pockets. - Do a deep watering after planting.
Watering should be thorough, so water goes down, not just stays on the surface. In the first weeks, make sure the soil doesn’t dry out — hydrangeas are sensitive to lack of moisture. - Mulch around the bushes.
A 2–3 inches (5–7 cm) layer helps retain moisture and protects roots from overheating. This is especially important in sunny areas. - Maintain shape with light pruning.
Over time, bushes will grow and expand. Light pruning helps keep the line neat and controlled and stimulates fuller blooming.
Practical detail people often miss
Don’t try to make the line perfectly straight. Slight shifting of bushes or small differences in spacing make the planting feel more natural. Hydrangeas themselves look better when they have a bit of freedom in shape.
Such a row creates a sense of privacy through volume and bloom. During flowering, it becomes the main visual focus of the yard. And outside the season, it remains a clean green line that still holds the structure of the space.
4. Dog Proof Fence Line With Tough Grasses and Paths
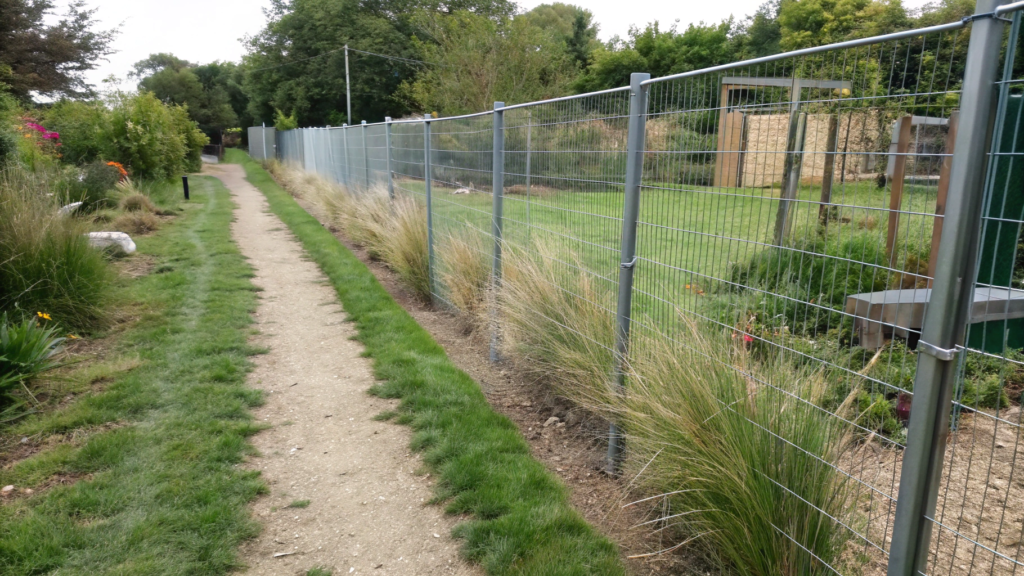
If you have a dog, you should immediately consider its behavior and create a zone that can handle it. Everything is simple: give the dog a clear path and plant things that don’t fall apart from constant movement.
A dog almost always moves along the fence on the same route. It patrols the territory, reacts to sounds, just runs out of habit. And if you don’t give it a “path”, it will create one anyway.
In this setup:
- along the fence there is a narrow running path
- on the edges — tough grasses that don’t break
- the whole line looks clean and structured, even with an active dog
As a result, there is no dirty strip and no constant attempts to “fix everything again”.
What you’ll need
- Seedlings of ornamental grasses (switchgrass, fountain grass, blue fescue)
- Gravel or small crushed stone for the path
- Landscape fabric (so grass doesn’t grow through gravel)
- Mulch for plantings
- Shovel
- Gardening gloves — for example, Pine Tree Tools Bamboo Gardening Gloves
How to do it
- Identify where the dog already runs.
You don’t need to invent a route from scratch. Look at the yard — usually the path is already there, just as trampled ground. This is your future path. If you ignore this and plant everything randomly, the dog will still make its own route. - Build a proper path along the fence.
Clear a strip about 1.5–2 ft (45–60 cm) wide. Remove the top layer of soil and level the surface. Then lay landscape fabric and cover it with gravel. You get a simple but durable path that is comfortable to run on and doesn’t turn into mud after rain. - Plant tough grasses along the edges.
On both sides of the path, plant ornamental grasses. They are flexible, don’t break from contact, and recover quickly. Spacing between plants — about 1.5–3 ft (45–90 cm), depending on the type. Don’t plant too densely — they need space to spread and fill out. - Leave space between the path and plants.
Don’t press plants right up to the path. Leave a small gap — at least 6–10 inches (15–25 cm). This reduces the chance that the dog will hit the plants every time it runs by. - Add mulch around the plants.
Mulch helps retain moisture and protects the soil from erosion. It also instantly makes the line look neat and finished. Without it, everything quickly starts to look like a work zone, not part of the yard. - Observe how the dog behaves after changes.
After the path is ready, watch for a couple of days. Dogs usually adapt quickly to the new route. If you see attempts to “cut corners”, you can temporarily add a small barrier or lightly reinforce that area. - Maintain the shape without overdoing it.
Grasses don’t require constant care. It’s enough to occasionally trim dry parts and make sure the path stays even and clean. Everything else they handle on their own.
Tip from experience
Don’t try to retrain the dog to use a different route if it already chose one. It’s much easier to build that habit into the design. Then the yard looks neat, not like a constant fight with your pet’s behavior.
Such a fence line stops being a problem zone. The mud disappears, and there’s no need to constantly replant or fix things. The space stays alive, but at the same time handles daily active movement of the dog.
5. Rock Mulch Buffer Strip That Stops Mud and Weeds
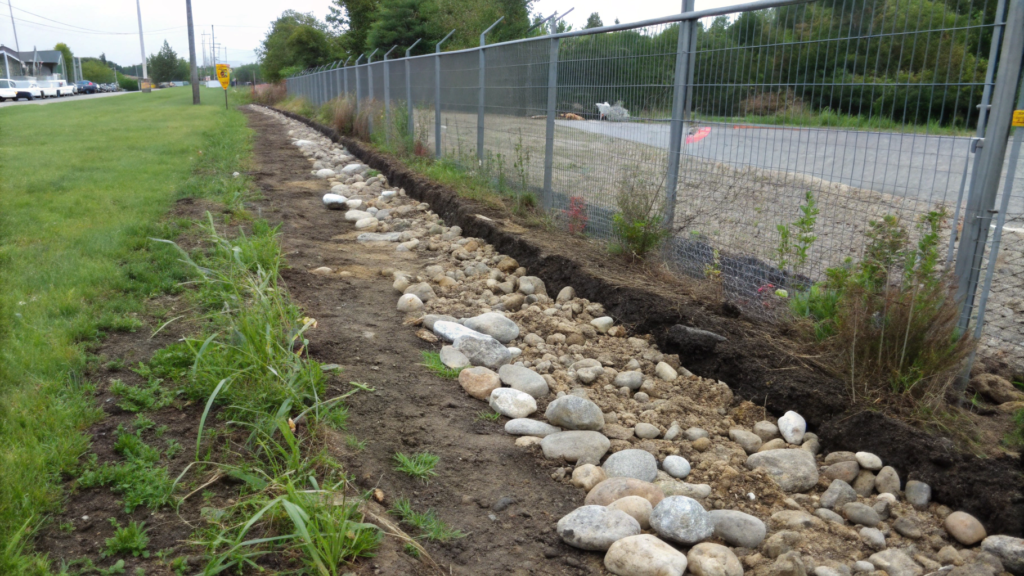
A rock mulch buffer strip takes on mud after rain, weeds, and uneven ground along the fence. And makes this zone controlled and clean. These spots often appear on their own: where water runs off the roof, where there is shade, where no one walks and no one maintains it. And the more you ignore it, the worse it gets. A stone strip solves it fast and without constant maintenance.
Here the goal is to make it clean and stable:
- the dirty strip along the fence disappears
- weeds almost don’t break through
- water doesn’t wash out the soil
- the line looks sharp and finished
This simple solution makes the yard look more expensive.
What you’ll need
- Gravel or decorative stone (pea gravel, crushed stone)
- Landscape fabric (weed barrier)
- Mulch or an extra layer of fine stone (optional)
- Edging or border (if you want a clean line)
- Shovel
- Rake for leveling the surface
- Gloves
How to do it
- Clear the strip along the fence.
First remove everything unnecessary: grass, weeds, roots, stones. Take off the top layer of soil about 2–3 inches (5–7 cm). If you leave roots, they will still push through the stone. Better spend a bit of time now than redo it later. - Set the width and shape of the strip.
Usually 1–2 ft (30–60 cm) is enough, but if the area is very problematic, you can make it wider. Go over it with a rake and level the surface. Already at this stage, you’ll see how the line pulls the whole space together. - Lay the landscape fabric.
Spread the fabric along the entire length and secure the edges. This is not a step to skip. Without it, the stone will sink into the soil, and weeds will come back. - Add the stone in an even layer.
Optimal thickness — 2–3 inches (5–7 cm). Spread it with a rake so the layer is even and consistent. If it’s too thin — soil will show through, if too thick — the stone will start to shift and move. - Make the edge clean.
You can leave it as is, but if there is lawn or a flower bed nearby, it’s better to add edging. It keeps the stone in place and makes the line more defined and sharp. - Light watering and final leveling.
Lightly water the surface so the stone settles. After that, go over it again with a rake and fix any uneven spots. This is the final touch that makes everything look clean.
Tip
Don’t choose stone that is too small or too light. Small stone spreads quickly, and light-colored stone almost immediately looks dirty. Medium-size gravel in a neutral tone is the most practical option, and it keeps a neat look longer.
Such a strip makes the yard noticeably cleaner and more structured. The feeling of a “neglected edge” disappears, and the fence line becomes clear and intentional. At the same time, it requires almost no maintenance — you do it once and just keep the shape.
6. Tree and Shrub Layering for Instant Backyard Rooms
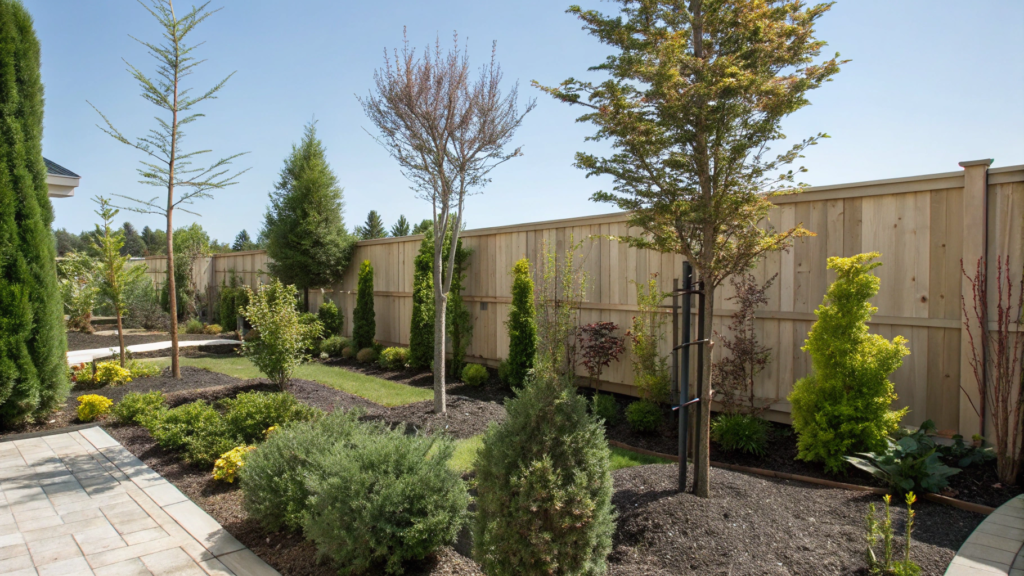
The problem of privacy without solid fences is solved very quickly with layering of trees and shrubs. You’re not just planting along a line. You’re dividing the space into small zones. And this feeling of privacy appears almost instantly if you place the levels correctly.
How the space is formed
There is no single line along the fence here. Instead, several planting layers are created that gradually form separate zones. It’s like you’re “building walls”, but not from boards — from plants.
Main layers:
- top layer — trees that set height and background
- middle — shrubs that block the view at eye level
- lower — low plants or open space, so it doesn’t feel overloaded
Then everything is built around spacing and offsets. Plants are not placed in one line — they are slightly shifted relative to each other. Because of this, depth appears, and the yard stops looking flat.
It’s important not to block everything completely. Small gaps between plantings create a feeling of lightness and let the space “breathe”. This is what makes these zones comfortable, not cramped.
What you’ll need
- Small decorative trees (serviceberry, dogwood, Japanese maple)
- Shrubs of different heights (hydrangea, spirea, ninebark)
- Low plants or ground covers (optional)
- Compost or soil improver
- Mulch
- Shovel
- Pruners
How to do it
- Define the zones you want to separate.
Walk around the yard and choose an area. It can be a seating zone, a place for a table, or just a plain corner. 1–2 zones are enough to start creating structure. - Place trees as the top layer.
Choose 1–3 points and plant trees there. The distance between them is usually 10–15 ft (3–4.5 m), so the canopies don’t interfere. They set the height and create a sense of a “ceiling” in the space. - Add shrubs in front of the trees.
Shrubs are placed not in a straight line, but slightly shifted. They block the view at eye level and create density. Spacing — about 3–5 ft (90–150 cm), depending on the variety. - Leave paths and openings.
Don’t close everything. Leave narrow paths or small “windows” between plants. This makes the space alive and functional, and easy to move through. - Prepare the soil before planting.
Add compost into planting holes, especially for trees. This helps plants root faster and reduces stress after planting. - Water and mulch.
Deep watering right after planting and a mulch layer of 2–3 inches (5–7 cm) help retain moisture and simplify maintenance. - Lightly adjust the shape over time.
After a season, plants will start to grow. Light pruning helps keep the structure clear and prevents zones from blending together.
Tip
Don’t try to line everything up perfectly. A slight shift — even a step left or right — makes the composition feel much more natural. And it’s better to use shrubs with different shapes, not identical ones — this makes the space feel deeper and richer.
With this kind of planting, you start getting zones where you want to pause and stay, not just walk through. The space becomes calmer, without the feeling of emptiness. And at the same time, you don’t need to build extra structures or fences.
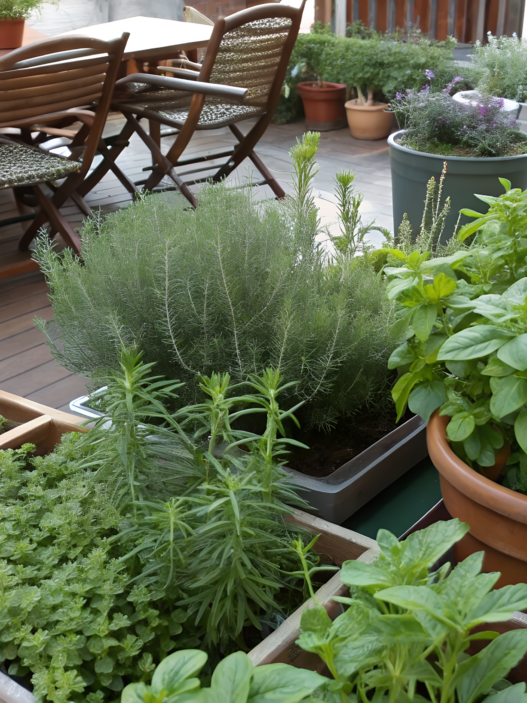
7. Narrow Fence Line Raised Bed for Tight Side Yards
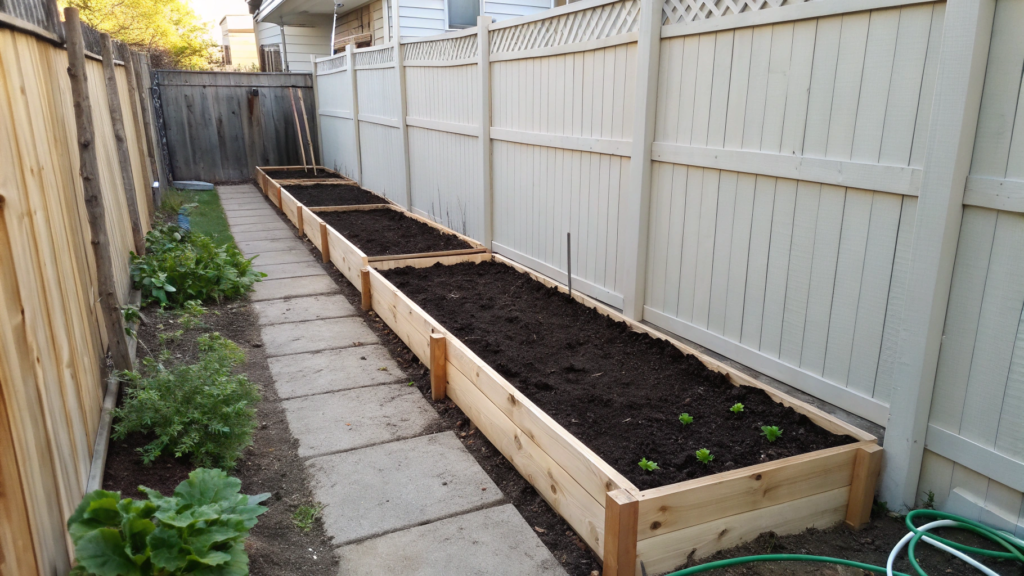
As a rule, in narrow side yards there is little light, little space, and most often it is just a passage along the fence that is not used at all. But exactly there you can make a narrow raised bed along the fence.
How this raised bed is structured
Here everything is built around compactness and a clean line. The bed goes along the fence and should not “eat up” the passage, so it is made narrow but functional. The raised structure immediately solves several things: soil doesn’t compact, it’s easier to control weeds, and visually the line looks cleaner and more defined.
Main parameters:
- width 12–18 inches (30–45 cm)
- height 10–18 inches (25–45 cm)
- placement strictly along the fence, in one straight line
Because of these dimensions, plants have enough space to grow, but the area doesn’t feel overloaded. And one more important point — after installation there should still be a passage of at least 2–3 ft (60–90 cm). Then the zone stays comfortable, not turning into a tight corridor you don’t want to walk through.
What you’ll need
- Boards or ready panels for the bed (cedar, treated wood)
- Screws or fasteners
- Garden soil or raised bed mix
- Compost
- Landscape fabric (optional, for the base)
- Drill or screwdriver
- Shovel
- Level for straight installation
How to do it
- Measure the space and leave room for a walkway.
First estimate the width of the passage. It’s important that after installing the bed there is at least 2–3 ft (60–90 cm) left for comfortable movement. Otherwise, the space becomes inconvenient and people will just stop using it. - Build a narrow box along the fence.
Assemble a structure with a width of 12–18 inches (30–45 cm). This is the optimal size: enough for plants, but not too much for a tight space. Height can be around 12 inches (30 cm) — this works for most plants. - Prepare the base.
Remove grass and level the ground. If there are weed issues, you can lay landscape fabric. It will slow down growth from below. - Install the box ровно по линии.
Use a level so the bed doesn’t shift or tilt. Even small misalignments in a narrow space are very noticeable. - Fill the bed with good soil.
Mix garden soil with compost. This mix retains moisture but doesn’t turn into a dense mass. This is important because the soil volume is limited. - Choose compact plants.
Herbs, greens, strawberries, dwarf vegetables work best. They don’t spread too much and don’t take over the passage. - Watering and basic care.
In narrow beds, soil dries out faster, so it’s important to monitor moisture. But thanks to the raised form, watering is easier — everything is within reach.
Tip
Don’t overload the bed with too many different crops. In a narrow space, it’s better to choose 2–3 plant types that go well together. Then the line looks clean and intentional, and maintenance stays simple.
As a result, instead of an empty passage, you get a neat, living line. The space starts to feel thought-out, even if it is very small. And at the same time, you get not only looks, but also real practical use.
8. Clumping Bamboo Alternative With Non Invasive Shrubs
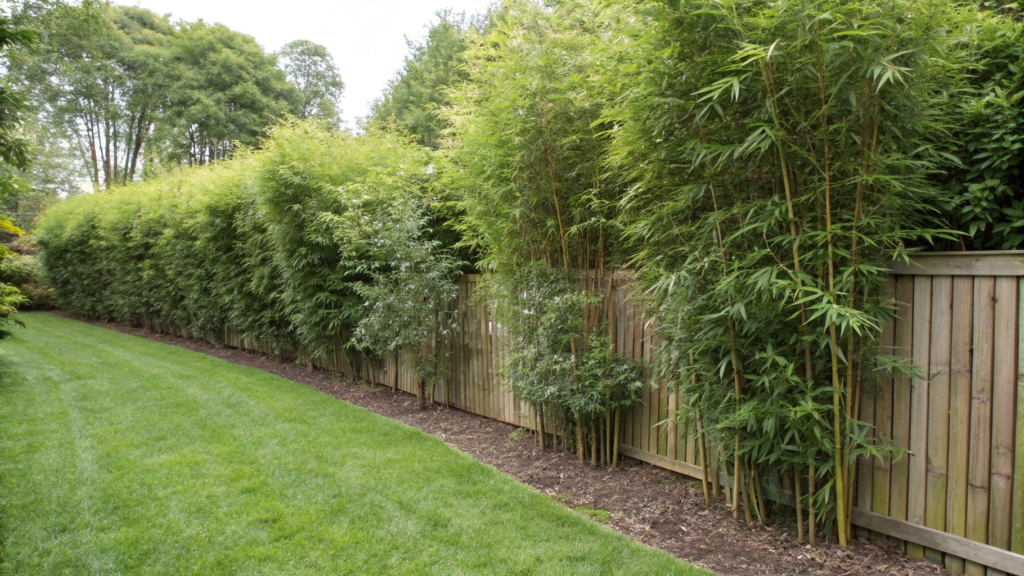
Bamboo grows fast, creates a dense screen, and looks impressive. But many types spread aggressively. And instead of a clean line along the fence, you end up with a constant fight for control over the yard.
That’s why more often an alternative is used — non-invasive shrubs that give a similar visual effect, but without the risk of “taking over the space”.
How this replacement looks
Here the goal is not to copy bamboo exactly, but to create a similar feeling of density and vertical structure using other plants.
Main elements:
- shrubs with a vertical or narrow growth habit
- dense planting to form a solid screen
- different leaf textures to avoid a flat green wall
Because of this, privacy is maintained, the planting looks softer and more alive, and there is no risk of plants spreading uncontrollably. Everything stays under control.
What you’ll need
- Seedlings of non-invasive shrubs (boxwood, arborvitae, holly, viburnum)
- Compost or soil improver
- Mulch
- Fertilizer for shrubs
- Shovel
- Pruners
How to do it
- Choose shrubs with a vertical shape.
Look not only at height, but also at the growth form. Choose plants that grow upward, not too wide. This creates that screen effect, similar to bamboo, but without aggression. - Mark the planting line along the fence.
Usually step back 2–3 ft (60–90 cm) from the fence so plants have room to grow. The line can be slightly uneven — it looks more natural than a perfect straight line. - Plant shrubs with tight spacing.
Distance — about 2–4 ft (60–120 cm), depending on the variety. This is denser than standard planting, but it helps form a privacy screen faster. - Mix 2–3 types of plants.
Don’t plant one species along the entire length. A bit of variety makes the line deeper and more interesting. You can combine, for example, darker and lighter foliage. - Prepare the soil before planting.
Add compost into planting holes. This speeds up rooting and helps plants gain mass faster. - Water and mulch after planting.
Deep watering and a mulch layer of 2–3 inches (5–7 cm) help retain moisture and reduce weeds. - Maintain shape with light pruning.
Over time, shrubs will grow. Light trimming helps keep the form and density, preventing the planting from falling apart.
Tip
If you want even more of a “bamboo feel”, choose plants with smaller leaves and lighter texture. They create a more airy screen and feel closer to the look people usually want from bamboo.
This alternative gives the same result — a dense green line along the fence. But without the risk that in a couple of years you’ll need to control growth and dig things out. The planting stays manageable, clean, and stable season after season.
9. Living Trellis Wall Using Vines on Fence Panels
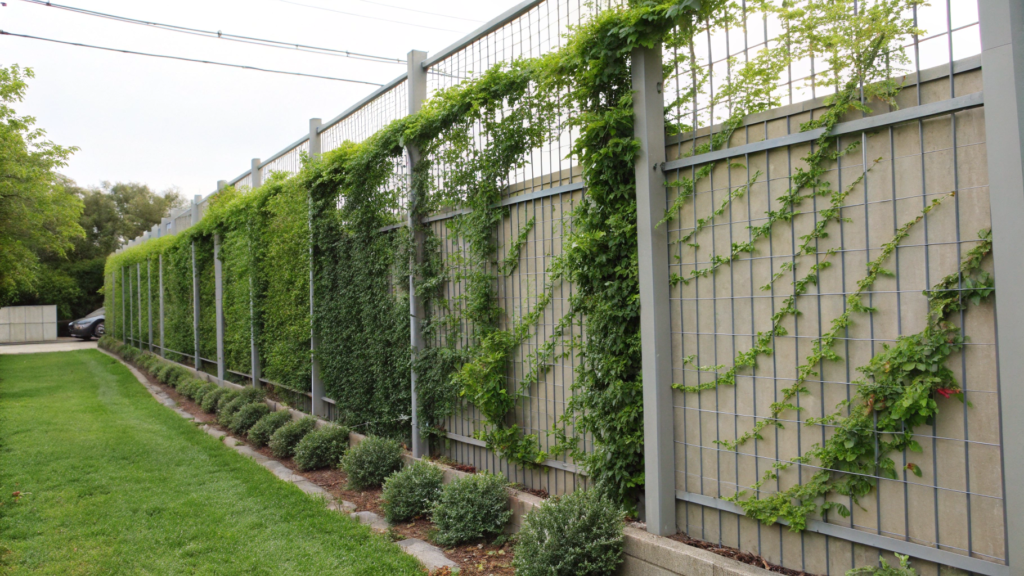
To turn a fence into a living vertical wall, climbing plants are used that grow along a support and gradually cover the entire surface. As a result, instead of a regular fence, you get a green backdrop with texture and movement that changes throughout the season.
How the living wall is structured
Here it’s important not just to plant at the base, but to give plants a structure to grow on. Without support, everything turns into a tangled mass. With support — into a clean vertical line.
Main elements:
- a support or trellis panel that plants can climb
- climbing plants with different growth speeds
- even distribution along the length
Then everything depends on how you guide the growth. Climbing plants don’t always go where you want right away, so at the beginning they need a bit of help. Gradually they fill the space, and the fence stops feeling like a separate element — it becomes part of a green wall.
What you’ll need
- Panels or trellis to attach to the fence
- Climbing plants (clematis, jasmine, climbing roses, honeysuckle)
- Fasteners or garden wire
- Compost or soil improver
- Mulch
- Shovel
- Pruners
How to do it
- Attach panels or supports to the fence.
If the fence is smooth or solid, plants won’t have anything to grab onto. So first install trellis panels. It’s important to leave a small gap — at least a couple of inches — so air can circulate freely and plants don’t overheat. - Mark planting points at the base.
Plants are not placed too close to each other. Usually spacing is 4–6 ft (1.2–1.8 m). This gives them space to grow and spread, and prevents overcrowding. - Prepare the soil before planting.
Add compost into each planting hole. Climbing plants grow quickly and need a nutrient-rich base to support that growth. - Plant and guide growth right away.
After planting, shoots are directed toward the support. Sometimes they need light tying. This prevents chaotic growth and helps fill the structure faster. - Water and mulch.
Deep watering after planting and a mulch layer of 2–3 inches (5–7 cm) help retain moisture and simplify care. This is especially important in the first weeks. - Monitor growth in the first months.
Plants will look for direction. At this stage, you can gently guide them, distributing growth across the panel. This takes little time but strongly affects the final look. - Prune to maintain shape.
When the wall starts filling in, light pruning helps keep it clean and controlled. Without it, plants may tangle and look messy.
Tip
Don’t choose just one plant type for the entire length. A mix of 2–3 varieties looks much more interesting, especially with different bloom times and leaf textures. For example, clematis adds bright flowers, honeysuckle adds volume, and climbing roses add density. Just consider growth strength so one plant doesn’t dominate the others.
If the combination is chosen well, the wall will change throughout the season, not look the same all the time.
Such a living wall doesn’t appear in one day, but already in the first season you’ll see how the fence starts to fade into the background. After a year, plants cover most of the surface, and the space feels more cohesive. At the same time, it keeps a sense of lightness — unlike dense hedges, here you still get movement, light, and depth.
10. Low Maintenance Mixed Hedge With Seasonal Color
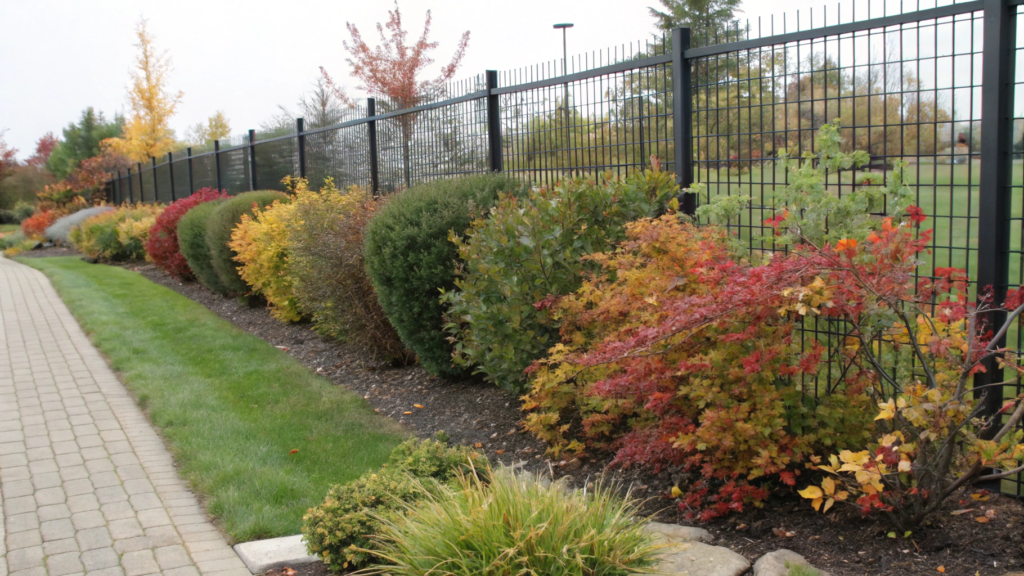
For a hedge along the fence, it’s better to make a mixed planting with seasonal color change. Because of this, the hedge looks alive all year, not just for a couple of weeks.
How this hedge is structured
Here you don’t plant one species along the entire length. The idea is to build a combination of plants that сменяют each other through the season and at the same time don’t require constant trimming.
Main elements:
- shrubs with different bloom times
- a mix of foliage (green, dark, tinted tones)
- natural growth form without strict geometry
Then everything is built on how they interact. One shrub blooms in spring, another in summer, a third gives bright foliage in fall. As a result, the line along the fence doesn’t freeze — it keeps changing, but without chaos.
What you’ll need
- Seedlings of different shrubs (spirea, hydrangea, boxwood, ninebark, weigela)
- Compost or soil improver
- Mulch
- Fertilizer for shrubs
- Shovel
- Pruners
How to do it
- Mark the planting line along the fence.
Step back 2–3 ft (60–90 cm) from the fence. This gives plants room to grow freely and makes maintenance easier. The line is better slightly uneven, not perfectly straight — it looks more natural. - Choose 3–5 types of shrubs.
Don’t take too many. A few species with different bloom timing and foliage color are enough. For example: spirea for spring, hydrangea for summer, ninebark for structure and leaf color. - Place plants based on their size.
Larger shrubs go farther apart (4–6 ft / 1.2–1.8 m), more compact ones — closer (2–3 ft / 60–90 cm). This prevents overcrowding and gives each plant space. - Don’t line everything up in one row.
Slight forward-back shifting creates depth. Even a small deviation from a straight line makes the hedge more visually interesting. - Prepare the soil before planting.
Add compost into planting holes. This improves soil structure and helps shrubs establish faster. - Water and mulch after planting.
After planting, water thoroughly and add a mulch layer of 2–3 inches (5–7 cm). This helps retain moisture and reduces weed growth. - Minimal pruning over time.
This type of hedge doesn’t need constant trimming. It’s enough to occasionally remove weak or outgrowing branches to keep a clean natural look.
Tip
It’s better to think through the color palette in advance. If you mix too many shades, the line may look random. But if you choose 2–3 main colors and repeat them along the length, the hedge will look intentional but not boring.
Fence as part of the yard
This kind of hedge always looks alive and evolving. In spring — the first blooms appear, in summer — volume builds, in fall — foliage brings color. And at the same time, there is no feeling that it needs constant attention. It grows at its own pace, while the yard looks clean and well thought-out.
As you can see, these 10 fence line landscaping ideas give a way for everyone to solve their own problem, but in essence everything comes down to one thing — the line along the fence stops being random. It becomes a real part of the yard.
You don’t have to do everything at once. Often it’s enough to choose one problem area and bring it into order. After that, the rest starts to fall into place on its own. And the yard stops feeling like a set of separate pieces.Write in the comments which fence line area is the most problematic for you right now and what exactly is happening there. Sometimes even one precise solution changes the whole picture.