
That awkward empty space under your deck? I used to think it was just some technical area no one really notices. Then I saw a few photos on Pinterest… and boom. That’s when my obsession with deck skirting ideas began — ones that actually upgrade your backyard without any major renovation or construction.
In this post, I’ve rounded up 10 of the most viral Pinterest ideas that don’t just cover up your under-deck space — they make it stylish.
And if you want more — there’s a Part Two waiting for you, with 10 more unique and creative deck skirting alternatives. Because trust me: the ideas are endless, and there’s a perfect match for every backyard.
1. Horizontal Wood Plank Skirting

Ah, wood… No other material brings out that same sense of coziness, warmth, and that “homey backyard” vibe. And if you’ve spent any time on Pinterest, you’ve definitely seen horizontal wood plank skirting in action.
What is horizontal wood plank skirting?
It’s a way to finish off the bottom of your deck using long wooden boards installed horizontally, with either small or noticeable gaps between them — totally up to your taste!
This instantly gives your yard a more structured, finished look — especially if your deck is open and doesn’t have much decor going on.
Sure, vertical slats are classic. But horizontal lines stretch the space visually. This is especially helpful if you’ve got a small backyard or the deck is up against a fence.
That’s one of the reasons horizontal wood skirting became such a hit on Pinterest.
Plus, this style helps you:
- hide the space under the deck — especially if, like us, you use it to stash hoses, buckets, garden tools, and random stuff;
- support a clean, modern look — especially with black or charcoal-colored wood;
- keep airflow moving — thanks to the spacing between the boards.
Choosing the Right Material
We wrapped our back deck with 1×6 cedar boards (around 2.5×15 cm). Cedar handles moisture like a champ, doesn’t warp, resists pests, and — bonus — smells amazing even two years later.
Other popular choices:
- Pine — more affordable, but absolutely needs sealing and paint.
- Ipe or teak — pricey, but tough as a rock.
- Thermally modified wood — great if you want that low-maintenance modern vibe.
If you’re on a budget, pre-treated pine is a solid option — something like:
1 in. x 6 in. x 8 ft. Pressure-Treated Pine (about 2.4 meters — just right for one span between posts).
Installation Tips
We mounted the boards directly to the deck posts, keeping about ⅜-inch (1 cm) gaps between them. That gave good airflow and let the wood settle naturally.
If your deck sits higher above the ground, consider adding an interior frame for better support.
I would advise you not to skimp on screws. Use stainless steel flat-head screws — once you install them, they’re in for good. Unlike our first year… when half the boards started popping off by September.
If you’re not using cedar or teak, I’d definitely recommend sealing the wood with oil or paint. We went with matte black paint, and it gave us that clean, minimalist look without being loud.
Just don’t skip seasonal touch-ups — especially if, like us, you live somewhere with cold and damp winters.
The Verdict?
Horizontal wood plank skirting is beautiful, budget-friendly, and it truly transforms your backyard.
If you love practical solutions that look like design choices — this one’s for you. And the best part? You don’t need to be a pro. Just grab a level, a saw, and carve out a weekend for it.
2. Metal Panel Skirting

I used to think metal was just too “cold” as a material. More fitting for a warehouse than a backyard. But everything changed after a trip to Washington State.
There, on one of the properties, we saw matte black metal panels covering the space under the deck. Ferns were growing nearby, gravel was neatly laid — and it all looked very stylish.
What is it exactly?
Metal skirting for decks means panels installed around the perimeter, covering the empty space beneath the deck surface. The most common materials are galvanized steel or aluminum. These panels can be:
- smooth;
- textured;
- perforated with patterns;
- corrugated (for added depth).
These panels are typically around 0.019–0.025 inches thick (0.5–0.65 mm), weigh 15 to 30 pounds per panel (7–14 kg), and are easy to find in 8-foot lengths (2.4 m).
Clear Advantages
- Fire resistance. A major benefit for those of us living in dry climates.
- Durability. Metal doesn’t care about mold, rodents, or harsh weather.
- Modern appearance. Especially when painted matte black, graphite, or moss green.
Downsides? Of course.
First, metal heats up. So if your deck faces south, it’s best to avoid smooth panels without shade.
Second, it rings when struck, so it’s better to install it with padding or gaskets.
Installation
Standard panel screws with washers are used for installation, and the panels are attached to a wooden frame. Leave a 1-inch (2.5 cm) gap from the ground for ventilation and to prevent dirt from rising to the surface.
How to make metal look “designer”?
I suggest:
- Adding a wooden trim frame along the top and bottom;
- Using vintage panels (easy to find at sales) — with a worn, aged effect;
- Combining metal with plants: even basic grapevines or clematis create incredible contrast.
Metal panels offer the perfect balance of practicality and style. They’re great for those tired of wood, not ready to splurge on stone, but still looking for a clean and modern backyard look.
3. Bamboo Reed Skirting

Oh, bamboo. It makes you think of a beachside bar or a tiny courtyard in a Japanese garden. But what’s especially nice — bamboo reed skirting costs next to nothing, can be installed in a day, and ends up looking like a designer touched it.
Bamboo reed skirting is basically rolls of bamboo reeds, held together with wire or nylon. You just unroll it and attach it around the perimeter of your deck. And just like that — a dull under-deck space turns into a cozy little corner.
And under the deck? There’s always something hiding: compost bin, garden cart, buckets of chicken feed. Now it’s all tucked away behind a warm bamboo curtain.
Why do I often recommend this option?
Because:
- Price. One roll will cost around $35–60 for 6 feet (about 1.8 m) in length and 16–24 inches (40–60 cm) in height. Perfect for a small deck.
- Simplicity. Just staple it to the wooden framing — done.
- Flexibility. You can install it temporarily (like for summer), or use it as a base for climbing plants and herbs.
- Aesthetics. Natural materials always win — especially in gardens with wild or herbaceous borders.
Here’s one of the options my friends in Oregon used (and they’re still happy with it): Backyard X-Scapes Bamboo Fence Panel 24″H x 96″W
Bamboo isn’t super durable
It lasts around 2–4 seasons if left untreated. But if you seal it with varnish or natural oil, it can easily survive winter — especially if you don’t live in a zone with 6-foot snowdrifts.
People nail the bamboo directly to the bottom edge of the deck… and it starts rotting from below. So:
- Leave a 1–2 inch (2.5–5 cm) gap from the ground;
- Use wire or zip-ties to attach it to the wood frame — not directly to the deck;
- If possible — add a sealing strip between the bamboo and wood.
It looks especially great when you combine materials — bamboo on the bottom, and a thin horizontal wood trim or planter box on top. One of our clients in Idaho did that with sage and thyme — and it looked absolutely beautiful.
If you’re looking for a budget-friendly, natural, slightly bohemian solution — this is the one for you.
Especially if your backyard isn’t full-blown high-tech and leans more into that wild garden look, where lavender, sage, and mint grow from every crack.
4. Stone Veneer Skirting

Stone veneer skirting brings a stylish, solid, and long-lasting look to your deck.
What is stone veneer?
It’s not natural boulders. It’s thin panels or tiles made of manufactured stone that look just like real stone, but are lighter, more affordable, easier to install, and less prone to cracking.
These panels are usually 0.75 to 1.5 inches thick (2–4 cm) and weigh around 8–12 pounds per square foot (about 4–6 kg per 0.1 m²).
Where did I first see it?
At a home show in Boise (yes, I’m that person who goes to stone veneer expos instead of concerts), I saw a deck with a stone skirt in warm sand and charcoal tones.
What surprised me most? It was just a plywood frame with faux stone tiles glued on. That simple.
Why is this a solid option?
- Durability. Stone stands up to weather, insects, and heat.
- High-end look. Even if the rest of the house is simple — stone adds visual weight.
- Low maintenance. Dirt doesn’t stick. Just rinse it with a hose.
- Warm or cool styling — depending on color. Sand and beige for cozy vibes; dark gray or graphite for a modern look.
Are there downsides?
Yes. It’s one of the most expensive options. The tile costs around $6–$12 per square foot, plus adhesive, sealant, and joint filler. Installation may take a day or two, especially if the surface isn’t perfectly flat.
But — you do it once, and it lasts.
One popular and trusted option Ekena Millwork – Faux Stone Wall Panel — lightweight, made for outdoor use, and looks very realistic.
How to install it?
- The surface must be rigid — plywood, concrete, or OSB.
- Panels are glued on with construction adhesive (made specifically for stone).
- If needed, they can be reinforced with anchors.
- It’s important to seal the joints to keep water from getting in.
If you want an impressive look without paying for real stone, and you’re ready to invest a few days and a bit more budget — this is absolutely worth it.
Stone veneer does something few materials can: it grounds the house, gives it a sense of weight, and makes the whole structure feel more solid.
5. Gabion Wall Skirting

If you’re looking not just to cover up the bottom of your deck, but to create a visual anchor for your entire backyard — gabions might be exactly what you need. No, you won’t see them in every yard. Yes, they’re a bit construction-site-inspired. But that’s exactly what makes them so strong and… compelling.
What is it?
Gabions are metal cages filled with stone. Essentially, they’re frames that hold whatever you want inside — from gravel and rocks to glass, bricks, or even old bottles if you’re going for an art piece vibe.
Sizes vary, but the most common setup is 3x1x1 feet (90x30x30 cm) panels assembled in a row along the base of the deck.
I first saw gabions in central Oregon, in a house where a couple had built a raised wooden deck—no lawn, just natural landscaping. Under the deck, they installed low gabions filled with basalt gravel and laid a strip of lighting along the top. It looked simply stunning.
Why are gabions a great option?
- Stability. The stones don’t go anywhere. Even if your dog crashes into the corner at full speed.
- Drainage. Air and water flow freely between the rocks — no damp buildup.
- Protection. Great for keeping small animals out. We know what it’s like when a skunk decides to move in under the deck.
- Style. Bold, architectural, and clearly intentional.
Is installation hard?
No — if you’re handy with a shovel and level. Here’s how it goes:
- Level out the ground beneath the gabions.
- Assemble the sections (they usually ship flat).
- Fill with gravel or another material.
- Tie them off and secure them.
Some people even build a small foundation underneath if they want the structure to be extra solid.
One popular kit for small gabions Kinbor Gabion Planter Box Cage Wall 3x1x1 ft — works great and can double as a planter.
You can fill it with basalt, granite, brick, marble chips, wood. You can even use bottles, tiles, roof tiles — if you’re creative!
Downsides?
- Weight. One gabion can weigh 100–300 pounds (45–135 kg) depending on the fill.
- Cost. Not the cheapest option — especially if you buy stone separately.
- Visual weight. Might overwhelm small or shaded yards — could throw off the balance.
A great combo is gabion on the bottom + wood slats on top. Or install gabions just on the corners and fill the rest with slatted wood. Designers use this trick often — it adds structure without overloading the space.
This is the right choice if you’re not afraid of physical work, want something unique and bold, and your backyard leans more toward natural or modern industrial style…
In that case, gabion wall skirting won’t just decorate your space — it might become the main visual feature of your yard.
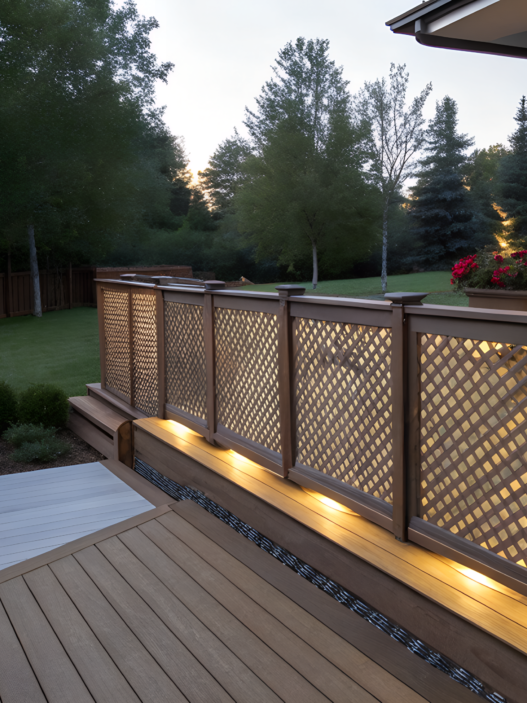
6. Slatted Wood Privacy Skirting

Slatted wood skirting is simple, yet it somehow always looks expensive. And if you pick the right stain — it can completely elevate the entire yard.
Slatted skirting means using thin wooden slats, installed either vertically or horizontally with even gaps between them. They allow air and light to pass through, but still hide everything under the deck.
The main difference from regular wood skirting is that here, the focus is not on mass — it’s all about rhythm and geometry.
What’s the appeal?
- Minimalist privacy. The gaps hide clutter but don’t make the space feel closed off.
- Great ventilation. Even in the heat, there’s no musty smell under the deck.
- Modern Nordic-yard style. Warm wood, rhythmic shadows, clean lines.
- Easy to install. Especially if the wooden frame is already in place.
Materials
- Cedar — for those who love the natural scent and color.
- Pine — best painted (must be treated!).
- Thermowood — if you want low maintenance.
Installation steps
- Measure and install horizontal guides (if installing vertical slats).
- Use spacers (we used ⅜ inch) for even gaps.
- Attach slats with screws or nails.
- Stain or oil the wood — especially the edges.
Tips. Use contrasting colors. For example, dark gray decking with light wood slats. Vary the spacing between slats — tighter at the bottom, wider at the top. Add lighting. A built-in LED strip along the top rail creates a cozy evening café feel.
If you want a modern look, visual lightness, and still need some privacy and storage coverage — this is the perfect option. Especially if your yard is on the smaller side and you don’t want to overwhelm it.
With this type of skirting, you get both style and functionality — all without bulk or unnecessary costs.
7. Corrugated Tin Skirting

If I had to choose one option for someone who wants to do it cheap, fast, but with impact, this would be it.
Corrugated tin is a visual mix of old barn vibes, tech charm, and simple rural practicality. Will it fit every yard? No. But if it does — it’ll make a statement.
Corrugated tin is thin sheet metal with a wavy surface. Most often it’s galvanized steel or aluminum, about 0.015–0.025 inches thick (0.4–0.65 mm) and 8–12 feet long (2.4–3.6 m).
It handles weather well, bends at corners, cuts with a grinder or tin snips — and most importantly — it costs way less than stone, wood, or even vinyl skirting.
I saw these panels at a neighbor’s place in southern Idaho. They bought a house with an open-raised deck and, literally over a weekend, covered the whole base with tin. Matte black top trim + light gray metal below. The result was this modern farmhouse style — and suddenly, the whole yard looked cohesive.
Pros
- Super budget-friendly. A 2×8 ft panel might cost $15–20.
- One-person install. Literally — one person, a drill, two hours.
- Easy to adjust. Cuts to height, bends around corners.
- Weatherproof. Hail, snow, rain — metal won’t rot.
Cons
- Noise. Rain on metal sounds romantic… for about ten minutes.
- Temperature swings. Can get very hot, especially on south-facing decks.
- Sharp edges. Be careful during install.
How to soften that “industrial” look?
- Paint it — graphite, dark green, even terracotta.
- Add a wood frame at the top and bottom — it turns the skirting into a design element.
- Plant grasses or ferns in front — metal + greenery = pure harmony.
If you want to cover the base of your deck fast and affordably, add a bit of rustic charm, and do it without much construction experience — corrugated tin skirting is your friend.
Just don’t forget gloves and edge caps for those sharp metal ends.
8. Living Wall Skirting with Climbing Plants

Living wall skirting is a way to cover the space beneath your deck using live climbing plants growing on stretched mesh, wood slats, or wire supports.
Basically — it’s a green “skirt” instead of a standard screen. And yes, it changes with every season — from blooming beauty to lush foliage.
Everything is pretty simple:
- Set up the support — like wire mesh, wooden slats, or a chain-link panel.
- Plant around the perimeter — spacing them 12–18 inches (30–45 cm) apart.
- Give them 1–2 growing seasons to fill in.
- Tie and guide the vines as they grow.
Which plants to choose?
Here are 5 favorites, tested over the years (and through Idaho winds):
- Clematis — blooms heavily, especially varieties like Jackmanii.
- Virginia creeper (Parthenocissus) — super fast-growing, brilliant in fall.
- Honeysuckle (Lonicera) — pollinator-friendly and fills the deck with fragrance.
- Hops — grows like crazy. Just keep an eye on it so it doesn’t take over.
- Wisteria — if you want something… cinematic.
Support suggestion Tierra Garden Rustic Trellis for Vines – 6-ft — stylish and easy for plants to cling to.
Pros:
- Eco-friendly. No plastic or metal — just plants.
- Attracts beneficial insects. Especially when in bloom.
- Changes with the seasons. Spring — soft green, fall — fiery red, winter — sculptural.
- Absorbs noise and dust. Especially helpful if your yard is near a road.
Cons:
- Time. Not a weekend project. Needs at least one full season.
- Maintenance. Pruning, tying, watering — especially during the first year.
- Uninvited guests. Dense foliage can attract lizards, spiders, even mice (especially if you leave compost nearby).
There was a retired couple living next door — very tidy folks. They saw the grapevine running along the side of our deck and decided to do the same.
By the next year, their entire deck was covered in greenery, and underneath it stood an old bench and table where they started hosting Sunday breakfasts. Their backyard literally came to life — and it all started with a few seedlings and some mesh.
What can be improved?
- Add a drip irrigation timer.
- Plant ornamental grasses at the base for a softer transition from ground to green wall.
- Use vertical planters — especially if you want a mix of foliage and flowers.
If you want a living, breathing backyard and you value natural balance and organic design, then a living skirting made of climbing plants will be one of the most rewarding solutions.
9. Decorative Concrete Block Skirting

When someone says “concrete,” the first image that comes to mind is usually something heavy, gray, and… well, not exactly pretty.
But decorative blocks are a different story. They’re dimensional, patterned, and full of rhythmic geometry — and with the right approach, they can turn into a true art piece.
Decorative concrete blocks (also known as breeze blocks or screen blocks) are hollow concrete units with ornamental cut-outs.
They usually measure 16×16 inches (around 40×40 cm) and weigh between 18 and 35 pounds (8–16 kg).
You’ll find designs with floral geometry, sunburst patterns, mid-century modern lines, and abstract cutouts.
Why is it great?
- Semi-transparency. Hides the mess under the deck but lets air and light through.
- Texture. Adds depth and visual interest even to a simple yard.
- Durability. Handles moisture, heat, snow, kids with soccer balls, and even robot vacuums.
- A touch of retro. Looks especially sharp paired with concrete paths or terrazzo.
When Lindy and I were traveling through Portland, we saw a project that blew us away: a modern home with a concrete facade and a landscape of grasses and cacti. Along the deck — decorative blocks with wave patterns, softly lit from within by string lights.
It looked like something out of an architecture magazine — and at the same time, completely homey. We immediately saved it to our “someday” folder.
How to install?
- Start with a solid base — either a concrete strip or a gravel bed set in cement.
- Set the blocks in one or two rows, secured with adhesive or mortar.
- You can leave space between them or fill the gaps with mortar for a clean finish.
Tip. Place blocks 2–3 inches off the ground. This extends their life and improves airflow.
To match the blocks to your style, paint them dark gray, warm white, or terracotta. Combine them with vertical planters or a bench in front of the wall.
Backlighting from inside the blocks looks especially impressive at night.
Drawbacks?
- Heavy. One block can weigh 15–30 pounds. This is not a one-evening DIY job.
- Precision required. It only looks good when it’s perfectly level.
- Cost. Blocks are around $4 to $8 each, but shipping and installation can easily double the budget.
Decorative concrete block skirting is for those who value structure, style, and texture.
If you’re willing to put in the effort, measure everything right, and want your yard to stand out — this option will give you something no wood or metal can:
the feeling that it was designed by an architect, not just slapped on for looks.
10. Mixed-Material Skirting Designs

When your head’s full of competing ideas — you like wood, but metal looks great… and stone might fit too… and maybe even some mesh —
mixed materials. Not only is it allowed, it’s stylish, practical, and looks incredibly smart when done right.
What is it?
It’s when you combine two or more materials to finish off the bottom of your deck. For example:
- Wood + Stone
- Metal + Bamboo
- Gabions + Wood inserts
- Concrete + Living plants
- Tin + Wood lattice
- Even blocks + greenery (yes, it actually looks cool!)
Why does it work?
- Contrast. Hard and soft. Light and dark. Warm and cool. That adds depth.
- Function. One material carries the structure, the other adds decoration. Or one’s permanent, the other’s seasonal.
- Flexibility. If one side of the deck is sunny — use metal. In the shade — go with plants.
- Visual appeal. Mixed skirting pulls the eye, creates architectural rhythm.
Combo ideas
| Material 1 | Material 2 | Effect |
| Cedar slats | Concrete blocks | Warm/cool contrast |
| Corrugated metal | Bamboo panels | Industrial + eco style |
| Gabions | Plants | Weight + “life” |
| Tin | Angled wood slats | Retro + geometry |
What to watch out for?
- Color palette. Avoid making it too busy. Stick with 2 base colors + 1 accent.
- Rhythm. If you’re using slats and panels — keep the spacing consistent.
- Transitions. Where materials meet should be clean and logical. Sometimes you’ll need a trim piece, other times just a sharp visual break.
If you want to do something different from everyone else, don’t mind spending a few more days on the project, and you’re ready for those wow reactions from guests — mixed-material skirting is your path.
It can be low-budget if you use leftover supplies, or upscale if you’re working with a designer.
The key is to stop thinking “either-or” — and start thinking “yes-and.”
Your deck, your style
By now, you’ve probably noticed that deck skirting isn’t about “just covering it up.” It’s about adding an architectural element, a touch of style, and real function to what’s often the most forgotten corner of your yard.
Each of these 10 ideas has its own vibe. One suits rustic vintage, another fits bold geometry, and another might be the perfect fit for a flowering hedge all summer long.
And if none of them feel just right? Blend two or three and create something personal. I do it all the time.
And this is just the first half! In Part Two of this article, I’ll walk you through 10 more skirting ideas — some of which might surprise you.In the meantime — drop a comment and let me know which design caught your eye.
Maybe you already have your own version of a deck “skirt”?