
If you’re tired of the same old blue barrels under the downspout, you’re in the right place.
We’ve rounded up 10 unconventional, well-thought-out, and truly functional ways to rainwater collection that not only look cool but also actually work.
Some disguise their systems as planter boxes, while others build them directly into pergolas. A few designs even look like art pieces. These solutions have all been field-tested by real people who use creative methods to save water and enhance their spaces.
And if this isn’t enough for you—there’s also a Part Two with interesting rainwater harvesting designs you’ve probably never seen before
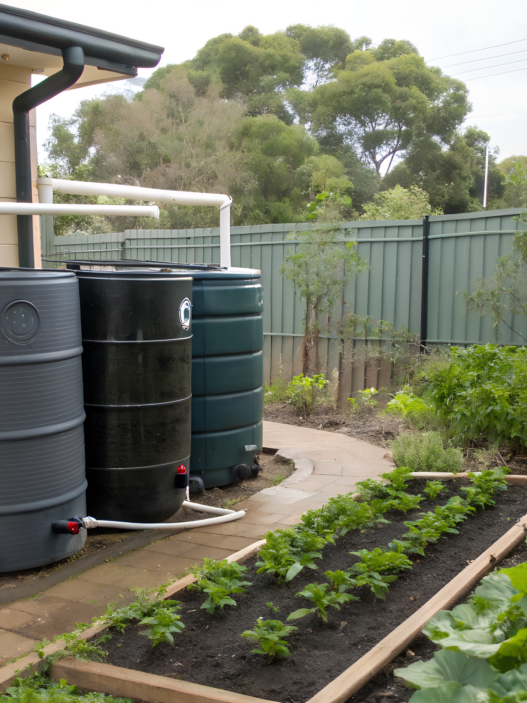
1. Rainwater collection integrated into raised garden beds

The first couple of years on our new property in Idaho, we fought off drought… with hoses. Not the smartest strategy, honestly. Especially when you’ve got six raised beds and you’re practically on your knees begging the water tank not to run dry.
That’s when we first built a rainwater collection system right into the raised bed itself. That was a turning point. Taking care of the plants got easier, the beds became more self-reliant, and the whole setup just got smarter. And yes—it actually looks good!
What is this idea, exactly?
Picture a typical raised bed, but with a rainwater reservoir built right underneath.
Even better—the entire structure is designed to guide water inside: roof, downspouts, and a gentle slope.
Here’s how it works:
- A roof (or awning) near the beds collects rainwater.
- Water runs through a downspout into a tank installed below the raised bed.
- Through a fitting and hose, water is distributed via a drip irrigation system directly to the plant roots.
- Any overflow drains into the ground or an extra reservoir so nothing is wasted.
We used a 50-gallon (190-liter) plastic cistern tucked right under the bed. The bed height is 22 inches (about 56 cm)—plenty of room for the tank, gravel layer, and fertile soil.
Why is this better than a regular barrel?
- Doesn’t ruin the aesthetic—the tank is completely hidden.
- You get a self-watering system—no more daily refills by hand.
- Saves space—especially important on a small lot like ours!
A quick tip from experience. If you live in a region with potential freezes, make sure to install your tank at a slight angle and add a drainage outlet for excess water. Even plastic tanks can crack when frozen.
And don’t be afraid to get creative. One of our beds is made entirely from old pallets, and the tank underneath? An old livestock feed container. It looked sketchy. But it works—perfectly!
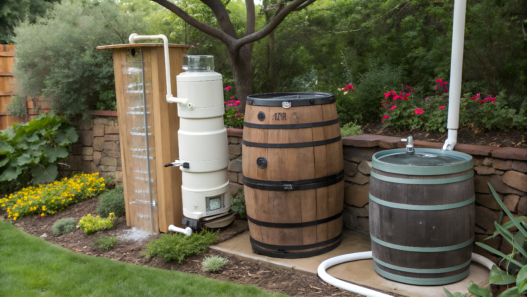
2. Repurposed wine barrel rainwater system with hidden overflow
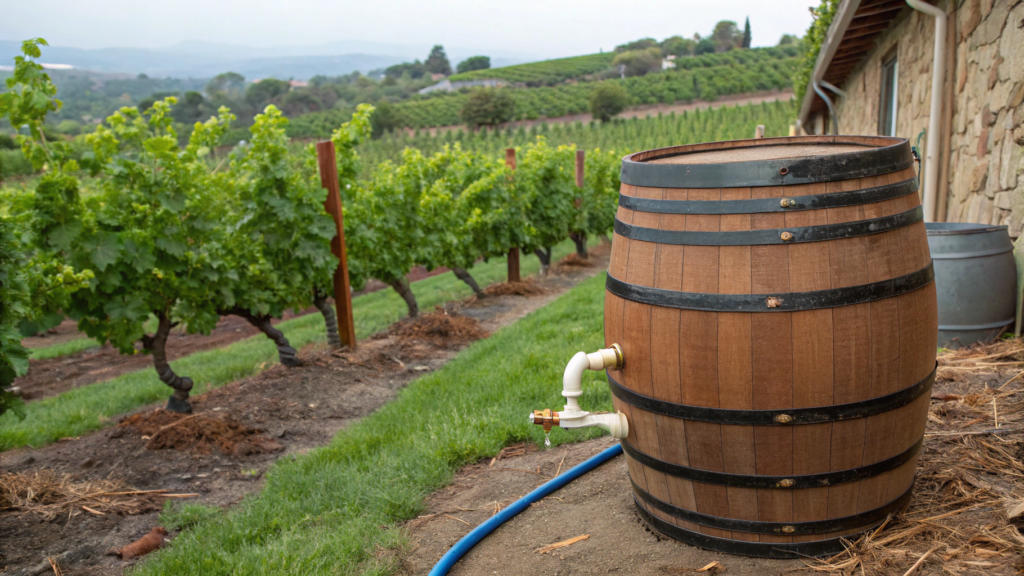
We have a couple we know—Jane and Tony. They live in Northern California, in an area where every other yard kind of looks like a mini vineyard. One day, while browsing a flea market in Napa, they came across a real oak wine barrel. Worn out, a bit cracked in places, but full of character! It was $35, and Jane literally grabbed it with both hands.
That’s how one of the most stylish and functional rainwater collection systems I’ve seen came to be. No plastic pipes, no clutter, no “technical” look. Just wood, brass, and a bit of cleverness.
How the system is built:
- They placed the barrel right by the back porch—right where the roof’s gutter drains.
- On top — a copper mesh filter to keep leaves out.
- Inside — a brass overflow fitting, hidden under the bottom band of the barrel. You wouldn’t see it unless you knew where to look.
- Excess water flows through a narrow pipe into a decorative gravel trench in the garden.
- The main spigot is installed on the side—about 12 inches (30 cm) off the ground, perfect for filling a watering can or bucket.
Why it works:
- The barrel fits perfectly into an aesthetic garden, especially in a cottagecore or rustic setting.
- Wood helps regulate temperature—the water doesn’t overheat in summer.
- The hidden overflow means no one’s tripping over plastic pipes.
A typical wine barrel holds about 60 gallons (227 liters). That’s enough to water a flower bed or microgreens for a whole week during dry weather.
3. Vertical rain chain catchers made from recycled metal
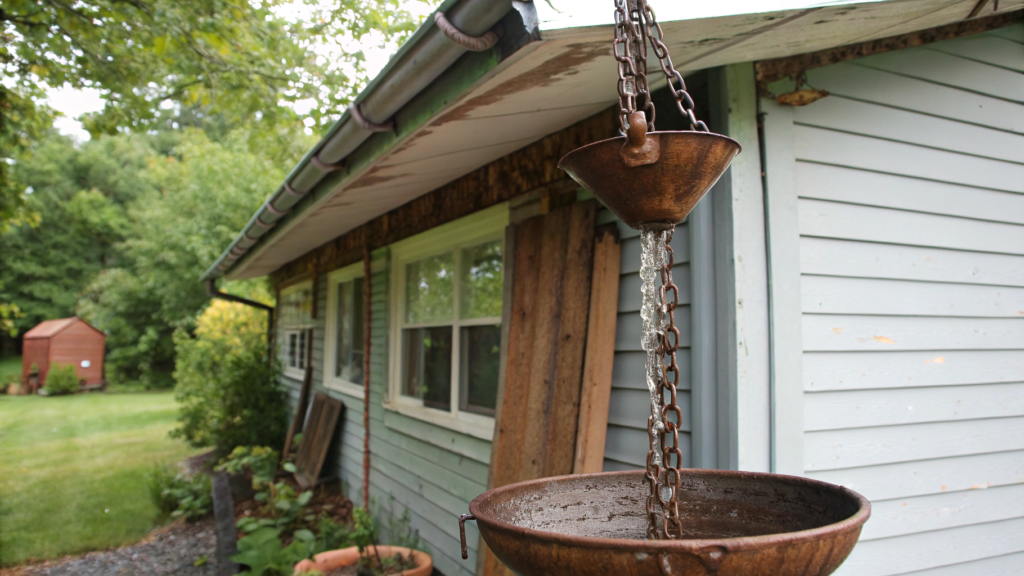
The first time we saw our neighbors Cindy and Mark’s yard, the first thing that caught our eye was the chain. Yep, just a regular-looking metal chain hanging from the roof instead of a typical downspout. That is—until it started to rain.
Water flowed down the chain like a water slide, trickling over each link, sparkling and gurgling as it went. And at the bottom—no plastic barrel, no concrete basin, but… a forged bowl welded by Mark from an old truck brake disc and scrap metal sheets. It looked like an art piece. But in reality, it was a fully functional rainwater catchment system.
What’s especially interesting—the bowl itself doesn’t act as the main container, but as a funnel. Water runs down the chain into the bowl, then flows through a hidden hose into a buried 30-gallon (roughly 113 liters) tank. It’s completely sunken under gravel and protected from heat and light. All the technical parts are hidden, and above ground—it’s all visual harmony.
To use the water, they either install a small submersible pump that pushes water up into a hose, drip system, or above-ground tank, or they simply draw water manually through a service hatch, like from a well. It all depends on volume, depth, and what the water’s for. The non-pump option only works with very shallow installation—most often they use compact 12V or solar-powered pumps.
How it’s made:
- The chain is attached to the gutter, just like a normal downspout. But without the pipe—water flows naturally down the chain.
- The chain is made from recycled aluminum from old garden structures, carefully polished and sealed.
- Below it—a receiving bowl with a mesh screen, connected to the underground 30-gallon tank (about 113 liters) via hose.
- The hose is hidden beneath the gravel—no visible “tech”, everything looks clean and intentional.
Why we liked it:
- Beautiful. It really changes how the house feels. You instantly think: someone with taste lives here.
- Functional. It’s not just decorative—the water is actually collected and reused.
- Fast evaporation—some of the water returns to the air, creating a small localized microclimate.
- Compact. Great for those with limited space or who don’t want bulky pipes all over the yard.
Cindy mentioned that after they set up this system, ferns started growing near the wall—it used to be dry and empty. Now there’s a whole green zone, just thanks to that gentle trickle of water.
4. Stone basin rain collectors built into landscaping
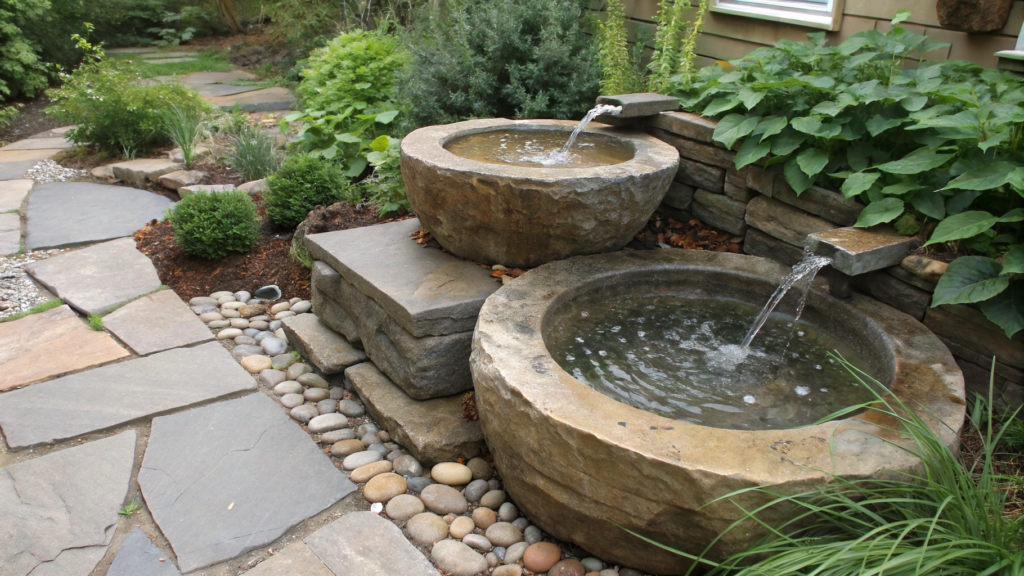
One summer we stopped by a small botanical garden on the way home—just to stretch our legs. And what caught your eye wasn’t the flowers, but the way the rainwater system was built. It was a real engineering solution disguised as part of the natural landscape.
The entire rainwater catchment system was integrated into the landscape using stone basins. Not the kind you buy at a garden center as a pre-made fountain. These were handmade—from flagstone, gravel, and broken slate.
How it’s built:
- Along the paths—there’s a barely noticeable slope (just a couple degrees) to guide water toward specific points.
- These points are stone basins, 20–30 inches (50–75 cm) in diameter, and 10–12 inches (25–30 cm) deep.
- Beneath the basins—a gravel layer and a perforated bucket/reservoir, connected to an underground pipe.
- Excess water is routed through a corrugated pipe into a holding tank—either plastic or concrete, hidden under the lawn or a garden bed.
What you end up seeing: a nice lawn with boulders and “natural” dips. But in fact—each basin can hold up to 10 gallons (38 liters) of water. During a downpour, that adds up.
Why this setup works:
- It doesn’t disrupt the look of the yard—it actually makes it look more refined.
- Safe for kids and pets—no exposed barrels, everything is low and flat.
- Blends perfectly with rain gardens and small beds of moisture-loving plants.
And yes—if these basins are properly placed and connected with piping, they don’t just collect water, they also relieve your yard’s drainage system. Fewer puddles, less sogginess, fewer problems.
Best placement spots:
- At the base of a slope or small hill. Even a 6–8 inch (15–20 cm) drop is enough to direct water.
- Along walkways or near the foundation—especially if water tends to drain there during heavy rain.
- Under a rain chain or downspout, if you want a natural-looking collection zone instead of a standard barrel.
- At the edge of the garden, if you want to use the rainwater for irrigation—you can route the overflow hose directly to your drip system.
Where not to place them:
- Right in the middle of a lawn. The grass will get soggy fast and you’ll either get a swamp or a mosquito party.
- In clay-heavy soil without drainage. Water won’t soak in, and you’ll end up with a standing puddle.
- In areas where kids or dogs run around. Even shallow basins can be a trip hazard.
Tip. If you’re unsure about the slope, just drop a ping pong ball on the ground—it’ll roll toward the low point. It’s a quick way to eyeball your yard’s natural flow.
The system looks simple, but it requires careful slope and drainage planning—this is more of a solution for someone ready to invest in a well-designed landscape.
5. Fence-embedded gutter system for discreet collection
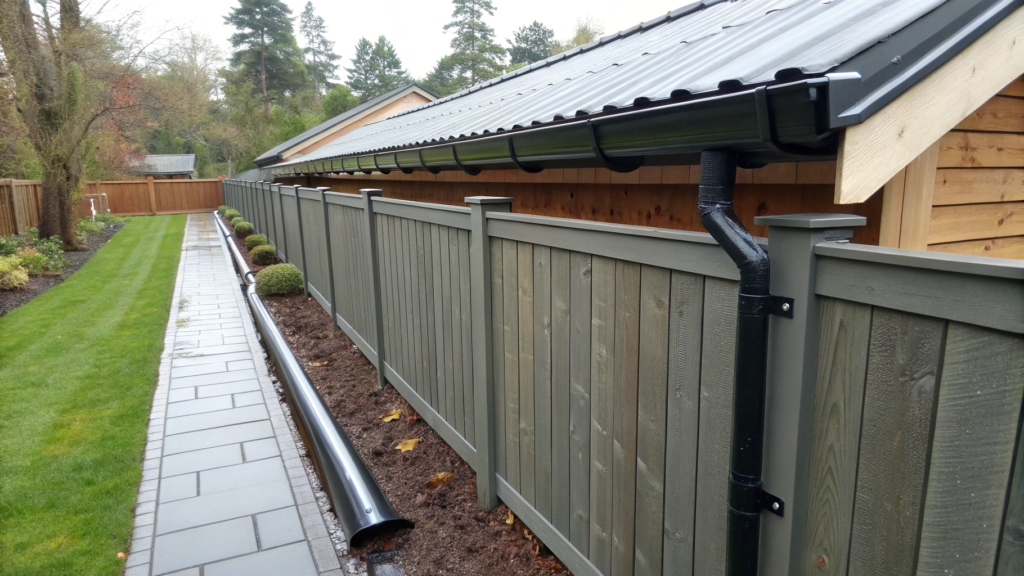
The idea behind this kind of fence is simple. If you build it with a slight inward slope, install a gutter along the top, and run a slim downspout on the side into the ground, you can collect rainwater just like from a roof. This is especially useful on properties without a large house or where the roof doesn’t provide enough water.
How it’s done:
- Along the top of the fence—a metal or plastic gutter, about 4 inches (10 cm) deep and 3–4 inches wide.
- Fence panels are tilted inward at a 5–10° angle, so water flows into the gutter.
- Water flows through a pipe into a reservoir hidden in a cabinet or under stairs—usually around 20–40 gallons (75–150 liters).
- The whole thing is disguised with decorative elements—wood, slats, or painted to match the fence’s look.
This kind of setup is typically used in narrow yards or densely built properties, where the roof is either inaccessible or impractical for collection.
Where this works well — and where it doesn’t:
Recommended:
- Along solid fences with a slope, especially if they already collect water on the inner side of the yard.
- On the south side of the property, where there’s less rain but every drop counts—a fence like this helps save even short bursts of rainfall.
- On small urban lots, where the roof area isn’t enough for collection, but there’s a long fence.
Not ideal for:
- Open or decorative fences with gaps—water won’t drain into the gutter, but will just fall randomly.
- If the fence borders a neighbor’s yard and the slope goes outward—you’ll just end up watering your neighbor.
- When using metal panels without anti-rust coating—rain and debris will cause corrosion and structural damage over time.
Important:
If you’re building a new fence, design it with the gutter in mind from the start. If it’s an old fence, make sure the top edge can support the weight of water and snow in winter.
6. Rainwater catchment disguised as a planter box
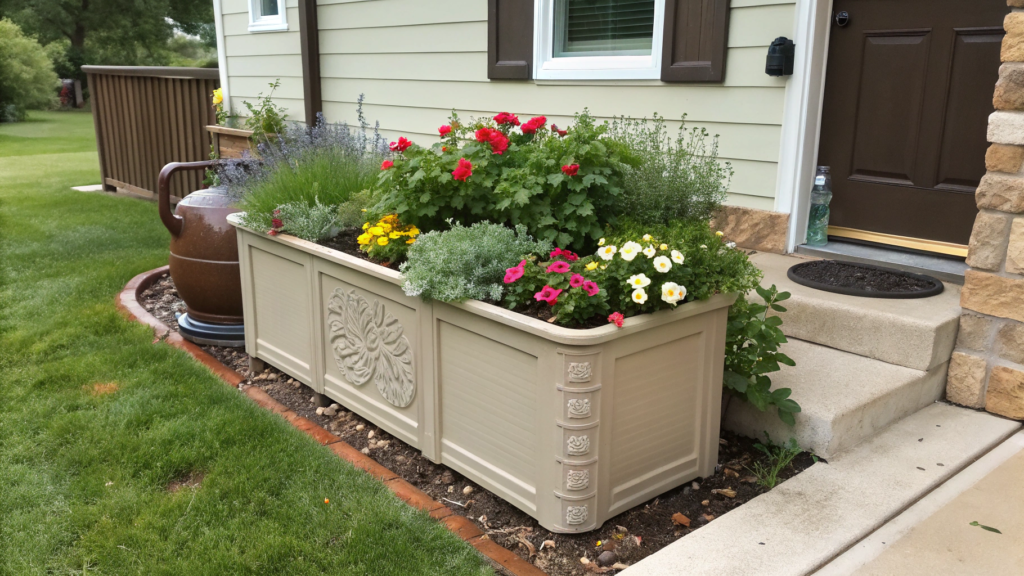
This idea is especially popular with people who want to collect water—but don’t want it to look like they’re collecting it. Or when a regular barrel just ruins the look of a neat front yard.
At some outdoor expos (like in Seattle and Austin), you’ll find this setup: from the outside, it’s a decorative flower planter. Inside? A full-fledged rainwater reservoir. Dual-purpose. And not a single passerby would suspect a thing.
How it works:
- Water flows down from the roof or canopy into a container disguised as a wooden planter box.
- Inside the container is a separation layer—a plastic grid or panel that keeps the soil from sinking into the water and helps with drainage.
- On top is a layer of drainage material, soil, and plants. No visible hoses or lids.
- Water collects in the bottom part of the box—usually around 20 to 40 gallons (75–150 liters).
- For irrigation, a spigot is installed on the side or a drain hose is connected to a drip system.
There are pre-made options for sale, but many people DIY these containers from wooden boards, plastic bins, old pallets, or even upcycled trash cans. The key is proper waterproofing inside and a way to access the overflow.
Where this works best — and where it won’t:
Suitable for:
- Near the front door or deck, where appearance matters most.
- Urban properties, where you need to balance looks with function.
- In front yard garden projects—when you want to collect water without making it look like a utility setup.
Not ideal for:
- Areas with constant direct sunlight—the water can overheat and start growing algae inside.
- If you want to collect large volumes—these setups are limited in capacity.
- Cold climates with hard winters, unless insulated—the water can freeze and damage the structure.
Tip. To avoid overheating, it’s better to use light-colored materials and plant leafy greens like calendula, basil, or mint on top. They create shade and pull moisture from the substrate.
7. Modular rain barrel setup using stackable containers

When you want to collect water from multiple sides of the roof but don’t want to install five huge bins that stick out like a sore thumb, modular container systems come to the rescue. Some of them can even be stacked vertically—like LEGO blocks, but filled with water.
How it works:
- The main container (usually 30–50 gallons) is placed under a downspout.
- Additional modules are connected nearby or stacked higher—linked via hoses using special adapters.
- All containers are connected into a single system, and water flows from one to another as they fill up.
- A spigot or drain hose is installed at the bottom to connect to an irrigation system.
- Some designs have a mesh divider or top filter to keep out leaves and debris.
Where to use modular systems
Suitable for:
- Yards with complex roof architecture, where water runs off from multiple angles and one tank can’t handle it.
- If you need to increase capacity over time—start with one barrel, then add a second, third, etc.
- When vertical space is limited—you can keep modules low and stretch them along a wall without stacking high.
Not ideal for:
- Properties on a steep slope—water won’t distribute evenly, and some barrels may stay empty.
- Densely built areas or very small yards, where every square foot matters.
- If you’re going for a decorative look—modular containers tend to look utilitarian and may need disguising.
Tip. For smooth operation, make sure all the barrels are on the same level, or the overflow won’t work properly. And definitely use a filter at the first entry point to keep hoses between barrels from clogging.
8. Pergola-based rain capture system with hanging storage tanks

There are some backyard setups you first notice just as part of the landscape. But look closer, and you’ll spot subtle gutters under the pergola roof, thin chains or pipes running down the corners, and tall narrow barrels tucked among grapevines or wisteria. Not bulky rain barrels—but slim, vertical tanks that look like outdoor water heaters or lawn sprayer canisters.
This is a rainwater harvesting pergola, perfect when you want to combine a chill-out zone with water collection—and your house roof just isn’t an option.
How it works:
- The pergola roof (made of polycarbonate, metal, or slate panels) catches the rain.
- Hidden gutters or drip edges run along the sides, channeling water downward.
- Water flows down chains or pipes into hanging vertical tanks—usually 10–20 gallons (38–75 liters) each.
- These tanks are mounted on brackets discreetly built into the frame. Sometimes they’re hidden with wood paneling or greenery.
- A hose or spigot at the bottom connects to a drip system or can fill a watering can directly.
A great fit for this setup WaterPrepared 35 Gallon Vertical Water Tank on Amazon
Great for:
- South-facing patios, where the pergola provides shade but still catches rain.
- Areas with no access to house gutters, but plenty of roof surface to collect water.
- When you want localized watering for plants around the pergola area.
Not ideal for:
- Open pergolas with no solid roof—no roof, no water to collect.
- Locations with high wind or storm activity—hanging tanks need solid anchoring.
- Some lightweight structures, like certain pergolas, can’t support the 100–200 lbs (45–90 kg) of water weight required for rainwater systems.
Tip. If you’re building a pergola from scratch, add support beams for tanks right from the start. Retrofitting later can be more expensive and tricky.
9. Wall-mounted rain tanks painted to match exterior design
At first glance, it looks like a simple clean house or shed wall. But take a closer look—and there it is: a flat, wall-mounted rain tank, perfectly color-matched to blend in. No bulky barrel, no yard space needed, no visual clutter.
These slim vertical tanks are installed directly onto a wall or fence. They’re just 10–14 inches (25–35 cm) deep but can hold up to 60–80 gallons (225–300 liters) of rainwater.
How the system works:
- A downspout connects to the top of the wall tank—usually with a filter or diverter.
- Water fills the tank evenly from top to bottom.
- At the base, there’s a spigot or hose connector, often with a built-in valve for drip irrigation.
- Reinforced brackets or bolts anchor the tank securely to the wall.
- The owner paints the tank surface to match the exterior or covers it with a decorative panel to ensure it blends in fully.
Where wall-mounted rain tanks work best:
Great for:
- Narrow side yards where there’s no room for big barrels or modular systems.
- When you want to harvest water from the roof without taking up valuable ground space.
- Designs where curb appeal matters, especially for visible areas like front yards.
Where they don’t work well:
Not ideal for:
- Older homes with fragile walls or stucco—a full tank adds serious weight.
- In cold climates, uninsulated tanks can freeze, which damages the entire system.
- Spaces without an overflow plan—these tanks still need a drain or backup pipe.
Tip. When installing a wall-mounted rain tank, leave a 1–2 inch gap between the tank and the wall. That small air space prevents moisture buildup and protects against mold.
10. DIY Rainwater Fountain Hybrid for Functional Decor

Sometimes, you just want to admire your rainwater system. That’s when so-called hybrid solutions come into play: structures that function as rainwater collection systems and simultaneously serve as decorative garden elements. The most common and striking option is a fountain-hybrid.
How It Works:
- Water from the roof or canopy flows through a gutter into a decorative bowl or reservoir hidden at the base of the fountain.
- Inside the bowl is a submersible pump with a filter. It pushes water upward, creating circulation (a stream, overflow, or waterfall).
- Rain fills the fountain with fresh water, and a sensor shuts off the pump when the level gets too high. A pipe then directs excess water to an underground tank or the garden.
Some people design the fountain to mimic a stream—with flat stones and “overflows” that operate only after rain. It’s impressive and doesn’t require constant electricity. If you want a continuously operating fountain, consider using a solar pump with a battery.
Works Well:
- In the central part of the garden if you want to create a decorative accent.
- In small areas where there’s no space for a traditional water collection system, but you still want to use some rainwater.
- In regions with mild climates where freezes are rare, and there’s no need to drain the system each season.
Not Recommended:
- Where leaves or debris from the roof heavily contaminate the water—even with a filter, the pump can fail quickly.
- If there’s no opportunity to service the pump or tank—you need to check at least once a month to ensure nothing is clogged.
- In places with constant shade and humidity—the bowl can become overgrown with algae, especially if the water stagnates.
Tip. When choosing a material for the bowl, avoid unsealed concrete—it quickly absorbs moisture and leaks. It’s better to use factory-made plastic forms with decorative finishes or stainless steel if you’re building from scratch.
What Did You Like Most?
You don’t have to implement everything at once. Maybe you have a narrow yard—then a wall-mounted tank would be perfect. Or perhaps you have flower beds by the fence? Consider a fence system with a gutter.
And if you want to see more options—don’t miss the continuation of this article, where we explore 10 more smart and unconventional systems. There are some very unexpected ideas that really work.Choose one or two solutions—and test them in practice. Share in the comments what worked for you and what didn’t.