
You’d think a small yard means small potential — but not in 2025. Thousands of people around the world are rethinking what a backyard pool can be and coming up with insanely stylish, thoughtful, and affordable setups even on the tiniest plots.
These days, you don’t need acres of land or a six-figure budget for a pool. What you need is a feel for aesthetic, zoning, and the way you actually want to relax — whether it’s a quick swim after work, a glass of wine by the water, or just dipping your toes on a hot day.
We’ve gathered 20 stunning small yard pool ideas that don’t just inspire — they actually work. Every one of them is proven, beautiful, and easy to adapt to your lifestyle — whether you’re into minimalism, weekend parties, or chill family hangouts.
1. LED Perimeter Lighting: A Striking Visual Upgrade Inground Pool

The first time we saw a pool with LED perimeter lighting, we just stood there in silence. It looked like it was glowing from the inside. And trust me—no patio light setup can match the vibe of a soft glowing strip right along the waterline.
This isn’t just about aesthetics. It’s functional, too:
Safety. You can clearly see where the edge ends and the water begins—even at night.
Ambience. Color-changing lights set a whole mood. Guests are amazed, and you honestly forget this is just your backyard.
Zoning. If your pool has a more complex shape or includes shallow lounging areas, lighting helps visually break things up.
Types of LED Lighting That Actually Work
In real life, you’ll come across three main options:
- Waterproof LED strips – Easy to install, run on 12V, and create a seamless continuous light line.
- Recessed spot lighting – Super sleek, but needs to be built-in during pool construction or drilled in during remodeling.
- Solar cap lights – Quick to install, but not as bright or long-lasting as wired options.
There’s nothing like sitting in a chair with a cup of tea (or maybe a glass of wine?) next to a pool that’s glowing with soft turquoise light. That’s why we chose RGB strip lights with IP68 waterproof protection and remote control.
How to Install LED Perimeter Lighting Around an Inground Pool
You don’t need to be an electrician for this—it’s more doable than it sounds. Here’s how we did it:
- Plan the layout. Walk the perimeter and mark out where the lighting will go. Consider steps, curves, corners.
- Prep the surface. If it’s tile or concrete, you can attach the strip directly—just use outdoor adhesive or mounting clips.
- Lay down the strip. Best placement is just under the pool coping lip so it’s invisible during the day.
- Hide the wires. Always! Use sealed cable channels and fasten them to the base of the coping.
- Connect the transformer. Most outdoor strips run on 12V—you’ll need a compatible adapter (often comes with the kit).
- Test and set your scenes. Use a remote or mobile app to pick your colors or light modes.
Pro tip. If you’re building a pool from scratch, plan for the wiring and conduit routes ahead of time! Saves a ton of hassle later.
Don’t Skip the Safety Side
Light and water = handle with care. Even if the system runs on 12V, it has to be installed correctly:
- Use only waterproof-rated components—look for IP67 or IP68.
- Keep all connectors and adapters inside sealed, weatherproof housings—away from direct water exposure.
- Install a dedicated GFCI (ground fault circuit interrupter) circuit—that’s the outlet with the little reset button, and yes, it’s required for pools.
- No extension cords running across the yard “just for now.” Seriously. Don’t.
And yep—Pinterest is full of these glowing pool edges right now. It’s one of those cases where looks and safety go hand in hand. Clean, simple, effective—and undeniably cool.
2. Rectangular Minimalist Design: Clean Lines and Modern Appeal

You know which pool shape comes to mind first? Of course, the classic rectangle. Clean edges, zero clutter, and that sense of architectural completeness.
It’s the style that’s been trending for more than just one season—and for good reason.
We looked at lots of shapes—curves, ovals, even teardrop designs. But we came back to the classic. And here’s why.
Why go with a rectangle?
Easier to build. Totally. Especially if you’re doing a concrete shell or using modular kits—everything is straight, no tricky curves or extra reinforcement needed.
Modern visual appeal. It looks clean, fresh, and not remotely “country-style”. Even next to lawn or gravel, it reads like a design element—not just “a hole with water”.
Perfect for narrow yards. For example, we have a pool that’s 24 feet long (7.3 m) and 10 feet wide (3 m)—and it fits snugly along the side of the yard without eating up space.
What a true minimalist inground pool actually looks like
Here are the signature features you’ll spot in just about every one of these Pinterest-worthy designs:
- Simple geometry. Usually 90° angles, with a 2:1 or 3:1 length-to-width ratio.
- Neutral tones. Grey concrete, warm white, graphite, raw wood with no shine.
- Minimal décor. No palm trees, fountains, or fiberglass mermaids. Just you, water, and the sunset.
- Tile or mosaic interior—but only in solid tones or subtle gradients.
And yes, these are the pools that make for those perfect reflection shots at golden hour. Especially when that perimeter lighting from earlier kicks in.
How to create this look in your own yard
If you’re ready to build or remodel, here’s your quick planning roadmap:
- Pick your size. For a small yard, ideal sizes are 10×20 ft (3×6 m) or 12×24 ft (3.6×7.3 m). Big enough to swim, chill, and not overpower the space.
- Choose the shell type. Concrete is universal but pricey. Modular kits or vinyl liners save on cost and speed.
- Design the coping. For that minimalist look, go with concrete pavers or heat-treated teak decking.
- Ditch the “lip” coping. That curved edge screams 90s. Flat edges flush with the patio always look more modern.
- Keep stairs low-key. No rails or bulky steps. Just clean built-in ledges that blend in.
What to plan for ahead of time
- Drainage. Minimalist means minimal slope—so a good water runoff system is a must.
- Concealed plumbing. Ask your contractor to tuck drains under tile and make overflow slots “invisible”.
- Color choice. Never underestimate how tile color affects the vibe. We almost went with bright blue… then switched to soft graphite. The pool instantly looked like a calm natural pond with tree reflections.
Minimalism isn’t “empty.” It’s intentional. When we first finished the pool, it looked… too plain. Then our first guest walked in and said: “Whoa, this looks like something out of a hotel in Palm Springs!”
That’s when it clicked. This style gives you a vibe that feels expensive and intentional—even though, in reality, it’s just a rectangle, clean water, and some wood around it. Nothing more. Nothing less.
3. Hidden Features That Elevate Function and Style
Ever looked at someone’s inground pool and thought, “I can’t figure out why it looks so good… but something about it just works”?
Most likely, it’s those subtle, smart features that don’t scream for attention—but completely change how the pool feels.
We didn’t think about these things at first either. We just wanted “a pool, period.” But then came the lighting, the cover, the automation… and now I can’t imagine our yard without these small upgrades.
What are “hidden” features?
They’re not invisible, literally—but they don’t mess with the aesthetic, don’t stick out, and don’t draw attention. They just work quietly in the background. And they make your daily pool experience smoother, simpler, and more polished.
Here are some features worth considering:
1. Automatic cover (no more cranking by hand!)
We added a remote-controlled roll-up pool cover, tucked right into the pool coping. It closes up the water when we’re not around (great for heat retention and water loss), and adds a layer of safety—especially if you’ve got kids or pets.
2. Hidden overflows and drains
These are what give the pool that sleek mirror-edge effect. Instead of a visible gutter, water flows through a narrow slit between the tile and the coping.
Looks clean, modern, and even helps keep surface debris in check.
3. Built-in seats and ledges (that look like part of the design)
Total must-have. Visually? Just a step or shelf. But in practice—you can sit with a drink without leaving the water. Especially awesome when the shallow shelf gradually transitions into the deep end.
4. Invisible heating systems
Traditional heaters are bulky, loud, and usually shoved against the wall. But now you can hide the heating system under a deck and use solar panels or hybrids.
For example, SunHeater S240U solar panels hook directly into the filtration system and raise water temps by up to +10°F (5–6°C) on sunny days—barely visible, super efficient.
5. Underwater lighting that doesn’t look like a holiday garland
Remember those LED strips we talked about earlier?
Well, this one’s cooler—recessed RGB lighting built right into the pool floor or steps. Almost invisible during the day, but at night it gives that amazing glowing-water effect. Especially with color transitions.
How to Add These Hidden Features to Your Inground Pool
You don’t need to rebuild the whole thing. Many of these options can be added to an existing setup. Here’s how to approach it:
- Work backwards from the experience. Don’t ask, “What can I afford?” Ask, “What do I want to feel?” Want warmth at night? Add heat. Need a cleaner look? Hide the drains.
- Hire someone who knows how to hide things—not just install them. Hiding plumbing is an art form.
- Stick to the style. Don’t bolt on something that clashes visually. Even the control panels and sensors should feel like part of the design.
These upgrades aren’t about impressing your guests with a “wow.” They’re about making your daily life easier and smoother. That’s the point of smart outdoor design.
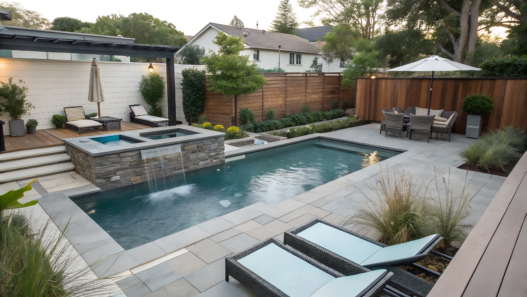
4. Stone Trim Borders: Natural Materials Meet Architecture

A concrete pool is like a blank wall. Functional. Clean. But everything changes once you bring in stone. And no, it doesn’t have to be fancy like marble.
Natural slate, sandstone, travertine—or even rough-cut river rock—can look way more interesting than standard pool tile.
Stone is one of those materials that doesn’t age—it evolves. It blends effortlessly with water, wood, fire, and even plain old grass.
The pros we’ve seen firsthand:
Slip-resistant. Even when wet, stone like travertine grips well—super important if you’ve got kids.
Heat-resistant. Some stone types barely heat up under the sun. Trust me, you’ll appreciate that when it’s July and your feet aren’t on fire.
Natural vibe. Pools with stone borders look like they’ve always been there—especially when paired with plants or trees.
Long-lasting. Stone holds up for decades. It doesn’t fade, warp, or crack like cheaper materials.
Most popular types of stone for inground pool edging in 2025
- Travertine – warm-toned, textured, ideal for hot climates
- Sandstone – light-colored, slightly rough, soft to the touch
- Slate – deep dark tones, great for bold, modern layouts
- Granite – ultra-tough and beautiful, a bit more expensive
- Quartzite – textured and shiny, looks premium but often priced like tile
We picked light travertine with soft edge cuts. Why? We wanted the coping to feel rounded and natural, not sharp like a kitchen counter. And the results went beyond expectations:
- Warm underfoot in the sun—never too hot
- Water glides over it rather than splashing off
- Looks even better when it rains—seriously, wet stone is gorgeous
How to Use Stone Around Your Inground Pool: Quick Tips
- Skip the “faux stone” tile. If you want a natural look, go with the real thing. It’s not always pricier, and the effect is in a whole different league.
- Shape the edges. Rounded cuts or broken-edge styles always look more organic than clean square slabs.
- Mix it up. Stone pairs well with other materials like wood or poured concrete. For example: stone coping + wooden deck? Gorgeous.
- Don’t over-perfect it. Slightly uneven edges make the pool feel “handmade” and natural—especially if you’re working with an organic shape.
Sometimes, you just have to let nature be part of your design. Stone isn’t a trend or a finish. It’s a material that connects earth, water, and sky. It enhances everything you’ve built—without trying to steal the show.
After we did the stone border, the pool stopped being just a place to swim. It became a gathering spot—even when nobody’s swimming.
5. Glass-Walled Pools: Seamless Views and Open Feel

If you’ve ever seen a pool with a clear wall, you know exactly what we’re talking about. It doesn’t look like a pool—it looks like an architectural art piece.
A glass or acrylic wall creates that boundary-free effect—like the water is just suspended in the air. This design trick is especially popular in modern backyard layouts and terraces, and it’s picking up steam fast.
Why it’s not just for show
Sure, a transparent wall looks cool. But there are legit benefits, too:
Openness. Especially if your yard slopes or has a view, the water becomes part of the landscape.
Safety. With one fully see-through side, you can easily watch what’s happening in the pool—even from outside.
Unique visual appeal. This doesn’t look like your standard American tile-lined pool. It’s an architectural statement.
Materials commonly used
Important note: the word “glass” is usually just shorthand. These walls are often made from clear acrylic or tempered safety glass—sometimes both.
| Material | Advantages | Drawbacks |
| Acrylic | Lighter, cheaper, flexible in shape | Can scratch or cloud over time |
| Tempered glass | Crystal clear, UV-resistant | Heavier, more expensive, pro install required |
| Fiberglass with clear inserts | Budget-friendly | Less visually striking |
Where and how to implement it
- One side wall — usually on the shallow end or Baja shelf area
- Partial window insert — about 4–6 ft wide and 2–3 ft tall (1.2–1.8 m × 60–90 cm)
- Above-ground pools with a clear side panel, built into a deck or slope
- Mini pools and spas — perfect for small yards to create depth and that wow factor
Key installation and maintenance notes
- Perfect geometry required. Surfaces have to be precisely aligned with no stress points—especially with glass.
- Waterproofing is crucial. Use sealants made specifically for glass panels that can handle long-term water exposure.
- Cleaning. Acrylic needs soft cloths and gentle cleaners—no abrasives. But it looks like a boutique display case when polished up right.
A glass inground pool wall makes the water part of the design—even if you’re standing outside it.
And at night, when the underwater lighting kicks on, it becomes a living sculpture. This isn’t for everyone—but if you’re after something truly unique, this is next-level backyard design.
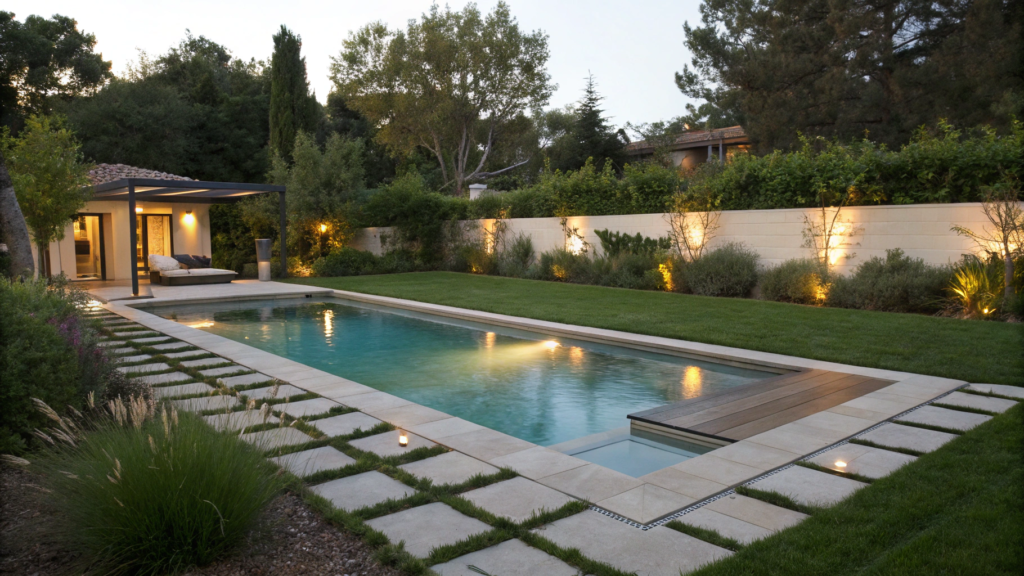
6. Resort-Style Layouts for Compact Spaces

So, if you think you need an acre of land and a team of landscape architects to get that resort feel—you really don’t.
Resort-style is not about size. It’s about the feeling you get when you step outside. It’s about relaxation, calm, privacy, and comfort.
Key elements of a resort-style layout:
1. Pool fits the layout—not stuck in the middle
Instead of placing the pool dead center in your yard, shift it to the side. This opens up space for a patio or chill zone. Even a 10×20 ft (3×6 m) pool can become the crown jewel if the layout is smart.
2. Shallow lounge shelf built right into the pool
One of the most popular upgrades right now is the Baja shelf. Add in-water loungers and you’ve got a mini spa zone.
Check out the Ledge Lounger shallow shelf chair — it’s built for 9–12 inches (23–30 cm) of water, sun and salt-resistant, and seriously good-looking.
3. Plants placed close to the action—not just along the fence
In resort design, greenery isn’t just for show. It creates intimacy and softness. Add tall pots or container trees near the inground pool border to carve out cozy corners.
4. Wood and lighting = atmosphere
Pair warm wooden decking with low, soft lighting along the water’s edge. Even a narrow wood path running beside the pool creates that tropical vibe, especially with warm, downward-facing lights.
5. The lounge zone isn’t next to the pool—it’s part of it
The idea is to make the level of the terrace and the pool edge the same, visually combining them into a single whole. If you place a chair or sun lounger close to the water, the resort effect is greatly enhanced.
Backyard layout ideas for small spaces
| Yard Size | Layout Possibility |
| 15×20 ft (4.5×6 m) | Small rectangle pool + platform with 2 loungers |
| 20×30 ft (6×9 m) | Pool with Baja shelf, patio + vertical garden |
| 30×40 ft (9×12 m) | Compact lap pool, dining area, umbrella, planters |
Mistakes that kill the vibe
- Chain-link or plastic fencing. Resort style = privacy. Opt for hedges, bamboo panels, or heavy outdoor curtains.
- Plastic folding chairs. Even one out-of-place chair can ruin the aesthetic. Stick to furniture made with fabric, wood, or rattan.
- Exposed pumps and filters. All the tech stuff? Hide it behind panels, greenery, or built-in enclosures.
A resort-style pool isn’t just about the water and a few chairs. It’s about stepping outside and instantly feeling like you’re on vacation, even if you spent the whole day covered in soil or glued to your laptop.
And the best part? This feeling is totally achievable in any space—as long as you get the layout and vibe right.
7. Baja Shelf Pools: Built-In Shallow Lounge Areas
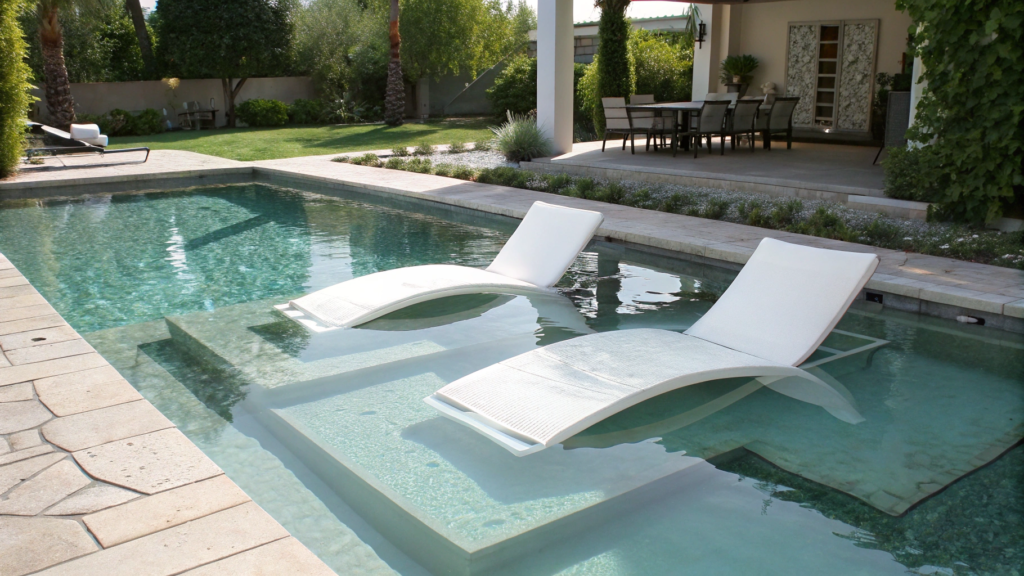
If you’ve ever seen an inground pool photo with two white loungers half-submerged in water — this is it. The Baja shelf is a shallow, built-in ledge (usually 6–12 inches or 15–30 cm deep) where you can lay back, sit, or chill without fully getting in.
Think of it as a beach zone — but with no sand. And no people around.
Why it’s a game-changer
In-water lounging. You’re in the water, but not swimming. Just cooling your feet, reading a book. It’s the introvert’s dream zone.
Perfect for kids. It’s a safe space for little ones to play while you relax at the edge and keep an eye on things.
Easy access for seniors. No need for stairs or deep water entry — just walk in and settle on the shelf.
Sunset and drink zone. Yep, many people add a built-in table or cup holder on the shelf to enjoy an evening drink right in the water.
How a Baja shelf is built
- Usually placed at the shallow end of the pool, opposite the deep side
- Built during pool construction (for concrete designs) or added in modular pools
- Can include umbrella sleeves, lighting, bubblers, or just stay sleek and minimalist
- Ideal depth: 9–12 inches (23–30 cm) of water over the platform
Can you add a Baja shelf to an existing pool?
You’ve got options:
- Floating loungers — not quite the same, but close
- Built-up corner platform — add one using fiberglass or concrete blocks
- Partial reconstruction — if you’re doing a reno, raise part of the pool floor
Planning from scratch? Just include it in the design. It only takes up 3–5 ft (90–150 cm) of length and can be straight or corner-style.
Handy tips for Baja shelf success
- Use non-slip tiles or textured mosaic — wet surfaces must stay safe
- Add an umbrella mount — built-in holes let you secure shade right on the shelf
- Underwater lighting on the shelf is a total vibe. Especially at night when it glows under the loungers
Why the Baja shelf isn’t just a luxury add-on
It’s where style meets usability. It brings zoning, personality, and lifestyle into your pool. You can sip morning coffee, watch the kids, or take killer photos — all without stepping out of the water.
If you want your pool to be more than a “place to swim,” the Baja shelf is how you make it a place to live.
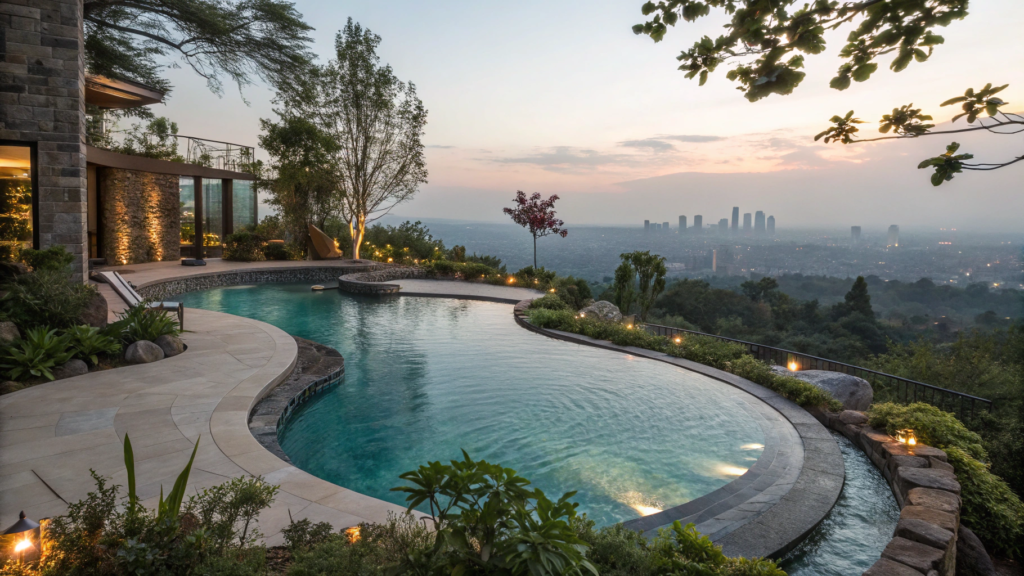
8. Zero-Edge (Infinity) Pools in Backyard Settings
When you hear “infinity pool,” your mind probably goes straight to cliffside villas, coconut smoothies, and slo-mo TikToks. But here’s the truth: zero-edge pools are just a clever design trick. Water spills over one or more edges into a hidden catch basin, creating that endless horizon effect.
And the view behind it? That’s entirely up to you.
Why the infinity effect still works in regular backyards
- Adds a sense of spatial depth, even in flat yards
- Visually expands your space, especially with evening lighting
- Hides the waterline, which makes the pool look ultra-clean and modern
How the system works
Water constantly spills over the edge into a hidden reservoir, then gets pumped back into the main inground pool. Here’s what it needs:
- A slight slope toward the overflow edge
- A catch basin (usually underground or at the side)
- A recirculating pump
Most setups only use one overflow edge to save cost while keeping the visual impact. This side can face your lawn, garden slope, or even be framed with plants or a stone wall.
Ways to use it in a home pool
1. Mini infinity (1 edge)
Most budget-friendly option. Great when the overflow looks out toward greenery or a seating area.
2. Half-infinity (2 edges)
Perfect for corner lots or sloped yards. Creates that “surrounded by water” illusion.
3. Infinity and glass wall
Combine this with the glass-walled pool setup and you’ve got a full-on visual showstopper. Especially impactful in narrow yards.
Downsides and what to know ahead of time
- More expensive than standard systems — overflow edges mean more water and more complex hydraulics
- Higher maintenance — debris lands right in the overflow gutter
- Requires pro installation — angles, slope, and pump strength need to be spot-on. No room for DIY errors
The upsides that make it worth it
Glass-like stillness. The surface stays calm, even with wind. Looks like liquid mirror.
Total vibe shift. Doesn’t feel like a “home pool.” Feels like a resort.
Evening showstopper. Infinity edge + lighting + simple wood deck = a spot you’ll never want to leave.
Infinity pools used to scream “luxury.” Now, they’re just smart design. Even a small pool can get the look with one well-placed edge. You don’t need a cliff, an ocean view, or palm trees—just a clean line, a little engineering, and the will to make your backyard next-level.
9. Curved Inground Pool Shapes for Softer, Organic Aesthetics
When a pool mimics the shape of a pond, lake, or stream — it doesn’t just fit into the landscape. It becomes part of it.
This style is especially loved by anyone who’s not into sharp, boxy urban looks and prefers a more relaxed, nature-inspired vibe.
Organic shapes create flow, balance, and that peaceful “ahhh” feeling.
Why curved pools feel so special
- No repeats. Every curved pool is one-of-a-kind. No “standard layout #3” vibes.
- Easy on the eyes. Without sharp corners, your gaze flows across the space instead of bumping into hard angles.
- Blends with plants and terrain. Palms, lavender, boulders, even a rock garden — everything looks naturally placed.
- Perfect for irregular lots. Got a slope, trees, or natural rock features? You don’t force the land to fit the pool — you shape the pool around the land.
Popular shapes and what makes them work
| Shape | Description |
| Freeform | No symmetry, soft curves, looks like a natural pond |
| Kidney-shape | A gentle bend, easy to zone: one side for chill, one for swimming |
| Figure-8 | Unique but balanced — naturally gives you two depth areas |
| Lagoon-style | Usually includes bridges, boulders, and even waterfalls. Full-on jungle resort energy |
A few things to know before going curved
- Design is more complex. You’ll need a pro architect or pool builder to avoid ending up with a wonky half-circle.
- Tiling can be trickier. You’ll likely need mosaic or custom cuts — but the result is stunning.
- Zoning happens naturally. Curved inground pools make it easy to create separate areas for kids, lounging, and deeper swimming — all without harsh dividers.
Design tips to boost the look
- Mix your finishes. Try mosaic for the pool interior, natural stone for the edge, with flowerbeds or pebbles around.
- Play with levels. A lounging deck just above the pool or separated by a small step adds visual depth.
- Add contour lighting. Soft lighting tracing the curve makes the whole scene glow at dusk.
- Skip the harsh lines. Keep everything around the pool — furniture, deck, even garden beds — soft and rounded.
Curved shapes make you feel calm. And that’s not just aesthetic — it’s science-backed.
A study from the University of Alberta showed that curved architectural lines lower anxiety and are perceived as more “friendly” than sharp edges.
So a curved inground pool isn’t just design — it’s about creating a space where your whole body says, stay a little longer.
10. Before & After: A Total Inground Pool Remodel

There’s something magical about seeing an old, tired concrete shell turn into a weekend dream space.
And truth is — a pool remodel doesn’t always mean ripping everything out and starting fresh.
More often, it’s about rethinking the space.
The typical “before”: a tired pool, harsh tile, chlorine smell
What most “outdated” pools have in common:
- Faded plaster or chipped lining
- Edge tile installed back in 2003
- Rusty rails and yellowed skimmers
- No lounging zones, no umbrellas
- Patchy lawn, maybe a fence
- Basically — nothing wrong, but a lot of room for better
And that’s the point — every detail can be upgraded.
What a remodel usually includes
- Tweaked inground pool shape (sometimes a full change, or just adding a Baja shelf)
- Finish upgrade: old tile → mosaic or quartz, dull gray → warm travertine
- Lighting makeover — built-in LEDs, underwater glow, or perimeter strips
- More zones: in-pool loungers, benches, steps, shelf seats
- Hidden filtration — quieter skimmers, cleaner lines
- Texture layering: container plants, wood panels, pergola shade
- Fence refresh: from vinyl pickets to hedges or textured walls
A real-life glow-up
| Before | After |
| 10×20 ft concrete pool, no finish | Same size pool, but with rounded corner, built-in shelf, light mosaic, and LED lighting |
| Plain fencing | Bamboo panel with planter wall and vertical greenery |
| No furniture | 2 loungers on shelf, small drink table, poolside umbrella |
| One wall-mounted spotlight | Perimeter LED + underwater lights |
Tips if you’re planning your own pool redo
- Make a 3D plan first. Even tablet apps can do this now. It helps visualize and avoid chaos.
- Do it in stages. If your budget’s tight, start with the structure and finish — add furniture or lighting later.
- Don’t toss everything. A smart refresh of an old shape often beats starting over with a generic design.
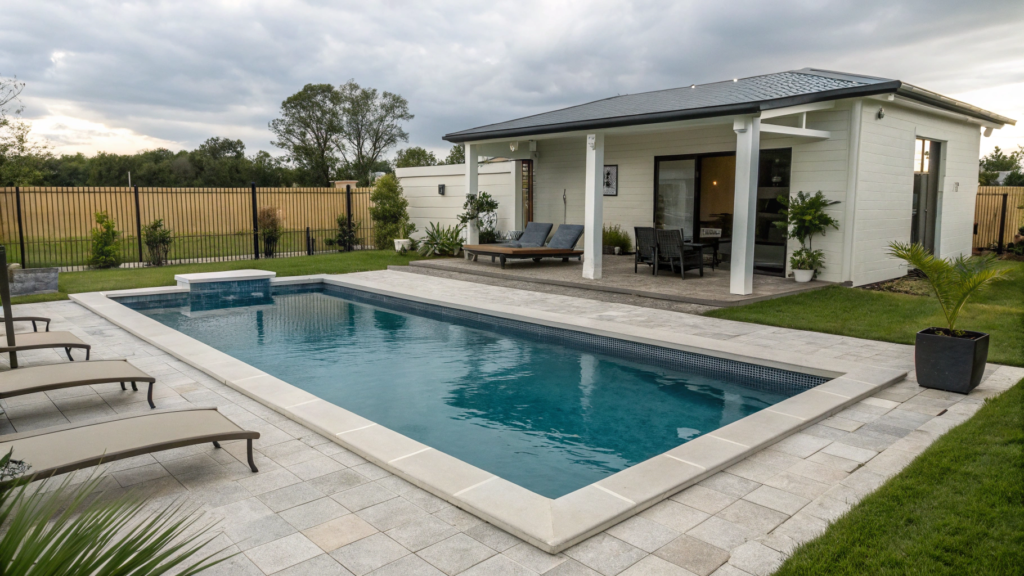
11. 12×24 Inground Pool: Compact Yet Functional

When your lot is small, every square foot counts.
And yeah, your first thought is probably: “Where would I even fit a pool when I barely have space for my raised beds?”
But a couple years ago, when we helped some friends design their micro-yard in Boise, everything shifted.
Their lot was even smaller than ours — and now their pool is the heart of the whole space.
So why 12×24?
That size is kind of the sweet spot. Long enough to swim a few strokes (especially if you’re a little frog like me!) — but still compact enough that it doesn’t swallow the whole yard.
And when you use some of the design ideas I’ll share in a sec, the space even feels bigger.
Plus, this size is perfect for:
- small family hangouts (fits 6–8 people comfortably)
- adding a built-in bench along one side
- installing an automatic pool cover (so you’re not skimming leaves every night)
- adding a compact waterfall or fountain at one end
A strictly rectangular shape is recommended for a backyard pool of this size. Why?
- It’s easier (and cheaper!) to build
- Makes it possible to use automatic covers without tricky cutouts
- Visually elongates your yard — especially if you lay tile or decking along the long side
BTW, check out this awesome floating wood pool deck platform (4×4 ft) — you can place it on one end of the pool. Kids love it, and so do adults.
A few things to think about ahead of time:
Depth.
If you just want to relax or splash around with kids, aim for 3.5–4 feet deep (about 1–1.2 meters).
But if you’re dreaming of cannonballs, that’s a whole different situation — and different safety standards.
Lighting.
Don’t skip on LED lights! They’re energy-efficient and they make a small pool look way more high-end at night. We even use them in our little decorative pond.
Heating.
For a small volume of water, a solar heater or portable electric heater works great.
Super easy to hook up — like, plug-in-coffee-maker easy.
Pool finish options for a 12×24 build:
- Mosaic tile (glass or ceramic) — deep color, glossy look, long-lasting, but pricier to install
- Exposed aggregate plaster — looks like a riverbed, less slippery, hides grime well
- Vinyl liner — budget-friendly, easy to install, changeable designs, but lasts 7–10 years
Pro tip. For small pools, go with light and cool-toned finishes — they make the space feel bigger and the water look clearer.
Now you can see that a 12×24 pool can absolutely work as a functional feature in a small yard.
I’ve got a whole folder of examples like this saved on my phone. And yep, I scrolled through them all at 1am instead of sleeping — just like you’re probably doing right now.
12. Space-Saving Design That Maximize Every Foot

When you’ve got a small yard, there’s no room for wasted space. Even one poorly placed path can ruin the flow of everything. And a pool? It’s not just “drop it in and swim.” It becomes the centerpiece — and every inch around it has to work.
So. In this part, I’ve put together real techniques that we (and our fellow micro-design geeks) use to make even the tiniest pool pull full weight.
1.Built-in ledges – a spot to sit
Why bother with lounge chairs when you can sit right on the pool edge?
A wide coping (at least 16 inches) along one long side gives you a built-in bench.
You can use wood, lay it with tile, or even add soft waterproof cushions with Sunbrella covers and ties so they don’t fly away in the wind.
2. Multi-functional corners
Every corner of the backyard pool can “do something.” What does that mean? For example:
- one corner – steps and a built-in fountain
- another – underwater bench and a small drink table
- third – a narrow grotto with lighting and plants
- fourth – a transition to a shower or a small shaded spot
A small pool needs to serve multiple purposes. That’s the only way it becomes the heart of the yard, and not just a wet patch.
3. Vertical planting instead of wide garden beds
If there’s not much room — go vertical. Right along the long side of the backyard pool, you can place:
- a vertical wall with mint and basil (smells amazing and mosquitoes hate it)
- a pergola with grapes or pole beans
- even a wall-mounted mini garden, like we built last year (I used wood boards and 5 balcony planters from Amazon — turned out cool and cheap)
4. Deck platform instead of tile around the pool
One of the smartest moves we ever made — instead of pouring concrete, we laid a raised deck platform. Why?
- it keeps the space visually light and clean
- you can hide utilities underneath or even a mini heater
- you can build the decking flush with the coping, making it look like one clean surface
5. Furniture you can slide away or hang
Fixed furniture is the enemy of micro yards. Use:
- hanging chairs on chains (if you have a place to attach them)
- foldable lounge chairs you can hang on hooks on the fence
- rolling carts for drinks, towels, toys — easy to roll out of the way
And yes, plan down to the inch
When we were working on the space around our 11.5×20 ft pool, I used painter’s tape and a measuring tape to mark out:
- walkways
- where people would sit
- how the umbrella opens
- where the fountain sprays water
Nothing brings you back to earth like realizing that once you open your folding chair, the walkway left is just 11 inches wide. That’s one awkward step — and you’re in the backyard pool.
It’s these tiny things that make the pool truly feel like it’s yours. Not the size — but how you made every inch work.
13. Built-In Seating and Fire Features for Multi-Use Backyard Pool

In a small yard, every element has to do more than just look nice — it has to work. And built-in seating with fire features is one of those cases where your pool becomes a multi-use zone, not just a puddle to cool off in.
Built-in bench right in the water — actually super practical
If you’ve never sat in shoulder-deep water with a glass of iced tea — you’re missing out.
A built-in bench is a ledge inside the pool shell, about 16–18 inches (40–45 cm) below the surface. Basically, you just sit in the water — and boom, you’re in spa mode.
The bench usually runs along one wall, sometimes wraps around a corner or goes L-shaped (perfect for mini pools!)
Important! This is poured during the pool’s construction. It’s not furniture or tile — it’s part of the actual structure.
You can sit here for hours without getting tired, kids and older folks feel safer, no need to drag furniture in or deal with wet cushions. Looks neat too, especially if tiled or finished in matching mosaic.
Tip. For added comfort, throw in a floating drink table with cupholders. It won’t sink and fits these spots perfectly.
Add fire — and your pool becomes a cozy zone at night
Now, about fire. And yes, this is totally doable, even in a small space. But it’s key to know the types and how to install them.
1. Fire bowl
The simplest and most popular option — a tabletop fire bowl that runs on biofuel.
Place it by the pool edge, it uses liquid bioethanol, no need for gas lines or ventilation.
It gives you real flame with zero gas, pipes, smoke, or smell. No permanent install needed.
Advantages:
- Safer than gas: no pressure, no leak risk
- Easy to extinguish — just cover with the lid
- Works even in rentals — nothing is built in
- Perfect for small yards and budget builds
2. Built-in gas fire pit insert
This is a stationary setup that must be planned during pool construction.
It’s a low stone feature built near (not in) the pool, with a gas burner insert.
Decorative fireproof stones or glass go on top, gas (propane or natural) feeds from below.
Important:
- Built near the edge for flame reflections in water
- Height: about 16–18 inches, like a bench
- Must be vented and heatproof
Professionals only — DIY gas pits are fire and injury risks
All of this is built during the construction phase
Let’s be clear: the bench, fire pit, even light channels — they’re poured when the pool is. Later on, you can’t “add a bench” or “embed fire in the coping.” It’s all monolithic.
So:
- Work with a landscape designer or architect if you’re unsure
- Talk to the pool builders — they often have templates for these add-ons
- Plan electrical, gas, and airflow ahead of time if you want fire or lights
Sure, some people DIY all this. But if you’re not a gas specialist — get help. Better to do it right once — and actually relax.
14. Transformation: Tiny Yards Turned into Backyard Pool Paradises

Turns out even a neglected backyard can become a tiny slice of paradise.
I’m talking about real micro-yard makeovers — step by step transformations into cozy, water-filled corners.
Step 1. Clear the space and define “anchor zones”
The first thing we did (and recommend to everyone): mark out your anchor zone for the pool.
Usually, that’s:
- the flattest corner of the yard
- the spot with the most direct sunlight
- ideally far from big trees (unless you love skimming leaves)
📏 For a 12×24 ft pool, you’ll need at least a 15×30 ft area (about 4.5×9 m) to allow some room around the edges.
Step 2. Micro-zoning
To avoid that “it’s just a pool and nothing else” vibe, split the yard into visual and functional zones.
Here’s how we did it:
- one zone: the water (pool itself and built-in bench)
- second zone: seating (2 chairs and hanging side table)
- third: greenery (vertical planter or lavender containers)
- optional: fire bowl / string lights / small pergola
Even in a 430 sq ft yard, this works — as long as you don’t overstuff it with furniture.
Step 3. Smart landscaping
After installing the backyard pool, you’re often left with “empty” gaps around it. No need for a full-blown magazine-style garden. Just go with:
- container plants like sage, thuja, lavender, rosemary (smells great and handles sun well)
- vertical modules — for example, a vertical stand with five pots looks great and doesn’t take up much space.; looks great, saves ground space
- gravel + wooden walkways instead of grass (you’re not mowing next to a pool anyway)
Step 4. Visual expansion
Here’s how to fake more space:
- stick to a rectangular pool shape
- go minimalist on decor (light tiles, clean edges)
- leave space around the pool (don’t press furniture up to the edge)
Tip. If you’ve got a fence, paint it a deep warm gray or matte black. Greenery and water pop like crazy against that backdrop — tried and true!
Real-life examples:
Our neighbors had a 16×20 ft yard (about 4.8×6 m) — now there’s a 10×20 pool, bench, pergola, 2 chairs and a firewood rack. Looks amazing and fully DIY.
And a follower from California had a backyard between her garage and house — she built an 8×12 plunge pool, added a wooden walkway around it, hung string lights — and now it’s the family’s go-to spa zone.
The magic doesn’t come from size. It comes from smart layout. You’re not expanding the space — you’re rebuilding it like a puzzle. And that’s where the magic happens.
15. Rectangular Backyard Pool That Visually Expand Small Spaces
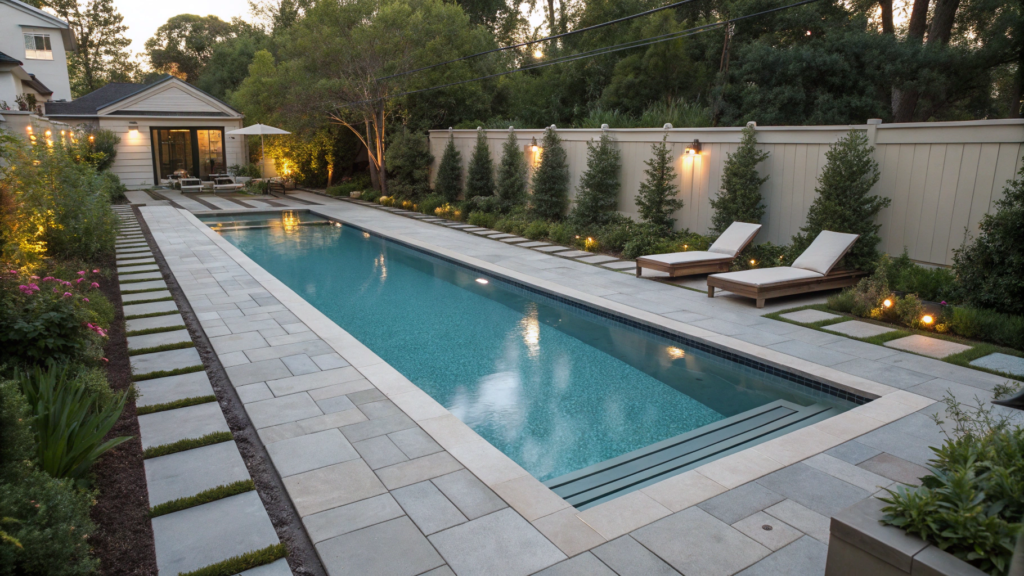
When your backyard is tiny, you can either cram in everything at once — or play with perception.
Why does a rectangle visually “stretch” the space?
It’s all psychology and geometry:
- The eye easily follows straight lines — it “glides” along them
- An elongated shape guides the eye forward, not sideways
- When everything around the pool follows the same lines (walkways, garden beds, loungers), it creates the illusion of an extended space
Even in a 5×9 m yard, a slim rectangular pool along the long side + minimalism around it makes it feel bigger than it actually is.
What pool sizes work best?
If your yard is small (under 540 sq ft), go for:
- 8×20 ft (about 2.4×6 m)
- or even 7×16 ft (2.1×4.8 m)
What matters isn’t just length — it’s that the aspect ratio is at least 1:2. That’s what creates that visual “corridor” effect that stretches the yard.
What else boosts the effect?
Here are some simple tricks that work like magic:
1. Light-colored finishes. Light tile or plaster makes the water look brighter and more refreshing.
Paired with beige, white, or gray coping, it feels open and airy.
2. Long boards or walkways placed lengthwise. If you lay wooden boards around the pool lengthwise, the eye naturally follows that direction.
3. Avoid vertical clutter. Don’t line the pool with benches, fences, or raised planters — they break the visual flow.
One built-in bench at the short end is plenty. Leave the rest open.
4. Smart placement. Put the pool along the long side of the yard, not across it. That way, you maximize the directional flow.
If the yard is narrow, the pool should work to extend it visually.
Real-life example:
One of our followers in Vancouver had a 16×20 ft yard (about 5×6 m). She installed a 7×16 ft pool along the long side, surrounded it with gravel and gray coping. On the sides — just two rosemary pots and a bench.
It looks like her yard is twice the size now.
A rectangular pool isn’t just practical (easy to cover, simpler to clean, fewer headaches during construction).
It’s also a visual design tool that makes a small yard look sleek, light, and well thought-out.
16. Hidden-Edge Pool for Seamless Integration

When your yard is already small, every boundary stands out. And if the pool edge looks like a step, a box, or a separate “structure,” it breaks up the space — not what we want.
That’s why more and more people are choosing hidden-edge pools (also called flush-edge or deck-level) — where the water sits level with the surrounding surface and appears to blend right into the patio.
What is a hidden-edge pool?
It’s when:
- The water rises right to the top of the pool shell
- The coping is thin, recessed, or made from the same material as the surrounding deck
- It feels like the pool is part of the ground, not a separate object
Sometimes this is called a deck-level pool or flush coping — basically, there’s no visible step between the water and the deck.
Why does it work so well for small yards?
- It erases visual boundaries between the pool and the yard
- The space feels bigger, cleaner, and more upscale
- Especially striking when paired with wood decking or light gravel
- Works even on very small pools, like 8×16 ft (2.4×4.8 m)
How is it built?
Important: This is a technical feature that must be planned during construction.
Here’s what it involves:
- Water flows into a hidden gutter or back into the shell itself
- Requires an overflow system to maintain the right water level
- Pool edges must be level, sharp, and flush-finished
This is not a classic “infinity pool” over a cliff. It’s more about blending the water into the yard, not putting an aquarium in the middle of it.
Can you DIY this?
Honestly — rarely.
True hidden-edge pools require precision, hydraulics, and preplanning. If you’re going for the real thing with a gutter system, it’s definitely a job for pros.
Pro tip:
If you want this look, bring it up early during design. Builders must account for it from the start. Retrofitting later is expensive and tricky.
But there is also a visual alternative. Lay your decking flush with a standard coping, raise the water level as close to the edge as possible, and use neutral materials.
The coping stays, but it visually blends in.
You’ll still get that “seamless” effect — just with less technical complexity.
Bottom line:
A hidden-edge pool is all about optical illusion — and it works. You don’t change your yard’s size, but it feels like the water is part of the space, flowing and uninterrupted.
Pair it with greenery and a clean rectangular shape — and the effect is magic.
17. Courtyard Backyard Pool Concept for Enclosed Spaces

If you have a walled-in, enclosed yard — don’t treat it as a limitation. Turn it into your advantage.
A courtyard pool is a pool built right into the interior space between your house, garage, shed, or fencing.
You don’t need a large lot. The key is to fit it smartly within the existing perimeter.
What is a courtyard pool?
- A pool located inside an enclosed space, often in a U-shaped layout (with the house on three sides)
- Compact in size: typically from 7×14 ft to 10×20 ft (2.1×4.2 m to 3×6 m)
- Meant to be an extension of your living space — like part of the kitchen or lounge
- Sometimes surrounded by panoramic doors, so you feel that “open courtyard” vibe even in winter
Why does it work in small spaces?
Here are three reasons:
- You’re not fighting the lot — the pool fits within what already exists
- Privacy and coziness — unlike an open yard, this setup feels like a cocoon; with lights at night, it’s magical
- Less visual clutter — walls and buildings naturally frame the pool, giving it a serene resort-like feel
How to adapt the idea?
If you’ve got a side yard between your house and shed, a strip along the garage wall, or a dead-end space behind an L-shaped patio — you can fit in a narrow rectangular pool and add:
- A built-in bench at one end
- A vertical garden along the wall
- A few hanging lights or string bulbs overhead
Even a 10×18 ft (3×5.5 m) space can become a courtyard zone with a pool, lounge spot, and a touch of greenery.
Landscaping is the soul of it
The pool itself is clean and architectural — but everything around it adds warmth and life. Try:
- Vertical panels with ivy or grapevines
- Trellises with sweet pea or honeysuckle
- Planters with mint, rosemary, or sage — aromatic and beautiful
- In the corner: an olive or citrus tree in a pot (even just for looks)
Integration is the keyword
A courtyard pool isn’t just “a pool in the backyard.” It’s a functional part of your home.
It sits next to the kitchen, dining space, or patio.
You don’t walk to it — you live beside it.
In our old house, we had a sunroom we never used. If we had installed a small plunge pool and opened up a wall — it would’ve become the most loved spot in the house, no doubt.
And yes — it’s technically simpler than it sounds
- If there’s already a wall, you don’t need a fence
- If there’s a concrete floor, you can install a prefab plunge pool
- If space is tight, try a covered pool system — one with a retractable surface that turns into a walkable deck when not in use
The cover can support furniture and people, so when the pool is closed, it’s just an extension of your living area.
If you love the idea of your backyard pool being part of your everyday life — where you drink your morning coffee or read a book by the water — this format is for you.
18. L-Shaped Backyard Pool for Smart Zoning in Small Yards

Ever tried squeezing a regular rectangular pool into a yard that already has a patio, flower beds, and a BBQ setup?
It just doesn’t fit. The walkway dead-ends. The lounge chair won’t fit. Someone’s always bumping into a fence.
That’s where the L-shaped pool comes in — a form that works with your space, not against it.
What is an L-shaped pool?
- A pool with one long straight section and a perpendicular “leg” that forms an L shape
- It divides the space into zones, letting you swim, sit on a built-in bench, and still have room for a grill, a table, or some greenery
- The “tail” can be narrow, deep, or shallow — depending on your needs. You define what each “leg” is for
Why does this work in small yards?
- It breaks away from the boxy look — a rectangular pool in a small yard feels like a parking spot, while an L-shape visually opens the space
- Perfect for tricky layouts — got a corner where a rectangle won’t fit? Send the “tail” into it. Got a side patio? The short arm can run alongside it
- It allows you to separate zones by activity:
– One leg for swimming (deeper water)
– The other for relaxing (bench, steps, shallow area for kids)
How is an L-pool built?
- Either as a monolithic pour (concrete, built on-site)
- Or a pre-fab fiberglass shell — some US manufacturers (like Leisure Pools or Latham Pools) offer ready-made L-shapes
- Depth is often split: the long section around 5 ft (1.5 m) and the short arm around 3 ft (0.9 m)
- Needs to be designed from the start — shape affects filtration, plumbing, and structural planning
Zoning layout ideas with an L-pool:
| Zone | How to use it |
| Long “leg” | Swimming zone, deeper water |
| Short “tail” | Bench seating, shallow zone for kids, small water feature |
| Inside corner | Great for pergola, fire bowl, or vertical plants |
| Along one side | Deck, loungers, pathway to the house |
Real-life example:
A couple in Salt Lake City had a 5×10 m yard with an odd house corner and an overhang.
They installed a 3×6 m L-pool — the long leg ran along the fence, the short tail pointed toward their patio.
In the inner corner, they added a fire bowl and rosemary planters.
The result? Compact, zoned, elegant.
And best of all — you could walk freely around, no crushed plants or stubbed toes.
An L-shaped pool is like custom cabinetry for your yard. It doesn’t just fill space — it divides it, simplifies it, and upgrades it.
If you love clean geometry, smart design, and efficient use of space — this shape should be your top contender.
19. Luxe Touches for Tiny Pool: Materials and Add-Ons

You can’t make your pool bigger — but you can make it feel expensive. And not in the boring “just buy the priciest stuff” kind of way.
It’s all about finish quality, attention to detail, and thoughtful design — that’s what brings style, coziness, and the vibe you’re aiming for.
1. Light-colored smooth plaster or microcement
The color of the water mostly depends not on the sky (surprise!), but on the finish of the pool.
Light beige, sandy, or gray tones give the water that spa-like feel — not the “2002 chlorinated blue.”
And microcement or exposed aggregate (plaster with natural stone chips) adds texture and a soft, earthy effect.
2. A wooden deck flush with the water
This is a must-have if you want boutique vibes, not sauna vibes.
Even just a deck board frame around a tiny pool makes it feel like part of the space — not just a stuck-on feature.
The wood should be either thermally treated or a moisture/UV-resistant composite.
3. Perimeter or underwater lighting
Lighting is cheaper than any stone — but 10x more powerful in terms of impact.
Strip along the edge (warm white)
Underwater spotlights
Corner lights
The reflections and outlines in the water shift the entire mood. Especially in small spaces, lighting defines the whole environment.
4. Stone-textured tile
Smooth concrete is out. What’s trending now is tile:
travertine-style
matte finish
or warm textures that mimic natural stone.
It looks high-end, it’s not slippery, and it blends perfectly with any water tone.
Most importantly — it avoids the “public pool” look. And that matters!
5. Mini bar or built-in drink table
This one’s pure joy. Drop a small table in the corner (even a floating one), toss on a couple of glasses, a book, sunscreen — and suddenly you’re not in a “yard bucket,” you’re in a personal resort.
There are even inflatable bar trays like this — they look like toys, but actually work great.
6. Greenery and scent
Add containers with rosemary, mint, or lavender.
When you’re sitting in the water and everything around smells like summer — you don’t need anything else.
It’s that feeling of “I didn’t leave — I arrived home.” That’s luxury too, just a different kind.
All of this — without a massive budget
You can add just 1–2 of these things, and your backyard pool will stop being a “feature” and start becoming a lifestyle element.
And the best part? It’s all doable, no fancy engineering required, and works for backyards as small as 3×4 meters.
20. DIY Backyard Pools That Are Blowing Up in 2025
Back in the day, a backyard pool meant a huge budget, an excavator, and a pile of permits.
But in 2025, DIY pools aren’t some “hack” — they’re a full-blown movement.
Thousands of people all over the world are building their own mini pools — fast, stylish, and on a budget.
Why are they blowing up right now?
- Yards are getting smaller — but the need to cool off hasn’t gone anywhere
- People want aesthetic vibes without a mortgage
- And most importantly: the market is full of kits and ready-made solutions you can assemble without hiring a crew for three weeks
DIY Pool Types That Are Really Taking Off:
1. Stock Tank Pool
This is a galvanized metal livestock tank (usually 6–8 feet in diameter) turned into a mini backyard pool.
- Filled with water and placed on a flat surface
- Often painted on the outside or wrapped in wood
- Add a circulation pump — and that’s it, you’re done!
Cost: $400–$1,000 with equipment
Install Time: 1 day
2. Wooden Frame Pool with Liner
The purest form of DIY: build a wooden frame, line it with vinyl, reinforce it, and wrap it in decking boards.
You can make any shape — L, rectangle, square.
- Shape flexibility — perfect for rentals, odd corners, or creative layouts
- Easy to replace the liner in a few years
- Looks like a proper plunge pool if finished nicely
Budget: $1,500–$3,000
Visual: Chic if
3. Built-In Plunge Pool from Concrete Blocks
If you’re not afraid of mortar — you can build a mini in-ground pool from concrete blocks, pour the floor, waterproof it, and tile it.
It’s a more permanent option that takes more effort.
- Typically: 2.5×2.5 m square, 1.2 m deep
- Use CMU-type blocks
- Critical to properly seal and level the base
- Build time: 3–5 days + leveling
- Needs some skill or assistance
Result: Long-lasting, solid, custom
4. Semi-Sunken Hybrids
This is a hybrid of wood framing + liner + partial digging. Example:
- Build a raised wood platform
- Dig the ground 30–40 cm deep
- Insert a plastic tub
- Wrap the whole thing like a terrace
This results in very aesthetic pools, even in 3×3 m, with a “design project” feel, rather than a “quick fix at the cottage.”
What Unites All These Options?
- No permits needed in most US states (if depth < 4 ft)
- Can be built in a weekend, especially with two people
- Perfect for micro-yards or even balconies (some plunge pools fit in a planter box!)
They’ve already gone full-trend.People are turning them into real living spaces: with pergolas, lights, lavender pots, and wine chilling in an ice bucket.
Small Yard — Big Possibilities
You don’t need to wait on a team of contractors to start relaxing. You don’t need to spend a year’s salary to get a stylish and functional backyard pool. Everything’s already out there — shapes, materials, formats, even ready-to-go kits.
In 2025, your pool isn’t just a design feature. It’s a vibe, a personal escape, and a reflection of how you want to live.If one of these ideas speaks to you — drop a comment. Or share this with someone who’s been dreaming about a pool but still thinks they “don’t have enough space.”