When we first started looking for deck skirting ideas to finish off the bottom of our deck, there was really just one thought in our heads: “Well, I guess we’ll just go with a lattice?”
But, turns out, lattice is far from the only (or most interesting!) deck skirting option. Today, you’ll discover 10 fresh, creative, and truly effective alternatives for deck skirting. And every single one of them is not just pretty — it’s practical, too.
By the way, if you missed part one of this series, it’s packed with 10 more awesome ideas worth checking out — natural materials, hybrid designs, and a few quirky tricks you won’t see in typical Pinterest roundups.
1. Recycled pallet wood skirting

When we first started working on our deck skirting, let’s just say our budget didn’t exactly scream “go buy new lumber.” But pallets? Oh, they were everywhere — just waiting to be claimed! And the best part? You can turn them into something way more than a basic skirt. With a little love, they become a beautiful, textured finish that adds warmth and personality to the whole setup.
Pallet wood skirting is a perfect way to repurpose old lumber and give your deck that rustic, lived-in feel.
Why pallet wood is worth a try:
- Free or almost free material — check construction sites, supermarkets, and warehouse dumpsters.
- Naturally weathered texture — aged just enough to look interesting.
- Flexible layout options — run boards vertically, horizontally, diagonally, or even in a herringbone pattern.
We did a version of this under an old deck in Idaho. First, we measured everything, then hauled home a trailer full of boards we scored from a farmer off Craigslist. The pallets were rough, full of nails, and a little dusty — but the wood? Solid! All we needed was to tear them down, sand them, and stain.
And speaking of stain — we used Minwax Wood Finish Penetrating Stain, one of the best out there. It sinks in deep, brings out the grain, and gives the wood a smooth, even finish.
How to build pallet wood deck skirting:
- Find the pallets. Look for HT-marked (heat treated) ones — no mold, no signs of chemical treatment.
- Break them down. Use a pry bar or claw hammer. Gloves and patience are your best friends here.
- Sand the boards. A palm sander with 80- and 120-grit paper works great to smooth out rough surfaces and bring out the wood’s texture.
- Cut to height. Standard deck skirting is around 24 inches (61 cm), but measure based on your setup.
- Apply the stain. Use a brush or a rag to apply a thin, even coat.
- Build the frame. Use 2×2 or 2×4 lumber as the structural backing. This is what you’ll mount the boards to.
- Attach the boards. Screw them in vertically, horizontally, or at an angle — your call.
Leave a 1/2″ (1.2 cm) gap between boards to allow airflow. - (Optional) Add trim. A 1×2 board around the edge gives a clean, professional finish.
- Seal it (optional but recommended). Use Minwax Spar Urethane, if you want extra protection from moisture and sun.
A few numbers from real life:
- For a 16-foot (4.8 m) side of the deck, 2 feet high (60 cm), we used around 7 pallets.
- One pallet weighs about 35–40 lbs (16–18 kg) — get ready for a solid workout!
- The whole job took two days: one for prep, one for install. We worked as a team of two.
But the best part? It’s the feeling. You’re not just admiring the finished look — you’re seeing a story. The effort, the hands-on work, and how old wood got a second life.
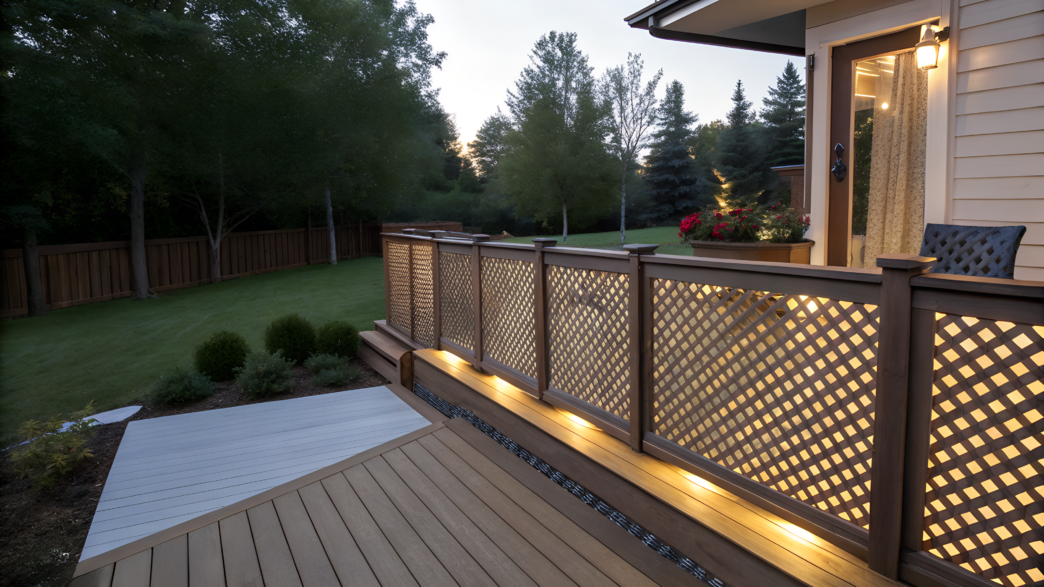
2. Trellis screen deck skirting

If you’ve ever tried to hide the mess under your deck without turning your yard into a solid wall of lumber, then a trellis screen might become your new favorite trick. It’s not just a lattice alternative — it’s a light, breathable, and genuinely stylish solution that works with almost any design style.
Back when we were working on our first deck, I wanted airflow, sunlight and… well, a way to stash the hose without building a bunker. Since then, trellis panels have become one of my go-to options.
Why trellis skirting works so well:
- It lets air and light pass through, keeping the under-deck area from turning into a musty cave.
- It supports climbing plants — grapevines, clematis, ivy, or even hops (especially if you’re into that boho-hippie vibe like we are).
- It comes in ready-to-install panels, lightweight, moisture-resistant, and doesn’t need paint or stain.
The whole design just feels light. Open. Almost architectural. Especially if you line up 2 or 3 panels in a row and let greenery grow into them.
A friend of ours grows Canadice grapes on their trellis — by the end of summer, the entire space under the deck disappears behind a wall of lush green leaves.
How to install trellis skirting:
- Choose your material — wood, metal, or PVC.
If you want a long-lasting and zero-maintenance solution, go with PVC. - Mount panels to a frame under the deck,
leaving at least 1 inch (2.5 cm) of space from the ground to prevent rot. - Secure with anchors or rust-resistant screws
for durability through all seasons. - (Optional) — add trim frames around the edges
to give the whole thing a finished and intentional look.
Pro tip. Avoid metal mesh if you live in a damp climate — even galvanized ones eventually rust. But PVC trellis? That’s forever. Ours has been up for 3 years now and still looks brand new — through snow, rain, and full Idaho sun.
Trellis skirting isn’t just about hiding the gap — it’s a chance to turn that under-deck space into a real part of your landscape, not just a utility zone.
And yes — if you have dogs or chickens, a trellis will definitely keep them from launching their own “excavation projects” under the deck.
3. PVC panel skirting
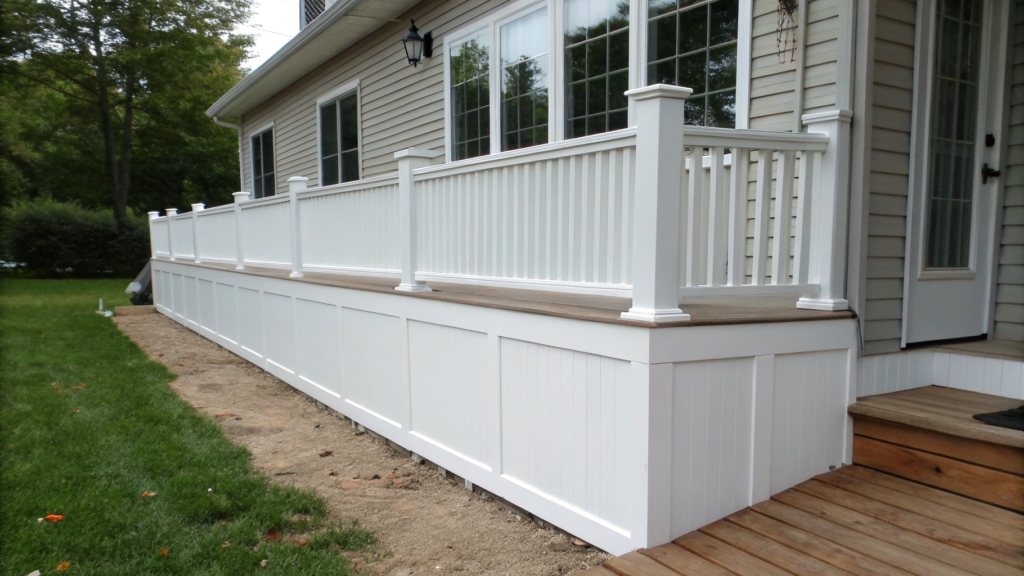
If you need a set-it-and-forget-it solution that can handle rain, snow, sun, and even a clumsy rake hit — welcome to the world of PVC panels. It’s probably the lowest-maintenance material for deck skirting, and it absolutely doesn’t have to look like a tacky ‘90s backyard fence. The key is to choose the right style.
PVC panels are easy to cut, don’t rot, don’t rust, don’t need paint, and pretty much last forever.
There’s a house down the road where these panels have been up for five years — not a single crack. Still white, clean, and smooth. Even the dogs nap under there in summer — it’s cool and shaded.
Why PVC is convenient:
- Moisture-resistant and UV-stable
- Doesn’t need paint or treatment
- Lightweight — easy to install solo
- Smooth texture — just rinse with a hose to clean
How to install PVC panels:
- Choose your panels. Go with exterior-grade decorative panels with UV protection.
Example: Barrette Outdoor Living PVC Panels — size: 2×4 feet (61×122 cm).
Not the cheapest option, but they truly last for years. - Mark and cut. PVC cuts easily with a handsaw or jigsaw. Trim to skirt height.
Leave a 1-inch (2.5 cm) gap from the ground for ventilation. - Build the frame. Use wood or aluminum framing. What matters most is that it’s straight and sturdy.
- Attach the panels. Use screws with washer heads or decorative rivets.
Spacing: every 12–16 inches (30–40 cm). Don’t overtighten — PVC expands in sunlight. - (Optional) — add trim. A narrow border makes the skirting look neat and finished. Looks especially sharp in a contrasting color.
What else matters:
- Don’t buy panels that are too thin — they may bend during installation or crack in winter.
- If you live in an area where summer hits +100°F (38°C), go for fade-resistant panels — otherwise they’ll turn velvet-gray by next season.
PVC is rarely chosen for its looks (though some options are quite nice), but it really shines in reliability and ease of maintenance. And sometimes, that’s exactly what you want — no fussing, no touch-ups, no board replacements. Just install it — and move on with life.
4. Hinged panel deck skirting with storage access

Sometimes decor can double as something useful. Hinged skirting means the panels under your deck open on hinges, giving you access to a real storage space beneath the porch.
Our neighbors have this exact setup. All their gardening tools, hoses, frost blankets, and even crates of seed peas (yes, in December!) are neatly tucked away under the deck. And to get to them — no crawling around or ripping off a section of lattice. Just click — and the door swings open.
What’s great about it:
- Functionality — store everything from tools to seasonal furniture.
- Access in seconds — no screws or panels to remove.
- Disguised as regular skirting — nothing gives away that there’s a full storage zone behind it.
By the way, here’s something handy: National Hardware Hinges for Outdoor Panels — heavy-duty outdoor hinges that resist rust and support even heavy wooden panels (up to 60 lbs / ~27 kg each).
Tip. Use double hinges per door, especially if the panels are wide.
How to build it: step by step
- Choose your panel material. Plywood, PVC, or treated lumber, 1/2 to 3/4 inch thick (1.2–1.9 cm). Panels should be lightweight but stiff enough not to sag when opened.
- Build a frame. Use 2×2 or 2×4 boards (5×10 cm) to make a rectangular frame. This keeps the panel from warping. Use wood glue and screws for strength.
- Attach the panel to the frame. Cut the panel to fit the opening, place it on the frame, and fasten it with screws for wood or PVC. Make sure the edges are flush — if they stick out, the door won’t close properly.
- Install the hinges. Mount 2–3 exterior-grade hinges at the bottom (if the panel opens downward) or at the side.
Use galvanized or stainless steel hinges to prevent rust.
Place them about 4–6 inches (10–15 cm) from the ends. - Add a latch. Use a catch, magnet, hook, or even a lock if you need extra security. The main thing is to keep the panel from swinging open in the wind.
- Add a handle. A recessed handle or simple cut-out is enough. Avoid bulky hardware that would ruin the clean look.
- (Optional) — gas struts. If the panel is heavy, install gas shocks. They hold it open and prevent it from slamming shut.
Tips:
- Keep doors no longer than 3 feet (91 cm) to prevent sagging.
- If the ground under the deck is bare dirt, lay down landscape fabric and gravel to avoid moisture and mud.
- Some people use T1-11 plywood siding — it looks like wood but costs less and weighs less.
This setup is almost furniture-level carpentry. It’s not just a cover-up — it’s a hidden, usable space.
And yes, if you’ve ever needed a place to hide Christmas gifts from the kids — this one’s for you.
5. Herringbone-pattern wood skirting
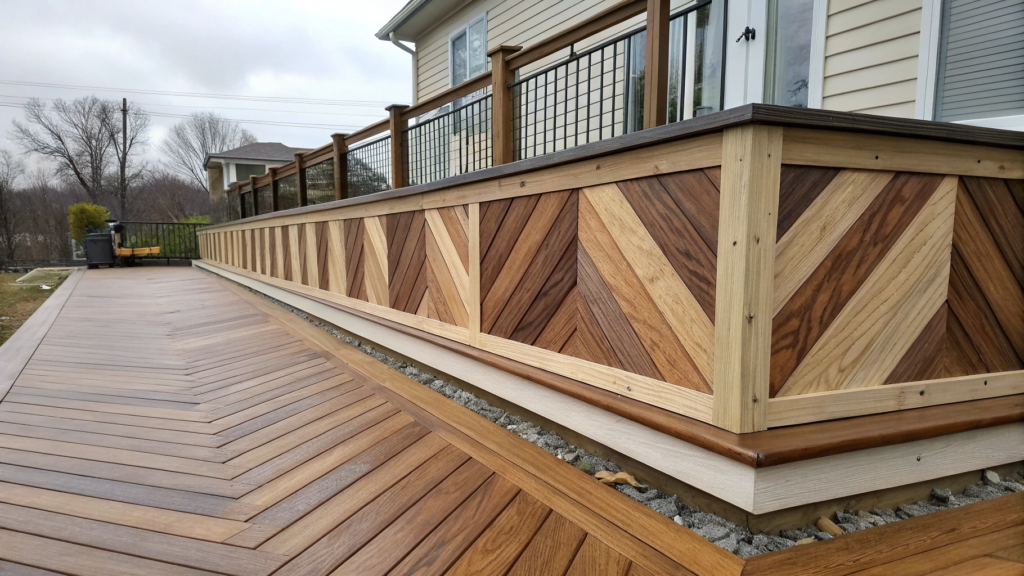
You probably know this pattern already. Herringbone is a classic with history.
Now imagine using it not on your floor… but under your deck.
And believe me — it looks amazing!
A herringbone pattern in your deck skirting instantly makes your home stand out — especially if the boards are finished in contrasting tones or done using light charring (Shou Sugi Ban). That gives the wood depth and character. Some people even do their whole façade this way, but for skirting, it’s a more affordable way to add a design feature.
Why go with herringbone:
- Texture and movement — the pattern creates a sense of flow and a “living” surface.
- Perfect for paint or stain — alternate colors however you like.
- Works with narrow or wide boards — 2×2, 1×4, 1×6 (5×5 cm, 2.5×10 cm, 2.5×15 cm).
And no, you don’t have to cut every board by hand.
There are pre-finished options like UFP Edge Thermally Modified Wood — lightly charred and ready to install with a beautiful look.
How to install herringbone skirting:
- Create a flat base. Build a backing surface using moisture-resistant plywood (3/4″ or 18 mm) or solid boards mounted to a frame. This is your canvas for laying the pattern.
- Mark the center axis. Snap a vertical line down the middle of the panel — this is your symmetry line for laying the boards out in both directions.
- Cut boards at a 45° angle. Use a miter saw or angle guide. It’s best if the boards are all the same width — you can vary the length.
- Lay boards from the center outward. Start in the middle, placing board pairs in a V shape. Use a level to keep your pattern straight.
- Trim the outer pieces. Once the pattern reaches the edges, cut any overhang flush. Do this after laying to get the best fit.
- Add a border frame. A thin trim around the pattern hides the edges and gives a clean finish. Try a 1×2 (2.5 x 5 cm) board — horizontal or vertical.
A few tips:
- Only do herringbone on a flat base — uneven backing = warped pattern.
- If the boards are unfinished, apply stain + sealant to protect from UV and moisture.
- Don’t overdo the color palette: one natural tone + one accent works better than a rainbow.
This option takes time and precision, but the result is absolutely worth it. Everyone notices. Everyone asks.
6. Deck skirting from vintage shutters

Old wooden shutters — the kind gathering dust in attics, barns, or your neighbor’s collection — can become a beautifully atmospheric skirting option for your deck. This decorative approach adds unique texture and visual “storytelling” to your outdoor space.
There’s a couple in our neighborhood who did exactly this under their porch. It looks unusual, decorative, and definitely “not like everyone else.”
And the best part? These shutters aren’t just for looks. They’re solid, hold their shape well, and easily adapt to openings of different sizes.
Why it works:
- Each panel is one of a kind.
From color to texture, shutters give your deck character and a vintage charm. - It’s eco-friendly reuse.
This is repurposing at its finest. - Different sizes? No problem.
If the space under your deck is uneven, old shutters fit right in thanks to their variety in shape and height.
You can find them at flea markets, Facebook Marketplace, Habitat for Humanity ReStores, and sometimes even on Amazon — look for wooden decorative shutter panels (not always cheap, but definitely eye-catching!).
How to use vintage shutters as skirting:
- Clean and inspect. Old paint may be flaking, or wood may be cracked.
Give them a quick once-over with a sander and make sure everything’s solid. - Paint or seal. Want to keep the patina? Just apply a clear exterior sealant.
Want a splash of color? Use outdoor paint — Slate Blue or Barn Red both give great country-style vibes. - Plan the layout. Install shutters tightly side-by-side, or leave small gaps for airflow.
You can even mix and match different styles. - Attach to a wooden frame. Use screws from the outside + L-brackets underneath for support.
Want access? Add hinges, like in the previous section. - (Optional) — add decorative elements. Hardware, house numbers, vintage handles — anything that turns the shutters into a statement piece.
Practical tips:
- Go for shutters with louvered slats — they add built-in ventilation.
- Don’t be afraid to mix styles, just keep a consistent color palette so it doesn’t look chaotic.
- No vintage shutters? Fake it!
Use basic boards, stain them in Weathered Oak, then lightly sand the edges for an aged look.
Shutter skirting is creativity, resourcefulness, and a love for turning functional into expressive.
It looks especially good on homes in farmhouse, cottagecore, or rusticana styles.
7. Decorative metal sheet skirting

When wood feels too warm, plastic too bland, and mesh too “backyard DIY”, metal comes in.
Perforated, patterned, precisely cut metal panels can instantly turn your deck skirting into a design feature.
This option works great for modern homes, minimalist builds, or whenever you want to highlight clean lines and geometry.
A couple in our neighborhood, whose home is mid-century modern, installed a black perforated metal skirting — and it looks fantastic.
A simple porch now looks like it belongs in an architecture magazine.
Why decorative metal is both stylish and practical:
- High durability
Resistant to impact, moisture, temperature swings, and UV light.
It just lasts and lasts. - Geometric design
Crisp cutouts create light and shadow effects, especially at sunset.
Dozens of pattern options: circles, honeycomb, diamonds, even florals. - Low maintenance
Especially aluminum or powder-coated panels — no painting or staining required.
How to use decorative metal for skirting:
- Choose your metal. Most common options are aluminum or galvanized steel.
Aluminum is lighter and rust-free, but a bit pricier.
For shade — go with black or bronze; for contrast — white or silver. - Build a frame. Wood or metal works. What matters most is that it’s flat and strong enough to hold the panels securely.
- Attach the panels. Use screws with washers and thermal spacers to avoid damage and rattle.
Space your fasteners every 12 inches (30 cm) or so. - Add a trim or border (optional). A narrow wood or metal frame around the edges gives a tidy and finished look.
- (Optional) — mount panels on hinges. If you need access behind the skirting (for storage), hinges + a latch or magnetic catch work perfectly.
Tips:
- Never cut metal with a grinder without eye protection (seriously).
Use tin snips or a circular saw with a proper blade. - Seal the cut edges with an anti-corrosion primer, especially if using steel.
- Leave a 1/8 inch (about 3 mm) gap between panels to allow for thermal expansion.
Metal is without a doubt a bold choice, but it’s exactly what can make a deck feel clean, modern, and intentional.
Especially when paired with gravel paths, outdoor lighting, and sharp landscape geometry.
8. Laser-cut screen panel skirting

Laser-cut panels aren’t just skirting — they’re interior design turned inside out.
With intricate cut-out patterns, these panels turn the bottom of your deck into a gallery of geometry, shadows, and light.
They’re made from composite materials, aluminum, steel, PVC, and even moisture-resistant MDF designed for outdoor use. But the real charm lies in the patterns — from Moroccan grids and jungle shadows to mid-century droplets. Or you can even order custom ones.
Why laser-cut panels are a “wow” move:
- Patterns look high-end and polished
Even if your frame is DIY, these panels instantly elevate the whole space. - Create light-and-shadow effects
Especially stunning under bright sun or with backlighting at night. - Available as ready-made products
No need to custom-cut — just pick your style and size.
How to use laser-cut panels for skirting:
- Choose your style and material. For outdoor use, PVC or aluminum works best — weatherproof and long-lasting.
Avoid particleboard or MDF in damp zones. - Install a sturdy frame. Especially important for metal panels.
Use a wooden or metal support structure to hold them firmly. - Mount the panels carefully. Use screws with decorative caps or hidden mounts for a cleaner look.
Don’t overtighten — some materials can crack. - Plan spacing and rhythm. Place panels at even intervals or alternate patterns.
You can even add hinged access for under-deck storage. - (Optional) — add internal lighting. Solar-powered LED strips can turn the panel into an art piece at night.
A few practical notes:
- Laser-cut panels cost more than wood or basic PVC sheets,
but the visual impact more than justifies it. - They work especially well with modern, minimalist, or Asian-style homes.
- You don’t need to cover the entire skirting — even one panel as a center feature or side detail can make a bold design statement.
Laser-cut panels are like tattoos for your deck.
Not because you need them — but because they’re just too beautiful to resist.
9. Charred wood (Shou Sugi Ban) deck skirting

When wood is burned with an open flame, it transforms into something magical (and I’m not exaggerating). The color turns deep black, almost graphite-like. The grain pattern becomes more pronounced. The surface becomes more resistant to moisture, insects, and even fire.
This technique — Shou Sugi Ban — was used in Japan back in the 18th century to protect homes from humidity, mold, and pests. Now, it’s making a comeback as a stylish and durable exterior finish.
Why Shou Sugi Ban is awesome:
- No paint or sealer needed
Thanks to the burning process, the wood is naturally protected. - Lasts longer than regular wood
Moisture and bugs don’t like charred surfaces. - Looks expensive
Even the simplest boards turn into something high-end. - Works with any layout — horizontal, vertical, herringbone, angled — it all looks great.
Want something ready-made? Try UFP Edge Charred Wood Shiplap Boards (1×6 / 2.5×15 cm) — they come pre-charred and ready to install.
How to make a Shou Sugi Ban-style skirt:
- Choose the right wood. Pine, spruce, or cypress work best — softwoods that burn evenly. Boards should be dry, straight, and free of coatings.
- Char the surface. Use a propane torch (preferably a wide one with flame control). Move along the grain until the surface is evenly blackened and slightly blistered. Be careful — it’s fire!
- Brush it clean. After burning, scrub the surface with a wire brush to remove loose ash and reveal the texture underneath.
- Oil it. Apply a natural exterior oil (like linseed or tung oil) to seal the char and protect against moisture. Reapply once a year.
- Mount it to the frame. Install like regular siding — use screws countersunk into the wood, and keep everything level. You can go horizontal, vertical, or mix it up.
Safety tips:
- Work outdoors and keep a bucket of water or a fire extinguisher nearby.
- Char the boards before installation, not in place.
- Never burn coated or painted wood — only raw timber.
10. Painted plywood panel skirting — budget-friendly, with character

Plywood is often seen as a “cheap” material. But if you trim the edges, paint it the right color, and install it cleanly — you’ll get a sleek, modern-looking deck skirt that holds its own next to more expensive options.
This works especially well for homes in mid-century, boho, or Scandinavian-inspired styles.
Another benefit: plywood has a smooth, solid surface. Visually, it looks like a seamless wall — unlike boards or lattice. That gives you more room to play with color, geometry, even stencils.
A great option: RevolutionPly Plywood (5mm) — lightweight, smooth, and great for exterior painting.
How to install painted plywood skirting — step by step:
- Choose exterior-grade plywood. Look for ACX or Exterior plywood, at least 1/2 inch (12mm) thick. Avoid OSB — it’s rougher and absorbs moisture more easily.
- Cut to size. Plywood cuts easily, even with a handheld circular saw. Keep the bottom edge 1–2 inches (2.5–5 cm) off the ground to prevent moisture damage.
- Seal the edges. Sand, prime, and paint the exposed edges. These absorb water the fastest if left untreated.
- Paint it. Use high-quality exterior acrylic paint. Great colors include:
Matte black (modern and minimal)
Olive green or warm terracotta (natural tones)
Bright accent colors (for boho or creative vibes)
- Mount to a frame. Use screws spaced about every 12 inches (30 cm). Hide the screws with decorative caps or paint them the same color as the panel.
- (Optional) Add a pattern. Use stencils or painter’s tape to create geometric shapes, stripes, grass silhouettes, mountain outlines — whatever you like. Just don’t go overboard.
Key things to keep in mind:
- Paint before installation — that way, all sides are protected.
- In humid zones, add a topcoat like Rust-Oleum Spar Varnish for extra moisture protection.
- Don’t place plywood flush with the ground — it will darken and decay quickly.
Plywood is a blank canvas. You can turn it into anything — a bold, monochrome wall or a hand-painted art piece.
The bottom line?
With just a few panels, the underside of your deck can become a DIY design feature. There are endless styles to choose from — and something for every skill level and budget.
Oh — and remember: this is Part 2 of our deck skirting collection! If you’re curious about stonework, hedges, or brick ideas, check out Part 1 — packed with even more inspiration and practical tips.Tell us in the comments — which style speaks to you the most? Or maybe you’ve already done something cool in your own yard?
We’d love to see what you’ve come up with!