A lot of people still think that rainwater systems collection is just a barrel under a pipe. But in reality, it can be part of the design — an aesthetic, a functional detail that you actually want to show off.
In the first part of this article, I already shared 10 practical ideas — from sculptural rain barrels to vertical gardens that water themselves. And here — you’ll find ten more solutions, just as vibrant and definitely not boring. With real examples, nuances, and discoveries that might help you out — even if all you’ve got is a balcony and a couple pots of mint.
1. Sculptural rain collectors that double as garden art
Collecting rainwater is part of a sustainable lifestyle philosophy, and yes — it can be beautiful too. When we were working on our second homestead in the Pacific Northwest, I realized I didn’t just want each functional element to work — I wanted it to look good doing it. That’s when I fell in love with the idea of sculptural rain collectors — ones that look like garden art but function as actual working rainwater systems.
How it works
A sculptural rain collector gathers water from your roof, awning, or pergola through a downspout system (or even a rain chain), and channels it into a reservoir. The main difference? The appearance. It could be:
- a decorative metal tower with cutouts and texture,
- a ceramic urn with an unusual shape,
- an abstract piece made from recycled glass or copper.
We installed a tall cylindrical copper sculpture-style collector — it looks like something from a sculpture park but holds up to 65 gallons (about 250 liters) of water. We placed it near the east side of our home, where most of our decorative plants are, and now we water them with clean, collected rainwater — no need to tap the system.
What you’ll need to set this up:
- Downspout system. If you don’t have one yet — start with a rain chain. It’s both pretty and practical. I use a copper chain with cups I got on Amazon — it’s sturdy, doesn’t rust, and blends perfectly into the garden. It’s 8.5 feet (2.6 m) long and weighs 3.5 lbs (1.6 kg). Takes about 20 minutes to install.
- Sculptural reservoir. You can find a ready-made designer collector that looks like a clay urn, is UV-resistant, and even comes with a hose for irrigation hookup. It weighs around 18 lbs (8.2 kg) and stands about 35 inches (89 cm) tall.
- Irrigation connection. Most reservoirs have an outlet spigot at the bottom where you can hook up:
a standard garden hose,
a drip irrigation system (with an adapter),
or even a pump if you need to move water uphill.
We have a small solar-powered automatic pump connected, which feeds a drip line running directly through the flower beds alongside the path. The watering runs on a timer.
A few tips from us:
- Place it somewhere visible from your kitchen window or the patio. Let the sculpture be something you enjoy every day.
- Add some lighting. Small garden lanterns around it create an almost magical vibe in the evening — and no one would ever guess it’s a water tank.
- Make sure the surface is level. A heavy collector can tip if it’s not on even ground.
I think solutions like this are inspiring — you’re not just collecting water, you’re literally creating a story in your garden. And pretty much every visitor we’ve had sees it and immediately asks: “Wait… what is that gorgeous thing?”
2. Rain harvesting troughs installed along backyard walkways
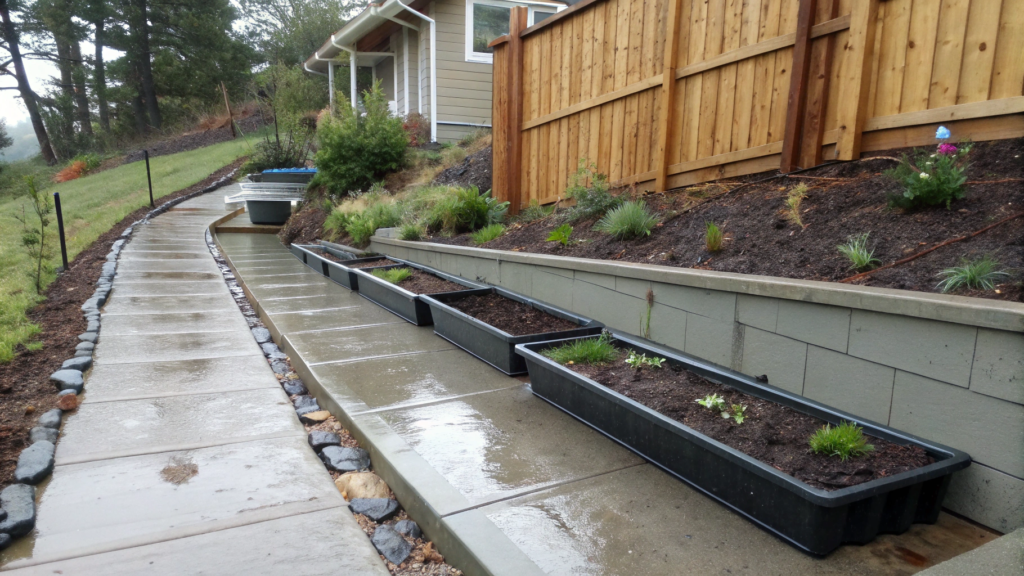
Sometimes the most brilliant ideas turn out to be surprisingly simple. That’s exactly the case with rainwater troughs along garden walkways — looks like basic drainage, but in practice, it’s a fully functional part of an autonomous irrigation system.
Many landscape designers (and just practical gardeners) have long been integrating rain collection directly into walkways — not just to catch water from roofs, but also from solid surfaces underfoot. This approach works especially well on sloped sites or in gardens that regularly “flood” after rainfall.
How does it work?
Flat troughs with grates — usually made of plastic or galvanized steel — are laid along the walkway (on one or both sides). Water passes through them and is directed into:
- an underground reservoir;
- a storage tank (barrel, drum, cistern);
- or directly into a drip irrigation system.
Important: for the system to work properly, the walkway should have a slight slope — 1–2% — so the water naturally flows toward the collection point.
We once spotted a great example in a backyard in Oregon, where a couple building a Japanese-style garden solved runoff beautifully: narrow metal troughs lined the edges of a path, and just off to the side, hidden under some decorative shrubs, was a 65-gallon (around 250-liter) reservoir.
Their goal was to completely avoid using tap water — everything came from the sky, passed through the walkway, and returned to the soil through a filter and drip system. The reservoir itself was hidden under a wooden lid and even doubled as a bench.
What you need to set it up:
- Water troughs (channel drains, trench drains) — choose length based on your walkway.
- Grates — metal or plastic, removable.
- Connectors — couplings, elbows, downspouts.
- Water tank — barrel, drum, or underground reservoir.
- Filter and pressure regulator — if connecting to a drip irrigation line.
- Gravel and geotextile — for drainage around the troughs.
Where can you use this?
In truth, these troughs are a universal solution. They work great:
- along main garden paths;
- at the edge of a patio or terrace;
- between a garage and the yard;
- along garden beds — to catch every extra drop of rain.
One couple in New Mexico, for example, turned the path to their greenhouse into a full-on water collection system. The entire walkway was paved with brick, and composite troughs were installed along the borders, sloping toward a 30-gallon tank. From there, water went straight to a greenhouse hose with a timer. Works like clockwork.
Usually, the water from the troughs flows into a holding tank, which then:
- either delivers water by gravity (if higher than the beds);
- or uses a built-in pump (if pressure is needed);
- or you just open the spigot and fill a watering can manually.
Some systems also use water level sensors to prevent overflow. But even a simple, gravity-fed setup with a single barrel is already a great way to save both water and effort.
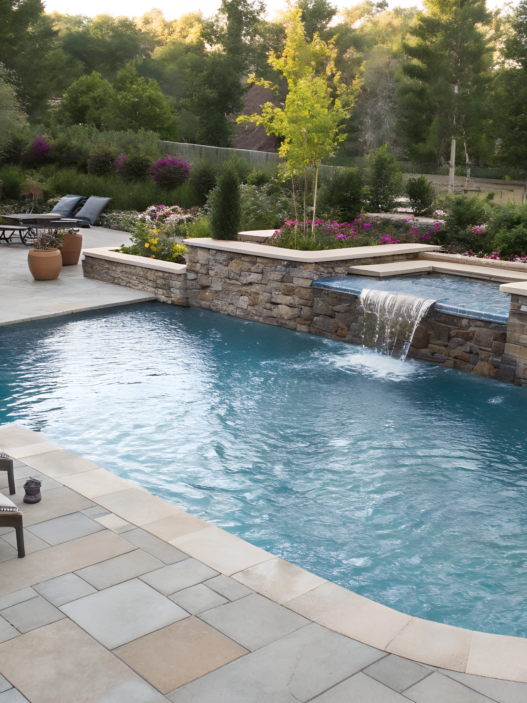
3. Hidden gutter-to-reservoir system inside privacy walls
If you’ve got a modern minimalist backyard or a cozy patio space with privacy walls and wooden panels, you probably want to keep things looking clean. In this case, a hidden gutter system inside the fence or wall structure works beautifully.
What does it look like?
Picture a typical fence or decorative wall, for example:
- made of wooden slats with spacing,
- or concrete blocks with built-in niches,
- or even metal panels with laser-cut patterns.
Now imagine concealed gutters running inside this structure. Rainwater from the roof or a canopy is collected and directed through internal channels into a reservoir hidden at the base of the wall or fence section.
This could be a slim vertical tank built between posts, or even a full system made from multiple connected sections.
Real-life example
In Austin, Texas, an architect integrated aluminum guttering directly into the frame of a decorative wall that separated a pool zone from the vegetable garden. Inside the wall was a narrow 80-gallon (about 300-liter) tank installed in a shallow underground bay, with an access lid hidden behind a panel.
Water flows in from a gazebo roof and is directed through a slim vertical pipe into the garden’s drip system. A small solar-powered pump mounted on the same wall provides the pressure.
What to consider?
To build something like this yourself, here are a few key things to plan:
- Gutter placement. You need to route water from the roof (or any surface) into the hidden system. Suitable options include:
sloped gutters along the wall,
internal downspouts within vertical panels,
slim funnels along the top edge of the fence.
- Materials. Use PVC pipes, aluminum gutters, or even flexible hose with brackets for concealed channels. For the tank, look for slim vertical cisterns, which are often used in narrow spaces behind homes.
- Reservoir. Ideal choices are 50–100 gallon (190–380 liter) slimline models that fit inside fence bays or the base of the wall. The tank should include:
an overflow valve,
an inlet filter,
a spigot or hose outlet at the bottom.
- Water access. You can run a drip line from the tank or install a manual spigot to fill a watering can. For underground tanks, consider adding a pump with a water level sensor.
Example uses
- In a private seating area — the wall hides not only the watering system but also storage space for hoses and filters.
- On a terrace — a 6″ (15 cm) thick plywood fence contains a tank inside, with drainage subtly integrated into a horizontal seam between panels.
- Along a roadside fence — a sleek metal screen with built-in gutters collects water and sends it to an underground cistern connected to a pump for hedge irrigation.
From the outside, it’s just a clean, modern wall or fence. But inside — it’s a fully functional rainwater collection and storage system. Perfect for anyone who wants to stay independent from the tap without compromising on looks.
4. Vertical garden planters that collect and reuse rainwater

A vertical garden looks beautiful, but watering it? A total headache. Especially in summer — the top plants dry out fast while the bottom ones get drowned. We had this exact issue and honestly… taking care of it got exhausting.
One day, we saw how a couple in British Columbia built their vertical garden where rain did all the work. Seriously: the water flows from top to bottom, passing through the soil of each level and ending up in a bottom collection tray — which then gets reused.
How does it work?
It all starts with a simple setup: several planters stacked vertically or mounted on a panel. The top tier gets water — from rain or a connected tank. Then, the water filters down through the soil and roots, gently feeding each level. Any excess drains into a bottom container.
That extra water can be reused — either pumped back up through a drip system or poured manually from a watering can. Not a drop goes to waste.
And no, you don’t have to worry about overwatering the top pots. Most good designs have flow-restricting drainage holes that prevent water from pooling or spilling.
Personal experience: we tried it, and it works
Last season, we set up one of these systems against the north wall of the shed. It got water from a small gutter (only about 10 feet long), and surprisingly, it was enough. We filled the planters with lettuce, arugula, basil — things that like consistent moisture. In the bottom tank, we added a leaf filter and a plastic lid to keep mosquitoes out.
For nearly two months, we didn’t use the hose once. We just hooked up a soft hose to the bottom tray and occasionally cycled water back to the top. That’s it.
What do you need to build this?
- Vertical self-watering planters. Quick to install and look nice (no “greenhouse-on-the-balcony” vibes).
- Collection container below — any shallow container with a lid will work. You can use a decorative pot or even an old cooking pot (we actually used an enamel one!).
- Filter at the top funnel — especially helpful if there are trees or bushes nearby.
- Mini-pump (optional) — if you want a closed-loop system to move water back to the top.
Perfect for small spaces
This kind of setup is a game changer for:
- balconies where there’s no room for raised beds;
- fence lines — you can hang it right on the railing;
- roof runoff zones near the house — great for catching and reusing water.
Some friends in Vancouver have theirs running along a fence that catches water from their neighbor’s roof (with permission!). Lettuce, parsley, mint — growing strong all season.
5. Deck-side rainwater tanks camouflaged as storage benches
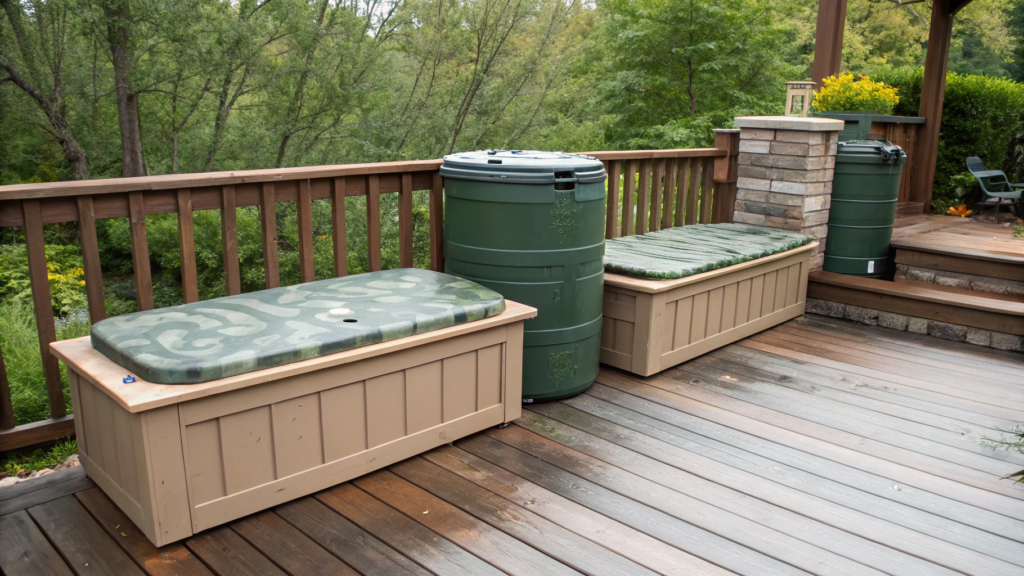
If you’re like us and want everything in your yard to look cohesive, then hiding your rain tank inside outdoor furniture — like a bench or storage chest — is one of those “why didn’t I do this earlier?!” ideas.
How does it work?
To the eye, it’s just a garden bench. Or a patio chest for pillows. Or a seat running along your deck. But under the lid — a 30, 50, or even 100-gallon tank (about 110 to 380 liters).
It’s connected to the nearest downspout or rain chain. And at the bottom, it’s got:
- a water spigot,
- or a hookup for a hose or drip irrigation system.
And on top? You’re sitting there, relaxing, reading a book. No one would guess you’re literally sitting on your watering system.
Real-life example
Our neighbors have a low wooden deck, and next to it stood a solid teak bench where they used to store throws and cushions. At one point, they cleared it out, dropped in a slim 40-gallon tank (RainReserve Rain Barrel Bladder Tank), and connected it to a rain chain from the roof.
Nearby — a hose with a sprayer and a timer. Now that “bench” waters their whole rosemary and sage bed. And it still looks like designer furniture. The Keter Eden 70 Gallon Storage Bench Deck Box looks like a classic seat but is actually a sealed, roomy container. It easily fits the tank and is still comfy to sit on.
What to plan for:
- Slope — the bench or box should sit slightly higher than the garden beds you’re watering. That way, gravity can do the work.
- Overflow valve — especially important if the system catches water from the roof.
- Ventilation or cover — to prevent mosquitoes and smells. Some people use mesh fabric under the lid — works great.
Sometimes, putting a rain barrel in plain sight just doesn’t look right — especially on a cozy deck. You don’t want the vibe of a 1985 backyard. But we’ve seen firsthand: function can be stylish.
6. Rain chain systems feeding into decorative ceramic pots
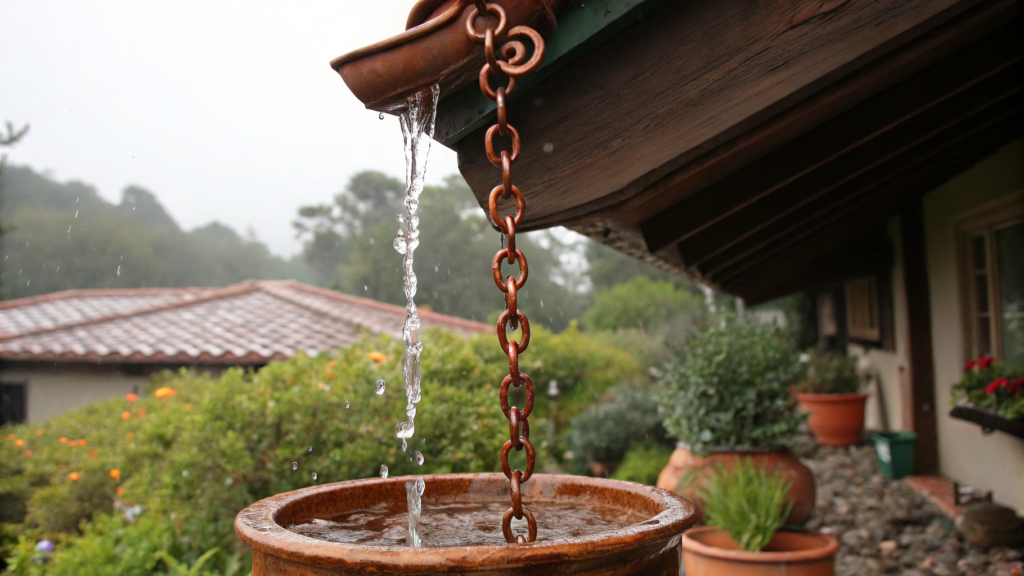
Rain chains bring real aesthetic joy every time it rains. These copper or iron links let the water flow down — not just as drainage, but like a living, shimmering fountain.
What it looks like and how it works
You hang a rain chain in place of a traditional downspout — on the edge of a roof, canopy, pergola, even a greenhouse. Water doesn’t just fall — it flows, trickles, dances through cups and links. It’s almost like a slow-motion fountain.
At the bottom, place a decorative pot or urn. Best choices: ceramic, clay, or glazed stoneware — for both looks and stability. Inside the pot, you can:
- simply collect the water to use with a watering can;
- hide a small tank connected to a hose;
- or fill it with gravel and turn it into a filter well that drains into an underground reservoir.
The first rain chain we installed wasn’t for practicality. I was just tired of seeing that ugly downspout running from the canopy into a beat-up plastic barrel. We bought a lovely copper chain with lotus cups — something like Rain Chain Copper Lotus Flower Cups — and hung it by the deck.
Underneath, we set an old clay vase we once brought back from New Mexico. It wasn’t watertight, so I placed a soft 10-gallon tank inside and ran a hose through the base. That hose now feeds a drip line watering our sage and lavender along the path.
What to keep in mind
- Stability. Even though ceramic is heavy, it’s best to partially bury the pot in the soil for better support.
- Leaf filter. Add a mesh at the top, especially if you have nearby trees.
- Overflow. Always plan a drainage outlet if the pot fills up.
- No need for watertight seal. If you’re not storing water, just fill the pot with gravel and let the water filter down into the ground.
Sometimes I just stand there watching the water drip… tinkle… flow. And knowing that this moisture isn’t wasted — that it’s going back to the plants and the earth — gives me one of the simplest and most powerful feelings.
7. Compact rain collectors designed for small patios and balconies

If you’ve got a tiny space — like a 5×2 meter (16×6 ft) balcony with just a few herb pots — even a 50-gallon barrel feels like a whale in a goldfish bowl. But you still want to use rainwater for irrigation. And guess what? It’s totally doable!
We saw a great setup on YouTube — a family had bought a foldable compact rain barrel, the VINGLI 66 Gallon Collapsible Rain Barrel. It stood neatly under a downspout, took up minimal space, but still collected up to 66 gallons (≈250 liters) — then released it through a spigot or hose into containers of petunias and lettuce.
Why it’s a great solution:
- Lightweight and collapsible — takes almost no space when empty and easy to store in winter.
- About 24″×34″ (≈60×88 cm) — fits even a narrow balcony or under a bench.
- Mesh lid and spigot let you collect clean water and use it instantly.
- Weather-resistant PVC — UV- and cold-proof for all-season use.
I place one of these barrels right under the downspout. When it rains, water flows in by gravity, and the mesh keeps out leaves and mosquitoes. Then I just turn the tap to fill a bucket or connect a thin hose for drip irrigation into my container veggies.
In hot spells, we fill half the barrel in two rains, and that water lasts 3–4 days. And all the while — the balcony stays clear, no eyesore, no bulky barrel in the way.
Even a few gallons of rainwater save resources. And for a small patio gardener — that’s already a big win.
8. Downspout diverters connected to custom wooden cisterns

Everyone wants something wooden with character in their yard — and not just decorative, but truly functional.
That’s exactly what custom wooden cisterns connected to downspout diverters are. And yes — they actually work. The key is to build them smart.
What does it look like?
From the outside — a box or round barrel-style shape made of cedar, pine, or oak. On the inside — there’s always a liner: food-safe plastic, PVC, or a flexible membrane. Otherwise, the wood will eventually leak.
Some folks just cover a ready-made plastic tank with boards or wood slats — and that works, too.
On the side — a diverter hooked up to the downspout. It’s a special device that redirects part of the rainwater flow into the cistern. It takes about 30 minutes to install and comes as a kit — like the EarthMinded Rain Barrel Diverter Kit, reliable, easy to install into 2″x3″ or 3″x4″ downspouts, and compatible with most containers. You can find it on Amazon.
How we set ours up
Lindy built a wooden “barrel” next to the greenhouse. The base was an old 45-gallon plastic tank, which we covered with treated wood and stained to match the shed. A “barrel-not-barrel” kind of thing.
We connected a standard diverter to it — it automatically sends rain into the tank, and once it’s full, the rest flows back down the original pipe.
We added a spigot and a mini-filter, and now this tank powers drip irrigation for an entire row of peppers and eggplants. It runs smoothly from spring through October.
Why use a diverter?
Because:
- you don’t have to cut off the whole downspout;
- water only flows in when it rains (no constant supply);
- when the tank’s full — the water just keeps going down the drain, not onto your lawn;
- the built-in filter protects from leaves and debris.
Important tip
Never rely on just the wood — always use a liner (even food-safe plastic wrap in two layers will do).
Treat the wood with oil or weatherproof sealant. Install the cistern on a strong base — especially if it’ll weigh over 400 lbs (180 kg) when full.
This kind of tank becomes part of the yard: a planter stand, part of a fence, and at the same time it collects water, feeds your plants, and saves you both effort and utility bills.
9. Rainwater collection towers made from stacked concrete rings
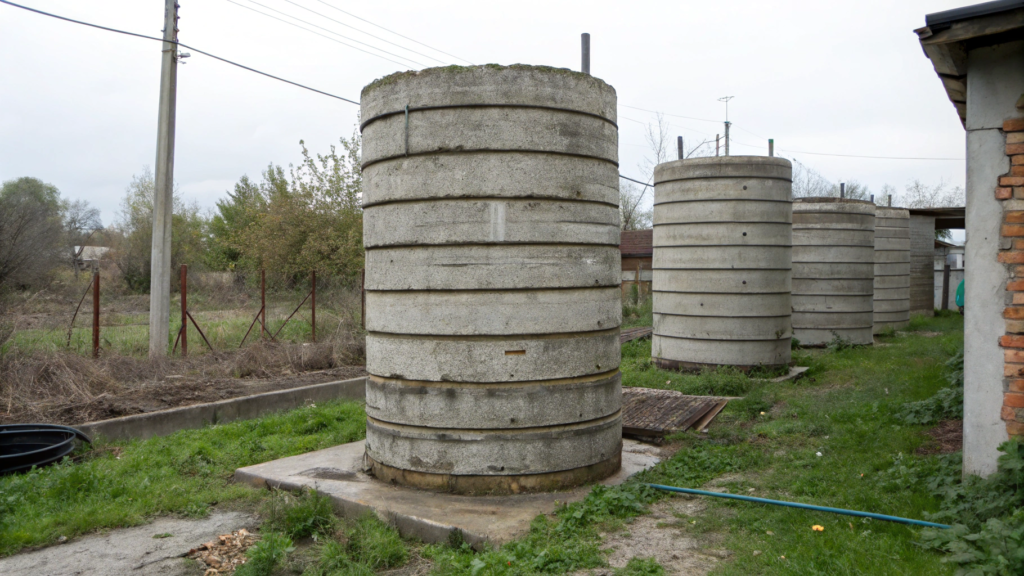
It looks like an old well, forgotten in the far corner of the yard. But in fact — it’s one of the most durable and reliable ways to store rainwater. Especially if you want to store a lot and avoid plastic barrels altogether.
These towers are built from standard concrete rings used for wells or sewer systems. Yep — the same ones meant to be buried. But in this case, they’re stacked above ground.
Where the idea came from
We first saw this setup at a neighbor’s place in Idaho. He stacked three concrete rings on top of each other, covered the top with a metal lid and debris screen, and added a side spigot. When I asked how much it holds, he smirked:
“Enough to water all my potatoes through September.” And he wasn’t kidding. Three rings, each 3 feet in diameter (≈90 cm) and 2 feet tall (≈60 cm), give you about 320 gallons (≈1200 liters) of water.
How it works
- The base is a flat, compacted gravel or concrete pad.
- Rings are stacked, sealed at the joints (even clay or mortar works).
- At the bottom — an outlet for a spigot, hose, or drip line.
- On the side — a diverter with a filter connects to a downspout.
- On top — a lid with a debris screen and an overflow outlet to a drain or backup tank.
If built right — the water stays fresh, doesn’t smell or turn green, and can be stored for months.
Why it works
- Concrete keeps the water cool — no overheating in the sun.
- Durability — these towers can last 20–30 years without replacement.
- Stability — in wind or animal-heavy areas, these won’t tip over.
- Eco-friendliness — you can often reuse old rings from construction sites or demolition.
A few important notes
- Each ring weighs between 600–1300 lbs (300–600 kg). You’ll need machinery to move them.
- Always install an overflow outlet — otherwise water will spill over in heavy rains.
- You can coat the inside with bitumen or waterproof sealant to avoid leaks or contamination.
How much can you collect?
Roughly, 1 inch (2.5 cm) of rain on a 1000 sq ft (≈93 m²) roof yields up to 600 gallons. That means one tower like this could fill in just a couple good rains — especially in spring or fall.
You can use this tower as the main water source for your entire irrigation system — or make it part of the landscaping: surround it with stone, cover it in moss, or integrate it into a rock garden.
10. Fence-integrated bamboo gutters leading to ground reservoirs
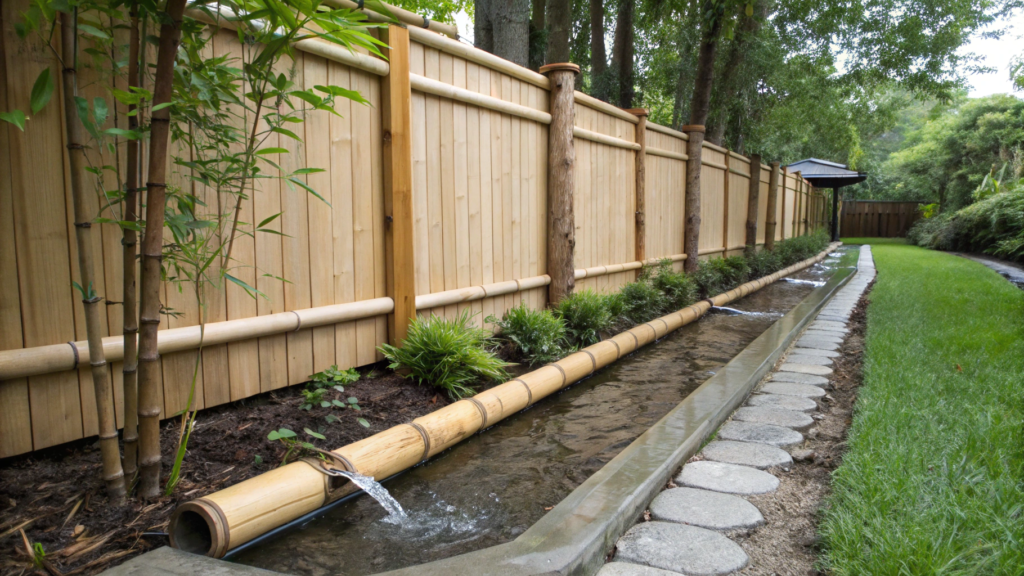
A gutter that… doesn’t look like a gutter. Because it’s made of bamboo, built right into the fence running along the southern border of the garden. Yes — hidden right inside it.
This idea came to us after seeing something similar in a Japanese-style garden at a show in Eugene. There, bamboo wasn’t just a decorative accent — it was a functional water drainage system, guiding rainwater from a canopy, through the fence, into a concealed underground reservoir.
How it works
- Bamboo sections, split lengthwise, create open channels.
- These “gutters” are mounted on the inner side of the fence, with a slight slope — so water flows.
- At a chosen point (usually at the bottom or near a post), all the water drains into a subterranean tank — could be plastic, concrete, or even a gravel-filled dry well.
- From there — it’s up to you: pump it to your irrigation system, or let it flow by gravity to your garden beds.
A real-life example: along our permaculture row
A while back, we set up this kind of drainage along the fence where we grow lavender, rosemary, and sage. The fence section is wooden, and on the inside, at 3 feet height, we mounted 6-foot (1.8 m) bamboo half-pipes. Each joint was sealed with silicone gaskets and wrapped in natural jute twine — both for aesthetics and protection.
At the lower corner of the lot, all the water from this run drains into a 45-gallon underground tank, cut from an old food-grade barrel. From there, we either run it through a hose for drip irrigation, or just use the spigot for manual watering.
Why bamboo?
- It’s natural and beautiful — goes great with wood and plants.
- Lightweight, flexible to work with.
- With proper treatment (oil + sealer), it holds water for years.
- And honestly, it works just as well as store-bought gutters — especially when you need modest capacity and local drainage.
You’ll want to keep a slope of 1–2%, so water keeps flowing and doesn’t sit still. Don’t forget debris protection and making sure all the joints are sealed — especially if you’re connecting several sections together.
We use basic garden-grade bamboo about 2–3 inches (5–7.5 cm) in diameter, cut it lengthwise — and just like that, you’ve got two half-pipes. Sand the edges, coat with linseed oil or exterior varnish — and it’s ready to go.
This setup works for roof runoff, or for redirecting rain from patios, canopies, or even greenhouses.
Now it’s your move
All these ideas aren’t about trends or looks. They’re about making your space smarter, more beautiful, and more independent from the hose and the meter.
And it doesn’t matter whether you start with a bamboo gutter or a concrete tower — what matters is that you start.If you haven’t read the first part of this series, definitely check it out — there’s a whole batch of ideas you can put into practice today. And if you have questions or came up with your own version — drop a comment and share what you’ve built in your backyard.