At some point, you realize that a porch isn’t just “that spot by the door.”
It’s the first hello from your home. It’s the little corner where coffee tastes better than in the kitchen. And sometimes, one single flower can shift your whole mood.
But let’s be honest: most “pretty porch decor” ideas are kinda boring.
Same old planters, geraniums, string lights. Everyone’s porch starts to look the same.
In this article, I put together 10 porch flower display ideas that break the rules — and actually work.
We’ve tried every single one of them on our own porch. What really matters? Bringing back joy, playfulness, and life to porch decorating.
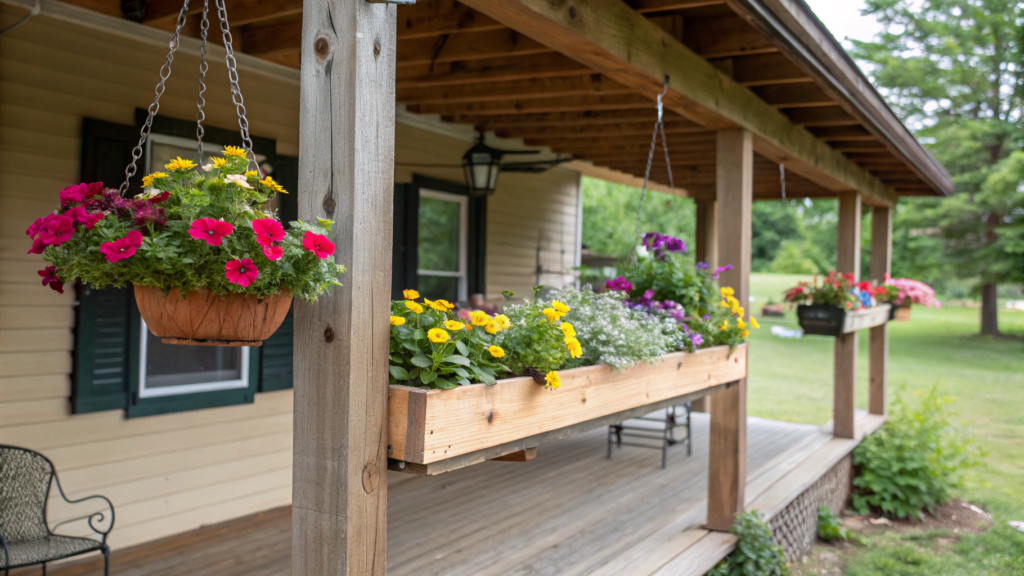
1. Upside-Down Hanging Flower Planters
Upside-down planters aren’t weird — they’re gravity-defying and neighbor-watching-head-turning!
The first time I saw one was in a vintage gardening mag from the ‘80s. Some city gardener was growing strawberries upside-down on a New York balcony. It looked wild. Naturally, I had to try it.
The benefits? First off — it saves space. Perfect for narrow porches or if you want to leave room for swings or cozy chairs.
Second — the visual impact. It looks like the flowers are pouring downward like a waterfall.
How to make one yourself:
- Choose the right container.Plastic buckets work great, or grab purpose-made upside-down planters with holes at the bottom — like these ones on Amazon. They usually come with leak protection and built-in root ventilation.
- Cut a hole in the bottom (if using a basic bucket). About 2–3 inches wide (5–7 cm) — big enough for the plant’s root system to fit through without falling out.
- Insert the plant roots-up. Yep, it sounds odd, but you gently pull the plant through the hole from the inside out, securing it in place with coconut fiber or moss to keep the soil in.
- Add soil from the top. Use light, compost-enriched soil. We mix in a bit of worm castings and always mulch the top (which will be the “bottom” once hung).
- Hang it up. Use a sturdy ceiling hook — these planters can weigh 10–15 lbs (4.5–7 kg) when filled with soil.
Best plants for upside-down growing:
- Petunias
- Verbena
- Nasturtiums
- Cherry tomatoes
- Herbs like basil and mint (yep, they actually love hanging upside down!)
Fun fact. The first week, we accidentally overwatered one planter… and it rained on everything below it.
Now we place shallow trays underneath — and surprise! They’ve turned into little water gardens of their own.
2. Summer Front Porch Flowers in Rain Boots
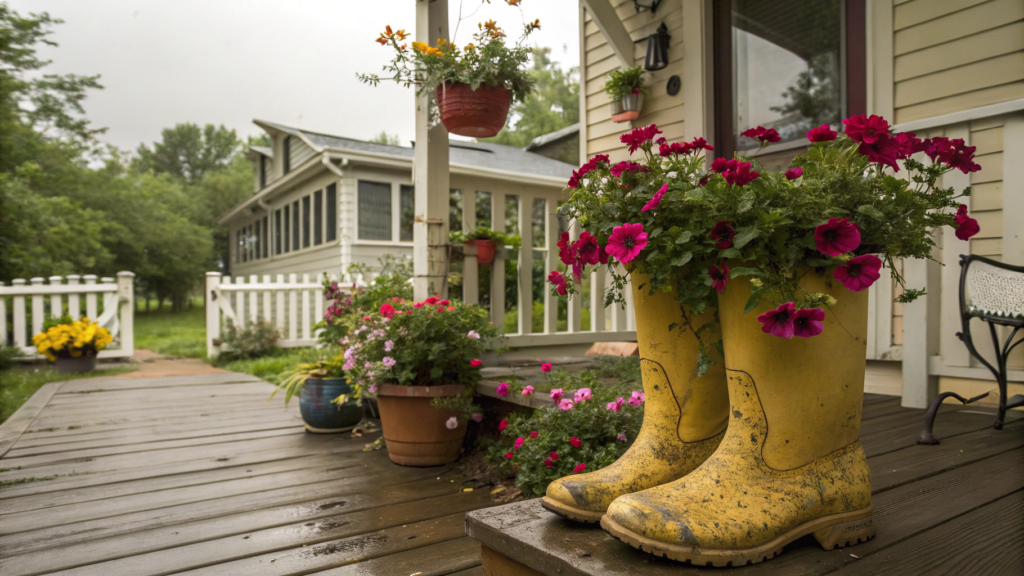
Every year when summer starts, the same thing shows up on our porch: a pair of worn-out yellow rain boots.
Totally useless as shoes anymore — but they bloom with petunias like nobody’s business.
So… why even bother planting flowers in boots?
Well, here’s why:
- It saves space
- It’s free (no new planters needed!)
- And it’s got that perfectly imperfect charm — simple, sweet, and full of character
How to turn rain boots into quirky summer planters:
1. Pick your boots. Old or decorative ones — doesn’t matter. Just make sure they stand up on their own.
2. Drill some drainage holes in the soles. Two or three should do it — about 1/4 inch wide (0.5–0.6 cm).
3. Add drainage material:
- Clay pebbles
- Gravel
- Broken terracotta shards
4. Fill with potting mix. We use a light, nutrient-rich blend:
- 60% compost
- 30% coconut coir or vermiculiteporch
- 10% sand
(+ optional worm castings because… of course)
5. Plant your flowers! One main plant per boot works great. Add trailing blooms or herbs around the edges if you like.
Great flower choices for boot planters:
- Petunias – bold, trailing, and bloom all summer
- Verbena – compact, sun-loving, and low maintenance
- Nemesia – sweet scent and tidy growth
- Lobelia – perfect for soft trailing effect
- Dusty Miller (Cineraria) – silvery foliage adds contrast and calm
Once you’re done, just set the boots near your front steps or tuck them into a porch corner.
One year we even lined up two pairs — ours and a kid-sized set — filled with all kinds of colors.
Someone walked by and said, “That looks like your family in flower form.”
I loved that. And now it’s a summer tradition.
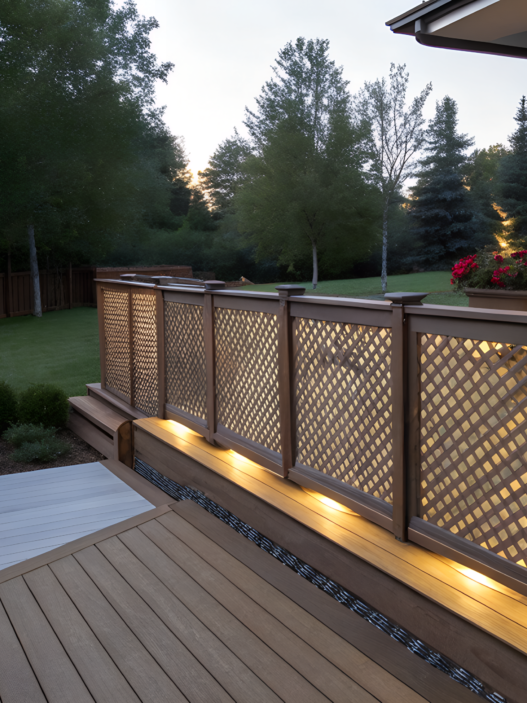
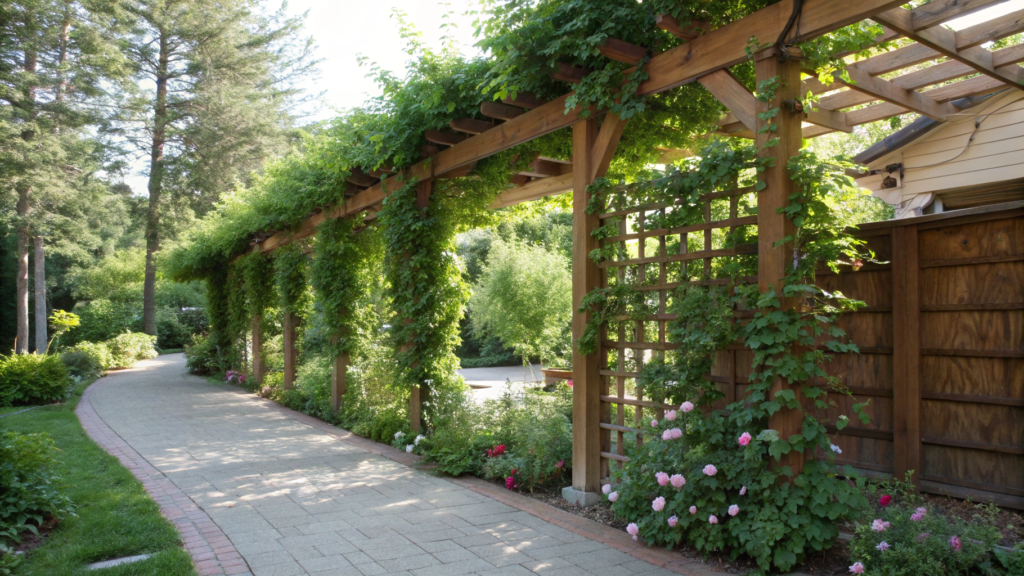
3. Turn a Garden Trellis into a Living Porch Divider
When we moved into our first little plot of land, our porch looked straight out onto the driveway.
Every time a neighbor parked, dogs barked, cars passed… it just ruined the vibe.
That’s when the idea hit us — let’s build a wall. But not a brick wall — a living one.
So we built our very first garden trellis divider. A simple wooden structure, some soil, lots of climbing plants — and suddenly, we had a private little green oasis right on the porch.
Why it works so well:
- It visually separates the space without making it feel closed off
- It creates shade and a cooler microclimate, especially if you plant fast-growing vines
- It turns an open porch into a cozy “outdoor room”
- And yeah… it’s just plain gorgeous
What you’ll need:
Here’s what we used to build our trellis divider on the back porch:
- A garden trellis – we picked a folding wooden one, about 6 feet tall (180 cm) and as wide as the porch would allow.
- Pots or long planters at the base – we placed them right under the trellis so the plants could climb. Ours were cedar boxes made by Lindy from leftover wood.
- Floor and ceiling mounts (if needed) – some windy days are no joke. Without anchors, the trellis was halfway to the chicken coop.
When the structure was already standing, the most enjoyable part began, that is, the selection of plants.
Oh, how wrong I was with my first attempts. I thought that planting beans would be enough and it would be beautiful. Yeah, it was beautiful. For exactly two weeks. Then it dried up.
Plants that actually work (spoken from experience):
- Clematis – fast-growing, lush, loves partial shade
- Black-eyed Susan vine – bold orange-yellow blooms, sun-loving
- Sweet peas – smells heavenly but wilts in hot weather
- Hyacinth beans – purple flowers and edible pods
- Mini cucumbers – yep, real cucumbers! Just go with dwarf varieties
I usually mix 2–3 types — edible + ornamental.
What we get is a wild little vertical jungle: beautiful to look at and something to snip for dinner. Once it’s grown in, you can even tuck a chair and table behind it and pretend the world doesn’t exist beyond the leaves.
It’s easier than you might think to take care of it all. Watering is done with a watering can or a drip hose that can be stretched along the container. Once a month I feed with compost tea. In the fall I cut everything off, leave the lattice “bare”, and in the spring – a new one.
Oh — and if you’re really not into caring for live plants?
You can totally fake it. There are some great artificial greenery panels on Amazon these days that look crazy realistic — especially if you sneak in a few drops of essential oil on the leaves.
4. Porch Flower Box on Wheels
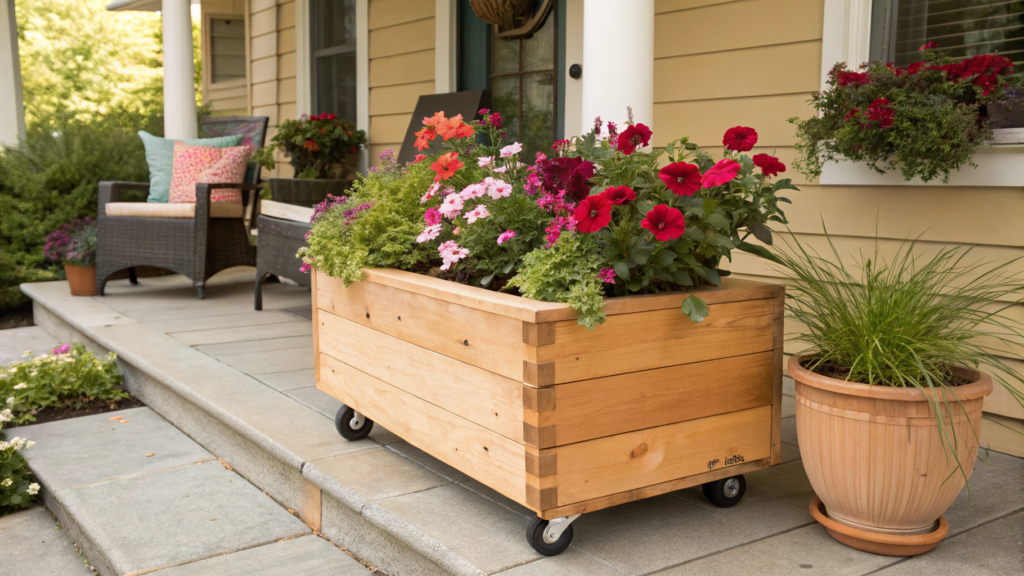
One hot July afternoon, I was dragging a giant wooden flower box into the shade for the millionth time when it hit me:
“Why don’t we just put wheels on this thing?”
Genius.
That was the start of our first rolling flower bed. Now we move it with the sun: in the morning — roll it into the light, midday — wheel it into the shade, and by evening, we park it right by the front steps so the blooms greet whoever drops by.
Why build a flower box on wheels?
- Because sunlight shifts throughout the day
- Because plants are living things — and their needs change too
- Because sometimes you just want to switch up your porch decor
- And because, honestly? It’s just fun to wheel your flowers around in the morning 😄
How we built our rolling flower box (no tears, no splinters):
We kept it super simple.
Here’s how we made ours — and yes, it’s still rolling strong.
You’ll need:
- A wooden box or planter – build it from scrap wood like we did, or grab a solid ready-made one with drainage holes
- Casters (wheels) – four total, at least two with brakes. Rubber wheels are best so you don’t scratch the porch
- Soil and drainage materials – standard stuff: gravel, lightweight soil mix, compost, and mulch
- Flowers and herbs of your choice – just stick with plants that don’t mind a bit of movement or light changes
Our go-to combo for a mobile garden oasis:
I switch it p seasonally:
In spring — more greens.
By summer — in go the bright blooms.
Come fall — I tuck in dwarf asters and a pumpkin next to it for that full-on harvest market feel.
- Lavender – loves sun and breeze, fills the porch with fragrance. We always plant it along the edge — it likes space.
- Caladium – if you want that vacation-vibe aesthetic? This is your plant. Loves shade, pairs beautifully with herbs and begonias.
- Basil and mint – yep, we grow edibles too! Roll the planter into the sun in the morning, and by lunch you’ve got fresh herbs for tea or pasta.
- Blooming begonias – my no-fail flowers. Long-lasting, forgiving with water, and they look like you hired a landscape designer… when you absolutely didn’t.
- Ornamental grasses – we use fescue or dwarf miscanthus. They add height, motion, and make the whole planter feel like a mini meadow
Care routine?
- Daily – check the soil moisture (planters dry out faster, especially in direct sun)
- Monthly – add a dose of compost tea or nettle brew (yeah, I’m that person)
- Seasonally – refresh the mulch and clean the wheels (leaves love to get stuck in there)
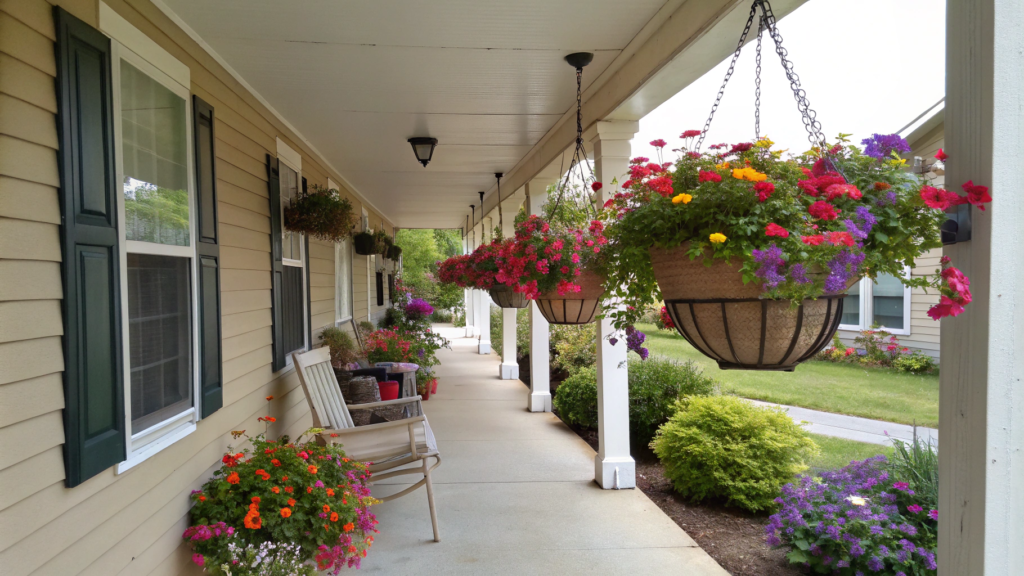
5. Farmhouse Front Porch Flower Bar
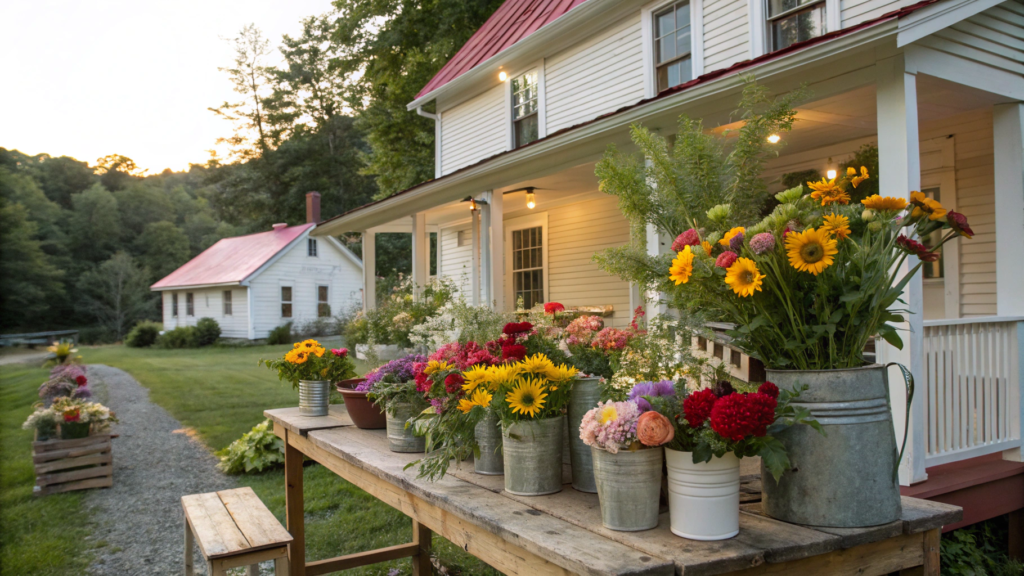
One time we decided to have dinner out on the porch. It was hot, and I wanted to decorate — but not just toss some flowers in a vase and call it good. I was dreaming of something atmospheric — like those old Southern farm scenes from vintage movies.
So we made a flower bar.
What even is a flower bar — and why is it awesome?
It’s not about alcohol.
(Okay, not mostly about alcohol.)
It’s:
- a long console, shelf, or table running along a porch wall or railing
- covered with pots of flowers, herbs, greenery, maybe a few jars or bottles with floating blooms
- tucked underneath — baskets, garden tools, gloves, even a pair of old scissors for real-deal functionality
- and the vibe? Like walking into a flower shop with really good taste
How we built ours (and how you can, too):
We started with a salvaged wood board — about 1×10 and 5 feet (150 cm) long.
We mounted it straight onto the porch railing, adding little “legs” from scrap wood underneath for support.
If you want something sturdier or more permanent, a ready-made wooden console like this would do the trick beautifully.
What’s on our “bar”:
- Terracotta pots filled with petunias and nemesia
- Metal buckets with sage and mint
- A glass bottle with a sprig of dill in water — surprisingly elegant
- A low vase holding blooms that faded in the garden but deserved one more moment of glory
- And sometimes… a cup of tea. Or a glass of wine.
Let’s be real: this bar occasionally becomes a bar.
Flowers & herbs that always look amazing:
- Petunias and verbena – they spill over the edge like little waterfalls
- Thyme, oregano, and mint – touch them and the fragrance fills the air
- Asters and daisies – a little wild and messy, in the best way
- Succulents in mini pots – for contrast, texture, and rhythm
- Blooms in water – snip a flower head, drop it in a teacup… pure charm
Some mornings, I set my coffee down on that bar, listen to the birds, and just take it in.
No daily maintenance, no pressure.
You can change it out every week if you want.
It’s a living, breathing little corner — exactly what a porch should be.
6. Back Porch Fake Flower Wall with Scented Oils
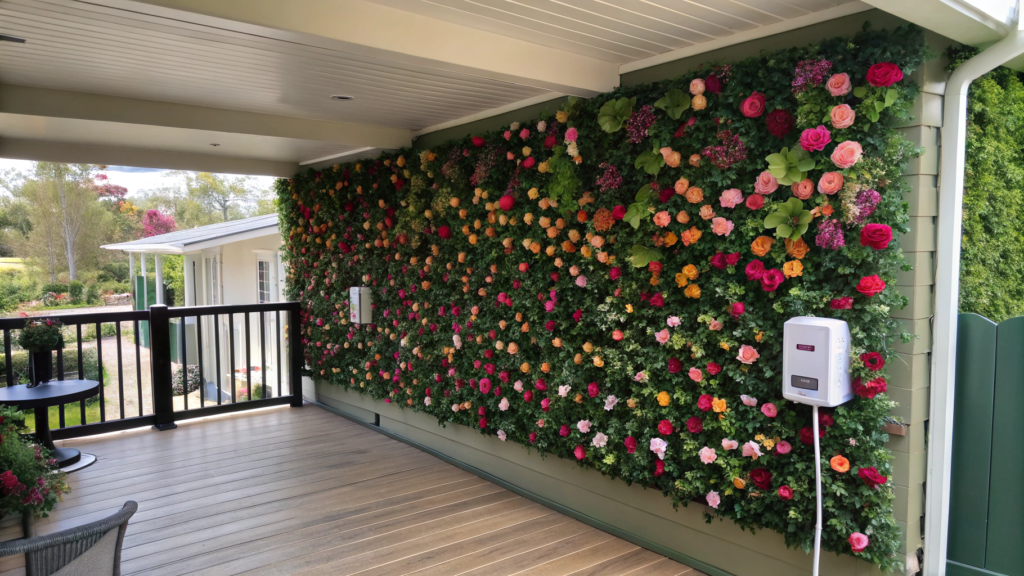
Every backyard has that corner. For us, it was the north-facing wall of the back porch.
Always in the shade, always a little damp, always… meh.
We tried everything — but no live plant made it past week three.
So what’s a fake flower wall — and why would you want one?
It’s a way to bring life to a “dead zone” on your porch without fighting nature.
And it’s not just a sheet of plastic you slap on the wall.
It’s a backdrop that:
- stays fresh and pretty 365 days a year
- needs zero sunlight, water, or irrigation
- and smells like a real garden — thanks to a few drops of essential oils
I’ll admit — I was skeptical at first.
I thought it would look cheap.
But then I saw these premade panels — full, textured, varied in tone, and easy to mount on a trellis or wooden frame.
We clipped them in place one evening, and by sunset, the whole space felt transformed.
How we made it smell real:
We picked 2–3 essential oils: geranium, lavender, and lemon.
A few drops on the lower leaves (where the sun wouldn’t burn it off too fast) — and boom.
When the breeze came through, it really did feel like standing in a blooming garden.
Sometimes I even spritz it with a mister filled with water and a drop of oil — just for that soft, “morning mist” scent.
No science. Just vibes.
Want to DIY your own flower wall?
No need to buy panels — you can totally make this from scraps and what’s already in your shed.
Here’s how we did it:
- Base frame:
Use a wooden trellis or build a square frame from four boards. Stretch chicken wire, plastic garden mesh, or even leftover fencing across it. - Flowers:
Pick faux flowers from the dollar store, old wreaths, or craft bins. Choose ones that won’t bleach instantly in the sun (we test by leaving them in full sun for a week — if they survive, they’re in!). - Mounting:
Use zip ties, wire, or hot glue. We laid everything out loosely first, got a feel for the look — then attached them.
Pro tip. Don’t overthink symmetry. Imperfect = natural.
- Add scent:
Fill a spray bottle (an old one from garden supplies works great) with water and a few drops of essential oil.
Spritz a couple times a week — and there you go: a faux flower wall that smells like summer.
That’s how we made our first one — no fancy kits, just what we had lying around.
And honestly? That version, the one we pieced together ourselves, ended up being our favorite.
Because it felt like us.
7. Tiered Hanging Baskets Using Recycled Kitchen Colanders

When holes in a colander aren’t a flaw — they’re a built-in drainage system.
Wanna know what our favorite box in the shed is?
The one full of what looks like junk: old metal strainers, bits of chain, leftover hooks, rusted wire.
And every summer, that “junk” turns into one of the prettiest features on our porch:
A tiered hanging flower basket made from recycled kitchen colanders.
Lightweight. A little vintage. Totally unique.
And somehow, it ends up different every year.
Why it works (and works beautifully):
- Built-in drainage — no need to drill anything
- Light but sturdy — no sagging ropes or snapping hooks
- Handles or holes make them easy to hang
- And when you stack a few in a row? You get a vertical garden that takes up zero floor space and looks like functional art
So what does it actually look like?
Picture a chain of three hanging colanders.
Each one tells a little garden story:
- Top tier: mint and nasturtium
- Middle: lobelia and dwarf thyme
- Bottom: parsley, basil, and trailing verbena that spills out like curly hair
We hang ours from a hook under the porch awning — right at eye level.
Every time we walk by, we snip a bit of mint for tea, give the thyme a quick sniff, or just admire the movement of it all in the breeze.
How to build your own colander planter tower:
- Find 2–3 colanders. Metal, enamel, even sturdy plastic works. Just make sure each has either handles or holes for attaching.
- Stack ’em with rope or chain. We use chain or wire, spacing them about 8–10 inches (20–25 cm) apart so each tier has growing room.
- Line each colander with coconut fiber or landscape fabric. That stops the soil from falling out the drainage holes. Add a bit of gravel for drainage, then your potting soil on top.
- Plant. Sun-lovers go on top. Shade-tolerant or trailing plants go on the bottom.
We’ve even mixed flowers and herbs — it’s a total vibe. - Water smart. Top tier only! Water flows down “cascade-style,” hydrating everything on the way.
And here’s the best part:
Even if you’re not a designer, it still turns out looking amazing.
And each season, you get to reinvent it. One year ours was all edible — another, all lavender and trailing blooms.
8. Magnetic Flower Pots for Metal Porch Columns

Yes, magnetic flower pots are real. And no — they don’t fall.
When we first moved in, I thought our porch had seen it all.
Nice white metal columns, solid railings, lots of charm.
But here’s the problem: nothing would stick.
You couldn’t hang a pot, mount a bracket — nada.
Then, as often happens around here, inspiration struck in the garage:
Magnets.
Why magnetic planters aren’t just a gimmick:
- You can move them around every single day if you want
- No nails, no holes, no drilling
- They don’t clutter up the porch
- And the best part? They create this magical floating effect — people stop and stare, trying to figure out how it works
Do they actually stay put?
Yep. But we had to learn a few things the hard way.
How we built our first magnetic planter:
- Start with a small or medium plastic pot. Lightweight is key. We chose simple, stylish ones without drainage holes (no dripping!).
- Glue a strong neodymium magnet to the back. Look for ones that can handle at least 10 lbs (4.5 kg) — like the kind used in tool racks.
- Hack version. Place your flower pot inside a small metal bucket, and stick the magnet to that instead. Same result, less commitment.
- No glue? No problem. Use magnetic hooks or trays — some even come with built-in rings to hold your planter steady.
We planted lobelia, kalanchoe, even a little microgreen patch — super easy to take off and bring into the kitchen.
And when the rainy season started? We just popped them off in five seconds and moved them inside.
Real talk: how not to mess it up
- Don’t try to hang heavy ceramic pots — they will fall
- Double-check that your columns are actually metal (we’ve been fooled by wood painted to look like it…)
- Always test the magnet with an empty pot first
Where to place magnetic pots?
We love them on each side of the entryway — gives you a floating floral archway look.
Sometimes we spiral them upward around a column so the plants trail from top to bottom.
Also perfect for mini vases: pop a few wildflowers into a glass jar, stick it on a magnet — and boom, a “modern cottagecore” statement.
9. Floating Planter Shelf Between Porch Posts
We had this weird empty space between two porch posts.
Just… space.
It looked like someone forgot to finish decorating.
One morning I grabbed two boards, a roll of rope, and a cup of coffee. An hour later — there it was: a floating shelf full of flowers.
And just like that — the corner came to life.
What is a floating shelf, exactly?
It’s a hanging shelf strung between two columns, where you can place flower pots, candles, herbs, books — whatever brings you joy.
And the magic? It’s not just about the looks.
- It doesn’t take up any floor space
- It adds a subtle division between areas of your porch
- And it seriously looks like it’s floating.
Especially early in the morning, when the light hits the flowers and they cast soft shadows on the posts — total dream.
How we built ours (it’s easier than you think):
What we used:
- Two wooden boards (1×8 or 1×10), around 3–4 ft long (90–120 cm)
- Synthetic rope or thick jute twine (moisture-resistant)
- 4 carabiners or hooks
- Screws and a drill
- And yep — a pretty waxed rope because let’s face it, it matters
How we put it together:
- Drill four holes in each board — one in every corner
- Thread the rope through the holes and tie knots underneath to hold the board in place
- Attach the upper ends of the ropes to hooks mounted in the porch posts or overhead beam
- Use a level to make sure it’s even (trust me — one crooked pot and the whole shelf looks like it’s tipsy)
- Decorate!
What we keep on our shelf:
- Little pots with succulents and petunias
- Glass jars filled with sand and tealights
- Tiny clay bowls of microgreens
- And sometimes — a weathered book with a dried flower tucked inside. No one reads it, but everyone asks about it.
Then you stand there, coffee in hand, watching the shelf gently sway in the breeze.
No creaking. No clutter.
Just a small, simple thing that somehow pulls your whole porch together.
10. Fall Porch Flowers Planted in Hollowed-Out Pumpkins

We love pumpkins. But not just for eating.
Because a pumpkin isn’t just a seasonal decoration — it’s a natural, biodegradable flower pot that blends right in with autumn leaves.
Why pumpkins are more than just “cute”:
- They’re compostable containers — no waste, no plastic
- They look festive without needing extra decor
- Perfect for one-day events or the whole season
- And (my favorite part!) — they smell amazing, especially if you drop in a little cinnamon or orange oil
How we make our pumpkin planters
Nothing fancy.
Instead of carving a spooky face, we fill them with flowers.
Step-by-step:
- Pick a sturdy pumpkin. Thick-skinned and flat-bottomed varieties work best: white “Casper”, gray-green “Jarrahdale”, or the classic “Cinderella”.
- Cut the top and scoop out the insides. Use a spoon, hands, scraper — whatever works.
Optional. Scorch the inside edge with a flame to slow down decomposition. - Insert a plastic pot or coconut liner. This protects the pumpkin flesh and helps hold moisture. Sometimes we just toss in a fabric liner or landscape cloth bag.
- Add soil and plant your flowers. Go for fall faves: asters, mums, violas, yarrow, ornamental kale. Don’t overstuff — pumpkins have limits.
- Place and decorate. We line them up by the stairs, on the porch shelf, or beside the front door. Add pinecones, dry leaves, and a candle — boom, instant October mood.
Some years, I even make mini versions — tiny pumpkins with a hole cut just big enough for a succulent.
Looks like a forest creature left you a gift.
And when the season ends? We toss the whole thing into the compost.
No cleanup. No guilt. Just a little more earth for next year’s garden.
My Porch, My Rules
And that’s a wrap on our list of 10 bold porch flower displays that break the rules.
But honestly? I feel like this is just the beginning.
Don’t be afraid to get a little weird with your porch. It’s your space. If hanging herbs from a colander or planting begonias in rain boots makes you smile — that’s all that matters.
So tell me — which one of these ideas speaks to you the most? Have you tried anything like this already?
Or are you just starting to imagine your porch in a whole new way?
Drop a comment below – I’m really interested in how you “break the rules” on your porch.