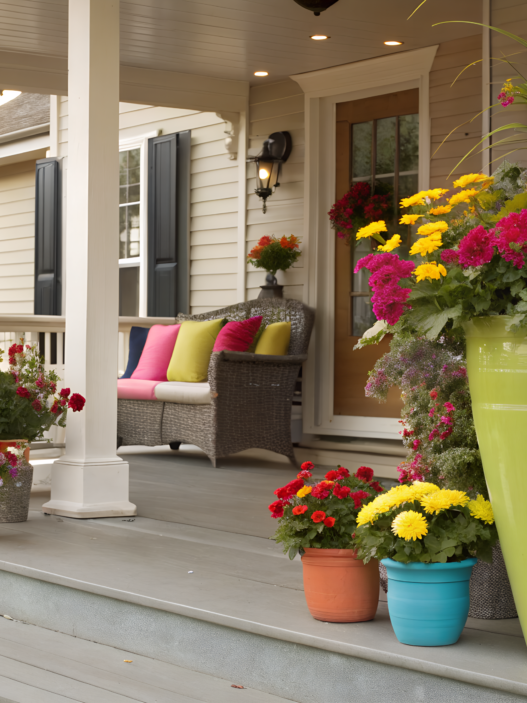
A porch is more than just an entrance to a home. It’s the first thing guests see. It’s where you put down a cup of coffee, step out barefoot in the morning… or just hang out in silence, watching the breeze ruffle the grasses. And the flowers here aren’t just decoration. They make the porch flower come alive. But when you start looking for ideas – everything is the same: beautiful, but boring.
And I have collected for you 10 non-standard, inspiring floral solutions, which we personally embodied at our place. All of these are simple materials, a little creativity, and the result is a porch that no one will pass by in silence.
1. Farmhouse Flower Crates for Covered Porches
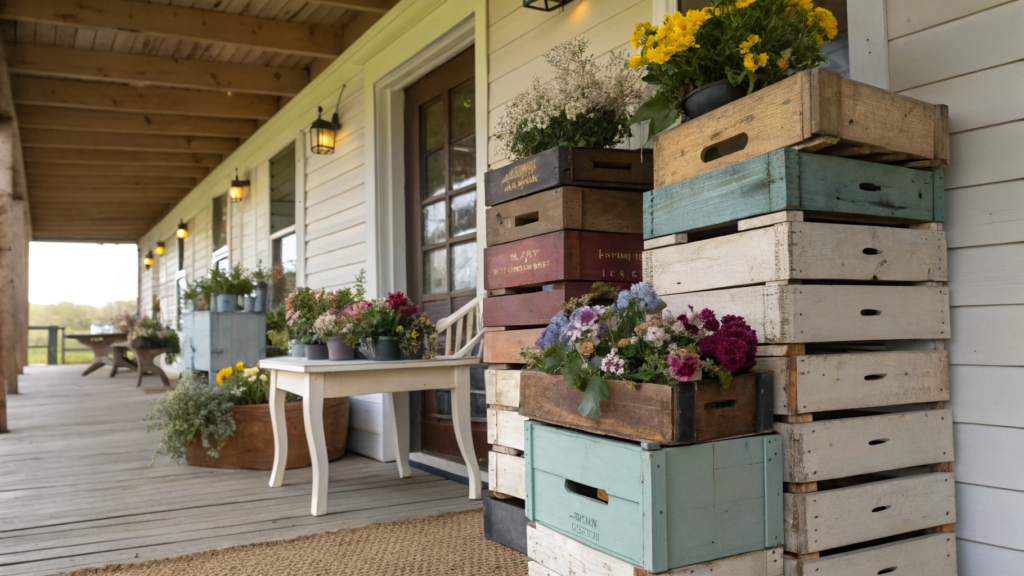
These rustic flower boxes remind me of a morning at the farmer’s market: coffee in hand, fresh flowers, the scent of wood… I guess it’s because they immediately create a cozy feeling without imposing anything.
Porch decor often looks the same. And the drawers? They bring movement and layers. Stack them one on top of the other, paint them, put them on the side of the door and you no longer just have flowers, but a mood.
Each drawer can be different in height, color, even history – and together they create a feeling that it’s not all just “decoration”, but part of your life.
If you love to craft, it’s easy to make a drawer like this! Here’s a basic outline:
What you’ll need:
- Boards or pallets
- Nails or screws
- Hammer or screwdriver
- Sandpaper
- Paint or stain (optional)
How to do:
- Measure and cut the wood to the desired size
- Assemble the box by fastening the sides and bottom together
- Sand the rough edges
- If desired, paint or stain.
Tip. Screw the wheels on the bottom and the box can be easily rolled.
How to decorate
When the drawers are assembled and stand in their place, let’s do the filling.
Not just planting something, but turning the drawer into a part of the space that you can’t pass by without smiling.
1. I often start with a game of height. I put a drawer, top it with a second smaller one, and add a pot with ampelike flowers on the side. Nasturtiums hanging downwards look like a waterfall. A simple idea, but the effect – as if the designer worked.
2. Then I think about seasonality.
- In spring I want tenderness – tulips, primroses, a bit of greenery.
- Summer is the time of fragrance: sweet peas, lavender, basil.
- In the fall – shades of honey and wine: chrysanthemums, velvets, ornamental cabbage.
- And in winter? Why not put in a drawer of fir branches, a couple of cones and weave a garland there? It works well, it’s been tested. Even the neighbors took pictures at our box on New Year’s Eve.
3. Light is another important element. Sometimes I just wrap the drawer with a thin garland on batteries, sometimes I put a lantern with warm light next to it. No ostentatious illumination – just a soft glow, as if the flowers themselves glow in the evening.
4. And the finishing touches. Twine handles, an old sign that says something like “Herbs & Flowers”, a piece of tile under a drawer or a small stool on the side. Little things like that seem to suggest that this drawer is there for a reason. It’s part of the house.
If you don’t feel like fiddling around, there are great ready-made options with the same charm. A set of rustic wooden crates – can be stacked on top of each other or used individually.
Did you know that adding natural materials – wood, colors – to your interior reduces stress levels and boosts your mood? It’s proven: biophilic design really works!
2. Vertical Hanging Beds That Bloom Like Waterfalls

Of all the ideas we have implemented on our veranda, the vertical waterfall beds have had the strongest effect. They create the feeling of a living stream, the flowers seem to flow from top to bottom, as if in motion.
What is a suspended waterfall bed? It is a design where flowers are planted in several levels, usually in fabric or wooden pockets, which are fixed vertically – on the wall, railings, old stairs or even just on a strong rope. Flowers are planted from top to bottom, and their stems and flowers “flow” in a cascade, creating a flowing effect.
- Important! Such structures are better placed under a roof or in a place protected from rain.
Which plants to use
The choice of flowers for planting is very important. The main thing here is that they should hang down smoothly. Here’s what works great for us:
- Surfinia (especially white and purple) is one of the leaders. It blooms exuberantly and doesn’t require complicated care.
- Lobelia – especially good in the lower tiers. She has small but dense flowers.
- Pelargonium ivy-leaved – looks lush and powerful, especially in the central part of the pendant.
- Dichondra ‘Silver Falls’ is a real treasure! Its silvery shoots stretch downward as if they were drops of water.
- Calibrachoa – mini petunias, look neat, but bloom actively until the fall.
A tried-and-true flyhack. Combine three levels of saturation in color – a bright top, a pastel midrange and a dark, dramatic bottom. This way it creates a sense of depth.
How to make this design
- Get a vertical fabric cachepot organizer – with pockets, easy to attach to a wall or fence.
- Alternatively, a wooden or metal frame with staggered drawers or baskets.
- Drainage. In each pocket or box be sure to pour a thin layer of expanded clay or small stones. And on top – the earth. This will not let the water stagnate and keep the roots from rotting.
- Hang the construction in the penumbra or under the morning sun, so that the flowers were comfortable.
Lighting. We attached a solar-powered LED strip on the back of the structure, and when the sun goes down – the flowerbed begins to softly illuminate from the inside. It looks like an art object, seriously.
- By the way, on a side note! If you want to extract from the hanging beds not only beauty, but also benefit – add aromatic herbs to them: mint, thyme, oregano grow perfectly cascading. In addition, they attract bees and deter mosquitoes.
Vertical “flower waterfalls” do not require a lot of space, but give a lot of impressions. And believe me, when you have such a corner, even an ordinary tea on the porch turns into a small event.
3. Fake Flowers, Real Style

Once we went on vacation for two weeks, and our whole porch… died. After that, I made a rule: live flowers in the zone of visibility – artificial flowers in the zone of stability. Especially on the south side, where everything burns even in the shade.
Why artificial flowers at all?
- Not afraid of the sun. Good artificial plants do not fade even under direct rays.
- Don’t require watering. Especially convenient if you’re away or just don’t want to run around with a watering can every day.
- No litter. No fallen petals or dirt from the ground – clean and tidy.
- Economy. Bought once – and it lasts for a long time.
And if you think they look like a plastic bouquet from a funeral, know this: modern options are really surprising. Some people even touch them to check whether they’re real or not.
Where to use them
I’m not suggesting filling an entire plot with them. But on the porch, especially:
- In overhead planters where watering is difficult.
- In areas of high wind or sun, where live flowers burn out in a week.
- In narrow boxes under railings where the soil dries out quickly.
- For winter and early spring decor when it’s too early to plant live.
How do you make sure they don’t look too fake?
This is where the design magic comes into play:
Choose matte materials. Shiny looks too cheap.Fabrics like polyester with a fine texture look better.
Combine. Mix artificial with live or dried flowers. It’s very confusing to the eye.
Add greenery. For example, eucalyptus branches look fresh and structural.
Use in pots with soil. Yes, yes! Even fake flowers can be stuck in the ground – it visually tricks the brain and everything looks natural.
Wipe down regularly. Dust on artificial plants is their biggest enemy. I run a damp cloth over them once a month and they’re good as new again.
One time I even did a test: I stuck artificial flowers in an old watering can by the entrance. For a week (!), none of the guests noticed that they weren’t real!
4. Back Porch “Flower Bed Benches” That Double as Seating
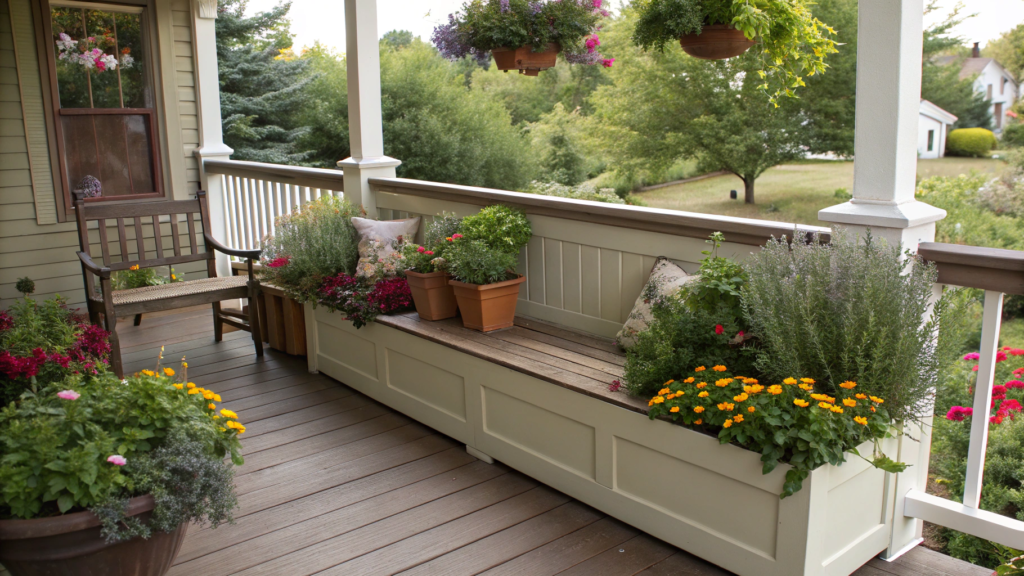
If I had to pick just one feature that completely transformed our backyard—it would be the flower bed bench.
It’s a simple idea we stumbled into almost by accident… and now I can’t imagine our porch without it.
A flower bed bench is a setup that serves two purposes at once:
- Seating. A sturdy, comfy spot to sit down, sip some tea, and watch the birds and blooms do their thing.
- Planter. Built-in boxes or containers where you can grow flowers, herbs… even salad greens!
It’s not just furniture—it’s a living part of your garden. One that evolves right along with you.
How You Can Build One (Or Cheat and Buy It)
Here are three versions we’ve tried (or seen friends use) — each one can be customized to fit your style and your budget.
1. Bench with Built-In Side Planters
This one’s a classic: a seat in the middle, with two planter boxes on either side.
You can build it from wood if you’re feeling handy — or just grab a ready-made bench with built-in planters if tools aren’t your thing.
We planted rosemary, calendula, and marigolds in ours. And every time you sit down? That little whiff of herbs and color blooming beside you… just perfect.
2. Bench on Brick Bases with Planters All Around
This one’s budget-friendly but still super charming.
You stack two low columns of bricks or cement blocks, place a wide wooden plank across for seating, and arrange slim, rectangular planters around the sides and back.
It gives you the feeling of sitting in a ring of flowers, even on a tiny patch of patio. And since the planters are loose, you can switch up the look for every season.
3. Bench with Pull-Out Planter Drawers
This idea came to us later — and it turned out so good.
We started with a basic wooden bench on legs, then added planter boxes on wheels underneath, like pull-out kitchen drawers.
Now we’ve got plants that roll out when we want to rearrange or give them more sun — super helpful if you like refreshing your setup often but don’t want to drag heavy pots around.
What to Plant?
I always try to mix plants that are both gorgeous and useful. You know—something to admire and something to nibble.
Start with some flowers just for the joy of it:
Asters, petunias, zinnias — they bring fullness and color instantly.
Then trail nasturtiums off the sides — they hang down like living fringe.
If you want something fragrant too, lavender is always a good call.
Now for the edible zone:
We often tuck in rosemary, thyme, and mint — you sit down, reach out, and you’re already holding something for tea or dinner.
In spring, we love planting leaf lettuce in the lower boxes where it gets a bit of shade.
And calendula? We grow it not just for the bright blooms — but also for making homemade salves and tinctures.
The best part? Mixing things up.
One time we planted thyme next to purple petunias — it looked stunning, smelled amazing, and the bees were obsessed.
Just like that, we had a flower bed, an herbal medicine cabinet, and a mini kitchen garden in one.
A Few Styling Tips
Paint the bench in a warm, neutral tone — something like natural wood, deep green, or terra cotta.
Toss on a couple of cushions with waterproof covers, and suddenly your flower bench becomes a true relaxation zone, not just a seat.
Why It Feels So Different
I noticed something. When you sit next to plants—not just look at them—you start to treat them differently.
You’re there. You breathe in the scent, snap off a sprig of mint, watch a bee land on a bloom.
And that’s exactly what makes a flower bed bench special.
It turns your backyard into a space you live in, not just walk through.
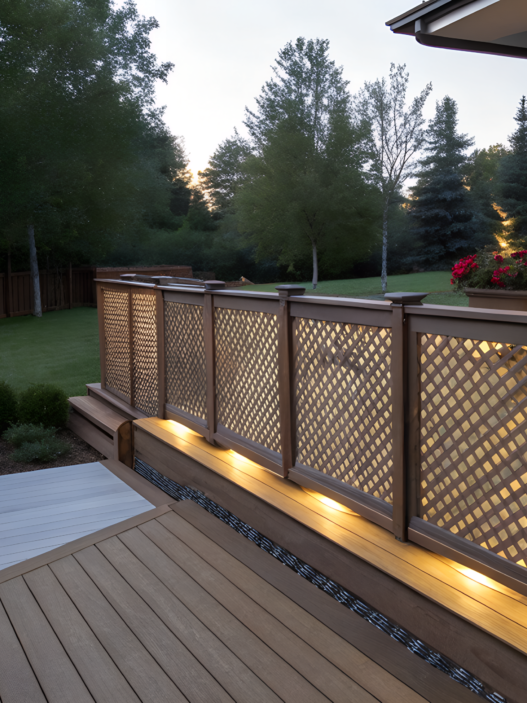
5. Decorating Flower Boxes with Solar Lights

There are a few things that completely change the vibe of your porch in the evening — and solar lights are definitely one of them.
Hang them randomly, and they’ll look… meh.
But when you weave them into your flower boxes?
Now that’s a whole different story — more like a summer stage set, just waiting for the curtain to rise.
Why Solar?
- No cords. You don’t need to mess with extension cables or worry about rain.
- They turn on automatically. Smart little things — they light up as soon as the sun sets.
- Energy-saving. They run on sunlight, so your electric bill stays right where it is.
- Flexible for any setup. Stick them, wrap them, glue them, hang them — whatever works for your layout.
Solar lights are one of the easiest upgrades you can make to boost nighttime charm without lifting a hammer.
How to Style Flower Boxes with Lights
These are the setups we’ve tested ourselves — and yes, we’ve shared them plenty of times on Rooted Revival!
1. Wrap the perimeter with fairy lights
Simple but super tidy.
Works especially well on wooden boxes with warm tones — the lights reflect gently off the wood and bring the whole planter to life.
2. Stick mini lights directly into the soil
Just like tiny garden stakes, but on a smaller scale.
Tuck a couple of them between the plants, and come sunset — the greenery glows softly from below. It’s like your garden box wakes up at night.
3. Attach a strip light behind the box
If your box is against a railing or wall, secure an LED strip to the back side.
The light will reflect off the surface behind it and cast a soft glow across the space. Subtle, but so pretty.
4. Add glass jars with lights to the mix
Drop some solar fairy lights into glass jars and either nestle them in the soil or hang them from little hooks nearby.
It’s the perfect focal point — especially surrounded by darker foliage.
Best Plants to Pair with Lights
Not all plants look great under artificial lighting — especially the cooler-toned LEDs. But some really do shine:
- Silvery or pale-leafed plants: like dichondra, heuchera, and wormwood
- Soft white or yellow flowers: think petunias, lobelia, alyssum
- Textured herbs: like mint, rosemary, and thyme, which catch the light beautifully in that soft dusk glow
A good combo of texture + light leaf color makes everything look fresh, even after the sun dips.
Quick Tip That Saved Us
If your solar panel is separate from the light fixture — don’t place it right next to your plants.
The leaves will throw shade (literally) and block the panel from charging fully.
We spent a month thinking our lights were defective… until we moved the panel just 12 inches into the sun. Since then? Flawless.
Honestly, I think every flower box deserves to glow at night — not just sparkle during the day.
There’s something magical about stepping onto your porch after a long day and seeing your plants bathed in soft, warm light.
It’s like your garden is still awake, just slower… quieter… breathing light instead of air.
And sometimes, that’s exactly the kind of peace you need.
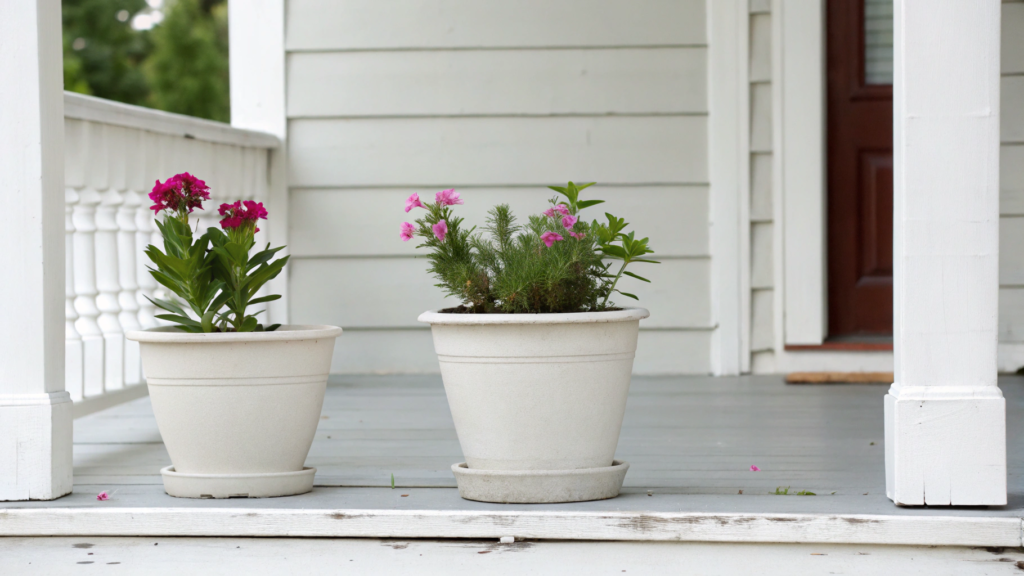
6. Spring Front Porch Pots That Look Fresh Even in the Shade

If you’ve got a covered front porch that barely sees direct sunlight — you already know how tough it is to make plants look alive there.
And it feels especially unfair in spring, when everything else is waking up… while your porch pot is sitting there with a tired-looking fern that, once again, “didn’t quite make it.”
But after a few trial-and-error seasons, I’ve found some combinations of plants and pots that actually thrive in the shade.
The Right Pot Makes All the Difference
Your container is more than just something to hold dirt — it’s a visual anchor, especially in shaded corners where the light doesn’t help much.
- Go for light-colored or bright pots — dark colors just disappear in the shadows.
- Glossy ceramic pots often look slightly wet or reflective, which makes them feel “alive,” even without direct sun.
- Tall, vertical pots are best — they pull the eye upward and create the illusion of space.
We picked a set of warm terracotta planters and grouped them near our wooden porch wall. Not in a line, but offset like a soft zigzag, and it added so much visual interest right away.
Plants That Actually Thrived in the Shade
I’ve tested everything from violets to culinary herbs. These are the plants that not only survived — they genuinely looked happy:
- Ferns. Thrive in humidity, hate harsh sun — total shade lovers.
- Heuchera. Hardy, colorful, and surprisingly long-lasting.
- Ivy (Hedera). Trails, climbs, survives just about anything.
- Violets & pansies. Made for cool, dappled spring light.
- Alyssum. Soft scent, soft bloom, zero drama.
And here’s something I noticed: bold color contrasts don’t work well in shade.
Bright yellow next to deep purple? They cancel each other out in low light.
But pastel tones or single-hue combos? They suddenly look like something straight out of a magazine — even if you just tossed a couple pots together last-minute.
A Foolproof Planting Layout
Even if your entry area feels uninspiring, this layout adds instant depth:
- Center: a heuchera or small fern
- Middle layer: violets, primroses, or alyssum
- Trailing edge: ivy, dichondra, or trailing geranium
The result? Effortless layers that give the feeling of a designed garden bed, even in one pot.
Drainage & Watering Tips for Shade Zones
Shade is sneaky. The soil stays moist longer — which sounds great, until it starts drowning your plants. So:
- Add a layer of clay pebbles or foam chunks at the bottom of your pots
- Always use drainage holes — non-negotiable
- Stick with liquid fertilizer every 10 days, focused on foliage growth (not blooms)
When we first moved in, the front entrance was kind of sad.
Just gray steps and a blank wall.
Now? We’ve got three tall fern planters, a trailing ivy, and a ceramic pot full of violets in the corner.
Every morning, on my way to get the mail, I pass by them.
And somehow, the day starts just a little softer. A little calmer.
And it all started with one shady little corner that deserved better.
7. Minimalist Porch Flower Pots That Still Pop!
Minimalism is kind of like good air — you don’t see it, but you know it’s there.
And on the porch, you can feel it even more clearly.
Sometimes, just one clean planter with one purposeful plant sets the tone better than ten colorful combos screaming for attention.
No visual noise. Just quiet confidence.
What Kinds of Pots Actually Pop?
In minimalism, it’s not just about color — form, texture, and depth matter too.
Here’s what really works:
- Matte finishes. No glare, no distractions — they keep the focus on the greenery.
- Simple geometry. Squares, tall cylinders, clean lines without curves.
- Calm colors: white, charcoal gray, warm beige, deep green, slate.
Choosing the right minimalist flower pot means letting the plant be the statement, while the container quietly supports it.
Plants That Hold Their Own in Simplicity
Without the floral fireworks, all the attention goes to shape and texture.
No fuss. Just bold, thoughtful structure. Here are a few that shine in that quiet spotlight:
- Heuchera ‘Obsidian’ – nearly black, velvet-like leaves that feel rich and grounded.
- Blue fescue – silvery and soft, perfectly rounded like a planted cloud.
- Carex ‘Toffee Twist’ – wild, caramel-colored strands that look like the wind styled them.
- Snake plant (Sansevieria) – straight, sculptural, architectural. Total minimalist icon.
We actually planted ‘Toffee Twist’ in a plain white pot and set it at the edge of our porch.
It ended up being the most photographed spot in our yard all June. Go figure.
Where You Place It Matters
Minimalism loves breathing room.
Don’t cram your pots together or shove them in the corner as an afterthought.
Instead, try this:
- One tall focal pot by the door
- A symmetrical pair flanking your steps
- A single pot at the porch’s edge — like a quiet exhale
Empty space is part of the design. Let the simplicity shine.
Want to Add a Little “Something”? Do It Intentionally.
Sometimes you do want a tiny flourish. That’s fine — just keep it purposeful.
- A smooth stone at the base — not decor, but an anchor
- A wood or concrete stand — adds height and rhythm
- A solar light — not for “magic,” just to carry the moment into the evening
Minimalism doesn’t mean boring. It means clarity, intention, presence.
When everything else in the garden is blooming and glowing and dancing with bees — having just one quiet corner on the porch feels like a breath.
You walk there to slow down. To sit. To just be.
And, to tell the truth, this “unremarkable” white pot by the steps is now more important to me than the whole flowerbed in front of the house.
8. Old Ladder Turned Into a Flower Tower
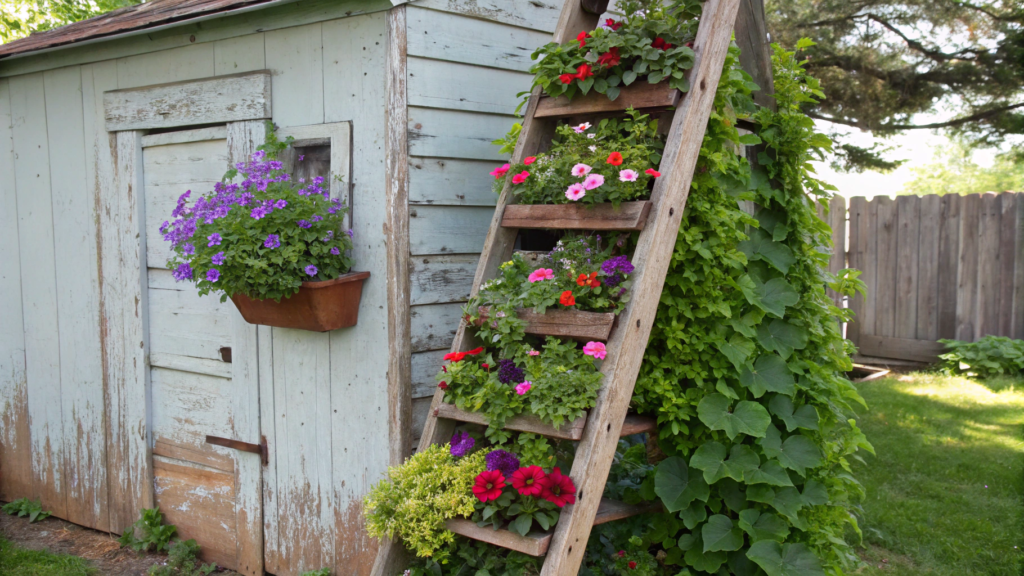
When we first moved onto our land, there was an old wooden ladder leaning inside the shed out back.
Wobbly. Splintery. Faded paint peeling off.
Today? That same ladder is our favorite vertical garden, and every season we reinvent it.
This year — it’s a full-on flower tower… and honestly, it looks amazing.
Why a ladder works so well
Vertical always wins — especially on a small porch where space is tight, but you still want that “wow” moment.
And an old ladder is already a ready-made frame. No tools, no building — it’s halfway there before you even start.
Plus, it’s already got character. Scuffed wood, rusted screws, paint with a story.
Way more charm than a plastic shelf from the garden store.
And let’s be real — repurposing what you already have? That’s budget-friendly and pure permaculture thinking.
How to turn it into a flower display
We’ve played with a few ideas, but here’s what works best:
One pot per step. Keep it simple. If the ladder is sturdy, just place pots directly.
Or attach small metal hooks or holders to keep things in place.
Pro tip. Put trailing plants up top so they cascade downward, and bigger, fuller plants at the base for balance. It’s all about that natural layering.
Here’s what we grew last season:
- Top: Supertunias, dichondra ‘Silver Falls’
- Middle: Begonias, lobelia, small heucheras
- Bottom: Thyme, sage, marigolds
And yes — we picked herbs from the bottom row every single morning for our salads. Functional and beautiful.
Securing your ladder safely
This part matters. Especially with an old ladder — they’re not always stable.
You’ve got a few good options:
- Lean it against a wall and secure it with a screw or hook at the top
- Use a heavy planter at the base to anchor it
- Dig the bottom into the soil about 4–6 inches if it’s going on the ground instead of a porch
We went with that last one — just set it into the earth slightly — and it hasn’t budged, even in wind.
No ladder? No problem.
You can build a “ladder” from scraps.
We once made one from two side rails and old fence slats. A little crooked, but that became part of the charm.
Seriously — it looked rustic, personal, and kind of perfect.
You can also paint it to match your vibe:
- White looks cheerful and clean
- Natural wood feels calm and warm
- Black is modern, bold, and really makes greenery pop
Right now, our flower ladder sits right next to the workshop wall. Every time I head over for tools, I brush past the sage leaves.
Sometimes I pick a flower just because it’s there. And every single time, I think to myself: Good thing I didn’t burn that ladder.
9. Boho Porch Planters Using Macramé and Wildflowers
There’s something so effortlessly calm about the boho style. No rules. No formality. Just fabric, wood, soft light, and a bit of wild green.
Unlike classic or farmhouse styles, boho doesn’t care about symmetry.
It’s all about layers, texture, and air. You can mix rope with metal, ceramics with fabric, sunflowers with sagebrush — and somehow it still looks like you planned it that way… even if you didn’t.
What to Plant in Boho Planters
Boho pots are the perfect home for wildflowers and herbs. Not polished hybrids — but the kind of plants that look like they just wandered in from the field next door.
Think:
- Rudbeckia, gaura, oregano, coriander, amaranth, catmint
- Anything that blooms a little wild, a little messy, but full of character
- Herbs with fine leaves and soft flowers: thyme, lavender, ornamental millet
Last year, we planted two bunches of amaranth with white lobelia in a hanging macramé pot.
It looked like something out of an old vintage postcard — soft, imperfect, and completely dreamy.
Choosing (or Making) Macramé Hangers
If you’ve ever tied a basic knot, you’re already halfway to making macramé.
But if you’re short on time (or just want something that works right away), you can grab ready-made cotton macramé hangers — they’re gorgeous and strong enough to hold ceramic planters.
Here are a few tips:
- Use pots with drainage holes — macramé has no saucers, so water needs somewhere to go
- Hang them at different heights — it adds dimension and flow to the composition
- Leave a little breathing room around each one, so the hangers feel light and airy
We hang ours from hooks screwed into the porch ceiling — one near the door, one by the steps, one in the corner.
And when they sway gently in the breeze, it feels like the plants are dancing.
Want your setup to last longer? Mix in some dried florals — like St. John’s wort, tansy, or even a single eucalyptus branch. They blend beautifully with live plants, especially in that soft, golden evening light.
Now we have five macramé planters hanging on our porch. Each one is different, each one with its own little story. One we tied together by hand. One was a gift from a friend. And you know what? This corner… it’s my favorite.
Because it’s not just about style. It’s about us.
10. Covered Porch Bed Frame Turned Into a Flower Display Wall

If you’ve ever moved furniture out to a rural property, you’ll know this feeling:
An old bed frame — too solid to throw out, but totally useless in its current form.
At first, it’s just leaning behind the shed. Then, suddenly, it’s holding a bucket. Then one day…
“Hey… what if we turned this into a flower wall?”
That’s exactly how we ended up with one of the most eye-catching features on our porch: a vertical flower display made from a repurposed bed frame.
What Kind of Frame Works Best?
Go for either the headboard or the footboard — especially if it has:
- Metal rods (they make great anchors for hangers)
- Wooden slats you can hook things onto
- A width that’s narrow enough to fit comfortably on your porch
We used a metal headboard with a gridded design.
Didn’t even bother painting it — the rust gave it character.
But if you want something cleaner, you can always spray it down with matte-finish metal paint in a dark tone for a more polished look.
How to Set It Up
If your porch is covered, you can simply lean it against a wall and secure it with two anchor bolts.
Or place it vertically in a corner, between the railing and the wall.
Stability is key — we placed two heavy ceramic planters with ferns at the base to act as visual and physical anchors. It hasn’t moved an inch since.
Turning It Into a Living Wall
Now here’s where the fun starts. The frame itself is already a decorative trellis — you just need to bring it to life.
Try this setup:
- Hook S-clips or small hangers onto the bars
- Hang mini planters, enamel buckets, or even old teacups with trailing blooms
- Fill in the gaps with twining vines or a soft strand of solar fairy lights
The result? It doesn’t look like old furniture — it looks like a custom-built garden installation.
What We Planted
- Top row: ivy and petunias to create a gentle cascade
- Middle: geraniums and alyssum for shape and color
- Bottom (in ground pots): basil, sage, lavender — they smell amazing and are easy to snip while passing by
Little Details That Make a Big Impact
- Varied height makes it more dynamic — skip symmetry and lean into that artistic, layered feel
- A white wall behind the frame makes the flowers pop — we actually painted our porch wall for that reason
- Add a solar spotlight at the base for evening glow — it turns the whole setup into a little garden stage
Now this bed-frame-turned-flower-wall is one of those corners people always stop to look at.
No one ever guesses it used to be a bed — the one we threw an old mattress on and dumped winter coats on top of.
And that’s the magic of it. What used to be a bulky leftover from the house…
is now something we built memories around.
Where to Start Today
If you’ve made it this far, I’m guessing your hands are already itching to get started.
Here’s my advice: start with what you already have.
An old ladder.
A forgotten side table.
One spare pot and a few wildflowers from the edge of the yard.
Sometimes that’s all it takes to turn your porch into your new favorite spot — the place you keep walking past just to admire. And if you’ve already tried one of these ideas?Tell me about it in the comments. Share your photos, your wins, your “oops” moments.
This kind of creativity deserves to be collected and passed along.