
The front porch is the first thing guests see. And the first thing you see when you come home. That’s why it’s worth making it feel fresh and spring-like—not over-the-top, not complicated, just simple and beautiful in a kind way. Spring Planter Ideas are a perfect way to bring that welcoming touch to your entryway.
But not everyone has the time (or desire) to chase the sun or constantly water plants. That’s where smart combos come in—using artificial flowers, pre-made setups, and easy materials.
This list includes 12 planter ideas to brighten up your entryway, balcony, or even a little spot by the door. They’re all simple, impressive, and don’t require you to be a landscaping pro.
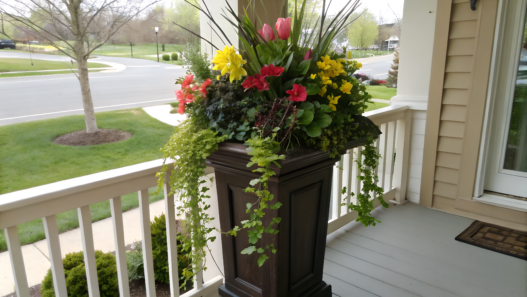
1. The Easiest Way to Build a Tall Spring Planter That Looks Designer

I used to think tall planters were just for catalogs. You know, those pristine white setups that feel untouchable. But then I tried making one myself—and yup, it worked!
Now I do them every season. They totally elevate your front entrance. And yes—you can put one together in just a couple of hours, with stuff you probably already have.
What you’ll need:
- A tall container (about 50–60 cm high). Even a plastic basket wrapped in burlap or jute works—it looks like ceramic but costs next to nothing.
- Something to fill the bottom—foam, old plastic pots, large rocks. No need to fill the whole thing with soil—just the top layer.
- Good-quality soil (or none, if you’re using artificial flowers).
- Main plants — 2–3 “statement” flowers. Purple hyacinths, daffodils, and tulips look amazing.
- “Filler” plants — mint, ivy, forget-me-nots, verbena.
- Trailing ones — periwinkle, lobelia, or fake greenery.
- (Optional) A battery-powered LED string light — if you want it to glow at night. It’s a small thing, but trust me—it’s magical.
How to do it:
- Fill the bottom — use old pots, bricks, or foam. It lightens the weight and cuts down on soil.
- Add soil only to the top third of the planter.
- Place your “main stars” — like a lush bunch of fake daffodils and tulips (or real ones, if you’re okay with upkeep). Position them toward the center, slightly tilted—not just sticking straight up.
- Add the “supporting cast” — mint, alyssum, ivy. They bring volume, texture, and depth.
- The trailing ones matter — periwinkle or even faux eucalyptus add life and movement.
- Cover the soil with moss or bark — it instantly gives that polished look.
- If using string lights — hide the battery pack inside and weave the lights among the flowers. The evening glow? Total wow-effect.
I love this tall plastic planter on Amazon—it’s lightweight, looks like stone, and doesn’t crack even in the cold. Plus, you can repaint it easily if the color doesn’t match your vibe.
Tips from experience:
- Stick to one color palette: like only yellow and white flowers, or pastels with silver-toned greens.
- If you’re using fake flowers—better to get 1–2 high-quality stems than a bunch of cheap ones. You can tell the difference.
- Oh, and we had three spring storms—and the planter didn’t budge. Just place it in a corner protected from strong wind—and you’re good.
This spring could be the first time you say: “Oh yeah, that’s my porch with the fabulous planter.”
And you won’t even need to tell anyone it’s all DIY.
2. Fake Flowers, Real Wow: The Front Porch Planter That Fools Everyone
We have one planter in the garden that’s never been watered. Not once. One day the neighbor said, “Your pansies look amazing! Mine never bloom like that!”
I almost laughed. Because… they’re not real. And they’ve looked like that for three seasons in a row.
If you’re tired of flowers wilting before they even bloom, or your porch is too shady—this is going to be your new favorite planter.
What you’ll need:
- A base planter — a classic plastic one is fine, but the ones with a “stone” or ceramic look are best.
- Floral foam or foam scraps — to hold flowers in place.
- Good quality fake flowers — pansies, muscari, freesia, ivy, violas. The trick is mixing textures.
- Moss or coconut fiber — to cover up the “guts.”
- (Optional): String lights, metal stakes, a “Hello Spring” sign.
How to assemble:
- Put the foam in your planter and secure it. Double-sided tape works great.
- Start with the tall pieces — like tulips or allium. Place them near the center, slightly towards the back.
- Add in color and shape — vibrant pansies, violas, and small bushy flowers. Scatter them around—not symmetrically.
- Finish with greenery — faux ivy, grass, dried leaves.
- Cover everything with moss or fiber — and there you go! Not a drop of water needed, and it still looks like it came straight from a greenhouse.
And one more thing—from personal experience. To make it feel truly real, I always use flowers with different sizes and textures. Small violas next to large tulips create that natural “garden” vibe—like they’re actually growing and competing for sunlight.
Visual focus is super important too. Don’t be afraid to place the fullest part of the arrangement toward the street side. That’s the part people see first. And tilt it a bit—the whole thing will look more natural.
And if, like us, you live somewhere that still gets spring frosts—just don’t rush to set the planter outside. Even fake flowers don’t love -10°C nights. Proven in Idaho.
3. Early Spring DIY Planter That Thrives in Shade (No Sun? No Problem!)

You know what’s the most frustrating? When your porch or the north side of your house gets… absolutely zero direct sunlight. And that’s it. All the “sun lovers” just give up, stretching out like students at a 9AM lecture.
But that doesn’t mean there can’t be beauty there. Oh yes, there can! You just need to know which plants don’t mind the dark and how to help them shine.
What you’ll need:
- A short planter box or container (like a wooden rectangle container with a vintage look and drainage holes — we love it)
- Moisture-retaining soil — since shady spots are humid, but you don’t want soggy messes
- Shade-loving live plants:
violas
begonias
coleus
hostas (small varieties)
ferns
ivy
- (Optional): Fake accents — for pops of color without worrying about blooming
How to assemble:
- Create a drainage layer at the bottom — small stones, gravel, or foam chunks work great.
- Add moist but loose soil that holds water well but doesn’t get swampy.
- Plant the most voluminous plant in the center — like a lush begonia or hosta.
- Around the sides, add flowering shade-loving accents — violas, coleus, or marigolds.
- At the edges, plant trailing greenery — ivy or fern — to get that “living waterfall” vibe.
- Cover the soil with moss or coconut fiber — it’s pretty and helps keep moisture in.
- Place the box in partial or full shade, far from direct sunlight. That’s it!
Even the shadiest porch can look like a botanical garden corner with this setup. Ours stayed vibrant until the end of June, when the sun finally got generous. Then we just swapped a few violas for lobelia and gave the whole thing a fresh twist.
By the way, if you don’t want to deal with soil, you can build the exact same planter using fake shade-friendly plants. Visually? No difference at all. Especially if you add a bit of real moss and keep it in the shade.
As you can see, the real secret is just choosing plants that don’t need sun—but actually enjoy its absence.
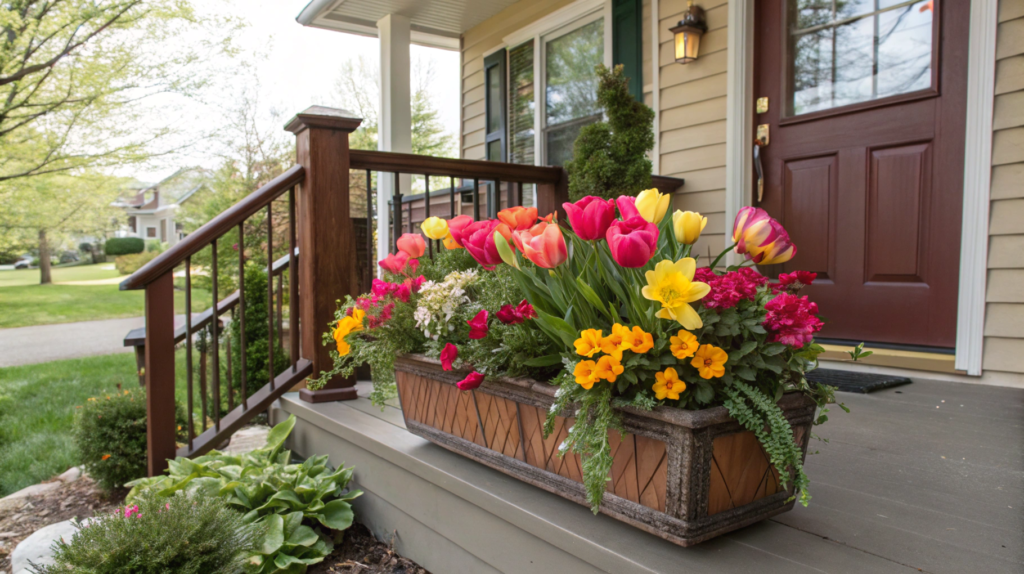
4. How to Style a Rectangle Planter for Maximum Curb Appeal
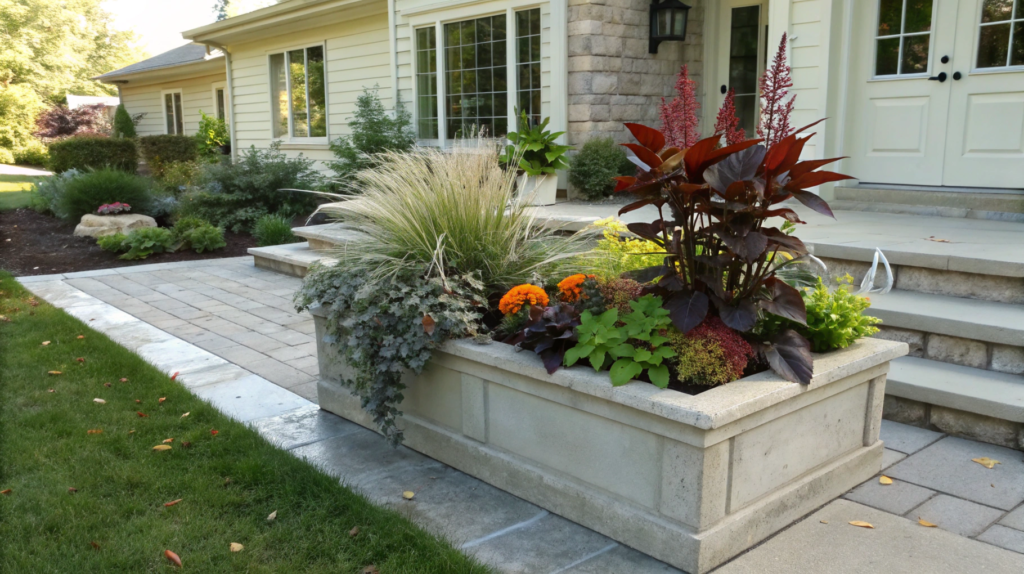
The trick with rectangular planters? It’s all about planting smart and placing things right. I learned this the hard way—one of our first boxes looked more like a random grocery store bouquet. Colors clashed, shapes fought, and overall… it screamed “I tried, okay?”
But then I figured out the rule of thirds, the concept of a “foreground,” and what a “visual anchor” does—and suddenly, everything clicked. Here’s how we arrange these planters now, and it works for any front step, whether it’s a country cottage or a sleek modern house.
What you’ll need:
- A rectangular planter, at least 60 cm long — best if it has a neutral or natural texture
- Soil or floral foam — depending on whether you’ll use live or artificial plants
- Plants, grouped by role:
Anchor (tall, dominant): ornamental allium, rosemary, lavender
Filler (mid-height, textured): pansies, violets, calendula
Trailing (adds movement): ivy, lobelia, verbena, alyssum
How to assemble:
- Fill the planter with floral foam or moist soil, leaving a little space at the top.
- Insert the anchor plant — the tallest one — slightly off-center (not dead in the middle).
- Add the fillers along the length, alternating textures — fuzzy next to smooth, small flowers next to bold ones.
- At the front and sides — plant trailing greenery to frame the whole composition.
- Step back and check how the planter looks from the street — that’s the angle most people will see.
- Add moss, wood chips, or decorative stones to hide the soil and give it a polished finish.
One of our favorite tricks is symmetry with inner asymmetry. Meaning, the box itself is perfectly centered on the stairs, but inside — the left side is a bit fuller, the right has more trailing greens. It gives the vibe of: “Creative, but organized people live here.”
And don’t fear repetition. If you have two boxes — place them on either side of the porch with identical plant setups. It looks straight out of a design magazine. We did it on our old porch, and now again at the entryway of our new place.
5. This Large Faux Flower Planter Survived 3 Storms in the UK

Some people think fake flowers are just for grandma’s windowsill. Then I show them a photo of our massive planter that not only looked stunning—but also survived three spring storms in a row. Still standing by the door, not a single bloom missing.
We built it for our coastal property. We needed something bright, bold, and windproof, because out there the wind literally blows sideways. And honestly? We just didn’t want to water anything anymore. No time. So we went full faux—but made it “wow.”
What you’ll need:
- A heavy, stable planter — at least 60 cm tall, preferably with slanted sides
- Floral foam or a concrete block inside for weight
- High-quality artificial flowers:
ornamental cabbage
hydrangeas
eucalyptus
dahlias
- Hot glue gun or wire — to make sure nothing flies away
- Coconut fiber or moss — to cover the base
How to assemble:
- Place a weight inside the planter — like a concrete block, sandbag, or a couple of bricks.
- Insert floral foam on top of the weight and secure it with hot glue.
- Start with the central large blooms — hydrangeas, cabbage, dahlias. They create mass and the “center of gravity.”
- Add greenery and texture — eucalyptus, dried florals, twigs.
- Use wire and glue to fix everything in place, especially around the edges. Don’t hold back—it’s better to overdo it.
- Cover the base with moss or coconut fiber.
- Place the planter in a protected spot—but don’t hide it too much.
This planter stood wide open on the porch, fully exposed to Atlantic winds. And while we did have to move a few outdoor lights after one storm, the planter didn’t budge. Why? Because we used weight, the right shape, and locked those flowers down tight.
Also — we didn’t use a single “cheap bundle” from the supermarket. Only faux flowers that actually look real.
Pro tip. After assembling the whole thing, spray it with hairspray. Yup, regular hairspray. It forms a light protective film that guards against moisture and dust. Works like magic, especially in the off-season.
6. A Front Door Planter That Screams ‘Spring Is Here’ (With Zero Effort)

Spring is that time when people either drag rakes onto the porch—or drag them back inside… because it snowed again.
And on those days, you just want to do something without fuss, without dirt under your nails, and without needing to water things every 48 hours.
That’s how we came up with this mini door planter project. It takes 15 minutes, costs next to nothing, and looks amazing. No dirt, live plants, hassle.
What you’ll need:
- A short, wide planter or basket — you can hang it on the doorknob or just set it beside the door. For example, this Amazon basket with handles is perfect for outdoor use.
- Floral foam or sturdy styrofoam — to hold everything in place
- Faux tulips, daffodils, forsythia — 2–3 colors in the same tone
- Trailing greenery — ivy, eucalyptus
- A ribbon or seasonal sign — like “hello spring” or “welcome”
How to assemble:
- Fit the floral foam tightly inside the planter so it doesn’t stick out over the edges.
- Arrange the tulips and daffodils with varied height — taller in the center, lower toward the sides.
- Add trailing greenery along the edges, letting it spill outward — this adds volume and motion.
- Tuck 1–2 branches of forsythia or baby’s breath between the flowers — this adds lightness.
- Cover the top with moss or sisal to hide the foam.
- Attach the ribbon or place a small sign in front — and you’re done!
A few little tricks that make it feel like spring:
- First, color palette. Don’t try to squeeze in all the rainbow. Go with something soft—like blush and cream, yellow and green, or lilac with white.
- Second, in this case, symmetry is your friend. These look great as a pair—one on each side of the door.
- And finally—try adding tiny details, like a faux butterfly or a miniature nest with plastic eggs. Sounds silly? Wait till you see it. You’ll definitely smile.
7. Turn Any Indoor Corner Into a Spring Garden With This Artificial Trick

Sometimes spring outside just doesn’t want to show up. Wind, grey skies, rain.
That’s exactly when I started “planting spring” inside — in the corners no one notices.
One of those corners, right in our entryway, now looks like a tiny botanical garden every year. And honestly? It’s just a well-styled arrangement of fake plants. No soil, sunlight, watering cans.
What you’ll need:
- A corner or vertical shelf — hanging or standing. We used this three-tier Amazon shelf, and it fits perfectly in corners.
- Optional backdrop — a mirror, light fabric, decorative panel, or fairy lights
- Faux plants — ferns, peperomia, ivy, mimosa, lavender bushes
- Extras: bird figurines, candles, jars, faux bird nests, spring postcards
How to assemble:
- Set up your shelf in the chosen corner. If you like, add a backdrop (mirror or fabric works great to reflect light).
- On the bottom tier, place the heavier-looking plants — like faux ferns or potted hydrangeas.
- Middle shelf gets small flowers and springy details — birds, jars, Easter eggs.
- Keep the top light — a few trailing ivy branches and maybe some mini string lights.
- Vary the depth — some elements closer to the edge, some tucked back — to create dimension.
- For a cozy vibe, add a warm light string or a spring-scented candle (lemon, lily of the valley, mint).
This kind of “corner garden” isn’t just pretty. It works like a mood beacon. Especially when you wake up to snow outside or pass this spot 20 times a day — and every time, you catch yourself smiling.
Bonus? It’s completely maintenance-free. We built our setup in February — and it lasted through May. We only swapped out a few bits for more summer vibes. The magic? It’s all in the tiny details that make it feel alive, even if everything’s plastic.
8. No-Grow Magic: Outdoor Spring Planter Using Only Faux Blooms

Lindy and I figured this out a while ago: in spring, not everything has to grow to be beautiful. Some planters you can just… build. No soil, watering and sunlight. Yet they still look like you grew them with care—and ten pro tips.
Here’s our go-to method for creating an outdoor faux planter that lasts till June and never raises a single eyebrow.
What you’ll need:
- A large outdoor planter — best if it’s stable with a wide opening
- Floral foam or styrofoam — to secure the flowers
- Faux spring flowers:
tulips
daffodils
violas
lavender
ivy
- Greenery (a mix of artificial leaves and grasses)
- Moss or sisal — for decorative coverage
How to assemble:
- Set the planter in place first (it’ll be heavy to move later).
- Insert several foam blocks to create a firm foundation.
- Arrange flowers by “zones.” Tulips and daffodils go in the center and slightly higher; violas and lavender go toward the edges, a bit lower.
- Add greenery between the flowers to soften the look and make it feel more natural.
- Place trailing ivy at the outer edges — this adds a “lively” effect.
- Cover the top with moss or sisal to hide the structure and finish the look.
- Spray the whole thing with anti-dust spray or regular hairspray — it’ll keep the planter looking fresh for 2–3 months even in weird weather.
This planter is perfect for anyone who wants beauty without the burden. We made ours right before a two-week trip to Portland, and when we got back — it looked exactly the same. No fallen petals, bug bites and watering cans used.
And the best part — you can remake it season after season. Just pull out the old flowers, stick in new ones, and boom: fresh look. Buy once, use for years.
9. DIY Spring Planter for Full Sun That Doesn’t Need Watering

Every yard has that one spot where the sun just blazes. Plants burn up, the soil turns to rock, and water vanishes in minutes.
We had that exact corner by the garage. Full sun all day, wind, heat — and planters survived maybe a week.
Until we made a setup with nothing but artificial plants.
What you’ll need:
- A heat-resistant outdoor planter — make sure it won’t fade or crack
- Dense styrofoam or bricks — to weigh down the base and hold the foam
- Floral foam — for securing the plants
- Faux plants that mimic drought-tolerant varieties:
lavender
succulents
sedum
ornamental grasses (like fake miscanthus)
- Gravel or decorative stones — to cover the surface and add a natural look
How to assemble:
- Place bricks or weights in the bottom of the planter so it won’t blow away.
- Add styrofoam above that, then insert floral foam and secure it with glue.
- In the center, insert tall grass or lavender-style stems to add height.
- Around them, place artificial succulents and sedum, mixing green and grey tones.
- Add some faux pebbles or dried-looking accents in between for realism.
- Top the surface with gravel or stones — this creates a rock garden vibe.
- Step back and check the view from the street — if it looks balanced, you’re done!
Let’s be real: this is the ultimate low-maintenance setup. You can put it in the sunniest spot, and it’ll ask nothing from you. Rainstorm? Heatwave? Still perfect.
Plus, we always choose plants with that “heat-tolerant” look — silvery, dusty, thick-leaved. They actually look like real survivors. And this visual trick? Works every single time.
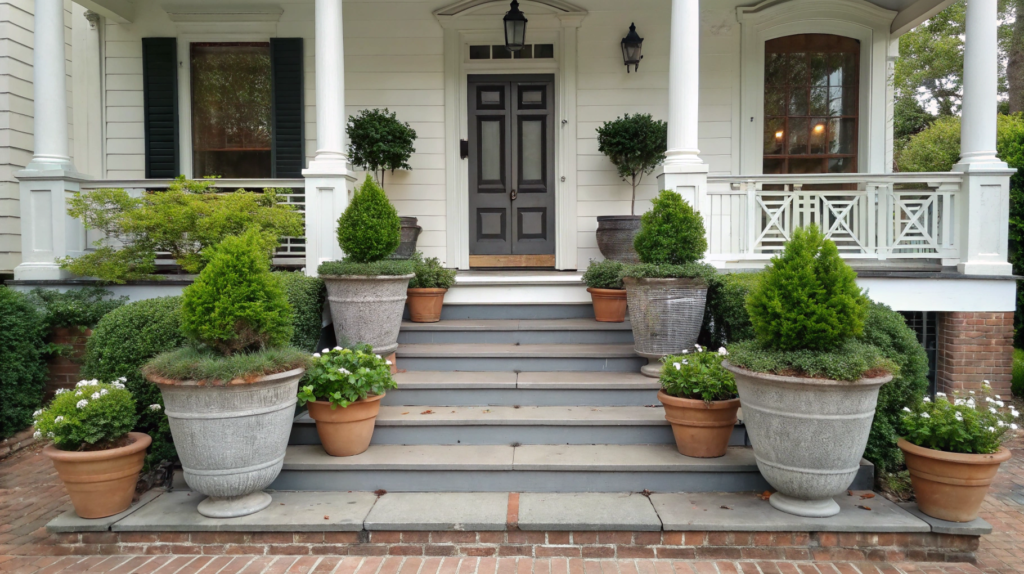
10. Front Porch Beautiful: The Planter Hack That Works Every Single Time
No matter how many planter combos we’ve tried, there’s one trick that always works.
Early spring, midsummer, late fall — doesn’t matter.
Country porch, city stoop — works everywhere.
It’s not the flowers. Not the pots. Not fancy design.
It’s simply keeping everything in one style and on one level. That’s what turns random pots into a real composition.
We use this method on our porch every season — and it’s foolproof.
What you’ll need:
- Three to four planters of different shapes, but same color or texture
(Like this textured stone-look set from Amazon — lightweight and sturdy) - Flowers in one color palette — even if they’re fake.
White-green, purple-pink, yellow-orange — your call, but no rainbow explosion - Decor accents: wooden sign, lantern, metal bucket, wreath — anything that fits the theme
- One repeating element — like ivy in every planter, acting as a “common thread”
How to assemble:
- Arrange the planters in a straight visual line — along the wall or up the steps.
- Make sure the heights “jump” — short pot → tall pot → medium pot.
- Fill each with flowers in the same palette, but different textures.
- Include one repeating plant in each — like lavender or ivy.
- Add one “non-plant” accent nearby — sign, old pail, or lantern.
- Take a photo. Yep — if you smile looking at it, you did it right.
We often underestimate the power of repetition. But that’s what makes a setup feel whole. Same color, same shape, same plant — and the brain says, “Yep, that’s intentional.”
Different heights create a kind of visual rhythm. It brings energy to your entry, without looking chaotic.
We’ve used this style with both real and faux plants. In spring, summer, fall — always feels cozy, stylish, and full of soul.
And yep — our neighbors always stop to look. Every time.
11. How to Create a Layered Look in Tall Planters (Using Mostly Dollar Store Finds)

Ever scroll through Pinterest and see those stunning, layered planters where every bloom is perfectly placed, and it looks like a designer made it?
Don’t get jealous — you can absolutely make one yourself. And yeah, most of the stuff can come from your local Dollar Tree.
Because with this kind of planter, it’s all about the structure — not the price tag.
What you’ll need:
- A tall planter — best if it’s lightweight plastic so you can move it easily
- Styrofoam or empty pots — to fill space and avoid wasting soil
- Faux or real plants in different heights and textures:
Verticals: decorative spikes, dried flowers, lavender
Fillers: petunias, daisies, pink geranium
Trailing: ivy, periwinkle, lobelia
- Moss or sisal for covering gaps
- (Optional): string lights, a garden pick, or a little “welcome” sign
How to assemble:
- Place styrofoam or upside-down plastic pots inside to bulk out the bottom and save on filler.
- Add floral foam on top (or soil, if using real plants).
- Start with the tallest element — like a decorative spike — slightly behind center.
- Around it, add your mid-height pieces — petunias, daisies, bushy faux florals.
- At the edges, place the trailing elements — ivy or periwinkle, letting them drape naturally.
- Fill in any gaps with moss or sisal to hide the base and make it feel garden-grown.
- Add one accent piece — like a small garden sign or decorative pick — to tie it all together.
The real trick here is layering. When you have different heights, textures, and directions all in one pot, your eye flows across the whole thing.
That’s what gives it that “expensive” layered effect we all love in high-end garden shots.
And yep — you can build it all for $15–20. We’ve done it plenty of times — lavender and ivy from Dollar Tree, dried bits from the clearance bin, moss from old gift packaging. The secret? Focus on the whole picture, not just each flower.
12. This UK-Inspired Planter Is Proof That You Don’t Need Real Flowers for Real Charm

The British know gardens. And it’s not just “castle flowerbeds.” It’s a real style — where even the tiniest porch looks like it’s straight from a romantic period film.
After Lindy’s trip to Devon, we decided to build our own English-inspired planter. No real flowers and soil. But it had all the British character.
What you’ll need:
- A planter in English style — narrow base, widening at the top. Dark or stone-textured looks best
- Artificial flowers in “antique” tones: dusty pinks, purples, wine red, olive green
- Ferns and ivy — as the base
- Miniature accents: small roses, lavender, thyme
- Moss, sisal, or natural burlap — to keep it garden-y, not store-display
How to assemble:
- Add weight inside the planter if it’ll be outdoors (brick, stone, etc.)
- Insert floral foam and secure it.
- Start with the ferns and ivy — they create a green foundation and a wild, natural vibe.
- Add medium-size flowers: roses, geranium, vintage-style tulips.
- Along the edges, place delicate details — sprigs of lavender, hyacinths, tiny dried blooms.
- Cover any visible foam or wires with moss or burlap to keep it organic-looking.
- Set the planter against a brick wall or beside your front door. Trust me — it’ll look warm and lovely.
Why this style works without real flowers:
English gardens are about feeling, not botanical perfection. It’s about form, color, texture, and light play.
If your palette is right and your layers are thoughtful, no one’s going to guess it’s all faux.
We set this planter by the front door — and three (!) people asked what we were feeding our hydrangeas.
The answer? Fabric, wire, and a little moss. And after the rain? Still looked 100% real.
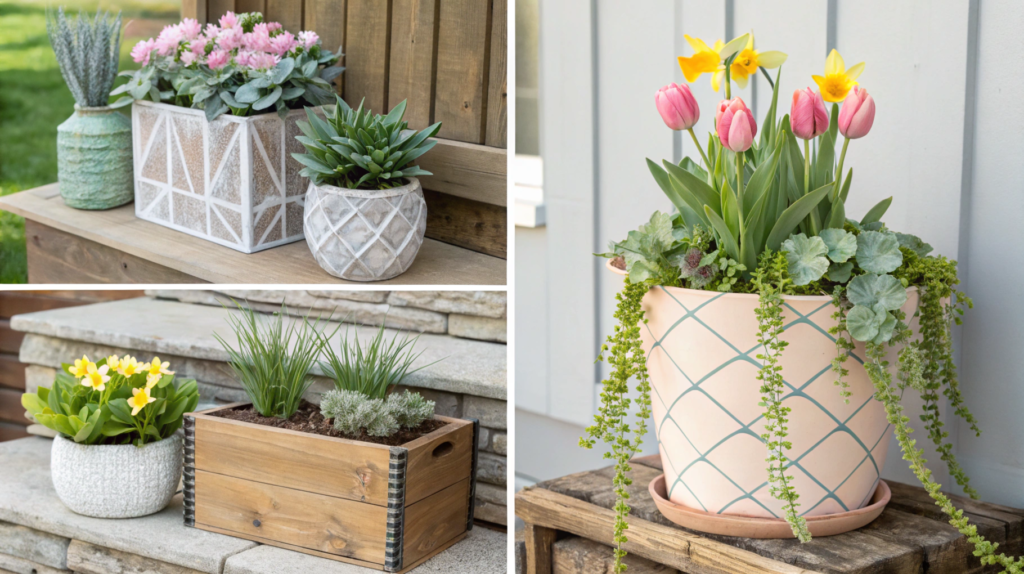
13. 4 Genius Spring Planter Ideas That Don’t Need Real Flowers
Spring doesn’t always show up the same way.
Sometimes it brings sunshine and snowdrops. Other times — rain or even frost.
That’s when artificial arrangements step in. They look amazing and need almost zero care.
Here are our four go-to planter ideas that get compliments every season — without water or sun.
1. Mini Garden in a Watering Can
This one brings a smile to anyone walking through the gate. Just grab an old metal watering can, stuff in some floral foam, and build a mix of faux daffodils, ferns, and a couple of dried florals.
We place it right by the porch — and it sets the spring mood long before anything real starts to bloom.
2. Hanging “Flower Fountain”
No need to overthink it: get a wire hanging basket, add floral foam, then cascade faux violets, forget-me-nots, and trailing ivy.
The result? A floating flower waterfall that gently sways in the breeze. Looks magical — like it’s suspended in air.
3. Rectangular Planter on a Bench
It looks like a magazine cover, but takes only 20 minutes to make. Place a rectangle planter on a wooden bench by the entry. Fill it with a combo of faux lavender, ornamental cabbage, and a few grasses.
Add a lantern or candle nearby, and boom — you’ve got yourself a whole spring scene.
It works beautifully with a matching wreath on the door.
4. The “Trickster” Planter
This one’s genius. Plant a couple of real herbs — say, rosemary or thyme — then surround them with faux blooms.
Geraniums, pansies, periwinkle — they’ll look totally real thanks to the mix.
Honestly, even we forget which parts are fake.
The secret is in structure and color palette. Modern faux flowers are so good, they fool the eye instantly. Just skip the neon plastics and don’t cram in every color.
We stick to one palette — like white and green, or blush and lavender — and always add texture: ivy, moss, twigs.
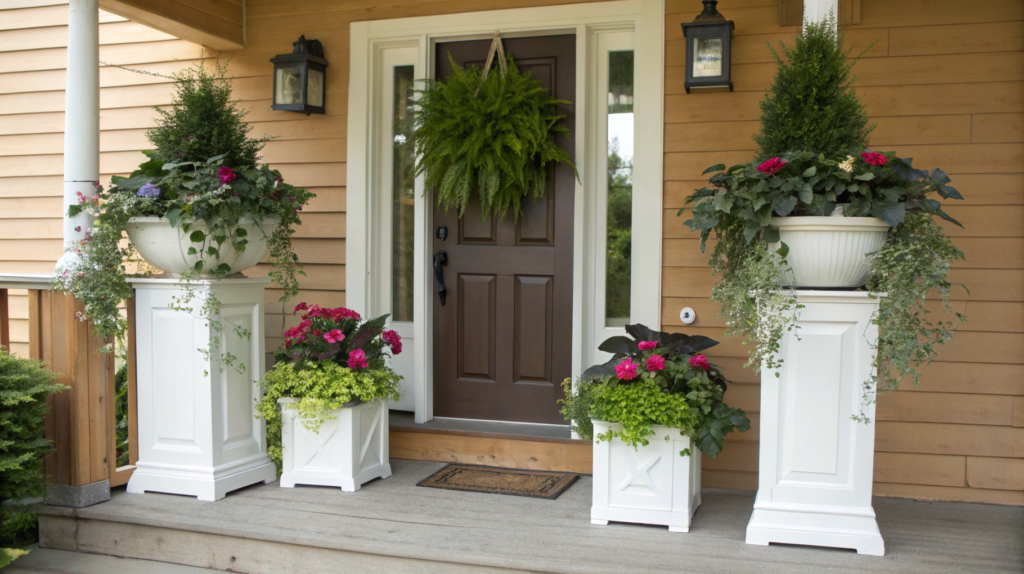
14. Tall, Rectangle & Front Door: The 4 Best DIY Planters for a Wow-Worthy Porch
We can all debate design tastes — but when it comes to the entryway, one rule always wins:
A bold planter put together with care.
We’ve tried dozens of shapes and styles. But these four types consistently wow us, our guests, and even the neighbors.
Different goals, different budgets — same amazing effect.
1. Tall Column Planter With a Central Accent
This is the bestseller on our porch. A tall, narrow planter (60+ cm) with a centerpiece plant — like faux lavender or hydrangea — and cascading greens around it.
Together, it creates that sense of height and “garden drama.”
We place a pair of these at the base of the stairs — and even a plain home suddenly looks like a magazine shoot.
- Here’s our favorite tall planters from Amazon – sustainable, looks expensive but is lightweight and doesn’t crack.
2. Rectangle Planter With a “Busy” Look
Perfect for narrow porches. We use a rectangular planter as a background base, then fill it with colorful artificial flowers, grasses, and small decor — like a metal bird or lantern.
Set it close to a brick or wooden wall, and it blends into the architecture like a built-in garden feature.
3. Symmetrical Planters by the Door
A timeless classic. Two identical planters on either side of the door, each with the same setup: a rosemary bunch, a bit of ivy, and a few faux tulips.
Perfect if you love a clean, orderly visual. We do this every spring — only the color palette changes.
4. Freestyle “Garden Improv”
Want something more natural? Go for a casual mix — tall lavender or miscanthus, center it with chartreuse coleus or geranium, then let ivy or lobelia spill over the sides.
Different heights, different textures — all in one palette. It feels spontaneous, yet cohesive.
Form and structure are the heart of a great arrangement. Tall planters bring architectural drama. Rectangle ones ground the space. Symmetrical ones add rhythm. Freestyle ones bring life and motion.
And it doesn’t matter if your flowers are real or fake.
What matters is the composition, the textures, and a little love.
The rest? That’s visual magic.
15. 12 Early Spring Planters That Work in Shade or Full Sun

Spring can be tricky. Morning sun, afternoon shade, then more sun later—but from the weirdest angle, like someone’s playing with spotlights.
Luckily, some planters are total pros.
They work in both partial shade and full sun—especially when you choose the right plants, or go faux.
Here are 12 we’ve personally tested and loved—no hesitation recommending them.
For all live planters, we use a general-purpose container mix: loose, moisture-retentive, with perlite and compost. It works for both sunny and shady spots. If a planter is half faux, we fill the bottom with foam and top it off with a little soil—so the “illusion” feels real.
1. Violas + Ivy in a Terracotta Pot
It blooms for a long time, is not afraid of cold weather, perfectly tolerates partial shade. Ivy gives volume and “coherence” of the composition.
Advice. Put it where there is at least a little diffused light – then the Viola will bloom longer, and the ivy will not stretch out.
- It is better to take soil with compost – Viola likes a nutritious environment, especially in containers.
2. Faux Daffodils + Real Thyme
Thyme is real, flowers aren’t — but together, it’s an alpine-style mini garden. And yes, thyme smells amazing!
Tip. Use gravel or white stones for a natural look, and sandy soil — thyme hates soggy roots.
3. Faux Hyacinths + Dried Grass
Minimalism in the style of an English country house. Looks great at the entrance or on a garden bench.
Tip. Choose hyacinths with a matte surface, so that there is no “glossy plastic” effect.
4. Rectangle Planter with Violets + Rosemary
You can combine live and artificial versions – either way there will be scent and beauty. Likes partial sun.
Tip. Do not forget about drainage – rosemary does not like standing water, even if it is in the company of artificial “neighbors”.
- Ideally works soil with drainage additives – rosemary badly tolerates moisture at the roots.
5. Periwinkle + Pansies
Looks like it “grew by itself” — especially if you let it grow a little. Works in both deep shade and light.
Advice. Ideal for hanging baskets on the north wall or near a shed — without extra care.
- Universal garden soil will do — the main thing is not to over-water it and make sure that the water does not stagnate.
6. Ornamental Cabbage + Eucalyptus
Both are hardy, both don’t require much care, and both look great until summer.
Tip. Works best in large pots – at least 40 cm in diameter, so that the leaves open beautifully.
- Use a dense, moisture-absorbing substrate – ornamental cabbage likes stable humidity.
7. Faux Lavender + Moss in a Metal Basket
Texture is the star here. Looks classy without a single bloom.
Tip. Add a touch of real soil under the moss — helps keep it alive and fragrant.
8. Fern + Mini Succulents
Perfect in any corner — especially porches or shady entryways.
Tip. Mix faux and real — visual trickery works great with these textures.
9. Faux Tulips + Real Mint
Mint gives a scent, tulips – a visual effect. Even if the sun disappears for a long time – the composition keeps the “spring mood”.
Tip. If you use real mint, watch the watering – it dries quickly in containers, especially in the sun.
- The soil should be light, with good drainage – mint is very “drinkable”, but does not tolerate stagnant water.
10. Lobelia + Ivy + Sisal
Light, airy, “flowing” composition, looks perfect in hanging cachepots.
Tip. You can alternate artificial lobelia with live ivy – it has excellent stability and decorative value.
11. Faux Petunias + Decorative Stone
Surprisingly stylish and… very practical. Especially if you don’t want to mess around with watering.
Tip. It is better to use light-colored pebbles so that the cachepot will not overheat in the sun.
12. Coleus + Pink Begonia
A bright color combination that survives in both sunny and overcast areas. Suitable for the entrance, balcony, terrace.
Tip. Coleus can be cuttings and transferred to new cachepots – it grows quickly even in the shade.
- Both cultures like loose and moist soil – universal soil with peat is a good choice.
16. The Only 4 Planter Ideas You Need for a Beautiful UK-Style Porch This Spring

British porches are a vibe. A story, a style, a quiet kind of care — the kind of place where tea tastes better.
And you don’t need 20 planters or a designer’s budget.
Just four key choices can bring that perfect “British garden charm” to your entry.
1. Matching Hydrangeas in “Stone” Planters
Symmetry is the foundation of English elegance.
Place two identical planters on each side of your door. Even faux hydrangeas add fullness and magazine-worthy beauty.
Tip. Use textured stone-look planters for the full effect.
2. Hanging Pastel Flower Basket
In Britain, even the air above the door says “spring.”
A hanging basket with pink tulips, ivy, and moss? Instant charm.
Tip. Avoid neon colors — the British palette is muted, vintage, and soft.
3. Corner Wooden Planter with Wild Greens
There’s value in a little messiness.
A simple wooden box with eucalyptus, ferns, dried stems — like you just gathered it all from a field.
Tip. Set a watering can or garden trowel nearby — it adds a lived-in, soulful touch.
4. Lavender Planter by the Path or Mailbox
Just a small touch — but it turns your entry into a postcard.
Lavender, burlap, decorative stones — and suddenly you’re in Kent.
Tip. Choose matte faux lavender that mimics the real texture.
British garden style isn’t about being fancy. It’s about clean compositions, soft lines, natural colors, and that quiet feeling that this garden’s been loved for years.
And One Last Thing…
If even one of these planter ideas made you smile — well, spring has officially begun.
Doesn’t matter if you’ve got a front porch or a balcony, a green thumb or none at all — beautiful corners can exist anywhere.
No soil, no stress, no pressure. Just the joy of creating something lovely — for yourself.And hey — if you’ve built a planter like this before, or want to share your own idea…
Leave us a comment! We’d love to hear your story.