Some days, you don’t want to build — you just want to hide. From the sun, the neighbors, or the noise of the world. That’s where a quick and easy Outdoor Privacy Screen comes in. No concrete, no screws, no weekend-long projects — just simple solutions you can set up fast and feel the difference instantly.
They’re mobile, easy to use, and still look clean and neat. Perfect for rentals, seasonal setups, and those moments when you need something “right here, right now.”
Each option is safe if set up properly. Pay attention to stability, choose moisture-resistant materials, and don’t use lightweight panels in open wind without securing them.
1. Quick DIY Living Wall Privacy Screen That’ll Wow Your Guests

At first, our backyard was totally exposed to the neighbors. No fence, no bushes — just an open field and that awkward feeling someone’s always watching. And there I was, naïvely dreaming of sunny outdoor brunches and barefoot morning coffees on the grass… Ha!
A few months in, we realized we urgently needed a screen — but one that wouldn’t ruin the view. We wanted something that would make it even better. That’s when we came up with the living wall — simple, but so impressive.
A living wall isn’t just a plant-covered panel. It’s a full-on vertical garden that hides you from prying eyes, beautifies your space, and supports local biodiversity (the bees and butterflies will thank you!).
And the best part — you can build it yourself in just one day.
What you’ll need for this outdoor privacy screen?
Here’s what we used:
- Wooden frame (like 2×4 lumber) — you can buy ready-made panels or DIY. We used 6 pieces, 6 ft (about 1.8 m) long and 4 ft (1.2 m) wide.
- Geotextile fabric or thick garden fabric to attach inside the frame and create pockets for soil
- Screws, drill, level — basic tools
- Potting soil — about 4–6 bags, 40 lb (18 kg) each
- Plants:
Petunias, coleus, and sweet potato vine for decoration
Strawberries and mint — for practicality
- Drip irrigation system (optional, but a total game-changer)
- Wall mount or stand to fix the structure in place
Here’s one handy ready-made frame you can buy and convert into a living wall: Plant Stand Vertical Garden Frame on Amazon
How we did it (and how you can too)
- Built the wooden frame and stained it (if you want that natural look) or painted it matte black (looked awesome!).
- Attached the garden fabric to the inside with a staple gun, forming horizontal “pockets” — like those over-the-door shoe organizers.
- Filled the pockets with soil — firm, but not overly stuffed so they don’t sag.
- Planted the flowers — mixed colors, heights, and leaf textures to keep the wall looking vibrant and alive.
- Placed the frame at the edge of the patio, a bit off to the side, creating a cozy corner.
In the summer, we had a few guests over — and every single one thought this was a store-bought designer piece.
Once we said we made it ourselves in a day, came the rapid-fire questions:
“Where’d you buy that fabric? How does it attach? Which plants are good for shade?”
And yes, it absolutely saved us from the “glass-wall neighbor” situation.
Tips:
- Don’t overwater — the geotextile holds moisture and it’s easy to drown the plants
- Hang the wall where it gets at least 4–6 hours of sun daily, especially if you want to grow greens
- In winter, just remove the plants, dry the fabric, and store the frame in the shed — it’ll last you many seasons.
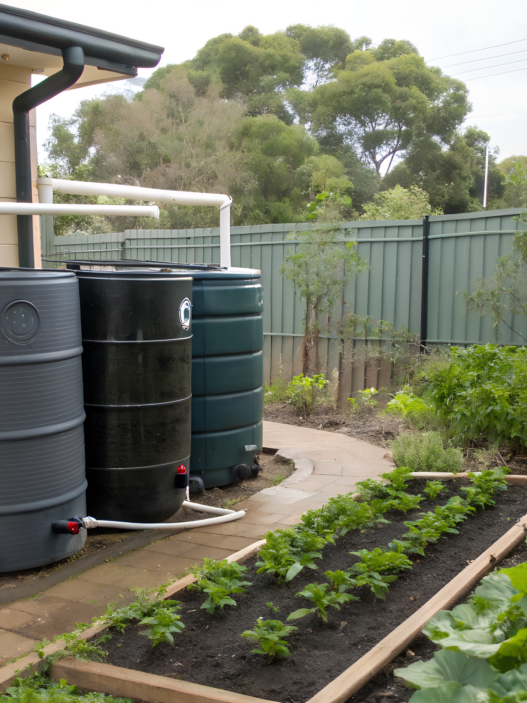
2. 2025’s Most Pinned Fast Outdoor Privacy Fence Made from Recycled Materials

When I browse Pinterest, I look for solutions that are fast, affordable, and actually doable over the weekend. And this fence checks every box.
I first spotted the idea on a board dedicated to “backyard glow-ups” — and I instantly knew: this is it. Minimal cost, no complicated tools, and it looks great.
What really matters to us is that it’s made from recycled materials. It’s beautiful, eco-friendly, and perfect for anyone living the permaculture life.
Add the budget-friendly part — and you get a solution that’s easy on your wallet.
What you’ll need for this outdoor privacy screen?
We built a 6×12 ft (about 1.8 x 3.6 m) fence in a day using:
- Pallets — 4–6 pieces, standard 40″x48″ size
You can often get pallets for free from local stores, Craigslist, or Facebook Marketplace - Metal T-posts — 3–4 pcs
- Hammer and T-post driver — to drive the posts into the ground
- Wood screws
- Screwdriver and long wood screws — to attach the pallets to the posts
- Metal brackets or mounting plates (optional, for added stability)
- Stain or paint (optional — we used matte black paint for a more modern look)
- Optional: Level — to keep the pallets straight and lined up
How we did it
- Installed the posts evenly spaced, about 4 ft apart. Driving them into the ground was the most physically demanding part — the rest was easy.
- Attached the pallets to the posts. We used long wood screws, drilled straight through the pallet’s side slats into the wooden T-posts.
You can also use L-shaped brackets — especially if you need more support.
If you’re placing the fence in an open area, make sure the structure is wind-resistant. - Stood the pallets upright — either on the wide or narrow side, depending on your desired height.
We used the narrow side up to get a taller screen that fully covered our seating area. - Stained or painted the wood. You can also leave it as-is — especially if the wood already has character.
- Decorated it (optional):
Placed herb pots along the top — the pallet slats make them look built-in!
Added hooks for garden tools, especially if the fence is near raised beds
It took us… exactly 6 hours, 3 lemonade breaks, and one argument about which side of the pallet goes up.
But when we stepped back and looked at the result, we were truly happy.
A few hacks:
- Mix pallets with different colors and textures — you’ll get a designer wall pattern
- If you live in a windy area, overlap the pallets slightly to reduce wind drag
- Pallets look amazing with stone pathways or gravel underneath — gives it a magazine-worthy look.
3. Easy Sliding Barn Door Privacy Screen You Can Build Yourself
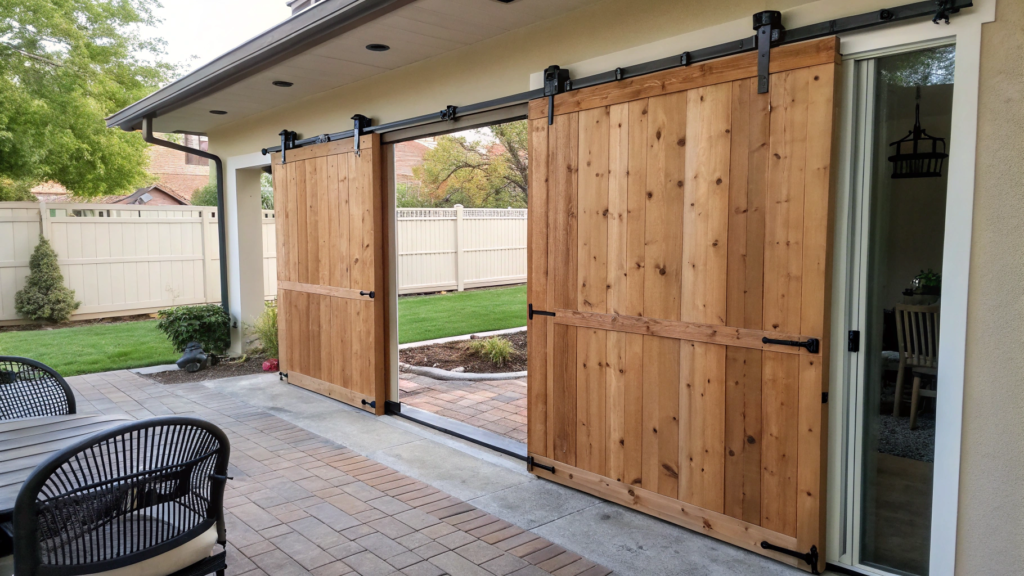
We built this barn door-style sliding screen in just a couple of days — and not because we’re master builders, but because it’s genuinely that simple.
And honestly, I have no idea how we lived without it before.
What’s the idea here?
A barn door is a door on rollers that slides along the wall. Now picture this: you take that concept outdoors and turn it into a stylish sliding screen that separates your patio from the yard, your outdoor kitchen from the garden, or your hot tub from the neighbors (especially the neighbors).
All of that — no concrete foundations, no heavy posts, no complex math.
What you need to buy (and where to get it)
Here’s our list:
- Two wooden panels (or build them from 1×6″ boards / 2.5×15 cm) — size depends on your area (ours were 3×6 ft / ~90×180 cm)
- Outdoor Sliding Barn Door Hardware Kit — that’s the track system
- Two 4×4″ wooden posts (10×10 cm), 8 ft (2.4 m) tall
- Screws, drill, level
- Wood stain or outdoor paint (we went with a warm “walnut” tone)
How we built it (super easy)
- Dug in two posts on either side of the area we wanted to close off.
We used concrete to set them, but you can also just compact the soil well (if it’s dense). - Installed the top rail from the hardware kit.
It connects the two posts and serves as the track for the door to slide on. - Built the door panel — just joined boards on a supporting frame + added a diagonal brace for that barn look.
You can also use a pre-made door if you’re feeling lazy. - Hung the door on the rollers. That’s it. It slides back and forth. Beautiful.
- Optional. Added a bottom guide to stop the door from swaying in the wind.
This can be a small floor-mounted roller that holds the lower edge of the door, making the movement smooth and stable — especially helpful if you get wind gusts or have active kids.
Why it’s convenient
- You can open it up and air out the space — unlike solid panels.
- It doesn’t eat up any depth — the whole setup runs along a single line.
- You can paint it to match any style — from boho to minimalism.
- It acts like an architectural accent — instantly makes your backyard feel “more expensive.”
Tip from us:
If you live in a windy area, don’t make the panel solid. Leave small gaps or use thin slats — this allows airflow and puts less pressure on the rollers.
We made a solid one at first — and it almost ripped the posts out during the first storm.
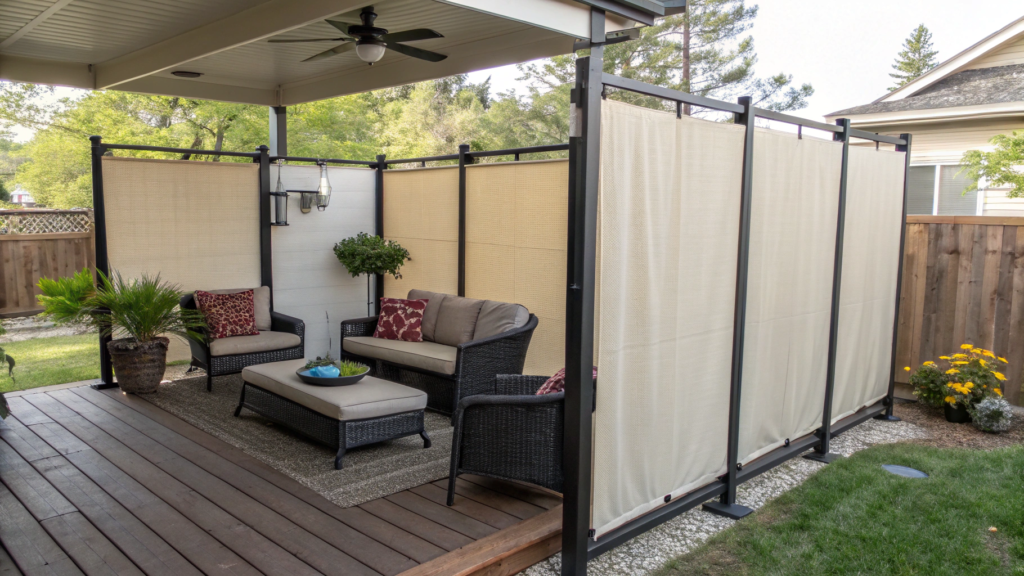
4. Fast Hanging Outdoor Privacy Screen TikTok Is Obsessed With

One evening I was sitting on the porch scrolling through TikTok (yeah, even permaculture folks have their weaknesses) — and in just 10 minutes, I came across hanging outdoor screens three times.
And not in some designer showrooms — in regular backyards.
They were quick to install, cheap, stylish, and looked amazing on camera — which is probably why they went viral.
What is it exactly?
A hanging outdoor privacy screen is basically a curtain for outside — but not like your bedroom ones. These are made from bamboo, wood panels, woven rattan, or durable outdoor fabrics (like Oxford or canvas).
And they hang from above: on hooks, curtain rods, or steel wire — to block you from neighbors, the street, or the sun. Super popular for porches, balconies, outdoor showers, or summer kitchens.
What you can use for this outdoor privacy screen?
Here’s a list of tried-and-true, TikTok-approved options:
- Bamboo roll-up screen
It comes pre-strung with cords, easy to hang, and gives a semi-transparent effect.
Here’s one: Bamboo Roll-Up Outdoor Shade - Outdoor curtains made from heavy fabric
Perfect for windy spots. Doesn’t wrinkle, fade, or lose shape. - Wooden slat or lattice panels
You can buy ready-made panels, attach hinges, and hang them on hooks — stylish, natural, especially next to plants.
How we set it up
- Stretched a steel cable between two posts on the terrace — basic 3/16″ (4.8 mm) wire.
- Hung a bamboo screen using carabiners. Took literally 20 minutes!
- Later, we added a fabric one — mounted on a curtain rod attached to the wall. It blocks direct sunlight from the couch area during the day.
- For the outdoor kitchen, we made a screen from a discounted rattan panel — hung it on a chain. Now it looks like part of the decor.
Perks:
Takes less than 30 minutes to install
Requires zero building skills
Easy to remove, swap, or store for winter
Adds movement, shade, texture — visually enriches your space
Works great for rental homes (no digging, no damage)
A few tricks:
- Add magnets or clips at the bottom to stop the screen from flapping in the wind
- For a more fixed look — use metal brackets + hooks instead of a curtain rod
- Hanging screens look extra beautiful with plants — try placing a pot of lavender, lemongrass, or climbing vines nearby
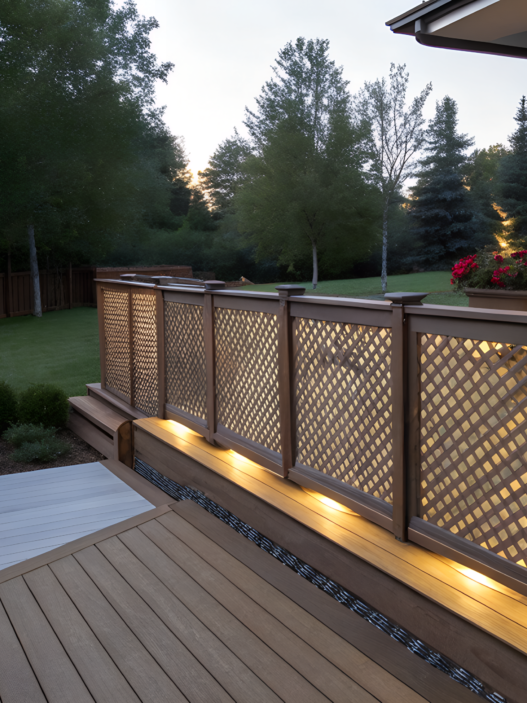
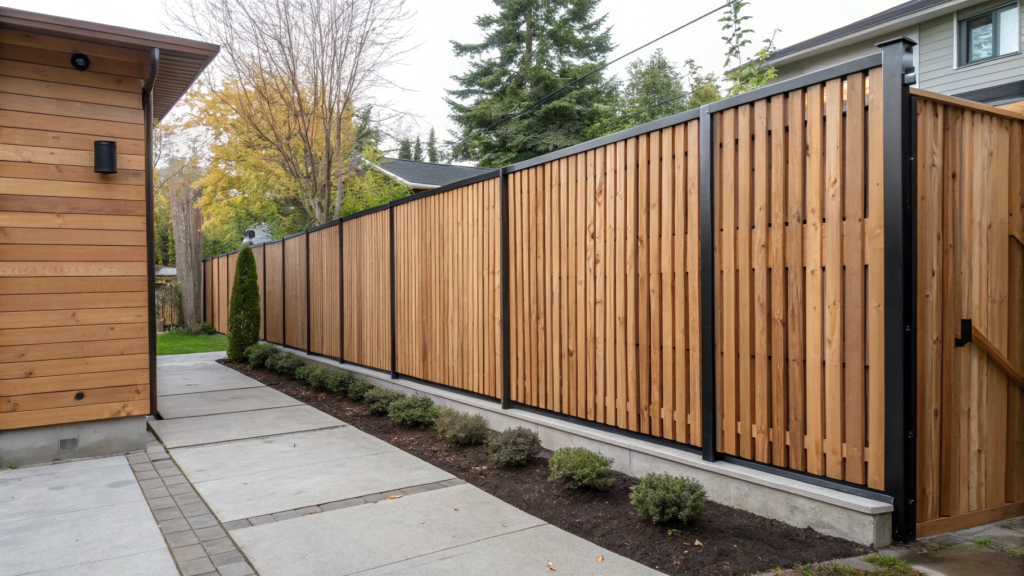
5. Simple Minimalist Wood Slat Walls for Sleek Backyard Privacy
A couple of years ago, we tried building a slat screen after getting tired of all the “temporary fixes” like bamboo, curtains, and colorful panels. We wanted something more durable, but still visually light.
It turned out so well that now it frames both our grill zone and the entrance to the garden.
What’s a slat screen?
It’s simple: vertical or horizontal wooden boards, spaced apart, mounted on a frame.
The spacing gives an airy feel, while still blocking enough of the view.
Minimalist. Modern. Functional.
What we used:
- 1×2″ boards (2.5×5 cm) made of cedar or heat-treated pine
Length — 6 ft (1.8 m), around 30 pieces for one 6×6 ft screen - 2×2″ studs (5×5 cm) — for vertical supports
- Outdoor wood screws
- Stain or wood oil — we used teak oil
- Level, drill, measuring tape
How we built it:
- Built the frame from two vertical and two horizontal studs (top and bottom).
- Mounted the slats horizontally, starting from the bottom up, with ~1″ spacing.
We used a spacer to keep the gaps consistent. - Oiled the entire structure to prevent the wood from fading or swelling due to moisture.
- Installed the screen at the edge of the porch, anchoring it in the ground and securing it to the house wall.
Optional. Сreate a double-sided screen by mounting a second layer of slats on the back in a staggered pattern. It looks stunning in sunlight — the shadows play like light strips in an old movie.
Why it’s actually practical:
First of all, it lasts. It won’t fall apart in a season like fabric or bamboo.
Second, it adapts to any style. Want it clean and geometric? Go for a Scandinavian vibe.
Add a few hanging pots, string lights, and a couple of wicker chairs — and boom, it’s a cozy boho corner. So many options!
Plus, slats don’t create a “solid wall.” Air circulates, light filters through, and you still feel that privacy. Especially lovely on a warm evening, when sunset shadows dance across those clean wooden lines.
And yes — it’s functional: you can use it to zone your yard, as a backdrop for raised beds, benches, garden furniture, or even for climbing plants.
Tips:
- Want to get creative? Mount some slats at an angle — you’ll get a dynamic pattern.
- Add planter boxes or a bench at the base — the screen becomes a full-on relaxation zone.
- Light up the back with LEDs — and you’ve got yourself a floating wall effect in the evening.
- By the way, if you want it to be mobile, don’t anchor it in the ground — use casters with brakes.
6. Easy Outdoor Privacy Screen Using Vintage Doors for a Rustic Vibe

Old doors are pure magic. They’ve already got character, texture, history. But most importantly — they’ve got a shape that’s just right for… closing off the space you want to keep private.
Here’s a simple idea that really works: turn two vintage doors into a real outdoor privacy screen — beautiful, stable, and easy enough to build without hiring a carpenter.
Where to find old doors?
- Construction material dumps
- Facebook Marketplace / Craigslist
- Flea markets, garage sales
- Or if you’re lucky — by the roadside with a “Free” sign (yes, it happens)
What’s the setup?
You use two doors as side posts, with a horizontal beam between them that ties everything together.
In the center, you can place fabric, lattice, vines, mesh, or anything else as the actual “screen.”
The result? A neat, charming, and super versatile divider you can adapt to different styles and seasons.
What you’ll need:
- 2 vintage doors (at least 6–7 ft tall)
- 1 wood beam or board (2×4″, around 4–6 ft long)
- Metal brackets to attach the beam to the doors
- Drill and wood screws
- Supports: wooden back “legs” and weights at the base
- Optional: fabric, macramé, mesh, or decorative panel
How to build it:
- Stand the doors upright on a flat surface (patio, pavers, or compacted soil).
- Attach the top beam, screwing it into each door with metal brackets. This creates a sturdy U-shaped frame.
- Add back supports if the screen stands alone (a simple angled board or a T-leg will do).
- Fill the center space — hang sheer fabric with hooks, stretch macramé, secure a rattan panel, or even install a vertical pocket garden.
- Optional: place planter boxes or decorative blocks at the bottom of each door for weight and extra charm.
Why it’s super convenient:
- Takes just an evening to build, no concrete or foundation needed
- You can switch the “filling” every season — fabric, mesh, macramé
- Easy to disassemble and move around when needed
- Fits perfectly in rustic, boho, or even minimalist settings (especially if left natural)
Safety first
Even with a top beam, this is still an outdoor setup — it needs to be secure, especially if you live in a windy area.
Make sure:
- It stands on a flat surface
- The doors have back supports and some weight at the base
- No glass inserts if kids are playing nearby
And the best part? You can take it apart and stash it in the shed super quickly whenever you need the space back.
7. Quick DIY Outdoor Privacy Screen with String Lights for Nighttime Magic
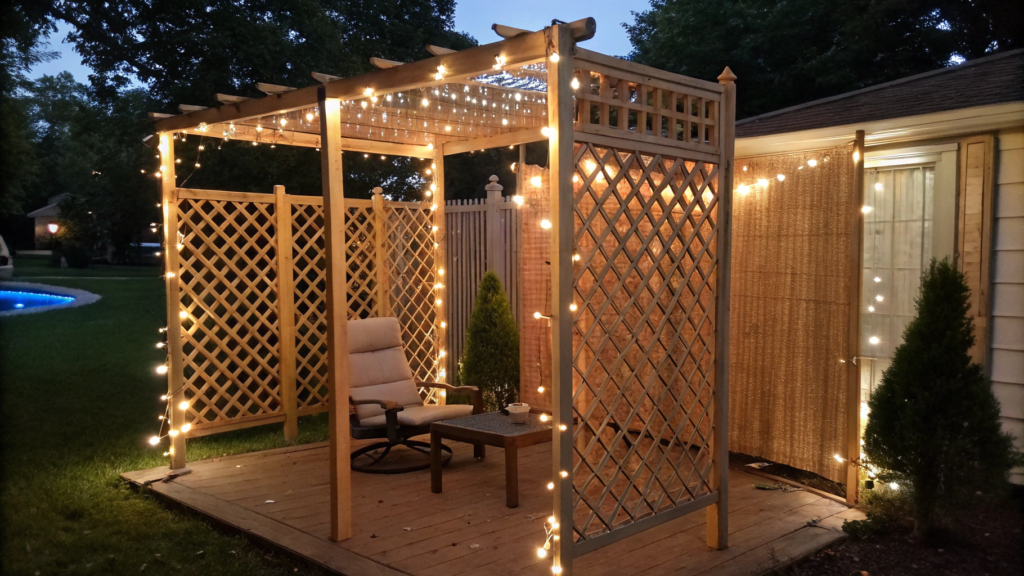
You’ve definitely seen those photos: café-style bulbs, a gentle breeze, a cozy chair in the shade — and it’s all just for you.
So why not combine privacy and light? Build a screen that blocks nosy neighbors during the day and turns into a glowing chill zone at night. And yes — you can DIY it.
What’s this screen all about?
It’s a structure (usually wood or lattice) with string lights attached right to it.
It can be:
- Stationary (anchored in the ground)
- Mobile (on casters or legs)
- Straight, angled, or used to divide a space from the side
Important note
Weight and wind can be tricky. Many string lights look light, but if the bulbs are glass — they pull down and sway.
That’s why the screen must be stable, especially if it’s not bolted to a wall or deck.
If you’re using lightweight materials, go for plastic-bulb lights — they still look cozy, but are basically weightless.
What we used:
- Wooden panels, 3×6 ft, made of 1×3″ slats on a frame
- Casters with brakes, to move the screen around
- Ground-set posts, if you want a permanent version
- Solar-powered or weatherproof string lights (IP65 rating)
- Hooks and staples to attach the lights
How to choose safe lights
- Look for IP44 or IP65 waterproofing, and plastic bulbs — safer and lighter
- For plug-in lights — check for UL or CE certification, and waterproof connectors
- For solar-powered ones — make sure they’re protected from moisture and overheating if left outside long-term
How we built it (our process):
- Built the screen using vertical slats on a frame — approx. 6 ft tall and 3 ft wide
- Placed it between our grill zone and dining area, right on the flat terrace
- Attached string lights around the frame, and ran one strand from the top of the screen to a nearby tree — created a dreamy “roof of light”
- Screwed in slim planter boxes at the bottom — filled with basil, mint, and thyme. That added weight and visual appeal to the structure
Our tips:
- Make sure the screen won’t tip from the weight of the lights — either anchor it to the ground or build a solid base
- Use threaded hooks, not adhesive ones — moisture will ruin sticky mounts
- If the screen is near a wall, you can run the lights diagonally from the wall to the screen’s top corner — cozy diagonal glow
- Want a “light gazebo” feel? Place two screens at an angle and stretch the lights between them
It’s a simple project — but the result feels like you’re in another world.
8. Fast Upcycled Shutter Walls for Perfect Backyard Privacy

A couple of vintage wooden shutters, a bit of imagination — and you’ve got yourself a unique, super cozy, almost free divider that looks straight out of a Pinterest dream.
What’s the idea?
You take 2–6 old wooden shutters — ideally the louvered kind — and turn them into a screen.
It can zone your patio, act as a decorative sofa backdrop, hide a messy tool corner or outdoor shower, or just add facade charm to a boring garden nook.
Where to find shutters?
- Building salvage yards
- Craigslist, OLX, or similar sites
- Friends who are remodeling
- Or just lying by the curb with a “FREE” sign — especially during old house demolitions
What we used:
- 4 old wooden shutters (5–6 ft tall)
- Hinges — to connect them accordion-style
- 2 2×4″ boards — to build a stable frame
- Wood screws, paint, sandpaper
- Optional: hooks, handles, signs
- No time to hunt? You can also buy ready-made shutters
How we built this outdoor privacy screen?
- Cleaned the shutters from dirt and old paint, then lightly sanded them
- Connected two shutters together with hinges — created two folding panels
- Built a simple wooden frame and attached the shutter panels to it
- Painted everything in a soft matte gray-green — to keep it rustic, but make it blend with the garden
- Set it up near the garden beds in a zigzag accordion shape — that way, it supports itself.
At the base, we added small angled wooden supports (like easel legs) to keep it from tipping backward in the wind.
In front, we placed wooden flower boxes, turning it into both a divider and a planter wall backdrop.
Stability and safety
Shutters are light, but once connected with hinges, they become a sail in the wind. So:
- Always set them in a zigzag, not a straight line
- If permanent — screw them into posts or a wall
- For temporary setups — use back supports, or place planters, crates, or large stones at the base to weigh and stabilize
Why it’s such a great option:
- Feels homey and inviting, especially near greenery
- Can be painted any color — from whitewashed to black
- Works for rental homes — no drilling or digging
- Easy to move or disassemble — no concrete required
Little tricks we loved:
Slide fairy lights or LED strips between the slats — magical at night
Add hooks for hanging planters, baskets, or signs
Short shutters? Mount them on plant boxes or wood stands — they’ll look like built-in furniture
In our case, the shutter screen stands near the outdoor shower — and it’s now one of our favorite spots in the whole garden.
Even when no one’s showering — just sitting nearby as the lights come on is pure bliss.
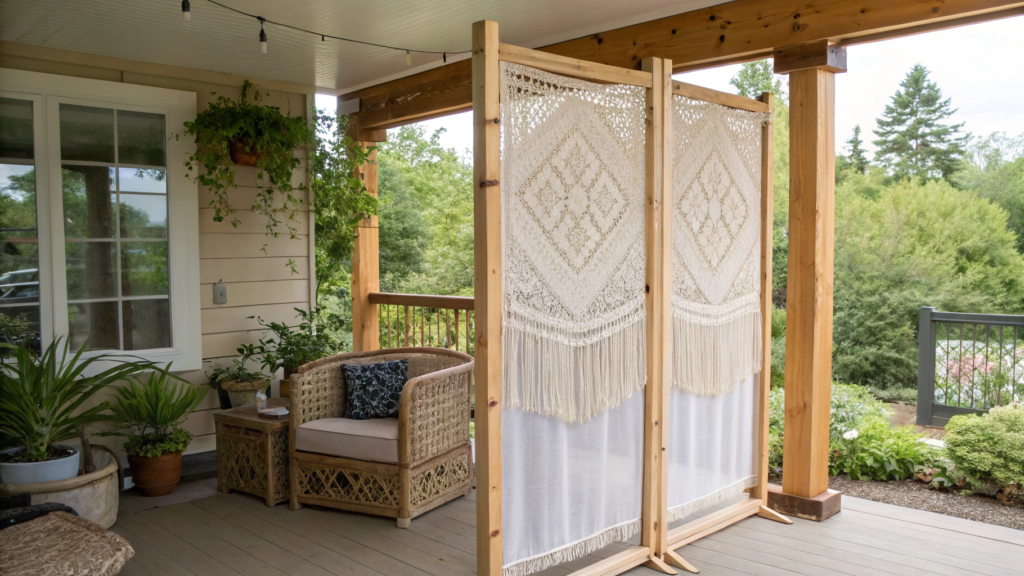
9. Easy Boho Macrame Outdoor Privacy Screen That’s Pinterest Perfect
I wanted a lounge area — you know, a little shade, a little privacy, and a lot of coziness.
And one day I looked at some bamboo sticks, a piece of rope and thought:
“We need macrame.”
What’s this screen about?
It’s a light wooden frame with a macrame panel stretched inside. Or even a few panels.
It looks airy, but gives you a real sense of privacy — especially if you hang plants or sheer fabric nearby.
You can place this screen on your porch, meditation/yoga area, or even use it as a photo backdrop (guests absolutely love it!).
One thing no one talks about
Macrame is not made for wind and rain. Natural fibers absorb water, sag, and fade. So:
- Use it only under a roof or in a sheltered spot
- Take it down for winter or during heavy rain
- Or make the panel removable, so it can be washed and dried
What we used:
- Wooden frame from 2×2″ studs (about 6 ft tall, 4 ft wide)
- Ready-made macrame panel
- Screws, hooks, level
- Optional: wood base with planter boxes, chains, beads, string lights
How we built this outdoor privacy screen?:
- Built a rectangular frame — super simple, just a wooden rectangle
- Stretched the macrame — attached it to the top bar with hooks
- Added a planter box with herbs at the bottom — visually grounded the whole thing
- In the evening, hung a string of LED lights — it softly highlighted the knots
Why it’s boho — and why it’s awesome
Macrame creates diffused shade while letting air flow through. Feels light and breezy, doesn’t overpower the space. You can swap the panel based on mood or season.
Looks amazing in photos and videos — your lounge zone gets its own Insta-moment.
And honestly? It’s just beautiful. Even without anything else
Our tips:
- Don’t want to buy macrame? Make it yourself! It’s actually fun — Lindy and I sat down in the evening, knotting and chatting. Felt like the old days
- Use white or beige cotton rope, 3–6 mm thick
- Want it to last longer? Treat the rope with moisture and UV protection spray
- Hang nearby plant pots, mirrors, or dreamcatchers — and voilà, your boho zone is complete
10. Quick Outdoor Privacy Screen You Can Install in Under an Hour
That moment when you need to “cover this corner before the guests arrive.”
Fast. Simple. No tools, no concrete, no level.
These are the go-to express solutions we actually tested at home. Some of them — literally thrown together between breakfast and cartoons.
Let’s be clear: these are temporary fixes
All of the screens below:
- Are easy to set up and remove
- Perfect for rentals, decks, vacation homes
- But not made for hurricanes, dogs, or bouncing kids
If you’re after something permanent, better go with a sturdier build.
But if the goal is quick privacy, a cozy nook, or light zoning — these totally work.
1. Foldable 3-Panel Screen (accordion-style)
Sold ready-made — like indoor ones, but made of weather-resistant plastic or wood.
Just unfold — and done.
Example: 3-panel outdoor folding screen on Amazon
Setup time: 2 minutes
Pro tip. Place planters next to it for added stability
2. Bamboo Roll + Rope or Zip Ties
The most popular “save me from neighbors” move. Just grab a bamboo roll, stretch it between two posts — that’s it.
Even works for balconies.
Time: 10–15 minutes
Tip. Secure it every 1.5–2 ft to avoid sagging
3. Decorative Fence Panels with Legs
Somewhere between furniture and fence. These panels are sold pre-made, some with legs and stands included. They look stylish and work great for zoning.
Basically — a garden center screen, but at your place.
No mounting needed
Assembly time: up to 30 minutes
Great next to hot tubs, grills, or raised beds
4. Fabric Screen with Tension Ropes
If you’ve got two posts, a tree, or a fence nearby — just stretch a piece of canvas or Oxford cloth. Use hooks, carabiners, or even zip ties.
Looks lovely against greenery.
Works both as shade and windbreak
Setup: 20 minutes
You can even hang a curtain with grommets — super easy to slide open when needed
5. Planter-Integrated Screen
Genius idea — buy or build a planter box, and attach a lightweight panel to the back: bamboo, slats, or even fabric on rings. The plants anchor the base, and the top gives you privacy.
Check. Planter with privacy screen on Amazon
Can be built in 45 minutes
And just like that — you’ve got something both pretty and functional.
We use these kinds of screens near the outdoor kitchen, by the grill, on the balcony, and next to the shower. They’re not forever, but:
- Let you create a “cozy capsule” in under an hour
- Solve the problem here and now
- And look way better than just throwing up a bedsheet
One note on wind. If wind is expected — weigh the base down (with pots, sand, or wood), and secure the top in 2–3 points. Light materials catch wind easily — and your screen might just fly away.
Outdoor Privacy Screen
These simple builds have saved us more than once — from sun, drafts, or street noise.
Sometimes, the “temporary” solutions stick around — simply because they work.If you want to adapt one of these ideas to your own space — leave a comment, I’d love to help.
And if you’ve already tried something like this — share what worked (and what didn’t).
Stories like that help all of us find better solutions.