Sometimes, all we really need is a quiet moment to ourselves — a cozy corner to sip coffee or tea, shielded from the wind or the neighbor’s view. Instead of heavy fences or solid walls, I’ve always preferred Outdoor Privacy Screen ideas that feel warm and welcoming, not boxed in. Over the past few years, Lindy and I have experimented with dozens of creative solutions to make that kind of space possible.
In this article, I’ve collected 10 simple ideas you can DIY, even if you’ve never built anything before. You don’t need a thousand dollars or a week off work. Every one of these ideas has been tested by us — in the rain, in the heat, and on those days when all you want is to hide away and listen to the leaves rustling.
1. Easy DIY Bamboo Outdoor Privacy Screen That’s TikTok Viral in 2025

You’ve definitely seen that bamboo screen all over TikTok this year.
A cozy little corner where you can sip tea without catching every neighbor’s glance.
We built one next to our outdoor kitchen, and honestly — it was one of the fastest and most satisfying weekend projects we’ve done.
Why bamboo is the best choice
First, it’s lightweight and eco-friendly. You don’t need to paint or treat it.
Second, it comes in ready-made rolls, already wired together — just unroll it and attach.
And it also:
- cuts easily to any height (you can even use basic garden shears);
- doesn’t mind rain or sun (our June storm proved that);
- looks natural and upscale, even if you’re attaching it to old fence posts.
We ordered this Bamboo fencing roll (6 ft x 16 ft) — and it honestly exceeded all expectations: sturdy, even, no weird smell, and just looked good.
What you’ll need:
- Bamboo fencing roll — 6 ft tall by 16 ft long (perfect for one long patio wall);
- Posts or supports — 4×4″, spaced every 5–6 feet;
- Zip ties or garden wire for attaching;
- Burlap or garden fabric if you want full visual privacy;
- Solar string lights — to add that cozy evening café vibe.
How to build it:
- Dig the posts into the ground (we went 2 feet deep and secured them with concrete).
- Unroll the bamboo fencing along the posts — it’s easier with two people so it doesn’t sag.
- Attach the bamboo to the posts using zip ties (3–4 per post should do it).
- If you want more privacy, add a layer of fabric behind the bamboo.
- Decorate the top edge with string lights — not just for light, but for a cozy visual accent. Hang them along the back of the roll so they light it softly without blinding you.
A few small tips:
- Don’t pull the bamboo roll too tight — it should “breathe” with the wind.
- Overlap the rolls if you’re connecting two — it’ll look neater and give better coverage.
- If you live in a windy area, attach the bottom to a horizontal board for extra support.
- Want it to last? Treat the bamboo with outdoor furniture oil — it won’t turn gray or brittle.
Even if you don’t have a perfect fence, you can attach bamboo to pretty much anything — even the frame of an old canopy tent.
Now we have this little spot in the backyard where we can sit, relax, and stop worrying about who’s walking by.
And the best part? The whole project took less than two hours. No wonder it went viral — it really works.
2. Fast Outdoor Curtain Wall You Can Build for Instant Privacy
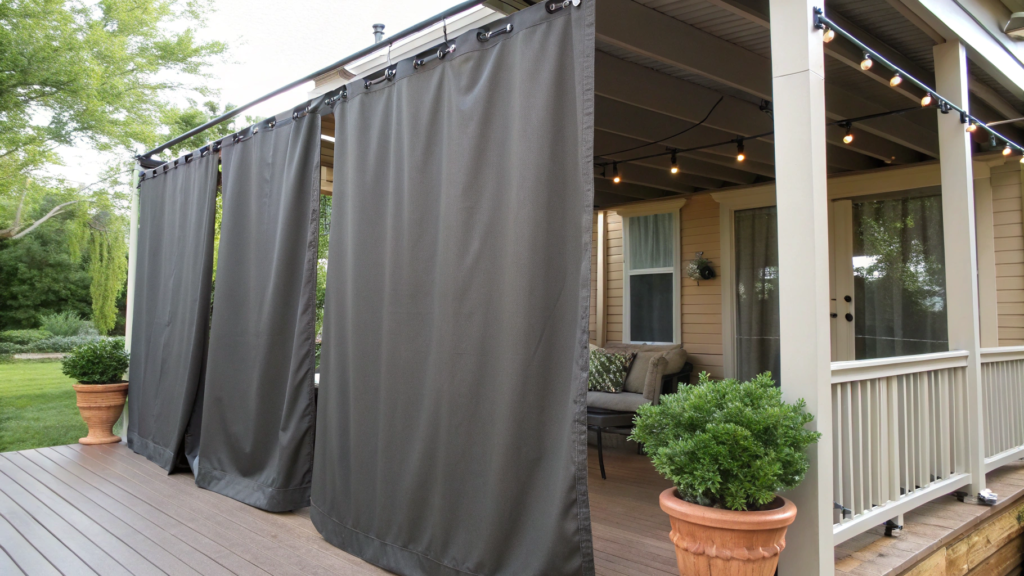
Let’s be honest — sometimes you just want to have breakfast on the porch in your pajamas, without an audience.
That’s why we now have a curtain that sways in the breeze, blocks the view from the neighbors, and makes you feel like you’re somewhere in a cozy rental villa in Portugal.
Yes, we made it with stuff we had on hand. Yes, no hammer or concrete involved.
And by the way — this idea totally blew up on Pinterest and Reels in 2025: outdoor curtains for patios, gazebos, and even tiny front yards.
What you’ll need:
- Curtain rod or metal pipe — at least 8–10 ft long (2.5–3 m), based on the width of the area you want to cover
- Heavy-duty outdoor curtains that hold their shape and don’t fade
- Mounting gear — hooks, anchors, brackets, depending on your surface
- Steel cable or tension cord, if you can’t attach a solid rod
- Clips or pins — to secure the curtains in windy weather
How to build it:
- Choose your privacy zone — porch, patio, side of a pergola, or even next to your entryway
- Attach the rod or tension cable. We used a steel wire with anchors on the wall — cheaper and strong
- Hang your curtains. If they have grommets, just slide them through the cable or rod
- Use clips if needed to keep the sides in place during wind
- And that’s it. You’ve just made a lightweight, movable privacy wall that protects you from wandering eyes and sets the mood
From experience (and a few hacks):
- If you want the build to be budget-friendly but solid, go with galvanized wire and tensioners instead of a full curtain rod — it attaches with two anchors, holds well, and costs way less.
- Pay attention to the fabric — make sure it’s outdoor-rated, UV- and water-resistant. Regular indoor curtains will fade and stretch quickly.
- If you live in a windy area, secure the bottom of the curtain — we tie ours to a low rail or just anchor it with a couple of heavy planters.
- And don’t forget about style — curtains pair beautifully with plants, woven chairs, and string lights.
That’s it. Comfort. Privacy. No tools, no noise. And now you can totally have that pajama breakfast, with the curtain gently fluttering in the breeze, like you’re on the coast.
3. Quick and Stunning Vertical Garden Screens That’ll Transform Your Backyard

When you live on less than an acre, and every wall counts — you start to look at vertical space differently.
And vertical garden screens? Absolute game changer.
They not only block views, but also turn dull corners into living, breathing garden nooks.
Especially if you’re like us and just love every little sprout growing in your yard.
What you’ll need:
- Wall trellis or garden panel — pre-made sections in wood, metal, or plastic all work
- Planters or vertical hanging containers — like those soft vertical pockets you can attach straight to the wall
- Screws or zip ties — for attaching to the frame or trellis
- Soil and plants — basil, thyme, sage, petunias, strawberries… whatever brings you joy!
- Optional — automatic drip irrigation system (if you’re ready to take it up a notch)
How to build it:
- Pick your spot — house wall, fence, pergola, frame — anything will do. Just make sure it gets good light.
- Mount the trellis or frame. We repurposed an old metal shelving unit — worked great.
- Hang your vertical containers. Screw them in if they have holes, or use zip ties for soft ones.
- Fill them with soil and plant. Mix edible and decorative — the combo looks amazing!
- Water regularly, or install drip irrigation (we skipped that and regretted it in the summer).
What to plant? Our vertical garden favorites:
If you want your screen to do more than just block — to actually bring joy (and scent!) — here’s what we always go back to. They’re easy and beautiful.
- Petunias — bloom all season, handle heat, and create full cascades
- Nasturtium — grows fast, climbs up the trellis, and has bold blooms (plus it’s edible!)
- Mint — bees love it, but keep it in its own pot — it spreads like crazy
- Basil — green, purple, lemon-scented — smells amazing and fills space
- Calendula — low-maintenance, long bloom time, great for tea too
- Alyssum — tiny flowers, big scent, especially in the evenings
- Strawberries — trail beautifully and give fruit after fruit — even if it’s just for looks, they’re worth it
We try to mix it up: bold + green, decorative + edible. It keeps things balanced and fun. Nothing here is “just for show” — it all grows with a purpose.
A few things to keep in mind if you want your greens to thrive:
Check your sunlight first. Basil loves morning sun, mint prefers dappled shade.
We nearly lost our strawberries the second week — they were in a too-hot spot.
Think about weight. Wet soil is heavy. Don’t attach everything to a flimsy plastic fence — it might topple right over.
If you want it to look really good, play with textures — mix light greens with deep purples, tuck flowers between herbs. It’s simple, but looks expensive.
And last: don’t do it all at once. We added pots and panels bit by bit. It’s like building a living puzzle — and that’s the real joy of it.
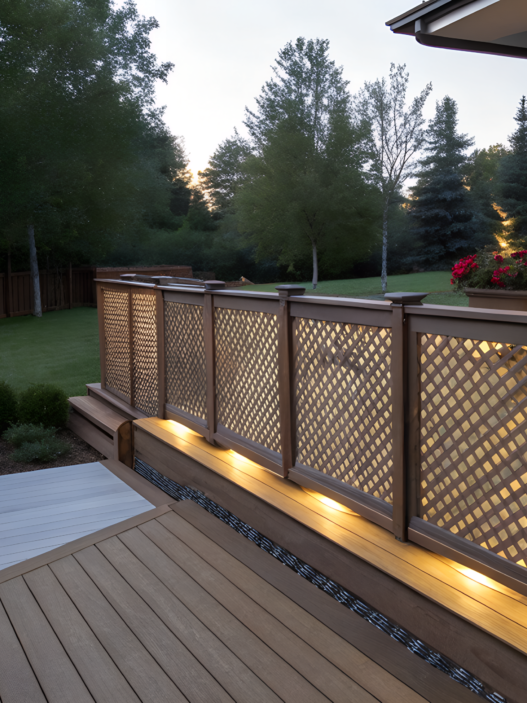
4. Simple 2025 Lattice Panel Screens for Backyard Privacy Goals
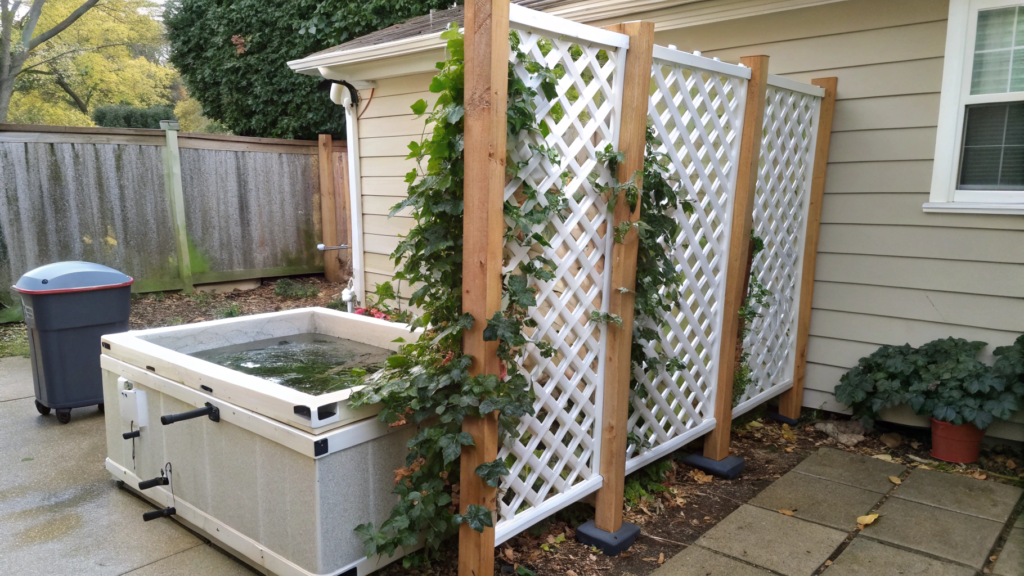
Modern lattice panels have become one of the biggest trends of 2025 — and for good reason.
They tick off three boxes at once: they add privacy, serve as a decorative plant support, and cost next to nothing.
We have one standing behind our outdoor sink. In summer, it’s covered in ivy and kale. In fall, it starts to shed but still gives off that cozy, sheltered feel.
What you’ll need:
- Ready-made lattice panel — plastic or wood. Plastic is lighter, wood feels warmer (we used a 4×8 ft one)
- Frame or supports — posts or a wooden frame to attach the panel to
- Screws, angle brackets, or even garden wire, depending on your setup
- Burlap, fabric, or mesh — if you want a more solid backing for one side
- Plants for vertical greening — we’ll talk about that in a second!
How to build it:
- Measure your panel to fit the space. If your area isn’t perfectly level (like ours), don’t stress — trim the panel to fit the slope
- Install your frame: two or three posts, or two vertical rails
- Attach the panel to the frame. We used screws with decorative washers — it looks neat
- Add a backing fabric if you want more privacy on one side
- And one important thing — don’t leave the panel bare. Its charm comes alive once green things start to grow on it
What to plant near your lattice panel:
A lattice without plants is just a fence with holes. That’s why we always go all in on planting around it. Here are some of our favorites:
- Clematis — delicate, full of flowers, grows like crazy. Look for long-vine varieties
- Sweet pea — smells incredible, blooms early, climbs like a pro
- Scarlet runner beans — edible, decorative, and they give great shade
- Zucchini or pumpkins — yep, if your panel’s strong enough. The vines hang beautifully!
- Honeysuckle — a hardy perennial, great for bees
- Climbing roses — definitely a “forever” kind of choice, but stunning if near a porch
Our go-to combo: clematis + scarlet runner beans + a couple of hanging pots with petunias.
By midsummer, the lattice turns into a full-on green waterfall.
Good to know before you start:
Plastic panels are lighter, but they can flex in the wind — secure them well.
If you’re in a humid area, PVC panels are better — wood will need more care.
And don’t be afraid to paint your panel! We gave ours a soft gray-green tint and now it blends perfectly with the garden.
A lattice isn’t just a privacy screen — it’s a backdrop for life. For vines, flowers, butterflies, morning coffee, and late-night chats.
And when it’s done with care, no one would guess it started as a cheap panel from the garden store.
5. Fast Modern Outdoor Privacy Screens You Can DIY with Minimal Tools

Some ideas take weeks to plan. And some just hit you over morning coffee — and by evening, they’re standing in your backyard.
That’s exactly what happened with our “modern” privacy screen — we just wanted something clean, nothing “country,” no vines, no trellises, no flowers.
Just something simple and sleek, like the homes you see on Pinterest, with black pergolas and concrete tiles.
But we’re not designers, and we don’t have a workshop. So we built it with just three things.
What you’ll need:
- Decorative composite panels or ready-made aluminum sections — they look seriously good
- 2–3 wooden posts or a ready-made metal frame
- Fasteners — screws, anchor bolts, maybe a couple of angle brackets
- Drill and level — and that’s it. No saw needed
How we did it:
- Installed two wooden posts vertically, spaced just a bit wider than the panel
- Screwed in the first panel between them. We picked a laser-cut design — sharp geometric pattern, looked expensive
- Added a second panel on top to increase the height — came out to about 6 feet (1.8 m)
- Installed a third post to the side, creating a corner. It turned into a cozy nook next to the bench
Now here’s what matters — if you want it to look like a catalog, not like “we threw it together”
- First — don’t be afraid of black. Most modern panels are dark, and they look super fresh against the greenery.
- Second — composite materials are lighter than wood, need no treatment, and handle rain like a champ. A huge plus if you don’t want to repaint every two years.
- Also — if you want the screen to feel intentional, add potted plants at the base. We placed two dark containers with hostas and white geraniums — looked minimal but full of life.
From real-life experience: little things that make it easier
If you don’t have a hammer drill — don’t attach directly to concrete or brick. Use anchors in a wood frame or galvanized brackets
Choose panels with small cutouts, not solid ones. They let air through and still give you privacy
Want to make a cozy corner? Turn one panel 90 degrees. Boom — instant “outdoor office” vibe
And most importantly — don’t be scared to try! This was our first time working with panels, and we finished it in an evening. No dust. No drama. Almost.
If you’re after something modern, clean, and simple — with no vines, no weaving, no blooms — this one’s perfect.
We now call that little spot our “urban zone”. Even though we still sit there sipping chamomile tea like always.
6. Easy Pallet Privacy Wall You Can Make This Weekend

Pallets are one of the most underrated materials in any homestead. Especially when it comes to creating privacy.
One weekend, Lindy and I dragged home four pallets from the local shop, and by Sunday evening we had a wall — one that not only blocks the view from the road, but actually looks cool.
No, it’s not “landscape architect approved,” but it’s homey, hands-on, and full of soul.
What you’ll need:
- 3–5 wooden pallets (euro format works best — 48″x40″)
- 2–3 posts or metal pipes — for support
- Wood screws, drill, hammer
- Wood stain or oil — to protect the wood
- Hooks, planters, hanging pots — optional but nice
- Some free time and a good mood
How we did it:
- Cleared out the area next to the corner of our deck — there’s a walkway to the compost bin, and neighbors pass by all the time
- Dug in two posts (2 feet deep), added a third post to form a corner
- Placed the pallets vertically like panels, and simply screwed them into the posts
- Covered everything with wood oil — the dry wood soaked it right up
- Hung up a couple of flower boxes and solar lights — and just like that, we had a new private garden nook
Now for a bit of real talk:
Don’t use old moldy pallets. They could be contaminated, especially if they came from warehouses. Ask a local store or construction site — they often give them away for free.
Build it dry first — no screws at the start. See how the pallets fit together. You might need to trim some, especially if you want a step-like effect or a decorative zigzag.
Oil is a must. Even if it’s a temporary screen, wood dries and cracks fast in the sun. We used deck oil — smells nice and really protects.
Add planters! We hung petunias, lavender, and thyme in little buckets — and the wall became part of the garden, not just a structure.
What to plant right on the pallets?
We love adding life right into the build. Here’s what works great with a pallet wall:
- Petunias and nasturtiums — in hanging boxes or pots
- Thyme, sage, basil — fit perfectly into horizontal slats
- Succulents — if it’s a sunny spot, tuck them between the boards
- Pansies and calendula — add color and don’t need much water
- Mini cherry tomatoes in hanging pots — unusual and tasty
We went even further and placed two big containers with mint and strawberries at the base. Now the wall has a living, edible foundation.
The result?
By the end of one weekend, we had a cozy, warm, and vibrant space — and it’s now one of our favorite spots in the whole yard.
7. Easy Backyard Privacy Using Hanging Planters: The Viral Hack of 2025

Most “hacks” don’t work. But this one… Hanging planters as a privacy screen — it was love at first sight.
Lindy saw a Reels video where someone hung planters from an old beam and completely blocked off their balcony from the neighbors.
That’s how our living curtain came to be — a vertical row of hanging pots that not only shields us from the road, but also blooms, smells wonderful, and brings joy all day long.
What you’ll need:
- Horizontal beam — a board, pipe, rope, or even an old ladder
- Hanging planters — we used soft fabric pots with hooks — lightweight, breathable, and quiet in the wind
- Mounting hardware — chains, hooks, carabiners
- Soil and plants — see our favorite picks below
- String lights or fairy lights — if you want to add a little extra charm
How we did it:
- Attached a horizontal beam between two posts near the outdoor kitchen
- Hung six planters on it — spaced about 1.5 feet apart. They hang at different heights to keep it visually interesting
- Filled each one with something different: some with herbs, some with flowers
- Placed two planter boxes with lavender underneath the beam — it turned into a kind of curtain, but made of greenery
More than just pretty — it actually works
You can swap out the plants season by season. In spring — green onions and violas.
In summer — petunias and basil, fall — ornamental cabbage and thyme.
Plus, this kind of screen gives the sense of a room — even if you’re on a tiny lot, it still feels like your own little zone.
What to plant in hanging pots?
- Petunias — grow fast, cascade nicely, even cover the sides
- A mix of basils — green, purple, lemon — colorful and fragrant
- Thyme and oregano — heat-tolerant and beautifully trailing
- Nasturtium — fills in space quickly, blooms well, and edible too
- Alyssum — small flowers, big scent
- Strawberries — yes, really! Their runners trail beautifully from hanging pots
Our personal favorite combo? Petunias + nasturtium + basil.
One pot, and you’ve got scent, color, and privacy all at once.
If you want more shade and coverage, hang the pots closer together — even stagger them in two rows.
Don’t use heavy pots, especially if your beam isn’t fixed in place. Lightweight fabric or plastic ones work best.
To avoid running around with a watering can, we added a simple drip irrigation system — just a hose with holes, strung across the top. Saved us a ton of time.
And don’t forget to rotate the plants with the seasons — it keeps things fresh and makes your yard feel new without much effort.
8. Quick Outdoor Fabric Screens That Look Like a Luxury Resort

Fabric, wind, and a little imagination… That’s how we ended up with a real little resort corner, even though the beach is thousands of miles away — and there are definitely no palm trees around here.
We hung up a few pieces of fabric, and suddenly that old grill corner in the back looked like a café in Greece.
And it really did feel like a designer privacy screen.
What you’ll need:
- Heavy-duty outdoor fabric — white, linen, beige, or even something with color. Best to use pre-made outdoor panels, like UV-blocking curtains
- Curtain rod, rope, cable, or even a thick cord
- Hooks, anchors, zip ties — whatever works for your wall or frame
- String lights, lanterns, or bamboo — if you want to add some extra atmosphere
How we did it:
- Ran a thick rope between our pergola and the side of the house (you could also use two posts)
- Hung two panels of fabric on each end — they softly framed the space, gave some shade, and created a feeling of privacy without turning it into a tent.
It’s not a solid wall — more like a soft corridor of fabric. You feel like you’re in your own little space, even if the sky is wide open above you.
- Tied the bottoms of the panels to lavender pots — it keeps them from blowing too wildly in the wind
- At night, we added string lights — soft glow, flowing fabric, and scent in the air.
The whole space came together naturally
Tips to keep it looking great:
Use actual outdoor fabric — it won’t fade, sag, or soak up moisture.
Indoor curtains will look sad and droopy in a week.
Top mounting is key — don’t skimp on the anchors, especially if attaching to a wall. Wet fabric weighs more than you think.
If you want that “coastal resort” vibe, choose light-colored fabric with a soft weave — it gives shade without blocking everything.
Add one textured piece — maybe a jute rug, a wooden bench, or a bamboo panel off to the side. That’s what brings the look together
Do you need to plant anything nearby?
You can — if you want to boost that “tropical feel.” We added a couple of planters with ornamental grass, geranium, and mint (yes, mint is basically everywhere here).
But honestly, the fabric alone already sets the tone. Just don’t overdo it — it’s like crisp white sheets in a good hotel: simple, and that’s what makes it feel so good.
9. Simple Trellis Privacy Screen You Can Create on a Tiny Budget
Good old trellis. Simple, cheap, but if you use it right — it gives you both privacy and beauty.
You can put one together in just a couple of hours. And there it is — a real little rest zone, with a wall of wood and green.
What you’ll need:
- Ready-made trellis or strips of wood for a DIY version (we used leftover 1×2″ boards)
- 2 support posts — you can even reuse old pergola poles
- Drill, screws, and a level
- Wood stain or paint (optional) — we used leftover clear outdoor finish
- Climbing plants — list of our favorites below
How we did it:
- Built a frame — two vertical supports with horizontal boards every 8 inches. Nothing fancy — just screwed the boards right in
- Installed the whole structure next to our compost area, to separate it from the “people zone”
- Stained the wood (we had some left over from last season)
- Planted two clematis at the base and added one pot of runner beans.
A month later — it was completely covered, and you could only see the trellis from the inside
A trellis doesn’t weigh the yard down. Air flows through, sunlight still gets in — but you still feel like there’s a wall behind you.
And it costs next to nothing. We honestly used all leftover materials, aside from the plants.
Even if you buy a ready-made panel, it’s about $30 tops.
And the best part — you can change the look every season. Trim it. Paint it. Rethread it.
It’s a living piece, not a permanent fixture.
What grows well on it?
- Clematis — the classic: fast-growing, full of flowers
- Ornamental beans — underrated, but super striking
- Nasturtium — light, fragrant, covers everything in green
- Sweet peas — perfect for spring
- Cherry tomatoes on a trellis — yes, that’s a thing
- Zucchini or pumpkins — if your trellis is sturdy and you want a little garden drama.
We’ve got clematis and beans climbing ours. And when everything blooms — it doesn’t look like a DIY project anymore. It looks like art.
Tips that help:
Raise the frame a couple of inches off the ground if you want it to last — don’t set boards directly on the soil.
Don’t be afraid of asymmetry — we made one side of our trellis a bit higher, and it turned out way more interesting than a perfect rectangle.
Want more privacy? Mix two types of plants with different leaf thickness — like clematis + beans, or rose + mint.
And yes — a trellis is perfect if you want to screen off the compost bin, shed, or trash cans. Tested. Approved.
10. Fast Rolling Outdoor Privacy Screen Walls TikTok Can’t Stop Talking About

These rolling privacy walls have totally taken over TikTok.
We used cheap materials, minimal tools, and within a day we had a movable screen that blocks off our outdoor shower or creates a little grilling zone when guests come over.
What you’ll need:
- Plywood, boards, or OSB panels — for the wall surface
- Caster wheels with brakes
- Wood frame (2×2 or 2×4) — to hold it all together
- Fasteners, drill, measuring tape, level
- Wood stain, paint, or fabric — to finish it off
- Plants (optional) — more on that below
How we did it:
- Built a 6×4 ft rectangular frame out of 2×2 boards
- Added two T-shaped base legs for stability. We screwed two caster wheels with brakes onto each leg — four wheels total. It rolls smoothly, and the brakes keep it steady even in wind
- Covered one side with OSB board (cheap and sturdy), and the other with fabric
- Stained and sealed the whole thing — came out in a nice warm tone
- Set it up next to our outdoor sink so we could move it around as needed
Why it’s so handy:
You’re not locked into one layout forever. Tired of it? Roll it away
You can rearrange the yard for guests, for work, for relaxing
Start with one panel, or combine 2–3 to create a cozy corner
From experience — what we wish we’d known:
- Get caster wheels with brakes. Even a light breeze can move the panel if it’s not locked in place
- Make the base wide enough. A narrow, tall frame can tip, especially on uneven ground.
- Use materials that handle moisture. We forgot to seal the bottom edge, and the OSB started breaking down by fall.
- Dress it up. We hung fabric and a couple of pouches with mint and thyme — turned the panel from “construction” to “intentional”
Styling ideas:
- Wrap the wall in fabric and add warm string lights — instant beachy vibe
- Use chalkboard paint so the kids can draw or you can write the evening’s menu
- Mount some flower pots and turn it into a vertical garden
Rolling walls give you zoning freedom — especially when space is limited but you want the yard to breathe, evolve, and shift with the seasons.
Your quiet corner
I can’t say which idea will work best for you. We all have different spaces, neighbors, and habits.
But if even one of these ideas makes your yard feel a little quieter, cozier, or just nicer to be in — then this article was worth writing.
And if you feel like sharing what worked for you — I’d love to hear about it in the comments.