
A family backyard is more than just the ground around the house. It’s an extension of your home. It’s where a kid can grab a strawberry straight off the bush. Where you rest in a hammock. Where neighbors forget to check their phones. And if you build it with heart — that family backyard becomes a little world you actually want to live in.
In this post, I’ve gathered 10 of our most successful (and tested!) additions that transformed our yard — and can work for you, even if all you’ve got is a tiny lot or puddles every spring. From pea trellis arches to shaded pergolas. From raised mulch walkways to flowers that literally guide guests like signposts.
No templates here. Just what sets the mood, brings the family backyard together, and makes your yard feel alive.
1. DIY Flower Beds Near the Play Area – Safe, Low-Maintenance & Stunning

Flower beds near the kids’ area decorate the space, make it feel cozier, and can actually be super functional — from blocking dust to forming a natural boundary.
We spent a lot of time trying to “pull together” the family backyard into one unified space. It used to be a scattered mess of sandbox-swing-playhouse, and honestly? It looked like someone dropped a playground out of the sky. We knew we had to unite it into one zone where kids could have fun and adults wouldn’t cringe. The flower beds were our first step.
1. Safety first
No sharp corners. Use rounded wooden boards for the edges (for example, cedar 2×6 inches).
Avoid plants with thorns, spikes, or toxic leaves. Even something lovely like lavender can cause eye irritation if your kid rubs their face after “exploring” it.
2. Built to take a beating
Kids will run, jump, ride, kick — so the plants need to withstand dust, balls, feet, and all that “love”.
Best choice? Perennials like echinacea, sage, geranium, calendula. They’re pretty, sturdy, and even edible — which your kid will definitely test.
3. Low maintenance
Nobody wants to pull weeds in 95°F (35°C) while kids are yelling, “Mom, push me on the swing!”
That’s why mulch is your best friend. We covered the whole flower bed perimeter with landscape fabric and poured bark mulch on top (at least 2 inches / 5 cm deep).
Keeps weeds out, retains moisture, and looks tidy.
How we did it
We had about 8 feet (2.4 m) of space between the lawn and playhouse. We built two 4-foot-long (1.2 m) beds with space between them — enough for a tricycle to roll through.
What we planted inside:
- in the center: lemon thyme and mint (smells amazing and looks great)
- around the edges: marigolds and calendula to repel insects
We water it with a drip hose — no puddles, no hassle.
One tiny but important detail
The border between lawn and bed. We used a flexible plastic edging:
Dimex EasyFlex No-Dig Landscape Edging Kit (1.5 inches / 4 cm high) — to keep mulch from spilling into the grass.
These beds totally changed the vibe. The play area stopped looking like a foreign object plopped in the yard. Now, it’s part of the garden. And here’s one more thing: kids start to respect the space more when it’s beautiful. Tested and proven.
2. Edging Landscape to Define Parent + Kid Spaces (No Fence Needed!)

When your family backyard has to fit a play area, a veggie patch, and a cozy seating zone — things get messy fast. Someone will kick a ball into the tomatoes. Or drive a toy truck straight through the wisteria. (Yes, that actually happened.)
We didn’t want to put up fences or metal sections — I just don’t like when a yard looks chopped up like a public park. So instead, we divided the space visually, using simple but clear landscape edging solutions.
Why landscape zoning works better than fences:
- Doesn’t block your view — you can still see where your kid is, even from across the yard
- Looks natural and pretty
- Doesn’t create “off-limits” areas like fences do. Everything’s still shared — just with gentle boundaries
What we did:
1. Different ground covers for different areas
We laid light-colored gravel for the sitting area, and bark mulch for the play zone. It works both visually and practically:
- mulch is soft if your kid falls
- gravel doesn’t get tracked everywhere like grass
- and both are cheaper than lawn and don’t need mowing
2. Living border
We planted a low lavender hedge (12–16 inches / 30–40 cm tall) between the zones. It keeps bugs away, smells great, and blooms beautifully — without blocking your line of sight.
Note. Lavender doesn’t love rough play. We planted it along a 2-inch-high (5 cm) concrete edge so a runaway bike wouldn’t crush the roots.
3. Small steps or a wooden walkway
To mark the transition, we laid down a simple wood board pathway (24 inches / 60 cm wide — enough to carry a cup of coffee across it).
It works almost subconsciously: kids see that past this line is not the play area anymore.
We built ours by hand, but if you want something ready-made, here’s a solid option: Plow & Hearth Wooden Garden Pathway (Amazon)
4. Different levels of light and shade
In the adult zone, we created shade — two maple trees and a pergola with climbing grapes. The kids’ zone is sunnier and open.
When your kid gets hot, they naturally move to the shade. The point is — every zone has its own “character.”
You’re sitting in a chair, sipping tea made from your own mint. The play zone? Just across a flower bed and border. You can see and hear everything, without getting up. And yet — you’re in your own space.
Kids feel it too. They know this part’s theirs, that part’s mom’s. And that’s not a battle — it’s mutual respect. Space teaches respect.
3. Front Porch Flowers That Lead to an Epic Setup for Family Backyard

Almost everyone who visits us starts by glancing at the porch… and then raises an eyebrow and takes a few steps forward toward the garden — even without waiting for an invite. And that’s exactly how it should be.
The porch isn’t just a spot in front of the door. It should say right away: a family lives here who loves their space. And hey, you don’t need a designer with a fancy portfolio. Just the right plant choices and a bit of heart.
Why porch flowers matter:
- They set the tone for the entire yard
- They smoothly connect the house to the garden
- They give off the first scents and colors that pull people deeper into the family backyard
Our recipe for a “working porch”:
- Asymmetry is your friend
Forget the identical pots with identical petunias on both sides of the door. On our porch, we’ve got a big old barrel with a trellis for sweet peas on one side, and on the other — a stepped wooden shelf with pots of thyme, nasturtiums, and basil.
And that’s what makes it great — it looks like the plants live there, not like someone lined them up for inspection. - “Navigating” flowers
Flowers can actually guide people. We realized this when we placed pots of marigolds, lemon verbena, and sage along the path from the porch to the garden. The colors and scents kind of call you in. - Mix beauty + edible
Mint, basil, rosemary — it’s not just about salad. These look amazing, grow easily in containers, and… let’s be honest, you can’t not touch the mint when you walk by.
Kids love that too — they grab a leaf and chew on it as they head toward the swings. - Vertical is just a wow effect
On one side of our porch is a metal arch with clematis climbing up. On the other? Just an old ladder turned into a flower stand. It adds height and depth to the whole setup. - Echo the rest of the yard
It matters that the flowers on your porch “reflect” somewhere else. We have nasturtiums at the front and also near the greenhouse beds. Same with the marigolds.
It creates a rhythm. Dot — comma — dot. The eye picks up on it. It’s like you’re reading the space like a poem.
In the end, there’s nothing showy about it. No “this is the lounge zone, this is the curated corner.” It’s just a porch that welcomes you. And a space where you and your guests already feel inside, even if you’ve just stepped out.
4. Family Backyard Layout with Tall Flowering Trees for Shade + Beauty
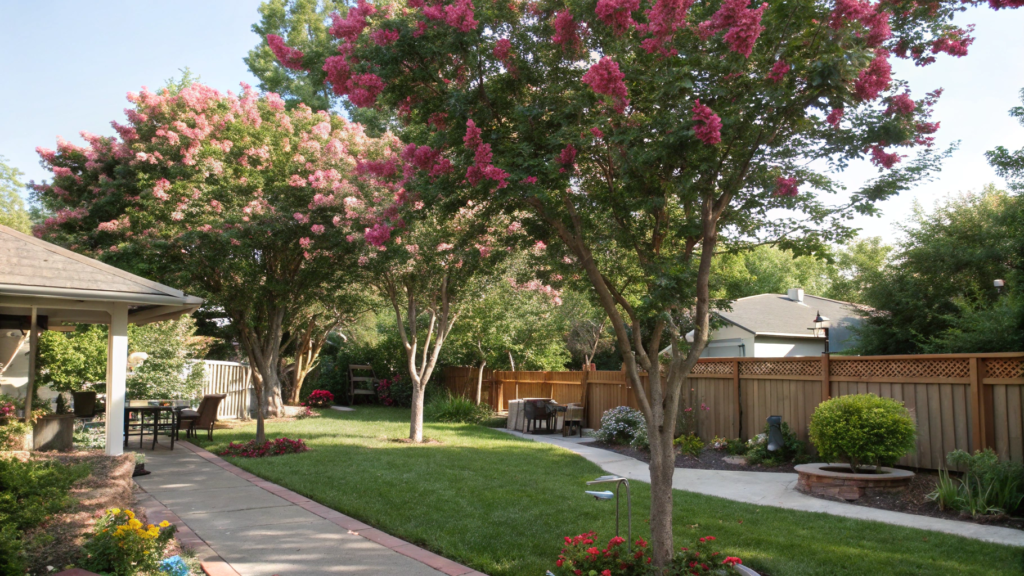
We had this one day in July — it hit 98°F (36°C), and in the sun it felt like 110°F (43°C). And our yard… not a single patch of shade.
That’s when I knew: we needed trees. Big ones. Flowering. And fast.
Why tall flowering trees are kind of genius:
- They offer cool shade for lunch or a quiet rest (yes, we actually take quiet hours!)
- Blooms all season long — a treat for bees, guests, and your Instagram
- Stability — unlike umbrellas or tents, a tree won’t fly away in the wind
- They help with zoning — creating outdoor “rooms” for kids, hammocks, shaded beds
What we planted — our real-life picks:
1. Redbud (Cercis canadensis)
- Height: up to 20–30 ft (6–9 m)
- Blooms: bright pink flowers right on the trunk in early spring
- Leaves: large, heart-shaped, offering solid but breathable shade
- We planted ours next to the kids’ zone — when it’s in bloom, it’s like a fairytale. Bonus: no sticky seeds like maples!
2. Serviceberry (Amelanchier)
- Height: 15–25 ft (4.5–7.5 m)
- Fruit: totally edible — and delicious!
- In fall: turns a blazing orange
3. Magnolia ‘Jane’
- Blooms: large pinkish-purple flowers
- Not as huge as the classic magnolias — grows up to 15 ft (4.5 m)
- Looks elegant, but still very “homey”
It’s right by our swing. In spring, it’s white-pink and dreamy. In summer — a patch of dappled shade. And come fall — the leaf pile underneath. Kid heaven.
Where to plant them?
This part matters. Otherwise, you’ll end up moving garden beds and swings every six months.
We did it this way:
- Sketched out the yard (yep, just on graph paper)
- Marked the zones: where we play, where we sit, where the veggies go
- Positioned trees where:
-Their shade would cover the south-facing side from 12–4 PM
–They wouldn’t block morning sun on garden beds
-They would frame the space instead of cutting it in half
Combine trees with flower beds
Trees aren’t just trunks and canopies. There’s the ground beneath them too. We planted shade-lovers at the base: hostas, vinca, lemon balm. Looks like mini flower beds. Keeps the ground covered. And gives kids a “forest” to play in.
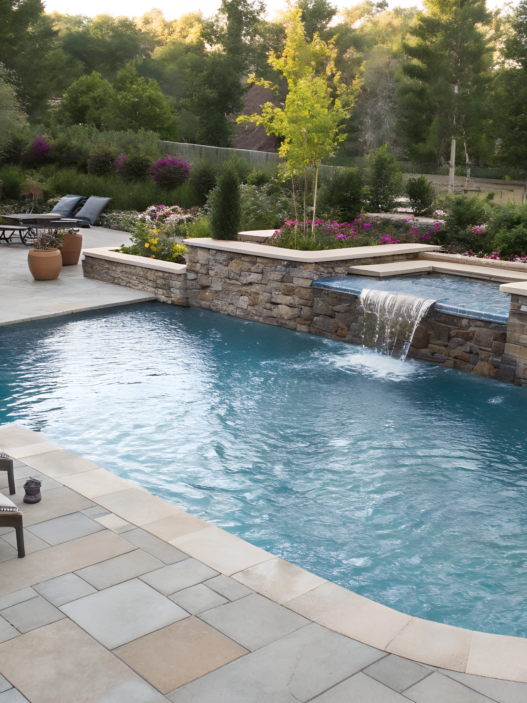
5. Family Backyard: Water Fountain Placement That Calms Kids + Delights Guests

It’s always a good thing when your yard has a spot where you can relax, listen to the sound of water, and watch the kids play nearby. A fountain became the perfect solution: not only does it decorate the garden, but it also brings a feeling of calm and comfort.
Why you should consider adding a fountain to your yard:
- Soothing water sounds – the gentle flow of water helps you relax and melt the stress away
- Attracts wildlife – birds and butterflies love water, and your garden will become a magnet for them
- Natural space divider – a fountain can subtly separate a play area from a seating area
- Child-friendly – modern fountains can be completely safe even for toddlers
What to look for when choosing a kid-safe fountain:
- Shallow basins – avoid fountains with deep pools to lower any drowning risks
- Durable materials – pick ones made from strong materials that won’t crack or shatter if bumped
- No sharp corners – smooth, rounded shapes are best for little hands and feet
- Solar-powered – no need to plug into the grid, which makes them safer and easier to set up
Place your fountain near the seating area, so you can enjoy the sound while relaxing. Or set it up next to the kids’ play zone — a safe fountain can even become part of the play experience.
And in the center of the yard, it can act as a focal point, pulling the whole landscape together and drawing the eye.
To keep your fountain clean and working:
- Clean it regularly – remove leaves and debris so the water stays fresh
- Check the pump – make sure it’s running smoothly and isn’t clogged
- Drain it for winter – prevent freeze damage by removing water in cold months
A fountain in the yard isn’t just décor — it’s a true source of joy for the whole family. It creates a cozy atmosphere, helps everyone unwind, and makes your yard feel like a special place.
If you’re thinking about adding a fountain, focus on safety, placement, and maintenance — and it’ll bring you happiness for many years to come.
6. Family Backyard: How to Use Flower Pot Design to Lead Guests Through Your Yard
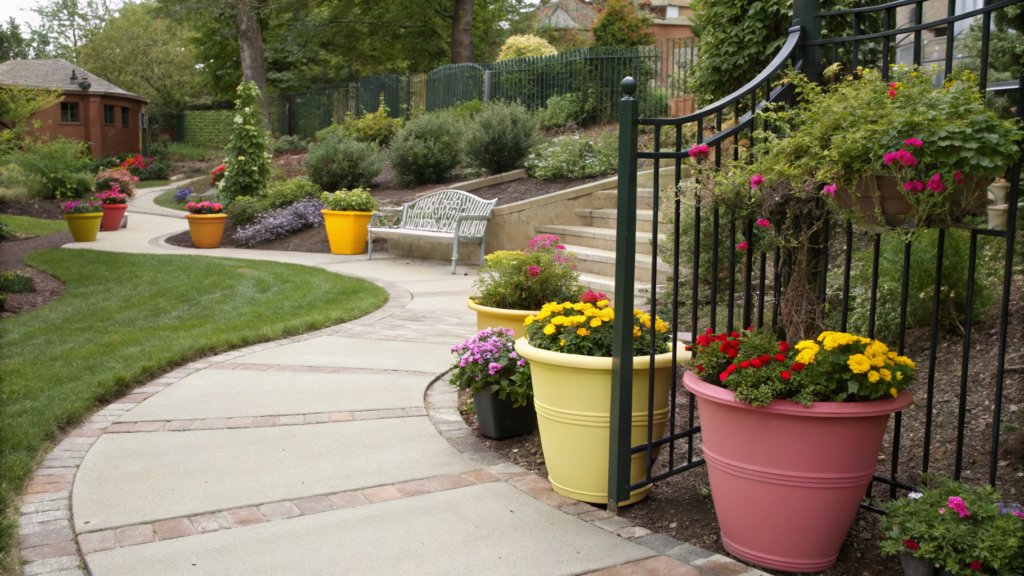
When guests come over, they ask a ton of questions as they walk: “What’s that bush?” “Is that edible?” “How did you even come up with this layout?”
And that’s when I know our flower pot setup worked. We don’t use them just as decoration — they’re navigation points that guide people through the yard, like quiet hints saying “look here,” or “sit there.”
It works especially well on yards with curves, corners, or hidden spots. Let me show you how to do it with zero stress or symmetry.
In short: flower pots are the garden’s signal lights. Guests move toward what’s bright, interesting, and beautiful.
So place them where you want to draw attention or direct movement.
Examples:
- On a path corner — to signal it keeps going
- Next to a bench — to invite someone to sit
- In front of stairs or a rise — to mark the transition
- By the garden gate — to show a new area
- Along a long wall or fence — to break it into visual sections
Even lining them up in a row works — they act like an arrow, especially if the plants repeat in color or form.
A story in every pot
Each pot is a little world. It can be edible, floral, aromatic, or sensory. We like to mix:
- A tall plant (like rosemary or ornamental pepper)
- A main bloomer (nasturtium, petunia, calibrachoa)
- A trailing edge (dichondra, verbena, thyme)
Pots like these — Plow & Hearth Wooden Garden Pathway — work great even in rainy spring weather.
Height matters! The lower the pot sits, the taller your central plant should be. If it’s on a stand — play with cascading effects.
We created a color gradient from the entry to the lounge zone — starting with bright orange and yellow (calendula, nasturtium), moving into pinks and purples (ageratum, sage), and ending with cool greens and whites (ferns, mint, chamomile).
Most guests don’t even realize it consciously, but the eye picks up the rhythm — and follows the color deeper into the yard.
Don’t forget height and rhythm
To keep people from just walking past, mix up the height and spacing between pots. Here’s what we do:
- One large pot, then three steps, then two medium ones side by side
- A tall one, then six to eight steps, then a group of three mixed sizes
- Then a pause, a bench, and a tiny mint pot for scent
It’s like visual music — rhythm, pauses, accents. And people move through it without thinking, but loving every second of it.
7. Raised Mulch Walkways That Keep Family Backyard Feet Dry in Any Weather
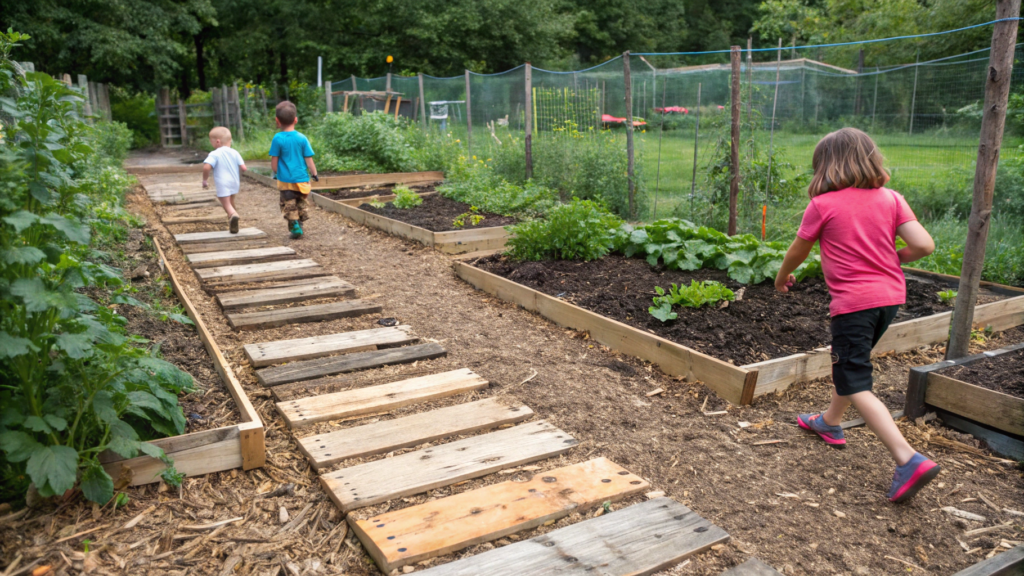
The rain had barely stopped, and the kids were already sprinting into the garden — two minutes later, everyone’s socks were soaked. That was our spring every single year. Especially when you’re trying to plant something, and all you’ve got is mud up to your ankles.
That’s why one day we grabbed a wheelbarrow, a rake, and a pile of old pallets… and started building raised mulch walkways.
Since then — not a single soggy shoe. And bonus: it’s pretty, soft, natural, and smells amazing (especially if you use pine mulch!).
Why raised walkways are more than just “convenient”
- Water drains faster from a raised path than from compacted soil
- Mulch creates a soft, bouncy layer that feels great underfoot
- They fit naturally into the look of any yard — especially if your space has that “wild & cozy” style like ours
Plus, walkways give kids an actual route to run on — a “track” that keeps your garden beds from turning into a racetrack.
What you’ll need:
- Pallets or boards — for edging (width: 4–6 inches / 10–15 cm)
- Cardboard or landscape fabric — to block weeds
- Mulch — pine, leaf, or wood chips, depending on your style and scent
- Stakes or fasteners — to secure the edges if needed
- Rake and level — to smooth the base
How we did it, step by step:
Step 1. Planning
We walked through the yard and marked where we move most — from the gate to the veggie patch, from beds to greenhouse, from house to compost pile.
Step 2. Laying the base
First we removed the top 2–3 inches of soil, then laid down thick cardboard (hello, Amazon boxes!). Crucial step — skip it, and weeds will break through in two weeks.
Step 3. Edging
We placed 6-inch (15 cm) high boards along the edges, dug them in a bit, and secured with wooden stakes. This gave the path its shape and kept the mulch from spilling.
Step 4. Mulch, generously
We didn’t hold back — poured at least 4 inches (10 cm) of mulch, and topped it up every few months. Walking on it feels like a woodland trail under your feet.
What we’d improve next time
If we were doing it again, we’d definitely add a gravel layer under the mulch in areas that stay damp — that way it lasts longer and doesn’t turn into compost after a heavy rain.
And we’d use different types of mulch for different areas. Along the “quiet path” we used pine. Near the compost? Coarse leaf mulch.
That way the garden starts to “talk” to you through texture.
8. Add to Family Backyard a Secret Garden with Mosquito-Repelling Plants – Safe & Magical

At some point, we realized we needed a quiet little spot for evening tea… without mosquitoes. But just planting mint around a bench wasn’t enough. We wanted a tucked-away green space, where you could breathe, unwind — and not get eaten alive. That’s how the idea for a secret garden with mosquito-repelling plants was born.
Choose your spot — and be picky
Start by finding a private corner you can visually close off a bit. The back of the yard, behind the shed, even part of the veggie zone if there’s a shrub or trellis for cover.
Important:
- The area should get at least 6 hours of sunlight — most repellent plants love sun
- Avoid low, damp spots — that’s where mosquitoes thrive
If you don’t have natural shade, add an arch, canopy, or pergola — and later, train vines up it for cover.
Create “green walls”
Secrecy comes from plants that surround and protect the space. You don’t need a fence — just a living hedge. Here are some of our go-tos:
- Lavender (Lavandula angustifolia)
This is one of those times when beauty and function go hand in hand. The scent keeps mosquitoes away — and for us, it’s pure joy. Grows up to 3 feet (90 cm) tall. - Lemongrass (Cymbopogon citratus)
The core of most natural repellents, thanks to its citronella content. Line it along the garden edges for both a wall and a shield. Can grow up to 5 feet (1.5 m). - Rosemary
Bees love it — mosquitoes don’t. The smell gets stronger in heat and when touched. Trims well into a neat hedge too.
Set up your hedge around the edge of the garden — it’ll be both beautiful and functional. Just don’t go too symmetrical — this isn’t Versailles. It’s your corner of the wild.
9. Dramatic Backyard Entry with Pea Trellis and Front Flower Beds Combo

You walk into the yard and everything’s blooming, fragrant, the air thick with greenery — and you just want to stay. That’s exactly the kind of feeling we wanted when we came up with the idea for a dramatic backyard entry, mixing a pea trellis arch with front flower beds.
This zone isn’t just pretty — it’s practical. The peas give a harvest, the flowers attract pollinators, and the entrance looks like something out of a storybook.
And yes — all of this fits into two square yards of space. Not an inch wasted!
Start with the arch — it sets the tone for the whole scene
A garden arch draped in greenery always feels like an invitation. And here’s our favorite twist: instead of decorative vines, we use snap peas or garden peas.
Why it works:
- Peas grow fast — in just 4–5 weeks, they’re climbing like crazy
- You actually get a harvest (up to 6 oz per plant!)
- And they’re surprisingly beautiful: delicate tendrils, white or purple blooms, lush green leaves
We bought this one: Garden Arch Trellis, 7.5 ft – Amazon Link. Simple metal, but sturdy. Easily supports mature pea vines — and under $50.
How to plant it:
- Spacing: sow seeds every 3–4 inches (7–10 cm)
- Plant on both sides of the arch and let them grow toward each other
- Fertilizer: we use fish emulsion weekly to boost early growth
If you’re in USDA zones 6–8 like us in Idaho, aim to plant in late March or early April.
Don’t skip the flower beds — especially near paths and steps. We love them for what they are::
- Make the transition from house to garden soft and visually rich
- Attract pollinators — bees, butterflies
- Bring scent and color — lavender, thyme, calendula!
Here’s our go-to flower bed mix:
- Calendula (Calendula officinalis) — edible, medicinal, super tough
- Lavender — our go-to mosquito shield
- Nasturtium (Tropaeolum majus) — edible from leaf to seed (tastes like capers!)
- Lemon balm — bees love it, and the scent is so good
- Thyme — you can walk on it, and it won’t care
Tip. Plant in a checkerboard layout so the bed doesn’t look flat. And line the edge with stone or wood chip paths — feels natural, cozy, and grounded.
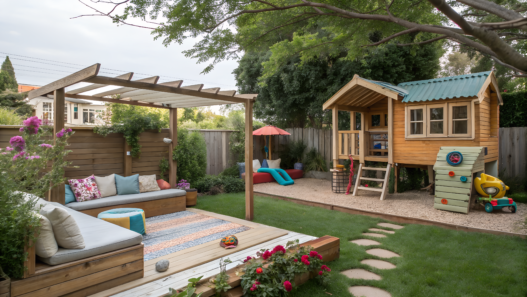
10. Mixing Play + Peace: Backyard Layout That Actually Works for Families
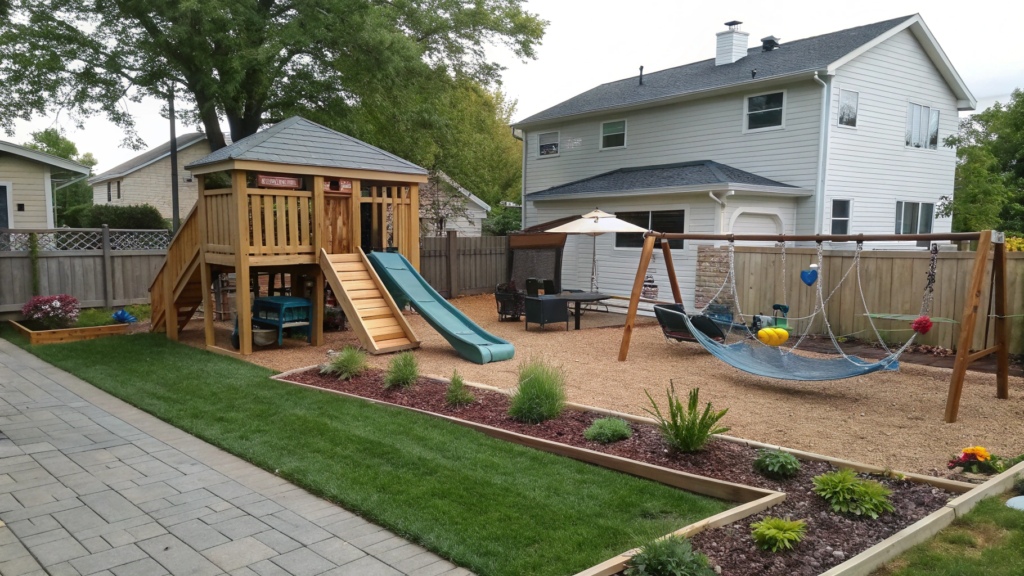
Family backyard layout is always a balancing act. It needs to excite the kids and keep adults from retreating back inside.
It took us nearly two years to get that balance right. Now I’ll show you how to do it way easier than we did.
Divide into zones — and give each a vibe
The first rule: don’t try to make the whole yard work for everyone all at once. Every zone should have a clear purpose and a distinct mood. No need for fences — just use visual cues and different ground covers.
Here are the zones that really work:
Play zone (for kids — and sometimes adults)
- Surface: mulch, grass, or sand
- Elements: slide, swings, tent, sensory table, water table
- Keep it close to the house — so you can watch from the porch or kitchen
Quiet zone (for parents and tired grandparents)
- Surface: gravel, pavers, or wood decking
- Elements: bench, hammock, flower bed with lavender or lemon balm
- Add a privacy screen using shrubs or a vertical garden (we love building these with pallet crates!)
Garden zone
- Even a couple raised beds can spark kids’ interest
- Our friends added a “kid’s garden bed” — just for their little one. Teaches patience and care.
A shared space for everyone
For us, it’s a fire pit. Truly one of our best decisions. It’s a hangout, a cooking zone, a gathering spot. We surrounded it with tree stumps, chairs, a wooden deck.
If a fire zone isn’t your thing — a shaded outdoor table works great too, especially surrounded by mint and thyme in containers.
Small touches that make a big difference:
- Stone paths that kids can run barefoot on
- Curtains on the pergola — perfect for “playing house”
- Toy storage that doesn’t scream toy storage
- Hanging strawberry baskets — kids are obsessed with them!
A Family Backyard
’ll be honest: none of these elements showed up overnight. We tried, made mistakes, rearranged, and looked for “the right spot” for each pot, path, and swing. But that’s exactly what makes a family backyard feel alive — it grows with us.
Now, our guests say: “It just feels like you could live out here.” And friends’ kids? They don’t need instructions — they just run where they feel free.
And even though it’s not perfect — it’s filled with warmth, care, and a bit of chaos. If you want to create a space like this — don’t be afraid to start with just one element.Leave a comment and tell me how you set up your yard — and if any of my ideas helped you out.