

Fall always brings a special urge to fill the house with warmth and light. And the best way to do it is with simple but creative ideas you can actually make with your own hands. In this article I’ve collected 10 Whimsical DIY Room Decor Ideas for a Cozy Fall Glow that will help turn any room into a cozy fall retreat.
We’ll use what’s available to everyone: paper, jars, thread, yarn, leaves, and a little imagination. Each idea is not just an instruction but a piece of our life. Some ideas I picked up from friends and then Lindy and I brought them to life at home, and some we came up with ourselves. And all of them became part of our fall décor. I’ll also give you practical tips and links to products that really help finish the project.
If you want to add a bit of warmth and light to your space — and most importantly, do it with your own hands — then stay with me.
1. Handmade Paper Leaf Garlands

I still remember how Lindy and I gathered armfuls of maple leaves in Idaho and brought them home. But real leaves dry out quickly, break, and lose their color. That’s when I first tried making a paper leaf garland. And guess what, it became our permanent fall décor.
The idea is simple: instead of collecting new leaves every year and getting upset when they fade, you can cut them out of paper, paint them, string them together — and get a lasting DIY fall decoration.
What you’ll need:
- Colored heavy paper or cardstock (scrapbooking sets work great, size about 8.5 x 11 in / 21 x 29 cm).
- Scissors or a utility knife.
- Thread or thin twine (jute twine looks especially cozy).
- Glue or double-sided tape.
- Optional: acrylic paints or markers for leaf veins.
How to make it whimsical DIY decor:
- First prepare the base: draw or print leaf templates. The most expressive shapes are maple, oak, and birch. Best to make different sizes: from 2 to 6 in (5–15 cm).
- Cut the paper leaves and gently bend them with your fingers so they don’t look flat. You can even slightly notch the edges to imitate natural details.
- Add the veins. Use markers or acrylic paint with a fine brush. Gold and copper shades look especially striking, creating a subtle autumn glow in the evening light.
- Prepare the thread or jute twine: stretch it across your table, taping down the ends so it doesn’t slide. Now start attaching the leaves. The best spacing is 4–5 in (10–12 cm), but you can vary it depending on the effect you want.
- Let the glue dry completely, then gently remove the garland and hang it along a window, shelf, or above the bed.
When the soft evening light turns on, the paper leaves cast shadows and gently sway in the air. That’s when the room gets that cozy fall glow — warm and homelike.
To make the garland stand out even more, you can pair it with small battery-powered LED string lights. They’re light, safe, and easy to weave into the paper décor. Important: always use LED bulbs — they don’t heat up and won’t damage the paper.
Pro tip. Make your garland longer than you planned. Usually it feels like 3–4 feet (about 1 m) is enough, but for a window or mantel you’ll actually need 8–10 feet (2.5–3 m). Better to prep more leaves right away — it’s quicker than going back to cut out extras later.
2. Cozy Knitted Pillow Covers

You probably noticed that pillows instantly change the mood of a room. One fall, Lindy and I decided to just throw on a couple of new covers — and suddenly our old sofa felt like a completely different piece of furniture.
For fall, knitted pillow covers work best. Their texture immediately creates a sense of warmth, even if the heaters aren’t on yet. The soft knit adds depth and contrast, especially next to smooth fabrics like linen or cotton.
What you’ll need for this whimsical DIY decor:
- A few standard pillows: 18 x 18 in (45 x 45 cm) or 20 x 20 in (50 x 50 cm).
- Knitted or jersey pillow covers — you can buy them ready-made or knit them yourself.
- Optional: decorative details — wooden buttons, tassels, cords.
How to update the interior:
- Pick a color palette. For fall, terracotta, mustard, olive, and beige shades work beautifully. White or cream covers can serve as the base, while brighter ones make perfect accents.
- If you’re buying ready-made covers, check the fabric composition. Acrylic blends are easier to wash, while 100% cotton feels softer but needs gentler care.
- For those who knit: use needles size 8–10 (5–6 mm). For an 18 x 18 in (45 x 45 cm) cover you’ll need about 2–3 skeins of medium-weight yarn.
- Slip the new covers onto the pillows and arrange them in groups of 2–3 pieces. The secret is mixing textures: smooth linen, knitted patterns, velvet.
We noticed that such pillows don’t just decorate the room, they actually affect our daily habits. Suddenly we found ourselves spending more time in the living room. Simply because it was so soft and comfortable.
If you use candles near the sofa or blankets, always choose LED options to avoid any risk.
If you want a ready solution, check out MIULEE Pack of 2 Decorative Knitted Throw Pillow Covers on Amazon. They have a classic knit design and a convenient zipper on the side. These covers are easy to wash and switch out with the seasons.
Pro tip. Add one or two oversized pillows, like 24 x 24 in (60 x 60 cm). They double as mini poufs and look amazing in the corner of the sofa or on the floor next to a low table.
3. Rustic Mason Jar Lanterns

In fall, Mason jars are especially perfect as little lanterns. The light shining through glass gives a soft glow, and if you add a few details — they turn into real decorative accents.
One evening, the power went out at our place. Lindy and I quickly dropped some candles into jars and spread them around the room. It looked so beautiful that we decided to keep them as part of our décor even after that night.
What you’ll need:
- Mason jars — pint size (16 oz / 470 ml) or quart size (32 oz / 950 ml).
- Small LED candles or tea lights (much safer than an open flame near fabrics).
- Jute twine, lace, or ribbon for decoration.
- Dried flowers, leaves, pinecones — for filling or outside accents.
- Optional: acrylic paints or glass markers.
How to make it whimsical DIY decor:
- Wash and dry the jars thoroughly. The glass should be completely clear, with no trace of labels.
- Decorate the tops. Wrap the rim with jute twine and tie a bow, or add lace or wooden beads.
- Place LED candles inside. I love warm-toned ones that give off a soft amber light. This is much safer than an open flame: with fabric and dry leaves nearby, you can leave the lanterns glowing even overnight.
- For extra coziness, add a few pinecones, dried leaves, or a mini battery string light inside.
- Arrange the lanterns on a windowsill, mantel, or group them together on a tray for a centerpiece.
These lanterns are easy to switch up depending on the season. In fall you can add yellow leaves and acorns, in winter — spruce branches and cinnamon sticks, in spring — flowers. They’ll always feel fresh and new.
Pro tip. Make a few lanterns in different sizes and group them. A set of 3–5 jars always looks more impressive than just one. Especially when placed on the dinner table — the soft light creates that very atmosphere we all love about fall.
4. Autumn-Themed Photo Wall

All of us have tons of photos from memorable trips, forest walks… All of these are our memories. So why keep them only on your phone? From these shots you can create a photo wall that becomes the centerpiece of your room for the whole season.
What you’ll need:
- Printed photos (square 4×4 in or classic 5×7 in).
- Frames of different sizes or simply clothespins and string.
- Fall décor elements: leaves (paper or real), mini pumpkins, pinecones.
- A small fairy light string for extra glow.
How to make it whimsical DIY decor:
- Choose the spot. A free wall in the living room or a corner in the bedroom works best. The background should be simple so the photos and décor stand out. For us, it’s always the wall by the window where natural light falls in.
- Plan the composition. I love mixing different sizes: a few larger frames and many small photos around them. If you don’t have frames, hang a string horizontally and clip the photos with clothespins. It creates a living “memory line.”
- Add autumn accents. Between the photos you can place paper leaves, small twigs, or even dried orange slices. One time I slipped real red leaves between the glass and a photo — it turned out surprisingly beautiful!
- Lighting matters. Warm light makes even the simplest photo part of the décor. I use a thin string of Minetom Fairy Lights Plug in 200 LED String Light on Amazon sand weave it right between the photos. In the evening, the wall literally glows with memories.
- Don’t be afraid to change it. In fall the wall comes alive with picnic and forest shots, while in winter you can fill it with holiday photos and cozy gatherings with friends. Once we even changed the theme every three months — and it turned into a little family tradition.
And the most important part: such a wall reminds you that home is not just walls and furniture, it’s the story of your life. In fall, it feels especially right to see it in front of you.
Pro tip. If you host many guests, leave a few empty frames or clothespins on the wall. Let everyone print and add their own photo — then your memory collection will grow all by itself.
5. Whimsical Fairy Light Canopy
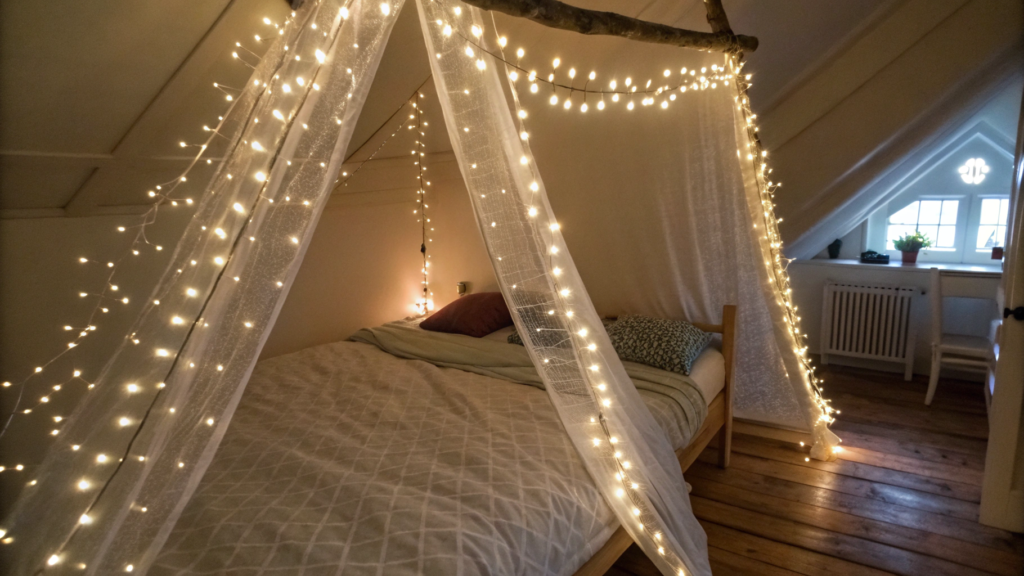
One time Lindy and I strung a fairy light garland right above the bed — and the whole bedroom suddenly turned into a little tent. Sleeping under that glow felt just like being at the cabin as a kid, when mom left the nightlight in the hallway and its soft light slipped through the door crack.
What you’ll need:
- Fairy lights (warm ones work better than cool). The optimal length for a room is 33–66 ft (10–20 m).
- Hooks with adhesive backing or special holders for string lights.
- Light fabric — tulle or gauze — for the “canopy effect.”
- Optional: transparent Command Hooks or small nails.
How to make it whimsical DIY decor:
- Pick the spot. The most striking option is above the bed or sofa. But once we did it in the living room: we stretched fabric corner to corner and wove in the lights. It turned into a tent inside the house.
- Attach the base. First, secure the fabric to the ceiling or walls using transparent Command Hooks or small nails. Let it drape slightly, creating soft folds. Don’t stretch it too perfectly — that light asymmetry makes everything feel alive.
- Add the lights. Carefully weave the string lights into the fabric or fasten them right on top. Use small clear clips for lights or thin plastic ties — they’re almost invisible and hold well. The more loops, the denser the glow. I love leaving the bulbs along the edges too, so it creates a “glowing frame.”
- Create layers. Try combining two types of lights: one long string and several small battery strands. This gives depth — the room doesn’t just look lit, it looks filled with light.
- The final touch. Place a blanket and a couple of pillows nearby. In the evening, the whole family ends up in this very corner — tested and true!
Twinkle Star 300 LED Window Curtain String Lights are perfect for this project. You can hang them as a whole “wall of light” or use them in sections. They plug into an outlet, not batteries, so they run steadily and brightly. And since they’re LED-based, they barely heat up — safe to use right next to fabric.
By the way, we stopped turning on the overhead light and noticed we spend time more calmly. It even feels like tea tastes slower under this glow.
Pro tip. If you want a real wow effect, add dried orange slices or paper leaves to the lights. When the light shines through them, it creates a golden shimmer — it looks beautiful and cozy.
6. Pumpkin Centerpiece Arrangement
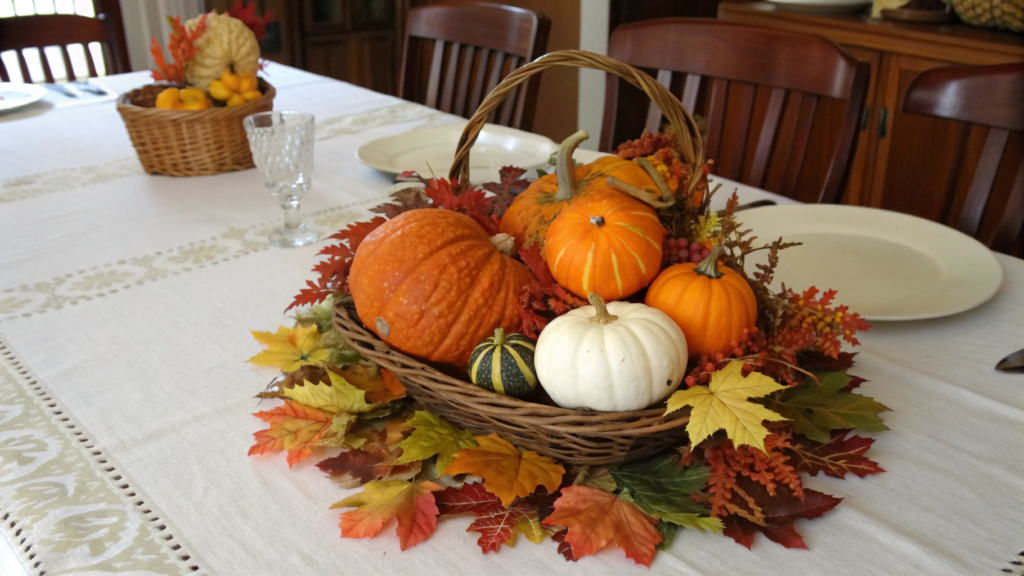
Fall without pumpkins is like pie without cinnamon. If in summer our table usually holds bouquets of wildflowers, then in fall the centerpiece is always a pumpkin arrangement.
I first tried putting one together about five years ago. It looked so good that every guest kept asking where we bought it.
What you’ll need:
- Mini pumpkins (baby boo, jack be little) — about 4–6 pieces, each 3–4 in (7–10 cm).
- One or two medium pumpkins for the center, 8–10 in (20–25 cm).
- A wooden tray, basket, or long rectangular box.
- Greenery: eucalyptus, sagebrush, rosemary sprigs.
- Optional: glass candle holders or LED candles.
How to make it whimsical DIY decor:
- Choose the base. For a long table, a rectangular box or basket works best. For a round table, use a wide tray.
- Place a large pumpkin in the center. It becomes the focus of the arrangement. Pick a classic orange one or go with white if you want a more neutral style.
- Add the mini pumpkins. Arrange them on the sides, alternating colors. White and orange together look especially harmonious.
- Weave in the greenery. A couple sprigs of eucalyptus or rosemary give a fresh accent and add fragrance.
- Light up the centerpiece. Place small candles between the pumpkins. For safety, it’s best to use Homemory Flameless Votive Candles on Amazon. Their flickering glow looks like real flames but without the fire hazard.
This kind of decoration works not only for dinners. We’ve placed it on the mantel and even on the porch — it holds up well for a couple of weeks outdoors.
And when the season ends, you can still use the pumpkins. Medium ones are great for soup or pie, and the little ones can go to the chickens (if you’ve got them, like we do). No waste — everything is put to
7. Painted Acorn Jars
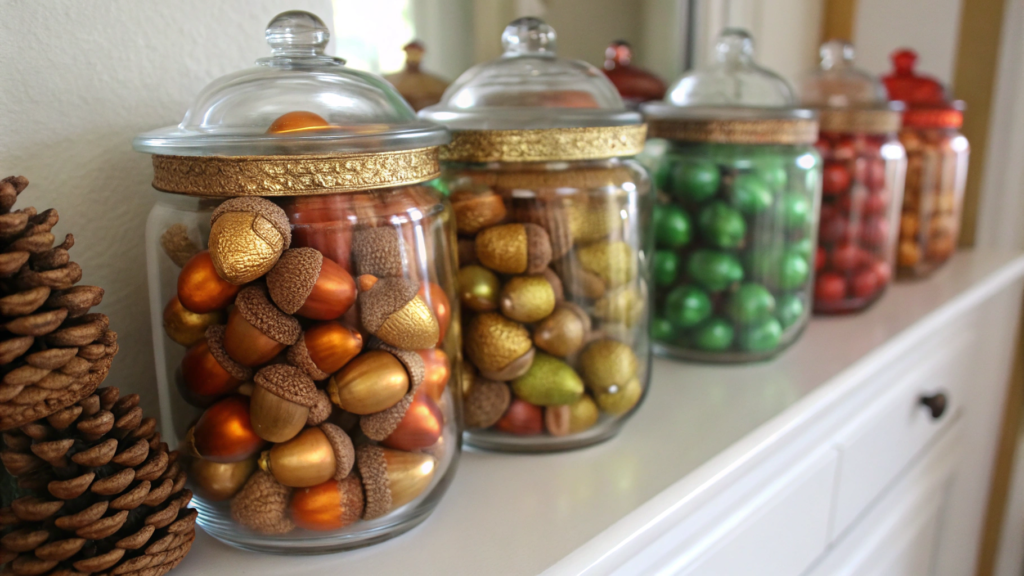
I’ll be honest: this idea isn’t mine. I first saw it at a friend’s place in Portland. We stopped by for tea, and on her shelf were glass jars full of acorns. But not just regular ones — they were painted gold, copper, and warm green. It looked so unexpectedly stylish that at first I didn’t even realize they were just acorns!
The next day I went to the nearest park and collected a whole bag. And yes, now we also have jars filled with colorful acorns that fit perfectly into our fall décor.
What you’ll need:
- Acorns — collected in the park or bought (usually 30–40 per jar is enough).
- Glass jars (Mason jars or any clear glass jars, 16 oz / 470 ml).
- Acrylic paints: gold, copper, green, burgundy.
- Small brushes.
- Newspaper or paper to cover the table.
How to make it whimsical DIY decor:
- Prepare the acorns. Wash them and dry them in the oven at low heat (200°F / 90°C, about 30 minutes). This kills insects and extends shelf life.
- Paint the caps or the acorns themselves. I like leaving the nut natural and painting just the cap — it creates a beautiful contrast. But my friend, the one I got the idea from, painted the whole acorn — it gave an almost jewelry-like effect.
- Let them dry completely. Acrylic paint usually needs just a couple of hours.
- Fill the jar. Start with the larger acorns at the bottom, smaller ones on top.
- Decorate the jar. Tie the rim with twine or ribbon, or attach a small tag with the date or a note like “Fall 2025”.
We keep ours on the windowsill and near the fireplace. In the evening, when the lights are on, the gold and copper acorns sparkle — such a simple idea, but it looks like high-end décor.
Pro tip. Paint the acorns in different shades of the same palette — for example, from dark gold to light champagne. That way the jar will look more layered and dimensional.
8. Fall-Themed Dreamcatcher
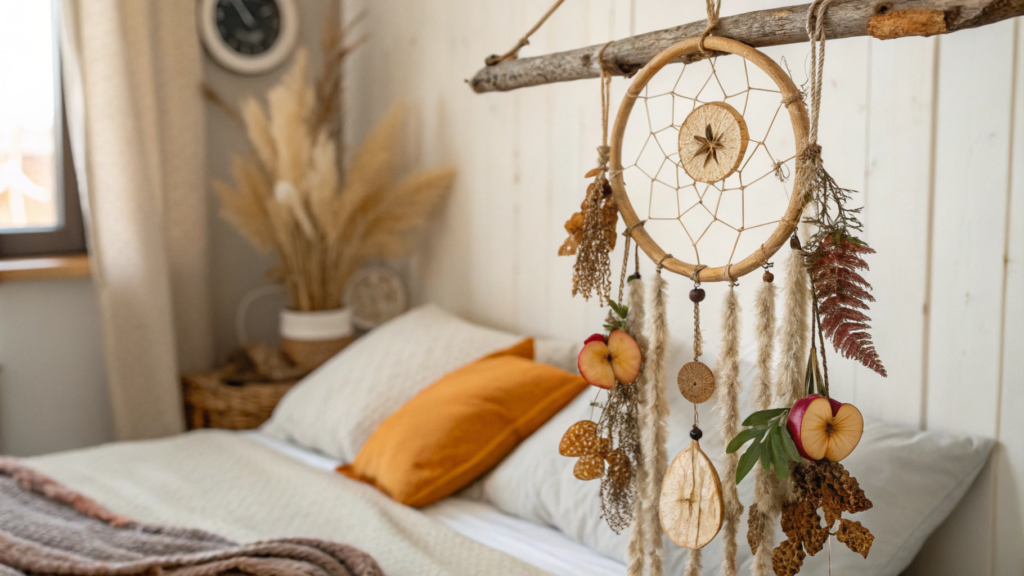
I “stole” this idea in the most unexpected place — at a craft fair in a small Washington town. There was a woman making dreamcatchers out of simple materials: dried herbs, yarn, and even dried apple slices. I stood at her booth for ten minutes just staring at all the weaving, and realized a dreamcatcher could be easily adapted for fall.
When we got home, we made our own fall dreamcatcher. And it’s still hanging in our bedroom, even though the season has long since changed.
What you’ll need:
- Base ring: metal or wooden, 8–12 in (20–30 cm).
- Yarn or thick thread in warm shades (burgundy, olive, mustard).
- Dried leaves, feathers, acorn caps, small pinecones.
- Hot glue gun.
- Optional: lace or ribbons.
How to make it whimsical DIY decor:
- Wrap the ring with yarn. Pick a base color, like dark green. The thread should cover the whole frame tightly.
- Create the web. This is the most meditative part. Start weaving the thread from the center, forming a pattern. Don’t chase perfect symmetry — the slight unevenness adds charm.
- Add fall accents. Attach ribbons and dried leaves to the bottom of the dreamcatcher. You can glue on pinecones or even small twigs. I saw one version at the fair with dried orange slices — in the light they looked like stained glass.
- Decorate with feathers or acorns. Hang them on threads of different lengths. It creates a sense of movement, especially when the window is open and a little breeze flows through.
- Pick the spot. Above the bed or near a window works best. In the evening, with the lights on, it comes to life.
For convenience, you can use a ready-made base like LOKMAN 8 Inch Metal Craft Rings on Amazon. They’re much easier to work with than branches if it’s your first time making a dreamcatcher.
In fall, this piece doesn’t just decorate the room — it actually creates a sense of calm and coziness.
Pro tip. Use several small rings and make a whole composition of three dreamcatchers. They’ll look like a mini fall gallery on your wall.
9. DIY Woven Wall Hanging

On the wall of a small shop Lindy and I once stopped at, there were the most beautiful woven wall hangings. The prices, though, were way too high. I remember thinking: “I could make something like this myself!” So I tried. The result even surprised me: a simple but authentic woven wall hanging in fall colors.
What you’ll need:
- A wooden stick or branch (12–16 in / 30–40 cm).
- Thick yarn in different shades: mustard, burgundy, cream, olive.
- Scissors.
- Hot glue gun (optional, for securing the ends).
How to make it whimsical DIY decor:
- Choose the base. The best option is a straight, dry branch — it gives the piece a natural “woodland” vibe. If that’s not available, a smooth wooden dowel works just as well.
- Prepare the yarn. Cut strands about 20–30 in (50–75 cm) long. Make sure to alternate colors. Lindy and I usually use 6–8 strands of each shade.
- Attach the yarn to the stick. Fold a strand in half, loop it over the stick, and pull the ends through the loop. This creates a neat knot that holds well.
- Build the composition. Alternate the colors to form vertical stripes. You can cut the bottom edge straight or shape it into a triangle — the triangle version looks more dynamic.
- Add finishing touches. Include a couple of decorative details: beads, small feathers, or dried grasses. Once I wove in a thin gold thread — in the evening light, it shimmered just a bit.
If you’ve never made one before, the Craft Crush DIY Woven Wall Hanging Kit on Amazon is super convenient. It comes with bases and instructions — a great place to start.
A woven wall hanging instantly brings life to a blank wall. We keep one in our entryway, and every time someone visits, they stop and look closely at it.
Pro tip. Use different yarn textures — fluffy, smooth, or knotted. That way the hanging won’t look flat, but instead almost alive.
10. Pressed Leaf Frames
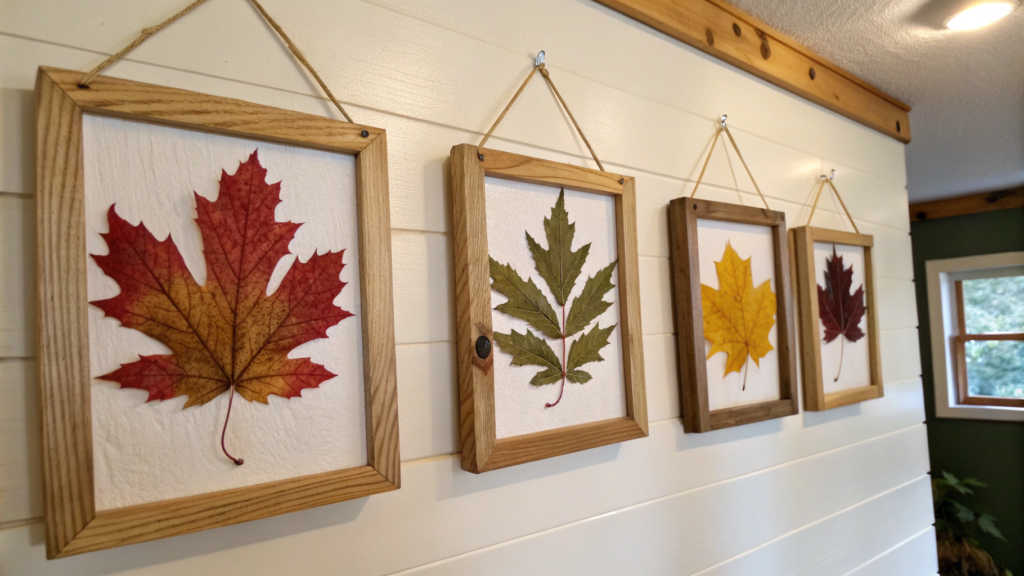
At my neighbor’s house, where we brought over an apple pie, I noticed frames on the wall with leaves inside. And not store-bought posters, but actual leaves collected outside. Red maple, yellow birch, dark green oak — it all looked so natural and beautiful, like an open-air art gallery. It was simply stunning!
What you’ll need:
- Pressed leaves (you can collect and dry them between books for 5–7 days).
- Glass frames — 8×10 in (20×25 cm) or larger, in different sizes.
- White or black paper for the background.
- Optional: marker for notes (tree name, date).
How to make it whimsical DIY decor:
- Collect the leaves. Pick bright and undamaged ones. Best to collect during the day, when they’re dry.
- Dry them. The classic method is pressing them between book pages. If you need it faster, iron them through paper on low heat.
- Prepare the frame. Remove the glass, place the background paper, and carefully arrange the leaves. Try not to overlap them completely — let each have its own space.
- Assemble everything back. The glass will press the leaves flat, keeping them preserved for a long time.
- Hang the frames. They look best as a series of 3–4 together, especially if the leaves are different colors and shapes.
Now we have a whole leaf collection at home: birch and maple in the living room, oak and chestnut in the bedroom. It’s not just beautiful, it’s also a reminder of what fall looked like that year.
If you’d like to make it easier, get a ready-made gallery frame set. With different sizes, you can create a real wall composition.
Pro tip. Leave one space for a family photo next to the leaves. It becomes a “memory frame”: a fall leaf and your family picture from the same day. Things like this feel especially heartwarming on long winter evenings.
Sharing Fall Stories
I’ve shared our favorite fall projects that bring that cozy fall glow into our home every year.
Now I’m curious — which of these ideas speaks to you most? Would you try a paper leaf garland or maybe a fall dreamcatcher? Or do you already have your own tricks for creating an autumn vibe at home?Drop a comment below! Share photos of your projects and tell me how you’re bringing fall atmosphere into your space this season. I’d love to read your stories — and who knows, maybe they’ll inspire me with new ideas for the next season.


