Many people think that herbs are very simple. You place a couple of pots — and it seems like enough. But in reality, how exactly they are arranged and lit affects convenience, yield, and even taste.
We first tried a windowsill, then outdoor containers, then separate zones with wind protection and proper light. And the difference between “grows however it wants” and “everything is under control” becomes noticeable pretty quickly.
Here I tried to bring together 10 herb design ideas that actually work in real life. So you can take an idea and apply it right away. With details, with nuances, with things that only become clear after a few seasons. There is no single “right” way here. There is a set of solutions from which you can build your own version — for your space, habits, and rhythm.
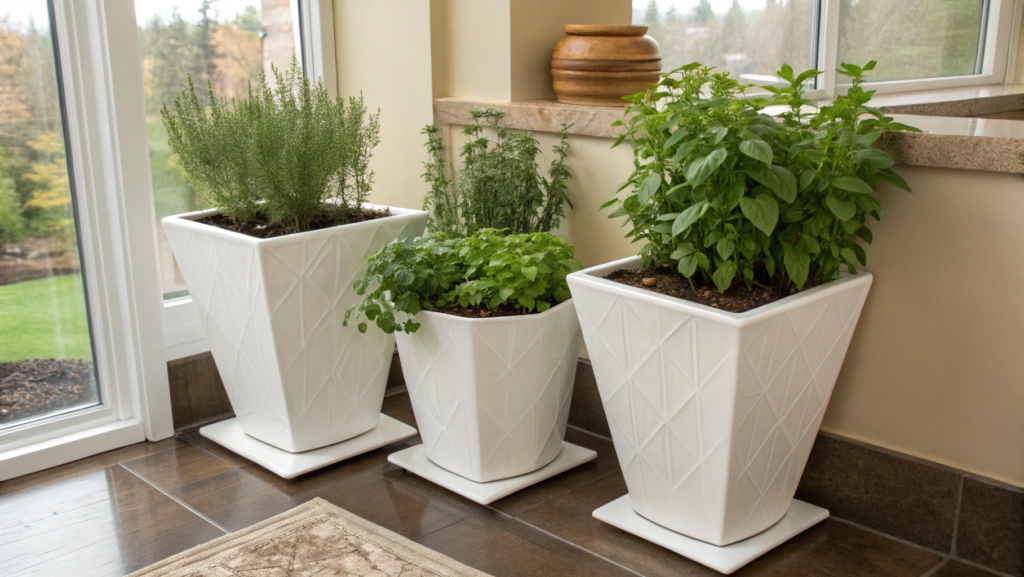
1. Minimalist Indoor Herb Arrangements for Modern Homes
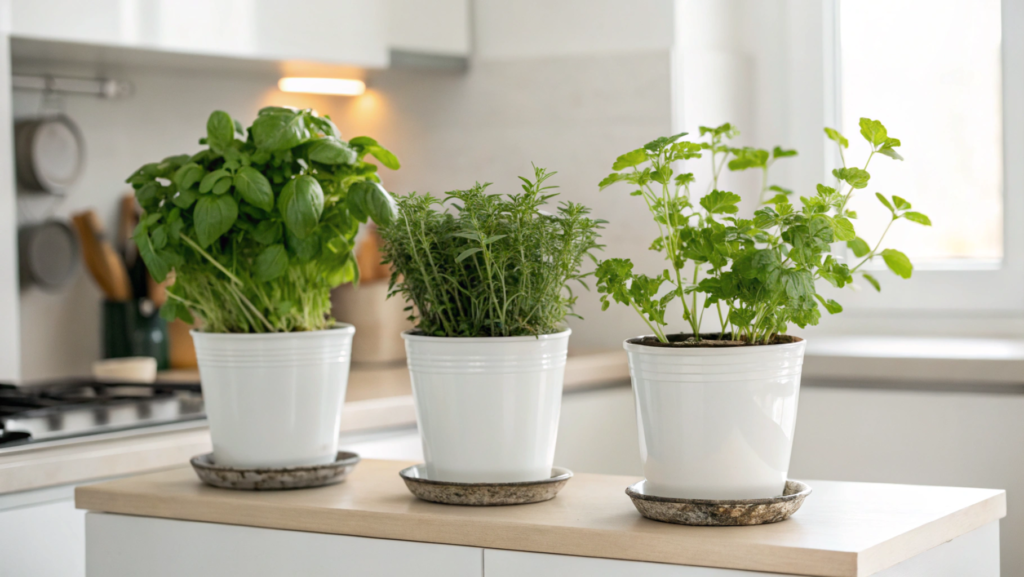
Minimalist indoor herb arrangements are a convenient way to keep fresh herbs within reach and at the same time maintain a clean, neat interior. We decided to keep only those plants that are used almost every day.
Minimalism here works as a tool for simplification, not as a limitation.
First, it is important to reduce the number of varieties. It is optimal to leave three to five herbs that are actually used in cooking:
- basil
- thyme
- rosemary
- parsley
- mint
This set covers most everyday needs and does not create extra maintenance load.
Second, it is worth using matching containers. This immediately removes visual noise and simplifies care. For example, Mkono Ceramic Plant Pots Set of 3 with Bamboo Tray — ceramic pots with a diameter of about 4.5 inches (around 11.5 cm) are suitable for most herbs with a shallow root system. A uniform size helps maintain a consistent watering routine.
Third, placement matters. The most convenient layouts:
- one line along the windowsill
- a compact triangle on the countertop
- a two-plus-one group with a slight offset
This kind of geometry makes the space look more organized and improves access to the plants.
What You’ll Need
Before starting, it is better to prepare a basic setup. Nothing extra — only what is actually needed.
- matching pots with drainage holes (about 4–5 inches / 10–12 cm)
- a tray or a single base to avoid mess on the surface
- light indoor potting soil
- perlite or another loosening material if you mix soil yourself
- scissors or a small pruner for regular trimming
- basic herbs: basil, thyme, rosemary
If it is clear in advance that natural light is limited, it is better to immediately plan for compact grow lighting. This prevents stretched and weak plants after a couple of weeks.
How to Build a Minimalist Herb Setup
- Choose the right spot.
A window with good natural light works best — a south or southwest side. Herbs need about six hours of light per day. With insufficient light, plants stretch and lose density. - Prepare light soil.
Dense garden soil retains moisture and slows growth. A ready indoor mix or a combination of universal soil, perlite, and coconut fiber works well. This structure provides airflow to the roots. - Set a watering routine.
A simple rule: the top layer of soil about one inch (around 2.5 cm) deep should dry out. After that, watering is fine. With identical pots, it is easier to keep a stable routine. - Trim plants regularly.
Pruning stimulates growth and helps maintain a compact shape. With basil, this is especially noticeable — after cutting the tops, it becomes bushier. According to Oregon State University Extension, regular pruning can noticeably increase the overall amount of greenery due to active branching.
Practical details that improve the result
- Lighting often matters more than the choice of variety. If there is not enough light, a simple LED setup helps maintain plant shape and leaf density. Compact LED panels with a neutral white spectrum work better than warm household light.
- The surface under the pots affects how the whole composition looks. Matte materials — wood, stone, or calm dark plastic — look cleaner and do not distract attention from the plants.
- Spacing between pots also matters. When they stand too close, the composition feels overloaded. Small gaps allow air to circulate and make the setup visually lighter.
And one more detail that is often missed — height. When all plants are on the same level, the line looks neat. This simplifies care and makes the whole corner feel more organized.
In the end, herbs are always within reach, maintenance takes minimal time, and the space stays neat. Gradually, the need to buy greens from the store disappears — everything grows at home. That is why a minimalist herb corner becomes a convenient working tool in the kitchen.
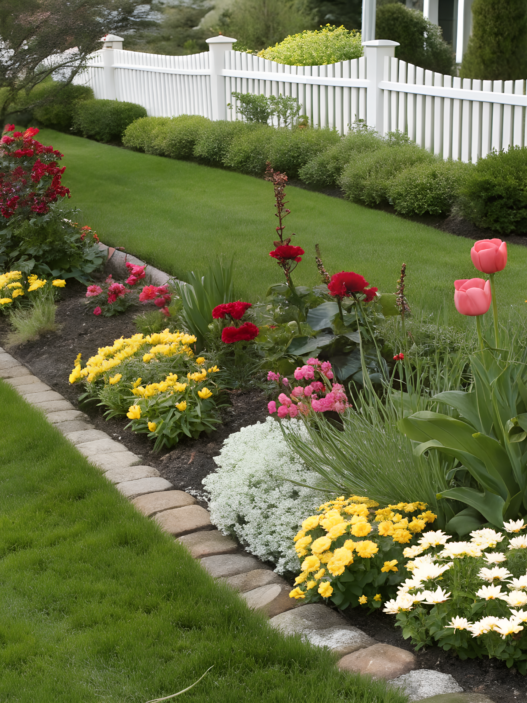
2. Classic Cottage Herb Garden Layouts
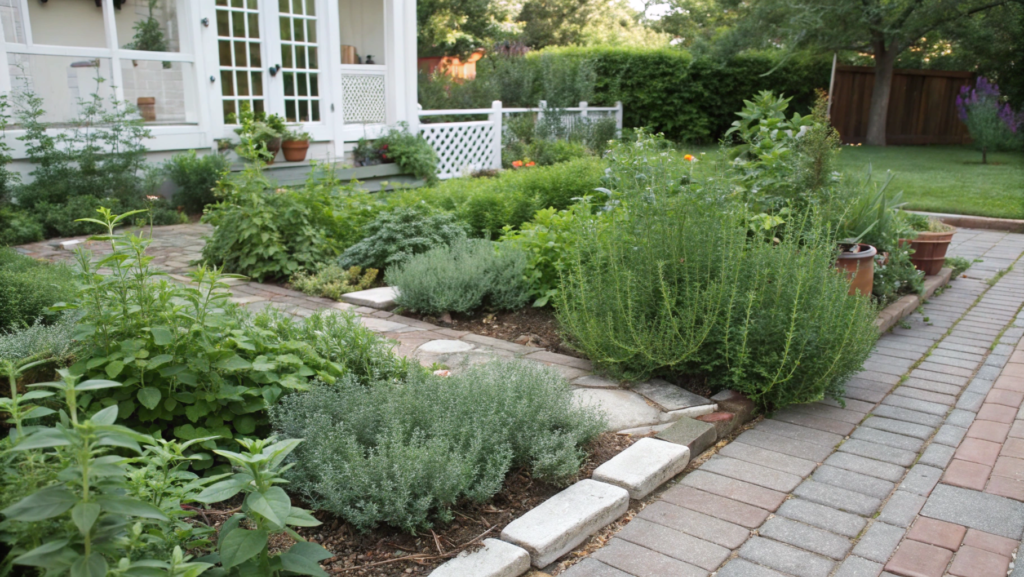
Lindy and I used to do everything neatly and “by the line”. But pretty quickly we realized that herbs grow better where there is a bit of freedom, a softer, more natural structure.
In classic cottage herb garden layouts, there are no strict lines, but there is logic. Everything is built around convenience, planting density, and the natural growth of the plants.
Main principles:
- different plant heights — from low thyme to taller rosemary bushes
- soft transitions between plants — without harsh borders
- dense planting — to cover the soil and reduce moisture evaporation
- access from paths — so you can easily harvest
According to the Royal Horticultural Society, dense mixed planting can reduce weed growth by shading the soil.
What You’ll Need
Before setting up this kind of area, it is better to prepare everything in advance. There are a few more elements here than in a minimalist setup, but it still stays simple.
- garden shovel or trowel — to shape the planting area and loosen the soil
- mulch (bark, straw, or wood chips) — a layer of about 2 inches (around 5 cm) helps retain moisture and protect roots
- compost or humus — improves soil structure and provides nutrients at the start
- a mix of herbs — basil, sage, oregano, thyme, lavender
- garden scissors or pruners — for regular trimming and shaping
How to Build a Classic Cottage Herb Area
- Define the shape of the area.
Soft lines work best — slightly curved edges or oval shapes. This makes the planting feel more natural and helps with plant distribution. - Arrange plants by height.
Place taller plants (rosemary, sage) in the back, and lower ones (thyme, oregano) closer to the edge. This gives better access and keeps a neat look. - Group herbs by needs.
Plants with similar water and sunlight requirements should grow together. For example, rosemary and thyme prefer drier soil, while basil needs more moisture. - Add mulch.
After planting, cover the soil with mulch. This reduces water evaporation and helps control weeds.
What to Keep in Mind During Care
It is better to leave a bit less space between plants than what is recommended on the packaging. As herbs grow, they cover the soil and create their own microclimate.
- Controlling spread is important. Thyme and oregano can quickly take over the space. Regular trimming helps maintain shape and prevents one plant from overtaking the others.
- Watering should be less frequent but deeper. This encourages stronger root development. According to Oregon State University Extension, deep watering helps form more resilient plants.
- And one more detail — paths. Even a narrow path about 12 inches (around 30 cm) wide makes maintenance much easier. You don’t have to reach across the entire area just to cut a few sprigs.
A classic cottage herb area is a convenient, living system where plants fill the space, the soil stays covered, and harvesting takes minimal time. You can always add a new herb, remove something extra, or adjust the layout — this kind of planting easily adapts to your habits and the season.
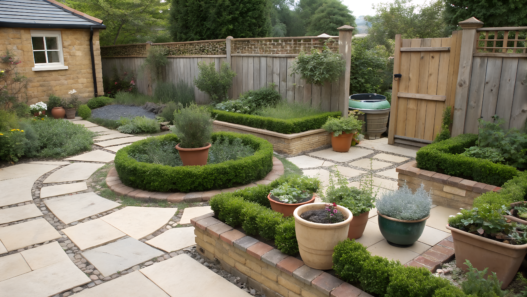
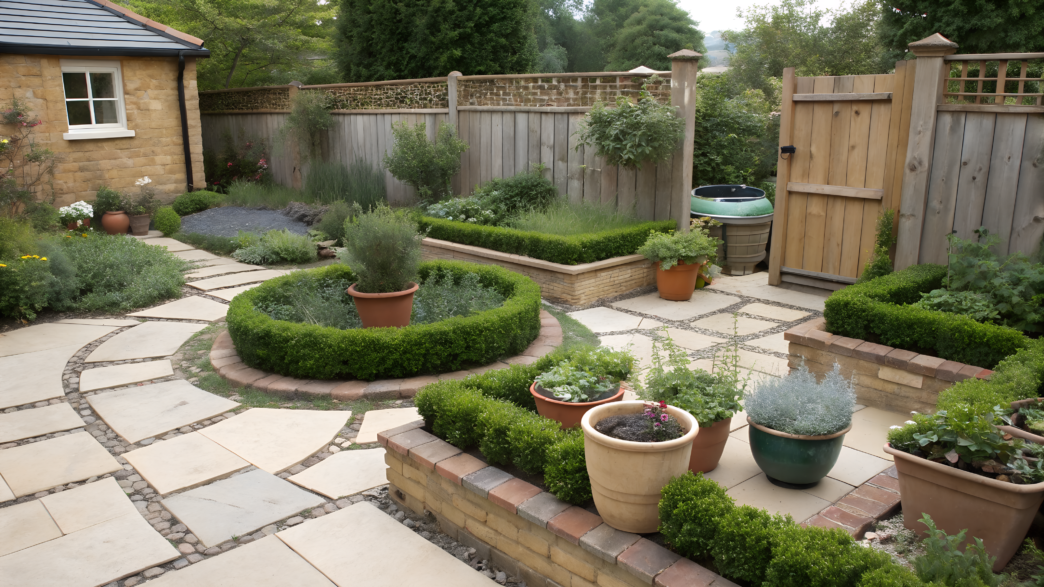
3. Geometric Raised Beds for Organized Growth
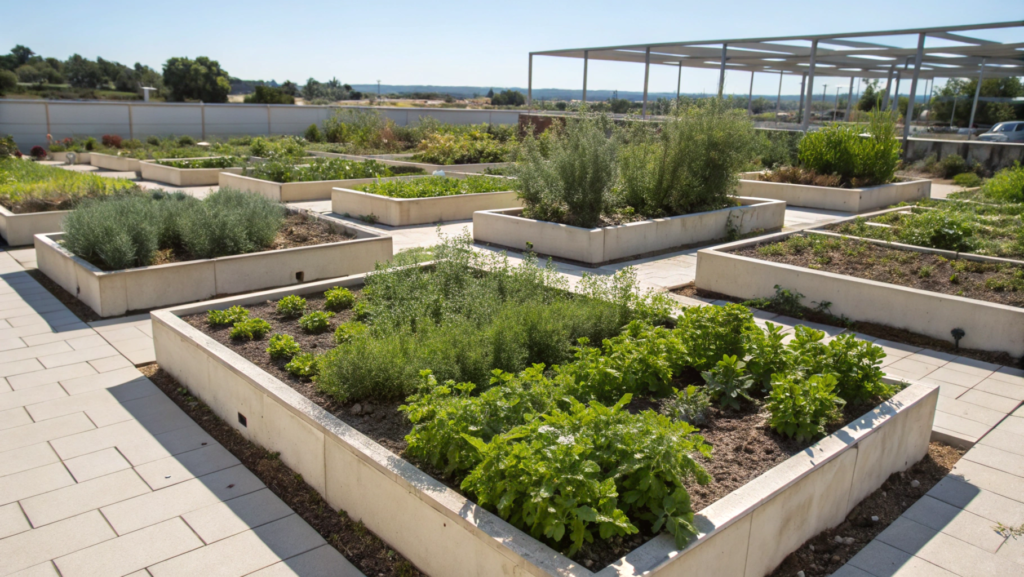
The geometric raised beds format helps keep a herb area organized without constant control. Clean shapes, clear structure, easy access — all of this makes maintenance much simpler.
At the very beginning, we planted herbs freely, without strict borders. Everything looked lively, a bit chaotic. But as the number of plants grew, problems started. In some places it was hard to reach, in others herbs began to intertwine, and somewhere one plant simply took over all the space.
When beds have a clear shape, you don’t have to constantly “figure out” where everything grows and how to reach it.
What this gives in practice:
- easy access to every plant — no need to step on the soil just to cut a few sprigs
- control over spreading — each plant stays within its zone and does not crowd out neighbors
- more even watering — water distributes predictably across the bed, without dry or overly wet spots
- a neat appearance — the area looks tidy even without constant maintenance
What You’ll Need
Before starting, it is better to prepare everything right away. This avoids situations where half the work is done but something important is missing.
- wooden or metal bed frames — optimal height about 10–12 inches (25–30 cm). This is enough for herb roots to feel comfortable and for the soil not to dry out too quickly
- fasteners and screws — it is important to secure the structure well so it does not deform over time
- quality soil mix — a combination of compost, garden soil, and a loosening material works best. This type of soil holds moisture but does not become dense
- mulch (bark, straw, or wood chips) — a layer of about 2 inches (around 5 cm) helps retain moisture and protect the top layer of soil
- garden tools — shovel, rake, and pruners for maintenance and trimming
How to Build These Beds
- Choose the shape and size.
The most practical option is rectangles or squares. The width of the bed should not exceed 3–4 feet (around 90–120 cm) so you can reach the center from any side. If it is wider, you will have to step on the soil, which compacts it and slows plant growth. - Prepare the base.
First, remove all grass and level the surface. If the soil is heavy and dense, it is better to loosen it slightly. This helps water drain down instead of staying around the roots. - Assemble the frame.
Install and secure the sides. It is important to check the angles — when they are straight, the whole structure looks clean. Even a small shift becomes noticeable, especially if there are several beds. - Fill the bed with soil.
Use a loose mix that allows air to pass through. Herbs do not grow well in compact soil, especially rosemary and thyme. If the soil is too heavy, root development slows down. - Divide plants inside the bed.
It is better to plan in advance where each plant will grow. For example, in one section plant herbs that prefer drier conditions — rosemary and thyme. In another, place those that need more moisture, like basil and parsley. This simplifies watering and reduces the risk of overwatering.
What to Pay Attention To
- Spacing between beds is often underestimated. Paths about 18–24 inches (45–60 cm) wide allow you to move freely without touching or damaging plants. When the path is too narrow, maintenance becomes uncomfortable.
- The height of the bed affects soil temperature. Raised structures warm up faster in spring, and plants start growing earlier. This is especially noticeable in cooler climates.
- Mulching helps retain moisture in the soil and reduces the number of weeds. The soil does not dry out as quickly, and the roots stay more stable.
- Regular trimming helps maintain plant shape. In geometric beds, this is especially noticeable — neat bushes keep the overall structure and do not break the layout.
Taking care of geometric raised beds becomes easier, access to herbs is more convenient, and the area looks neat without constant effort. From a practical point of view, this is one of the most удобных formats for herbs, especially when their number grows and you want to keep control.
4. Rustic Container Gardening with Herbs
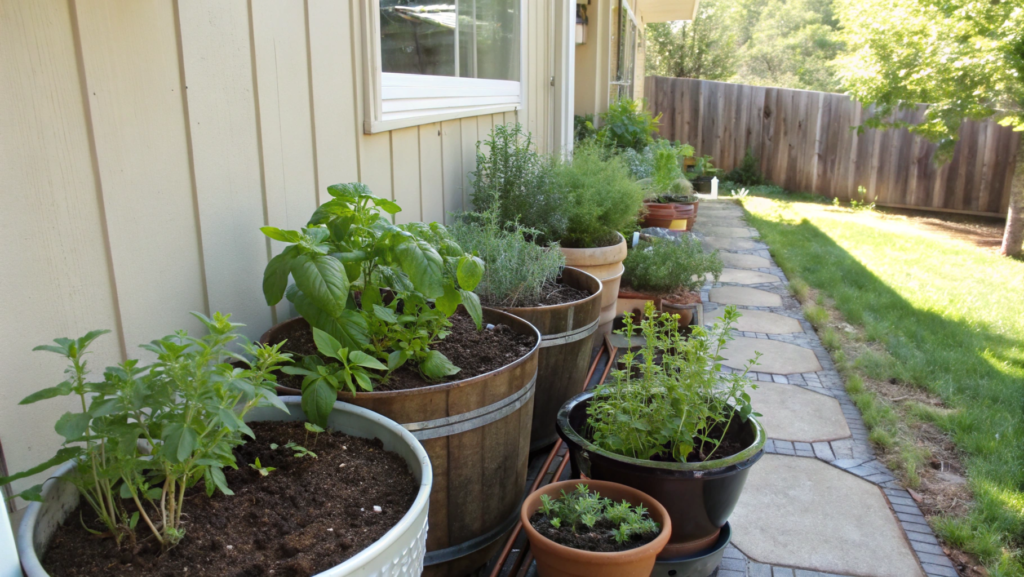
This is a very flexible approach, especially if there is no large yard or if you want to place greenery right next to the house. Containers can be moved, combined, rearranged.
And this kind of setup often looks the most natural.
The container format gives control that is often missing in open ground.
What this gives in practice:
- you can change plant placement — move them closer to the sun or into shade
- easier soil control — each container has its own mix
- fewer weed problems — they simply don’t have time to take over
- easy access — no need to bend down, especially if containers are raised
Container growing allows more precise control over conditions and helps reduce plant stress during temperature changes.
What You’ll Need
Containers give flexibility, but a basic setup is still necessary.
- containers of different types — wood, clay, metal. Depth should be at least 6–8 inches (15–20 cm) so roots can develop properly
- drainage holes — without them, water will stagnate and roots may rot
- light soil mix — a container mix with good aeration
- drainage layer — expanded clay or small gravel at the bottom helps water drain
- garden scissors or pruners — for regular trimming
You can also use Keter Urban Bloomer Raised Garden Bed with Self Watering Planter — it looks like a wooden box but has a built-in water reservoir, which makes maintenance easier.
How to Build a Container Composition
- Choose containers of different shapes and heights.
The best look comes from a combination: one slightly taller, one lower, one wider. This creates volume and makes the setup feel more natural. - Check drainage.
Each container should have holes. Add a layer of expanded clay or stones about 1–2 inches (around 2.5–5 cm) thick at the bottom so water does not stagnate. - Fill with soil.
Use a light mix that holds moisture but does not become dense. In containers, soil dries out faster than in open ground, so balance is important. - Group herbs by needs.
It is better to keep plants with similar requirements in the same container. For example, rosemary and thyme prefer drier soil, while basil needs more moisture. - Arrange containers as a group.
Do not place them in a straight line. It is better to create a small group with different heights and spacing. This makes the composition look more natural.
What to Keep in Mind
- The material of the container affects watering. Clay dries out faster, so these pots need more frequent watering. Plastic and metal retain moisture longer.
- The size of the container directly affects growth. The larger the volume, the more stable the conditions inside. Small pots dry out faster and require more frequent care.
- Placement matters. Containers can be moved — this is their main advantage. If a plant looks weak, it is easy to move it to a better spot.
- Grouping makes the composition visually stronger. When containers stand alone, they get lost. When grouped, the setup looks more complete.
According to University of Maryland Extension, container plants may need watering more often than plants in open ground, especially in hot weather.
The container format gives flexibility. You can change placement, experiment with combinations, and add new plants without rebuilding the entire area. At the same time, care stays simple, and the result remains stable.
5. Wall-Mounted Herb Displays for Vertical Impact
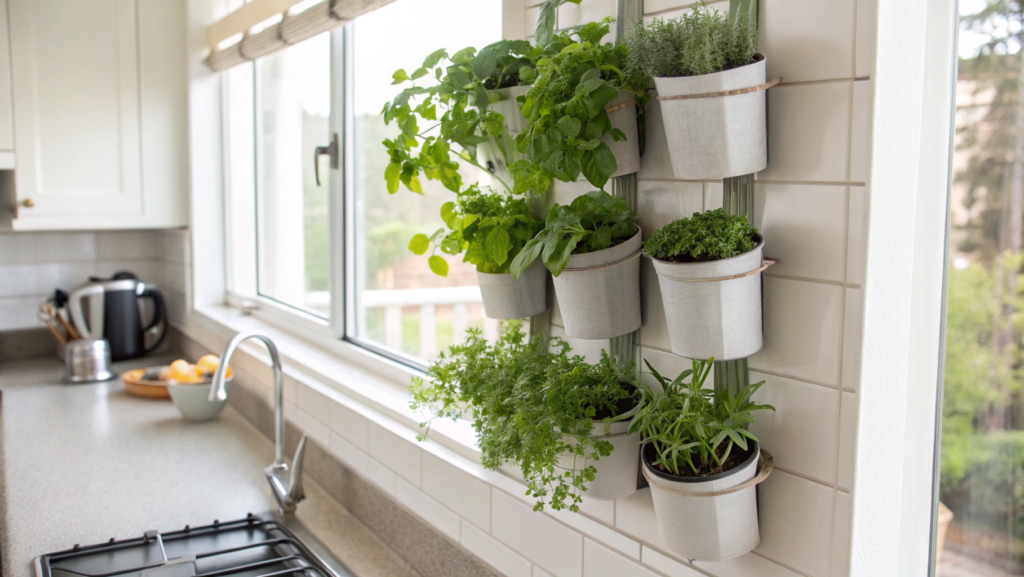
When windowsills are already taken, countertops too, but you still want to keep herbs close at hand, vertical setups give a lot — both in convenience and in how the space looks.
Mount a few containers on the wall near the kitchen window… and after a while you realize this is one of the most convenient formats. Everything is at eye level, nothing gets in the way, and it still looks clean.
Not in every case it makes sense to move herbs onto the wall. But there are situations where this solution works especially well.
- limited space — a small kitchen or balcony
- keeping herbs near the cooking area
- lack of horizontal surfaces
- need to free up the countertop
At the same time, it is important to consider that vertical planting needs more attention to watering and light.
What You’ll Need
Here it is important not just to “hang pots”, but to build a system that will not create problems after a couple of weeks.
- wall mount or rail system — the base of the structure, should hold the weight of wet soil
- containers with drainage — depth not less than 5–7 inches (12–18 cm) so roots do not dry out too quickly
- trays or built-in water collection — otherwise water will run down the wall
- light, breathable soil — especially important in vertical setups so it does not compact
- mounting hardware (anchors, screws) — basic fasteners often cannot handle the weight
If you do not want to assemble everything manually, you can use Mkono Wall Hanging Planter Set of 3 Vertical Planters — compact hanging containers that are easy to install and do not look overloaded.
How to Build a Vertical Herb Setup
- Choose a wall with good light.
It is best to place it near a window. If there is not enough light, plants will stretch and lose shape. Ideally, not less than five to six hours of light per day. - Plan the height placement.
The lower row should be at a level where it is easy to water and harvest. The upper row should not be too high, otherwise maintenance becomes inconvenient. - Secure the base structure.
Use strong fasteners. Wet soil weighs more than it seems, and over time the load only increases. - Prepare the containers.
Add a drainage layer about 1–2 inches (around 2.5–5 cm), then soil. This helps prevent water buildup. - Arrange plants by levels.
More moisture-loving herbs should go lower — some water will flow down. More drought-tolerant ones (thyme, rosemary) should go higher.
What is often overlooked in vertical planting
- Water behaves differently. It does not stay evenly in each container. It moves from top to bottom. Upper pots dry out faster, lower ones stay wet longer.
- The weight of the structure increases over time. A dry system and a wet one are different loads. This should be considered when choosing mounts.
- Access to plants must stay easy. If you need to reach too far or remove containers to water them, the system quickly becomes inconvenient.
- Container size matters more than it seems. Very small pots dry out quickly. It is better to choose slightly larger volume than deal with constant control.
Vertical container systems usually need more frequent but lighter watering to keep moisture stable.
How to keep the setup clean, not overloaded
Limit the number of containers. Three or four elements look better than a fully covered wall. Empty space between them makes the composition lighter.
Use containers with similar or matching styles. Mixing is possible, but carefully. If everything is different, the structure starts to look random.
Leave some empty space. This helps the eye rest and makes the plants stand out more.
Keep lines straight. Even a small tilt in a vertical setup is immediately noticeable.
Vertical herb setups save space and make the area more functional. Everything is within reach, nothing gets in the way, and the kitchen or outdoor area does not feel crowded. This is not the simplest format — it does need a bit more attention. But in return, you get a compact, organized system that works every day.
6. Kitchen Windowsill Herb Gardens That Keep on Giving
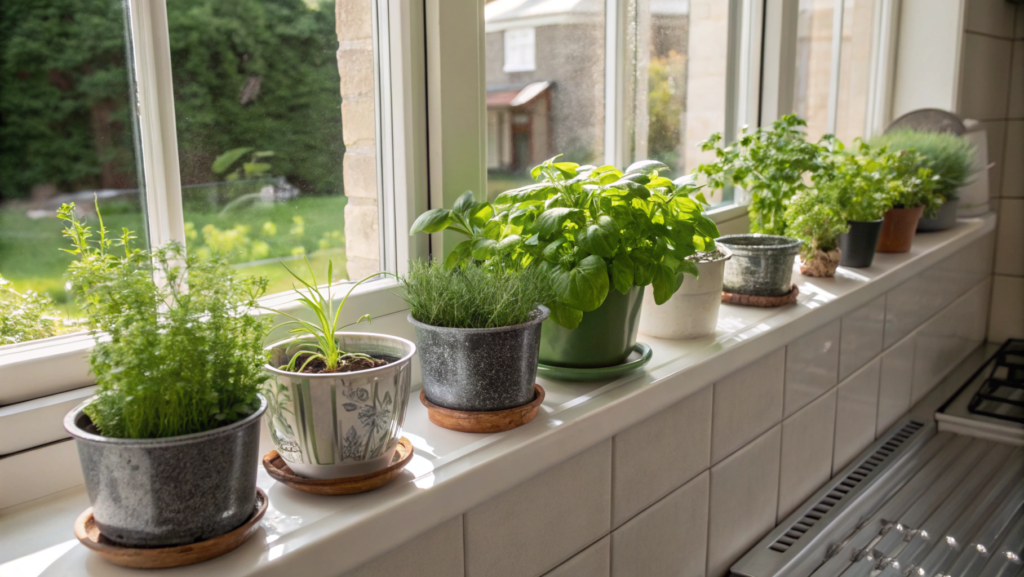
Kitchen windowsill herb gardens that keep on giving are one of the simplest and at the same time most useful formats.
Several important factors come together here.
- natural light — the window provides a stable flow of light, especially in the first half of the day
- easy access — no need to go outside or to another room
- plant condition control — any changes are visible right away
- space saving — no need to dedicate a separate area for herbs
Even compact setups, with enough light, can provide steady herb growth without losing quality.
What You’ll Need
It is important to build a basic setup that you won’t need to change after a couple of weeks.
- same-size pots — about 4–6 inches (10–15 cm) in diameter. In smaller volumes, roots quickly reach the walls and growth slows down
- trays — protect the windowsill from moisture and help manage excess water after watering
- light soil mix — holds moisture but does not become dense, which is important for roots
- drainage layer — expanded clay or gravel about 1 inch (2.5 cm) thick
- basic herbs — basil, parsley, green onion, thyme
How to Build a Windowsill Herb Setup
- Choose the brightest window.
A south or southwest-facing window works best. Plants get the maximum amount of light during the day. The minimum is about five to six hours. If the window faces north, growth will be slower and leaves less dense. In that case, it is better to plan for additional lighting right away. - Use matching containers.
When all pots are the same size, it is easier to control watering and soil condition. It also creates a cleaner look. The volume should allow roots to grow for at least a few weeks without repotting. Very small pots dry out quickly and require constant attention. - Prepare the right soil.
The soil should be light and breathable. If it is too dense, water will stagnate and roots will suffer. A mix with added perlite works well — it helps keep structure and prevents compaction after watering. - Place plants based on growth.
Taller herbs like basil are better placed on the sides. If they are in the center, they will block light for lower plants. Lower herbs like thyme should stay closer to the middle. This helps all plants receive even light. - Keep space between pots.
Leave a small gap between containers — about 1–2 inches (2.5–5 cm). This improves air circulation and reduces the risk of mold or fungus. When pots are too close, moisture stays longer and creates problems.
What to Keep in Mind
Light changes throughout the year.
In summer, there is enough light and plants grow actively. In winter, light becomes weaker, especially in the morning. During this time, even a well-placed windowsill may not be enough. Leaves become thinner, and growth slows down.
Watering depends on the windowsill conditions.
If there is a radiator under the window, soil dries out faster. Sometimes in one or two days. It is important to check the top layer — if it is dry at about 1 inch (2.5 cm) depth, it is time to water.
Rotating plants helps keep shape.
If pots are not rotated, plants start leaning toward the light. After a few days, this becomes visible — the plants tilt. Turning them a quarter every two to three days helps keep them straight.
Temperature affects aroma.
If the windowsill gets too warm (for example, from a radiator), leaves can lose some of their aroma. This is especially noticeable with basil and parsley.
According to University of Minnesota Extension, stable temperature and sufficient light directly affect the level of essential oils in herbs.
How to Keep the Windowsill Clean and Organized
- Limit the number of plants. It is better to keep three or four pots than overload the space. Too many plants make even watering inconvenient.
- Use a single tray or base. This protects the surface and simplifies care. You can water several plants at once without moving each pot.
- Keep a straight line. When pots are aligned and evenly spaced, the windowsill looks clean without extra elements.
- Keep it clean. Fallen leaves and excess moisture quickly create a messy look. Cleaning takes a couple of minutes but makes a big difference.
This is how the windowsill becomes one of the most stable formats for growing herbs at home. Minimal space, clear care routine, and quick access. And what matters — it scales easily. You can start with two plants, see how they behave, and only then add more.
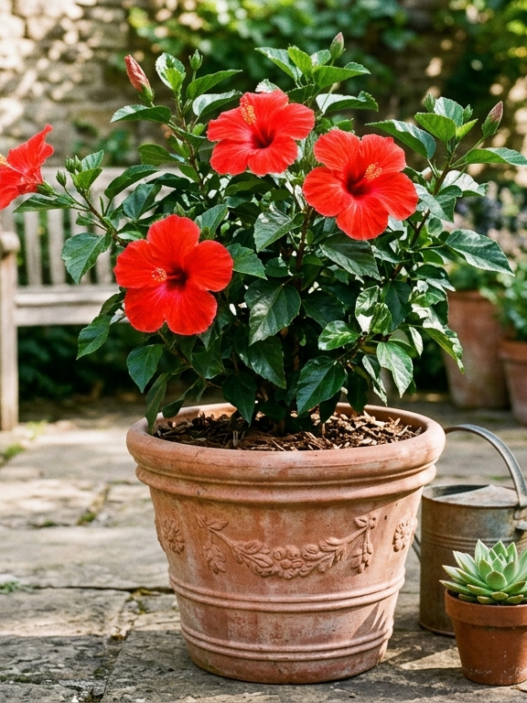
7. Sculptural Planters for Showpiece Herbs
I think no one would argue that it matters not only how herbs grow, but also how they look in the space. One well-chosen container can replace several обычных pots at once.
It is not always necessary to place many herbs. Sometimes it is more important to highlight one or two, but do it neatly and visibly. These solutions work especially well if:
- the space is already overloaded with details — it is better to add one accent than several small elements
- there is a free corner or empty surface
- appearance matters more than yield
- you want herbs to become part of the interior, not just a functional zone
What You’ll Need
There are fewer elements here, but each one matters more.
- a large decorative container — height not less than 8–12 inches (20–30 cm) so the root system can develop without restriction
- drainage holes — necessary, otherwise water will stagnate
- a tray or hidden water collection system — to protect the surface
- quality soil mix — with good airflow
- one or two herbs — it is better to choose ones that hold shape well (rosemary, lavender, sage)
How to Build a Sculptural Herb Setup
- Choose a container with a strong shape.
It should stand out on its own. Simple forms also work if they have texture or good proportions. Very small details are better avoided — they get lost. - Prepare drainage.
Add a layer of expanded clay or gravel about 1–2 inches (2.5–5 cm) thick at the bottom. This prevents water buildup and helps roots breathe. - Fill the container with soil.
The soil should be loose. In large containers, this is especially important, because dense soil holds moisture for too long. - Choose one dominant herb.
Rosemary, lavender, or sage keep their shape well and look like a самостоятельный element. If you plant several different herbs, the composition loses clarity. - Place the container with space in mind.
It looks best where there is some free space around it. If you place it among many objects, the effect disappears.
What to Pay Attention To
- The size of the container should match the plant. A container that is too small limits growth. One that is too large makes moisture control harder.
- Material affects maintenance. Ceramic retains moisture longer and does not overheat as quickly. Metal can heat up faster, especially in the sun.
- Plant shape needs support. Regular trimming helps maintain a clean silhouette. Without it, even the best composition quickly loses its look.
- Placement affects perception. If the container stands in a walkway or near an active area, it starts to get in the way. It is better to choose a calmer spot.
One well-chosen container can completely change how the space feels, while still staying functional.
8. Container Mixes for Continuous Harvest

Container mixes for continuous harvest allow you to harvest fresh herbs longer and more consistently than planting one herb in a single pot.
When containers are built around only one plant, the harvest often comes in waves. First there is a lot of greens, then the plant weakens, then it needs time to recover. When you combine plants with different growth speeds, the picture changes.
What this gives in practice:
- some herbs can be cut often because they recover quickly
- some keep their shape longer and support the overall structure
- the planting looks fuller, even if one type temporarily weakens
- the harvest is more evenly distributed, not one strong wave
- containers are used more efficiently, without empty soil areas
This approach is especially useful in the kitchen or on a terrace, where you want to use fresh herbs regularly. In practice, you build a working composition where some plants give quick results, while others maintain volume and structure.
What to consider before planting
The main mistake here is usually not the choice of plant, but combining herbs with different habits that are uncomfortable in the same container.
It is especially important to look at three things:
- moisture needs
- growth speed
- mature plant size
If you plant rosemary and basil together, for example, problems will appear. Rosemary prefers drier soil and does not like constant moisture. Basil needs more even watering. At first it may not be obvious, but over time one of them will suffer.
That is why the best mixes are not “everything you like”, but plants with similar conditions and different harvest timing.
What You’ll Need
Before planting, it is better to prepare everything. In mixed containers, this is especially important because it is harder to fix later.
- containers at least 8–10 inches deep (around 20–25 cm) so multiple plants have enough root space
- drainage holes in every container, otherwise soil will stay too wet
- light, breathable soil mix for container growing
- perlite or another loosening material if the soil feels too dense
- a moderate amount of compost to support growth without making the mix heavy
- garden scissors or a small pruner for regular harvesting
- trays or protective bases if containers are placed near the house, on a terrace, or on a windowsill
Combinations that work best
Here it is important not just to plant several herbs together, but to build a container that is convenient for both care and harvesting.
1. Soft culinary mix
Works well for the kitchen, where herbs are used almost every day.
- parsley — provides a steady mass of greens
- chives — quickly regrow after cutting
- cilantro — gives a fast start but needs replacement
- dwarf basil — adds volume and frequent harvest
This container works well because there is always something ready to cut. Even if one plant weakens, others continue to grow.
2. Mediterranean mix
Suitable for sunny spots and less frequent watering.
- thyme
- oregano
- compact sage
- low-growing rosemary, if the container is deep enough
This group grows more slowly but keeps its shape longer. The harvest is not as frequent as with soft greens, but the container stays stable and neat.
3. Fast-cycle mix
Good for those who do not mind replanting regularly.
- cilantro
- dill
- leaf parsley
- green onion
This is not the most long-lasting combination in one cycle, but it is very practical if you want fresh tender greens and are okay with reseeding.
How to Build the Containers
- Choose a container with enough volume.
For two or three herbs, you need more than a small decorative pot. Roots need space to develop. If the container is too tight, plants will compete for water and nutrients. - Combine plants with similar needs.
Do not try to mix herbs with very different watering requirements. Thyme and oregano work well together, but basil and rosemary create extra difficulty. The closer the conditions, the easier maintenance becomes. - Place plants based on behavior.
Fast-growing herbs should not dominate the center if they can overshadow others. Basil, for example, expands over time and takes light. More compact herbs feel better near the edges or front. - Do not overcrowd at the start.
A common mistake is planting too densely because it looks empty at first. After two to three weeks, plants grow and fill the space. It is better to leave some room than deal with overcrowding and poor airflow. - Treat harvesting as part of growth.
If you cut too much at once, recovery takes longer. It is better to harvest a little but regularly. Some shoots go to the kitchen, while others continue growing. - Replace fast-growing herbs in time.
Some herbs are not meant to stay long in one container. Cilantro and dill grow fast, give harvest quickly, and finish just as fast. It is better to see them as part of a cycle.
Small details that affect continuous harvest
Container depth affects not only root growth but also overall stability. Deeper containers hold moisture longer, heat up less, and do not exhaust as quickly.
Different growth speeds should be used as an advantage. Fast herbs give early harvest, slower ones build up and continue later. This creates the feeling of a constant supply.
Feeding should stay moderate. Too much fertilizer gives quick soft growth, but plants can stretch or weaken later.
Trimming the tops helps extend the harvest. This is especially visible with basil, chives, and parsley. The more regular the cuts, the more stable the container behaves.
Replacing individual plants is a normal part of the process. There is no need to wait until the whole container weakens. Sometimes replacing one tired plant is enough to refresh the entire setup.
How to keep the setup clean and balanced
Mixed containers can quickly turn messy if not guided. To avoid this, it is important to manage both harvest and shape.
- First, remove everything unnecessary in time. Yellow leaves, stretched shoots, rough stems — all of this affects both appearance and plant health.
- Second, do not be afraid to thin out. It may feel difficult to cut healthy growth, but it allows the rest to develop properly.
- Third, keep the composition readable. If one plant starts covering everything, it is better to limit it. Plants should grow together, not compete for space.
- And fourth, rotate containers evenly toward the light if they are placed near a window or wall. Otherwise, one side will grow stronger while the other weakens.
Mixed containers combine productivity, convenience, and flexibility. They allow you to harvest longer, use space efficiently, and keep maintenance simple without turning it into a complex system.
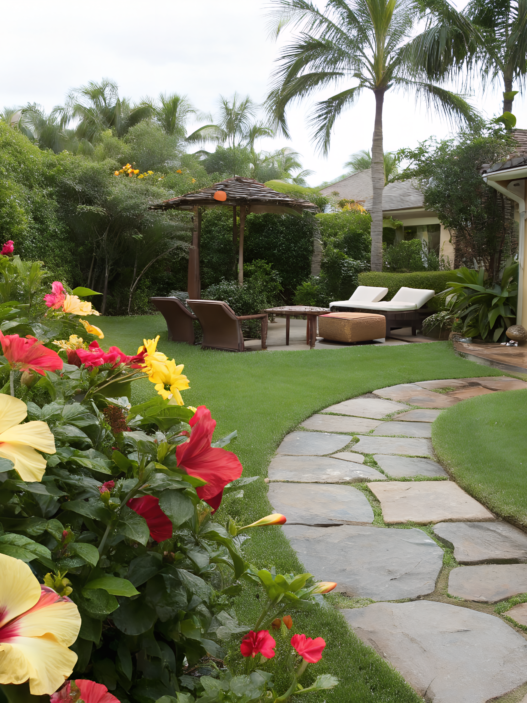
9. Outdoor Herb Corners for Every Season
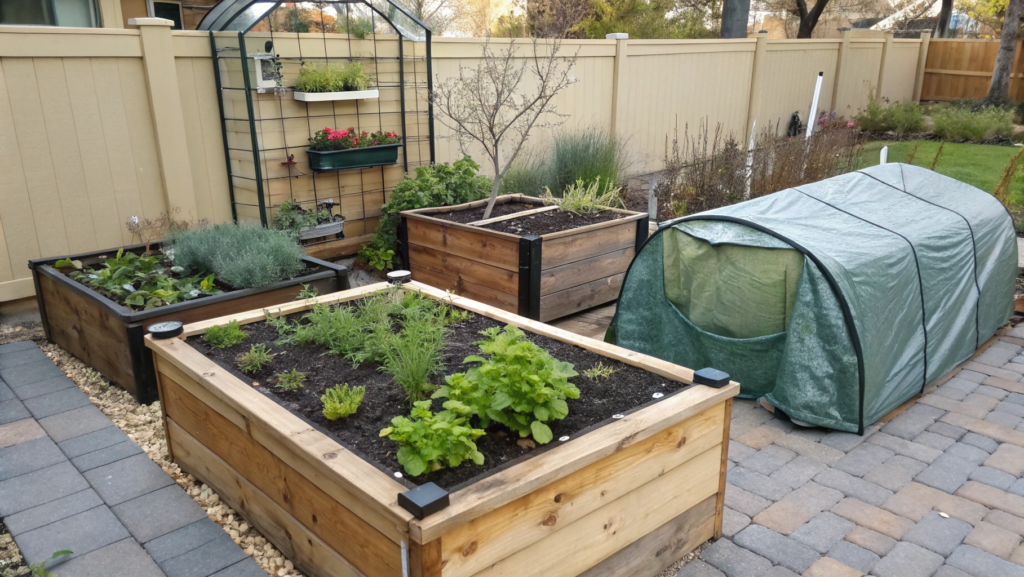
Outdoor herb corners for every season — here it is important not just to plant herbs, but to plan the location, weather protection, and plant selection for different periods.
It does not always make sense to dedicate a separate area for herbs. But there are situations where it brings real convenience.
- you want to keep herbs close to the house, not on a distant part of the yard
- you need to protect plants from wind and temperature changes
- you want to extend the harvest season
- you want everything in one place, not spread across the garden
Such a corner becomes a working zone. Not a decorative bed, but a place where everything is within reach.
What You’ll Need
Here it is important to plan not only planting, but also the conditions around it.
- a well-lit area — at least 5–6 hours of sun per day
- wind protection — a house wall, fence, or hedge
- well-draining soil — herbs do not like standing water
- containers or raised beds — for flexibility and convenience
- mulch — a layer of about 2 inches (around 5 cm) to retain moisture
- garden tools — pruners, shovel, rake
If you want to create a neat and protected setup right away, you can use Giantex Wooden Cold Frame Greenhouse Garden Bed — a compact structure with a transparent lid that protects plants from wind and cold.
How to Build a Herb Corner That Works All Season
- Choose a spot with natural protection.
The best option is near a house wall or fence. These areas are less exposed to wind and cool down more slowly at night. This is especially important in early spring and fall. - Decide on the base — soil or containers.
If the soil is heavy or poorly draining, raised beds or containers work better. This helps control soil composition and prevents water buildup after rain. - Separate herbs by season.
Some plants handle cooler weather well (thyme, sage, oregano), while others are sensitive to cold (basil). It is better to plan this in advance to avoid constant replanting. - Add simple protection.
Even basic cover — film or a lid — can extend the season by several weeks. This is especially noticeable in spring and fall when nighttime temperatures drop. - Make access convenient.
You should be able to reach herbs easily in any weather. Narrow paths or dense planting quickly become inconvenient, especially after rain.
Important details
The microclimate near walls is warmer.
Walls absorb heat during the day and release it at night. This creates more stable conditions for plants.
Containers can be moved.
If cold weather is expected, they can be moved closer to the wall or even indoors. This adds flexibility that open ground does not provide.
Mulch protects roots.
It keeps warmth and moisture, which is especially important during seasonal transitions.
Watering depends on weather.
In heat, soil dries faster. In cooler conditions, it stays moist longer. It is important not to water by habit, but based on soil condition.
Mulching and wind protection can significantly reduce plant stress during sudden temperature changes.
How to Make the Corner Easy to Use
- Keep herbs in one place. This saves time. There is no need to walk around the whole yard to collect greens.
- Leave space for movement. Even a small path about 18–24 inches (45–60 cm) wide makes maintenance easier.
- Avoid overcrowding. Too many plants reduce access, and some start to suffer from lack of light.
- Add a simple cover system. This can be a lid, film, or a portable structure. Even small protection gives a noticeable effect.
Such a corner helps keep herbs under control throughout the entire season. In spring they start earlier, in summer they grow steadily, and in fall they hold their shape longer. This is not a complicated system, but it does require a bit more attention to detail. In return, you get fresh herbs for a much longer time.
10. Lighting Tricks for Thriving Indoor Herb Gardens
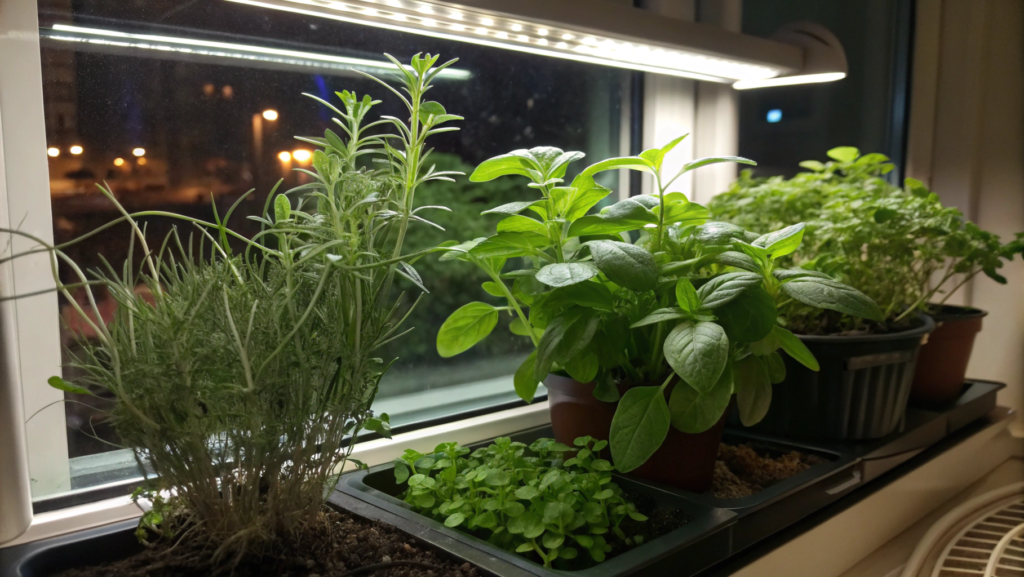
Many people think that placing herbs on a window is enough for lighting. In practice, unfortunately, it is not. It is not always obvious right away. But there are several signs that appear quite often.
- stems stretch upward, become thinner and less stable
- leaves lose насыщенный color, become lighter
- space between leaves increases — the plant stops being dense
- aroma becomes weaker, especially in basil and mint
- growth slows down, even if watering and soil are fine
Lack of light directly reduces the concentration of essential oils, which are responsible for the taste and aroma of herbs.
What You’ll Need
To make light work for you, not against you, it is better to prepare a basic setup right away.
- LED grow light with neutral or cool spectrum — these support active growth
- mount or stand — to fix the light source at the correct height
- timer — helps maintain a stable schedule without manual switching
- reflective surface (optional) — a light wall or panel enhances the lighting effect
- healthy plants — light supports growth but does not fix weak plants
A compact LED grow light panel works well — it does not look like industrial equipment and provides stable light for small setups.
How to Set Up Lighting So Plants Actually Grow
- Place the light at the correct height.
The optimal distance is about 6–12 inches (15–30 cm) from the tops of the plants. If the light is too far, it becomes weak. If too close, leaves may overheat and dry out. It is important to adjust this as plants grow. - Keep a consistent lighting duration.
Herbs need about 12–16 hours of light per day. Less slows growth. More can stress plants. A timer helps maintain a stable routine. - Combine natural and artificial light.
If there is a window, the lamp should support it, not replace it. During the day, plants get natural light, and in the evening or on cloudy days — additional light. - Distribute light evenly.
If light comes from one side, plants will lean toward it. It is better to position the source so it covers the whole group. Otherwise, one side develops faster than the other. - Watch the temperature near the light.
Even LED lights can slightly warm the air. If containers are too close, soil may dry out faster. This should be considered when watering.
What affects the result
Light intensity matters more than its presence.
Just having light is not enough. It needs to be strong enough. Weak light supports growth, but not density or flavor.
Lighting schedule must be stable.
If today plants get 10 hours, tomorrow 5, and then 12 again, they start reacting unpredictably. Leaves weaken and growth becomes uneven.
Different herbs react differently.
Basil needs more light than mint or parsley. If all plants are in one place, the most demanding ones will struggle first.
Light affects not only growth, but also taste.
The better the lighting, the stronger the aroma. This is especially noticeable with basil, thyme, and rosemary.
How to integrate lighting into the interior
- Use compact light sources. Large lamps make the space look technical. Smaller panels or linear lights look cleaner.
- Hide the mounts. If possible, place the light under a shelf or cabinet — it becomes almost invisible.
- Keep a clean plant layout. When pots are aligned and light comes from above, the composition looks complete.
- Avoid too many extra elements. The fewer details around, the better the plants stand out.
Light is not an additional element, but the foundation of indoor herb growth. Even good soil and proper watering cannot compensate for its absence. When lighting is set correctly, plants become denser, aroma improves, and care becomes more predictable.
How this works for you in practice
It is interesting to see what actually works in different conditions. Everyone has different light, different climate, and different time for maintenance — and the same setup can behave differently.
Some people start with a windowsill and keep it for years because it is convenient. Others quickly outgrow it and move to containers or outdoor setups. Sometimes it goes the other way — starting with a larger system and then simplifying to a few neat pots near the kitchen.
Write in the comments what works for you. Where are your herbs growing now? What turned out to be the most convenient? Did you have to change something — and why? Small details like light placement or container choice often make a bigger difference than expected.
And if you are just starting, write too. It is often easier to choose a good setup right away than to rebuild everything later.