Spring is all about freshness—those smells that greet you the moment you crack open the window in the morning and hear the garden waking up. Your hands are back in the soil, and your whole self belongs to your little patch of earth. The last thing you want is to be stuck inside, cooking for hours. That’s where our Spring Menu comes in—quick, seasonal meals that let you savor the season without missing a moment outdoors.
That’s exactly why I put together this spring menu—the one we actually make here at home, using what literally grows right outside our window.
You’ll find light recipes, gluten-free dishes, seasonal veggies, a little cheese, a bit of creativity—and a full board of springtime joy.
And yes, there’s a grazing table, and something sweet to end the meal—everything Lindy and I love to bring to the table this time of year.
1. Elegant Spinach-Strawberry Salad with a Wild Twist
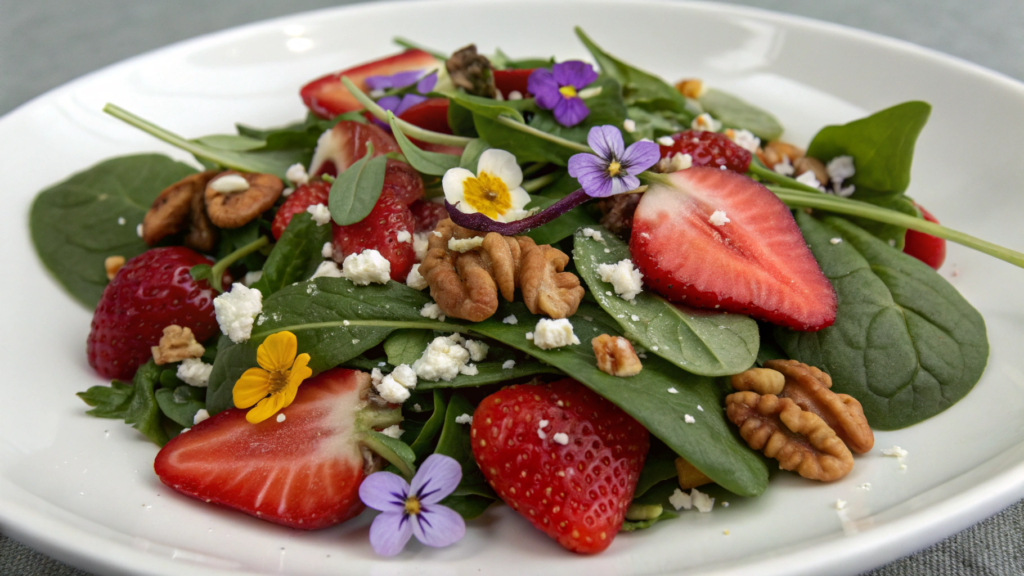
This recipe came together kind of spontaneously—one day we were walking around the garden and found some young dandelion leaves and a handful of violets growing at the edge. We tossed them into our usual strawberry-spinach salad and suddenly… it just popped. That’s how this became our new spring favorite. And honestly, I can’t imagine the season without it anymore.
This salad looks like it came out of a magazine, takes 10 minutes to throw together, and the mix of flavors… well, just try it yourself!
What you’ll need:
Makes 4 servings
- 5 oz (about 140 g) of fresh baby spinach
- 1 cup sliced fresh strawberries
- ½ cup toasted walnuts (or pecans)
- ¼ cup crumbled goat cheese
- A handful of fresh edible flowers (like violets or kale blossoms, if you’ve got them)
- A handful of young dandelion greens (optional, but highly recommended)
- A small pinch of sea salt
Honey-Macadamia Dressing:
(You can make it ahead—it keeps well in the fridge for up to 5 days.)
- 3 tbsp extra virgin olive oil
- 1½ tbsp apple cider vinegar
- 1 tsp honey or maple syrup
- ½ tsp Dijon mustard
- Salt and pepper to taste
Pro tip: I sometimes add just a drop of orange juice—it brightens the whole thing up beautifully.
How to assemble the salad:
- In a large bowl, gently mix the spinach, dandelion, strawberries, and flowers (if using).
- Crumble the goat cheese on top—don’t stir it in, just scatter it.
- Add the toasted walnuts right over the top.
- Drizzle the dressing right before serving. Don’t do it too early—spinach wilts fast!
- Finish with a small pinch of sea salt, and that’s it.
What I really love about this salad is that it doesn’t need an occasion, but still feels like something you’d get served in the garden of a cozy French bistro. We usually bring it out as a light appetizer before something heartier.
And if I’m feeling a little fancy? I’ll set the table with cold prosecco, some goat cheese crackers, and boom—perfect little spring dinner on the porch.
To be honest, I sometimes make this just for myself with a cup of warm tea, after a long day in the garden.
Because, well… don’t we all deserve a little beauty on our plate?
2. Easy Carrot-Parmesan Galette
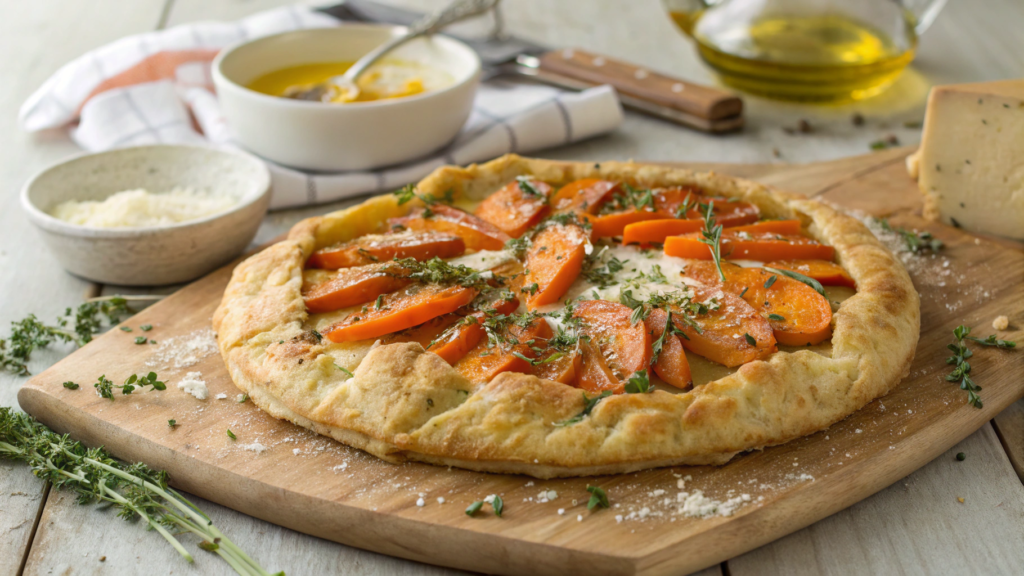
This recipe is my secret spring go-to—it looks like a 10 out of 10, smells like a fancy bakery, and comes together in just about 30 minutes.
And the best part? You can make the dough ahead of time… or skip it completely. I’ll show you both options!
I first tried a carrot galette at a little café in Portland, where Lindy and I were served a delicate flaky round filled with warm root veggies and cheese.
Since then, I’ve tested a dozen versions, but this one—with young carrots, fresh thyme, and grated Parmesan—is hands-down my favorite.
Ingredients:
Makes 1 galette (about 6 servings)
For the crust:
- 1 sheet of chilled puff pastry (store-bought works fine),
or: - 1½ cups (190 g) all-purpose flour
- 1 stick (113 g) cold butter
- ¼ cup (60 ml) ice water
- A pinch of salt
For the filling:
- 3–4 young carrots, shaved into ribbons (a vegetable peeler works great)
- ½ cup grated Parmesan
- 2 tbsp olive oil
- 1 tsp fresh thyme (or ½ tsp dried)
- Salt and pepper to taste
- Optional: a bit of lemon zest or red pepper flakes
How to make it:
- If you’re making the dough yourself, combine flour, salt, and cold butter, working into crumbs. Add ice water, form into a dough ball, and chill for 30 minutes.
- Roll out the dough into a 10–12 inch (25–30 cm) circle and place on parchment paper.
- Layer carrot ribbons in a spiral, leaving a 1½-inch (about 4 cm) border.
- Sprinkle with Parmesan and thyme, season with salt and pepper, and drizzle with olive oil.
- Fold the edges inward to form a rustic crust.
- Bake at 400°F (200°C) for about 30 minutes, until golden and crisp.
- If you want to make your life easier, I recommend this OXO Y-peeler on Amazon — it makes perfect ribbons in seconds.
We usually serve this with a glass of dry white wine and a fresh green salad—and it already feels like a celebration.
If it’s warm outside, I bring the galette out to the porch where the dog’s already waiting (and there’s always a hopeful chicken or two lurking around).
It tastes amazing warm, but just as good at room temperature, or even the next morning, if by some miracle there’s a slice left. Which… rarely happens.
3. Gluten-Free Deviled Eggs with Spring Herbs & Lemon Zest
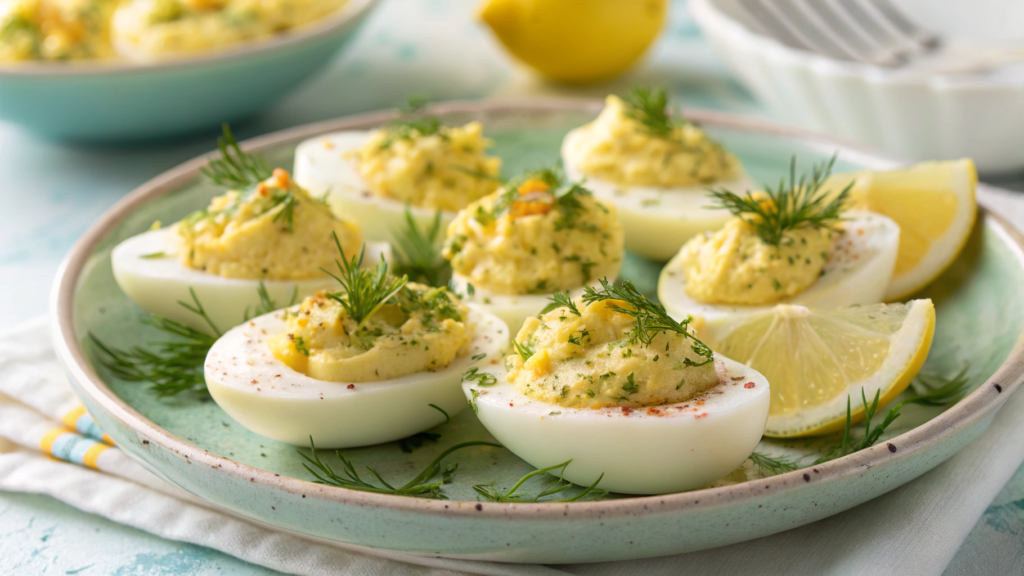
Deviled eggs work anywhere and everywhere. Everyone loves them, and everyone has their own version.
But in spring, I crave something lighter, brighter… with the kind of fresh flavor that feels like walking barefoot through the garden.
That’s how this version came to be: gluten-free, with lemon zest, dill, chives, and a splash of olive oil instead of mayo.
Maybe it’s a bit sacrilegious to mess with classic deviled eggs, but believe me—even the skeptics usually eat three.
What you need:
Serves 6 (12 halves)
- 6 large eggs
- 1½ tbsp extra virgin olive oil
- 1 tsp lemon juice
- 1 tsp lemon zest
- 1 tsp Dijon mustard
- 1 tbsp finely chopped dill
- 1 tbsp chopped chives or green onion
- Salt and freshly ground pepper to taste
- Optional: a pinch of smoked paprika or chili flakes for garnish
Note! Use high-quality olive oil here—it’s the flavor backbone.
How to make them:
- Boil the eggs for 9 minutes, then transfer immediately to an ice bath to make peeling easier.
- Peel the eggs, slice in half, and gently scoop out the yolks.
- In a bowl, mash the yolks with olive oil, mustard, lemon juice, zest, and the chopped herbs.
- Add salt and pepper to taste—and be sure to taste the filling. It should be bright and balanced. Add more zest or lemon if needed.
- Fill the egg whites with the mixture using a spoon or piping bag—it’ll look extra neat that way.
- Finish with a sprinkle of paprika, chili flakes, or more fresh herbs—whatever gives it that spring touch.
How we serve them:
These eggs show up every year at our Easter breakfast, next to a bread board, fresh herbs, crackers, and honey.
But they also fit beautifully on a spring grazing table, especially when you want things to be both pretty and easy.
Sometimes I lay them out on a wooden tray with bright radishes, parsley sprigs, and garden peas—yes, all from our own yard.
Occasionally I add a few drops of fermented hot sauce on top—and suddenly they’ve got a whole different personality.
As my mom used to say: “A little fire turns eggs into an event.”
4. Skillet Pizza with Spring Veggies
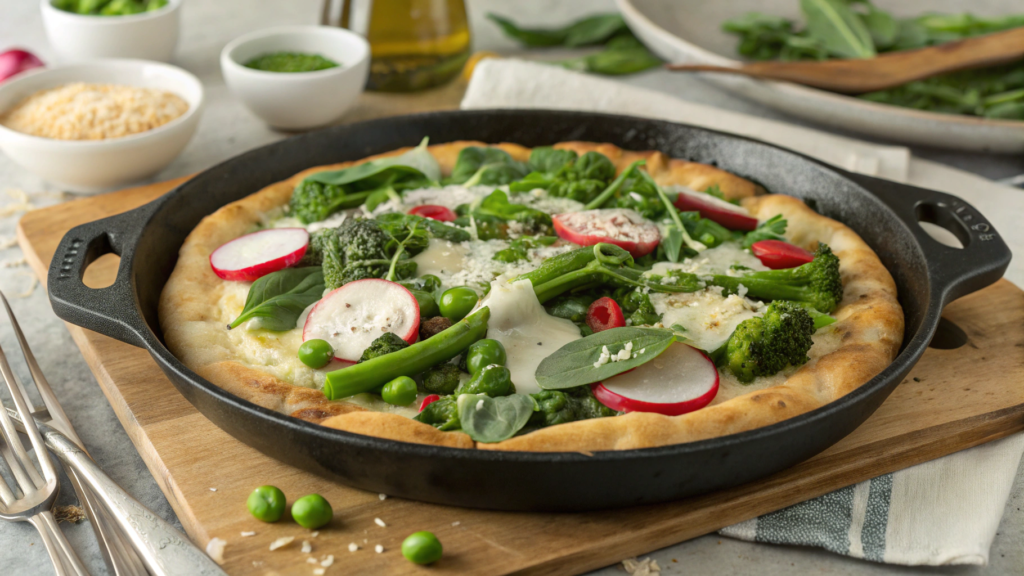
Sometimes you just don’t feel like turning on the oven—especially in spring, when the house is already warming up from the sun and all you want is something light, green, and crispy for dinner.
That’s how we ended up making pizza in a skillet. And honestly? Ever since then, the oven’s been getting jealous. Because this pizza turns out… yeah, WOW.
Crispy crust, fresh veggies, a little cheese—and boom! Dinner in 20 minutes.
And the best part? You can throw in whatever’s growing in your garden right now: peas, green onions, spinach, broccoli—even radishes (yep, you can roast those too!).
Ingredients:
Makes 2 servings (one 10-inch pizza)
- 1 ball of pizza dough (~8 oz / 225 g) — or use your favorite homemade recipe
- ½ cup shredded mozzarella
- ¼ cup grated Parmesan
- ⅓ cup finely chopped spinach or baby kale
- ¼ cup fresh green peas or snap peas (frozen works too)
- A few slices of radish, broccoli, or zucchini
- 1 tsp olive oil
- A pinch of salt and freshly ground pepper
- Optional: a bit of lemon zest, red pepper flakes
Here’s a Lodge Cast Iron Skillet, 10.25 inch that’s perfect for this recipe.
How to make it:
- Preheat your skillet (cast iron is best) over medium heat, no oil needed, just get it nice and hot.
- While it heats, roll out your dough into a circle slightly smaller than the pan.
- Carefully place the dough in the dry skillet. Cook for 2–3 minutes until bubbles start to form underneath.
- Flip the dough! Quickly layer the toppings: first cheese, then spinach and veggies, Parmesan on top.
- Cover with a lid and cook for 3–4 more minutes, until the cheese melts and the bottom gets golden and crisp.
- Remove from heat, sprinkle with salt, pepper, maybe some lemon zest—it gives it that springtime brightness!
Sometimes I slice this pizza into little triangles and serve it on a wooden board next to the spring grazing table.
Other times, I toss it in a lunchbox for the next day.
And when the weather’s good, we bring the whole skillet out to the porch and just eat it with our hands.
The peas crunch, the crust crackles, the sun is shining—and nothing else matters.
5. Cold Spring Noodle Salad with Ginger-Lime Magic

When everything’s blooming outside, your mood is good, and you don’t feel like cooking at all—this salad saves the day. It’s got a bright limey zing, a little hint of sesame, and seriously, it’s so fresh.
Also? It’s done faster than the water boils for the noodles.
This dish shows up on our table every single spring, and even our friends’ kids somehow end up asking for seconds.
Ingredients:
Makes 2 large servings
Base:
- 4 oz (115 g) rice noodles (soba works too)
- 1 small carrot, grated or shaved into ribbons
- ½ red bell pepper, thinly sliced
- ⅓ cup finely shredded cabbage (red or green)
- A handful of fresh cilantro
- 2 tbsp roasted peanuts (or cashews)
Dressing:
- 1½ tbsp fresh lime juice
- 1 tsp grated ginger
- 1 tbsp soy sauce (or tamari for GF)
- ½ tsp sesame oil
- 1 tsp honey or maple syrup
- Optional: a pinch of red chili flakes
How to make it:
- Cook the noodles according to the package—usually 5–7 minutes in hot water, no boiling needed.
- While they’re softening, grate the veggies, slice the pepper and cabbage, chop the cilantro.
- In a small jar, combine all the dressing ingredients, shake well or whisk together.
- Drain the noodles and rinse with cold water to stop the cooking.
- In a big bowl, toss everything together—noodles, veggies, herbs. Pour over the dressing and mix it all up.
- Top with peanuts, add more cilantro if you like—then bring it to the table.
By the way, this salad works great as an appetizer or a side dish with pizza or galette.
But sometimes? I just put it in a bowl, add a hard-boiled egg or some roasted tofu slices, and call it a complete, light dinner.
We also take it on picnics—packed in a jar, wrapped in a kitchen towel. And honestly, it’s one of those dishes that gets even better after an hour, once the flavors have had time to settle in.
6. Mini Zucchini Cakes

When zucchini season hits the garden… you know it. They multiply fast, and every year I find myself thinking: how do I use them in a way that’s tasty, simple, and not boring?
Of course, mini zucchini cakes. They look neat, smell like herbs and cheese, and they’re perfect for a spring menu. Plus, they’re easy to eat with your hands (which is always a win when you’ve got a drink in the other).
Ingredients:
Makes 12 mini cakes
- 2 medium zucchini (about 1½ cups grated)
- 2 eggs
- ½ cup shredded cheese (cheddar or Parmesan—your call)
- ¼ cup chopped green onion
- ¼ cup rolled oats or breadcrumbs (GF if needed)
- 1 garlic clove, grated
- ½ tsp salt
- Pinch of black pepper
- Olive oil for greasing the muffin pan
Here’s the Wilton Non-Stick Mini Muffin Pan, perfect for this recipe.
How to make them:
- Grate the zucchini, place in a colander, salt it, and let sit for 10 minutes to release excess moisture. Then squeeze it out—really well!
- In a bowl, mix together the eggs, cheese, green onion, garlic, and seasonings. Add the squeezed zucchini and oats.
- Preheat the oven to 375°F (190°C) and grease your mini muffin pan with olive oil.
- Spoon the mixture into each cup, pressing down gently with a spoon.
- Bake for 18–22 minutes, until the tops are golden and your kitchen smells amazing.
- Let them cool slightly and gently remove from the pan.
We love to serve these mini cakes on a board with spring salad or as part of a grazing spread.
And if there’s a little jar of dipping sauce nearby—something like Greek yogurt with lemon juice and mint—you can bet the plate will be empty in five minutes.
They’re delicious warm or at room temp. And unlike a lot of standard appetizers, they feel like something truly homemade. Just like the best parts of spring cooking.
7. DIY Crostini Board

The crostini board is the perfect dish for anyone who doesn’t want to spend hours in the kitchen but still wants everything to look beautiful with zero stress.
We often put one together when we invite friends over to the porch.
Some folks eat gluten-free, some are vegetarian, and some just want “whatever’s crunchy.”
So you give everyone a little bit of their own flavor. Or five.
What to put on a crostini board:
The base. Toasted slices of baguette or bread (gluten-free works too). You can toast them in a dry skillet or bake them in the oven with a drizzle of olive oil.
Now for the toppings! I divide them into three categories to keep things simple:
Spreads:
- Goat cheese whipped with herbs
- Green pea and mint purée
- Hummus (classic or with extras like beet or garlic)
- Ricotta with lemon and honey
- Avocado mash with lime
Fresh & Pickled Add-ons:
- Cucumber or radish slices
- Pickled red onion
- Chopped boiled eggs with herbs
- Thin zucchini ribbons
- Sautéed mushrooms with balsamic
- Microgreens or cress
“Surprises”:
- Strawberries with balsamic
- Nuts (walnuts, pecans)
- Honey with rosemary
- Edible flowers—like violets or thyme blossoms
- A drop of pesto, if you’ve got some
How to assemble:
- Toast the bread slices and let them cool.
- Place the spreads in small bowls or smear them directly on the toasts.
- Lay out the veggies, herbs, and “surprises” separately, so everyone can build their own crostini.
- Set out a few knives, spoons, and colorful napkins—and let the party begin.
I usually don’t even tell anyone what’s going to be on the table. I just lay it all out on a big board, and 10 minutes later everyone’s debating their favorite combo and going back for round two.
It’s a surprisingly easy way to impress your guests—and you won’t feel exhausted doing it.
Best part? You can prep everything in advance. And on party day, you just build it like a puzzle.
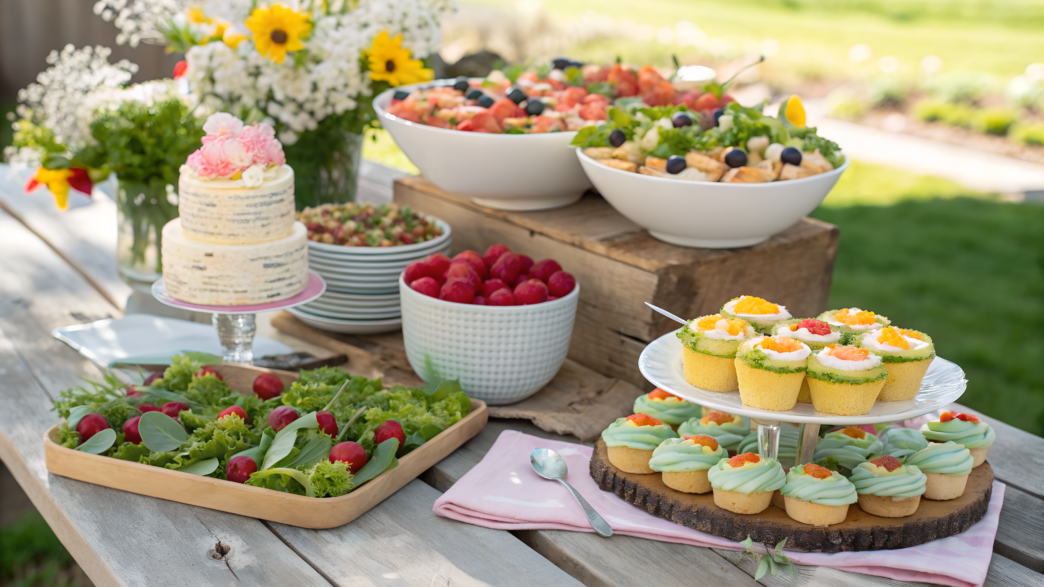
8. Easy Recipes for an All-Spring Produce Grazing Table

If spring could talk, it wouldn’t whisper — it’d speak in radishes, cress, strawberries, baby carrots.
And it’s exactly this time of year when you just want to lay out all that’s crunchy, fragrant, bright—on one big board.
No plating. Just everyone gathered around. Eating with hands. Tasting. Laughing.
We call it simply — a spring grazing table.
It’s perfect for picnics, patio lunches, or those days when you don’t feel like cooking but still want that wow effect.
It’s not about fancy recipes—it’s about the harmony of flavors and textures. All you need is a few staples, a little creativity, and a beautiful board (or tray).
What to put on your spring board:
Just-picked veggies:
- Baby carrots (leave a bit of the tops on—they’re cute!)
- Snap peas
- Radish slices
- Broccoli or cauliflower, lightly blanched
- Thin cucumber slices
- Lettuce, cress, or baby spinach
Fruits & berries:
- Strawberries (whole or sliced)
- Thin-sliced apples
- Grapes
- Kiwi or pear (whatever’s in season)
Cheeses & dips:
- Herbed goat cheese
- Ricotta with lemon
- Hummus (spring versions with peas are great!)
- Cream cheese with a drizzle of honey
- A bit of aged cheese—cheddar or Parmesan—for balance
Crunch & texture:
- Crackers or multigrain crispbreads
- Roasted chickpeas
- Sunflower or pumpkin seeds
- A handful of nuts—walnuts, almonds
- Pickled onions or gherkins
Pretty (and edible) extras:
- Edible flowers: violets, rosemary blossoms, dill blooms
- Fresh mint or thyme
- Microgreens
How to build it:
- Start in the center: place a few small bowls of dips or cheese.
- Around those, spread out ingredients by color, texture, or just your gut feeling.
- Add height—stand carrots upright or put lettuce in a little jar.
- Toss in a few “wild” touches—those little things that make it feel alive.
- Don’t fear the chaos. Spring is a little chaotic by nature.
This board usually becomes the main dish at our place. Not a side. Not an extra. The center of the table.
We’ll add some herb deviled eggs, mini zucchini cakes, or just glasses of mint lemonade—and that’s it.
I love watching people pick their plate, trying new things, crunching peas, taking strawberries straight by hand. That’s spring on a board.
9. Balsamic Berry Tart
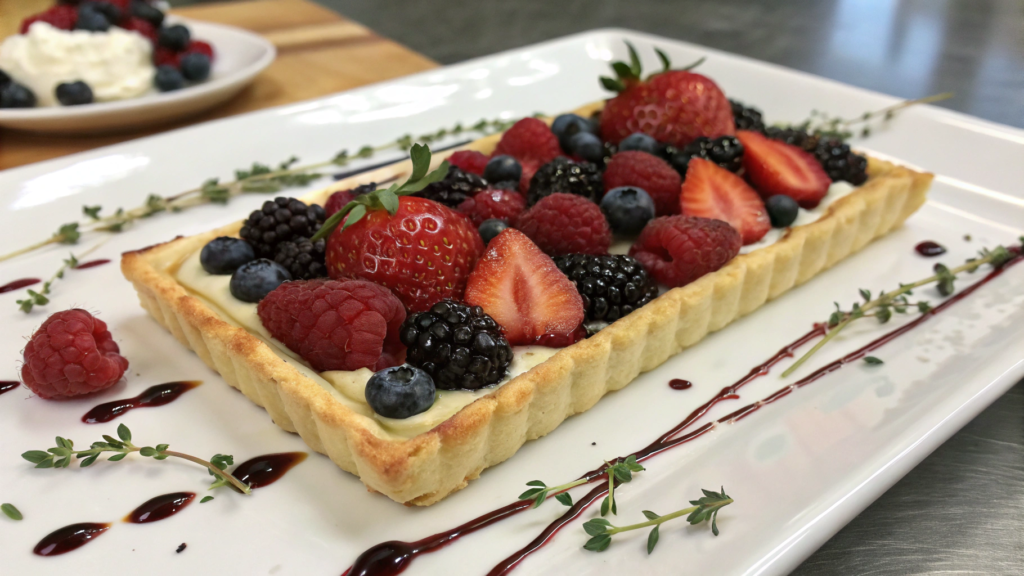
This tart is like a perfect final scene: calm, pretty, a little complex—but only in taste.
And sure, it seems simple: dough, berries, cream.
But a single spoon of balsamic vinegar takes it somewhere else—deeper, brighter, richer, with that bold spring flavor that’s not quite sweet, not quite tart.
Ingredients:
Makes 6–8 servings
Crust:
- 1 sheet puff pastry (about 8–9 oz / 225–250 g), thawed
- 1 egg, lightly beaten (for brushing)
Cream filling:
- ¾ cup ricotta
- 2 tbsp honey or maple syrup
- ½ tsp vanilla extract
Topping:
- 1½ cups mixed berries (we love strawberries, blueberries, raspberries)
- 1 tsp good quality balsamic vinegar
- ½ tsp honey
- Optional: a pinch of fresh thyme or mint leaves
How to make it:
- Preheat the oven to 400°F (200°C).
- Roll out the pastry into a rectangle and place it on parchment paper on a baking sheet.
- Fold the edges in 1 cm to make a border, and prick the center with a fork so it doesn’t puff up.
- Brush the edges with the beaten egg. Bake for 15–18 minutes, until golden.
- Meanwhile, whip the ricotta, honey, and vanilla until creamy.
- In a separate bowl, toss the berries with balsamic and honey.
- Once the crust cools, spread the cream on top, then layer the berries.
- Garnish with mint or thyme, if you want a touch of aroma.
Sometimes I enjoy a tart in silence, just with a cup of tea, when it’s been a long and busy day.
And sometimes with music, with friends, on the porch, when everything else has been eaten and everyone wants “something sweet but not sugary”.
Spring menu
And that’s our full spring menu. Not cooked for likes. Cooked for people.
It should be delicious, simple, seasonal, made with the joy of sharing. Let these ideas inspire your own version—whether it’s a warm carrot galette, mini zucchini cakes, or a big spring board with veggies and cheese.
You can tweak every recipe to fit your life: leave out the cheese if you’re dairy-free, swap baguette for gluten-free crispbread, or add whatever just popped up in your raised bed today.
Share in the comments—did any of these recipes speak to you?